Download Article
Download Article
Microsoft Word’s Comments feature lets multiple authors communicate with each other about the text in a Word document. Used in conjunction with the Track Changes feature, an editor can explain to the author his or her reasons for making changes to the text or ask for clarification of a particular passage, to which the author can respond with comments of his or her own. Versions of Word since Word 2002 display comments in balloons in the right margin of the document in Print Layout or Web Layout view, and comments can also be displayed in the Reviewing Pane. You can display or hide these comments and add, edit, and delete them; the steps below tell you how.
-
1
Turn on the markup feature. How you turn on the feature depends on the version of Word you’re using. Word 2003 and earlier versions use the older menu and toolbar interface, while Word 2007 and 2010 use the newer menu ribbon interface.
- In Word 2003, select «Markup» from the «View» menu.
- In Word 2007 and 2010, click the «Show Markup» drop-down in the Tracking group of the Review menu ribbon and make sure the Comments option is checked.
- Selecting Markup from the View menu again in Word 2003 or unchecking the Comments option in Word 2007 or 2010 will turn off the markup feature, hiding the comments.
-
2
Choose the correct display view if necessary. Comment balloons display only when your document is in either the Print Layout view, the Web Layout view, or the Full Screen Reading view in Word 2007 and 2010. To change the display, do the following:
- In Word 2003, click Print Layout or Web Layout on the View menu.
- In Word 2007 and 2010, select Print Layout or Web Layout from the Document Views group on the View menu ribbon.
- If you do not have the correct display view, your comments will not appear, but portions of the text that were highlighted to be commented upon will retain their highlighting and be followed by the comment number.
Advertisement
-
1
Choose the point in the text you wish to comment on. Drag your cursor over the words you wish to comment on, or place your cursor at the end of a piece of text.
-
2
Insert the comment. Once you select the option for inserting comments for your version of Word, a balloon will appear in the right margin with identifying initials and a sequence number if you are in Print Layout or Web Layout view. If you are in normal or Outline view, a number will appear in the Reviewing pane.
- In Word 2003, select Comment from the Insert menu.
- In Word 2007 and 2010, select New Comment from the Comments group in the Review menu ribbon.
- If your new comment falls between existing comments, the comments following it will be renumbered to reflect their new positions in the comment sequence.
-
3
Type your comment in the balloon. All text formatting features, such as bolding, italics, and underlining are available for comment text. You can also insert hyperlinks in comments.
Advertisement
-
1
Select the comment you wish to respond to.
-
2
Insert your response comment. Follow the same procedure as described for inserting comments under «Adding Comments.» Response comments display the identifier of the responder and a sequence number, followed by the identifier and sequence for the comment being responded to.
- You can respond to your own previous comments. This is a good way to clarify the wording of your previous comments if you think your original words may be misunderstood.
Advertisement
-
1
Turn on the comment display, if necessary. Follow the instructions under «Displaying Comments» for your version of Microsoft Word.
-
2
Click the balloon whose comment you wish to edit. If you cannot see the complete text of the comment in the comment balloon, you can turn on the Reviewing Pane to review the complete text of your comment there. See the instructions under «Displaying the Reviewing Pane.»
-
3
Make the text changes you want.
Advertisement
-
1
Right-click the comment you wish to delete. This displays a pop-up menu.
-
2
Select Delete Comment from the popup menu. The comment balloon disappears, and the sequence numbers of the comments following it are each decreased by 1.
Advertisement
-
1
Display your document in Print Layout view. See the step in «Displaying Your Comments» about choosing the correct display view for instructions on doing this.
-
2
Turn on the comment display, if it is not already turned on. Again, see «Displaying Your Comments» for instructions for your version of Word.
-
3
Determine which comments you wish to display and print. You can choose to display and print the comments made by all reviewers of the document or only comments made by a single reviewer. The method varies slightly according to your version of Microsoft Word.
- In Word 2003, select Show on the Reviewing toolbar, then select Reviewers and select either Show All Reviewers to display the comments of every reviewer or select the identifier for a specific reviewer to display only that reviewer’s comments.
- In Word 2007 and 2010, select Show Markup from the Tracking group in the Review menu ribbon and select either All Reviewers from the Reviewers submenu to display the comments of every reviewer or select the identifier for a specific reviewer to display only that reviewer’s comments.
-
4
Print your document. Display the Print dialog box in your version of Word and select «Document showing markup» to print the selected comments along with the document.
- To access the Print dialog box in Word 2003, select Print from the File menu.
- To access the Print dialog box in Word 2007, click the Microsoft Office button in the upper left and select «Print» from the menu.
- To access the Print dialog box in Word 2010, click the File tab and select «Print» from the File menu at the left edge of the page.
- To print the document without the comments, select «Document» from the Print dialog box.
Advertisement
-
1
Open the Reviewing Pane. The method for doing this depends on your version of Microsoft Word.
- In Word 2003, select Reviewing Pane on the Reviewing toolbar. (If the Reviewing toolbar is not already displayed, select Toolbars from the View menu and then select Reviewing.)
- In Word 2007 and 2010, select Reviewing Pane from the Tracking group in the Review menu ribbon and select Reviewing Pane Vertical to display the pane beside your document or Reviewing Pane Horizontal to display the pane beneath your document.
-
2
Close the Reviewing Pane when finished. Click the «X» in the upper right corner.
Advertisement
-
1
Display the Options or Word Options dialog. Microsoft Word uses the user name and initials that you were prompted to give when you installed Microsoft Office. (If you did not supply your own name and initials at this time, Word and other Office programs will use the name «Owner» and the initial «O.») You can change the name and initials after installing by using the Options dialog in Word 2003 or the Word Options dialog in Word 2007 and Word 2010.
- In Word 2003, choose Options from the Tools menu. Select the User Information tab.
- In Word 2007, click the Microsoft Office button and select Word Options. You can also select Change User Name from the Track Changes dropdown button in the Tracking group in the Review menu ribbon.
- In Word 2010, click the File tab and select Options from the File menu at the left edge. You can also select Change User Name from the Track Changes dropdown button in the Tracking group in the Review menu ribbon.
-
2
Enter your name and initials in the fields under «Personalize your copy of Microsoft Office.»
-
3
Click OK. This closes the Word Options dialog and changes the user name and initials to your entries.
- Although comments you make after changing your initials will reflect the new identifier, comments made prior to the change will still display the identifier you used previously.
Advertisement
Add New Question
-
Question
How do I select two texts at the same time in Word?
It is impossible to select two texts at the same time.
-
Question
Is there a program that saves Word comments to auto drop them into documents?
I have used the autocorrect feature for years to accomplish this. I save the comment in autocorrect and assign it some code letters. When I want to use the comment, I type in the code letters and voila! The saved comment appears. As an editor, this comes in very handy.
-
Question
How do I change the position of a comment box?
It’s not possible to change the position of a comment box. If you accidentally added the comment to the wrong place, remove the comment, and re-comment in the correct place.
Ask a Question
200 characters left
Include your email address to get a message when this question is answered.
Submit
Advertisement
Video
-
Comments are color-coded according to the identity of the reviewer and when they were created. Initial comments are typically displayed in red, while comments displayed by the most recent reviewer prior to the current reviewer typically appear in blue.
-
You can identify the full name of the commenter and the date the comment was made by resting your mouse cursor on the comment balloon. The information will appear in a ToolTip.
Thanks for submitting a tip for review!
Advertisement
-
You cannot insert a comment on text in the header or footer.
Advertisement
About This Article
Thanks to all authors for creating a page that has been read 249,616 times.
Is this article up to date?
Insert or delete a comment
Attaching your comments to specific parts of a document makes your feedback more clear. If someone else is commenting on the document, replying to their comments lets you have a discussion, even when you’re not all in the document at the same time.
-
Select the content you want to comment on.
-
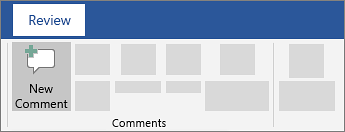
Go to Review > New Comment.
-
Type your comment. If you want to make changes to any of your comments, just go back and edit them.
-
To reply to a comment, go to the comment, and select Reply.
Note: Keep in mind that it’s possible for others to edit your comments. Comments in an Office document are stored in the file, so anyone with edit access to your file can edit your comment.
Delete comments
Right-click the comment, and choose Delete Comment.
To delete all the comments in the document, go to the Review tab, click the down-arrow on Delete, and choose Delete All Comments in Document.
-
Select the content you want to comment on.
-
Select Review > New Comment.
-
Type your comment, and select Post.
-
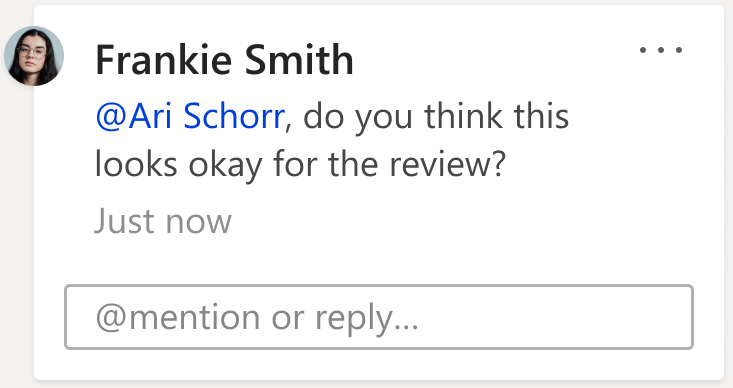
To reply to a comment thread, go to the comment, and select @mention or reply.
Bubbles 
Practice with comments and other collaboration features in Word by downloading this Collaborate in Word learning guide.
Edit comments
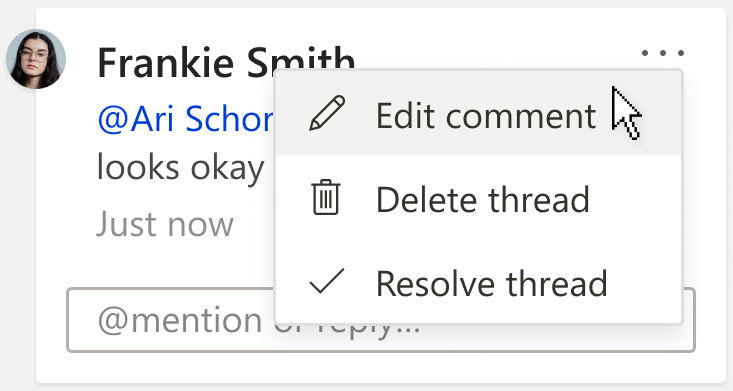
You can edit a comment by selecting Edit comment under the More thread actions drop down menu, which can be found in the top right hand corner of the comment.
Note: In Word for the Web we have restricted the Edit comment option to be available only on comments that you have authored. However, keep in mind that it may still be possible for others to edit your comments by modifying your Office file directly.
Delete comments
You can delete a comment by selecting Delete thread under the More thread actions drop down menu, which can be found in the top right hand corner of the comment.

Need more help?
A lot of people find this blog when they’re trying to sort out specific problems with their comment boxes (comment boxes suddenly going tiny, or comment box text running in the wrong direction, changing the language in your comment balloons). Here are general instructions on customising your comment boxes (or balloons, as they are officially called) in Word.
Why would I want to customise my comment balloons?
To be honest, the main reason for doing this is if something goes wrong. But the standard, default text size and layout may not be suitable for your purposes, and you might want to change it to make it more readable for someone with limited vision, etc.
You might also have preferences about which margin your comment balloons appear in, and how big they are.
The principles we are going to learn about here also apply when you want to customise the general styles in your document, which we will look in particular another time.
If you take a look at a document with standard comment boxes, you will see they look something like this:
Annoyingly, you will need to go to three different places to make these changes. I provide a recap at the end, but a summary might be useful here:
- To change the location and size of balloons: Track Changes – Track Changes Options
- To change the size, font, colour etc.of the heading (Comment M2 etc) AND/OR the size of all text in the comment balloon: Styles – Balloon text
- To change the font and colour of the actual paragraph of text in the balloon AND/OR the size of all of the text in the comment balloon: Styles – Comment text
Note: my article on customising Track Changes will tell you how to change the colours in which the comments and corrections by different reviewers appear.
How to change where your balloons appear and their size
If you want to change which margin your balloons appear in, their size, and whether they are linked to the text by a line, you must go into the Track Changes Options menu. In the Review tab, click on the little arrow at the bottom of the Track Changes button and bring up Track Changes Options. There, at the bottom, is your balloons section:
I think this is fairly self-explanatory.
How to find the menu for customising comment balloon text
There are two ways to reach the menu you need:
- Press Control + Alt + Shift + s all at the same time
- Make sure you’re in the Home tab and click on the little tiny arrow at the bottom right of the Styles menu
Either of these options will bring up the full Styles dialogue box.
Using either of these methods, you will bring up the Styles dialogue box.
Now, ignore all of it except the three buttons at the bottom. Click on the rightmost button: Manage Styles to bring up the next box: Manage Styles. When you first open this window, the sort order is in what Word thinks is a useful order: As Recommended – click on the down arrow to change it to Alphabetical:
Once you’ve got the list into alphabetical order, it’s relatively easy to find Balloon Text (note: not Comment text) and you will see that it then confirms how you have your text set up (blue circle).
Click the Modify button … Now you can change your font and font size. You’ll notice lots of other options (blue circle) to change the spacing, etc.
I’m going to change the font size, font, orientation and colour of the comment box heading, and the size of the text:
Note: As we will see, the changes in colour, font and italics etc. only apply themselves to the heading of the comment text, where it says “Comment: L1”. Why? Because it’s Word, and we are changing, very specifically, information about the Comment Balloon itself. See below for how to change the text in the comment balloon. EXCEPT, and here we may tear our hair out a little, this IS where we change the text size in the comment box .
Note, however, (blue arrow) that this does not change the size of the text itself – that is controlled from Balloon Text, and you’re just going to have to remember that, or look at the Recap I’ve written at the bottom!
At this point in either menu option, you can also click on the Format button and change all sorts of aspects:
Now, you probably won’t want to go to this level of fancy detail with the comments balloons, but, of course, this dialogue box is not only for changing the style of comment balloons: it’s also where you set up all of the styles in your document if you want to change and customise them.
You can also choose whether this change applies only to this document, or to all documents based on this template, and add it to your Quick Styles list if you want:
Press the OK button, and carry on pressing OK buttons until you get back to your document. Now, your comment will appear in the style you have chosen. If you’ve only chosen to amend the Comment Balloon text size, only the header will have changed:
If you’ve chosen to customise the Comment Text as well, you will have made all of these changes:
Now your comment boxes have large, easy-to-read text in a useful colour. and a very fancy heading. We’ve customised your comment boxes or, as you now know to call them, your comment balloons, and the comment text
A quick recap
- To change where the balloons appear, and their size, use the Track Changes Options section in the Review tab
- To change the size and orientation of the comment balloon header text, and/or the size of all of the text, use the Comment Balloon option in the Manage Styles list
- To change the colour and font of the comment balloon text, and/or the size of all of the text in the balloon, use the Comment Text option in the Manage Styles list
Why not take a look at these related topics, which should help you further?
What to do if your comment boxes go tiny in Word
What to do if your comment boxes start running from right to left
Changing the language in your comment balloons
Customising Track Changes
This is part of my series on how to avoid time-consuming “short cuts” and use Word in the right way to maximise your time and improve the look of your documents. Find all the short cuts here …
Do let me know if this has helped you, saved your bacon, etc. – and do share with the buttons at the bottom of this article.
Learn to collaborate with others in cloud-based documents
Updated on November 5, 2019
What to Know
- Highlight the text you want to comment on, go to the Review tab, and select New Comment. Type the comment. Click the document to return.
- To delete a comment, right-click it and select Delete Comment. To hide comments, select the Show Markup menu and uncheck Comments.
- To reply to a comment, select the Reply icon. To print without comments, go to Review, select No Markup, and print the document as usual.
This article explains how to add, hide, delete, and print comments on documents in Microsoft Word. Instructions cover Word 2019 through 2007, Word Online, and Word for Microsoft 365.
How to Enter a New Microsoft Word Comment
The ability to add comments to Microsoft Word documents is one of the program’s most useful features. In multi-user environments, it provides an easy and effective way to collaborate and comment on document drafts. But, even single users find the feature handy for adding notes and reminders.
To add a comment to a Word document:
-
Highlight the text you want to comment on.
-
On the ribbon, go to the Review tab and select New Comment.
-
Type your comment in the field that appears in the right margin. It contains your name and a timestamp that’s visible to others.
-
To edit your comment, click the comment box and make the change.
-
Click anywhere in the document to continue working.
Other people can change the comments you leave in a document if they have edit access.
How to Delete, Hide, Reply, and Print Comments
Once you start a comment thread inside a Word document, you can choose to delete, hide, print, or reply to it.
Delete a Comment
To delete a comment, right-click on the comment and select Delete Comment. Or select the comment and, in the Review pane, select Delete Comment.
Hide All Comments
To hide a document’s comments, go to the Review tab, select the Show Markup drop-down arrow, and uncheck Comments.
To hide existing comments temporarily in Word 2016 and Word 2013, choose No Markup in the Display for Review box.
Reply to Comments
To reply to a comment, select the Reply icon underneath the comment or right-click the comment and choose Reply to Comment.
Print the Document Without Comments
To print the document without comments, go to the Review tab and select No Markup. Then, print the document as normal.
Thanks for letting us know!
Get the Latest Tech News Delivered Every Day
Subscribe
In this article, you’ll learn how to add comments in Word, as well as two ways to quickly navigate your comments.

Adding comments in Word is a fantastic way to mark up your documents without having to directly edit the contents of your document. It’s like adding sticky note reminders for yourself (or your colleagues) without messing up your content.
If you frequently work with lots of comments in Word, I recommend adding the Comments Group to your Quick Access Toolbar, as pictured below. That way you can quickly get at the commenting commands, without having to dig through your Ribbon, which I will show you how to do below.
Once you are done adding comments, you can learn how to remove all comments in Word here.
[Update] How to turn off modern comments in Word
Microsoft has introduced a new comment system in Word, giving you two options to choose from:
- Classic Comments (as described in this blog post)
- Modern Comments
To follow along with this blog post, you will first need to disable the modern comments system using the Word options dialog box, as I only cover the classic comments system here.
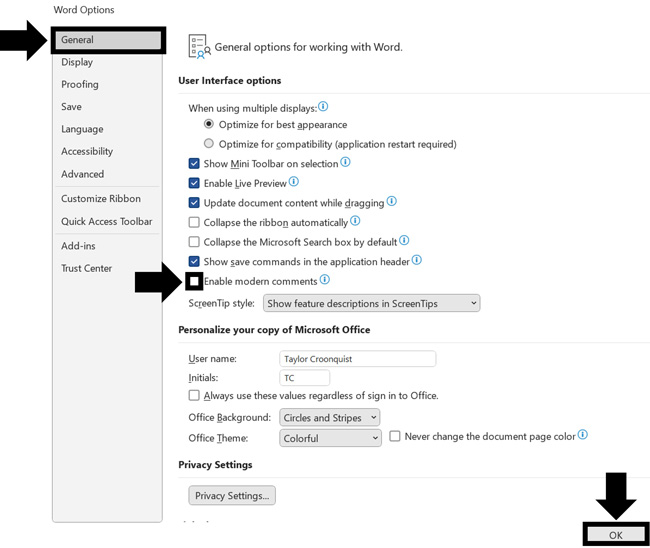
To disable modern comments in Word, simply:
- Click the File tab in Word
- Select Options (at the bottom left of your screen)
- In the Word options dialog box, find the General tab
- Unselect Enable modern comments
- Click OK
Alternatively, if you want to use the modern comment system, you can follow the same steps listed above to enable (instead of disabling) modern comments.
Please double-check that you have disabled the modern comment system before following the steps described below.
[Watch] Adding Comments in Word
1. Microsoft Ribbon (Adding Comments)
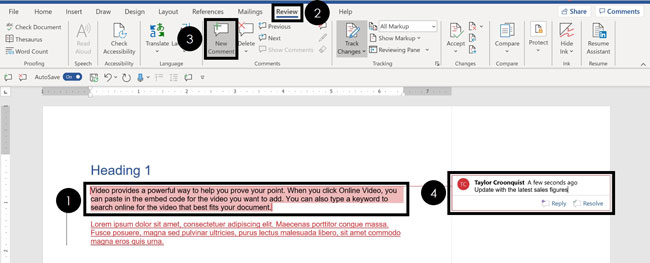
To add a comment to something in Word, simply:
- Select the text (or object) you want to comment on
- Navigate to the Review tab
- Click New Comment
- Write your comment
You can add comments to anything in Word, including text, images, charts, tables, etc. Simply place your cursor next to (or highlight) what you want to comment on and click on New Comment.
Comment Writing Tip: Make sure that the comments you add to Word are actionable and constructive.
There’s nothing worse than trying to update a document based on vague comments that don’t make much sense.
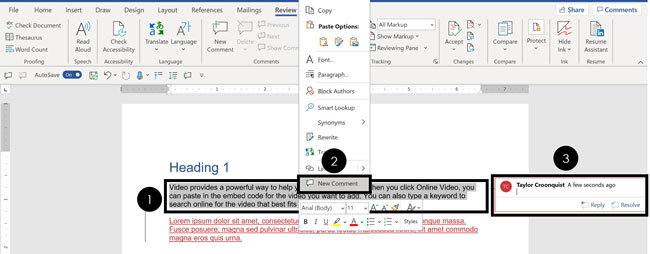
2. Right-Click Menu (Adding Comments)
To add a comment using the right-click menu, simply:
- Select and Right-Click what you want to comment on
- Select New Comment
- Write your comment
This is the fastest way to add comments in Word, as you don’t have to continually navigate back and forth between the contents of your document and the Review tab.
Delete Comment shortcut: You can also right-click any comment within your document and use a shortcut to quickly delete them. To learn how to do that (and a variety of other ways to remove comments in Word), read our guide here.
3. Quick Access Toolbar (Adding Comments)
If you want add, remove and navigate between lots of comments in Microsoft Word, I recommend adding the Comments group to your Quick Access Toolbar (which is super easy to do)
To add the Comments group to your Quick Access Toolbar, simply:
- Navigate to the Review tab
- Right-click the Comments group (anywhere along the bottom)
- Select Add to Quick Access Toolbar
With the Comments group added to your Quick Access Toolbar, you can now get at all the comment commands (add, next, previous, etc.) by simply clicking it with your mouse, as pictured below.
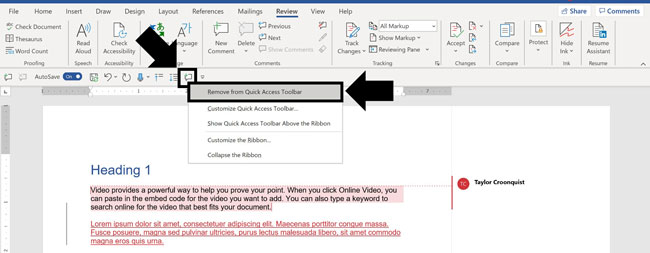
If you later want to remove the Comments group from your Quick Access Toolbar, simply right-click the command and select Remove from Quick Access Toolbar, as pictured below.
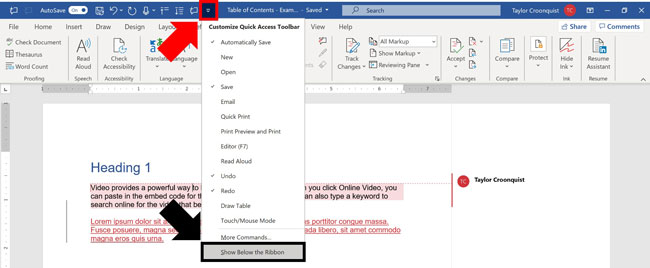
Note: If your Quick Access Toolbar is above your Ribbon, I recommend moving it below your Ribbon.
To do that, simply click the Customize Quick Access Toolbar command and select Show below the Ribbon.
4. Microsoft Ribbon (Navigating Comments)
To use the Previous and Next comment commands, simply:
- Navigate to the Review tab
- Click Previous or Next
Previous takes to you the preceding comment from where you are currently active in your Word document.
Next takes you to the next comment from where you are currently active in your document.
If you have a lot of comments to review, you can also navigate your comments using the Reviewing Pane, discussed below.
Hidden Comments: The cool thing about the Previous and Next commands is that they work even if your comments are hidden. To learn how to hide comments in Word, read our guide here.
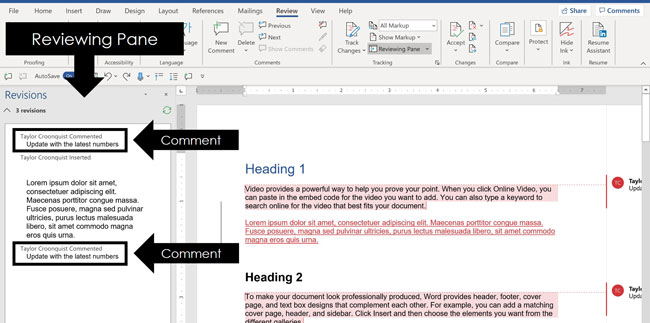
5. Reviewing Pane (Navigating Comments)
To open the Reviewing Pane in Word to review and navigate your comments, simply:
- Navigate to the Review tab
- Open the Reviewing Pane dropdown menu (click the downward facing arrow at the end)
- Choose either Reviewing Pane Vertical or Reviewing Pane Horizontal
Inside of the Reviewing Pane you can see and click through comments and other tracked revisions, as shown below.
Conclusion
So those are the basics of adding comments in Word, and two separate ways you can navigate them within your document.
Adding comments is a fantastic way to mark up your documents without editing the underlying content. In this way you can quickly scan through your document and easily remember what you need to change in the future.
If you enjoyed this tutorial and want to learn more ways to improve your Microsoft Office skills, visit us here.


