
![]()
Download Article
![]()
Download Article
Microsoft Word’s Comments feature lets multiple authors communicate with each other about the text in a Word document. Used in conjunction with the Track Changes feature, an editor can explain to the author his or her reasons for making changes to the text or ask for clarification of a particular passage, to which the author can respond with comments of his or her own. Versions of Word since Word 2002 display comments in balloons in the right margin of the document in Print Layout or Web Layout view, and comments can also be displayed in the Reviewing Pane. You can display or hide these comments and add, edit, and delete them; the steps below tell you how.
-

1
Turn on the markup feature. How you turn on the feature depends on the version of Word you’re using. Word 2003 and earlier versions use the older menu and toolbar interface, while Word 2007 and 2010 use the newer menu ribbon interface.
- In Word 2003, select «Markup» from the «View» menu.
- In Word 2007 and 2010, click the «Show Markup» drop-down in the Tracking group of the Review menu ribbon and make sure the Comments option is checked.
- Selecting Markup from the View menu again in Word 2003 or unchecking the Comments option in Word 2007 or 2010 will turn off the markup feature, hiding the comments.
-
2
Choose the correct display view if necessary. Comment balloons display only when your document is in either the Print Layout view, the Web Layout view, or the Full Screen Reading view in Word 2007 and 2010. To change the display, do the following:
- In Word 2003, click Print Layout or Web Layout on the View menu.
- In Word 2007 and 2010, select Print Layout or Web Layout from the Document Views group on the View menu ribbon.
- If you do not have the correct display view, your comments will not appear, but portions of the text that were highlighted to be commented upon will retain their highlighting and be followed by the comment number.


Advertisement
-
1
Choose the point in the text you wish to comment on. Drag your cursor over the words you wish to comment on, or place your cursor at the end of a piece of text.
-
2
Insert the comment. Once you select the option for inserting comments for your version of Word, a balloon will appear in the right margin with identifying initials and a sequence number if you are in Print Layout or Web Layout view. If you are in normal or Outline view, a number will appear in the Reviewing pane.
- In Word 2003, select Comment from the Insert menu.
- In Word 2007 and 2010, select New Comment from the Comments group in the Review menu ribbon.
- If your new comment falls between existing comments, the comments following it will be renumbered to reflect their new positions in the comment sequence.
-
3
Type your comment in the balloon. All text formatting features, such as bolding, italics, and underlining are available for comment text. You can also insert hyperlinks in comments.


Advertisement
-
1
Select the comment you wish to respond to.
-
2
Insert your response comment. Follow the same procedure as described for inserting comments under «Adding Comments.» Response comments display the identifier of the responder and a sequence number, followed by the identifier and sequence for the comment being responded to.
- You can respond to your own previous comments. This is a good way to clarify the wording of your previous comments if you think your original words may be misunderstood.


Advertisement
-
1
Turn on the comment display, if necessary. Follow the instructions under «Displaying Comments» for your version of Microsoft Word.
-
2
Click the balloon whose comment you wish to edit. If you cannot see the complete text of the comment in the comment balloon, you can turn on the Reviewing Pane to review the complete text of your comment there. See the instructions under «Displaying the Reviewing Pane.»
-
3
Make the text changes you want.


Advertisement
-
1
Right-click the comment you wish to delete. This displays a pop-up menu.
-
2
Select Delete Comment from the popup menu. The comment balloon disappears, and the sequence numbers of the comments following it are each decreased by 1.


Advertisement
-
1
Display your document in Print Layout view. See the step in «Displaying Your Comments» about choosing the correct display view for instructions on doing this.
-
2
Turn on the comment display, if it is not already turned on. Again, see «Displaying Your Comments» for instructions for your version of Word.
-
3
Determine which comments you wish to display and print. You can choose to display and print the comments made by all reviewers of the document or only comments made by a single reviewer. The method varies slightly according to your version of Microsoft Word.
- In Word 2003, select Show on the Reviewing toolbar, then select Reviewers and select either Show All Reviewers to display the comments of every reviewer or select the identifier for a specific reviewer to display only that reviewer’s comments.
- In Word 2007 and 2010, select Show Markup from the Tracking group in the Review menu ribbon and select either All Reviewers from the Reviewers submenu to display the comments of every reviewer or select the identifier for a specific reviewer to display only that reviewer’s comments.
-
4
Print your document. Display the Print dialog box in your version of Word and select «Document showing markup» to print the selected comments along with the document.
- To access the Print dialog box in Word 2003, select Print from the File menu.
- To access the Print dialog box in Word 2007, click the Microsoft Office button in the upper left and select «Print» from the menu.
- To access the Print dialog box in Word 2010, click the File tab and select «Print» from the File menu at the left edge of the page.
- To print the document without the comments, select «Document» from the Print dialog box.


Advertisement
-
1
Open the Reviewing Pane. The method for doing this depends on your version of Microsoft Word.
- In Word 2003, select Reviewing Pane on the Reviewing toolbar. (If the Reviewing toolbar is not already displayed, select Toolbars from the View menu and then select Reviewing.)
- In Word 2007 and 2010, select Reviewing Pane from the Tracking group in the Review menu ribbon and select Reviewing Pane Vertical to display the pane beside your document or Reviewing Pane Horizontal to display the pane beneath your document.
-
2
Close the Reviewing Pane when finished. Click the «X» in the upper right corner.


Advertisement
-
1
Display the Options or Word Options dialog. Microsoft Word uses the user name and initials that you were prompted to give when you installed Microsoft Office. (If you did not supply your own name and initials at this time, Word and other Office programs will use the name «Owner» and the initial «O.») You can change the name and initials after installing by using the Options dialog in Word 2003 or the Word Options dialog in Word 2007 and Word 2010.
- In Word 2003, choose Options from the Tools menu. Select the User Information tab.
- In Word 2007, click the Microsoft Office button and select Word Options. You can also select Change User Name from the Track Changes dropdown button in the Tracking group in the Review menu ribbon.
- In Word 2010, click the File tab and select Options from the File menu at the left edge. You can also select Change User Name from the Track Changes dropdown button in the Tracking group in the Review menu ribbon.
-
2
Enter your name and initials in the fields under «Personalize your copy of Microsoft Office.»
-
3
Click OK. This closes the Word Options dialog and changes the user name and initials to your entries.
- Although comments you make after changing your initials will reflect the new identifier, comments made prior to the change will still display the identifier you used previously.


Advertisement
Add New Question
-
Question
How do I select two texts at the same time in Word?

It is impossible to select two texts at the same time.
-
Question
Is there a program that saves Word comments to auto drop them into documents?
I have used the autocorrect feature for years to accomplish this. I save the comment in autocorrect and assign it some code letters. When I want to use the comment, I type in the code letters and voila! The saved comment appears. As an editor, this comes in very handy.
-
Question
How do I change the position of a comment box?
It’s not possible to change the position of a comment box. If you accidentally added the comment to the wrong place, remove the comment, and re-comment in the correct place.
Ask a Question
200 characters left
Include your email address to get a message when this question is answered.
Submit
Advertisement
Video
-
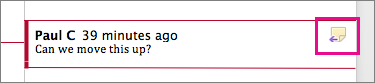
Comments are color-coded according to the identity of the reviewer and when they were created. Initial comments are typically displayed in red, while comments displayed by the most recent reviewer prior to the current reviewer typically appear in blue.
-
You can identify the full name of the commenter and the date the comment was made by resting your mouse cursor on the comment balloon. The information will appear in a ToolTip.
Thanks for submitting a tip for review!
Advertisement
-
You cannot insert a comment on text in the header or footer.
Advertisement
About This Article
Thanks to all authors for creating a page that has been read 249,616 times.
Is this article up to date?
A lot of people find this blog when they’re trying to sort out specific problems with their comment boxes (comment boxes suddenly going tiny, or comment box text running in the wrong direction, changing the language in your comment balloons). Here are general instructions on customising your comment boxes (or balloons, as they are officially called) in Word.
Why would I want to customise my comment balloons?
To be honest, the main reason for doing this is if something goes wrong. But the standard, default text size and layout may not be suitable for your purposes, and you might want to change it to make it more readable for someone with limited vision, etc.
You might also have preferences about which margin your comment balloons appear in, and how big they are.
The principles we are going to learn about here also apply when you want to customise the general styles in your document, which we will look in particular another time.
If you take a look at a document with standard comment boxes, you will see they look something like this:

Annoyingly, you will need to go to three different places to make these changes. I provide a recap at the end, but a summary might be useful here:
- To change the location and size of balloons: Track Changes – Track Changes Options
- To change the size, font, colour etc.of the heading (Comment M2 etc) AND/OR the size of all text in the comment balloon: Styles – Balloon text
- To change the font and colour of the actual paragraph of text in the balloon AND/OR the size of all of the text in the comment balloon: Styles – Comment text
Note: my article on customising Track Changes will tell you how to change the colours in which the comments and corrections by different reviewers appear.
How to change where your balloons appear and their size
If you want to change which margin your balloons appear in, their size, and whether they are linked to the text by a line, you must go into the Track Changes Options menu. In the Review tab, click on the little arrow at the bottom of the Track Changes button and bring up Track Changes Options. There, at the bottom, is your balloons section:

I think this is fairly self-explanatory.
How to find the menu for customising comment balloon text
There are two ways to reach the menu you need:
- Press Control + Alt + Shift + s all at the same time
- Make sure you’re in the Home tab and click on the little tiny arrow at the bottom right of the Styles menu
Either of these options will bring up the full Styles dialogue box.

Using either of these methods, you will bring up the Styles dialogue box.

Now, ignore all of it except the three buttons at the bottom. Click on the rightmost button: Manage Styles to bring up the next box: Manage Styles. When you first open this window, the sort order is in what Word thinks is a useful order: As Recommended – click on the down arrow to change it to Alphabetical:

Once you’ve got the list into alphabetical order, it’s relatively easy to find Balloon Text (note: not Comment text) and you will see that it then confirms how you have your text set up (blue circle).

Click the Modify button … Now you can change your font and font size. You’ll notice lots of other options (blue circle) to change the spacing, etc.

I’m going to change the font size, font, orientation and colour of the comment box heading, and the size of the text:

Note: As we will see, the changes in colour, font and italics etc. only apply themselves to the heading of the comment text, where it says “Comment: L1”. Why? Because it’s Word, and we are changing, very specifically, information about the Comment Balloon itself. See below for how to change the text in the comment balloon. EXCEPT, and here we may tear our hair out a little, this IS where we change the text size in the comment box .

Note, however, (blue arrow) that this does not change the size of the text itself – that is controlled from Balloon Text, and you’re just going to have to remember that, or look at the Recap I’ve written at the bottom!
At this point in either menu option, you can also click on the Format button and change all sorts of aspects:

Now, you probably won’t want to go to this level of fancy detail with the comments balloons, but, of course, this dialogue box is not only for changing the style of comment balloons: it’s also where you set up all of the styles in your document if you want to change and customise them.
You can also choose whether this change applies only to this document, or to all documents based on this template, and add it to your Quick Styles list if you want:

Press the OK button, and carry on pressing OK buttons until you get back to your document. Now, your comment will appear in the style you have chosen. If you’ve only chosen to amend the Comment Balloon text size, only the header will have changed:

If you’ve chosen to customise the Comment Text as well, you will have made all of these changes:

Now your comment boxes have large, easy-to-read text in a useful colour. and a very fancy heading. We’ve customised your comment boxes or, as you now know to call them, your comment balloons, and the comment text
A quick recap
- To change where the balloons appear, and their size, use the Track Changes Options section in the Review tab
- To change the size and orientation of the comment balloon header text, and/or the size of all of the text, use the Comment Balloon option in the Manage Styles list
- To change the colour and font of the comment balloon text, and/or the size of all of the text in the balloon, use the Comment Text option in the Manage Styles list
Why not take a look at these related topics, which should help you further?
What to do if your comment boxes go tiny in Word
What to do if your comment boxes start running from right to left
Changing the language in your comment balloons
Customising Track Changes
This is part of my series on how to avoid time-consuming “short cuts” and use Word in the right way to maximise your time and improve the look of your documents. Find all the short cuts here …
Do let me know if this has helped you, saved your bacon, etc. – and do share with the buttons at the bottom of this article.
Microsoft Word’s comments feature allows multiple authors to communicate over text in a Word document. Used in conjunction with the Track Changes feature, an editor can explain the reasons for making changes to the text or ask for clarification on a specific passage, to which the author can respond with their own comments. Versions of Word since Word 2002 display balloon comments in the right margin of the document in Print Layout or Web Layout, and comments can also be displayed in the Review Pane. You can show or hide, add, edit and delete these comments; the following steps will show you how.
Steps

Step 1. Activate the tagging feature
How to enable this feature depends on the version of Word you are using. In Word 2003 and earlier versions, use the old menu and toolbar interface, while in Word 2007 and 2010 use the Ribbon menu interface.
- In Word 2003, select «Tags» from the «View» menu.
- In Word 2007 and 2010, click on the “Show Tags” floating menu in the Control group of the “Review” menu and ensure that the Comments option is checked.
- Selecting Tags again from the View menu in Word 2003 or unchecking the Comments option in Word 2007 or 2010 will turn off the tagging feature, hiding the comments.

Step 2. Choose the correct view if necessary
Comment balloons appear only when the document is in Print Layout, Web Layout, or Full Screen Reading views in Word 2007 and 2010. To change the view, do the following:
- In Word 2003, click Print Layout or Web Layout on the View menu.
- In Word 2007 and 2010, select Print Layout or Web Layout in the Document Display Modes group on the Display tab of the Ribbon.
- If you don’t have the correct view, comments won’t appear, but portions of the text that have been highlighted for comment will keep highlighted and will be followed by the comment number.
Method 1 of 7: Adding Comments

Step 1. Choose the point in the text where you want to comment
Drag your cursor over the words you want to comment on, or place your cursor at the end of a snippet of text.

Step 2. Enter the comment
When you select the option to enter comments for your version of Word, you will be presented with a balloon in the right margin with the identifying initials and a sequence number if you are in Print Layout or Web Layout. Draft, a number will appear in the review panel.
- In Word 2003, select Comment from the Insert menu.
- In Word 2007 and 2010, select New Comment in the Comments group of the Review tab.
- If the new comment falls between existing comments, the following comments will be renumbered to reflect the new positions in the comment string.

Step 3. Enter your comment in the balloon
All text formatting features such as bold, italic, and underline are available for comment text. You can also insert hyperlinks in comments.
Method 2 of 7: Responding to Existing Comments

Step 1. Select the comment you want to reply to

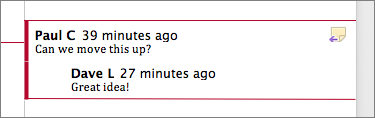
Step 2. Enter your reply comment
Follow the same procedure described for entering comments in “Adding Comments”. Reply comments display the author identification and a sequence number, followed by the identification and sequence number of the comment being responded to.
You can reply to your own previous comments. This is a good way to clarify the writing of your previous comments if you feel that the previous words might not be so well understood
Method 3 of 7: Editing Comments

Step 1. Activate the display of comments, if necessary
Follow the instructions in “Viewing Comments” for your version of Microsoft Word.

Step 2. Click on the balloon whose comment you want to edit
If you cannot see the full text of the comment in the comment balloon, you can activate the review panel to rate the full text of your comment there. See instructions in «Displaying the Review Panel».

Step 3. Make as many text changes as you like
Method 4 of 7: Deleting Comments

Step 1. Right-click on the comment you want to delete
This will display a floating menu.

Step 2. Select Delete Comment from the floating menu
The comment balloon will disappear and the sequential numbers of the following comments will be reduced by 1.
Method 5 of 7: Printing Reviews

Step 1. Place the document in Print Layout view
See the step in “Displaying Comments” on choosing the correct view.

Step 2. Activate the display of comments, if it is not already activated
Again, see “Viewing Comments” for instructions for your version of Word.

Step 3. Determine which comments you want to display and print
You can choose to display and print comments made by all reviewers on the document or just comments made by a single reviewer. The method for this varies slightly depending on your version of Microsoft Word.
- In Word 2003, select View from the Reviewing toolbar, select Reviewers and then Show All Reviewers to show all reviewers’ comments, or select a specific reviewer’s identifier to display only their comments.
- In Word 2007 and 2010, select Show Tags in the Control group of the Review tab and select “All Reviewers” from the Reviewers submenu to display all reviewers’ comments, or select a specific reviewer’s identifier to display only their comments.

Step 4. Print the document
Open the print dialog in your version of Word and select «Document showing markups» to print the selected comments along with the document.
- To access the print dialog in Word 2003, select Print from the File menu.
- To access the print dialog in Word 2007, click the Microsoft Office button in the upper left corner and select “Print” from the menu.
- To access the print dialog in Word 2010, click the File tab and select “Print” from the menu on the left edge of the page.
- To print the document without the comments, select “Document” in the print dialog.
Method 6 of 7: Displaying the Review Panel

Step 1. Open the Review Panel
The method for doing this depends on your version of Microsoft Word.
- In Word 2003, select Review Pane from the Reviewing toolbar (if the Reviewing toolbar isn’t showing, select Toolbars from the View menu, then check Review).
- In Word 2007 and 2010, select Review Pane in the Control group of the Review tab and select Vertical Review Pane to display the pane beside the document or Horizontal Review Pane to display the pane below the document.

Step 2. Close the Review Panel when finished
Click on the «X» in the upper right corner.
Method 7 of 7: Changing the Comment Identifier

Step 1. Display the Word Options or Options dialog
Microsoft Word uses the username and initials requested when you installed Microsoft Office (if you do not provide your own name and initials at this time, Word and other Office programs will use the name «Owner» and the initial «P»). You can change the name and initials after installation using the Options dialog box in Word 2003 or the Word Options dialog box in Word 2007 and 2010.
- In Word 2003, choose Options from the Tools menu. Select the Display tab.
- In Word 2007, click the Microsoft Office Button and select Word Options. You can also select “Change Username” from the “Control Changes” button in the Control group of the Review tab.
- In Word 2010, click the File tab and select Options from the left edge menu. You can also select Change Username from the “Control Changes” button in the Control group of the Review tab.

Step 2. Enter your name and initials in the fields below “Customize your copy of Microsoft Office”

Step 3. Click OK
This will close the Word Options dialog and change your username and initials according to your input.
Comments made after changing the initials will display the new identifier, but comments made before the change will still display the old identifier
Tips
- Comments are color-coded according to the reviewer’s identity and when they were created. Initial comments are usually displayed in red, while comments made by the most recent reviewer before the current reviewer are usually displayed in blue.
- You can identify the commenter’s full name and date the comment was made by placing your mouse cursor over the comment balloon. The information will appear in a context tip.
Microsoft Word’s Comments feature lets multiple authors communicate with each other about the text in a Word document. Used in conjunction with the Track Changes feature, an editor can explain to the author his or her reasons for making changes to the text or ask for clarification of a particular passage, to which the author can respond with comments of his or her own. Versions of Word since Word 2002 display comments in balloons in the right margin of the document in Print Layout or Web Layout view, and comments can also be displayed in the Reviewing Pane. You can display or hide these comments and add, edit, and delete them; the steps below tell you how.
Contents
- 1 Steps
- 1.1 Displaying the Comments
- 1.2 Adding Comments
- 1.3 Responding to Existing Comments
- 1.4 Editing Comments
- 1.5 Deleting Comments
- 1.6 Printing Comments
- 1.7 Displaying the Reviewing Pane
- 1.8 Changing the Comment Identifier
- 2 Video
- 3 Tips
- 4 Warnings
- 5 Sources and Citations
Steps
- Turn on the markup feature. How you turn on the feature depends on the version of Word you’re using. Word 2003 and earlier versions use the older menu and toolbar interface, while Word 2007 and 2010 use the newer menu ribbon interface.
- In Word 2003, select «Markup» from the «View» menu.
- In Word 2007 and 2010, click the «Show Markup» drop-down in the Tracking group of the Review menu ribbon and make sure the Comments option is checked.
- Selecting Markup from the View menu again in Word 2003 or unchecking the Comments option in Word 2007 or 2010 will turn off the markup feature, hiding the comments.
- Choose the correct display view if necessary. Comment balloons display only when your document is in either the Print Layout view, the Web Layout view, or the Full Screen Reading view in Word 2007 and 2010. To change the display, do the following:
- In Word 2003, click Print Layout or Web Layout on the View menu.
- In Word 2007 and 2010, select Print Layout or Web Layout from the Document Views group on the View menu ribbon.
- If you do not have the correct display view, your comments will not appear, but portions of the text that were highlighted to be commented upon will retain their highlighting and be followed by the comment number.
- Choose the point in the text you wish to comment on. Drag your cursor over the words you wish to comment on, or place your cursor at the end of a piece of text.
- Insert the comment. Once you select the option for inserting comments for your version of Word, a balloon will appear in the right margin with identifying initials and a sequence number if you are in Print Layout or Web Layout view. If you are in normal or Outline view, a number will appear in the Reviewing pane.
- In Word 2003, select Comment from the Insert menu.
- In Word 2007 and 2010, select New Comment from the Comments group in the Review menu ribbon.
- If your new comment falls between existing comments, the comments following it will be renumbered to reflect their new positions in the comment sequence.
- Type your comment in the balloon. All text formatting features, such as bolding, italics, and underlining are available for comment text. You can also insert hyperlinks in comments.
- Select the comment you wish to respond to.
- Insert your response comment. Follow the same procedure as described for inserting comments under «Adding Comments.» Response comments display the identifier of the responder and a sequence number, followed by the identifier and sequence for the comment being responded to.
- You can respond to your own previous comments. This is a good way to clarify the wording of your previous comments if you think your original words may be misunderstood.
- Turn on the comment display, if necessary. Follow the instructions under «Displaying Comments» for your version of Microsoft Word.
- Click the balloon whose comment you wish to edit. If you cannot see the complete text of the comment in the comment balloon, you can turn on the Reviewing Pane to review the complete text of your comment there. See the instructions under «Displaying the Reviewing Pane.»
- Make the text changes you want.
- Right-click the comment you wish to delete. This displays a pop-up menu.
- Select Delete Comment from the popup menu. The comment balloon disappears, and the sequence numbers of the comments following it are each decreased by 1.
- Display your document in Print Layout view. See the step in «Displaying Your Comments» about choosing the correct display view for instructions on doing this.
- Turn on the comment display, if it is not already turned on. Again, see «Displaying Your Comments» for instructions for your version of Word.
- Determine which comments you wish to display and print. You can choose to display and print the comments made by all reviewers of the document or only comments made by a single reviewer. The method varies slightly according to your version of Microsoft Word.
- In Word 2003, select Show on the Reviewing toolbar, then select Reviewers and select either Show All Reviewers to display the comments of every reviewer or select the identifier for a specific reviewer to display only that reviewer’s comments.
- In Word 2007 and 2010, select Show Markup from the Tracking group in the Review menu ribbon and select either All Reviewers from the Reviewers submenu to display the comments of every reviewer or select the identifier for a specific reviewer to display only that reviewer’s comments.
- Print your document. Display the Print dialog box in your version of Word and select «Document showing markup» to print the selected comments along with the document.
- To access the Print dialog box in Word 2003, select Print from the File menu.
- To access the Print dialog box in Word 2007, click the Microsoft Office button in the upper left and select «Print» from the menu.
- To access the Print dialog box in Word 2010, click the File tab and select «Print» from the File menu at the left edge of the page.
- To print the document without the comments, select «Document» from the Print dialog box.
Displaying the Reviewing Pane
- Open the Reviewing Pane. The method for doing this depends on your version of Microsoft Word.
- In Word 2003, select Reviewing Pane on the Reviewing toolbar. (If the Reviewing toolbar is not already displayed, select Toolbars from the View menu and then select Reviewing.)
- In Word 2007 and 2010, select Reviewing Pane from the Tracking group in the Review menu ribbon and select Reviewing Pane Vertical to display the pane beside your document or Reviewing Pane Horizontal to display the pane beneath your document.
- Close the Reviewing Pane when finished. Click the «X» in the upper right corner.
- Display the Options or Word Options dialog. Microsoft Word uses the user name and initials that you were prompted to give when you installed Microsoft Office. (If you did not supply your own name and initials at this time, Word and other Office programs will use the name «Owner» and the initial «O.») You can change the name and initials after installing by using the Options dialog in Word 2003 or the Word Options dialog in Word 2007 and Word 2010.
- In Word 2003, choose Options from the Tools menu. Select the User Information tab.
- In Word 2007, click the Microsoft Office button and select Word Options. You can also select Change User Name from the Track Changes dropdown button in the Tracking group in the Review menu ribbon.
- In Word 2010, click the File tab and select Options from the File menu at the left edge. You can also select Change User Name from the Track Changes dropdown button in the Tracking group in the Review menu ribbon.
- Enter your name and initials in the fields under «Personalize your copy of Microsoft Office.»
- Click OK. This closes the Word Options dialog and changes the user name and initials to your entries.
- Although comments you make after changing your initials will reflect the new identifier, comments made prior to the change will still display the identifier you used previously.
Video
Template:Video:Use Comment Boxes in Microsoft Word
Tips
- Comments are color-coded according to the identity of the reviewer and when they were created. Initial comments are typically displayed in red, while comments displayed by the most recent reviewer prior to the current reviewer typically appear in blue.
- You can identify the full name of the commenter and the date the comment was made by resting your mouse cursor on the comment balloon. The information will appear in a ToolTip.
Warnings
- You cannot insert a comment on text in the header or footer.
Sources and Citations
- http://office.microsoft.com/en-us/word-help/insert-or-delete-a-comment-HA001219010.aspx
- http://support.microsoft.com/kb/286169
- http://office.microsoft.com/en-gb/word-help/list-of-document-options-HP005189523.aspx
- Rodney Ruff, Omaha, NE; Microsoft Word user (Word 2007 on laptop, Word 2010 on desktop)
You may like
Use comments in your document to make suggestions to other people or to track issues for follow-up.
Insert a comment
-
Select the text you want to comment on, or click at the end of the text.
-
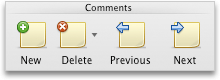
On the Review tab, click New Comment.
-
Type your comment. Word shows your comment in a balloon in the document’s margin.
Reply to a comment
-
In the comment, click the Reply button.
Or click the comment and on the Review tab, click New Comment.
-
Type your reply.
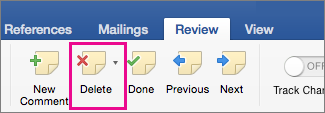
Delete a comment
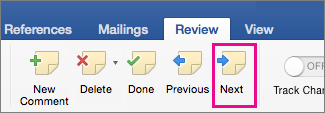
-
On the Review tab, in the Comments section, click Next to select a comment.
-
On the Review tab, click Delete.
To delete all comments at once, click the arrow by Delete, and then click Delete All Comments in Document.

See also
Track changes in Word for Mac
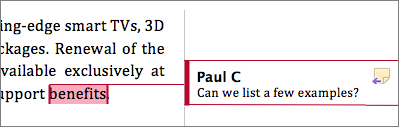
To preserve the layout of your document, comments are displayed in balloons that appear in the margin. 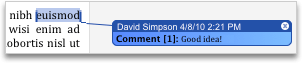
Insert a comment
-
Select the text or item that you want to comment on, or click to insert the cursor near the text that you want to comment on.
-
On the Review tab, under Comments, click New.
-
Type the comment text in the comment balloon.
Tip: You can also turn on Track Changes, which uses revision mark to show additions, deletions, and formatting changes.
Delete a comment
-
Select the comment that you want to delete.
-
On the Review tab, under Comments, click Delete.
Tip: You can also delete a comment by clicking the close button in the upper-right corner of the comment balloon.
Change the name or initials used in a comment
If you collaborate with multiple reviewers and want to avoid anonymous comments, ask your reviewers to add their names or initials by using this procedure.
-
On the Word menu, click Preferences.
-
Under Personal Settings, click User Information
. -
In the First, Last, and Initials boxes, type the first name, last name, and initials that you want to use in your comments.
 .
.See also
Use tracked changes