
Word for Microsoft 365 Word 2021 Word 2019 Word 2016 Word 2013 Word 2010 Word 2007 More…Less
In Word, you can make your text bold in three ways: use the Bold button on the Mini toolbar, use the Bold button on the Home tab, or use the keyboard shortcut.
Make text bold
Select the text that you want to make bold, and do one of the following:
-
Move your pointer to the Mini toolbar above your selection and click Bold
 .
. -
Click Bold
in the Font group on the Home tab. -
Type the keyboard shortcut: CTRL+B.
Note: Click Bold  or type the keyboard shortcut again to unbold the text that you selected.
Need more help?
Getty Images / Geri Lavrov
Updated on January 26, 2019
There are many shortcuts for common functions in Microsoft Word. These shortcuts or commands can come in handy when typing a report or term paper, or even a letter. It is a good idea to try some of these functions before you actually begin a project. Once you become familiar with the way they work, you may become hooked on shortcuts.
Executing Shortcuts
Before you can use shortcuts commands, it’s important to understand a few requirements. If the shortcut involves a section of text (words you have typed), you will need to highlight the text before typing the command. For instance, to bold a word or words, you must highlight them first.
For other commands, you may only need to place the cursor at a specific place. For instance, if you want to insert a footnote, place the cursor in the relevant position. The commands below are sectioned into groups by alphabetical order to make it easier to find the ones you need.
Bold Through Italics
Boldfacing a word or group of words is one of the handiest shortcut commands in Microsoft Word. Other commands, such as centering text, creating a hanging indent, or even calling for help can be useful shortcuts to know. The latter command—calling for help by pressing the F1 key—brings up a printed helpfile to the right of your document, which even includes its own search function. (The last section of this article contains instructions for the search command.)
|
Function |
Shortcut |
|
Bold |
CTRL + B |
|
Center a paragraph |
CTRL + E |
|
Copy |
CTRL + C |
|
Create a hanging indent |
CTRL + T |
|
Decrease the font size by 1 point |
CTRL + [ |
|
Double-space lines |
CTRL + 2 |
|
Hanging Indent |
CTRL + T |
|
Help |
F1 |
|
Increase the font size by 1 point |
CTRL + ] |
|
Indent a paragraph from the left |
CTRL + M |
|
Indent |
CTRL + M |
|
Insert a footnote |
ALT + CTRL + F |
|
Insert an endnote |
ALT + CTRL + D |
|
Italic |
CTRL + I |
Justify Through Single-Space Lines
Justifying a paragraph will make it flush left and flush right rather than ragged-right, which is the default in Word. But, you can also left-align a paragraph, create a page break, and even mark a table of contents or index entry, as the shortcut commands in this section show.
|
Function |
Shortcut |
|
Justify a paragraph |
CTRL + J |
|
Left-align a paragraph |
CTRL + L |
|
Mark a table of contents entry |
ALT + SHIFT + O |
|
Mark an index entry |
ALT + SHIFT + X |
|
Page Break |
CTRL + ENTER |
|
|
CTRL + P |
|
Remove a paragraph indent from the left |
CTRL + SHIFT + M |
|
Remove paragraph formatting |
CTRL + Q |
|
Right-align a paragraph |
CTRL + R |
|
Save |
CTRL + S |
|
Search |
CTRL = F |
|
Select All |
CTRL + A |
|
Shrink Font One Point |
CTRL + [ |
|
Single-space lines |
CTRL + 1 |
Subscripts Through Undo
If you’re writing a science paper, you might need to place certain letters or numbers in subscript, such as in H20, the chemical formula for water. The subscript shortcut makes it easy to do this, but you can also create a superscript with a shortcut command. And, if you make a mistake, correcting it is only a CTRL = Z away.
|
Function |
Shortcut |
|
To type a Subscript |
CTRL + = |
|
To type a Superscript |
CTRL + SHIFT + = |
|
Thesaurus |
SHIFT + F7 |
|
Remove Hanging Indent |
CTRL + SHIFT + T |
|
Remove Indent |
CTRL + SHIFT + M |
|
Underline |
CTRL + U |
|
Undo |
CTRL + Z |
TheTechieSenior.com is reader supported. We may earn a commission if you buy through links on this site. As an Amazon Associate, we earn from qualifying purchases. Learn more here.
Everyone has seen text that is bold, italicized, or underlined. This article will teach you how to easily bold, italicize, or underline in MS Word.
Table of Contents
The instructions given in this article work the same and are applicable to both the Windows and Mac versions of Microsoft Word. However, the design and appearance of the font boxes and other controls that are mentioned may be different between the Mac and Windows versions. This article may include instructions that aren’t available in the Android, iOS, or iPadOS versions*.
How to Bold, Italicize, or Underline in MS Word
The processes for bolding, italicizing, or underlining are nearly identical in Microsoft Word. For sake of clarity for those who only need to know how to do one of the three, I’ve broken each into its own process.
For any of them, the process begins with selecting the words you wish to format. That selection can be any length, from one character to an entire document. The methods for selecting a block of text are fairly universal across computers and different apps. In case you are new to computers or are brand new to MS Word or other word processing software, here is how to select text.
You’ll know your text is selected when it remains shaded or highlighted without you touching the keyboard.
How to select a section of text in MS Word (and most other apps).
Following are some ways to select a specific subset of words as well as selecting all words at one time.
A simple way to select content – method one:
- Click your mouse or trackpad just to the left of the first word you want to format.
- Hold the shift key down and click just to the right of the last word or character you wish to format.
- Your selection should be highlighted now.
A simple way to select content – method two:
You can also make your selection with just your mouse or trackpad.
- Click and hold your mouse or trackpad at the beginning of the selection.
- Drag across and down until all of your intended text is highlighted.
Select all words or characters within a document:
If you are working on a document in which you want every character formatted a certain way, you can select the entire document with one key combination.
- Hold the keys Command on a Mac or Control in Windows.
- Tap the A key.
All of the text in your document should be selected and highlighted.
What is bold in Microsoft Word?
Bold is used when you want a section of your document to stand out. This is an example of bold text within a paragraph. You might use bold to highlight headings such as the one just above this paragraph. It can be used for emphasis within sentences. Titles are often bolded.

A Microsoft Word feature called Styles can also be used to bold headings, but we’ll stick to the most basic methods in this article. (Hint: Styles are found in the ribbon after you tap the Home tab.)
How to bold text in MS Word.
I’ll list the methods for bolding text from the simplest and quickest to the most complex. For any of the first three methods you’ll first need to select the text you wish to format as bold.
1) The fastest way to bold text in Microsoft Word:
• Select the word or words you wish to bold.
• Use the keys Command + B on a Mac or Control + B in Windows to bold them. The keys must be pressed at the same time.
2) The second easiest method for bolding text:
• Select the text you wish to turn bold.
• In the Home tab of MS Word, look for the section that contains the drop-down box to change the font. Just under that box is a row of buttons that begins with one labeled with a bold uppercase B. That is the bold button.
• Select it to bold your selection. (The button will appear depressed when active.)
• Unselect it to unbold text.
• Select the words you want to bold.
• Right-click the selected text.
• From the menu that pops up, select Font…
• A font control box will open. At the top of the box, be sure Font is selected.
• In the center of the first line is a section titled Font Style. Click the list just below Font Style and choose Bold.
To use this method to return to normal text, follow the same steps but choose Regular from the list of choices.
How to italicize words in Microsoft Word.
The methods for italicizing and underlining text in Microsoft Word are very similar to the method we used to bold text. However, to eliminate any chance of confusion, I’ll give the details separately for each.
1) The easiest and quickest way to italicize words in Microsoft Word:
• Select the text you wish to bold following the instructions above.
• Use the keys Command + I on a Mac or Control + I in Windows to italicize the text.
2) The second easiest method for italicizing words:
• Select the block of text you wish to have italicized.
• In the Home tab of MS Word, look for the section that contains the drop-down box to change the font. It’s the same section where you found the Bold button in the previous instruction.
• In the row of buttons that begins with a bold uppercase B, the second button is an italicized I. Select it to italicize your text.
• Unselect it to return to normal text.
There may be times that you would italicize large blocks of text. For example, italics are frequently used to indicate quoted text in books and other forms of writing. Accordingly, you can italicize a single letter or many paragraphs at one time. Select the letters, words, or sentences you want to italicize.
• Using a mouse or trackpad, right-click the selected text.
• From the menu that pops up, select Font…
• The same font control box that you used in the third method of making text bold will open. At the top of the box, be sure Font is selected.
• Click the list just below the title, Font Style. You notice that you have two choices of italics—Italics and Bold Italics. Select whichever you need.
• Use the same steps to return to normal text. Just choose Regular from the list of choices.
How to underline text in Microsoft Word.
Select your section of content as instructed above.
1) The quickest way to underline a selection in Microsoft Word:
• Find the characters you would like to underline. Select them by following the instructions above.
• Use the keys Command + U on a Mac or Control + U in Windows to underline the text. Be sure you press Command or Control and the letter U at the same time.
2) The second easiest method for underlining in Microsoft Word:
• Select the block of text you wish to have underlined.
• In the Home tab of MS Word, look for the section that contains the drop-down box to change the font. It’s the same section where you found the Bold button in the previous instruction.
• In the row of buttons that begins with a bolded uppercase B, the third button is an underlined U. Select it to underline your text.
• Unselect it to return to normal text.
3) As in bolding and italicizing, there is a slower method to underline using the right-click menu.
Underlines aren’t normally used on large blocks of text, partly because they can make consecutive lines of text difficult to read. However, you can underline as much text as you wish.
• Select the words that should be underlined.
• Using a mouse or trackpad, right-click the text you want to underline.
• From the menu that pops up, select Font…
• The same font control box that you used in the third method of bolding and italicizing text will open. At the top of the box, be sure Font is selected.
• This time skip to the second row of controls labeled Color and Underline. The first control on that row controls font color. The second control allows you to select from a large variety of underlines.
• Select whichever you prefer.
In the list of underline styles, the first is Words only. If you choose Words only, the underline will show only under the actual words. Spaces between words will not be underlined. The other choices in the list will result in an underline that spans from the beginning of the text you selected to the end of the selection, including the spaces between words.
To return to normal text with no underline, use the same steps but this time choose (none) for the underline style.
Bonus tip: If you know in advance that you will want a line of text to be bold, italicized, or underlined, place your cursor at the point in the document where the text is to begin. Click the bold, italic, or underline button in the Home tab of the ribbon and begin typing. The text from the point where you located your cursor should now be bold, italicized, or underlined.
You can click all three – bold, italics, and underline at the same time. When you type your text will have all three formats applied at one time, as you type it.
When you’re ready to go back to regular font weight, click the bold, italic, or underline button again. From that point on, your text will return to normal.
You’ll learn more Microsoft Word hints and tips here.
* The instructions given here often refer to icons in the ribbon. The icons discussed are part of the basic set of icons available when Microsoft Word is installed. The ribbon in Microsoft Word is highly customizable. If you have made changes to your ribbon, it is possible that an icon mentioned may not be visible in your installation of MS Word.

Bold, Italic, Underline Functions in Microsoft Word
In this article, let’s find out the Bold, Italic, and Underline functions in Microsoft Word, and how to use them.
These three commands or fonts are often used by writers, usually to indicate certain words and also to indicate unfamiliar words.
Well, if you want to know, you can follow the article below which explains the functions and how to use the three commands in Microsoft Word, here’s a full explanation.
FUNCTIONS AND HOW TO USE BOLD, ITALIC, AND UNDERLINE IN MICROSOFT WORD
These three types of fonts have different functions and how to use them is fairly similar, here is the complete tutorial.
1. Bold function and how to use it
Bold is a type of font that has a command with character level performance, serves to thicken the shape of the letter. Here’s how to use it.
- The first block of text or letters you want to change.
- Then click the “B” icon on the “Home” ribbon.
- Or you can use the shortcut “CTRL + B“.
- Done, see the example above, guys!
2. Italic Function and How to Italic
Italic type is a font that serves to italicize a letter, here’s how.
- Select the text or letters to which you want to add an Italic font.
- Then click the “I” icon on the “Home” ribbon.
- Or you can use the shortcut “CTRL + I“.
- Done, see the example above, guys!
3. Underline Function
Underline is a character formatting command that serves to underline a letter, here’s how to use it.
- The block of letters to which you want to add an Underline format.
- Then click the “U” icon on the “Home” ribbon.
- To make it easier you can use the shortcut “CTRL + U“.
- Done, see the example above, guys!
Well, that’s an explanation of the functions and how to use Bold, Italic, and Underline in Microsoft Word.

MS Word
How to Make Letterhead in Microsoft Word
![]()
Published
1 year ago
on
November 18, 2021

How to make a letterhead in Word correctly and neatly is actually easy, but surely there are still many of you who don’t know how to make it.
In an official letter, of course, there is a letterhead and there is always a line at the bottom right. Well, it turned out to be quite easy to make you know.
Apart from being the introduction to a letter, letterhead is also commonly used as a place to write the identity of the letter, such as the identity of the sender and recipient.
For those of you who want to know how to make it, here we explain in full the steps to make a letterhead in Word for you.
HOW TO MAKE LETTERHEAD IN WORD
You should know how to make a letterhead in Word this time, guys, especially when you want to send letters between agencies.
Although not all agencies use it, it doesn’t hurt you to try and find out how to make this letterhead, here are the steps!
- First, open your Word.
- Place the cursor at the back of the last word of the letterhead
- Then select the menu Borders – Borders and Shading.
- After the border menu appears, all you have to do is select the line you want on the menu with a sign like this.
Don’t rush to click Ok, because there’s one more thing you have to do to make it, guys. In the section below, remove it or set it like this to make the line only exist at the bottom, and then Ok.
Yeah, you have successfully drawn the line, Guys, it’s easy and fast, right, how to make a letterhead in Word?
You don’t need to be confused anymore about how to make it. For beginners, making letterhead or letterhead does sound quite difficult.
In fact, how to make a letterhead in Word is fairly easy as long as you already know the procedure. After all, the letterhead cannot be made casually because it is an official identity.
The letterhead contains the official identity of an institution, agency, or company. Well, you can create an official identity on the letterhead in Microsoft Word.
MS Word
How to Create a Background in Microsoft Word
![]()
Published
1 year ago
on
November 18, 2021

This way of making a background in Word aims to beautify the appearance of the document and make it more attractive Guys.
Usually, this is often found in the use of proposals, certificates, covers, and not infrequently in job applications.
With this function, how do you make it? It’s so easy. Yes, although there are several ways you can do this, you can follow this tutorial in full.
HOW TO MAKE A BACKGROUND IN WORD
This background function is very useful if you want to create a document that upholds the originality of Guys, for example, a thesis.
In addition to having to know how to create a table of contents in Microsoft Word, you may also need to know how to create a background in your thesis document, especially in showing the results of the tests you did.
How to make this background is also needed if you want to make an official letter from the agency. Besides needing to know how to make letterhead lines in Word, you also need to know how to add a background to the letter. Here’s how:
- The first thing you can do is change the color.
- Go to Design – Page Color – and immediately choose a color like this.
That is the easiest way and you can change the color according to your needs or tastes, guys. In addition to this method, you can also replace it with an image that you have.
The method is almost the same, guys, pay attention to the following rare:
- Go to the Design menu.
- Click Page Color.
- Select Fill Effects.
- Next, select the tab Picture – Select Picture – From a File.
- Then find the image you have and press Ok
- Finished! The background will change.
But, you also need to remember that both methods will not appear when you print either color or image.
To make it appear when printing, then you need to go to the File menu – Options – Display – and check the Print background colors and Image.
Well, after you go through these few steps, the background will change and also enter when you print, GRATZ!!! It’s easy to make a background in Word.
MS Word
How to Create a Signature in Word
![]()
Published
1 year ago
on
November 11, 2021

There are several ways to make a signature in Microsoft Word. And the method is really easy, just follow the steps below, guys!
Making a signature is really needed, especially in the digital era like now, right? Of course, you need a signature in your Word file, so from that our Team will provide this tutorial in detail.
Actually, you can also use a third application or additional devices such as pens that support your PC or laptop. But this is the easiest way without using other devices and applications Guys.
HOW TO CREATE A SIGNATURE IN WORD
You need to sign first, Guys on a piece of white paper. Make sure the paper is really white and the pen has colour ink that you can really see clearly.
This function is for later photos or files the resolution will be smaller Guys. Not only that, but the customized color saturation will also reduce the thickness of the pen color, you know.
So make sure you give a signature with a clear enough emphasis. Here’s how to create a signature in Word:
- Prepare a white paper with a signature on it. Photos using a smartphone or you can directly scan the signature through a scanner.

- You can reduce the resolution and crop it so that the photo focuses on the signature. For convenience, click the image file > Edit.
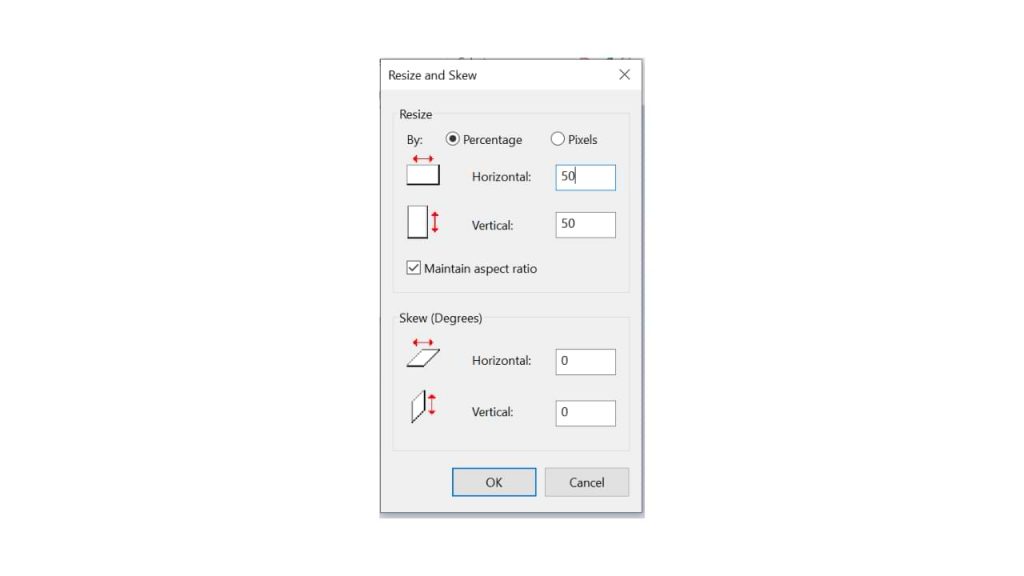
- On the Paint menu, you can resize to reduce the resolution. Choose 50 per cent resolution, fill Horizontal 50 and Vertical 50
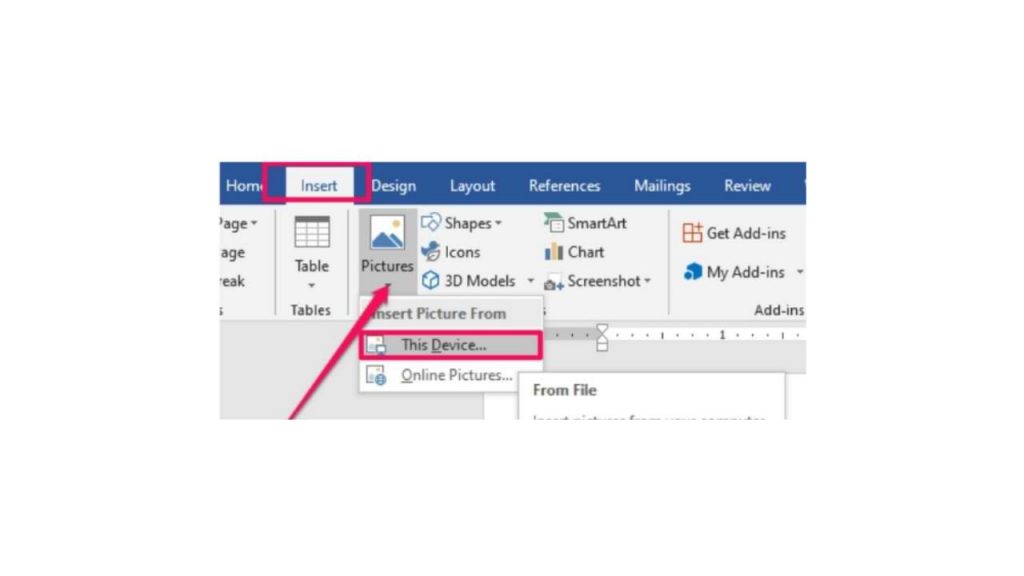
- Hover over the exact position of the word you want to add a signature to. Click Insert > Picture > insert the previous signature image file.
- After you insert the image, reduce the size again using the cursor for more precision.
- Double click on the image.
- On the Format menu, select the Color > Recolor > Black and White 50 per cent submenu.
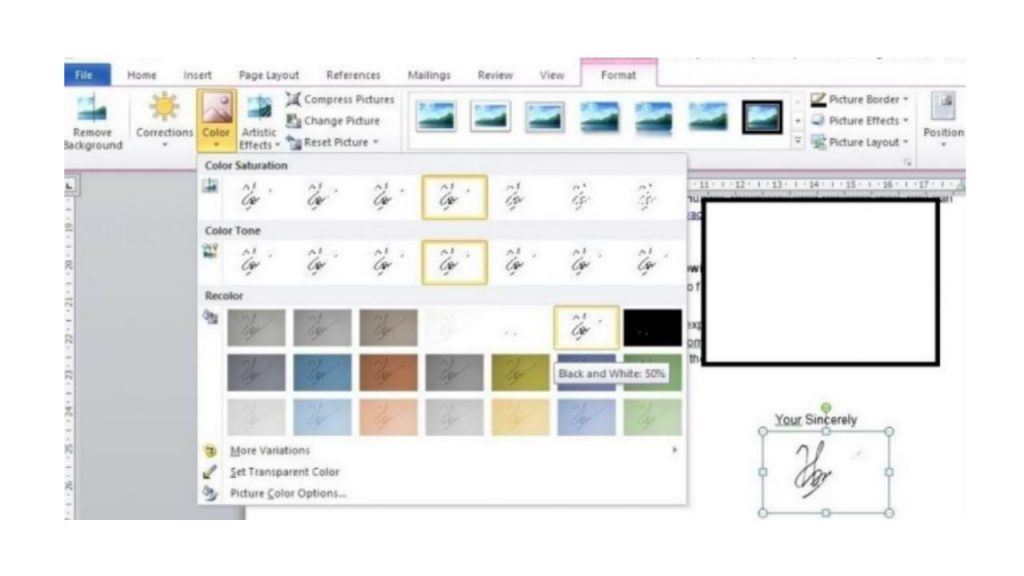
- if your signature is not clear, double click on the image, select menu Correction > Brightness 0 per cent (Normal) Contrast 40 per cent.
You can change the last two steps depending on the contrast and color saturation you want, guys. So you can at the same time adjust the thickness of your signature that has entered the word, so guys.
I also said what Guys, how easy it is to make a signature in Microsoft Word! The most important thing is to make sure your signature is clear enough, and the photos are of high enough quality. Obviously, so that later your signature looks good, it doesn’t break.
These commands are given in the Font group in the Home tab. Their functions are given below;
- Bold: It allows you to Bold the text of your document
- Italic: It allows you to Italicize the text of your document
- Underline: It allows you to underline the text of your document
See the image:


For Videos Join Our Youtube Channel: Join Now
Feedback
- Send your Feedback to [email protected]
Help Others, Please Share


