
You have several Excel workbooks and you want to merge them into one file? This could be a troublesome and long process. But there are 6 different methods of how to merge existing workbooks and worksheets into one file. Depending on the size and number of workbooks, at least one of these methods should be helpful for you. Let’s take a look at them.
Summary
If you want to merge just a small amount of files, go with methods 1 or method 2 below. For anything else, please take a look at the methods 4 to 6: Either use a VBA macro, conveniently use an Excel-add-in or use PowerQuery (PowerQuery only possible if the sheets to merge have exactly the same structure).
Method 1: Copy the cell ranges
The obvious method: Select the source cell range, copy and paste them into your main workbook. The disadvantage: This method is very troublesome if you have to deal with several worksheets or cell ranges. On the other hand: For just a few ranges it’s probably the fastest way.
Method 2: Manually copy worksheets

The next method is to copy or move one or several Excel sheets manually to another file. Therefore, open both Excel workbooks: The file containing the worksheets which you want to merge (the source workbook) and the new one, which should comprise all the worksheets from the separate files.
- Select the worksheets in your source workbooks which you want to copy. If there are several sheets within one file, hold the Ctrl key
 and click on each sheet tab. Alternatively, go to the first worksheet you want to copy, hold the Shift key
  and click on the last worksheet. That way, all worksheets in between will be selected as well.
 - Once all worksheets are selected, right click on any of the selected worksheets.
- Click on “Move or Copy”.
- Select the target workbook.
- Set the tick at “Create a copy”. That way, the original worksheets remain in the original workbook and a copy will be created.
- Confirm with OK.

One small tip at this point: You can just drag and drop worksheets from one to another Excel file. Even better: If you press and hold the Ctrl-Key when you drag and drop the worksheets, you create copies.
Do you want to boost your productivity in Excel?
Get the Professor Excel ribbon!

Add more than 120 great features to Excel!
Method 3: Use the INDIRECT formula
The next method comes with some disadvantages and is a little bit more complicated. It works, if your files are in a systematic file order and just want to import some certain values. You build your file and cell reference with the INDIRECT formula. That way, the original files remain and the INDIRECT formula only looks up the values within these files. If you delete the files, you’ll receive #REF! errors.
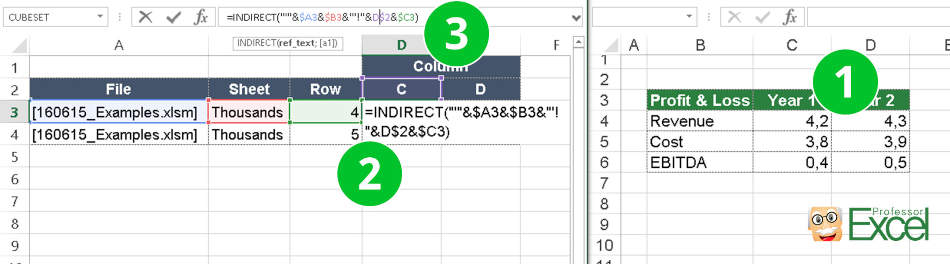
Let’s take a closer look at how to build the formula. The INDIRECT formula has only one argument: The link to another cell which can also be located within another workbook.
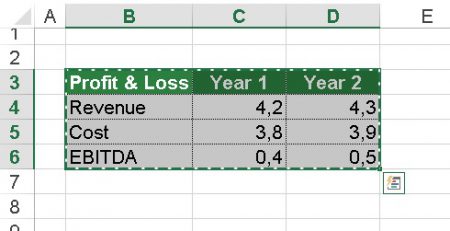
- Copy the first source cell.
- Paste it into your main file using paste special (Ctrl + Alt + v ). Instead of pasting it normally, click on “Link” in the bottom left corner of the Paste Special window. That way, you extract the complete path. In our case, we have the following link:
=[160615_Examples.xlsm]Thousands!$C$4 - Now we wrap the INDIRECT formula around this path. Furthermore, we separate it into file name, sheet name and cell reference. That way, we can later on just change one of these references, for instance for different versions of the same file. The complete formula looks like this (please also see the image above):
=INDIRECT(“‘”&$A3&$B3&”‘!”&D$2&$C3)
Important – please note: This function only works if the source workbooks are open.
Method 4: Merge files with a simple VBA macro
You are not afraid of using a simple VBA macro? Then let’s insert a new VBA module:
- Go to the Developer ribbon. If you can’t see the Developer ribbon, right click on any ribbon and then click on “Customize the Ribbon…”. On the right hand side, set the tick at “Developer”.
- Click on Visual Basic on the left side of the Developer ribbon.
- Right click on your workbook name and click on Insert –> Module.
- Copy and paste the following code into the new VBA module. Position the cursor within the code and click start (the green triangle) on the top. That’s it!
Sub mergeFiles()
    'Merges all files in a folder to a main file.

    'Define variables:
    Dim numberOfFilesChosen, i As Integer
    Dim tempFileDialog As fileDialog
    Dim mainWorkbook, sourceWorkbook As Workbook
    Dim tempWorkSheet As Worksheet

    Set mainWorkbook = Application.ActiveWorkbook
    Set tempFileDialog = Application.fileDialog(msoFileDialogFilePicker)

    'Allow the user to select multiple workbooks
    tempFileDialog.AllowMultiSelect = True

    numberOfFilesChosen = tempFileDialog.Show

    'Loop through all selected workbooks
    For i = 1 To tempFileDialog.SelectedItems.Count

        'Open each workbook
        Workbooks.Open tempFileDialog.SelectedItems(i)

        Set sourceWorkbook = ActiveWorkbook

        'Copy each worksheet to the end of the main workbook
        For Each tempWorkSheet In sourceWorkbook.Worksheets
            tempWorkSheet.Copy after:=mainWorkbook.Sheets(mainWorkbook.Worksheets.Count)
        Next tempWorkSheet

        'Close the source workbook
        sourceWorkbook.Close
    Next i

End Sub
Method 5: Automatically merge workbooks
The fifth way is probably most convenient:
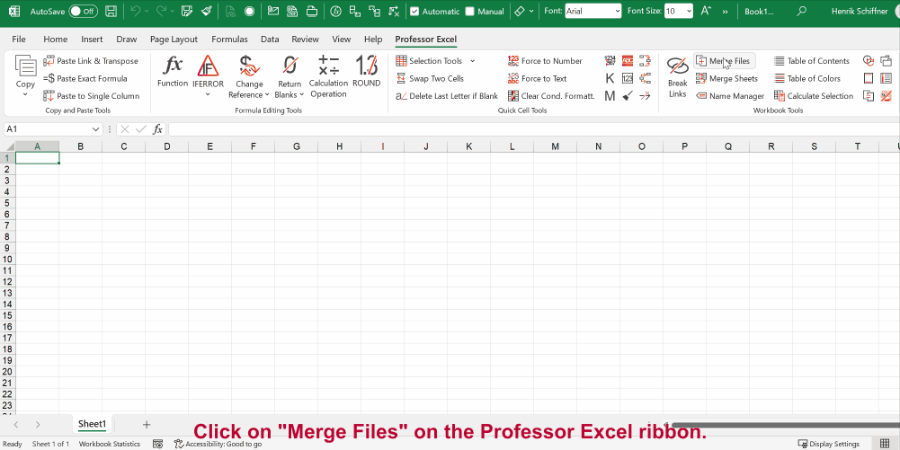
Click on “Merge Files” on the Professor Excel ribbon.
Now select all the files and worksheets you want to merge and start with “OK”.
This procedure works well also for many files at the same time and is self-explanatory. Even better: Besides XLSX files, you can also combine XLS, XLSB, XLSM, CSV, TXT and ODS files.
To do that you need a third party add-in, for example our popular “Professor Excel Tools” (click here to start the download).
Here is the whole process in detail:
Method 6: Use the Get & Transform tools (PowerQuery)
The current version of Excel 365 offers the “Get & Transform” tools to import data. These functions are very powerful and are supposed to replace the old “Text Import Wizard”. However, they have one useful feature: Import a complete folder of documents.
The requirements: The workbooks and worksheets you want to import have to be in the same format.
Please follow these steps for importing a complete folder of Excel files.
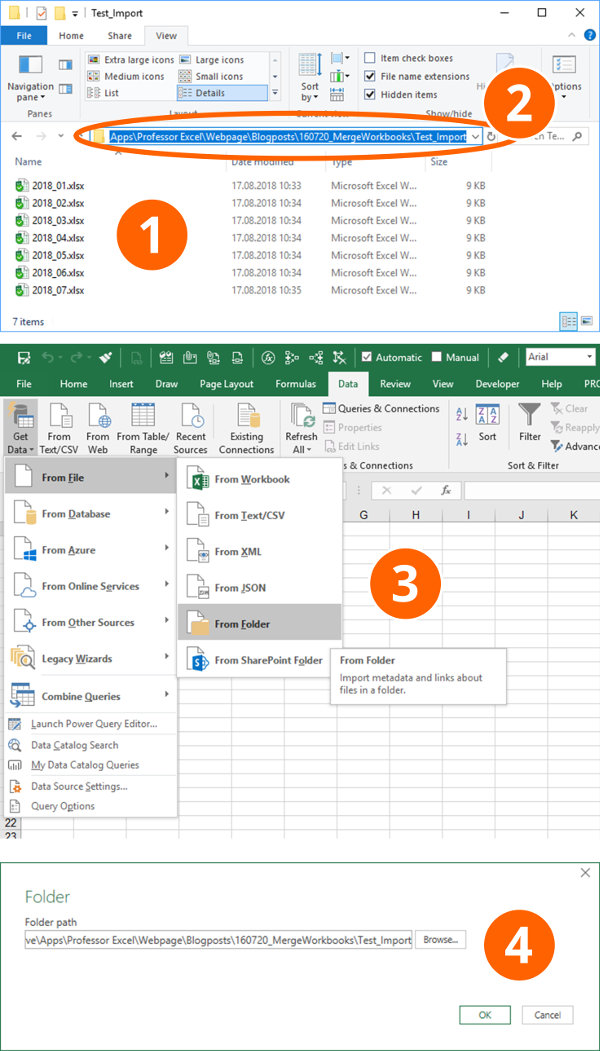
- Create a folder with all the documents you want to import.
- Usually it’s the fastest to just copy the folder path directly from the Windows Explorer. You still have the change to later-on select the folder, though.
- Within Excel, go to the Data ribbon and click on “Get Data”, “From File” and then on “From Folder”.
- Paste the previously copied path or select it via the “Browse” function. Continue with “OK”.
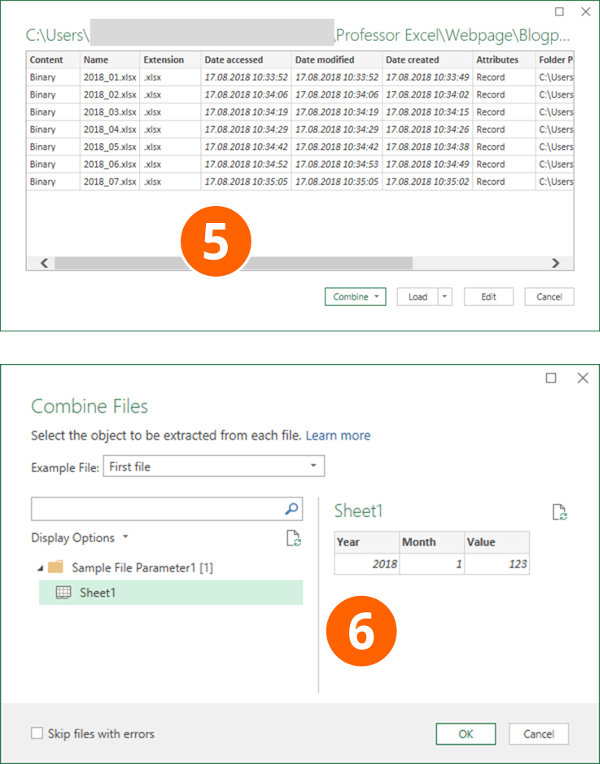
- If all files are shown in the following window, either click on “Combine” (and then on “Combine & Load To”) or on “Edit”. If you click on “Edit”, you can still filter the list and only import a selection of the files in the list. Recommendation: Put only the necessary files into your import folder from the beginning so that you don’t have to navigate through the complex “Edit” process.
- Next, Excel shows an example of the data based on the first file. If everything seems fine, click on OK. If your files have several sheets, just select the one you want to import, in this example “Sheet1”. Click on “OK”.
- That’s it, Excel now imports the data and inserts a new column containing the file name.
For more information about the Get & Transform tools please refer to this article.
Next step: Merge multiple worksheets to one combined sheet
After you have combined many Excel workbooks into one file, usually the next step is this: Merge all the imported sheets into one worksheet.
Because this is a whole different topic by itself, please refer to this article.
Image by MartinHolzer from Pixabay
If you’re a Microsoft Excel user, it doesn’t take long before you have many different workbooks full of important spreadsheets. What happens when you need to combine these multiple workbooks together so that all of the sheets are in the same place?
Excel can be challenging at times because it’s so powerful. You know that what you want to do is possible, but you might not know how to accomplish it. In this tutorial, I’ll show you several techniques you can use to merge Excel spreadsheets.
When you need to combine multiple spreadsheets, don’t copy and paste the data from each sheet manually. There are many shortcuts that you can use to save time in combining workbooks, and I’ll show you which one is right for each situation.


Watch & Learn
The screencast below will show you how to combine Excel sheets into a single consolidated workbook. I’ll teach you to use PowerQuery (also called Get & Transform Data) to pull together data from multiple workbooks.
Important: The email addresses used in this tutorial are fictitious (randomly generated) and not intended to represent any real email addresses.
Read on to see written instructions. As always, Excel has multiple ways to accomplish this task, and how you’re working with your data will drive which approach is the best.
1. How to Move & Copy Sheets (Simplest Method)
The easiest method to merge Excel spreadsheets is to simply take the entire sheet and copy it from one workbook to another.
To do this, start off by opening both Excel workbooks. Then, switch to the workbook that you want to copy several sheets from.
Now, hold Control (or Command on Mac) on your keyboard and click on all of the sheets that you want to copy to a separate workbook. You’ll notice that as you do this, the tabs will show as highlighted.
Now, simply right click and choose Move or Copy from the menu.


On the Move or Copy pop up window, the first thing that you’ll want to do is select the workbook that you want to move the sheets to. Choose the name of the file from the «To book» drop-down.


Also, you can choose where the sheets are placed in the new workbook in terms of sequence. The Before sheet menu controls where sequentially in the workbook the sheets will be inserted. You can always choose (move to end) and re-sequence the order the sheets later as needed.
Finally, it’s optional check the box to Create a copy, which will duplicate the sheets and create a separate copy of them in the workbook you’re moving the sheets to. Once you press OK, you’ll see that the sheets we copied are in the combined workbook.


This approach has a few downsides. If you keep working with two separate files, they aren’t «in sync.» If you make changes to the original workbook that you copied the sheets from, they won’t automatically update in the combined workbook.
2. Prepare to Use Get & Transform Data Tools to Combine Sheets
Excel has an incredibly powerful set of tools that are often called PowerQuery. Beginning with Excel 2016, this feature set was rebranded as Get & Transform Data.
As the name suggests, these are a set of tools that helps you pull data together from other workbooks and consolidate it into one workbook.


Also, this feature is exclusive to Excel for Windows. You won’t find it in the Mac versions or in the web browser edition of Microsoft’s app.
Before You Start: Check the Data
The most important part of this process is checking your data before you start combining it. The files need to have the same setup for the data structure, with the same columns. You can’t easily combine a four-column spreadsheet and a five-column spreadsheet, as Excel won’t know where to place the data.


Often, you’ll find yourself needing to combine spreadsheets when you’re downloading data from systems. In that case, it’s much easier to make sure the system you’re downloading data is configured to download data in the same columns each time.
Before I download data from a service like Google Analytics, I always make sure that I’m downloading the same report format each time. This ensures that I can easily work with and combine multiple spreadsheets together.
Whether you’re pulling data from a system like Google Analytics, MailChimp, or an ERP like SAP or Oracle that powers huge companies, the best way to save time is to ensure that you’re downloading data in a common format.
Now that we’ve checked our data, it’s time to dive into learning how to combine Excel sheets.
3. How to Combine Excel Sheets in a Folder Full of Files
A few times, I’ve had a folder full of files that I needed to put together into a single, consolidated file. When you’ve got dozens or even hundreds of files, opening them one-by-one to combine them just isn’t feasible. Learning this technique can save you dozens of hours on a single project.
Again, it’s crucial that the data is in the same format. To get started, it helps to place all of the files in the same folder so that Excel can easily watch this folder for changes.


Step 1. Point Excel to the Folder of Files
On the pop-up window, you’ll want to specify a path to the folder that holds your Excel workbooks.


You can browse to that path, or simply paste in the path to the folder with your workbooks.
Step 2. Confirm the List of Files
After you show Excel where the workbooks are stored, a new window will pop up that shows the list of files you’re set to combine. Right now, you’re only seeing metadata about the files, and not the data inside of it.


This window simply shows the files that are going to be combined with our query. You’ll see the file name, the type, and the dates accessed and modified. If you’re missing a file in this list, confirm that all of the files are in the folder and retry the process.
To move on to the next step, click on Edit.
Step 3. Confirm the Combination
The next menu helps to confirm the data inside your files. Since we’ve already checked that data is the same structure in our multiple files, we can simply click OK on this step.


Step 4. How to Combine Excel Sheets With a Click
Now, a new window pops up with the list of files we’re set to combine.
At this stage, you’re still seeing metadata about the files and now the data itself. To solve that, click on the double drop-down arrow in the upper right corner of the first column.


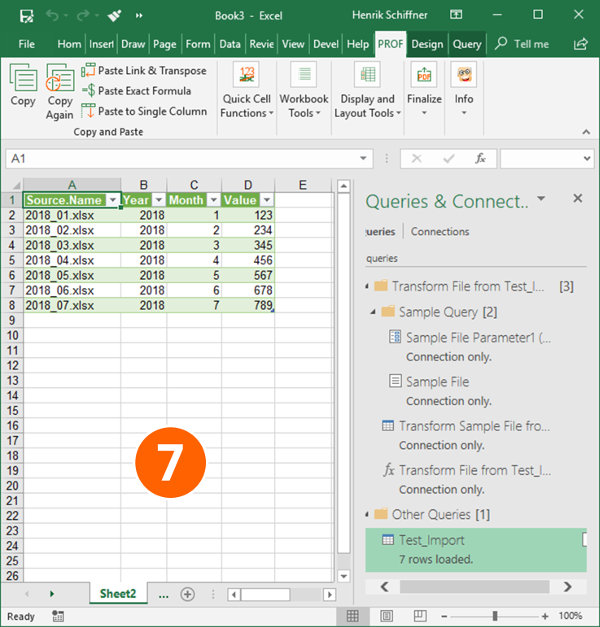
Voila! Now, you’ll see the actual data from inside the files combined into one place.


Scroll through the data to confirm that all of your rows are there. Notice that the only change from your original data is that the filename of each source file is in the first column.
Step 5. Close and Load the Data
Believe it or not, we’re basically finished with combining our Excel spreadsheets. The data is in the Query Editor for now, so we’ll need to «send it back» to regular Excel so that we can work with it.
Click on Close & Load in the upper right corner. You’ll see the finished data in a regular Excel spreadsheet, ready to review and work with.


Imagine using this feature to roll up multiple files from different members of your team. Choose a folder that you’ll each store files in, and then combine them into one cohesive file with this feature in just a few minutes.
Recap & Keep Learning
In this tutorial, you learned several techniques for how to combine Excel sheets. When you’ve got many sheets that you need to stitch together, using one of these approaches will save you time so that you can get back to the task at hand!
Check out some of the other tutorials to level up your Excel skills. Each of these tutorials will teach you a method for accomplishing tasks in less time in Microsoft Excel.
How do you merge Excel workbooks? Let me know in the comments section below whether you’ve got a preference for these methods, or a technique of your own that you use.
Did you find this post useful?

I believe that life is too short to do just one thing. In college, I studied Accounting and Finance but continue to scratch my creative itch with my work for Envato Tuts+ and other clients. By day, I enjoy my career in corporate finance, using data and analysis to make decisions.
I cover a variety of topics for Tuts+, including photo editing software like Adobe Lightroom, PowerPoint, Keynote, and more. What I enjoy most is teaching people to use software to solve everyday problems, excel in their career, and complete work efficiently. Feel free to reach out to me on my website.
Power Query can be of great help when you want to combine multiple workbooks into one single workbook.
For example, suppose you have the sales data for different regions (East, West, North, and South). You can combine this data from different workbooks into a single worksheet using Power Query.
If you have these workbooks in different locations/folders, it’s a good idea to move all these into a single folder (or create a copy and put that workbook copy in the same folder).
So to begin with, I have four workbooks in a folder (as shown below).

Now, in this tutorial, I am covering three scenarios where you can combine the data from different workbooks using Power Query:
- Each workbook has the data in an Excel Table, and all the table names are same.
- Each workbook has the data with the same worksheet name. This can be the case when there is sheet named ‘summary’ or ‘data’ in all the workbooks, and you want to combine all these.
- Each workbook has many sheets and tables, and you want to combine specific tables/sheets. This method can also be helpful when you want to combine table/sheets that don’t have a consistent name.
Let’s see how to combine data from these workbooks in each case.
Each workbook has the data in an Excel Table with the same structure
The below technique would work when your Excel Tables has been structured the same way (same column names).
The number of rows in each table can vary.
Don’t worry if some of the Excel Tables have additional columns. You can choose one of the Tables as the template (or as the ‘key’ as Power Query calls it), and Power Query would use it to combine all the other Excel Tables with it.
In case there are additional columns in other tables, those will be ignored and only the ones specified in the template/key would be combined. For example, if the template/key table that you select has 5 columns, and one of the tables in some other workbook has 2 additional columns, those additional columns would be ignored.
Now I have four workbooks in a folder that I want to combine.
Below is a snapshot of the table I have in one of the workbooks.
Here are the steps to combine the data from these workbooks into a single workbook (as a single table).
- Go to the Data tab.

- In the Get & Transform group, click on the New Query drop down.
- Hover your cursor on ‘From File’ and click on ‘From Folder’.

- In the Folder dialog box, enter the file path of the folder that has the files, or click on Browse and locate the folder.

- Click OK.
- In the dialog box that opens, click on the combine button.

- Click on ‘Combine & Load’.
- In the ‘Combine Files’ dialog box that opens, select the Table in the left pane. Note that Power Query shows you the Table from the first file. This file would act as the template (or the key) to combine other files. Power Query would now look for ‘Table 1’ in other workbooks and combine it with this one.

- Click OK.


This will load the final result (combined data) into your active worksheet.
Note that along with the data, Power Query automatically adds the workbook name as the first column of the combined data. This helps in keeping track of what data came from which workbook.
In case you want to first Edit the data before loading it into Excel, in Step 6, select ‘Combine and Edit’. This will open the final result in the Power Query editor where you can edit the data.
A few things to know:
- If you select an Excel Table as the template (in Step 7), Power Query will use the column names in this Table to combine the data from other Tables. If other Tables have additional columns, those will be ignored. In case those other Tables don’t have a column, which is there in your Template Table, Power Query would just put ‘null’ for it.
- The columns don’t need to be in the same order as Power Query uses column headers to map columns.
- Since you have selected Table1 as the key, Power Query will look for Table1 in all the workbooks, and combine all these. In case it doesn’t find an Excel Table with the same name (Table1 in this example), Power Query will give you an error.
Adding New Files to the Folder
Now let’s take a minute and understand what we did with the above steps (which only took us a few seconds).
We combined the data from four different workbooks in one single table in a few seconds without even opening any of the workbooks.
But that’s not all.
The real POWER of Power Query is that now when you add more files to the folder, you don’t need to repeat any of these steps.
All you need to do move the new workbook in the folder, refresh the query, and it will automatically combine the data from all the workbooks in that folder.
For example, in the above example, if I add a new workbook – ‘Mid-West.xlsx’ to the folder, and refresh the query, it will instantly give me the new combined dataset.
Here is how you refresh a query:
Each workbook has the data with the same worksheet name
In case you don’t have the data in an Excel Table, but all the sheet names (from which you want to combine the data) are the same, then you can use the method shown in this section.
There are a few things you need to be cautious about when it’s just tabular data and not an Excel Table.
- The worksheet names should be the same. This will help Power Query to go through your workbooks and combine the data from the worksheets that have the same name in each workbook.
- Power Query is case sensitive. This means a worksheet named ‘data’ and ‘Data’ are considered different. Similarly, a column with the header ‘Store’ and one with ‘store’ are considered different.
- While it’s important to have the same column headers, it’s not important to have the same order. If column 2 in the ‘East.xlsx’ is column 4 in ‘West.xlsx’, Power Query will match it correctly by mapping the headers.
Now let’s see how to quickly combine data from different workbooks where the worksheet name is the same.
In this example, I have a folder with four files.
In each workbook, I have a worksheet with the name ‘Data’ that contains the data in the following format (note that this is not an Excel Table).

Here are the steps to combine data from multiple workbooks into one single worksheet:
- Go to the Data tab.
- In the Get & Transform group, click on the New Query drop down.
- Hover your cursor on ‘From File’ and click on ‘From Folder’.
- In the Folder dialog box, enter the file path of the folder that has the files, or click on Browse and locate the folder.
- Click OK.
- In the dialog box that opens, click on the combine button.
- Click on ‘Combine & Load’.
- In the ‘Combine Files’ dialog box that opens, select ‘Data’ in the left pane. Note that Power Query shows you the worksheet name from the first file. This file would act as the key/template to combine other files. Power Query will go through each workbook, find the sheet named ‘Data, and combine all these.

- Click OK. Now Power Query will go through each workbook, look for the worksheet named ‘Data’ in it, and then combine all these datasets.

This will load the final result (combined data) into your active worksheet.
In case you want to first Edit the data before loading it into Excel, in Step 6, select ‘Combine and Edit’. This will open the final result in the Power Query editor where you can edit the data.
Each Workbook has the data with Different Table names or Sheet Names
Sometimes, you may not get structured and consistent data (such as Tables with same name or worksheet with the same name).
For example, suppose you get the data from someone who created these datasets but named the worksheets as East Data, West Data, North Data, and South Data.
Or, the person may have created Excel tables, but with different names.
In such cases, you can still use Power Query, but you need to do it with a couple of additional steps.
- Go to the Data tab.
- In the Get & Transform group, click on the New Query drop down.
- Hover your cursor on ‘From File’ and click on ‘From Folder’.
- In the Folder dialog box, enter the file path of the folder that has the files, or click on Browse and locate the folder.
- Click OK.
- In the dialog box that opens, click on the Edit button. This will open the Power Query editor where you will see the details of all the files in the folder.

- Hold the Control key and select the ‘Content’ and ‘Name’ columns, right-click and select ‘Remove Other Columns’. This will remove all the other columns except the selected columns.

- In the Query Editor ribbon, click on ‘Add column’ and then click on ‘Custom Column’.

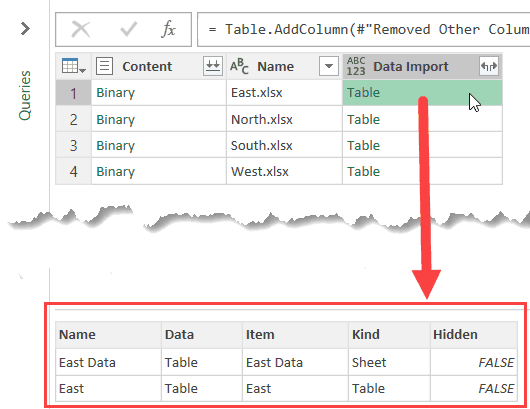
- In the Add Custom Column dialog box, name the new column as ‘Data Import’ and use the following formula =Excel.Workbook([CONTENT]). Note that this formula is case sensitive and you need to enter it exactly the way I have shown here.

- Now you will see a new column that has Table written in it. Now let me explain what happened here. You provided Power Query the names of the workbooks, and Power Query has fetched the objects such as worksheets, tables, and named ranges from each workbook (which resides in the Table cell as of now). You can click on the white space next to the text Table and you would see the information at the bottom. In this case, since we only have one table and one worksheet in each workbook, you can see only two rows.

- Click on the double-arrow icon at the top of the ‘Data Import’ column.

- In the column data box that opens, uncheck the ‘Use original column as prefix’, and then click OK.

- Now you will see an expanded table where you see one row for each object in the table. In this case, for each workbook, the sheet object and the table object are listed separately.

- In the Kind column, filter the list to only show the Table.

- Hold the control key and select the Name and Data column. Now, right-click and remove all the other columns.

- In the Data column, click on the double-arrow icon at the top right of the Data Header.

- In the column data box that opens, click OK. This will combine the data in all the tables and show in Power Query.

- Now you can make any transformation you need, and then go to the Home tab and click Close & Load.


Now let me try and quickly explain what we did here. Since there was no consistency in the sheet names or table names, we used the =Excel.Workbook formula to fetch all the objects of the workbooks in the Power Query. These objects can include sheets, tables, and named ranges. Once we had all the objects from all the files, we filtered these to only consider Excel Tables. Then we expanded the data in the tables and combined all these.
In this example, we filtered the data to only use Excel Tables (in Step 13). In case you want to combine sheets and not tables, you can filter sheets.
Note – this technique will give you the combined data even when there is a mismatch in column names. For example, if in East.xlsx, you have a column that has been misspelled, you will end up with 5 columns. Power Query will fill data in columns if it finds it, and if it can not find a column, it will report the value as ‘null’.
Similarly, if you have some additional columns in any of the tables worksheets, these will be included in the final result.
Now if you get more workbooks from which you need to combine data, simply copy-paste it into the folder and refresh the Power Query
You may also like the Following Excel Tutorials:
- Get a List of File Names from Folders & Sub-folders (using Power Query).
- Merge Tables in Excel Using Power Query.
- How to Combine Multiple Excel Files into One Excel Workbook.
- Combine Data From Multiple Worksheets into a Single Worksheet in Excel.
- How to Quickly Combine Cells in Excel.
- How to Select Every Third Row in Excel (or select every Nth Row).
- Split Each Excel Sheet Into Separate Files
- How to Import XML File into Excel | Convert XML to Excel
If you ask people who work with data, you will get to know that combining Excel files or merging workbooks is a part of their daily work.
Agree?
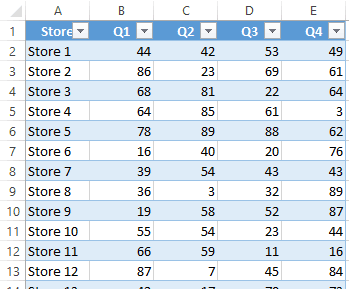
A simple an example: Let’s say you want to create a sales report and you have data of four different zones in four different files.
Now:
The very first thing you need to do is to combine those files in one single workbook and only then you can create your report further.
The point is: You have to have a method which you can use for merging these files. Say “YES” in the comment section if you want to know the best method for this.
Today in this post, I’m going to share with you the best way to merge data from multiple Excel files into a SINGLE workbook.
But, here’s the kicker.
This post will teach you something you need to learn to use in the real world data problem so make sure to read the entire post.
The Best Possible Way for Combining Excel Files by Merging data into ONE Workbook — POWER QUERY
Power Query is the best way to merge or combine data from multiple Excel files in a single file. You need to store all the files in a single folder and then use that folder to load data from those files into the power query editor. It also allows you to transform that data along with combining.
It works something like this:
- Saving All the Files into a Single Folder
- Combining them using Power Quer
- Merging Data into a Single Table
Make sure to download these sample file from here to follow along and check out this tutorial to learn power query.
Note: For combining data from different Excel files, your data should be structured in the same way. That means the number of columns and their order should be the same.
To merge files, you can use the following steps:
- First of all, extract all the files from the sample folder and save that folder at the desktop (or wherever you want to save it).

- Now, the next thing is to open a new Excel workbook and open “POWER Query”.
- For this, go to Data Tab ➜ Get & Transform Data ➜ Get Data ➜ From File ➜ From Folder.

- Here you need to locate the folder where you have files.

- In the end, click OK, and once you click OK, you’ll get a window listing all the file from the folder, just like below.

- Now, you need to combine data from these files and for this click on “Combine & Edit”.

- From here, the next thing is to select the table in which you have data in all the workbooks and yes, you’ll get a preview of this at the side of the window.

- Once you select the table, click OK. At this point, you have merged data from all the files into your power query editor and, if you look closely you can see a new column with the name of the workbooks from which data is extracted.

- So, right-click on the column header and select “Replace Values”.

- Here in the “Value to Replace” enter the text “.xlsx” and leave “Replace With” blank (here idea is to remove the file extension from the name of the workbook).
- After that, double click on the header and select “Rename” to enter a name for the column i.e. Zone .
- At this point, your merged data is ready and all you need is to load it into your new workbook. So, go to the Home Tab and click on the “Close & Load”.


 .
.
Now you have your combined data (from all the workbooks) into a single workbook.

This is the moment of JOY, write “Joy” in the comment section if you love to use “Power Query for combining data from multiple files”.
Important Point
In the above steps, we have used the table name to combine data from all the files and add all of it into a single workbook. But not all time you will have the same table name in all the Excel files and at that point, you can use the worksheet name as a key to summarizing all that data.
One more thing:
As I said, you can use a worksheet name to combine data with the power query but there are few more things which I want to share with you and you need to take care of those. Power Query is case sensitive, so when combining files make sure to have the name of worksheets in all the workbooks in the same letters.
The next thing is, to have the same name for the column headers, but here the kicker: The order of the columns doesn’t matter. If column1 in the north.xlsx is column2 in the west.xlsx, Power Query will match it, but you have to have column names the same.
So now, while combining files using power query you can use the worksheet name instead of the table name, and here you have «SalesData» as the worksheet name in all the files.
You select it and click on the «Combine & Edit» and follow all the steps which I have mentioned in the above method.
Why Power Query is the Best Way to Merge Data into a Single File?
Merge Data from Multiple Workbooks When you don’t have the Same Name for Worksheets and data in Tables
This is the hard truth…
…that in some situations, you won’t have the same name for worksheets and not all the data in tables all the time.
Now, what you should be doing in that case?
Well…
…in this case, you must know how you can combine data from all the files and I don’t want to miss to share with this thing with you.
…so without any further ado, let’s get started.
- First of all, open the “From Folder” dialog box to locate the folder where you have all the files.
- Now in this dialog box, locate the folder and click OK.

- After that, click on the “Edit” to edit the table.

- At this point, you will have a table like below in your power query editor.

- Next, select the first two columns of the table and click on the “Remove Other Columns” from the right-click menu.

From here, we need to add a custom column to fetch data from the worksheets of the workbooks.
- For this, go to Add Column Tab and click on the “Custom Column” button. This will open the “Custom Column” dialog box.

- In the dialog box, enter =Excel.Workbook([Content]) and click OK.

…at this time you have a new column in the table but next, you need to extract data from it.
- Now, open the filter from that newly added custom column and click OK to expand all the data into the table.

- Here you have the newly expanded table with some new columns.
- Now from this new table, delete all the columns except third and fourth.

- So, open the filter for the column “Custom.Data” to expand it and click OK.

The moment you click OK, you’ll get all the data from all the files into a single table…
…you need to make some changes into it to make it PERFECT.
If you notice, all the heading of the column are into data itself…

…so you need to add the column headings.
- To do this, you need to double click on the header and add a name, or you can right click and select rename it.

The next you need to exclude the headings which you have in the data table.
- Now open any column’s filter option and unselect the heading name which you have in the column data and click OK after that.

Now our data is ready to load into the worksheet, so, go to the Home Tab and click on the close and load.

Congratulations! you have just combined data from the different workbooks (with different worksheets name and without any table).
This is also important:
At this point, you have merged the data into one table.
But there’s one thing you need to do…
…and that’s applying some formatting to it and making sure that it won’t go away when you update your data.
Here’s what you need to do…
- First of all, select the column where you have dates (as it is formatted as number right now) and format it as dates.
- After that, make all the columns wide as per the data you have in them.
- Here you can also format amount and price as “Currency”.

But the next thing is to make this formatting fix.
- For this, go to “Design Tab”, and open properties.
- Untick “Adjust Column” width and tick mark “Preserve Cell Formatting”.
- Yes, that’s it.

Now you have a query in your workbook which can combine data from multiple files…
…and merge it into a single workbook…
…even if the worksheet name is not the same or if you don’t have tables.
And yes, you have also made the formatting fix. ?
In the end,
As I said, POWER QUERY is real and if you frequently use to combine data from multiple files then you must use this method…
…as it’s a ONE-TIME setup.
The most important thing is you when you use power query you can even clean the data from those files as well.
I hope this tutorial will help you to Get Better at Excel. But now, you need to tell me one thing.
Which method do you use to combine data from multiple files?
Make sure to share your views with me in the comment section, I’d love to hear from you. And please, don’t forget to share this post with your friends, I am sure they will appreciate it.
You must Read these Next
- Consolidate Data From Multiple Worksheets: This option can help you to combine data from multiple worksheets into a single one…
- Unpivot Data using Power Query: In this situation, you need to put some efforts and spend your precious time to make it re-usable…
- Create a Pivot from Multiple Files: In this post, I’d like to show you a 3 steps process to create a pivot table by using data from multiple…
About the Author

Puneet is using Excel since his college days. He helped thousands of people to understand the power of the spreadsheets and learn Microsoft Excel. You can find him online, tweeting about Excel, on a running track, or sometimes hiking up a mountain.
Excel for Microsoft 365 for Mac Excel 2021 for Mac Excel 2019 for Mac Excel 2016 for Mac Excel for Mac 2011 More…Less
If you receive information in multiple sheets or workbooks that you want to summarize, the Consolidate command can help you pull data together onto one sheet. For example, if you have a sheet of expense figures from each of your regional offices, you might use a consolidation to roll up these figures into a corporate expense sheet. That sheet might contain sales totals and averages, current inventory levels, and highest selling products for the whole enterprise.
To decide which type of consolidation to use, look at the sheets you are combining. If the sheets have data in inconsistent positions, even if their row and column labels are not identical, consolidate by position. If the sheets use the same row and column labels for their categories, even if the data is not in consistent positions, consolidate by category.
Combine by position
For consolidation by position to work, the range of data on each source sheet must be in list format, without blank rows or blank columns in the list.
-
Open each source sheet and make sure that your data is in the same position on each sheet.
-
In your destination sheet, click the upper-left cell of the area where you want the consolidated data to appear.
Note: Make sure that you leave enough cells to the right and underneath for your consolidated data.
-
On the Data tab, in the Data Tools group, click Consolidate.
-
In the Function box, click the function that you want Excel to use to consolidate the data.
-
In each source sheet, select your data.
The file path is entered in All references.
-
When you have added the data from each source sheet and workbook, click OK.

Combine by category
For consolidation by category to work, the range of data on each source sheet must be in list format, without blank rows or blank columns in the list. Also the categories must be consistently labeled. For example, if one column is labeled Avg. and another is labeled Average, the Consolidate command will not sum the two columns together.
-
Open each source sheet.
-
In your destination sheet, click the upper-left cell of the area where you want the consolidated data to appear.
Note: Make sure that you leave enough cells to the right and underneath for your consolidated data.
-
On the Data tab, in the Data Tools group, click Consolidate.
-
In the Function box, click the function that you want Excel to use to consolidate the data.
-
To indicate where the labels are located in the source ranges, select the check boxes under Use labels in: either the Top row, the Left column, or both.
-
In each source sheet, select your data. Make sure to include either the top row or left column information that you previously selected.
The file path is entered in All references.
-
When you have added the data from each source sheet and workbook, click OK.
Note: Any labels that don’t match labels in the other source areas cause separate rows or columns in the consolidation.
Combine by position
For consolidation by position to work, the range of data on each source sheet must be in list format, without blank rows or blank columns in the list.
-
Open each source sheet and make sure that your data is in the same position on each sheet.
-
In your destination sheet, click the upper-left cell of the area where you want the consolidated data to appear.
Note: Make sure that you leave enough cells to the right and underneath for your consolidated data.
-
On the Data tab, under Tools, click Consolidate.
-
In the Function box, click the function that you want Excel to use to consolidate the data.
-
In each source sheet, select your data, and then click Add.
The file path is entered in All references.
-
When you have added the data from each source sheet and workbook, click OK.
Combine by category
For consolidation by category to work, the range of data on each source sheet must be in list format, without blank rows or blank columns in the list. Also the categories must be consistently labeled. For example, if one column is labeled Avg. and another is labeled Average, the Consolidate command will not sum the two columns together.
-
Open each source sheet.
-
In your destination sheet, click the upper-left cell of the area where you want the consolidated data to appear.
Note: Make sure that you leave enough cells to the right and underneath for your consolidated data.
-
On the Data tab, under Tools, click Consolidate.
-
In the Function box, click the function that you want Excel to use to consolidate the data.
-
To indicate where the labels are located in the source ranges, select the check boxes under Use labels in: either the Top row, the Left column, or both.
-
In each source sheet, select your data. Make sure to include either the top row or left column information that you previously selected, and then click Add.
The file path is entered in All references.
-
When you have added the data from each source sheet and workbook, click OK.
Note: Any labels that don’t match labels in the other source areas cause separate rows or columns in the consolidation.
Need more help?
Want more options?
Explore subscription benefits, browse training courses, learn how to secure your device, and more.
Communities help you ask and answer questions, give feedback, and hear from experts with rich knowledge.