
Using SmartArt
- With a Word Document open, click on the ‘Insert’ tap in the ribbon and click on ‘SmartArt. ‘
- A dropdown will appear, click ‘Picture. ‘ Choose the layout you’d like to use.
- Add your photos to the template. Your photos will automatically size to fit within the template making a picture collage.
Contents
- 1 Does Microsoft have a collage maker?
- 2 How do I make a picture grid in Word?
- 3 How do I make a photo collage on Windows?
- 4 How do I put multiple pictures into one in Word?
- 5 How do you layout multiple pictures in Word?
- 6 How do I make a collage on my computer?
- 7 How can I make a collage of pictures on my computer?
- 8 How do I make a desktop collage?
- 9 How do I make a photo grid?
- 10 How can I merge two photos together?
- 11 How do I make a wallpaper collage on my laptop?
- 12 How do you make a collage on Microsoft PowerPoint?
- 13 How do I insert multiple pictures into paint?
- 14 What program can I use to make a collage of pictures?
- 15 Where can I make a collage?
- 16 Why can’t I select multiple images in Word?
- 17 Can I group pictures in Word?
- 18 How do you combine pictures and text in Word?
- 19 Can you format all pictures in Word at once?
- 20 How do I make a collage on my laptop Windows 7?
Does Microsoft have a collage maker?
Get Collage Maker – Photo Editor & Photo Collage – Microsoft Store.
How do I make a picture grid in Word?
Snap charts, pictures, and objects to a grid to align them in…
- Select a chart, picture, or object in the document.
- On the right end of the ribbon, select Format > Align > Grid Settings. The Grid and Guides dialog box appears.
- Turn on one or both of these options: Option. Description.
How do I make a photo collage on Windows?
How can I use windows photo gallery to create a collage.
- Select the photos you’d like to include in your collage.
- Click Create tab and select Auto Collage option and select one of five collage sizes. Photo Gallery will then automatically create a collage with those images.
- Save the collage.
How do I put multiple pictures into one in Word?
Inserting Multiple Graphics in a Document
- Place the insertion point at the place in the document where you want the graphics inserted.
- Display the Insert tab of the ribbon.
- Click the Picture tool.
- Use the controls in the dialog box to locate the folder that contains the images.
- Press Ctrl+A.
- Click Insert.
How do you layout multiple pictures in Word?
To move several pictures as one, group them. Hold down the Ctrl key and select each picture. Right-click the multiple-picture selection, choose Group from the contextual submenu and then choose Group again.
How do I make a collage on my computer?
A collage is a group of photos combined into one photo.
- On your computer, go to photos.google.com.
- Sign in to your Google Account.
- In the left menu, click Utilities.
- Under “Create new”, click Animation or Collage.
- Choose the photos you want to include.
- At the top, click Create.
How can I make a collage of pictures on my computer?
Windows 10 Editing Guide
- Press the + ‘Plus’ icon which will display the toolbar menu.
- In the Tool menu, press the Photos icon and select pictures from the dialogue box.
- Press Open, and the photo will be added to the canvas.
- Repeat for every photo you want to add to your collage.
How do I make a desktop collage?
To create a collage for your desktop background, simply save the photos you want to use, open up a presentation or photo editing program, upload and position your photos into a collage, save your work as a PNG or JPEG and then apply it to your home screen.
How do I make a photo grid?
How to Make a Photo Grid Collage?
- Open Fotor and click the “Make a Collage” button.
- Click “Classic Collage” and select the photo grid template you like.
- Upload your images, drag and drop your photos into collage cells.
- You can also modify the backgrounds, borders and add effects, stickers and texts.
How can I merge two photos together?
Open the Photo Gallery and locate the folder that contains photos you want to combine. Hold CTRL key to select multiple images and then click on the Photo Gallery’s Create tab. Select the Photo Fuse feature and proceed to designate the area of the photo you want to replace.
How do I make a wallpaper collage on my laptop?
How To: Laptop Wallpaper Collage
- STEP 1: FIND YOUR FAVORITE IMAGES. Find pictures for your collage!
- STEP 2: MAKE IMAGE BACKGROUND TRANSPARENT. Upload your images to https://www.remove.bg/ and re-download them with transparent backgrounds.
- STEP 3: PUT IMAGES INTO YOUR COLLAGE.
- STEP 4: CREATE YOUR WALLPAPER.
How do you make a collage on Microsoft PowerPoint?
Create & insert a Photo Collage in PowerPoint
- Open the PPT presentation.
- Select the slide where you want to show the collage.
- Go to Insert tab.
- Click on the Pictures button.
- Select all the pictures and insert them in your slide.
- Go to Picture Format tab.
- Click on Picture Layout button.
- Select a layout.
How do I insert multiple pictures into paint?
How to insert multiple Images in Paint
- Launch Paint, and go to File > Open (CTRL+O).
- Select the image you want to insert on top of another image.
- Now you would see the image has imported to Paint.
- Click Select > Select all (CTRL+A).
- Click Copy (CTRL+C).
- Next, go to File > Open (CTRL+O).
What program can I use to make a collage of pictures?
The 15 best collage maker tools in 2021
- Kapwing Collage Maker.
- MOLDIV.
- Photo Joiner. Photo Joiner has an intuitive interface.
- Ribbet. Flash-based collage maker Ribbet is simple and fun.
- Adobe Spark. Spark distills Adobe goodness into a super-simple interface.
- Canva Collage Templates.
- BeFunky.
- piZap.
Where can I make a collage?
With Canva’s free online collage maker, creating a masterpiece of memories is as simple as a few clicks. Create beautifully designed collages by dropping your images into our designer-made templates and instantly downloading them onto any device.
Why can’t I select multiple images in Word?
By default, Word inserts pictures In Line with Text in the document.Therefore, Word will not allow selecting multiple pictures in your document when they are In Line with Text. Therefore, you must change the layout of the pictures to With Text Wrapping. This will allow you to select multiple pictures at the same time.
Can I group pictures in Word?
Press and hold CTRL and select shapes, pictures, or other objects to group.Go to Picture Format or Picture Tools Format > Group > Group.
How do you combine pictures and text in Word?
Press and hold Ctrl while you click the shapes, pictures, or other objects to group. 2. Then right click and select Group. By doing this, we can group shapes, pictures, or other objects at the same time as though they were a single shape or object.
Can you format all pictures in Word at once?
Step 1: Open the Word document that contains your images. Step 2: Right-click on the first image and select Size and Position. Step 3: In the Layout box that opens, click on the Size tab. Then, uncheck the box next to Lock aspect ratio.
How do I make a collage on my laptop Windows 7?
How to Make a Photo Collage Using Windows
- Add pictures to the background by clicking the “Insert” tab at the top and then selecting “Picture.” Select “From File” to locate the desired photo on your hard drive.
- Resize photographs by right-clicking on the photo.
In many cases, merging images is required during your work with MS Word document. For example you want to combine two pictures just for a special effect. Without any help of image editor such as Photoshop, what can you do in Word? Please look at the following instruction.
Merge multiple images/pictures into one in Word
Merge multiple images/pictures into one in Word
1. Insert the images you want to merge in Word. See screenshot:
2. Click Insert > Shapes > New Drawing Canvas to insert the drawing canvas.
3. Copy and paste the images into the canvas and then drag them to the desired position. See screenshot:

Tip: You can select the image in canvas and right click to open the right-clicking menu, then specify the above and below position of the image from Bring to Front or Send to Back options.
4. Select all the images you want to merge by Ctrl + A, then click Format > Group > Group. See screenshot:

5. Copy the combined image, then click the blank place on the canvas. Delete the drawing canvas by press Backspace button, then paste the combined image in the document.

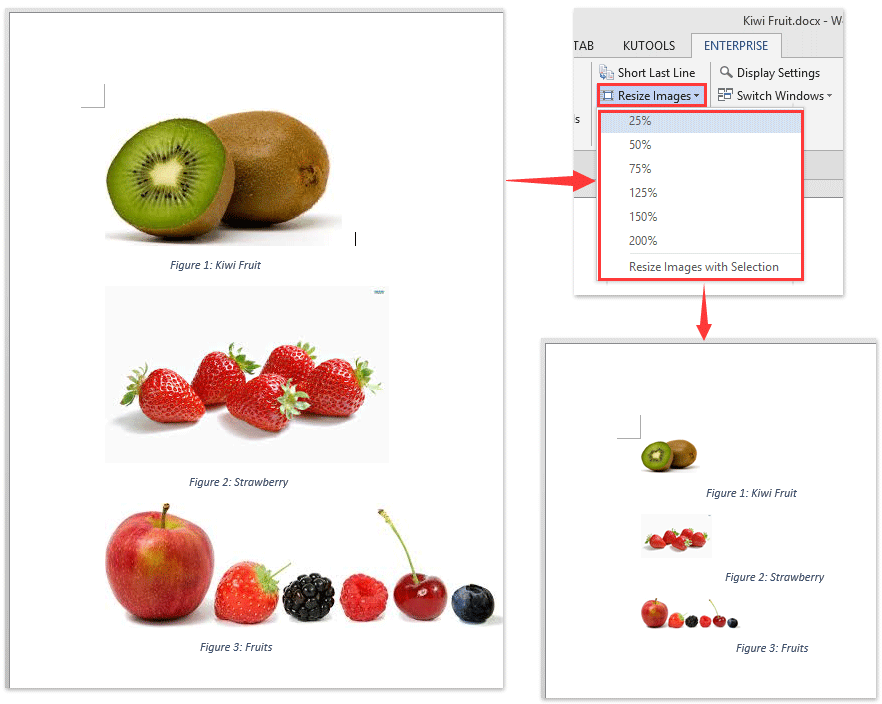
One click to batch resize all/multiple images in Word document
Normally, we can resize one image’s size manually in Word document. And it’s quite tedious to resize many images one by one. But, with Kutools for Word’s Resize Images utility, you can easily resize all images’ size to same 25%, 50%, … etc. or to the same width of selected image with only one click!
Relative articles:
Recommended Word Productivity Tools


Kutools For Word — More Than 100 Advanced Features For Word, Save Your 50% Time
- Complicated and repeated operations can be done one-time processing in seconds.
- Insert multiple images across folders into Word document at once.
- Merge and combine multiple Word files across folders into one with your desired order.
- Split the current document into separate documents according to heading, section break or other criteria.
- Convert files between Doc and Docx, Docx and PDF, collection of tools for common conversions and selection, and so on…
Comments (20)
No ratings yet. Be the first to rate!
Whether you want to illustrate your next corporate communication document with product photos, employee images, blueprints or other pictures, they may seem difficult to place on the page when they’re first opened in your Microsoft Word document. This is because Word’s default action is to create a solid space around each picture, preventing them from being dragged, layered or merged. You can quickly get around this and design striking graphics using Word’s picture editing tools.
-
Start Microsoft Word and click the Insert tab.
-
Click the Picture button on the tab and navigate to where the first picture to merge is located. Double-click the image, which opens the picture on the Word page. Repeat the browsing process until all images are on the Word page. If all the pictures to merge, or multiple ones, are located in the same folder or place on your network, save time by taking advantage of Word’s multi-click feature. Click once on the first image, press and hold down the “Ctrl” key and then click once on each other image. When they’re all selected, click the “Insert” button and the to-be-merged pictures open together on the page, but not yet merged.
-
Click any of the pictures to open the pink Picture Tools tab. Click the “Wrap Text” button below the tab on the ribbon. Although these are pictures, not text, this feature works the same way.
-
Click the “Square” button on the “Wrap Text” drop-down menu. The image will move slightly.
-
Repeat the “Square” process for each of the to-be-merged pictures; they may start to overlap each other.
-
Click one of the images and drag it so it overlaps another, beginning the merge. To bring the bottom image out from below, click the Picture Tools tab and select “Bring Forward.” Clicking the “Send Backward” button works the opposite way.
-
Drag and align the pictures so they create your merge. One striking approach is to create a horizontal merge where the pictures, all in a row, look as if they are morphing into each other.
In this post I’m going to go through how to combine pictures into one in word. This covers a few different subjects including how to make a picture collage in word, how to add a picture to a picture, and how to overlay pictures in word. Let’s go through these different but related subjects.
How to Combine Pictures into One – How to Add a Picture to a Picture
If you have two separate pictures and want to combine them into one and you want to do so in word, then the steps are pretty easy. There are two steps involved in making this happen and it’s important that you ensure that you do step one. There is no way round it and can lead to huge frustration if you don’t do this first step.
Step Number One- Ensure Your Pictures and Not in Line with Text
When you insert a picture into word, in general, unless you have changed the defaults, the picture appears in line with text. What this means is that it’s like a piece of text. You move it with your spacebar and delete it by pressing backspace or delete. However, you cannot have your pictures on this setting when you want to combine the two.
After you have combined them, if you want to change the way the picture is on your document, there is no issue, and you can change it back to in line with text. However, in order to combine the two, you have to have both pictures on any of the other settings.
If you want to learn more about what each of the other settings do, please check out that particular blog post on how to move a picture freely in Word.
To change the picture to Not in line with text do the following:
Step Two – Combining the Two Pictures Together and Putting them Side by Side
Once you have the two pictures where you want them, now it’s time to combine them together.
As you can see from the arrows, both pictures have been selected. If on your computer you don’t see this, please go repeat step one as that is almost always the cause of the frustration.
- Right click anywhere on one of the pictures and then on the pop-up menu select Group:
- This combines the pictures into one that you can move around the screen as if it’s one single picture.
If you want to have the picture that you’ve created In line with text again, feel free to now select this option from the Wrap text options that were mentioned above.
If you need to undo this and want to have the pictures separated, all you have to do is select the picture and then click on Ungroup.
How to Make a Picture Collage in Word
Whilst there is no specific tool that you can use in order to make a picture collage in word, there are several methods that you can use to create one.
Method One – Using SmartArt
There are many different types of SmartArt designs, and you can use any of them in order to create your collage. Let’s take a look at one together.
- On the insert menu, select SmartArt:
- On the pop up window, you can scroll through the whole lot and select one that takes your fancy.
Please note that even though there is one that says picture, you are under no obligation to use this one. Any of the options will work for this:
Not particularly great. However, don’t be fooled by the words [Text]. I’m not going to be adding any text at all here.
- Right click on one of the shapes and on the fill menu that appears select fill with picture:
Obviously I don’t want to have the word [Text] in my collage so let’s make sure to remove that. In order to do so simply put your curser where it says [Text] and press space. This removes the instruction telling you to add some text there.
That’s it. Pretty easy when you think about it.
Method 2 – Designing Your Own Collage
If you want to have your own design, this is also pretty easy and shouldn’t really take you much longer than finding a pre-existing format. This is what you need to do.
- On the Insert menu click on Shapes and then start adding shapes in the way that you want your collage to look. This is what I’ve come up with as an example:
Obviously, this is pretty rudimentary but for the purposes of this it’s fine.
- Right click on an image and from the drop-down menu select Fill and then select Picture:
You may want to remove the outline from the pictures that you have added. In which case, do the following:
- Click on the picture.
- Whilst holding down Ctrl click on the remaining pictures. What this does is that it selects them all. This saves you time when you come to removing the outline.
- Once they are all selected, on the Shape Format tab in the ribbon, click on Shape Outline.
You can even add a background to this collage very easily with the same method.
How to Overlay Pictures in Word
Adding a background to a collage uses exactly the same method as adding an overlay picture. The steps are the same so I’m going to use the same example as above.
- Add a rectangle directly on top of the collage.
- Insert a picture using the fill option as above.
- Right click on the picture and select Behind Text from the Wrap text menu.
- Remove the outline.
- And hey presto, you have a background as well 😊
If you want to group them all so that you can move everything together, please see above.
Changing the Opacity of the Pictures
If you want to blend in some of the pictures into one another, you can do so by changing the transparency of the pictures. In order to do so, do the following:
- Right click on the image; on the Fill menu, select Gradient and then More Gradients:
In Summary
I’ve gone through how to combine pictures into one, how to insert multiple pictures, how to put one picture on top of another in word as well as how to make a picture collage. As you can see, these are not overly difficult skills if you follow my instructions. I hope you have enjoyed this post and hope you have learned how to do the task that you want. If you have any question or comments, please leave them in the comments section below and I’ll try my best to answer them. Good luck!
Sometimes, because of work needs, you have to put together many images to illustrate the issues you are trying to present, the purpose is to make the article more intuitive, easier to understand.
Well, instead of leaving each image fragmented and disconnected, stitching those pictures together is probably a pretty great solution.
Did you know that in the Word application, you can also combine multiple photos together without having to use any other software?
I believe many of you still don’t know how to do it. That is why in this article, I will guide you How to combine multiple photos into one frame in Word in two very simple ways, that is using Textbox and Table.
#first. Use Text Box to combine pictures in Word
If you want to use Textbox to combine multiple images together, follow these steps:
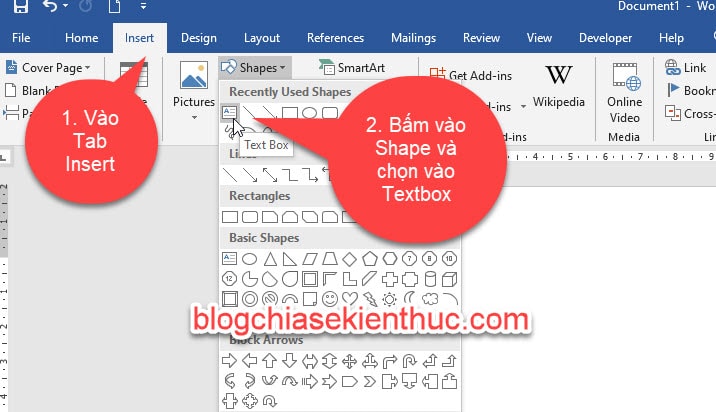
+ Step 1: First, you have to insert a Textbox into Word by going to Tab Insert => click Shape => and select Text Box.
+ Step 2: Then you draw the dimensions of Text Box corresponds to the size of the frame that you want to combine the image with.
Note: If the frame is smaller than the image, the image will not be displayed. So you must resize the Text Box so that it is larger than the image you want to insert, then the new image will be displayed.

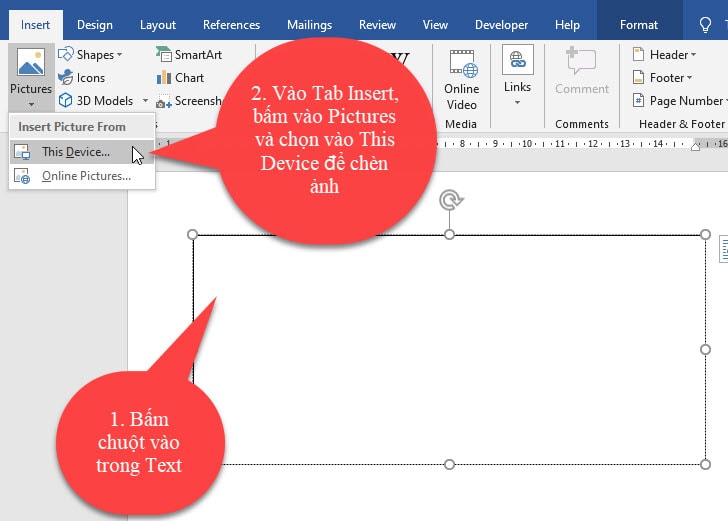
+ Step 3: After I finished drawing Text Box, the next step is to click inside Text Box => and in turn insert the image into the Text Box.
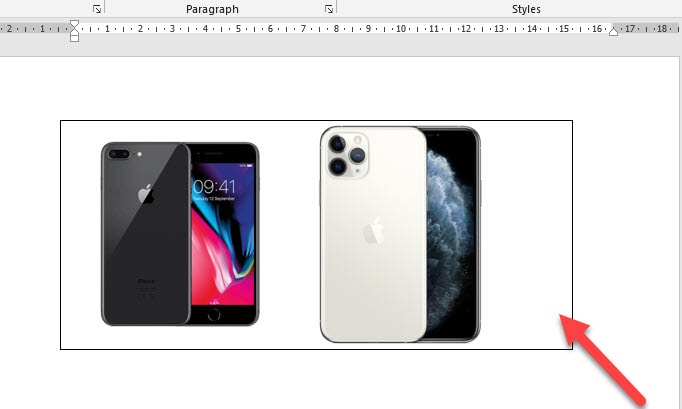
Here, I will in turn insert 2 images of iPhone 8 and iPhone 11 into the Text Box as a demo example.
Perform: I will insert the iPhone 8 image first, by clicking inside the Text Box => then on Tab Insert => click Pictures => and choose This Device to insert pictures.
NOTE: As for the version from Word 2013 and below, you choose Insert => and choose Pictures Please!
Next, I will add an iPhone 11 image next by clicking in the empty area next to the Text Box => then go to Tab Insert => click Pictures => and select This Device => select the location to save the image.
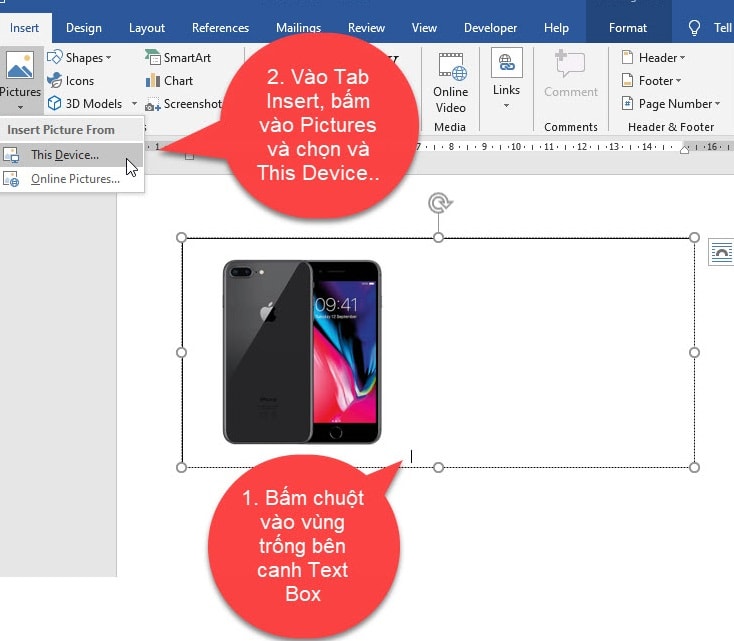
Here are the results: After inserting 2 images into the Text Box.
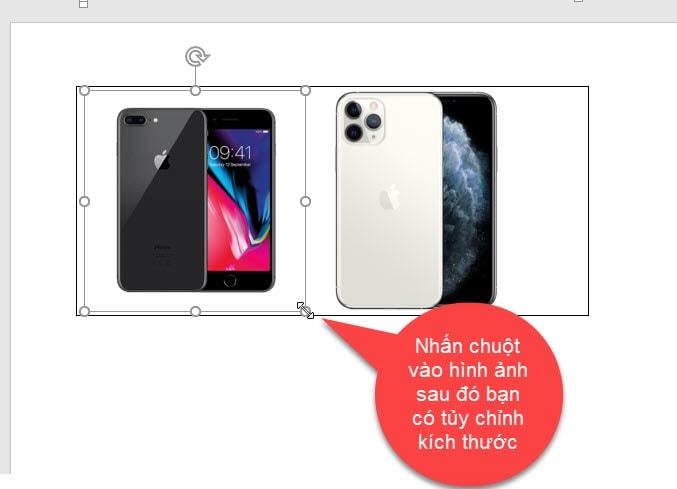
+ Step 4: After inserting, you can still customize the size of the image by clicking on the image => and stretching or shortening the width of the image to get the size you want.
+ Step 4: Custom…
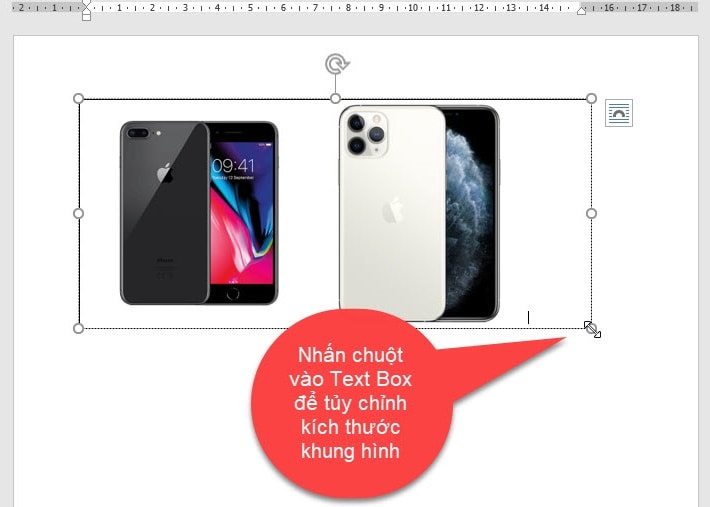
To change the size of the border, click on the border of the Text Box border => Then customize the size you want.
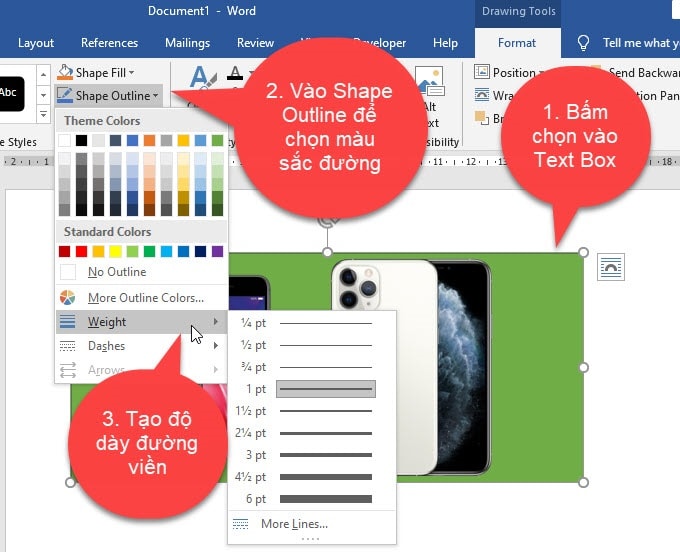
To format the color and border for the frame, double-click Text Box => now Word will automatically move to Tab Format.
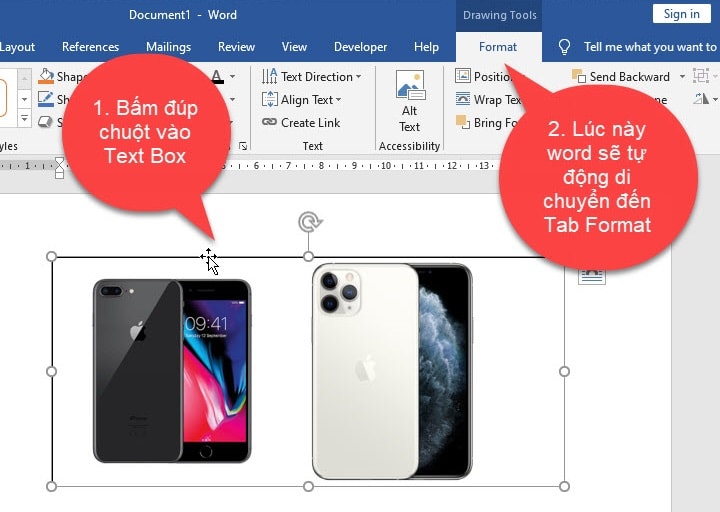
Okay, now to adjust the color of the frame, you have 2 ways to choose, first you go to Shape Fill and select the color you want, or click the down arrow in the group Shape Styles to choose from available templates.
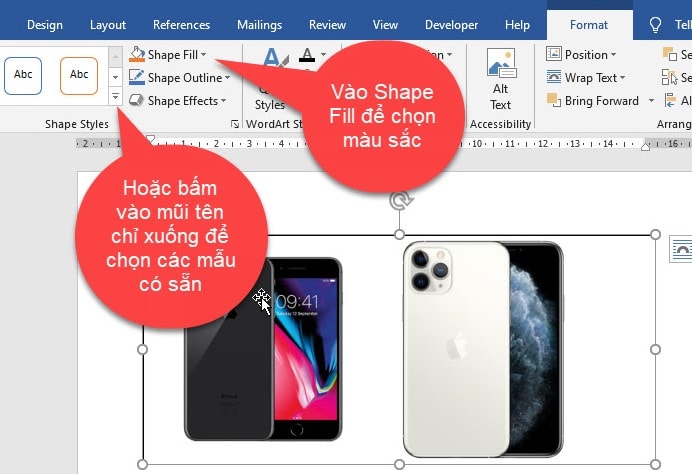
To adjust the border of the photo frame, select Text Box => then enter Shape Outline to choose the color for the border, and if you want to adjust the thickness of the border, go to Weight.
#2. Use Table to combine multiple pictures in Word
In addition to using Text Box, you can also use Table to combine multiple images together right on Word. The way to do it is the same as with the Text Box.
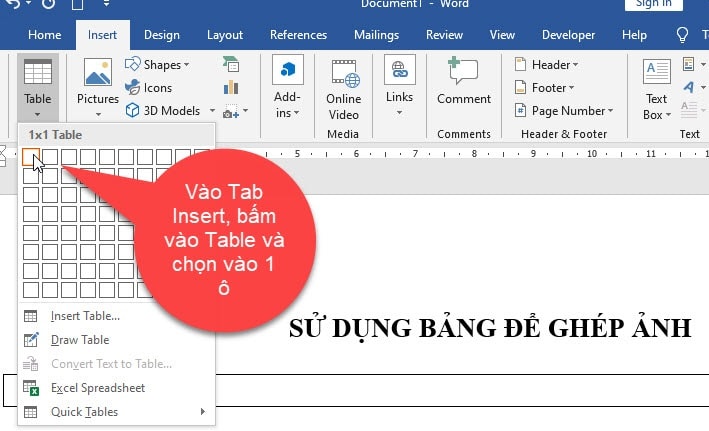
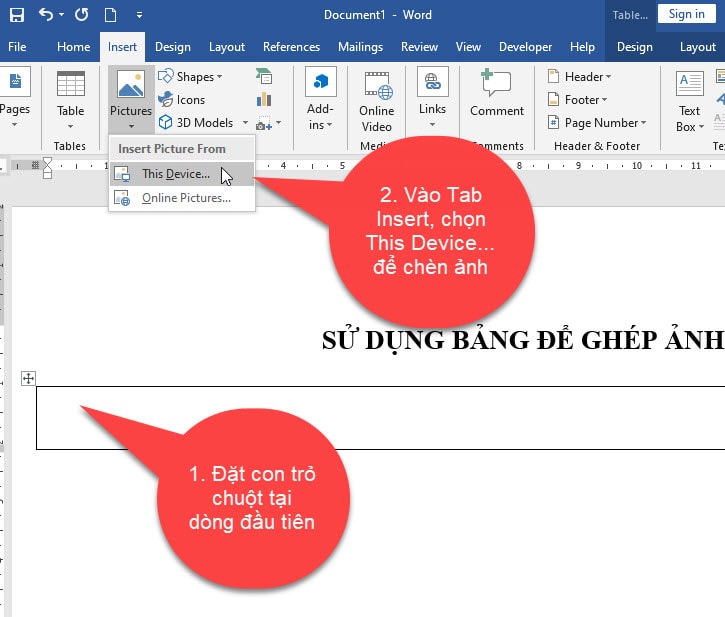
+ Step 1: To be able to combine images into a frame on the Table, you first need to insert the table into Word first.
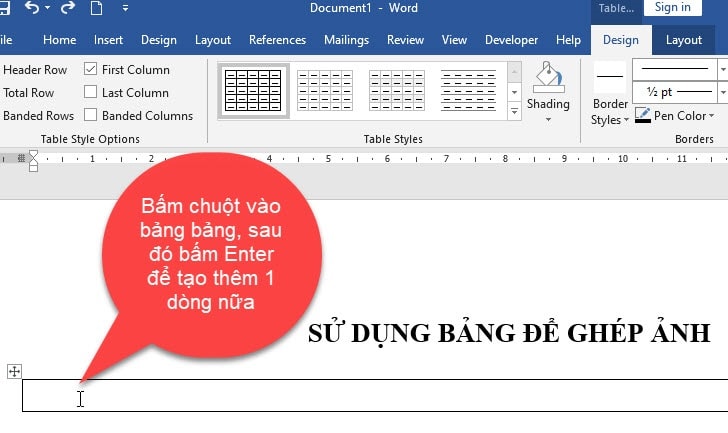
+ Step 2: After you have inserted the table into Word, click inside the table => and press Enter to create one more line is to make 2 lines, if you want to insert 3 pictures, create 3 lines.
+ Step 3: Next, you put the mouse pointer on the first line => then on Tab Insert => click Picture and select This Device to proceed with inserting the image into this line.
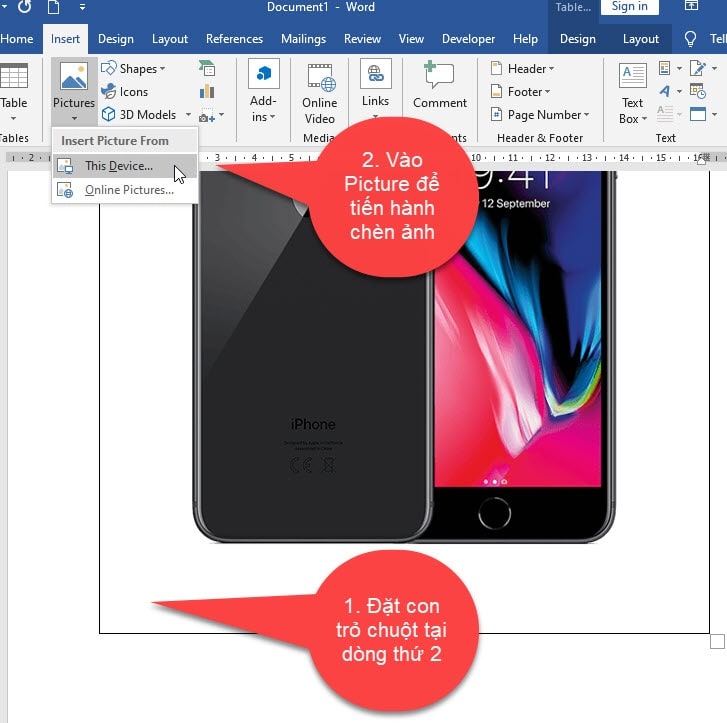
+ Step 4: Place the mouse pointer on the second line and continue to insert the image you want to merge into the second line, inserting the image is the same as above.
+ Step 5: After you have inserted 2 images into the table, the result will be as shown below:
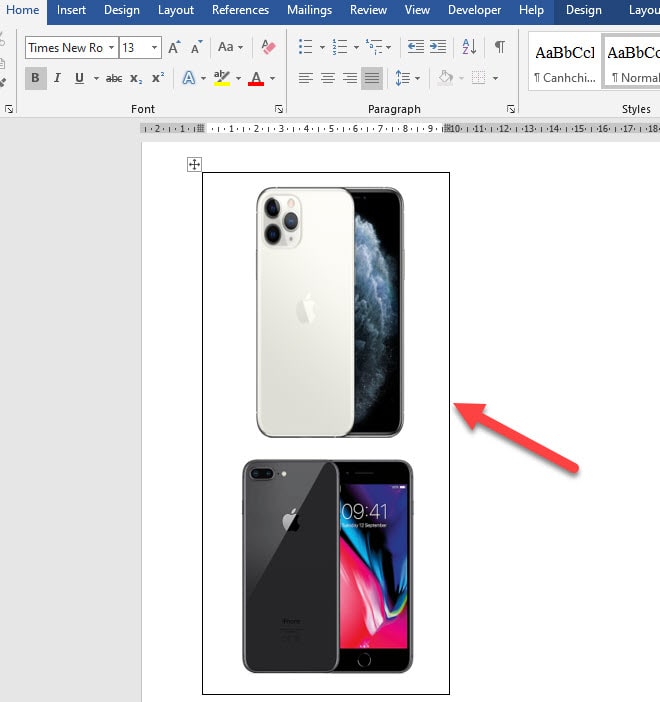
You can also customize the size of the image and table by clicking on the image => and then act like how to insert an image with the Text Box that I instructed above.
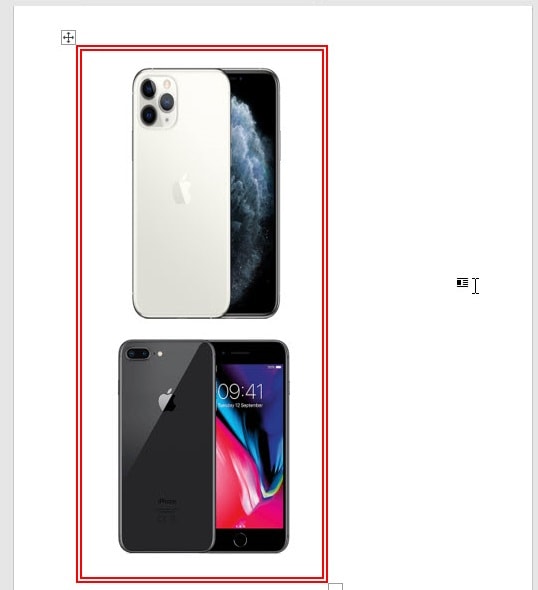
To change the border of the table to make it more beautiful, click on the table => then on Tab Design => and click on Border and Shading in Border.
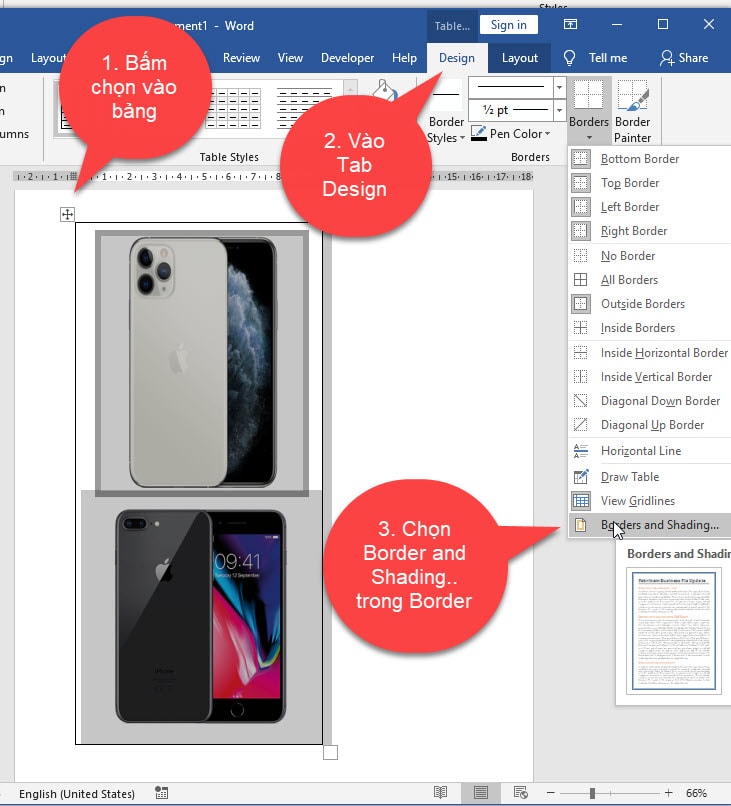
Next, select Tab Border => choose All and select border color and thickness => then press OK.
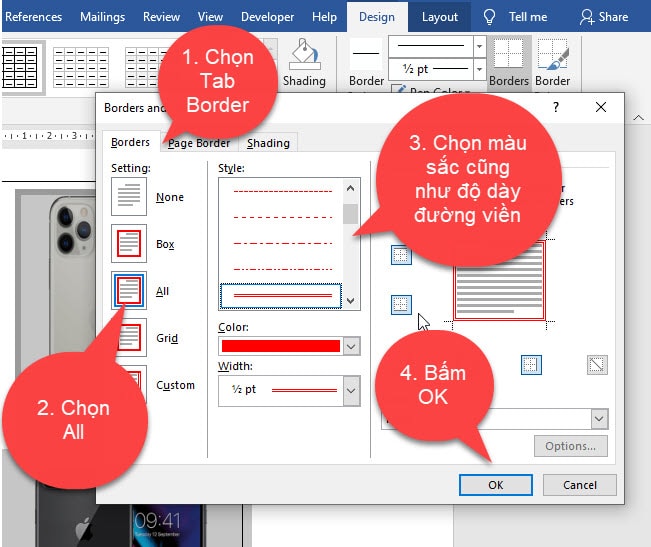
Result: The border of the table has been changed.
Read more:
#3. Conclude
So in this article, I have shown you 2 ways to do this Collage photos in Word it’s very simple. Personally, I like how to use Text Box to combine photos because it’s nicer and easier to customize…
If you like any of these two ways, please leave a comment below the article. Hope you are succesful !
CTV: Ngoc Cuong – techtipsnreview
The article achieved: 5/5 stars – (There are 3 reviews)
Note: Was this article helpful to you? Don’t forget to rate the article, like and share it with your friends and family!