
Summary
As part of the startup process, Microsoft Word can load Component Object Model (COM) add-ins. A COM add-in is a supplemental program that extends the capabilities of Microsoft Word by adding custom commands and specialized features.
NOTE: A Microsoft program and a third-party program both can install COM add-ins.
When you troubleshoot problems in Microsoft Word, you may need to use the /a startup switch to temporarily make unavailable certain components that typically are loaded when you start Word. By using this troubleshooting technique, you may be able to determine where a problem exists. This article describes how to determine which COM add-in files are installed in Microsoft Word and how to temporarily make them unavailable when you are trying to determine where a problem exists.
More Information
COM add-ins can be designed to be loaded and to run in one or more Office programs. COM add-ins, which use the file name extension .dll or .exe, can be implemented in any Microsoft programming product (such as Microsoft Visual Basic, Microsoft Visual C++, and Microsoft Visual J++) or in any third-party programming product that can create COM DLLs (dynamic link libraries) and executable files.
In earlier versions of Office, program-specific add-ins were created in Microsoft Visual Basic for Applications and were designed to meet the unique requirements of the add-in architecture of a specific Office program. In Microsoft Office XP, COM add-ins are created in any programming product that can create COM DLLs and executable files. COM add-ins are designed to connect to and disconnect from one or more Office programs by using a new, shared add-in architecture. Office XP continues to support all add-in architectures that were supported by earlier versions of Office.
When you use System Information to view which add-ins are loaded in Microsoft Word, COM add-ins do not appear in the list. Instead, the list contains only the templates and .wll files that have been added.
To view the loaded templates and .wll files in Microsoft Word, follow these steps:
-
Start Microsoft Word.
-
On the Help menu, click About Microsoft Word.
-
In the About Microsoft Word dialog box, click System Info.
-
In the System Summary tree, click to expand the Applications folder. To expand a folder, either double-click the folder or click the plus sign (+) to the left of the folder.
-
Click to expand the Office 10 Applications folder.
-
Click to expand the Microsoft Word 2002 folder.
-
Click Summary.
-
In the right pane of the System Information dialog box, scroll to the bottom of the list. Loaded Add-ins (templates and .wll files) are listed.
NOTE: COM add-ins are not listed in the Summary folder.
-
Click Close Find, and then click Exit on the File menu to close the System Information dialog box.
To determine whether any COM add-ins are loaded in Microsoft Office Word 2007, follow these steps:
-
Click the Microsoft Office Button, and then click Word Options.
-
In the navigation pane, click Add-Ins.
-
In the View and manage Microsoft Office add-ins. pane, on the Manage list, select COM Add-ins, and then click Go.
-
In the COM Add-Ins dialog box, the add-ins that are available (loaded) in Word 2007 are listed.
-
To temporarily make a COM add-in unavailable, select the add-in that you want to make unavailable, click Remove, and then click OK.
-
Click to clear the COM Add-In check box, and then click OK. When you restart Word 2007, Word 2007 does not load the COM add-in.
To determine whether any COM add-ins are loaded in Microsoft Word 2002 or in Microsoft Office Word 2003, follow these steps:
-
On the Tools menu, click Customize.
-
On the Commands tab in the Customize dialog box, click Tools.
-
In the Commands list, click the COM Add-Ins command, and then drag the COM Add-Ins command to a toolbar.
-
In the Customize dialog box, click Close.
-
Click the COM Add-Ins toolbar button that you added in steps 1 through 4.
-
In the COM Add-Ins dialog box, the add-ins that are available (loaded) in Microsoft Word are listed.
-
To temporarily make a COM add-in unavailable, clear the COM Add-In check box, and then click OK. When you restart Microsoft Word, Word starts without loading the COM add-in.
Need more help?
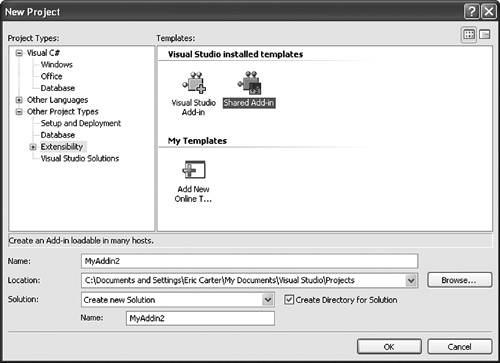
Writing a class that implements IDTExtensibility2 is not particularly difficult, but setting up the registry settings for the application you are targeting and creating the setup package for the COM add-in can be tricky. Luckily, Visual Studio provides a wizard that makes writing COM add-ins considerably easier. The wizard creates two projectsone for implementing the COM add-in and a separate setup project for the COM add-in. The COM Add-In Wizard has actually been part of Visual Studio since version 7.0, but you might not have come across it because it is somewhat hidden in the project hierarchy and listed as a «Shared Add-in» project.
The wizard can be found under Other Project Types > Extensibility > Shared Add-in and is shown in Figure 23-6. The only clue that the Shared Add-in project might have something to do with Office is the Office icon included on the Shared Add-in icon.
Figure 23-6. Creating a Shared Add-in project in Visual Studio.
The Shared Add-In Wizard steps you through the process of creating a COM add-in. One of the advantages of a generic interface such as IDTExensibility2 is that it can be used from just about any application that has a COM object model and as a result all the Office applications support loading IDTExtensibility2 COM add-ins. The wizard enables you to select the Office application that you want your COM add-in to load into, as shown in Figure 23-7. If you select the check box next to multiple Office applications, Visual Studio will register your COM add-in in a way that enables the same COM add-in to load in multiple Office applications.
Figure 23-7. Selecting the application host.
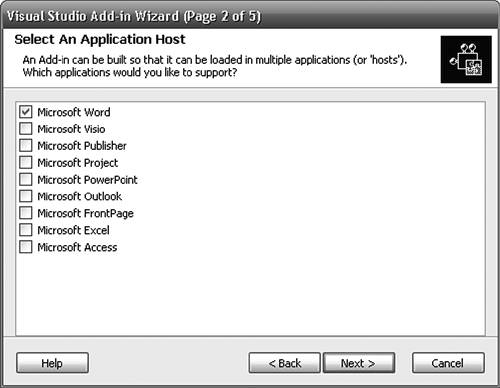
Although it is possible to write a single COM add-in that works in all the Office applications, it actually is quite difficult to write and even more difficult to maintain because bug fixing different application behavior often leads to the code in the COM add-in becoming overcomplicated. If you want to be able to share code among COM add-ins, creating a common library called by an application-specific COM add-in provides a more manageable solution.
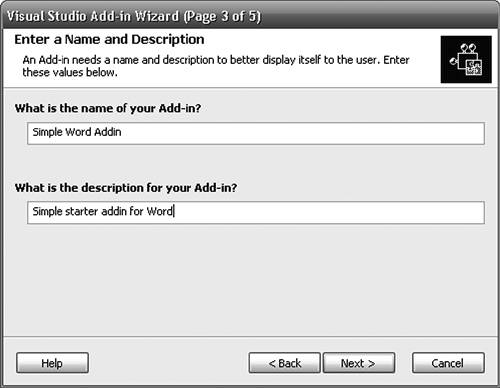
In this example, the application host for the COM add-in will be Microsoft Word. Selecting Microsoft Word in the wizard will result in the setup project registering the COM add-in in the correct location for Word so that you do not have to worry about dealing with the registry when you run the project. The registry settings for the COM add-in require a name and description, and this is collected in the next step of the wizard, as shown in Figure 23-8.
Figure 23-8. Setting a name and description for a COM add-in.
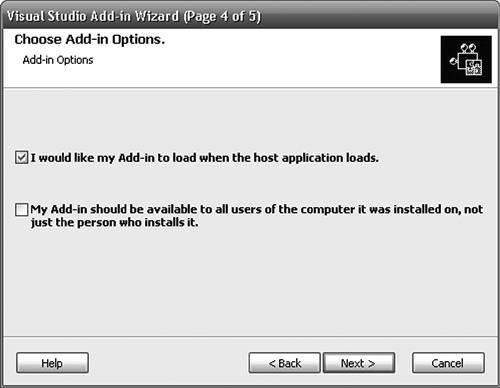
The final step of the wizard is used to determine the load behavior of the COM add-in and whether the COM add-in will be installed in HKEY_CURRENT_USER or HKEY_LOCAL_MACHINE. As mentioned before, it is preferable to register the COM add-in in HKEY_CURRENT_USER so that it will be visible in the COM add-ins dialog. Leaving the second check box unchecked in Figure 23-9 will ensure this behavior.
Figure 23-9. Setting load behavior for the COM add-in.
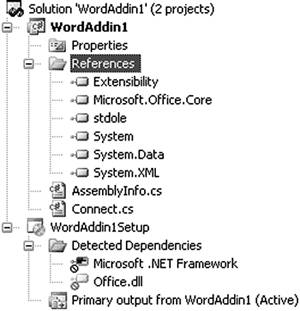
After the wizard has finished, a solution is created in Visual Studio containing the two projects, as shown in Figure 23-10. The main COM add-in project is a standard C# class library project that has been pre-populated with the core references required and a class called Connect in a Connect.cs file that has a basic implementation of the IDTExtensibility2 interface. The setup project will create an installer for the COM add-in that will include all the dependencies detected and will register the COM add-in in the registry.
Figure 23-10. The Solution Explorer view of a default COM add-in solution.
Changing the COM Add-In Project to Be More Office-Specific
The COM Add-In Wizard will create a project for any application that supports IDTExtensibility2, and as a result it creates a very generic project. The whole point of writing a COM add-in is to integrate with a particular Office application, so the first thing you need to do is add the appropriate primary interop assembly (PIA) for the application the COM add-in is targeting. The COM add-in being built in this example will load into Microsoft Word, so it needs to have a reference to the Word PIA. You will then be able to cast the application object passed in OnConnection to the Microsoft.Office.Interop.Word.Application object defined in the Word PIA.
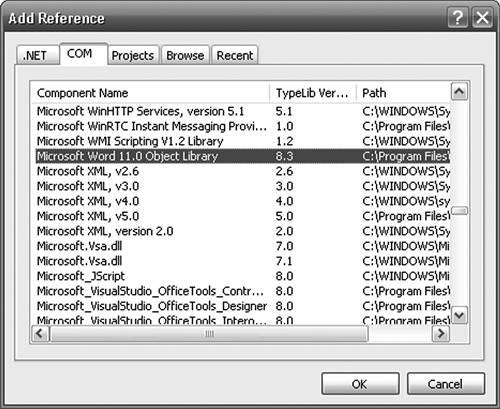
Adding the PIA for Word to a project is quite straightforward; it is just a matter of adding the reference to the Microsoft Word 11 Object Library. Right-click the WordAddin project node in the Solution Explorer tree view and choose Add Reference. Doing so brings up the Add Reference dialog shown in Figure 23-11. Click the COM tab, and then select the Microsoft Word 11 Object Library from the list. Finally, click OK to add a reference to the Word PIA to your Visual Studio project.
Figure 23-11. Adding a reference to the Word PIA.
The Connect class that is created by the wizard contains untyped code, so a few changes need to be made to make it more Word aware. By default, the project sets up two member variables within the class that are of type object. The addInInstance variable can be redeclared as type Microsoft.Office.Core.COMAddin object as defined by the Microsoft Office 11.0 Object Library PIA. After you have typed the addInInstance variable as a COMAddin object, you can use it to determine the registry settings for the COM add-in, such as the GUID, the ProgID, and the description. It also has a Connect property of type bool that can be set to false to disconnect the COM add-in.
The applicationObject member variable is also of type object. Because this COM add-in will only ever run inside of Word, it can be safely redeclared as type Microsoft.Office.Interop.Word.Application. Making this change will make developing considerably easier and safer. After changing the declaration of the applicationObject variable, all that remains is to change the assignment lines within the OnConnection method to cast the application argument from object to Microsoft.Office.Interop.Word.Application and the addInInst to Microsoft.Office.Core.COMAddin. Listing 23-3 shows the redeclaration of the addInInstance and applicationObject variables along with the new casts in OnConnection.
Listing 23-3. Strongly Typing applicationObject and addInInstance
public void OnConnection(object application,
 Extensibility.ext_ConnectMode connectMode,
 object addInInst, ref System.Array custom)
{
 applicationObject = application as
 Microsoft.Office.Interop.Word.Application;

 addInInstance = addInInst as
 Microsoft.Office.Core.COMAddIn;
}

private Microsoft.Office.Interop.Word.Application applicationObject;

private Microsoft.Office.Core.COMAddIn addInInstance;
Setting the Start Action
The COM add-in is now almost ready to go. The last problem to solve is that the project is set to start up a new instance of Visual Studio rather than Word. This is easily solved by changing the debug settings for the project so that the project will start up winword.exe rather than devenv.exe. To do this, bring up the properties for the project by double-clicking the Properties project item in the Solution Explorer window, and then select the Debug tab. Doing so brings up the dialog with a Start Action section, as shown in Figure 23-12.
Figure 23-12. The Start Action section of the Debug tab.

The start action for the project should be set to Start External Program. This value needs to change to the location of the Word process on your machine, typically C:Program FilesMicrosoft OfficeOffice11winword.exe. Now when you run the project, Word will be started rather than a new instance of Visual Studio.
Word will reuse existing running instances of Word when you run the project. This can cause problems with COM add-in development. If an instance of Word is already running when you run the project, the debugger will attach to that running instance, but your COM add-in will not be loaded into that already running instance. A way to ensure that the COM add-in will always be loaded in a new instance of Word is to pass the command-line switch /w, which will cause Word to always start a new instance.
Excel automatically creates a new instance if you start it up at the command line, so there is no need to do this trick for Excel. Outlook is a single-instance application without the ability to override this behavior, so when programming against Outlook applications you need to shut down Outlook after every run of the project.
My COM Add-In Project Doesn’t Work AnymoreWhat Happened?
A common issue that occurs in COM add-in development goes like this. «I just pressed F5 on my COM add-in project and nothing happens! My COM add-in doesn’t appear to load. What’s the deal?» Office has a system to protect itself from COM add-ins that fail. When you understand the system, you will better understand how to protect against your COM add-in not loading.
Office automatically disables a COM add-in if it detects that it crashed the host application while starting up. When the Office application loads and starts a COM add-in, it puts a sentinel in the registry associated with the COM add-in that it is loading. It then calls the COM add-in’s OnConnection and OnStartupComplete methods. If the COM add-in successfully returns from these two methods, Office removes the sentinel in the registry and everything works fine. If the COM add-in crashes in OnConnection or OnStartupComplete or if you stop debugging and kill the Office process before OnConnection or OnStartupComplete return, the sentinel is still sitting in the registry. When you relaunch the Office application, Office detects that a sentinel got left in the registry on the last run and it disables your COM add-in.
It is very easy to have this happen during developmentyou might be stepping through code invoked by your OnConnection or OnStartupComplete entry point and you get to a line of code and say to yourself, «This line of code is completely wrong.» You then stop debugging and change the code and press F5 to rerun the COM add-in. But on the second run the COM add-in does not work. Office detects the sentinel in the registry left over from the last run when you killed the process in the middle of OnConnection or OnStartupComplete and it disables your COM add-in.
The situation is even worse for unshimmed managed COM add-ins. The sentinel put in the registry for a managed COM add-in is the name of the DLL that bootstraps the COM add-in. In the case of a nonshimmed COM add-in, the bootstrap DLL is always mscoree.dlla component of the CLR. Mscoree.dll acts as a class factory to create COM objects implemented in managed code for a host such as Office that expects a COM object that implements IDTExtensibility2. It bootstraps the CLR into the Office application process, loads the managed COM add-in registered in the registry, and gives the Office application the managed COM add-in class that implements IDTExtensibility2 and through interop makes that class looks like a COM object to Office.
So suppose you have two add-in projectsAddin1 and Addin2both of which are unshimmed. You are debugging Addin1’s OnConnection handler and you hit Stop Debugging in the middle of it. This leaves the sentinel in the registry saying not that Addin1.dll crashed Office but that mscoree.dll crashed Office. Now you open the Addin2 project and run it, and because Addin2 is also registered with mscoree.dll as its class factory both Addin1 and Addin2 (and any other unshimmed managed add-ins) will be disabled.
To un-disable a COM add-in that has been disabled, go to the Help > About box of the Office application and click the Disabled Items button. Doing so pops up a dialog that will let you re-enable mscoree.dll for an unshimmed COM add-in or for a shimmed COM add-in whatever your shim DLL name is.
There is a second way your COM add-in can get disabled. If your COM add-in throws an exception in OnConnection or OnStartupComplete code and does not catch it, that exception propagates out to Outlook and Outlook disables the COM add-in by setting the LoadBehavior key to 2 (HKEY_LOCAL_MACHINESOFTWAREMicrosoftOffice<>Addins<>LoadBehavior). There is an easy way to deal with this issue. Always put your code that handles OnConnection and OnStartupComplete inside a try..catch block. Do not leak any exceptions in OnConnection or OnStartupComplete back to Office. To un-disable a COM add-in that has been disabled in this way, you can change the LoadBehavior key back to 3 using regedit.exe or re-enable the COM add-in using the COM Add-ins dialog.
A Simple Word COM Add-In
To really understand what is possible with COM add-ins in Office applications, refer to chapters on the object models of Excel (Chapters 35), Word (Chapters 68) and Outlook (Chapters 911). To show that the COM add-in being developed actually works, let’s add some code to the OnStartupComplete method of the COM add-in, as shown in Listing 23-4. The code will use the application object to add a button to the standard command bar in Word and show a message box when a user clicks the button.
Listing 23-4. A Simple Word COM Add-In
namespace WordAddin1
{
 using System;
 using Microsoft.Office.Core;
 using Extensibility;
 using System.Runtime.InteropServices;
 using System.Windows.Forms;
 using Word = Microsoft.Office.Interop.Word;

 [GuidAttribute("581C28BD-E701-4AC1-BD75-0979BCEEC91E"),
 ProgId("WordAddin1.Connect")]
 public class Connect : Object, Extensibility.IDTExtensibility2
 {
 private Microsoft.Office.Interop.Word.Application applicationObject;
 private Microsoft.Office.Core.COMAddIn addInInstance;
 private CommandBarButton simpleButton;
 private object missing = System.Reflection.Missing.Value;

 public void OnStartupComplete(ref System.Array custom)
 {
 CommandBars commandBars;
 CommandBar standardBar;
 commandBars = applicationObject.CommandBars;

 // Get the standard CommandBar from Word
 standardBar = commandBars["Standard"];

 try
 {
 // try to reuse the button is hasn't already been deleted
 simpleButton = (CommandBarButton)standardBar.Controls[
 "Word Addin"];
 }
 catch (System.Exception)
 {
 // If it's not there add a new button
 simpleButton = (CommandBarButton)standardBar.Controls
 .Add(1, missing, missing, missing, missing);
 simpleButton.Caption = "Word Addin";
 simpleButton.Style = MsoButtonStyle.msoButtonCaption;
 }

 // Make sure the button is visible
 simpleButton.Visible = true;
 simpleButton.Click += new
 CommandBarButtonEvents_ClickEventHandler(
 simpleButton_Click);

 standardBar = null;
 commandBars = null;
 }

 public void OnBeginShutdown(ref System.Array custom)
 {
 }

 void simpleButton_Click(CommandBarButton ctrl,
 ref bool cancelDefault)
 {
 MessageBox.Show("You clicked on the button");
 }
 }
}
- Remove From My Forums
-
Question
-
Hi
I am using AutoHotkey to automate tasks at work. Lately I’ve been trying to learn COM in order to make certain tasks be done in the background. While I still have a very long way to go, THIS seems the biggest problem right now.
I use a Norwegian version of Word 2010 at work. This is Word that has some sort of Add-Ins. There is a button called «Gem» under the Add-Ins tab. The button opens an inputbox where I write in the name of the document. (First) I need to find a way
to click the button «Gem» using COM (preferably) so that I could automate that with AutoHotkey. I looked into the Dialogs object but it seems to be meant for built-in dialogs if I understand correctly.The button «Gem» means Save basically but .Save does not work here either as this Add-In saves the document in some other system so that company employees could retrieve those files when needed from a certain interface.
So my questions here is: is there a way to click that «Gem» button using COM so that I could automate this with AutoHotkey? Alternatively, any workarounds?
I’ve tried many others places to ask this, that’s why I’m doing it here. Will really appreciate the help


Answers
-
Hello Bicels,
There is no trivial solution for calling custom buttons at runtime.
It looks like the «Gem» button doesn’t belong to the list of built-in ones due to the fact that it is located in the Add-in tab. If so, the hot key can be run using
SendKeys (comes from VBA) only if the «Gem» button has the
KeyTip property set to any value. If the property wasn’t set by the developer it will get any value at runtime (for example, Y1 and etc.). You can’t rely on this approach because the shortcut text can be different on other machines.The
ExecuteMso method of the Application class can be used for running built-in commands from the Ribbon UI. For example, the following code works like a charm on my PC with Word 2013 installed:WordApp.CommandBars.ExecuteMso("FileSave");You can download the list of control IDs using the following links:
Office 2013 ,Office 2010,Office 2007. But you are not allowed to call custom
buttons passing IDs (not IdMso).Finally, if you wan to call the «Gem» button functionality at runtime, you can call methods and properties of other add-ins programmatically. You need to ask developers of the «Gem» button whether they provide any public methods or
properties. The
COMAddIns property of the Application class provides access to all add-ins.@George, the question is how to call a ribbon button at runtime.
-
Edited by
Thursday, January 16, 2014 12:31 PM
-
Proposed as answer by
Jeffrey_Chen_
Thursday, January 23, 2014 5:34 AM -
Marked as answer by
George Hua
Thursday, January 23, 2014 6:05 AM
-
Edited by
-
Hi Bicelis
What commands are avialable depends on how this button is added to the Word interface. For the Add-ins tab (and no others) there are two possibilities: The button is defined as part of the Ribbon OR the button was created using the CommandBars object
model.If the latter (you’d need to ask the add-in’s manufacturer), then the CommandBarButton object has an Execute method that will run the associated command. What I’m not sure of is, whether this also applies to a COM add-in or if this is just for VBA — again,
you’d have to ask the add-ins manufacturer which it is and, if it’s a COM Add-in you’d have to test.Beyond that, and the comments by the others in this thread, I believe your only option would be to use the Windows API to try to trap mouse clicks on the control.
FWIW the Ribbon was designed specifically to NOT allow outside software to work with / interfere with functionality provided by an add-in. In the past, software would hide or delete buttons and such provided by other manufacturers, which was a real «pain».
Cindy Meister, VSTO/Word MVP,
my blog-
Proposed as answer by
Jeffrey_Chen_
Thursday, January 23, 2014 5:34 AM -
Marked as answer by
George Hua
Thursday, January 23, 2014 6:05 AM
-
Proposed as answer by
|
06-15-2017, 09:08 AM |
|||
|
|||
|
VBA code to enable a Word COM Add-In One of our firm’s Word add-ins in the COM Add-ins group is causing some freezing issues on occasion in Word when enabled. The add-in is very important for some users, so we’d like to give them the choice of easily enabling or disabling it, depending on what they’re doing in Word. I have tried all kinds of VBA code involving Application.COMAddIns, but can’t find the correct code to assign to a couple of buttons on the Quick Access Toolbar, one which would enable the add-in, the other to disable it. All meant to save the user time instead of having to go to File/Options/Add-ins/Manage COM Add-ins every time to either enable or disable the add-in.
Any help would be greatly appreciated. Thank you!!
|


|
06-15-2017, 03:26 PM |
|||
|
|||
|
Something like this: Code: Option Explicit
Sub DisconnetCOMAI()
Dim lngIndex As Long
Dim oCAIs As COMAddIns
Set oCAIs = Application.COMAddIns
For lngIndex = 1 To oCAIs.Count
If Application.COMAddIns(lngIndex).Description = "Microsoft Word Code Compatibility Inspector" Then
Application.COMAddIns(lngIndex).Connect = False
Exit For
End If
Next
End Sub
Sub ConnectCOMAI()
Dim lngIndex As Long
Dim oCAIs As COMAddIns
Set oCAIs = Application.COMAddIns
For lngIndex = 1 To oCAIs.Count
If Application.COMAddIns(lngIndex).Description = "Microsoft Word Code Compatibility Inspector" Then
Application.COMAddIns(lngIndex).Connect = True
Exit For
End If
Next
End Sub
|
|
06-16-2017, 09:01 AM |
|||
|
|||
|
VBA code to enable a Word COM Add-In Hi Greg, Thanks so much for your reply. Your code looks really good. It worked for one of my COM Add-Ins, but not for most of them. Not sure why. It probably has to do with something going on in the background of our system. Just wanted to say thanks for your work. Have a great day! Kurt
|
|
06-16-2017, 09:49 AM |
|||
|
|||
|
You might try printing the list of Com Add-ins to make sure you are using the correct descriptor.
|
|
06-16-2017, 10:05 AM |
|||
|
|||
|
VBA code to enable a Word COM Add-In Thanks for the idea Greg. I’ve put your code into the following: Sub printdescriptions() Nothing prints. Ideas? Thanks. Kurt
|
|
06-16-2017, 10:12 AM |
|||
|
|||
|
Well if the first one doesn’t have a description defined it wouldn’t print and then none of the rest would because you are exiting the For … Each loop. The idea is to try to find a unique identifier for the Add-in you want to disconnect. Try: Sub printdescriptions()
|
|
06-16-2017, 10:24 AM |
|||
|
|||
|
I copied your EXACT coding into a new macro. Still nothing prints. Should I be changing something in your code? Thanks a lot for your help!
|
|
06-16-2017, 10:34 AM |
|||
|
|||
|
Do you have any COM Add-Ins installed. Here is what my Com Add-In list looks like:
|
|
06-16-2017, 10:38 AM |
|||
|
|||
|
Here is what Prints
|
|
06-16-2017, 10:54 AM |
|||
|
|||
|
I have about 10 installed Com Add-ins. Where do you find the IMMEDIATE window you showed for what Prints?
|
|
06-16-2017, 12:09 PM |
|||
|
|||
|
The VB Editor «View» menu. Select «Immediate»
|
|
06-16-2017, 12:26 PM |
|||
|
|||
|
BINGO! I found the descriptions in the Immediate window, and discovered that in fact the descriptions are NOT what they appear to be in the «Description» area at the bottom of the COM Add-ins windows. I copied and pasted the actual description for the COM Add-in I wanted to enable and disable, inserted it into your previous code, and voila—it works. Many, many thanks for sticking with me! I believe you’ve helped me in times past, and I’m very appreciative for your professionalism, patience and expertise. Bravo!! Kurt
|
I have two different COM add-ins, one for Word 2003 and one for Word 2007.
Word 2003 works like a charm every time, no issues etc…but now, when I open Word 2007, the buttons from Word 2003 appear in my Word 2007 ribbon. This still happens even after I disabled my add-in or clean my project…I’ve tried everything, including deleting all .dlls for my Word 2003 add-in but the problem still persists…
Any suggestions on what the problem is?
cheers
![]()
eglease
2,3718 gold badges17 silver badges27 bronze badges
asked Mar 27, 2011 at 17:42
![]()
If you make a point of configuring those buttons in a template OTHER than normal.dot, they will automatically «go away» when you install.
It’s generally considered bad practice to make changes to Normal.dot, but many people don’t realize that unless you set the «CustomizationContext» property in word before creating you’re own buttons and toolbars, that’s precisely what you’re doing, modifying normal.dot, and those changes WILL persist after you’ve uninstalled your addin.
answered Mar 28, 2011 at 16:19
![]()
DarinHDarinH
4,8682 gold badges22 silver badges32 bronze badges
5
You must «manually» remove the button as part of your uninstall process. This is the code I use:
    public static void removeWordToolbarButton(
        Microsoft.Office.Interop.Word.Application word )
    {
        var commandBar = word.CommandBars["Tools"];
        var btn = commandBar.FindControl(
            Microsoft.Office.Core.MsoControlType.msoControlButton,
            System.Reflection.Missing.Value,
            "name_of_the_button",
            System.Reflection.Missing.Value,
            System.Reflection.Missing.Value ) as Microsoft.Office.Core.CommandBarButton;
        if ( btn != null )
        {
            btn.Delete( -1 );
            Marshal.ReleaseComObject( btn );
        }
        Marshal.ReleaseComObject( commandBar );
    }
answered Mar 27, 2011 at 18:13
![]()
Dan ByströmDan Byström
9,0025 gold badges38 silver badges68 bronze badges
2
I suspect that the problem relies in normal.dot template.
Try to save normal template after removing buttons, commandbars etc using:
wordApplication.NormalTemplate.Save();
answered Sep 4, 2011 at 15:54
![]()