
Typically, Word documents like books, reports, and letters have paragraphs that occupy the whole page width. In articles, newsletters, flyers, and brochures, all or only parts of the text may be arranged in two or more columns:

You don’t need to create tables to structure text into columns. Tables are useful for displaying translated versions of the legal document side-by-side, but table cells break the text flow and are not recommended for multi-column layouts. It is more convenient to use columns for text formatting in most other cases. Word also allows you to adjust your columns by adding column breaks.
Format text in columns
To format a text into columns, do the following:
1. Do one of the following:
- To use the same number of columns for an entire document, click anywhere in the document (empty or with content).
If you choose to format text in columns, Word fills the first column with text on the page and then moves to the beginning of the next column. When all columns on one page are filled, the text moves to the next page.
- To format only a part of the document, select the paragraphs that you want to wrap in columns.
If you select a part of the text and wrap it in columns, Word inserts section breaks at the beginning and end of the selected text to delineate the area where the column layout is applied:

See more about breaks and how to display them.

To manually specify where the text in each column should end, you can use a column break.
2. On the Layout tab, in the Page Setup group, click the Columns button:

3. In the Columns dropdown list, select one of the options:

- One (used by default),
- Two, Three to create two or three columns of equal width,
- Left, Right to create two columns of unequal width,
- More Columns… to specify more options in the Columns dialog box:

- In the Presets section, you can choose the same options as in the Columns dropdown list – One, Two, Three, Left, or Right.
- If you need more columns, type or select the number of columns you need in the Number of columns field. The maximum number of columns may vary depending on the font, font size, margins, etc. E.g., 13.
- The Line between checkbox inserts a vertical line between columns. This line clearly defines column borders, especially if you want to fit as much content on the page as possible (very handy for cheat sheets).
See more options below.

Format columns
I. It is recommended to justify the paragraphs in columns to give the page a clean and organized appearance. To justify the column text, select it and do one of the following:
- On the Home tab, in the Paragraph group, click the Justify button:

- Press Ctrl+J.

II. To change the width of columns or the space between them, do the following:
1. Click anywhere in the columnar text.
2. Do one of the following:
- On the Layout tab, in the Page Layout group, click the Columns button, then choose More Columns…
In the Columns dialog box, in the Width and spacing section:
In the Width box for any columns, enter or select a new width.
The Width measurements for the other columns change to match, and the width of all the columns changes.
See how the columns will be displayed in the Preview section.
- On the horizontal ruler, drag the margins to change the width of the columns:


III. To reduce white space on text lines, you can set up Word to hyphenate the text and break long words into syllables. See how to hyphenate automatically and manually for more details.
Remove columns
To remove column layout for the selected text or entire document, do the following:
1. Click anywhere in the columnar text.
2. On the Layout tab, in the Page Layout group, click the Columns button, then choose One.
Insert a column break
In the Word document, you can manually break columns. When you break a column, the text after the break moves to the top of the next column:

You can display column breaks as regular nonprintable symbols. Word displays them as ![]() .
.
To insert a column break, position the cursor at the beginning of the line you want to start in the new column, and then do any of the following:
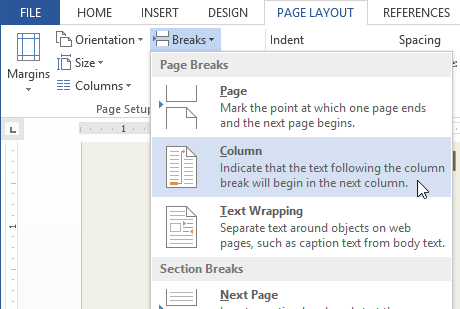
- On the Layout tab, in the Page Setup group, click the Breaks button, and then click Column to insert a column break:

- Press Ctrl+Shift+Enter.

The column break is inserted, and the cursor moves to the beginning of the next column.
Remove a column break
To remove a column break, click at the left end of the break or select the break and press the Delete key.
I’ll admit it — I’m not a big fan of adding columns in Microsoft Word. Not that there’s anything wrong with columns, per se. Columns work fine (until they don’t). But in a legal office environment, I usually format blocks of information with tables because they’re a bit easier to control.
That said, I have seen lots of legal professionals insert multiple columns in Microsoft Word to format things like service lists in Certificates of Service. Hey, to each her [his] own.
So if you want to format text with columns in Microsoft Word documents, here’s what you need to know:
Inserting columns: the basic primer
Everything starts from the Layout tab (known as Page Layout in versions 2007-2010) on the Ribbon:

Click on More Columns, and you’re taken to a dialog box that allows you to set up your columns exactly the way you want them.
The default is one column — just a regular document. You can use one of the presets (the two-column layout is useful for the service list application I mentioned above). Or you can customize it within an inch of its life. Width? Space between columns 1 and 2, or 2 and 3, or …? How about a line between them (like a newsletter would have)? You decide!
(If you don’t want your columns to all be the same width, be sure to uncheck the “Equal column width” checkbox at the bottom of the dialog box. Then, you’ll be able to customize the width of each column separately.)

Navigating between columns
Once you’ve set up your columns, you come to the tricky part. This is part of the reason I usually opt for tables rather than columns. If you use tables, moving between the cells is easy — just use the Tab key. To insert a column, however, you need to know a few tricks.
Say you’re typing in the first column of your document and you want to end that column there and start typing in the second column. To do that, you have to insert a column break. You can insert a column break in one of two ways:
- Press CTRL-SHIFT-ENTER simultaneously; or
- Go to the Layout tab, click Breaks, and choose Column

Personally, I’d go with Option 1 (assuming I remember the key combination in the heat of the moment).
Once you’ve inserted a column break, your cursor is in the next column, ready for you to type. When you insert a column break in your last column (the one farthest to the right), the cursor will go to the first column on the next page.
Viewing column boundaries
To me, it’s tough to work with columns (or tables, for that matter) if I can’t really see them. To turn on the column boundaries so you can see your columns laid out on the page, go to the File tab (or click the Office button in version 2007) and click Options, then go to Advanced and check the box next to Show text boundaries:

When columns are only part of your document
But what if only part of your document consists of multiple columns?
If you go back to the Columns dialog box (via Layout > Columns > More Columns), you’ll notice a drop-down at the bottom of the box:

If you choose This Point Forward, that will allow you to insert columns at the point your cursor is sitting in. Once you’ve inserted your columnar data, then go back to the Format Columns dialog box and choose the One Column format (being careful to once again choose This Point Forward in that bottom drop-down), and your document will return to the single-column format without disturbing the multi-column insertion you’ve just worked so hard on.
But what if you want to insert a two- or three- (or more-) column block of text into the middle of a one-column, normal document?
You may want to use a slightly different procedure, depending on whether you’re creating a brand-new document or you’re inserting a multi-column layout into the middle of an existing single-column document. You’re using the same dialog box, but if you’re editing an existing document and placing a multi-column layout in the middle, you’ll need to take a couple of extra precautions to ensure you don’t inadvertently create a formatting nightmare.
Inserting multi-columns into a new document
Let’s say you’re typing along in a brand-new document and decide that the next bit of text needs to be in two (or more) columns. There’s no text after the point where your cursor is right now, so you can switch back to single-column format once you get done inserting the multi-column section.
If you go back to the Columns dialog box (via Layout > Columns > More Columns), you’ll notice a drop-down at the bottom of the box:
If you choose This Point Forward, that will allow you to insert columns at the point your cursor is sitting in. Once you’ve inserted your columnar data, then go back to the Format Columns dialog box and choose the One Column format (being careful to once again choose This Point Forward in that bottom drop-down), and your document will return to the single-column format without disturbing the multi-column insertion you’ve just worked so hard on.
Inserting columns into the middle of an existing document
If you’re editing an existing document and you want to insert a multi-column layout somewhere in the middle of text you’ve already got typed, the “this point forward” method may result in a temporary and fixable but still infuriating mess.
Here’s how to avoid it: Insert section breaks before and after the point at which you want to insert your columns:

… then in Apply to:, choose This section instead:

Here’s a video demonstration:
Video: Inserting a column into the middle of an existing document (without creating a mess)
How do you see yourself using columns in your documents?
A column’s type determines how data is stored and displayed in a list or library. When you create a column for a list or library, you choose a column type that indicates the type of data that you want to store in the column, such as numbers only, formatted text, or a number that is calculated automatically.
This article discusses default types of columns that you can create and when to use each type of column. Columns are added to one or more views of the list or library to help you display the data in a meaningful way. Depending on your organization, additional types of column may be available.
Select your view of SharePoint from one of the following tabs:
Columns help you create meaningful views of the items in a list or library. By using columns, you can sort, group, and filter items, and you can also calculate data about items automatically and display the results of those calculations. Columns also enable you to specify what information should be entered about an item when someone adds an item to a list or library. When an item is added, a form appears and provides fields and options for entering information. When you create a list or library, certain columns, such as Title or Modified By, are created automatically. You can create additional columns to suit your needs. The columns that you create determine which fields and options appear in that form, and the columns that can be added to views of the list or library.
You specify the type of column that you want when you create a column. In some cases, you can also choose a different column type for an existing column, but this depends on what kind and how much data is currently stored in the column. Changing the column type of an existing column can corrupt the data already stored in the column. For these reasons, it’s important to decide what kind of data you want to store before you create a column. When deciding which column type you want, consider the following:
-
What kind of data do you want to store? Letters only? Numbers only? Formatted text? For example, you can’t store letters in a Number column. Knowing what kind of data you want to store is the first step toward choosing the most appropriate column type.
Some file metadata, such as created date and modified date, is already available in hidden, auto-generated columns. To show such a column in your list, select Add column > Show/hide columns, then select the column you want.
-
Do you want to use the data in financial calculations? If so, the Currency column type is the best option.
-
Do you want to use the data in mathematical calculations? How precise must those calculations be? You can calculate data in Number or Currency columns, but not Text columns. In addition, calculations in a Currency column are most precise.
-
How do you want to sort data in the column? In a Text column, numbers are sorted as strings of characters (1, 10, 100, 2, 20, 200, and so on), not as numeric values. To sort numbers as numeric values, use a Number or Currency column. Also, many date formats do not sort correctly if they are stored in a Text column. To ensure proper sorting of dates, use a Date and time column.
-
Do you want to ensure that people enter information in the column? If so, you can specify that the column is required and people cannot add an item without entering the information.
Used to collect and display small amounts of unformatted text in a single line, including:
-
Text only, such as first names, last names, or department names
-
Combinations of text and numbers, such as street addresses or account numbers
-
Numbers that are not used in calculations, such as employee ID numbers, phone numbers, postal codes, or part numbers
A single line of text column can display up to 255 characters in a single line. If you’re creating a column for a list or library and want to display formatted text or more than one line of text at a time, create a Multiple lines of text column. You can change an existing Single line of text column to a Multiple lines of text column without losing any data stored in the column already.
You can customize a Single line of text column in these ways:
-
Assign a character limit Limit the number of characters by setting the Maximum number of characters that you want. For example, if the column stores five-digit employee ID numbers, you can use this feature to help ensure that people enter only five characters.
-
Display a default value Automatically display specific text when someone adds a new item, while also allowing people to enter different text if they need to do so. When you set the Default value, people can enter information faster by accepting the default unless they need to change it. For example, if the column stores the name of a company assigned to a project and your organization works with a specific company for most projects, you can enter the name of that company as the default value. As a result, the company name appears automatically when a new project is added to the list, and team members do not have to enter the name.
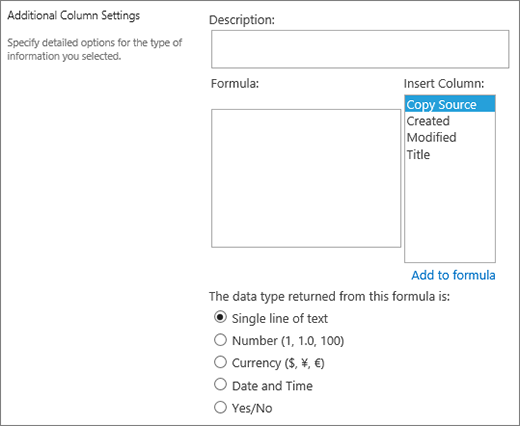
A default value can be either text that you specify or the result of a calculation, which is called a calculated value. Calculated values are helpful when you want to display specific text automatically but the text might vary depending on who added the item, when the item was added, or other reasons. To use a calculated value, you enter a formula, instead of specific text, as the default value. The formula can calculate a value based on information in other columns or system functions such as [today], to indicate the current date, or [me], to display the name of the person who adds or changes the item
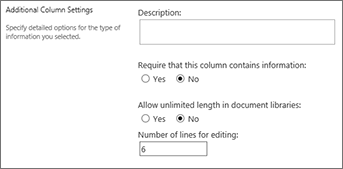
Used in a list or library to collect and display formatted text or lengthy text and numbers on more than one line, such as a description of an item. A Multiple lines of text column can store up to 63,999 characters, and you can specify the number of lines of text that you want to display when people enter information about an item. This type of column displays all the text when the column is viewed in a list or library.
You can customize a Multiple lines of text column in these ways:
-
Assign a display limit Limit the number of lines of that appear when people enter information about an item with the Number of lines for editing setting. For example, if the column stores lengthy notes about a calendar event, you might choose to display ten lines of text. This makes it easier for people to enter information because they can easily see all the text that they have entered. Conversely, if the column stores only a sentence or two about an event, you might choose to display only two or three lines of text.
If you assign a display limit, it doesn’t limit the amount of text that appears when the column appears in a list. All the text entered for an item appears in the column.
-
Enable or disable text formatting (Only available in lists) Use enhanced rich text (Rich text with pictures, tables, and hyperlinks) sets whether people can apply formatting such as bold, italics, or colors to text. If disabled, the list will not support any formatting options; if enabled, the list will support basic formatting such as bold, italics, bulleted or numbered lists, colored text, and background colors, as well as hyperlinks, pictures, and tables.
-
Append changes (Only available in lists) If versioning has been enabled for the list, Append Changes to Existing Text specifies whether people can add new text about an item without replacing any existing text about that item. If you choose to not append changes, new text about an item replaces any existing text about that item in the column. If you choose to append changes, people can enter additional information about an item, while also viewing text that was previously entered and the date and time that the text was entered. When viewed in a list , not as a field in an item form, the column displays the hyperlink View Entries, instead of the text, and people can click the hyperlink to see all the information stored in the column for that item.
Important: If you turn off this option after you create the column, all information except the most recent entry is deleted.
Add rich location data from Bing Maps or your organization directory. The location column provides additional columns to filter, sort, and search by related information including street address, city, state, country or region, postal code, coordinates, or name.
Note: This column is not available for Microsoft 365 US Government plans.
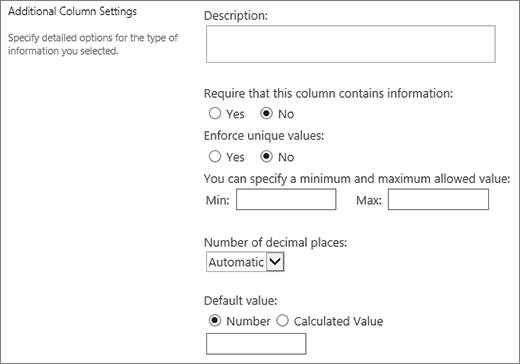
Used to store numerical values that aren’t monetary values.
Tips for choosing a Number or Currency column
Both the Number and Currency column types store numerical values. Use a Number column to store numeric data for mathematical calculations that aren’t financial calculations or don’t require a high degree of accuracy. Use a Currency column to store numeric data for financial calculations or in cases where you do not want round numbers in calculations. Unlike a Number column, a Currency column is accurate 15 digits to the left of the decimal point and 4 digits to the right. Both the Number and Currency column types provide predefined formats that determine how data appears.
You can customize a Number column in these ways:
-
Specify minimum and maximum values Limit the range of numbers that people can enter. For example, if the column stores the amount of work that has been completed for a task as a percentage, you can specify zero as the minimum value and one hundred as the maximum value. Similarly, if the column stores the number of attendees for an event and you want to limit attendees to a specific number, you can enter the maximum number of attendees as the maximum value.
-
Include decimal places Specify whether the numbers contain decimal places and the number of decimal places to store. If the column may need to store numbers that have more than five decimal places, you can choose Automatic when selecting the number of decimal places to include. Automatic is also a good choice if the column stores the results of calculations and you want the result to be as precise as possible. However, if you want to ensure that all values in the column have the same number of decimal places, it’s a good idea to limit the number of decimal places to zero, for whole numbers only, or another number of decimal places through five.
-
Display a default value Automatically display a specific number when someone adds a new item, while also allowing people to enter different numbers if they need to do so. A default value helps people enter information faster. For example, if the column stores the number of computers that each team member has and every team member has at least one computer, enter 1 as the default value. As a result, 1 appears automatically when a new item is added to the list, and team members do not have to enter the number.
A default value can be either a number that you specify or the result of a calculation, which is called a calculated value. Calculated values are helpful when you want to display a specific number automatically but the number might vary depending on who added the item, when the item was added, or other reasons. To use a calculated value, you enter a formula, instead of a specific number, as the default value. The formula can calculate a number based on information in other columns or system functions.
-
Format the number as a percentage The Show as percentage setting lets you display and store the number as a percentage, and to treat it as a percentage when it is used to calculate other values.
Used to store true/false or yes/no information, such as whether someone will attend an event. A Yes/No column appears as a single check box when people enter information about an item. To indicate Yes, team members select the check box. To indicate No, team members clear the check box.
The data in a Yes/No column can be used in calculations for other columns. In these cases, Yes is converted to a numeric value of one (1) and No is converted to a numeric value of zero (0).
You can customize a Yes/No column by choosing a default value for it. A default value is the selection that appears automatically when someone adds a new item. People can select a different value if they need to do so. For a Yes/No column you can specify whether the check box is selected automatically, indicating a Yes value, or not, indicating a No value.
Used to provide a searchable list of people and groups from which people can choose when they add or edit an item. For example, on a Tasks list, a Person or Group column named Assigned To can provide a list of people that a task can be assigned to. The contents of the list depends on how directory services and SharePoint groups have been configured for the site. To customize the contents of the list, you may need to contact your administrator.
You can customize a Person or Group column in these ways:
-
Allow multiple selections Allow people to select as many options as they like or limit the number of selections to only one option.
-
Include or exclude groups of people Specify whether the list includes only individual people, or additionally includes e-mail distribution lists and SharePoint groups. For example, on a Tasks list, you might want to include only individual people to ensure that a specific person is responsible for each task. On a Projects list, you might want to include e-mail distribution lists and SharePoint groups to ensure that a team is associated with each project.
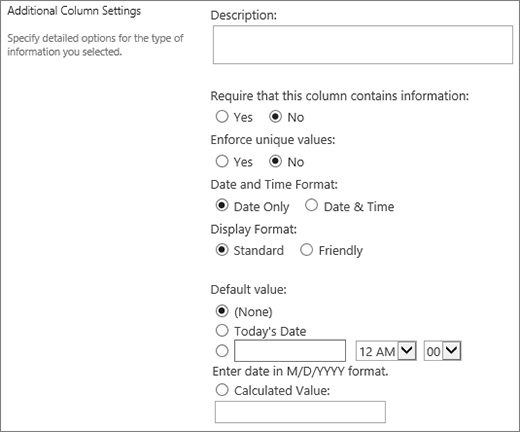
Used to store calendar dates, or both dates and times. The date format varies based on the regional settings for the site. If the format that you want is not available, ask your administrator to add support for the appropriate region to the site.
You can customize a Date and time column in these ways:
-
Include only the date or both the date and time Specify whether you want to include only the calendar date or both the calendar date and time of day.
-
Display a default value Automatically display a specific date or date and time when someone adds a new item, while also allowing people to enter a different value if they need to do so. A default value helps people enter information faster. For example, if the column stores the date when an expense is incurred and most expenses are incurred on the first day of the fiscal year, you can specify the first day of the fiscal year as the default value. As a result, that date appears automatically when a new item is added to the list, and team members do not have to enter the date.
A default value can be a value that you specify, the date an item is added to a list or library, or the result of a calculation, which is called a calculated value. Calculated values are helpful when you want to display a specific date or time automatically but the date or time might vary depending on the item. To use a calculated value, you enter a formula as the default value. The formula can calculate a value based on information in other columns or system functions such as [today], to indicate the current date. For example, if you want the column to display a date that is 30 days after the current date, type the equation =[TODAY]+30 in the Calculated Value box.
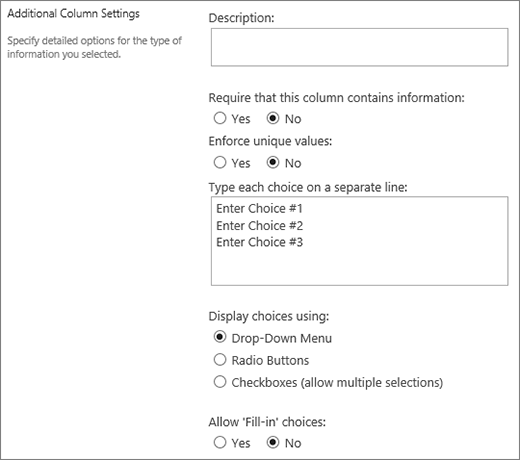
Used to let people choose from a list of options that you provide. This column type is an ideal choice in cases where you want to ensure that all the data in the column is consistent because you can limit the values that are stored in a column.
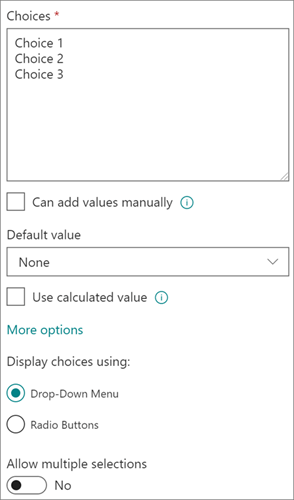
You can customize a Choice column in these ways:
-
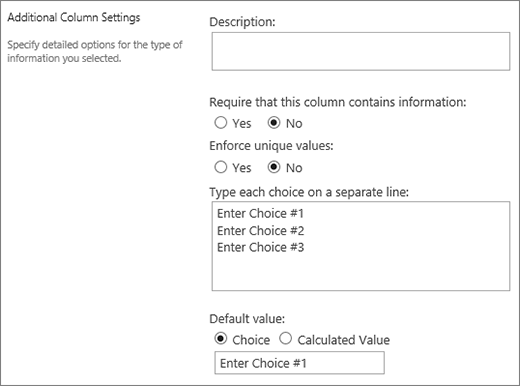
Define the list of choices Provide an exact list of values that people can choose. To provide this list, replace the sample text in the Choices box with the values that you want. Type each value on a separate line. To start a new line, press ENTER.
-
Enable additional custom choices To allow people to enter a value that is not included in the list of choices, turn on Can add values manually. Doing so is a good idea if you may not know all the values that people need to enter about items. If you prefer that people use only the values that you specify, turn off Can add values manually.
-
Display a default value Automatically select a specific value when someone adds a new item, while also allowing people to choose a different value if they need to do so. A default value helps people enter information faster. For example, if the column stores the names of companies assigned to a project and your organization works with a specific company for most projects, you can enter the name of that company as the default value. As a result, the company name appears automatically when a new project is added to the list, and team members do not have to choose the name.
A default value can be either a value that you specify or the result of a calculation, which is called a calculated value. Calculated values are helpful when you want to display specific text in the column automatically but the text might vary depending on who added the item, when the item was added, or other reasons. To use a calculated value, you enter a formula, instead of specific text, as the default value. The formula can calculate a value based on information in other columns or system functions such as [today], to indicate the current date, or [me], to display the name of the person who adds or changes the item.
From the drop-down menu, select either the default choice you want to display, or select None to leave the default choice blank.
-
Choose a display format Display the choices through a drop-down menu or radio buttons. First, select More options, then under Display choices using, select your preferred format.
Used to store a hyperlink to a Web page, graphic, or other resource.
A Hyperlink column stores the Uniform Resource Locator (URL) for a Web page, graphic, or other resource. Depending on the display format that you choose, it displays either a hyperlink that can be clicked to access the resource, or a graphic instead of the URL for the graphics file.
When a user adds a hyperlink to a list item, they must enter the URL and descriptive text that appears in the column. If the URL is for a graphics file, such as http://www.example.com/image.gif, they can optionally enter descriptive, alternative text for the graphic, which appears for people who turn off graphics in their browsers or rely on screen-reading software to convert graphics on the screen to spoken words.
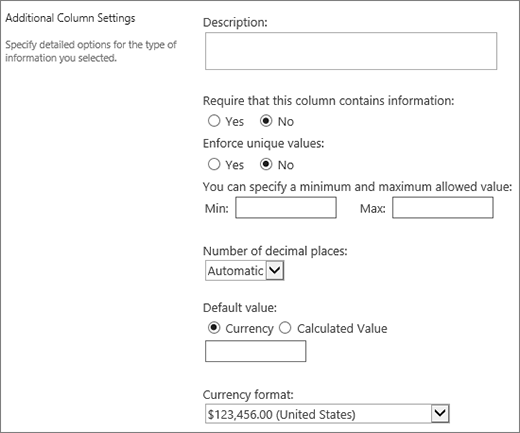
Used to store monetary values.
Tips for choosing a Number or Currency column
Both the Number and Currency column types store numerical values. Use a Number column to store numeric data for mathematical calculations that are not financial calculations or do not require a high degree of accuracy. Use a Currency column to store numeric data for financial calculations or in cases where you do not want round numbers in calculations. Unlike a Number column, a Currency column is accurate 15 digits to the left of the decimal point and 4 digits to the right. Both the Number and Currency column types provide predefined formats that determine how data appears.
You can customize a Currency column in these ways:
-
Specify minimum and maximum allowed values Limit the range of currency values that people can enter. For example, if the column stores reported expenses for an event and your organization limits reporting to amounts within a specific range, you can specify those limits as the minimum and maximum values.
-
Include decimal places Specify whether values include decimal places and the number of decimal places to store. For currency values, you can choose two decimal places or, if you prefer to store only round values, you can choose zero. For non-monetary values used in calculations that require a high degree of accuracy, you can choose to limit the number of decimal places to zero through five or, for more precise values, choose Automatic to automatically use the appropriate number of decimal places for the result of the calculation.
-
Display a default value Automatically display a specific value when someone adds a new item, while also allowing people to enter a different value if they need to do so. A default value helps people enter information faster. For example, if the column stores expenses incurred for setting up new accounts and that expense is typically the same for all new accounts, you can specify that amount as the default value. As a result, that value appears automatically when a new item is added to the list, and team members do not have to enter the number.
A default value can be either a value that you specify or the result of a calculation, which is called a calculated value. Calculated values are helpful when you want to display a specific value automatically but the value might vary depending on the item, who added the item, when the item was added, or other reasons. To use a calculated value, you enter a formula, instead of specific text, as the default value. The formula can calculate a value based on information in other columns or system functions.
-
Choose a currency format Ensure that all the values in the column are based on the same currency by selecting a specific currency format for the column. The dropdown box offers over 100 country choices so you can specify currency in most local formats.
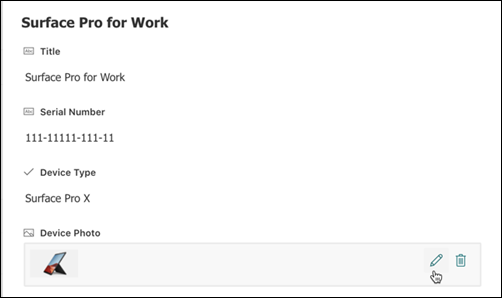
Use to add a single image file from your device to an item in a list or a library.
Once you add an Image column to a list or library, you can:
-
Add an image using the list or library form. For example, in the screenshot below Device Photo is the Image column.

-
View, replace, or delete an image when viewing the item or file properties in the form by selecting the Edit (pencil) icon or the Delete (garbage can) icon.

Use this column type to enable site users to select values from a specific term set of managed terms and apply these values to their content. Users can create and configure a Managed Metadata column to map to an existing term set or term, or they can create a new term set specifically for a Managed Metadata column.
Managed Metadata columns have several unique features and characteristics that help users select and apply terms to content, such as support for “type-ahead,” as well as support for disambiguation of terms, descriptions, synonyms, and multi-lingual values.
Managed Metadata columns promote the consistent use of metadata across sites because they provide users with a list of terms that they can apply to their content.
These terms come from a term set that is managed centrally in the Term Store Management Tool by a Term Store Administrator or other individuals with permissions to manage terms. Whenever the term set that a specific Managed Metadata column is bound to is updated, the updated terms will automatically become available to users wherever that Managed Metadata column is available.
You can customize the Managed Metadata column in the following ways:
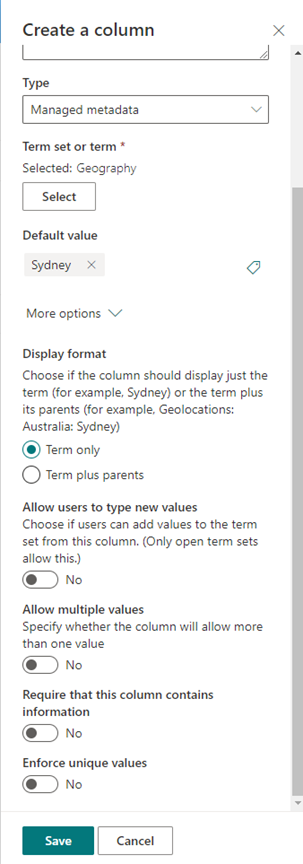
Selecting a term set or term – Specify the term set that contains the desired values to associate with this column.
When a term set is found, click it to select the first level of the hierarchy to show in the column. The levels below the term you selected will be displayed only when the user selects a value.
Display a default value – A specific value is automatically selected when someone adds a new item while allowing people to select different terms if they need to do so.
A default value helps users enter information faster. For example, if the term set associated with the column represents the various geographies your organization operates in, and there is one predominant location term that is relevant to the content in this list or library, you can select that term as the default value. As a result, that location term is selected automatically when a new item is added to the list or library, and users do not have to select a location unless it’s different.
Choose a display format – The selected value from the term set can be displayed either as a single value with just the term label (example: Sydney) or with the full hierarchical path of the term & its parents (example: Geolocations: Australia: Sydney)
Allow users to type new values – Enabling this option will allow users to add new terms to the term set. Please note that this option is available only if the term set is specified to be open to user contributions.
Allow multiple values – Selecting this option enables the column to contain more than one value. Please note that enabling this feature will prevent sorting data in list views.
For more information on what managed metadata is and how to use it, see Introduction to managed metadata.
Note: The Managed metadata option is currently being rolled out to Targeted Release customers and may not be available for some users.
Columns help you create meaningful views of the items in a list or library. By using columns, you can sort, group, and filter items, and you can also calculate data about items automatically and display the results of those calculations. Columns also enable you to specify what information should be entered about an item when someone adds an item to a list or library. When an item is added, a form appears and provides fields and options for entering information. When you create a list or library, certain columns, such as Title and Modified By, are created automatically. You can create additional columns to suit your needs. The columns that you create determine which fields and options appear in that form, and the columns that can be added to views of the list or library.
You specify the type of column that you want when you create a column. In some cases, you can also choose a different column type for an existing column, but this depends on what kind and how much data is currently stored in the column. Changing the column type of an existing column can corrupt the data already stored in the column. For these reasons, it’s important to decide what kind of data you want to store before you create a column. When deciding which column type you want, consider the following:
-
What kind of data do you want to store? Letters only? Numbers only? Formatted text? For example, you can’t store letters in a Number column. Knowing what kind of data you want to store is the first step toward choosing the most appropriate column type.
Some file metadata, such as created date and modified date, is already available in hidden, auto-generated columns that you can make visible in your list.
-
Do you want to use the data in financial calculations? If so, the Currency column type is the best option.
-
Do you want to use the data in mathematical calculations? How precise must those calculations be? You can calculate data in Number or Currency columns, but not Text columns. In addition, calculations in a Currency column are most precise.
-
How do you want to sort data in the column? In a Text column, numbers are sorted as strings of characters (1, 10, 100, 2, 20, 200, and so on), not as numeric values. To sort numbers as numeric values, use a Number or Currency column. Also, many date formats do not sort correctly if they are stored in a Text column. To ensure proper sorting of dates, use a Date and Time column.
-
Do you want to ensure that people enter information in the column? If so, you can specify that the column is required and people cannot add an item without entering the information.
Use this column field type to collect and display small amounts of unformatted text in a single line, including:
-
Text only, such as first names, last names, or department names
-
Combinations of text and numbers, such as street addresses or account numbers
-
Numbers that are not used in calculations, such as employee ID numbers, phone numbers, postal codes, or part numbers
A single line of text column displays 255 characters in a single line. If you’re creating a column for a list or library and want to display formatted text or more than one line of text at a time, create a Multiple lines of text column. You can change an existing Single line of text column to a Multiple lines of text column without losing any data that is stored in the column already.
You can customize a Single line of text column in these ways:
-
Assign a character limit Limit the number of characters by setting the Maximum number of characters that you want. For example, if the column stores five-digit employee ID numbers, you can use this feature to help ensure that people enter only five characters.
-
Display a default value Automatically display specific text when someone adds a new item, while also allowing people to enter different text if they need to do so. When you set the Default value, people can enter information faster by accepting the default unless they need to change it. For example, if the column stores the name of a company assigned to a project and your organization works with a specific company for most projects, you can enter the name of that company as the default value. As a result, the company name appears automatically when a new project is added to the list, and team members do not have to enter the name.
A default value can be either text that you specify or the result of a calculation, which is called a calculated value. Calculated values are helpful when you want to display specific text automatically but the text might vary depending on who added the item, when the item was added, or other reasons. To use a calculated value, you enter a formula, instead of specific text, as the default value. The formula can calculate a value based on information in other columns or system functions such as [today], to indicate the current date, or [me], to display the name of the person who adds or changes the item

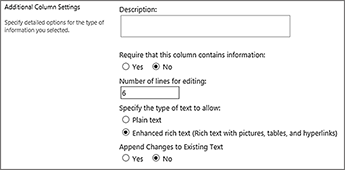
Use this column field type in a list or library to collect and display formatted text or lengthy text and numbers on more than one line, such as a description of an item. A Multiple lines of text column can store up to 63,999 characters, and you can specify the number of lines of text that you want to display when people enter information about an item. This type of column displays all the text when the column is viewed in a list or library.
You can customize a Multiple lines of text column in these ways:
-
Assign a display limit Limit the number of lines of that appear when people enter information about an item with the Number of lines for editing setting. For example, if the column stores lengthy notes about a calendar event, you might choose to display ten lines of text. This makes it easier for people to enter information because they can easily see all the text that they have entered. Conversely, if the column stores only a sentence or two about an event, you might choose to display only two or three lines of text.
If you assign a display limit, it doesn’t limit the amount of text that appears when the column appears in a list. all the text entered for an item appears in the column.
-
Allow unlimited length (Only available in document libraries) When using Multiple lines of text in a document library, you can specify that the field is not limited in length.
-
Enable or disable text formatting (Only available in lists) Specify the type of text to allow sets whether people can apply formatting such as bold, italics, or colors to text. There are two options: plain text, which does not support any formatting options; or enhanced rich text, which supports basic formatting such as bold, italics, bulleted or numbered lists, colored text, and background colors. It also has additional options for hyperlinks, pictures, and tables.
-
Append changes (Only available in lists) If versioning has been enabled for the list, Append Changes to Existing Text specifies whether people can add new text about an item without replacing any existing text about that item. If you choose to not append changes, new text about an item replaces any existing text about that item in the column. If you choose to append changes, people can enter additional information about an item, while also viewing text that was previously entered and the date and time that the text was entered. When viewed in a list , not as a field in an item form, the column displays the hyperlink View Entries, instead of the text, and people can click the hyperlink to see all the information stored in the column for that item.
Important: If you turn off this option after you create the column, all information except the most recent entry is deleted.
Settings for lists
Settings for libraries
Use this column field type to let people choose from a list of options that you provide. This column type is an ideal choice in cases where you want to ensure that all the data in the column is consistent because you can limit the values that are stored in a column.
Tip: To limit the values in a column to only those values that are stored in the site, use a Lookup column instead of a Choice column. You can learn more about Lookup columns later in this article.
You can customize a Choice column in these ways:
-
Define the list of choices Provide an exact list of values that people can choose. To provide this list, replace the sample text in the Type each choice on a separate line box with the values that you want. Type each value on a separate line. To start a new line, press ENTER.
-
Choose a display format Allow multiple selections with checkboxes or single selection without. Note that SharePoint will only display radio buttons in classic SharePoint.
-
Enable additional custom choices To allow people to enter a value that is not included in the list of choices, turn on fill-in choices. Doing so is a good idea if you may not know all the values that people need to enter about items. If you prefer that people use only the values that you specify, turn off fill-in choices.
-
Display a default value Automatically select a specific value when someone adds a new item, while also allowing people to choose a different value if they need to do so. A default value helps people enter information faster. For example, if the column stores the names of companies assigned to a project and your organization works with a specific company for most projects, you can enter the name of that company as the default value. As a result, the company name appears automatically when a new project is added to the list, and team members do not have to choose the name.
A default value can be either a value that you specify or the result of a calculation, which is called a calculated value. Calculated values are helpful when you want to display specific text in the column automatically but the text might vary depending on who added the item, when the item was added, or other reasons. To use a calculated value, you enter a formula, instead of specific text, as the default value. The formula can calculate a value based on information in other columns or system functions such as [today], to indicate the current date, or [me], to display the name of the person who adds or changes the item.
Use this column field type to store numerical values that aren’t monetary values.
Tips for choosing a Number or Currency column
Both the Number and Currency column types store numerical values. Use a Number column to store numeric data for mathematical calculations that aren’t financial calculations or don’t require a high degree of accuracy. Use a Currency column to store numeric data for financial calculations or in cases where you do not want round numbers in calculations. Unlike a Number column, a Currency column is accurate 15 digits to the left of the decimal point and 4 digits to the right. Both the Number and Currency column types provide predefined formats that determine how data appears.
You can customize a Number column in these ways:
-
Specify minimum and maximum values Limit the range of numbers that people can enter. For example, if the column stores the amount of work that has been completed for a task as a percentage, you can specify zero as the minimum value and one hundred as the maximum value. Similarly, if the column stores the number of attendees for an event and you want to limit attendees to a specific number, you can enter the maximum number of attendees as the maximum value.
-
Include decimal places Specify whether the numbers contain decimal places and the number of decimal places to store. If the column may need to store numbers that have more than five decimal places, you can choose Automatic when selecting the number of decimal places to include. Automatic is also a good choice if the column stores the results of calculations and you want the result to be as precise as possible. However, if you want to ensure that all values in the column have the same number of decimal places, it’s a good idea to limit the number of decimal places to zero, for whole numbers only, or another number of decimal places through five.
-
Display a default value Automatically display a specific number when someone adds a new item, while also allowing people to enter different numbers if they need to do so. A default value helps people enter information faster. For example, if the column stores the number of computers that each team member has and every team member has at least one computer, enter 1 as the default value. As a result, 1 appears automatically when a new item is added to the list, and team members do not have to enter the number.
A default value can be either a number that you specify or the result of a calculation, which is called a calculated value. Calculated values are helpful when you want to display a specific number automatically but the number might vary depending on who added the item, when the item was added, or other reasons. To use a calculated value, you enter a formula, instead of a specific number, as the default value. The formula can calculate a number based on information in other columns or system functions.
-
Format the number as a percentage The Show as percentage setting lets you display and store the number as a percentage, and to treat it as a percentage when it is used to calculate other values.
Use this column field type to store monetary values.
Tips for choosing a Number or Currency column
Both the Number and Currency column types store numerical values. Use a Number column to store numeric data for mathematical calculations that are not financial calculations or do not require a high degree of accuracy. Use a Currency column to store numeric data for financial calculations or in cases where you do not want round numbers in calculations. Unlike a Number column, a Currency column is accurate 15 digits to the left of the decimal point and 4 digits to the right. Both the Number and Currency column types provide predefined formats that determine how data appears.
You can customize a Currency column in these ways:
-
Specify minimum and maximum values Limit the range of currency values that people can enter. For example, if the column stores reported expenses for an event and your organization limits reporting to amounts within a specific range, you can specify those limits as the minimum and maximum values.
-
Include decimal places Specify whether values include decimal places and the number of decimal places to store. For currency values, you can choose two decimal places or, if you prefer to store only round values, you can choose zero. For non-monetary values used in calculations that require a high degree of accuracy, you can choose to limit the number of decimal places to zero through five or, for more precise values, choose Automatic to automatically use the appropriate number of decimal places for the result of the calculation.
-
Display a default value Automatically display a specific value when someone adds a new item, while also allowing people to enter a different value if they need to do so. A default value helps people enter information faster. For example, if the column stores expenses incurred for setting up new accounts and that expense is typically the same for all new accounts, you can specify that amount as the default value. As a result, that value appears automatically when a new item is added to the list, and team members do not have to enter the number.
A default value can be either a value that you specify or the result of a calculation, which is called a calculated value. Calculated values are helpful when you want to display a specific value automatically but the value might vary depending on the item, who added the item, when the item was added, or other reasons. To use a calculated value, you enter a formula, instead of specific text, as the default value. The formula can calculate a value based on information in other columns or system functions.
-
Choose a currency format Ensure that all the values in the column are based on the same currency by selecting a specific currency format for the column. The dropdown box offers over 100 country choices so you can specify currency in most local formats.
Use this column field type to store calendar dates, or both dates and times. The date format varies based on the regional settings for the site. If the format that you want is not available, ask your administrator to add support for the appropriate region to the site.
You can customize a Date and Time column in these ways:
-
Include only the date or both the date and time Specify whether you want to include only the calendar date or both the calendar date and time of day.
-
Display a default value Automatically display a specific date or date and time when someone adds a new item, while also allowing people to enter a different value if they need to do so. A default value helps people enter information faster. For example, if the column stores the date when an expense is incurred and most expenses are incurred on the first day of the fiscal year, you can specify the first day of the fiscal year as the default value. As a result, that date appears automatically when a new item is added to the list, and team members do not have to enter the date.
A default value can be a value that you specify, the date an item is added to a list or library, or the result of a calculation, which is called a calculated value. Calculated values are helpful when you want to display a specific date or time automatically but the date or time might vary depending on the item. To use a calculated value, you enter a formula as the default value. The formula can calculate a value based on information in other columns or system functions such as [today], to indicate the current date. For example, if you want the column to display a date that is 30 days after the current date, type the equation =[TODAY]+30 in the Calculated Value box.
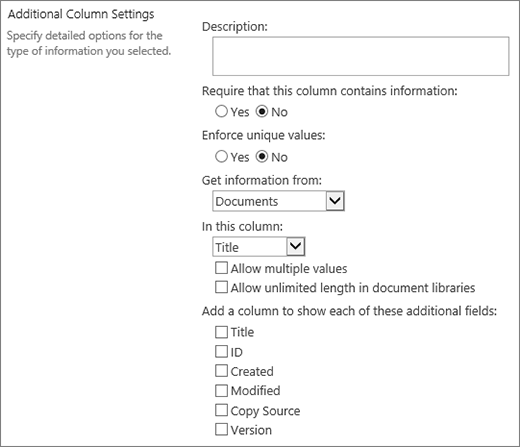
Use this column field type to let people choose values based on information that is already stored in the site. For example, if you want a column to store the names of customer accounts to which employees are assigned and the list of accounts must be limited to a Customer Accounts list on the site, you can create a Lookup column that displays the names in the Customer Accounts list. The list of choices in a Lookup column appear in either an expanding box, called a drop-down menu, or a list box, depending on whether you allow people to select more than one value.
You can customize a Lookup column in these ways:
-
Choose the source of the lookup values Specify which list, library, or discussion board on your site that contains the values that you want to store in the column. The source cannot be a subsite, workspace site, wiki, or blog. After you specify the list, library, or discussion board that you want, you can specify which column in that list, library, or discussion board contains the values that you want people to choose from.
-
Allow multiple selections Allow people to choose as many values as they like or limit the number of values that they can choose to only one value. If people can choose multiple values, all the values appear in the column, separated by a semi-colon (;).
-
Choose columns to display You can add one or more columns to show specific field values for this column type.
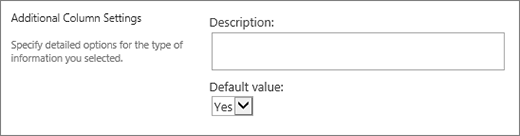
Use this column field type to store true/false or yes/no information, such as whether someone will attend an event. A Yes/No column appears as a single check box when people enter information about an item. To indicate Yes, team members select the check box. To indicate No, team members clear the check box.
The data in a Yes/No column can be used in calculations for other columns. In these cases, Yes is converted to a numeric value of one (1) and No is converted to a numeric value of zero (0).
You can customize a Yes/No column by choosing a default value for it. A default value is the selection that appears automatically when someone adds a new item. People can select a different value if they need to do so. For a Yes/No column you can specify whether the check box is selected automatically, indicating a Yes value, or not, indicating a No value.
Use this column field type to provide a searchable list of people and groups from which people can choose when they add or edit an item. For example, on a Tasks list, a Person or Group column named Assigned To can provide a list of people that a task can be assigned to. The contents of the list depends on how directory services and SharePoint groups have been configured for the site. To customize the contents of the list, you may need to contact your administrator.
You can customize a Person or Group column in these ways:
-
Allow multiple selections Allow people to select as many options as they like or limit the number of selections to only one option.
-
Include or exclude groups of people Specify whether the list includes only individual people, or additionally includes e-mail distribution lists and SharePoint groups. For example, on a Tasks list, you might want to include only individual people to ensure that a specific person is responsible for each task. On a Projects list, you might want to include e-mail distribution lists and SharePoint groups to ensure that a team is associated with each project.
-
Limit the list to site users only Specify whether the list includes all people and groups in the directory service or only those people and groups who have access to the site as members of a SharePoint group.
-
Specify which information to display Choose which information you want to display about people or groups. For example, on a Contacts list for a large organization, you might choose to display a person’s name, picture, and details such as skills and expertise. On a Contacts list for a small team, you might choose to display only a person’s name or e-mail address.
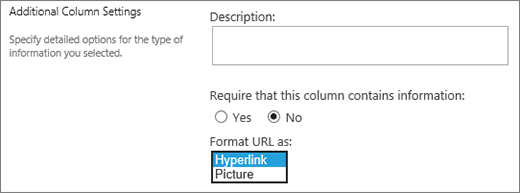
Use this column field type to store a hyperlink to a Web page or to display a graphic on the intranet or Internet.
A Hyperlink or Picture column stores the Uniform Resource Locator (URL) for a Web page, graphic, or other resource. Depending on the display format that you choose, it displays either a hyperlink that can be clicked to access the resource, or a graphic instead of the URL for the graphics file.
To display the URL as a hyperlink, select the Hyperlink format. When people enter information about an item, they can enter the URL and descriptive text that appears in the column, instead of the URL. To display a graphic, instead of the URL for the graphics file, select the Picture format. When people enter information about an item they must enter the complete URL for the graphics file, such as http://www.example.com/image.gif, and they can optionally enter descriptive, alternative text for the graphic, which appears for people who turn off graphics in their browsers or rely on screen-reading software to convert graphics on the screen to spoken words.
Use this column field type to display information that is based only on the results of a calculation of other columns in list or library. For example using =[quantity] * [item price] to calculate total price.
When you add a calculated column to a list or library, you create a formula that contains operators, such as subtraction (-) and addition (+), functions, specific values, and references to other columns. Formulas can calculate dates and times, perform mathematical equations, or manipulate text. For example, on a Tasks list, you can use this type of column to calculate the number of calendar days required to complete each task based on the Start Date and Date Completed columns (=[Date Completed]-[Start Date]). In a Contacts list, you can use a Calculated column to combine the first and last names of the contacts and separate them with a space, based on First Name and Last Name columns (=[First Name]&» «&[Last Name]). Note that the formula in a calculated column can only reference other columns in the same list or library.
In addition to entering the formula for the calculation, you specify what type of data you want the calculation to return and how to store and display that data. To learn more about each data type, see the appropriate section of this article.
For more on formulas and functions to use with the calculated field, see Examples of common formulas in SharePoint Lists. This article has many common formulas, as well as links to descriptions of all the functions that can be used in SharePoint.
Use this column to create additional choices for approvers when using task workflows.
A task workflow usually only provides outcomes of Approve or Reject, limiting how an item or document is handled. You may need to assign the task to someone else, or return it to the submitter for more information. With the Task Outcome column, you can offer a choice column field that lets you select different completion criteria options. For example, you can request clarification on an item or assign it to someone to give the approver more flexibility in the workflow.
The Task Outcome column is similar to the choice field as you type options into the choice field. You can set an individual choice as a default, or use a calculated value. To use a calculated value, you enter a formula, instead of a specific number, as the default value. The formula can calculate a number based on information in other columns or system functions. You can also choose whether the column value is required, as well as make the value unique between all entries.
For an indepth tutorial on using tasks and task outcomes in SharePoint, see Working with Tasks in SharePoint 2013 Workflows using Visual Studio 2012
Use this column to display data from external sources such as CRM apps, databases, or spreadsheets.
The external data column lets you connect to external data sources to provide like databases, spreadsheets, and CRM apps. For example, connecting with a Line-of-Business app such as SAP or Microsoft CRM can provide up-to-date customer information from the external data source that can be displayed and used in the list. Using an external inventory database, your list can present current prices, descriptions, or shipping weights that can be used for calculation or lookup by other columns.
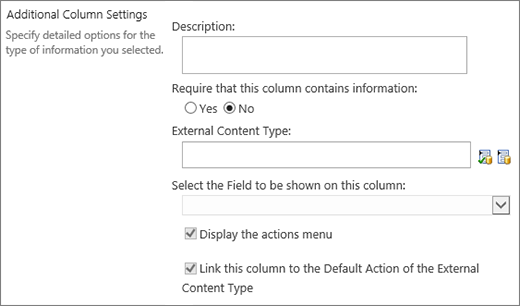
External data needs to be have some pre-requisites met before you’re able to access external data. These tasks are usually done by your administrator, and entail creating accounts and permissions for access to the data, activating Business Data Connectivity and Secure Store Services.
For more on creating, updating, and refreshing external data columns, see Create and update an external data column in a list or library or Work with external data in Excel Services (SharePoint Server).
Use this column type to enable site users to select values from a specific term set of managed terms and apply these values to their content. Users can create and configure a Managed Metadata column to map to an existing term set or term, or they can create a new term set specifically for a Managed Metadata column. Managed Metadata columns have several unique features and characteristics that help users select and apply terms to content, such as support for “type-ahead,” as well as support for disambiguation of terms, descriptions, synonyms, and multi-lingual values.
Managed Metadata columns promote the consistent use of metadata across sites because they provide users with a list of terms that they can apply to their content. These terms come from a term set that is managed centrally in the Term Store Management Tool by a Term Store Administrator or other individuals with permissions to manage terms. Whenever the term set that a specific Managed Metadata column is bound to is updated, the updated terms will automatically become available to users wherever that Managed Metadata column is available. You can customize the Managed Metadata column in the following ways.
Multiple Value field Selecting the Allow multiple values checkbox enables the column to contain more than one value. Note that enabling this feature will prevent sorting data in list views.
Display format The value selected from the term set can be displayed either as a single value or with the full hierarchical path.
-
Select the Display term label in the field checkbox to display value of the terms set as a single value. For example: City.
-
Select the Display the entire path to the term in the field checkbox to display the value of the terms set as a full hierarchical path. For example: Location, Continent, Country/Region, City.
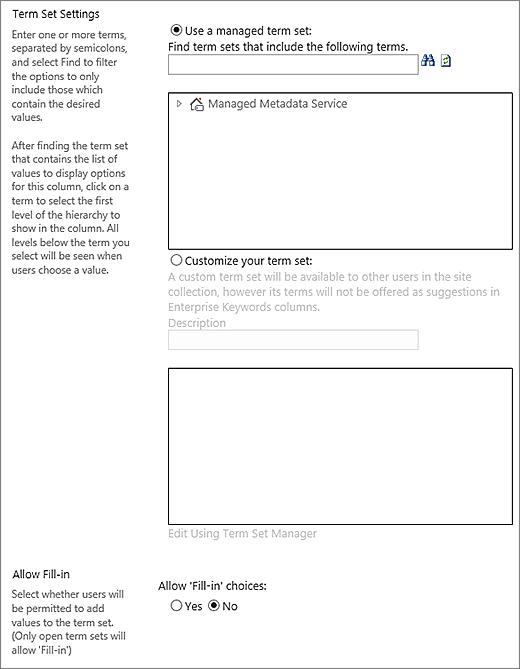
Term Set Settings Display terms from an enterprise managed term set, or create a custom term set to share with others in a site collection.
-
Use a managed term set Enter one or more terms, separated by semicolons, and select Find to filter the options to only include those which contain the desired terms. After finding the term set that contains the list of values to display in this column, click on a term to select the first level of the hierarchy to show in the column. All levels below the term you select will be seen when users choose a value.
Create a custom term set Enter a description for your custom term set and enter your terms set hierarchy directly into the box provided, or click Edit using Term Set Manager to open and use the Term Management tool.
For more information on managed metadata, see Introduction to managed metadata. This article describes what managed metadata is and how to use it.
Note: While a custom term is available to all users in a site collection, the terms in the set will not be available as Enterprise Keywords.
See Also
Use filtering to modify a view
Use sorting to modify a view
Format a column to change how it looks
Delete a column in a list or library
Lesson 16: Columns
/en/word2013/breaks/content/
Introduction
Sometimes the information you include in your document is best displayed in columns. Not only can columns help improve readability, but some types of documents—like newspaper articles, newsletters, and flyers—are often written in column format. Word also allows you to adjust your columns by adding column breaks.
Optional: Download our practice document.
To add columns to a document:
- Select the text you want to format.
 Selecting text to format
 - Select the Page Layout tab, then click the Columns command. A drop-down menu will appear.
- Select the number of columns you want to create.
 Formatting text into columns
 - The text will format into columns.
 The formatted text
To remove column formatting, place the insertion point anywhere in the columns, then click the Columns command on the Page Layout tab. Select One from the drop-down menu that appears.
 Removing column formatting
Your column choices aren’t limited to the drop-down menu that appears. Select More Columns… at the bottom of the menu to access the Columns dialog box. Click the arrows next to the Number of columns: to adjust the number of columns.
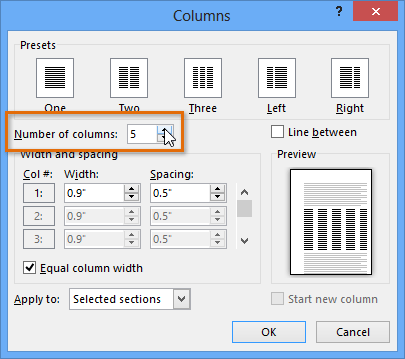 The Columns dialog box
If you want to adjust the spacing and alignment of columns, click, hold, and drag the indent markers on the Ruler until the columns appear the way you want.
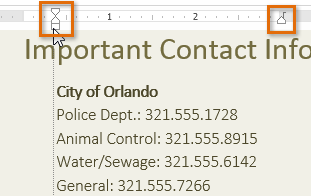 Adjusting the column
Adding column breaks
Once you’ve created columns, the text will automatically flow from one column to the next. Sometimes, though, you may want to control exactly where each column begins. You can do this by creating a column break.
To add a column break:
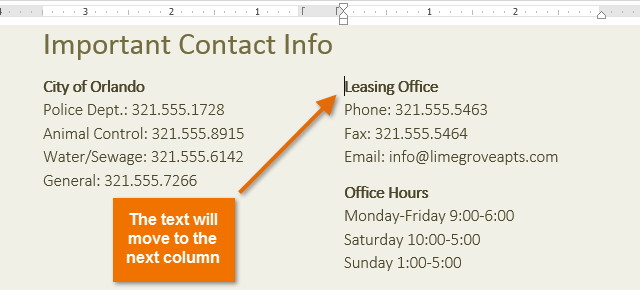
In our example below, we’ll add a column break that will move text to the beginning of the next column.
- Place the insertion point at the beginning of the text you want to move.
 Placing the insertion point
 - Select the Page Layout tab, then click the Breaks command. A drop-down menu will appear.
- Select Column from the menu.
 Adding a column break
 - The text will move to the beginning of the column. In our example, it moved to the beginning of the next column.
 After adding a column break
To learn more about adding breaks to your document, visit our lesson on Breaks.
Challenge!
- Open an existing Word document. If you want, you can use our practice document.
- Select the text you want to format into columns. If you’re using the example, select the two bulleted lists in the New Online Resident Portal section.
- Format the selected text into two columns.
- Add a column break. If you’re using the example, add a column break before Communicate with Lime Grove staff.
/en/word2013/headers-footers-and-page-numbers/content/
This content has been archived, and is no longer maintained by Indiana University. Information here may no longer be accurate, and links may no longer be available or reliable.
In Microsoft Word, you can set up either traditional columns or
newspaper-style columns. Traditional columns are simpler to set up,
but can be difficult to work with, as you have to fill the first
column before you can proceed to the next. With newspaper columns,
however, you can more easily switch between columns; also, information
you enter will not overflow into another column.
On this page:
- Traditional columns
- Newspaper-style columns
Traditional columns
To create traditional columns in a document:
Word 2007
- Highlight the text you want to format; if you do not highlight any
text, Word will format the entire document. - Click the tab, and then select
. - Choose the format of your columns. You can select a preset,
automatically formatted number of columns with equal spacing by
clicking , , , or
. You can also manually select the number, width, and
spacing of the columns by clicking . - Click .
Back to top
Word 2003
- From the drop-down menu, select
. - Choose the format of your columns. You can choose from preset
columns, or you can manually select the number, width, and spacing of
the columns. - Click .
Back to top
Newspaper-style columns
To create newspaper-style columns using a table:
- Open a new document.
- In Word 2007, from the tab, click ,
and then select . In other versions of
Word, from the menu, choose , and then
choose . - In the «Number of columns:» field, type the number of columns you
want in your document. For «Number of rows:», type
1(the number one). - Click to create your table. At this point your table
will probably be small.
You can also add or remove table borders:
- Move your cursor to the table. In Word 2007, from the tab, select . In previous versions
of Word, from the menu, select . - Choose the border options you want for your table. You can choose
from presets (such as «None») on the left side of the window, or you
can manually select which borders to turn on or off from the «Preview»
section on the right. - Beneath the «Preview» section, you will see «Apply to:». Make
sure this option is set to if you want your border
selection to apply to the entire table. - If you see gray lines where you have chosen not to have a border,
don’t worry. These are non-printing gridlines meant to help you see
where your columns are. To turn gridlines on and off:- Word 2007: From the tab, select
. - Previous versions of Word for Windows: From the
menu, choose or . - Word for Macintosh: From the menu,
check or uncheck .
- Word 2007: From the tab, select
Back to top
This is document ahjv in the Knowledge Base.
Last modified on 2018-01-18 12:34:59.
Showing the content in full width of a document may quickly bore the reader. Sometimes, it is a good idea to create your document like newspaper layout with multiple columns. This is one of the easy ways to show attractive content similar to newsletters and brochures. It helps to add different types of content in a single page and highlight the actionable part. In this article, we will explain how to insert columns in Word documents and arrange text using columns. If you have a long content, then make sure to add table of contents for easy accessibility of headings.
Using Default Templates with Columns
Though creating a custom column layout is easier, it takes
time to setup the layout. However, Microsoft offers predefined column templates
that you can choose for your use.
- Launch your Word application. On the backstage view, you can see the predefined layouts to select under “Featured” section. If you do not see backstage view, navigate to “File > New” menu and look under “Featured” section. You can also search for the column layouts using the search box.

- Select the template and Word will download it from the Microsoft Office library.
- As you can see, there are lot of beautiful columned layouts for resumes, brochures and events that you can choose from and modify.

Creating
Columns in Your Documents
If you do not want to use the template and start from the
scratch, you can create your column layout. It is possible to set a whole text,
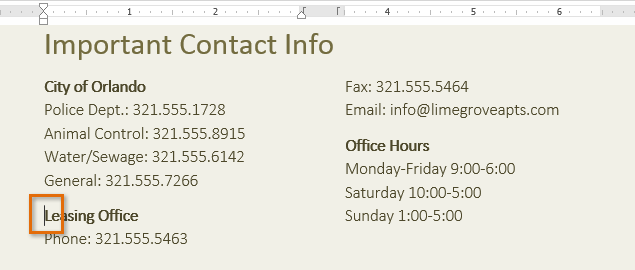
a selected area or a section into columns. Let us take an example document
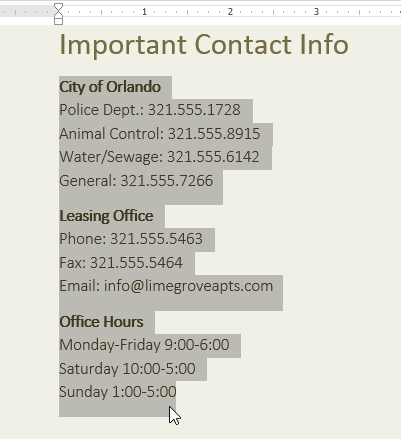
having two text paragraph like below:

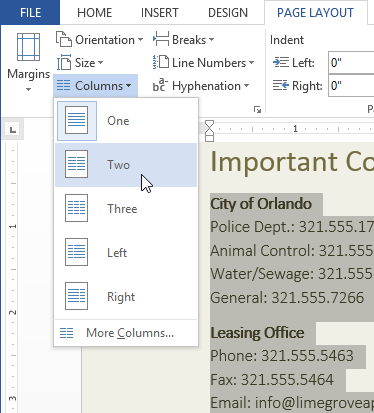
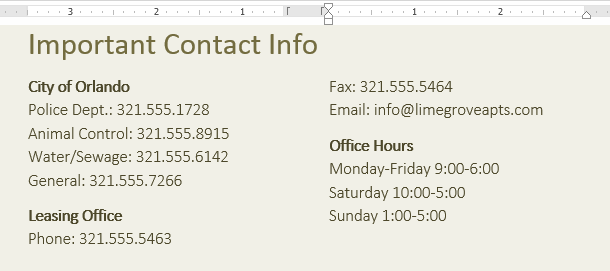
In order to break the two paragraphs into two columns, simply
go to “Layout” menu. Click on “Columns” dropdown and select “Two”. Word will
automatically split the two paragraphs into two columns as shown below.

Related: How to create eBook in Word?
Inserting
Manual Column Break
In the above example, you do not have to highlight the
section when you have two paragraphs. Just place the cursor in the section to
split into two columns based on the previous section break. If this does not
work for you or you want to manually decide the column break point, then follow
the below instructions.
- First click on the search box on the top menu and type
“show”. Select “Show All” option to show all formatting markups on your
document.

- Position your cursor where you want to create a column
break. - Switch to the “Layout” tab and click on the “Breaks”
list box. - Select “Columns” option to set a column break in the
selected cursor position.

- You can see the “Column Break” markup on your document
and Word will move the content below the column break to next page. - Now go to “Layout > Columns” and select “Two” to
create two columns at the column break point.

You will notice that Word continue the content from the first
column to next. The column break will make your document like a newsletter or
newspaper layout that continues from one column to next. However, you can also
manually type different content after creating columns.
Adjusting
the Column Width
By default, Word will adjust the columns to have equal width.
However, you can change the width of each column as per your need. In order to
adjust the column width, go to “Layout > Columns > More Columns” option.

You can customize the following options:
- Presets – choose one of the existing preset layout options.
- Number of columns – change the number of columns.
- Line between – enable the checkbox to insert a line between the columns.
- Equal column width – disable this checkbox and setup custom width and spacing for your columns.
- Apply to – apply the changes to whole document or only to this section.
After customizing your column layout, you can continue to
type in a columned layout.

Related: How to change embedded file name in Office?
Using
Markers in the Ruler
When you are working with columns, Word will split the
document into sections. You can view the width of the sections on the marker
available in top ruler.
Simply, double click on the ruler marker to open “Columns”
pop-up box to customize the options as explained above. Alternatively, you can
also set the width by dragging the markers in the ruler using mouse.

Undoing
Column Layout
If
you do not need the distribution into columns anymore, you can simply undo this
setting. Afterwards your text will appear in the original structure.
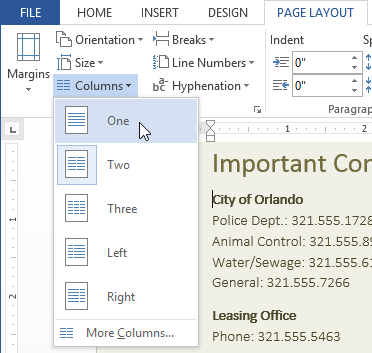
- In order to do so, open the “”Layout > Columns” list box and select the entry “One”.
- The formatting markups will remain intact. You can remove the column break by placing the cursor in front of the formatting symbol and remove it using the delete key.
Creating
Mixed Layout
You
can also easily create columns and full width layout sections in a single
document.
- In order to exit the column layout and go to full width section,
position your cursor at the end of the last column. - Go to “Breaks > Continuous” and apply a section break on the same
page. Now your cursor will go to next section and you can see a section break
in the formatting markup. - Go to “Columns” and select “One” to disable the columns and continue in
a full width.

Tips and Tricks
- In order to divide a section of your document into columns, select it with the mouse and create columns. When creating columns, Word defines the area automatically for individual sections.
- You can apply column break only to particular section of your document when your document has multiple sections.
- Use keyboard shortcuts, “Control + Shift + Enter” to create a column break.
- You can adjust the column width via the markers in the ruler only when you have selected “Equal column width” checkbox in the “Columns” dialogue window.
- Column changes are an important element to structure texts with multiple columns.
-
1
Open Microsoft Word. Its icon resembles a blue background with a white «W» on top.
- If you’d rather edit an existing document, simply double-click the document in question.
-
2
Click Blank document. It’s in the top-left corner of the templates page.
- If you’re editing an existing document, skip this step.
Advertisement
-
3
Click the Layout tab. It’s at the top of the Word window, to the right of the Home, Insert, and Design tabs.
-
4
Click Columns. This option is below and to the left of the Layout tab. Clicking it will prompt a drop-down menu with the following options:
- One — Default setting for Word documents.
- Two — Splits the page into two distinct columns.
- Three — Splits the page into three distinct columns.
- Left — Concentrates most of the text on the right side of the document, leaving a narrow column on the left.
- Right — Concentrates most of the text on the left side of the document, leaving a narrow column on the right.
- If you highlight a part (or all) of your document before clicking a column option, your document will be reformatted to appear in columns.
-
5
Click a column option. Doing so will apply invisible columns to your document; as you type, you’ll notice that your text jumps to a new line before reaching the standard right-most margin. Once you reach the bottom of the page, your text will continue in the next column until you reach the bottom of the page again, and so on.


Advertisement
-
1
Open Microsoft Word. Its icon resembles a blue background with a white «W» on top.
- If you’d rather edit an existing document, simply double-click the document in question.
-
2
Click Blank document. It’s in the top-left corner of the templates page.
- If you’re editing an existing document, skip this step.
-
3
Click the Layout tab. It’s at the top of the Word window, to the right of the Home, Insert, and Design tabs.
-
4
Click Columns. You’ll find this option below and to the left of the Layout tab.
-
5
Click More Columns. It’s at the bottom of the Columns drop-down menu.
-
6
Click a number of columns. You’ll see options like One, Two, Three, and so on at the top of this window. Clicking an option will apply it to your document.
- If you highlighted text, your settings will be applied only to the highlighted text.
-
7
Modify the column width and separation. You can do this by clicking the up or down arrow to the right of «Width» and the «Spacing» values, respectively.
- You can also uncheck the box next to «Equal column width» in order to make one column wider than the other.
-
8
Check the box next to «Line between» to draw a divider. Doing so will place a visible line between your columns.
- If you don’t want a visible divider, leave this option unchecked.
-
9
Click the «Apply to» drop-down menu. Doing so will allow you to click Selected text or Whole document to apply your column settings to the respective amounts of text.
-
10
Click OK. This will apply your settings and divide any selected text as per your customized column rules.


Advertisement
Add New Question
-
Question
How do I add columns to the middle of the document without changing the format of the entire document?

In Word, type the lines of text in a single column anywhere in the document. Then, select the lines of text and click the Page Layout tab. In the Page Setup options, click Columns and select the desired number of columns. Word automatically creates continuous section breaks before and after the columns. In some cases, it may be impossible to do without changing the format of the document.
-
Question
How do I rotate a page in Word?
Select the pages or paragraphs whose orientation you want to change. Click Page Layout > Page Setup Dialog Box Launcher. In the Page Setup box, under Orientation, click Portrait or Landscape. Click the Apply to box and click Selected text.
Ask a Question
200 characters left
Include your email address to get a message when this question is answered.
Submit
Advertisement
Thanks for submitting a tip for review!
About This Article
Article SummaryX
1. Open Microsoft Word or an existing Word document.
2. Click Blank document.
3. Click Layout.
4. Click Columns.
5. Click a number of columns.
Did this summary help you?
Thanks to all authors for creating a page that has been read 533,587 times.