
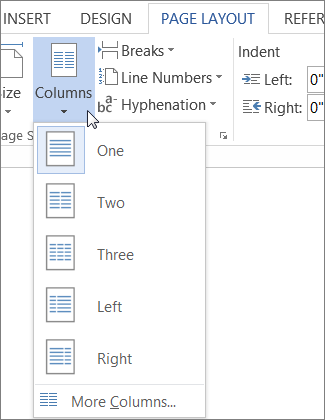
On the Page Layout or Layout tab, click Columns. At the bottom of the list, choose More Columns. In the Columns dialog box, adjust the settings under Width and spacing to choose your column width and the spacing between columns.
Contents
- 1 How do I change the column width in Word without affecting other cells?
- 2 How do I reduce the space between rows in a table in Word?
- 3 How do I remove spaces after columns in Word?
- 4 How do I increase the space between two columns?
- 5 How do I format a section into two columns in Word?
- 6 How do you change the width of a column without changing the whole?
- 7 How do you change the width and height of a column in Word?
- 8 How do you change column width in pages?
- 9 How do I fix the spacing between words in Word?
- 10 How do I get rid of the white space after a table in Word?
- 11 How do you get rid of extra spaces in Word?
- 12 How do I remove spaces from a column?
- 13 How do you do a section break?
- 14 What can I use instead of a grid gap?
- 15 What is the space between two columns called?
- 16 How do you add space between columns in CSS?
- 17 How do you change the column style of the paragraph to two columns?
- 18 How do I fix columns in Word?
- 19 How do I resize individual cell size in a Word table separately from the other cells?
- 20 How do I change the width of only one cell in Word?
How do I change the column width in Word without affecting other cells?
Case 1: Adjust the Width of One Column without Affecting Others
- First, click “View” tab and then check the “Ruler” box in “Show” group.
- Next you can see the ruler on the top of the document. And there are tabs on the ruler above each column border. Click on one of these tabs to adjust a specific column.
How do I reduce the space between rows in a table in Word?
Follow these steps:
- Select the entire table. (You can choose Select Table from the Table menu.)
- Choose Cell Height and Width from the Table menu. This displays the Cell Height and Width dialog box.
- Make sure the Column tab is selected.
- Adjust the Space Between Columns setting, as desired.
- Click on OK.
How do I remove spaces after columns in Word?
Main Menu > Format > Columns. when window opens you can adjust the spacing between the columns and put a divider lines between each as well.
How do I increase the space between two columns?
- Specify a 40 pixels gap between the columns: div { column-gap: 40px; } Try it Yourself »
- Divide the text in a element into three columns: div { column-count: 3; } Try it Yourself »
- Specify the width, style, and color of the rule between columns: div { column-rule: 4px double #ff00ff; } Try it Yourself »
How do I format a section into two columns in Word?
On the Layout tab, click Columns, then click the layout you want.
- To apply columns to only part of your document, with your cursor, select the text that you want to format.
- On the Layout tab, click Columns, then click More Columns.
- Click Selected text from the Apply to box.
How do you change the width of a column without changing the whole?
To use AutoFit, click a cell in the row or column you want to change. Within the ribbon menu, click “Home.” Under “Cells,” click the “Format” button. Under “Cell Size” click “AutoFit Column Width” or “AutoFit Row Height” as desired.
How do you change the width and height of a column in Word?
Resize rows, columns, or cells
- Select the table. The contextual tabs, Table Design and Layout, appear in the ribbon.
- On the Layout tab, you can specify the custom height and width. To resize specific rows or column, click on a cell and then adjust the row/column.
How do you change column width in pages?
Click a cell in the row or column you want to resize. In the Format sidebar, click the Table tab. In Row & Column Size, click the Height and Width arrows to set the size you want. The entire row or column is resized.
How do I fix the spacing between words in Word?
Change the spacing between characters
- Select the text that you want to change.
- On the Home tab, click the Font Dialog Box Launcher, and then click the Advanced tab.
- In the Spacing box, click Expanded or Condensed, and then specify how much space you want in the By box.
How do I get rid of the white space after a table in Word?
Go to Format | Paragraph. Click the Indents And Spacing tab. In the Spacing section, change any spacing before or after the paragraph to 0. Click in the Line Spacing box, select Single and then click OK.
How to remove multiple extra spaces between words in Word
- Please press Ctrl + H to display the Find and Replace dialog.
- Press More button to show more options.
- After finish the settings, click Replace All to remove all extra spaces between words from the whole document.
How do I remove spaces from a column?
Remove all spaces between numbers
- Press Ctrl + Space to select all cells in a column.
- Press Ctrl + H to open the “Find & Replace” dialog box.
- Press Space bar in the Find What field and make sure the “Replace with” field is empty.
- Click on the “Replace all” button, and then press Ok. Voila! All spaces are removed.
How do you do a section break?
Add a section break
- Select where you want a new section to begin.
- Go to Layout > Breaks.
- Choose the type of section break you want: Next Page Section break starts the new section on the following page. Continuous Section break starts the new section on the same page.
What can I use instead of a grid gap?
‘grid-gap’ has been deprecated in favor of ‘gap’. In a similar vein ‘grid-row-gap‘ and ‘grid-column-gap’ have been deprecated in favor of ‘row-gap’ and ‘column-gap’.
What is the space between two columns called?
Column gutter: The space between columns of type.
How do you add space between columns in CSS?
The space between two rows in a
can be added by using the CSS border-spacing and border-collapse properties
How do you change the column style of the paragraph to two columns?
Select the Page Layout tab, then click the Columns command. A drop-down menu will appear. Select the number of columns you want to create. The text will format into columns.
How do I fix columns in Word?
To fit the columns to the text (or page margins if cells are empty), click [AutoFit] > select “AutoFit Contents.” To fit the table to the text, click [AutoFit] > select “AutoFit Window.” To keep Word from automatically adjusting your column size, click [AutoFit] > select “Fixed Column Width.”
How do I resize individual cell size in a Word table separately from the other cells?
If you’re using windows, you can resize individual table cells by using ctrl+alt+left or right arrow keys.
How do I change the width of only one cell in Word?
I may have it! If you right click the cell to the left of the one you want to extend, choose Column > Width and change the number in in the “Width” box. This will free up the edge of your cell and allow you to drag it to where you want it.
. The border-spacing property is used to set the spaces between cells of a table, and the border-collapse property specifies whether the border of the table is collapsed or not.
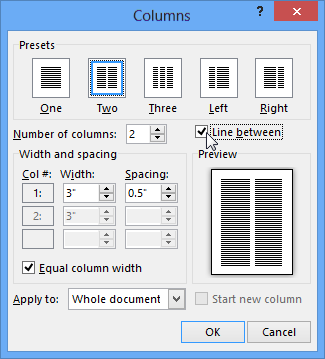
In Word, you can add newsletter style columns to a document. If you’d like to add a vertical line between the columns, open the Columns dialog box.
-
Choose Page Layout > Columns. At the bottom of the list, choose More Columns.

-
In the Columns dialog box, select the check box next to Line between.
Notes:
-
You can also use the Columns dialog box to adjust the column width and the spacing between columns.
-
If your document has more than one section, the new layout will only be applied to the current section.
-
Insert a column break to control how text flows between columns. For example, insert a column break to end a paragraph in one column and start a new paragraph at the top of the next column.
Need more help?
Want more options?
Explore subscription benefits, browse training courses, learn how to secure your device, and more.
Communities help you ask and answer questions, give feedback, and hear from experts with rich knowledge.
In Word, columns are used to divide the word page into sections. In most cases, the column size is uniform, and it’s upon the user to adjust. In this article, we shall discuss creating and customizing the columns in Word. Let’s get started.
Creating column in Word
Here are the steps to add a column to your document:
1. To get started, locate the Word application on your Pc. Double-click on it to open the application. To create a new document, click the File button on the toolbar. Then, locate the New button.
You can also use the keyboard shortcuts to open a new document. That is, CTRL + N. Alternatively, open an existing document that you need to add the columns.

2. Select or highlight the text you want to split into columns. To select all the readers, press the CTRL + A keys. To choose a section of your document, press the left mouse, and then move the cursor over the text you want to select.

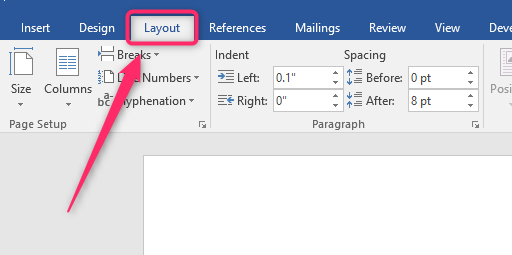
3. On the toolbar section, click on the Layout tab.

4. Locate the page setup section, then click on the Columns drop-down button.
5. From the drop-down menu, choose the columns you want to apply to your document.
Note:
You can create your page column using the table tools and customize the width of the cells.
Changing column spacing
Method 1
Here are the steps to follow:
1. Open the Word document you want to alter with its column. Alternatively, click the File button on the toolbar. Then, locate the Open button.
2. On the toolbar section, click on the Layout tab.
3. Locate the page setup section, then click on the Columns drop-down button.
4. Click on the More columns button.

5. In the number of columns section, enter the numbers of columns your document should have.
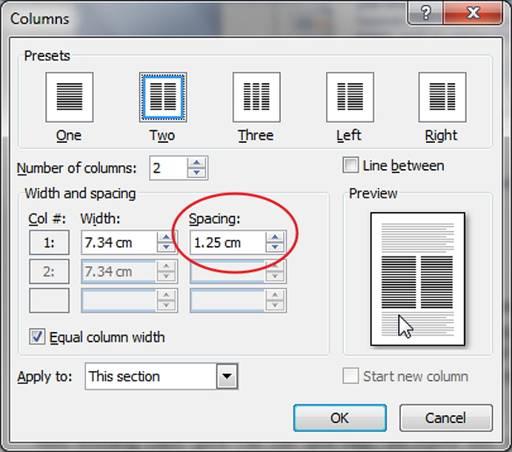
6. Then, In the Spacing section, use the up or down arrows to change the sizing of your column.

7. On the Apply to section, click the drop-down button and select where the changes should apply.
8. Finally, click the Ok button to save changes.
Method 2
Here are the steps to follow:
1. Open the Word document you want to alter with its column. Alternatively, click the File button on the toolbar. Then, locate the Open button.
2. On the toolbar section, click on the Layout tab.

3. Locate the paragraph section. On the spacing section, use the up or down arrows to change the sizing of your columns.

Method 3: Use the indent tool
You can also use the indent tool to alter the spacing of the columns.
Here are the steps to follow:
1. Open the Word document you want to alter with its column. Alternatively, click the File button on the toolbar. Then, locate the Open button.
2. On the toolbar section, click on the Layout tab.

3. Locate the paragraph section. On the indent section, use the up or down arrows to change the sizing of your columns.

When a text is divided into different columns but you don’t know how to adjust the distance between these columns?
- Adjust line spacing in Word — Instructions on how to adjust line spacing in Word 2007, 2010, 2013, 2016
- How to adjust the standard spacing between words in Word
Column text often makes the content easier to read because the line length is shorter.It is also possible to use smaller font than usual.So you can adjust the content of the text to fit a page.The type of document determines the number of columns and the width of each column.Typically between 40 and 60 characters per line.More or less can be difficult to read.
If the space between columns is too narrow, the reader is likely to continue reading one line from one column to the next instead of reading the content from one column to another.So to adjust the distance between the columns you can choose one of the following 2 ways!
1. Method 1
After you have typed the text, highlighted it and selected the column splitting operation in Page Layout -> Column, select More Column.

For Word 2013, select Columns from the Page Layout menu.Then adjust the spacing between the columns in the Spacing section.
The length of a line is usually shorter when the text is divided into columns.Therefore, you should be aware of the indentation on a paragraph.Encourage you to use paragraph indentation with small spacing or not even indentation.
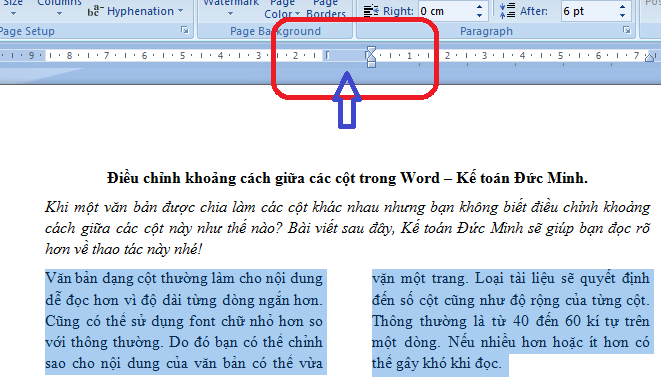
2. Method 2: Quickly access the Columns dialog box
Many column formatting options are in the Columns dialog box.To quickly open this dialog box, you can place the cursor at any column and double click on the space in the horizontal ruler as shown below:
Read more
- How to adjust the size of Word table cells equally
- How to adjust line spacing and line spacing in Excel
- Spacing, spacing words in Word
- Full Word Tutorial 2016 (Part 7): Use Line and Paragraph Spacing
- Tips for handling columns in Microsoft Word
- How to add columns and delete columns in Word
- Spacing rows and columns in Excel beautifully
- How does the word in Microsoft Word jump?
- How to Double Space in Word
- How to split columns in Word and tips or handle columns in Word

When you create multiple columns in Word, they default to a set width. It’s easy to change that default width for each column. Let’s look at two ways you can do that.
Set Up Column Width Precisely with the Columns Dialog Box
When you set a Word document to use multiple columns, Word assigns a default column width that depends on the number of columns you choose. Here are those default widths:
- One Column: 6.5″ width for the column. This is the standard setup you’re used to seeing when you start typing in a blank document with default page settings. Start with an 8.5″ width for the paper size, take away 1″ on either side for the default page margins, and you’re left with 6.5″ for the actual text.
- Two Columns: 3″ width for each column, with a 0.5″ space between columns.
- Three Columns: 1.83″ width for each column, with a 0.5″ space between columns.
And it goes on like that. Word lets you have up to 13 columns, and the more you add, the less space each column gets.
If you’re happy with the defaults, you can just set the number of columns you want and go about your business. But, you can change things up if you want. Maybe you want smaller columns, with more space in between those columns. Or, maybe you two columns to be a similar size, and then have a smaller column off to the right.
Let’s take a look at how to do all that using the “Columns” dialog box. This is the best way to set up columns if you don’t yet have any text in your document, or if you know the precise measurements you want to hit.
In Word, switch to the “Layout” tab on the Ribbon. That’s where the column magic happens. Click the “Columns” button and a dropdown menu opens with a number of options. Choose any of the numbers on the list to create that many columns with their default widths. Choose the “Left” or “Right” options to create a two-column layout where the column you chose (left or right) is smaller—about half the size of the other column. It’s the “More Columns” option we’re after here. Click that to set up your own custom column widths.

The “Columns” window that pops up lets you perform your customization. The “Presets” section contains the same options you saw on the “Columns” menu. You can also use the “Number Of Columns” box to set a specific number of columns from 1 to 13. So, start by choosing how many columns you want.
Select the “Line Between” option to have Word put a vertical line between columns.
And now, on to actually adjusting the column width. If you want your columns to all stay the same width as one another, you can just adjust the number in the “Width” box for column #1. Changes you make there apply to all columns, no matter how many you have. Same goes for spacing. Adjust the number in the “Spacing” box for column#1 to change the spacing between all columns.
Note that as you change one value (width or spacing), the other value changes as well. Bump up the width, and the spacing goes down. Bump up the spacing, and the width goes down. You only have so much page width to work with, after all. Here, we set the width down to 1″ and the spacing went up to 1.75″ to compensate.
If you want to control the width of each column individually (making some wider and some narrower), disable the “Equal Column Width” check box. When you do that, the width and spacing boxes for each column become available, and you can change them however you see fit. Keep in mind that you still have a fixed page width to work with, so adjust the width or spacing for one column will cause the others to change. You may have to work with it a bit to get things how you want them.
Here, we’ve set up three columns. The first two are 2″ in width and the third is smaller at 1.5″. We left a .5″ spacing between all columns.
Note also that you don’t get to adjust spacing for your final column. This makes sense, because the spacing only happens between columns.
Change Column Width on the Fly with Word’s Rulers
Now that you’ve seen how to set up column widths using the dialog box , let’s take a look at how you can change them on the fly with the Word ruler. This method is great if you already have columns in your document and you want to play around with widths to see what looks right to you.
RELATED: How to Use Rulers in Microsoft Word
First, you need to make sure that your document rulers are visible. If you can’t see them, switch to the “View” tab on the Ribbon, and then select the “Ruler” option. Word’s rulers are great for lining things up, keeping tabs on measurements, and controlling indentation and margins. You should really leave them on all the time.
Assuming you’ve already got your document set up for two or more margins, look at the horizontal ruler at the top of the page. You can see that there’s a gray space in the middle of the ruler between the two columns.
That represents the spacing between columns that we talked about in the previous section, and it’s defined by two margin markers (the upside-down “L”).
Dragging either one of the margin markers changes the size of the spacing, and the margins for the columns themselves. For example, if you slide the left margin marker to the left, the right maring marker automatically moves to the right, increasing the size of the spacing between those margins. The columns of text in your document change as you do this, too, giving you instant feedback on how the changes will look.
Here, we’ve dragged it it so the spacing is much greater than the default, leaving a wide space between columns.
You probably noticed that the ruler also contains a small white triangle (although where it appears changes based on which column you’ve selected text in. That’s the indent marker, and it lets you control the interior indent on paragraphs in each column—the right indent for the left column and the left indent for the right column. If you’re interested in learning more about how to use indents, be sure to check out that guide to using rulers in Word we mentioned earlier. Indent control works the same whether you have multiple columns or just one.
READ NEXT
- › How to Make Columns in Microsoft Word
- › This New Google TV Streaming Device Costs Just $20
- › Google Chrome Is Getting Faster
- › HoloLens Now Has Windows 11 and Incredible 3D Ink Features
- › The New NVIDIA GeForce RTX 4070 Is Like an RTX 3080 for $599
- › How to Adjust and Change Discord Fonts
- › BLUETTI Slashed Hundreds off Its Best Power Stations for Easter Sale