
The columns feature built into Word enables you to vary the layouts of your documents, but if something goes wrong then it can be difficult to get the end result you want. Switching on hidden formatting symbols (via the pilcrow icon in the Paragraph section of the Home menu tab) can help you assess where the column, section and line breaks are in your document.
Clearing Columns
-
In some situations, clearing all column formatting and starting again from scratch is the best way to resolve your issues. Press «Ctrl-A» to select all of the text in your document, then open the Page Layout menu tab and click «Columns.» Choose «One» from the drop-down menu. You can also use the Find and Replace dialog to remove all of the column breaks from a document — choose «More» and then «Special» in the dialog to find the column break option.
Column Settings
-
Double-check the column settings you have in place to make sure the formatting is configured as required. Select the section of the text you’re working with, then choose «Columns» and «More Columns» from the Page Layout menu tab. The subsequent dialog box enables you to set the number of columns, adjust the space between them and specify the width of each one. You can also add a line between your columns if required, though you can’t change its format.
Column Breaks
-
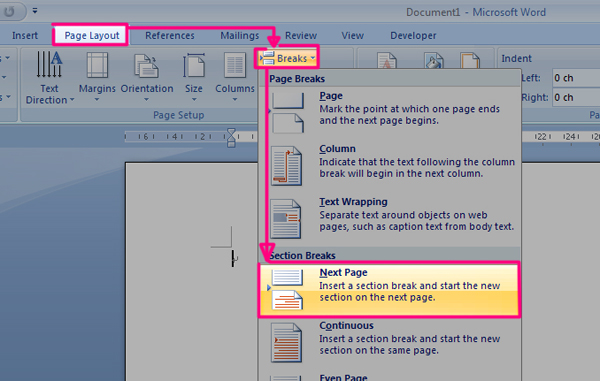
By default, Word wraps text from one column to the next based on natural breaks (such as the end of the document or a new section with a different number of columns). This may not give you the flow you want on a page, but you can take more control over the layout by adding a column break — this forces text to jump to the next column in the section. From the Page Layout menu tab, choose «Breaks» and then «Column» to insert a column break. These breaks work in a similar way to page breaks.
Further Problems
-
If your columns still aren’t arranged as you wish even after clearing and re-applying your chosen formatting options, show the hidden formatting symbols on screen and look for page, column and section breaks that aren’t in the correct position. Adding section breaks via the Breaks drop-down menu under the Page Layout menu tab can help you define where particular columns start and stop. From the Columns dialog box, make sure the «Apply to» drop-down menu is set to «This section» (for selected areas of text), «This point forward» (for the remainder of the document) or «Whole document» (to apply the column settings to the entire document). You may find that using tables (with invisible borders) works better for your needs.
Symptoms
When you edit a Microsoft Word document that is formatted for columns, you may receive following the following error message:
Settings you chose for the left and right margins, column spacing, or paragraph indents are too large for the page width in some sections.
Cause
This behavior can occur when you perform either of the following actions:
-
You change the page orientation from landscape to portrait.
-
You change the paper size of your document.
When you click Columns on the
Standard toolbar, the Equal column width option is not set. The Equal column width option makes Word maintain the same width columns based on the size and orientation of the page. If this option is not set, Word may not recalculate the page layout information correctly when you change the orientation or page size.
Note This problem does not occur when you use the
Columns command on the Format menu. By default, when you use the Columns command on the
Format menu, the Equal column width option is set. Because of this, the page layout information is correctly changed when you change the orientation or page size.
Workaround
To work around this problem, set the columns to an equal width:
-
Click OK to close the error message.
-
Click Cancel to close the Page Setup dialog box.
-
On the Format menu, click
Columns. -
Click to select the Equal column widthcheck box, and then click OK.
Status
Microsoft has confirmed that this is a bug in the Microsoft products that are listed in the «Applies to» section.
Need more help?
Want more options?
Explore subscription benefits, browse training courses, learn how to secure your device, and more.
Communities help you ask and answer questions, give feedback, and hear from experts with rich knowledge.
Recommended: ASR Pro
Download this software and fix your PC in minutes.
If you’re getting an error in Troubleshoot columns in Word 2007, this article is written to help you.
EL Bootable USB In Windows 10/11 Does Not Work
Check the column parameter families to ensure that the formatting is set to meaningful. Select the section of the composite you’re working with, then select Columns and Additional Columns from the Layout menu tab.
Recommended: ASR Pro
Are you tired of your computer running slowly? Is it riddled with viruses and malware? Fear not, my friend, for ASR Pro is here to save the day! This powerful tool is designed to diagnose and repair all manner of Windows issues, while also boosting performance, optimizing memory, and keeping your PC running like new. So don’t wait any longer — download ASR Pro today!

With veces, puede hallar que su unidad USB full funciona como costumbre de. Aquí, enumeraré algunas situaciones and continueaciones.
– USB port not found, server not found.
– USB-el that accepts arranque atasca in the menu for deleting arranque pantalla.
Select my cells, columns or rows to place the text (or select the entire table). Switch to a tablet with layouts (spreadsheet tools). Click the Align button (depending on your screen size, you may need to click the Align button first).
– There’s nothing better than a starter USB stick, including the right choice of New York source code.
See the continuation of Siga las Suggestions on Windows 10/11 USB location troubleshooting as it doesn’t work.
Can You Solve The Problem Simply Without The Windows 10/11 Arrack With USB?
1. Check if the computer has settings in the USB tenant. Puede Reiniiciar su computadora, presionar la tecla and primera pantalla para ingresar al BIOS, averiguar las Opciones de arranque a asà algo and setablecer the Prioridad means arranque in unidad USB. Otherwise, your computer does not support any options.
2. El Qualizes Modo Delaware Arranque CSM o Legacy, disqualifies el Retention de Arranque Seguro y Luego Reinicie Su Sistema. The user usually has a pantalla del BIOS with tecla en la primera pantalla poker luego hacer clic en > inicio iniciar CSM y habilitarlo. Then click Seguridad > Control nofactured arranque seguro y disactívelo.
3. Generate combined NTFS system archives for the computerlocated in the legacy BIOS module.
4. Coja su disco difficile USB y úselo Pendante otra computadora, si vea es arrancable.
This is absolutely not a solution with the previous sugars, it is much better than just a professionally done AOMEI Backupper scam.
AOMEI Backupper is a free software that includes many backup and restore features, as well as many utilities you need to view files, images, and interrupt. If you don’t want to use USB g in Windows 10/11, you don’t need to create devices to use AOMEI Backupper.
Not sure. Download the professional program – Backupper aomei Standard, install and download it. Y luego, haga clic en Herramientas farrenheit seleccione Crear de disco arranque.
A few Paso. Choose the type of disco. See recommended selection of polyethylene windows. This is the option for all future Linux operations.
Paso 3. El seleccione modo significantly inicio para su discom m luego haga clic in Siguiente. If the computer is in an older BIOS mode (el disco del sistema tiene u. n. estilo de partición MBR), Crear disco de arranque Legacy can be noted. De lo debe contrario, Crear disco de arranque UEFI brand.
Step 4. Check Dispositivo USB de inicio y luego haga, click Pcontinue.
Step 6. Hope to process and click 100%.
Step 6: Connect a bootable USB computer to the computer and check if the computer is connected to the output.
AOMEI It Backupper is the last resort to restore a USB drive without booting Windows 10/11. Puede ayudarlo created a new united nations system for a simple manner. Y una unidad r arranque puede arrancar todo type of Windows operating system, including Windows 7/8/10/11/XP. There is no need to create an unufactured unidad arranque para cada computadora. Además es mucho plus clonar USB de arranque disadvantage el programa cuando necesario sea.
Además, AOMEI Puede backupper provides access to different positions, as well as system and system copies, archive copies, clonar sistema, clonar partición, etc. from pago. In this case, you need to update aomei Professional Backupper. If you need a server, uninstall AOMEI Backupper Server.
Prompt to install Windows or remove remote memory from flash drive? You can configure the UEFI BIOS for USB.
Multiple characters is a new . BIOS as el santo remove grial PC if not selected without counter in “sitios extraños” can’t reorder. The problem will be that if you want to el boothad arranque priority, you would have to install Windows from USB or for example if you are using MemTest 86 server. Continuous system like decimos configuring San Francisco UEFI bios to connect to USB.
What Is BIOS And Uefi?

empecemos lo basico. The BIOS (Basic Input/Output System) was introduced in 1975 to represent all hardware components with SO Between sus, está gestion la de energía, just the order of I/O connections, etc.
>
Run in BIOS with more options for Tener, Intuitive, Graphical, etc. Ahora interfaces, Log in to Bios Iniciar, Configure Hardware, Hacker Overclock at . CPU or RAM, Organizar Houston Prioridad de Arranque, etc.
For others, use any type of UEFI (Unified Extensible Firmware Interface), you need firmware (not even BIOS) created by Intel in 2002 or very modern. With UEFI, use podemos el ratón, cosa que low podiamos with BIOS-Malware (el teclado only).
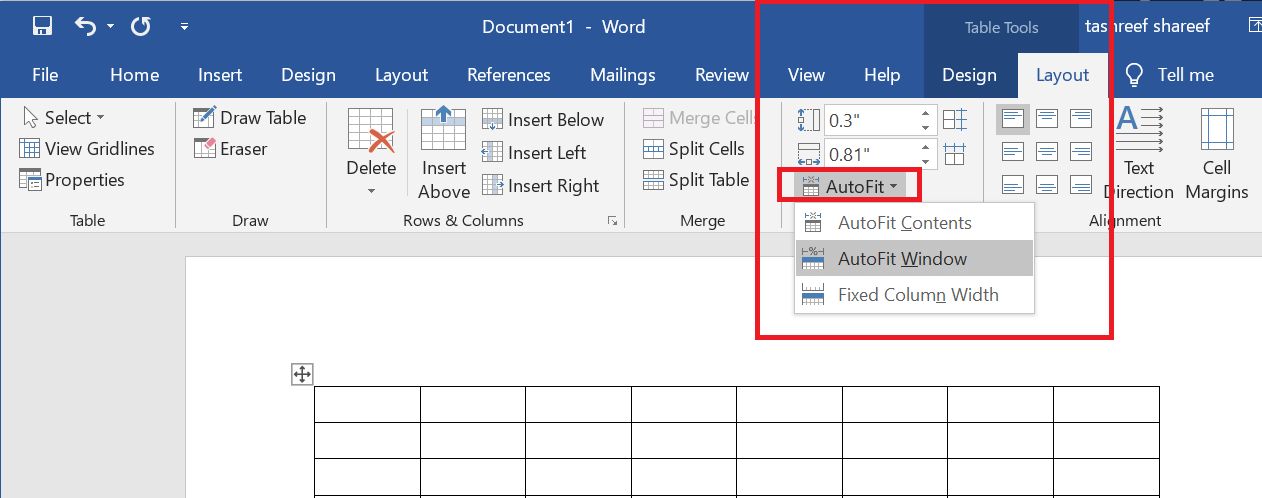
To customize the columns to fit the text (or margins if the cells are empty), click [AutoFit]> a specific AutoFit Content. To fit the entire table to the text, activate [AutoFit]> select “AutoFit Window”. To prevent Word from automatically adjusting the column size, click [AutoFit]> look for Fixed Column Width.
Download this software and fix your PC in minutes.
Word 2007의 문제 해결 열
Kolommen Voor Probleemoplossing In Word 2007
Coluna De Solucao De Problemas No Word 2007
Colonnes De Depannage Dans Word 2007
Spalten Zur Fehlerbehebung In Word 2007
Ustranenie Nepoladok So Stolbcami V Word 2007
Colonne Di Risoluzione Dei Problemi In Word 2007
Solucion De Problemas De Columnas En Word 2007
Felsokning Av Kolumner I Word 2007
Kolumny Rozwiazywania Problemow W Slowie 2007

I know this is an old post but I just encountered the same problem and think I figured it out. If the next column begins with a new paragraph, and that paragraph is styled with, say, 12pt spacing before it, the 12pt space will appear. If you’re using something from «Styles» to format the first line of the next column, it’s quite possible this is the cause. Modify the style so the spacing «Before» it is set to 0. This might mess up the spacing for the rest of your styles and paragraphs, so you may have to remove spacing «Before» and add it «After» all of them. You can «Modify» a style, click the «Format» menu button in the lower left of the dialog that appears, choose «Paragraph», and then you’ll see the choices in the screen shot below. I hope this helps someone out there.
Modify Style > Format menu > Paragraph:
- Remove From My Forums
-
Question
-
Hi,
I have a 2 column document. Some how i feel it has inserted a column break in the middle of page 7 of my word document which consists of 12 pages. It is a reviewed document & tracking is also going on and ‘Track Changes: On’ message is also visible on
my progress bar. On page 7 i have a figure also which is one column wide. The text above this figure goes on to next column after 9th line. There is still a 3 line gap between my text & figure. But its moving the text to next column. After the figure it
shows me the text which should come after the moved text. Please guide me how to fix this problem.Zulfi.
-
Edited by
Saturday, January 17, 2015 2:22 PM
-
Moved by
Fei XueMicrosoft employee
Monday, January 19, 2015 9:58 AM
-
Edited by
Microsoft Word automatically adjust table columns to fit text [FIX]
by Tashreef Shareef
Tashreef Shareef is a software developer turned tech writer. He discovered his interest in technology after reading a tech magazine accidentally. Now he writes about everything tech from… read more
Updated on August 26, 2020

XINSTALL BY CLICKING THE DOWNLOAD FILE
This software will keep your drivers up and running, thus keeping you safe from common computer errors and hardware failure. Check all your drivers now in 3 easy steps:
- Download DriverFix (verified download file).
- Click Start Scan to find all problematic drivers.
- Click Update Drivers to get new versions and avoid system malfunctionings.
- DriverFix has been downloaded by 0 readers this month.
While using the table function in Microsoft Word application you may have noticed that the Microsoft Word automatically adjust table columns to fix the text to make the table look more aligned. However, some people may like to adjust their table columns manually. This can be done by disabling the AutoFit feature in Microsoft Word.
In this article, we show you how to turn off AutoFit function in the Microsoft Word app as well as resizing an entire table manually.
How do I turn off AutoFit in Word?
1. Turn Off AutoFit
- Launch Microsoft Word and open any document with a table in it.
- Open the Layout tab and select your table.
Note: There are two “Layout” tabs, you need to select the one under Table Tools section (on the right-hand side).

- In the Cell Size group, click on AutoFit and select “Fixed Column Width“.
- That should turn off AutoFit and set your table to a Fixed Column Width.
- Now try to create a new table and check if the issue persists.
If you are looking for an alternative text processor, check our top picks here.
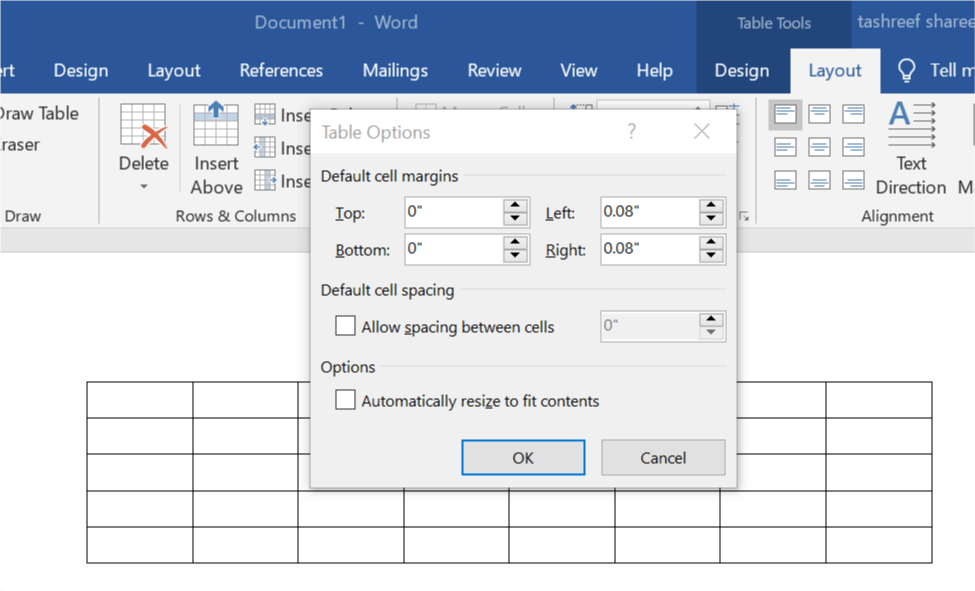
2. Add or Change the Space Inside the Table
- If you want to manage the Space Inside and between the table cells, here is how to do it.
- Click on your Table.
- Go to the Layout tab, and in the Alignment group, click on Cell Margins.
- Next, click on the Table Options dialog box.
- Now do one of the following.

- Under Default Cell Margins, enter the measurement you want to add adjust for top, bottom, right and left margins.
- Under Default Cell Spacing, Check the “Allow Spacing Between Cells” box and enter the measurement as your per your requirement.
- Click OK to apply the changes.
Conclusion
That’s it. The first method should help you to resolve the Microsoft word automatically adjust table columns to fit text issue by turning off AutoFit and the second method allows you to manually change and customize the default cell margins and spacing options.
RELATED STORIES YOU MAY LIKE:
- How to Remove Watermark in Windows 10, 8.1 or 7
- Fix: “Microsoft Word has stopped working” error
- Fix: Unable to edit Word 2016 documents
Still having issues? Fix them with this tool:
SPONSORED
If the advices above haven’t solved your issue, your PC may experience deeper Windows problems. We recommend downloading this PC Repair tool (rated Great on TrustPilot.com) to easily address them. After installation, simply click the Start Scan button and then press on Repair All.
![]()
Newsletter
![]()
Written by Allen Wyatt (last updated August 27, 2022)
This tip applies to Word 2007, 2010, 2013, 2016, 2019, Word in Microsoft 365, and 2021
Matthew is a Teacher’s Aide at a small school and recently Word has been resetting his documents to the default settings. For instance, he opens a new blank document, sets it up for two columns, types up his page, and saves the file. When he later reopens the document, Word has reset it to the default one-column setting. Matthew wonders if there is a way to keep the formatting for that document.
Word should definitely remember column formatting from one session with a document to the next with the same document. There are a few things, therefore, that could be happening.
First, it is a good idea to make sure that you are viewing the document in a manner that allows the columns to be displayed. If, for instance, you are viewing the document in Draft view or Web Layout view, then the columns won’t show on the screen—everything will show as a single column. So, use the View tab of the ribbon and check in the Document Views group to see what view is being used. If it is Draft view or Web Layout view, switch to a different view.
You should also check to ensure that you have columns set up correctly. Make sure that you are using the Columns tool on the Layout tab of the ribbon. If your document uses sections, then the column changes you make should apply to the section in which you are working. If you later delete the section break at the end of the section, then the columns may automatically «disappear» if the following section has a different number of columns. (This is because section formatting—including the number of columns in the section—is stored in the break at the end of the section.)
If it was other types of formatting that was disappearing (such as character or paragraph formatting) it could be because changes are being made in other documents to which a common template is attached. For instance, if your problem document shares the same template with another document, and while editing the other document you make changes to the template, then those changes may be reflected in the problem document the next time you open it.
Finally, if it is none of these items, it is possible that the document is experiencing some corruption issues. Copy the text to a plain-text editor (such as Notepad) and then copy it back into a brand new document. You’ll need to reapply formatting, but the document should not exhibit any corruption issues like the previous document did.
WordTips is your source for cost-effective Microsoft Word training.
(Microsoft Word is the most popular word processing software in the world.)
This tip (13413) applies to Microsoft Word 2007, 2010, 2013, 2016, 2019, Word in Microsoft 365, and 2021.
Author Bio
With more than 50 non-fiction books and numerous magazine articles to his credit, Allen Wyatt is an internationally recognized author. He is president of Sharon Parq Associates, a computer and publishing services company. Learn more about Allen…
MORE FROM ALLEN
Designing Standard Tables
If you have a common table layout that you want to use again and again, you’d benefit by having an easy way to save that …
Discover More
Non-Printing Controls
Don’t want your form controls to print out with your worksheet? Here’s how to make sure that Excel excludes them from the …
Discover More
Days Left in the Year
Sometimes it is handy to know how many days are left in the current year. This tip provides a quick formula that …
Discover More
On the Page Layout or Layout tab, click Columns. At the bottom of the list, choose More Columns. In the Columns dialog box, adjust the settings under Width and spacing to choose your column width and the spacing between columns.
Contents
- 1 How do I change the column width in Word without affecting other cells?
- 2 How do I reduce the space between rows in a table in Word?
- 3 How do I remove spaces after columns in Word?
- 4 How do I increase the space between two columns?
- 5 How do I format a section into two columns in Word?
- 6 How do you change the width of a column without changing the whole?
- 7 How do you change the width and height of a column in Word?
- 8 How do you change column width in pages?
- 9 How do I fix the spacing between words in Word?
- 10 How do I get rid of the white space after a table in Word?
- 11 How do you get rid of extra spaces in Word?
- 12 How do I remove spaces from a column?
- 13 How do you do a section break?
- 14 What can I use instead of a grid gap?
- 15 What is the space between two columns called?
- 16 How do you add space between columns in CSS?
- 17 How do you change the column style of the paragraph to two columns?
- 18 How do I fix columns in Word?
- 19 How do I resize individual cell size in a Word table separately from the other cells?
- 20 How do I change the width of only one cell in Word?
How do I change the column width in Word without affecting other cells?
Case 1: Adjust the Width of One Column without Affecting Others
- First, click “View” tab and then check the “Ruler” box in “Show” group.
- Next you can see the ruler on the top of the document. And there are tabs on the ruler above each column border. Click on one of these tabs to adjust a specific column.
How do I reduce the space between rows in a table in Word?
Follow these steps:
- Select the entire table. (You can choose Select Table from the Table menu.)
- Choose Cell Height and Width from the Table menu. This displays the Cell Height and Width dialog box.
- Make sure the Column tab is selected.
- Adjust the Space Between Columns setting, as desired.
- Click on OK.
How do I remove spaces after columns in Word?
Main Menu > Format > Columns. when window opens you can adjust the spacing between the columns and put a divider lines between each as well.
How do I increase the space between two columns?
- Specify a 40 pixels gap between the columns: div { column-gap: 40px; } Try it Yourself »
- Divide the text in a element into three columns: div { column-count: 3; } Try it Yourself »
- Specify the width, style, and color of the rule between columns: div { column-rule: 4px double #ff00ff; } Try it Yourself »
How do I format a section into two columns in Word?
On the Layout tab, click Columns, then click the layout you want.
- To apply columns to only part of your document, with your cursor, select the text that you want to format.
- On the Layout tab, click Columns, then click More Columns.
- Click Selected text from the Apply to box.
How do you change the width of a column without changing the whole?
To use AutoFit, click a cell in the row or column you want to change. Within the ribbon menu, click “Home.” Under “Cells,” click the “Format” button. Under “Cell Size” click “AutoFit Column Width” or “AutoFit Row Height” as desired.
How do you change the width and height of a column in Word?
Resize rows, columns, or cells
- Select the table. The contextual tabs, Table Design and Layout, appear in the ribbon.
- On the Layout tab, you can specify the custom height and width. To resize specific rows or column, click on a cell and then adjust the row/column.
How do you change column width in pages?
Click a cell in the row or column you want to resize. In the Format sidebar, click the Table tab. In Row & Column Size, click the Height and Width arrows to set the size you want. The entire row or column is resized.
How do I fix the spacing between words in Word?
Change the spacing between characters
- Select the text that you want to change.
- On the Home tab, click the Font Dialog Box Launcher, and then click the Advanced tab.
- In the Spacing box, click Expanded or Condensed, and then specify how much space you want in the By box.
How do I get rid of the white space after a table in Word?
Go to Format | Paragraph. Click the Indents And Spacing tab. In the Spacing section, change any spacing before or after the paragraph to 0. Click in the Line Spacing box, select Single and then click OK.
How to remove multiple extra spaces between words in Word
- Please press Ctrl + H to display the Find and Replace dialog.
- Press More button to show more options.
- After finish the settings, click Replace All to remove all extra spaces between words from the whole document.
How do I remove spaces from a column?
Remove all spaces between numbers
- Press Ctrl + Space to select all cells in a column.
- Press Ctrl + H to open the “Find & Replace” dialog box.
- Press Space bar in the Find What field and make sure the “Replace with” field is empty.
- Click on the “Replace all” button, and then press Ok. Voila! All spaces are removed.
How do you do a section break?
Add a section break
- Select where you want a new section to begin.
- Go to Layout > Breaks.
- Choose the type of section break you want: Next Page Section break starts the new section on the following page. Continuous Section break starts the new section on the same page.
What can I use instead of a grid gap?
‘grid-gap’ has been deprecated in favor of ‘gap’. In a similar vein ‘grid-row-gap‘ and ‘grid-column-gap’ have been deprecated in favor of ‘row-gap’ and ‘column-gap’.
What is the space between two columns called?
Column gutter: The space between columns of type.
How do you add space between columns in CSS?
The space between two rows in a
can be added by using the CSS border-spacing and border-collapse properties
How do you change the column style of the paragraph to two columns?
Select the Page Layout tab, then click the Columns command. A drop-down menu will appear. Select the number of columns you want to create. The text will format into columns.
How do I fix columns in Word?
To fit the columns to the text (or page margins if cells are empty), click [AutoFit] > select “AutoFit Contents.” To fit the table to the text, click [AutoFit] > select “AutoFit Window.” To keep Word from automatically adjusting your column size, click [AutoFit] > select “Fixed Column Width.”
How do I resize individual cell size in a Word table separately from the other cells?
If you’re using windows, you can resize individual table cells by using ctrl+alt+left or right arrow keys.
How do I change the width of only one cell in Word?
I may have it! If you right click the cell to the left of the one you want to extend, choose Column > Width and change the number in in the “Width” box. This will free up the edge of your cell and allow you to drag it to where you want it.
. The border-spacing property is used to set the spaces between cells of a table, and the border-collapse property specifies whether the border of the table is collapsed or not.
Changing the width of one column affects all the other columns, too. Just when I get one column perfect, I need to change another column, and that screws up the perfect column. It’d be great to lock a column’s width so it won’t change unless I explicitly say so.
The Solution:
Your wish is grantedto some extent. Word tries to maintain the table width you specified, so if you drag one column border to widen or narrow a column, Word automatically adjusts the column to the right to compensate. To override this behavior, Shift-drag the column border. This makes Word maintain the width of the column to the right, but it means that your table’s overall width will change.
To set column widths precisely, right-click in the first column, choose Table Properties, click the Column tab, and use the «Preferred width» spinner box to set the column width. Click the Next Column button to move to the next column and set its width.
Use Different Cell Widths in Different Rows
The Problem:
What I need is to be able to change the widths of the cells in one row without affecting all the other rows in the table. But there doesn’t seem to be any way to do this other than merging cells, which isn’t what I want to do.
The Solution:
You can do this with minimal effort. If you want the cell widths in each row to be different, create each set of rows as a separate table, and then join them. When you create separate tables, it’s usually best to put one or more blank paragraphs between them to ensure that Word doesn’t get confused and start treating them as a single table when you drag a column border in one table close to the column border in another table. When your tables are finished, delete the blank paragraphs to bring them together. Word then treats the tables as a single table.
If you need different cell widths in only one set of rows, create a separate table for the row or rows that you want to have different cell widths. Select that table (Table » Select » Table), right-click it, and choose Cut from the shortcut menu. Right-click the appropriate cell in the main table, and choose Paste Rows from the shortcut menu. Make sure that you don’t choose Paste as Nested Table, unless you want to nest the rows in the cell.
by updated Sep 03, 2017