
Symptoms
When you edit a Microsoft Word document that is formatted for columns, you may receive following the following error message:
Settings you chose for the left and right margins, column spacing, or paragraph indents are too large for the page width in some sections.
Cause
This behavior can occur when you perform either of the following actions:
-
You change the page orientation from landscape to portrait.
-
You change the paper size of your document.
When you click Columns on the
Standard toolbar, the Equal column width option is not set. The Equal column width option makes Word maintain the same width columns based on the size and orientation of the page. If this option is not set, Word may not recalculate the page layout information correctly when you change the orientation or page size.
Note This problem does not occur when you use the
Columns command on the Format menu. By default, when you use the Columns command on the
Format menu, the Equal column width option is set. Because of this, the page layout information is correctly changed when you change the orientation or page size.
Workaround
To work around this problem, set the columns to an equal width:
-
Click OK to close the error message.
-
Click Cancel to close the Page Setup dialog box.
-
On the Format menu, click
Columns. -
Click to select the Equal column widthcheck box, and then click OK.
Status
Microsoft has confirmed that this is a bug in the Microsoft products that are listed in the «Applies to» section.
Need more help?
Want more options?
Explore subscription benefits, browse training courses, learn how to secure your device, and more.
Communities help you ask and answer questions, give feedback, and hear from experts with rich knowledge.
- Remove From My Forums
-
Question
-
Hi,
I have a 2 column document. Some how i feel it has inserted a column break in the middle of page 7 of my word document which consists of 12 pages. It is a reviewed document & tracking is also going on and ‘Track Changes: On’ message is also visible on
my progress bar. On page 7 i have a figure also which is one column wide. The text above this figure goes on to next column after 9th line. There is still a 3 line gap between my text & figure. But its moving the text to next column. After the figure it
shows me the text which should come after the moved text. Please guide me how to fix this problem.Zulfi.
-
Edited by
Saturday, January 17, 2015 2:22 PM
-
Moved by
Fei XueMicrosoft employee
Monday, January 19, 2015 9:58 AM
-
Edited by
I know this is an old post but I just encountered the same problem and think I figured it out. If the next column begins with a new paragraph, and that paragraph is styled with, say, 12pt spacing before it, the 12pt space will appear. If you’re using something from «Styles» to format the first line of the next column, it’s quite possible this is the cause. Modify the style so the spacing «Before» it is set to 0. This might mess up the spacing for the rest of your styles and paragraphs, so you may have to remove spacing «Before» and add it «After» all of them. You can «Modify» a style, click the «Format» menu button in the lower left of the dialog that appears, choose «Paragraph», and then you’ll see the choices in the screen shot below. I hope this helps someone out there.
Modify Style > Format menu > Paragraph:
Microsoft Word automatically adjust table columns to fit text [FIX]
by Tashreef Shareef
Tashreef Shareef is a software developer turned tech writer. He discovered his interest in technology after reading a tech magazine accidentally. Now he writes about everything tech from… read more
Updated on August 26, 2020

XINSTALL BY CLICKING THE DOWNLOAD FILE
This software will keep your drivers up and running, thus keeping you safe from common computer errors and hardware failure. Check all your drivers now in 3 easy steps:
- Download DriverFix (verified download file).
- Click Start Scan to find all problematic drivers.
- Click Update Drivers to get new versions and avoid system malfunctionings.
- DriverFix has been downloaded by 0 readers this month.
While using the table function in Microsoft Word application you may have noticed that the Microsoft Word automatically adjust table columns to fix the text to make the table look more aligned. However, some people may like to adjust their table columns manually. This can be done by disabling the AutoFit feature in Microsoft Word.
In this article, we show you how to turn off AutoFit function in the Microsoft Word app as well as resizing an entire table manually.
How do I turn off AutoFit in Word?
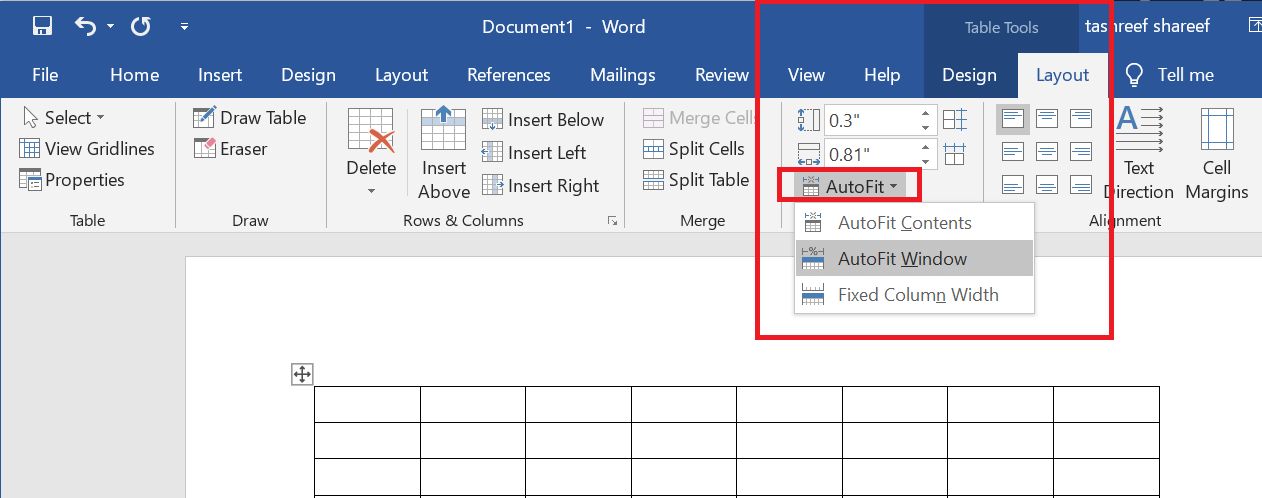
1. Turn Off AutoFit
- Launch Microsoft Word and open any document with a table in it.
- Open the Layout tab and select your table.
Note: There are two “Layout” tabs, you need to select the one under Table Tools section (on the right-hand side).

- In the Cell Size group, click on AutoFit and select “Fixed Column Width“.
- That should turn off AutoFit and set your table to a Fixed Column Width.
- Now try to create a new table and check if the issue persists.
If you are looking for an alternative text processor, check our top picks here.
2. Add or Change the Space Inside the Table
- If you want to manage the Space Inside and between the table cells, here is how to do it.
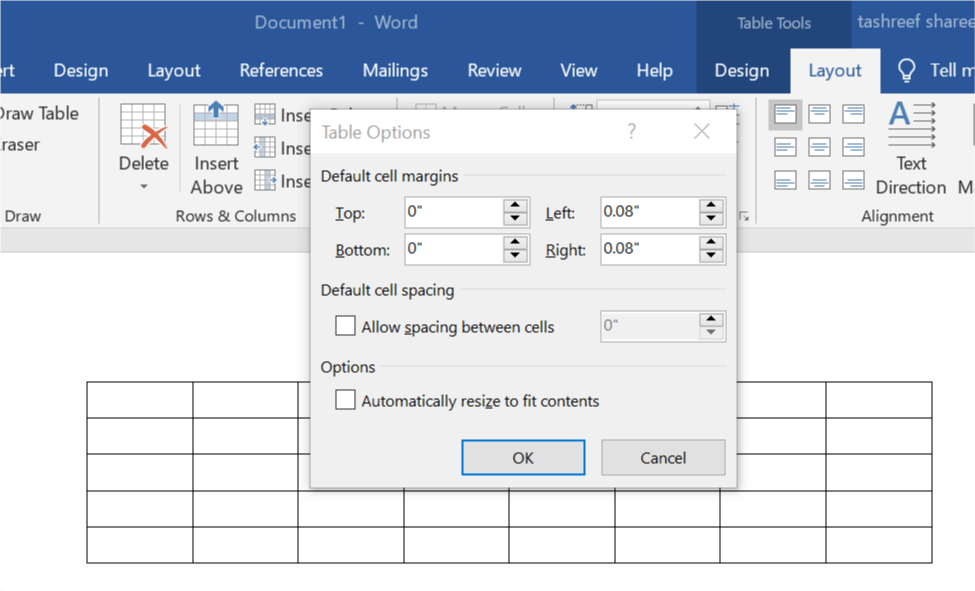
- Click on your Table.
- Go to the Layout tab, and in the Alignment group, click on Cell Margins.
- Next, click on the Table Options dialog box.
- Now do one of the following.

- Under Default Cell Margins, enter the measurement you want to add adjust for top, bottom, right and left margins.
- Under Default Cell Spacing, Check the “Allow Spacing Between Cells” box and enter the measurement as your per your requirement.
- Click OK to apply the changes.
Conclusion
That’s it. The first method should help you to resolve the Microsoft word automatically adjust table columns to fit text issue by turning off AutoFit and the second method allows you to manually change and customize the default cell margins and spacing options.
RELATED STORIES YOU MAY LIKE:
- How to Remove Watermark in Windows 10, 8.1 or 7
- Fix: “Microsoft Word has stopped working” error
- Fix: Unable to edit Word 2016 documents
Still having issues? Fix them with this tool:
SPONSORED
If the advices above haven’t solved your issue, your PC may experience deeper Windows problems. We recommend downloading this PC Repair tool (rated Great on TrustPilot.com) to easily address them. After installation, simply click the Start Scan button and then press on Repair All.
![]()
Newsletter
INTELLIGENT WORK FORUMS
FOR COMPUTER PROFESSIONALS
Contact US
Thanks. We have received your request and will respond promptly.
Log In
Come Join Us!
Are you a
Computer / IT professional?
Join Tek-Tips Forums!
- Talk With Other Members
- Be Notified Of Responses
To Your Posts - Keyword Search
- One-Click Access To Your
Favorite Forums - Automated Signatures
On Your Posts - Best Of All, It’s Free!
*Tek-Tips’s functionality depends on members receiving e-mail. By joining you are opting in to receive e-mail.
Posting Guidelines
Promoting, selling, recruiting, coursework and thesis posting is forbidden.
Students Click Here
The columns problem in word xpThe columns problem in word xp(OP) 12 Oct 03 05:08 I managed the upper half of the page one column and the lower half two columns. But as soon as I inserted a footnote in somewhere of the upper half, the whole words in lower half (area of two columns) jumped into next page, so a half blank page appeared! Thank you! Red Flag SubmittedThank you for helping keep Tek-Tips Forums free from inappropriate posts. |
Join Tek-Tips® Today!
Join your peers on the Internet’s largest technical computer professional community.
It’s easy to join and it’s free.
Here’s Why Members Love Tek-Tips Forums:
 Talk To Other Members
- Notification Of Responses To Questions
- Favorite Forums One Click Access
- Keyword Search Of All Posts, And More…
 Talk To Other Members
Register now while it’s still free!
Already a member? Close this window and log in.
Join Us Close
Problem
You have a Word table with several rows. You cut a row from the table and paste it into another position within the same table. The column widths don’t ‘honor’ the widths of the original row.
You figure out you can get around it by any of these methods:
- split the table, resize the column widths, then join the table back together again
- convert the table to text, then convert it back to a table again
- drag the columns to lock them into the previously established positions
- insert a blank row into the main table, then copy/paste the content from the cut row into the table cells.
But all of these solutions are painfully tedious and time-consuming. You should ask my husband just how painful — he had this problem and I heard him complain long and loud in frustration (he works with Word tables ALL the time)!
Solution
Check your Smart Cut and Paste settings and make sure the Adjust table formatting and alignment on paste check box is selected.
- Check the Smart cut and paste settings:
- Word 2003: On the menu, go to Tools > Options. Click the Edit tab.
- Word 2007: Click the Office button, then Word Options. Click Advanced in the left panel and scroll down to the Cut, copy and paste section.
- Make sure the Smart cut and paste check box is selected.
- Click the Settings button next to that check box.
- Make sure the Adjust table formatting and alignment on paste check box.
- Click OK to exit both windows.

Word 2003 window; the Word 2007 selections are the same, but the window is different

![]()
Written by Allen Wyatt (last updated August 27, 2022)
This tip applies to Word 2007, 2010, 2013, 2016, 2019, Word in Microsoft 365, and 2021
Matthew is a Teacher’s Aide at a small school and recently Word has been resetting his documents to the default settings. For instance, he opens a new blank document, sets it up for two columns, types up his page, and saves the file. When he later reopens the document, Word has reset it to the default one-column setting. Matthew wonders if there is a way to keep the formatting for that document.
Word should definitely remember column formatting from one session with a document to the next with the same document. There are a few things, therefore, that could be happening.
First, it is a good idea to make sure that you are viewing the document in a manner that allows the columns to be displayed. If, for instance, you are viewing the document in Draft view or Web Layout view, then the columns won’t show on the screen—everything will show as a single column. So, use the View tab of the ribbon and check in the Document Views group to see what view is being used. If it is Draft view or Web Layout view, switch to a different view.
You should also check to ensure that you have columns set up correctly. Make sure that you are using the Columns tool on the Layout tab of the ribbon. If your document uses sections, then the column changes you make should apply to the section in which you are working. If you later delete the section break at the end of the section, then the columns may automatically «disappear» if the following section has a different number of columns. (This is because section formatting—including the number of columns in the section—is stored in the break at the end of the section.)
If it was other types of formatting that was disappearing (such as character or paragraph formatting) it could be because changes are being made in other documents to which a common template is attached. For instance, if your problem document shares the same template with another document, and while editing the other document you make changes to the template, then those changes may be reflected in the problem document the next time you open it.
Finally, if it is none of these items, it is possible that the document is experiencing some corruption issues. Copy the text to a plain-text editor (such as Notepad) and then copy it back into a brand new document. You’ll need to reapply formatting, but the document should not exhibit any corruption issues like the previous document did.
WordTips is your source for cost-effective Microsoft Word training.
(Microsoft Word is the most popular word processing software in the world.)
This tip (13413) applies to Microsoft Word 2007, 2010, 2013, 2016, 2019, Word in Microsoft 365, and 2021.
Author Bio
With more than 50 non-fiction books and numerous magazine articles to his credit, Allen Wyatt is an internationally recognized author. He is president of Sharon Parq Associates, a computer and publishing services company. Learn more about Allen…
MORE FROM ALLEN
Designing Standard Tables
If you have a common table layout that you want to use again and again, you’d benefit by having an easy way to save that …
Discover More
Non-Printing Controls
Don’t want your form controls to print out with your worksheet? Here’s how to make sure that Excel excludes them from the …
Discover More
Days Left in the Year
Sometimes it is handy to know how many days are left in the current year. This tip provides a quick formula that …
Discover More