
Word for Microsoft 365 Word 2021 Word 2019 Word 2016 Word 2013 Word 2010 Word 2007 More…Less
You can use the numbered list feature in Word to add numbers to cells in a table.
Note: If a table cell contains multiple lines of text, Word numbers each line in the cell.
-
Select the table cells that you want to number.
To number the beginning of each row, select only the first column in the table by clicking the column’s top border.

-
On the Home tab, in the Paragraph group, click Numbering.
Note: To select a different number format, right-click a number in the list, point to Numbering, click Define New Number Format, and then select the options that you want.

See also
Automatically number rows in Excel
Need more help?
Want more options?
Explore subscription benefits, browse training courses, learn how to secure your device, and more.
Communities help you ask and answer questions, give feedback, and hear from experts with rich knowledge.
More often than not, you are required to insert number for each column in a Word document with multiple columns. Read on and we will present you an easy way to achieve that.
Now and then, when you create a Word document with multiple columns and want to add page numbers, by default, numbers will be added for each page. Then how to number each column instead? In this article, we will show steps to do the task.
First thing, open a Word document with multi-columns. For example, you’ve got a two-column Word document with only one number on each page:

Now we will introduce the steps to number each column instead, as below:

Steps to Insert Number for Each Columns
- First, double click the original page number to enter the footer area.

- Next, in the footer area, select and delete the original number.
- Then move the cursor to the location, where you want to insert the number for the left column. If necessary, you need to add some spaces to adjust the location properly.
- Then press Ctrl + F9 twice to insert a field.

- In this field, input the formula {={page}*2-1}, which calculates the number for each column automatically:

- Then click the right mouse button and choose the Update Field to update the field. Or simply press F9 to do the same thing:

Then the formula will calculate the number and display it for you, as below:

- Next, add some extra spaces to move the cursor to the location where you want to insert number for the right column.
- Repeat the steps as we do for the left column, except that this time we need to use formula {={page}*2}
- Finally, press ESC to finish the editing and exit footer area.
Now you see Word has inserted numbers below every column.
Apply the Tip to Multi-Column Document
This is just an example of document with two columns. You can also apply this tip to documents with three or more columns. Assuming the column number is n, you can just follow the above steps and input field formulas {={page}*n-(n-1)},{={page}*n-(n-2)},…,{={page}*n-(n-n)} for each column, from the left-most one to the right-most one.
Fix Corrupt Word Document
Word is definitely a powerful tool for daily office work. Useful as it is, constant operations will still lead to document corruptions frequently. Under such circumstances, a batch of ways can be taken to repair word, including utilizing the built-in repair function in Word, and many other third-party word recovery tools. All these ways will help you solve the problem efficiently.
Author Introduction:
Vera Chen is a data recovery expert in DataNumen, Inc., which is the world leader in data recovery technologies, including excel recovery and pdf repair software products. For more information visit www.datanumen.com

on
July 12, 2012, 12:43 AM PDT
A quick way to create a list of sequential numbers in Word
Creating a list of sequential numbers isn’t as difficult as it might sound at first. If you can create a table, you can create a list of sequential numbers.
 Creating a sequential list of numbers, in Word, sounds like an intimidating task. Sure, you can create a numbered list quickly enough, but that feature works with additional text – you’re numbering something. If you want a list of just numbers, you have to work a bit harder. Word’s SEQ field might come to mind, but that solution is better suited to template-type numbering. In order words, this field works great if you’re numbering documents, labels, and so on. It doesn’t work so well if you just want to create a list of sequential numbers. You can use it that way, but it’ll be more work than it’s worth.
Another way
Instead of working harder than you need to, insert a one-column table with as many rows as necessary to accommodate your list. Then, using Word’s numbering feature, number that column. Finally, convert the table to text. The resulting list is a fixed numbered list, so you’ll have to live with its limitations; when you can do so, this method definitely beats most alternative solutions.
To illustrate this simple technique, we’ll create a sequential list from 1 to 100. First, we need to insert a table with one column and one hundred rows:
- Position your cursor where you want the table.
- Click the Insert tab. Then, choose Insert Table from the Table dropdown in the Tables group. In Word 2003, choose Insert from the Table menu and then choose Table.
- In the resulting dialog, enter 1 in the Number Of Columns field and 100 in the Number Of Rows field.
- Click OK. The resulting table will have one column and one hundred rows.
The next step is to number the column, as follows:
- Select the table by clicking the Table Selector (the small square in the table’s top-left corner that I’ve circled in the figure above).
- Click the Home tab.
- Click Numbering in the Paragraph group. In Word 2003, Numbering is on the Formatting toolbar. At this point, you have a one-column table with one hundred rows displaying a sequential list of 1 to 100.
Converting the table to text is the last step:
- With the table selected, click the contextual layout tab. Then, choose Convert To Text in the Data group. In Word 2003, choose Convert from the Table menu, and then select Table To Text.
- In the resulting dialog, click OK, as the table uses paragraph marks to denote columns by default. You now have a numbered list, but no table or list items-just numbers.
The results is a numbered list and as such, has the same pros and cons. For instance, you can quickly remove the period character following each number and the indention property, as follows:
- Right-click anywhere in the list, choose Numbering from the resulting context menu and then choose Define New Number Format.
- In the Number Format field, delete the period character.
- From the Alignment dropdown, choose Right.
- Click OK.
You can change the numbers in the list by restarting the sequence or by specifying a new start number. You can change the list’s style. You can do anything to this list that you can do to a normal numbered list because it is a numbered list, with one exception: the list, while easy to format, is fixed. If you delete an item, the list updates accordingly, but I haven’t found a way to add numbers.
-
Software
Though Microsoft Word does not provide direct option to insert column numbers in your document, you can apply a small trick and make the work done.
Why would anyone ever need column numbers? Well, sometimes it is easy to design multiple pages in one page of your document and columns are handy tool. When printed each column can be treated as a different page. Now, our problem is how to show page numbers for those columns as if each column is a separate page.
This question was asked by Krishna Verma as a comment in one of the Practical Sets ICT Trends has published. This post is in response to his query.
Lets start solving the problem:
Create columns in your document (say, 3 for my example). Your document may have multiple pages. If it has only one page, there is nothing to work hard – you can just insert text boxes and type 1, 2 and 3 on three text boxes and position it properly. The problem is only when you have multiple pages and each page contain 3 columns.
The real trick is to insert Field Code below each column and enter formula on those field code so that it will produce 1, 2 and 3 on the first page while, 4, 5 and 6 on the second page and so on.

I’ve inserted very large page numbers inside big ovals, but its just to show them clearly. I have four pages and 3 columns in each page.
To insert column numbers like this, you should have knowledge of headers & footers, page numbers and field codes.
Headers & Footers
Header is the text displayed usually on the top margin of every page and footer is on the bottom margin. Page numbers, name of book, author, document created date, time etc. are common elements that are used as header or footer in any document.
You can switch to header & footer editing view by clicking on View >> Header & Footer (Word 2003) or Insert >> Header or Footer button >> Edit Header or Footer (Word 2007 & 2010). When you are in header or footer editing screen,
- The header and footer area are marked with dashed border and
- The regular text is dimmed to distinguish the contents typed as header or footer.

You can enter and format any text or object in header and footer editing screen as you can do in normal document editing.
Whatever you enter as header or footer appears on all the pages of document, at least on all pages of same section if you have multiple sections in document.
Page Numbering
MS Word has build in feature to insert page numbers in your document. You can insert page numbers by clicking on Page Number button on Header & Footer toolbar. You can also insert page numbers by clicking on Insert >> Page Numbers. It allows you to choose position and number format.
In our case, however, this page numbering can’t be of any help because we need to insert 1, 2 and 3 on a page to which Word thinks is Page 1. We will manipulate the field code of Page Number to achieve this.
Field Codes
Fields in Microsoft Word are used as placeholders for data that might change in a document and for creating form letters and labels in mail-merge documents. Word inserts fields automatically when you use particular commands, such as when you insert a page number, when you insert a document building block such as a cover page, or when you create a table of contents. You can also manually insert fields to automate aspects of your document, such as merging data from a data source or performing calculations.
You can insert field codes from Insert >> Field (Word 2003) or Insert >> Quick Parts >> Fields.
Alternately, Press Ctrl + F9 to insert field manually. For example Press Ctrl + F9 on your document; it will produce { }. Type Page inside the field code so that it appears as { Page }. Now when you hide field code or preview document you’ll see page number in place of that field code.
You can press Alt + F9 to switch between field code and field value. Alternately, right click on field and choose Toggle Field Codes.
To update the field value when you change field codes, right the field and choose Update Field.
To read more about field codes and the list of all the codes available in MS Word, Please click here.
Insert Column Number in Your Document
Now, lets start solving our problem. We have a document with multiple pages and there are 3 columns in each page.
- Go to the Footer editing screen because we are inserting page numbers at the footer and we want the column numbers to populate automatically when we insert for one page.
- Insert oval or any other shape if you wish to insert column number inside shapes; otherwise, you can directly insert on the footer area of document. If you insert column number directly on footer, set the tab stop positions so that the 3 codes we are going to insert are just below each of the columns.
- Place insertion line inside the first shape (You may need to right click and choose Add Text) or on first tab stop position. Press Ctrl + F9 to insert field code in the cursor position. It will produce a pair of braces and cursor inside it.
- Type there = 3 * and Press Ctrl + F9 to insert another field after equal symbol. This results in another pair of braces after ‘=’ symbol. Type Page inside the new field and enter –2 after the closing brace of Page field. the field code should read as:
{ = 3 * { Page } – 2 } - Similarly, insert { = 3 * { Page } – 1 } in the second box and { = 3 * { Page } } on the third box.
These codes will generate 3 x 1 – 2 = 1 on the first box; 3 x 1 – 1 = 2 on the second box; and, 3 x 1 = 3 on the third box. Similarly on second page these fields will produce 3 x 2 – 2 = 4 on the first box, 3 x 2 – 1 = 5 on the second and 3 x 2 = 6 on the third box of second page.

- After you’ve inserted all these 3 codes on footer close the footer editing screen. You’ll see the column numbers correctly populated on your document. If you find that the fields are not updated, check it in Print Preview screen or right click on the fields and choose Update Field.
How to insert column number if every page have 2 columns?
We inserted mathematical formula 3p, 3p-1 and 3p-2 in the field codes to generate 3,2 and 1 respectively. On the formula there was 3 because we had 3 columns in each page and ‘p’ stands for page number as Word counts and –2, –1 and –0 to produce required numbers respectively. So, if there are only two columns on the document, you can modify formula as:
= 2 * {Page} – 1
for the first column and
= 2 * {Page}
for the second column.
Now, I believe you can compose the formula when there are 4 columns in every page of document:
= 4 * {Page} – 3, = 4 * {Page} – 2, = 4 * {Page} –1 and =4 * {Page}
Voila! That’s all about inserting column numbers in document. I hope you can do it easily now. I’ll be happy to solve your queries if there is still anything confusing.
Wish you best of luck and happy studying!
Multilevel numbering in Word is the #1 headache for many people working with large documents.
Believe it or not, it’s not complicated. It just takes somebody to lead the way and point out the pitfalls you need to avoid.
Today that pleasure falls to me!
Before I start, grab your free multilevel numbering troubleshooting guide that shows you the steps to get multilevel numbering working properly first time, every time, together with answers to over 20 FAQs and plenty of real client examples constructed step by step to help you fix what isn’t working with your numbering.

1. What Multi-level Numbering Looks Like
Often used in the legal profession or in large corporate documents, multilevel numbering creates a logical hierarchy and easy navigation within the document. The headings can also be summarised later on in a table of contents. Here is a simple example:

2. How to Set Up Multilevel Numbering
Here is the correct process:
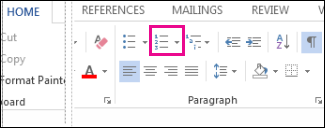
1. Select the text that you want to number (this can be a section of text or the whole document).

2. Select the Home tab.
3. Click the multilevel numbering icon in the Paragraph group.
![]()
4. You can either select an existing layout from the list to use as a starting point, or you can create a new numbering system from scratch. As you hover over each thumbnail image, Word provides a larger image of the numbering system.
5. Choose Define New Multilevel List to display the control dialog.

The dialog box can be broken down as follows:
Step #1 Click level to modify
In the top left is a list of levels. As you select each level, the settings in the rest of the dialog box changes.
Level 1 is the highest level, i.e. the main headings such as chapter or section titles.
Level 2 is subordinate to level 1.
Level 3 is subordinate to level 2.

Step #2 Enter formatting for number
This is where the level number is constructed. If you include a previous level number, it will be displayed with a grey background, as will the number for the current level.
Type anything you wish to put in between the numbers such as dots, dashes, brackets etc.
Clear any text in the ‘Enter formatting for this number’ box.
Step #3 Include level number from
When creating a subordinate level (or child level), you can first specify the level number of the parent.
For example, for section 3.2
- ‘3’ is the parent level (level 1) and
- ‘2’ is the child level (level 2)

Step #4 Number style for this level
Each level can have its own number style. It may be a standalone style, e.g. 1, 2, 3 or a, b, c or continue on from a higher level, e.g. 1.1.1 or 1.a.i.
- When creating 1.1 numbering, this option is 1, 2, 3.
- When creating 1.a numbering, this option is a, b, c

Step #5 Font
Set the font formatting for the selected level, if you want.

Step #6 Position
What position from the left margin do you want items for each level of numbering. For example, level 1 items may be 0cm from the left margin, level 2, 1cm from the left margin and level 3, 2cm from the left margin.
Here’s what they mean:
- The Aligned At determines how far from the left margin the number appears.
- The Text indent at figure determines how far from the left margin the text following the number is.

6. Click OK to save all the settings and close the dialog box.
The text you selected in step 1 now looks like this.

The next part is where the magic happens …
3. How to Apply Multilevel Numbering
Once you have created your numbering system:
1. Position the cursor at the beginning of a line.

2. Press the TAB key to move the text down a level (demote).

3. Press the SHIFT and TAB keys together to move the text up a level (promote).

If you prefer, you can also click the indent icon to demote and the outdent icon to promote between levels.
![]()
4. How to Change Multilevel Settings
Once you have created your numbering system:
1. Reselect all text that is using the multilevel numbering.
2. Click the multilevel numbering icon and select Define New Multilevel List (yes, you choose this option even if you are modifying an existing multilevel list).

The original settings that you defined are redisplayed.
3. In the top-left box select the level that you wish to change, then change your settings.
4. Repeat for the other settings.
5. Click OK to save the settings. Your numbered list should now reflect your new settings.
5. Linking Multilevel Numbering to Styles
Each level of a multilevel numbering system can be linked to a style. This means that as you apply styles throughout the document, the numbering is applied appropriately and automatically. You can either use the built-in Heading 1, Heading 2, Heading 3 styles or use your own custom styles.
1. In the Numbering dialog box, click the MORE button in the bottom-left corner to expand the dialog box.
2. Select level to modify in the top-left box.
3. Open the Link level to style drop-down list and choose the style you wish to connect to the numbering level.

4. Click OK.
5. In the document, apply the Heading 1, Heading 2, Heading 3 styles where needed.
It’s a good idea to create a body text style and apply that where appropriate, so that the body text does not inadvertently get caught up in the multi-level numbering.
6. Select the whole document (or the portion of the document where you want to apply your numbered sections).
7. Click the icon in the Paragraph group (Home tab).
8. Select your custom numbering style from the gallery. The thumbnail image should show the linked styles.

6. How to Use Styles to Set Number Levels
1. Select all the text that you wish to apply the same number level to. Alternatively, if you wish to go line by line, you can place the cursor anywhere in a line of text.
2. In the Styles gallery, click the style that corresponds to the number level you wish to apply. For example, to apply the top level numbering click Heading 1 and for the third level numbering click Heading 3 (assuming those are the styles you assigned).
The numbering and all the numbering settings will be applied to the selected text or the paragraph in which the cursor was positioned.

And that, my friend, is how you do multilevel numbering in Word with no loose ends.
How to set up a dual-multilevel numbering system in Word
7. Two resources to help you
1. Grab your free multilevel numbering troubleshooting guide.

2. Watch over my shoulder as I set up multilevel numbering from scratch.

8. What next?
I hope you found plenty of value in this post. I’d love to hear your biggest takeaway in the comments below together with any questions you may have.
Have a fantastic day.


About the author
Jason Morrell
Jason loves to simplify the hard stuff, cut the fluff and share what actually works. Things that make a difference. Things that slash hours from your daily work tasks. He runs a software training business in Queensland, Australia, lives on the Gold Coast with his wife and 4 kids and often talks about himself in the third person!
SHARE
Tables are visual displays of data arranged in rows and columns. Table cells contain numbers, text, or a combination of numbers and text. Some cells can include images, symbols, links, and other objects. See how to create and modify tables in Word.
Each table should be referenced in the document content. Typically, tables have a number and a title, which are referenced. Microsoft Word offers functionality to create automatically updated numbers for figures, tables, and equations. The numbers and titles, created using the Captions functionality, are used to cross-reference tables in a document and create a List of Tables.
The word Table and a number identify a table then follows the caption. A caption is a short block of text that explain table contents without referring to the document content:

See more about creating numbers and captions for figures: images, pictures, charts, etc., creating captions for equations, and creating captions for photographs.
Attention! We highly recommend checking the formatting requirements, accepted by your college, university, company, or established on the project, etc.
Insert a caption for tables
To add automatically updated numbers and a title (caption) for a table, select it by:
- Selecting all rows or columns of the table one by one, or
- Moving the mouse over the table until you see the table selection icons in the upper-left corner of the table and clicking it:

Note: You can also click on the table selection icon in the bottom-right corner for the same effect. See how to select table elements for more details.

After selecting a table, do one of the following:
- On the References tab, in the Captions group, click the Insert Caption button:

- Right-click on the selection and select the Insert Caption… in the popup menu:


In the Caption dialog box:

Select the label and its position
- Under Options:
- From the Label dropdown list, select the item type you need:

- Table,
- Equation – see how to create captions for equations,
- Figure (selected by default) — see how to create captions for figures,
- Another label (in this example, My Caption) was created using the New Label… button (see how to create a new label below).
Note: Remember that each type of object you labeled will be numbered sequentially within its group.
- From the Position dropdown list, select one of the options:
- Above selected item (selected by default for the Table label), or
- Below selected item (selected by default for the Figure label).
Note: The captions for tables are usually located above the tables.
- From the Label dropdown list, select the item type you need:


Exclude label from caption
- Select the Exclude label from caption check box if you don’t need to add the label to the caption:
Some requirements recommend using the lowercase word table instead of the automatically added Table in Word cross-references.
The option Exclude label from caption hides the label from being displayed in cross-references or a List of Tables.
For example:
- When you insert a cross-reference with the selected option Entire captions or Only label and number (see more details how to use cross-references in Word), Word adds the capitalized label and number, as you see in the Caption field of the Caption dialog box. E.g., “are listed in Table 3” or “are listed in Table 3 Number of articles by statuses and products”.
- All captions, created with selected option Exclude label from caption, Word adds in cross-references as their numbers without the labels. Type the word table (as required) and insert a reference to a caption (e.g., “are listed in table 3”).

Add a new label
- Click the New Label… button to create a new label:
In the New Label dialog box, type a new label name:


Note: See also how to delete a custom label.
Modify caption numbering
- Click the Numbering… button if you want to change any of the numbering options:
In the Caption Numbering dialog box:

- In the Format dropdown list, select the numbering format you need (some requirements recommend using Latin capital letters instead of numbers for tables):
- Select the Include chapter number check box to include the chapter number in the caption number. After selecting this option, two more options will be unlocked:
- From the Chapter starts with style dropdown list, select the heading level you need to include in the caption:
- In the Use separator dropdown list, select the punctuation you need to insert between the chapter number and the table number:
- At the bottom of the dialog box, see how your choices will look in the Examples section. E.g., Table 2.3” means the third table in chapter 2.
- Click the OK button.
- From the Chapter starts with style dropdown list, select the heading level you need to include in the caption:


Add a title
- To add the text of your caption, click after the table number and enter the text. E.g.:

Notes:
- There are several standard requirements for table titles:
- Chicago style recommends using the table title in line with the label and number. E.g.:

- In opposite, APA (American Psychological Association) and MLA (Modern Language Association) styles recommend using the table title with one double-spaced line below the table number (see how to adjust line spacing). E.g.:

To create such a title, don’t type any text in the Caption field, leave it, then do the following:
- Create a caption without a title.
- Position cursor after a caption number and add a new line (by pressing Shift+Enter) in which type of title you need.
Note: You can press Enter and create a new paragraph instead of a new line. See how to create a List of Tables (Table of Figures) for more details.
- Format the caption to adjust line spacing (see how to change caption line spacing).
- In addition, MLA style recommends using a hanging indent to the second line of long titles. E.g.:

- Chicago style recommends using the table title in line with the label and number. E.g.:
- Word offers very helpful functionality to create a text that can be displayed in a List of Tables instead of a caption text. See how to create a Table of Contents Entry.
- For most requirements, the number and the title should be without an ending period. If you need a period after a number, type it in the Caption field.
- If a table spans more than one page, the first page of that table should have a complete caption; the subsequent pages should have an abbreviated caption consisting of a label, a number, and the word Continued. E.g., “Table 3. Continued”.


Using an AutoCaption
See Adding captions with AutoCaption.
Group a table and its caption
According to all requirements, a table (or its part) with its caption should appear on the same page. Word adds captions for tables as a regular paragraph with selected Keep with next option. See how to keep lines and paragraphs together for more details.
See also how to keep a table row on one page and keep a table on one page of a Word document.
Edit or modify a caption
Microsoft Word adds numbers in captions as fields.
![]()
You can show all fields in a document with a gray background, see how to turn on or turn off highlighting of fields in a Word document.
- Labels:
If needed, you can change the label. Word for Microsoft 365 will update the reference if available. In this case, Word will not create a new label and a separate numbering. Be careful!
- Numbers:
DO NOT edit caption numbers! If you change a number:
- In some cases, Word will update it, and you will lose your changes,
- Otherwise, the caption number may stop updating automatically.
- Text:
To add or modify a caption text, click on it and change what you need, like in a regular paragraph.
Do not forget to format a caption according to the requirements you use!
Delete a caption and an unnecessary label
If you need to remove some caption, select the caption paragraph (full line or several lines) and press Delete. Do not forget to update fields in the document!
To remove the unnecessary label, do the following:
1. Open the Caption dialog box.
2. In the Label dropdown list, select the label you want to remove.
3. Click the Delete Label to remove a custom label:

Note: You can’t delete predefined labels: Equation, Figure, and Table.
Update caption numbering
Word automatically updates references and numbering if you insert a new text. However, copying, deleting, or moving context often leads to confusion in the document. After such operations, you have to update all dependencies manually.
To update fields in the document, select the entire document by clicking Ctrl+A, and do one of the following:
- Press F9,
- Right-click on any of the fields and select Update Field in the popup menu:


Word will update all fields. You can be sure that the numbering and references are correct.
We strongly recommend checking a document at least visually after changes!
Download PC Repair Tool to quickly find & fix Windows errors automatically
Microsoft Word is known as a popular program for editing documents, but did you know that you can do calculations in Word as well? Persons are aware of how to calculate data in Excel due to its many functions and formulas, but calculating in Word is least likely done in Microsoft Office.
Follow the steps below to sum a column or row of a table in Microsoft Word:
- Launch Word.
- Insert a table or use an existing one.
- Click the Layout tab and select Formula in the Data group.
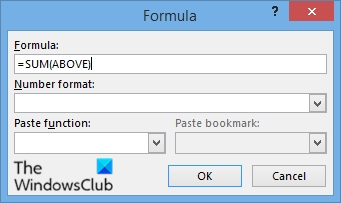
- Place the cursor into the cell you want to calculate.
- A Formula dialog box will open.
- Type into the Formula section
=SUM(ABOVE). - Click OK.
- You will see the result in the cell; the
=SUM(ABOVE)formula calculates everything above the cell.
Launch Word.
Insert a table or use an existing one.

Click the Layout tab and select Formula in the Data group.
Place the cursor into the cell you want to calculate.
A Formula dialog box will open.
Type into the Formula section =SUM(ABOVE).
Click OK.
You will see the result in the cell; the =SUM(ABOVE) formula calculates everything above the cell.
Depending on where you place the cursor, the position of the formula will automatically appear in the Formula dialog box. The example is below:
- =SUM(ABOVE) adds numbers in the column above the cell where you place the cursor.
- =SUM(LEFT) adds numbers in the row to the left of the cell where you place the cursor.
- =SUM(BELOW) adds numbers in the column below the cell where you place the cursor.
- =SUM(RIGHT) adds numbers in the row to the right of the cell where you place the cursor
In the Formula dialog box, you can use other formulas to do other calculations in Microsoft Word such as ABS, AND, AVERAGE, COUNT, DEFINED, FALSE, IF, INT, MAX, MIN, and more.
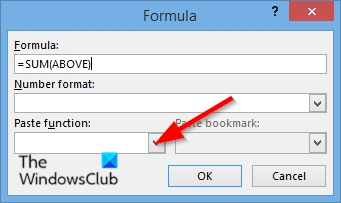
You can access these formulas by clicking the Past function drop-down menu in the Formula dialog box.
What is a formula on Microsoft Word?
In Word, you can perform logical comparisons in a table using formulas. A formula in Word updates automatically when you open the document that contains the formula. You can also update the result of the formula manually.
Is there AutoSum in Word?
Yes, the AutoSum function is available in Microsoft Word. You can add it to the Quick Access toolbar for easy access. For this, go to “File > Options > Customize Quick Access Toolbar.” Now, select All commands in the “Choose commands from” drop-down. Scroll down and find the Sum function. Once you find it, select it and click Add. Click OK. After that, the AutoSum function will be available on the Quick Access toolbar in Word.
We hope this tutorial helps you understand how to insert a formula to sum a column or row of numbers in a table in Word; if you have questions about the tutorial, let us know in the comments.

Shantel has studied Data Operations, Records Management, and Computer Information Systems. She is quite proficient in using Office software. Her goal is to become a Database Administrator or a System Administrator.
You have a column of numbers with a variety of lengths and decimal places. But no matter what you do with the paragraph alignment buttons, they just won’t line up properly at the decimal point.
For example:
|
Left aligned |
Center aligned |
Right aligned |


As with most things in Word, there are a couple of ways you can solve this problem — and the critical thing you need to know is that that what you want is called a ‘decimal tab’.
The procedure for setting a decimal tab is very similar for both Word 2003 and 2007.
- Turn on the ruler if it’s not already displayed (Word 2003: View > Ruler; Word 2007: View tab > Ruler check box).
- Select the column of numbers.
- Set the column’s contents so that the ‘paragraphs’ are left-aligned.
- Click the tab icon at the top left of the ruler several times (typically three times) until it looks like this:
Decimal tab icon
- Now, click in the ruler between the ‘flags’ where you want the decimal tab alignment to be.
- All your numbers are now aligned at the decimal point!


If you want to align several columns of numbers at once using the same decimal tab alignment, then the procedure is much the same:
- Select all the columns you want to align to the decimal tab and make sure the ‘paragraphs’ are left-aligned.
- Click the tab icon at the top left of the ruler until it shows the decimal tab icon.
- Click in the ruler between the grayed out ‘flags’ of the first column. All columns have the decimal tab applied to them at once.

Set a decimal tab for multiple columns
If you don’t like using the tab icons on the ruler, then you can set a decimal tab in the Alignment section of the Tabs dialog.

Tabs dialog
To open the Tabs dialog:
- Word 2003: Format > Tabs
- Word 2007: Home tab > Paragraph group > dialog box launcher (which then opens the Paragraph dialog) > Tabs button (at the bottom left of the Paragraph dialog).

Paragraph dialog launcher button
While Microsoft Excel is great at performing calculations, producing charts and storing data, you can more easily create a descriptive, expressive and readable business report by using Microsoft Word instead. You can perform some spreadsheet tasks with Word using standard tables. For instance, you can total a column of numbers in a Word table using the SUM function — just as you would in an Excel spreadsheet.
-
Launch the Microsoft Word application on your computer.
-
Click the «Insert» tab on the Ribbon. Click the Table icon to drop down the sheet of options. Click «Insert Table.»
-
Type the number of columns you will need in the «Number of columns» drop-down list. Type the number of rows you will need in the «Number of rows» drop-down list. Click the «OK» button.
-
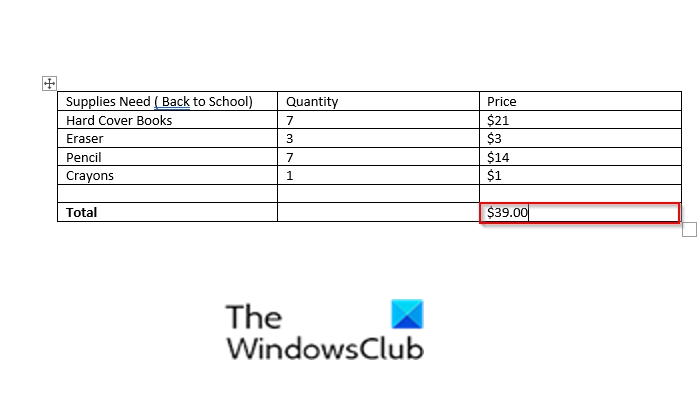
Type the numbers you want to total into their individual table column cells.
-
Right-click your mouse in the last row of the column of data you will be adding. Click the “Insert” option. Click «Insert Rows Below» in the submenu. This step adds an additional row to the table column that you can use for the total.
-
Click your mouse in the empty cell of last row of the column you will total. Click the «Layout» tab on the Ribbon.
-
Click the «Formula» ribbon icon. The dialog box should have the text «=SUM(ABOVE)» in the “Formula:”formula input box.
-
Click the «OK» button to accept the formula and total the column.