
Footnotes are short notes at the bottom of the page that provide explanations, additional comments, or an understanding of a particular word or phrase in the document content. Endnotes are the same as footnotes but appear at the end of an entire section or document.

Footnotes or endnotes in the document must be formatted according to the requirements accepted by your college, university, company, established on the project, etc.
The number or symbol inserted in the document content to refer to a footnote or endnote is called a reference mark. Footnotes appear on the same page as their reference marks, and endnotes appear at the end of the document or section (see more about their customization below). In most views, footnotes or endnotes are separated from the body text by a note separator line (see how to change a note separator line).
The numbering is always correct if you insert footnotes or endnotes using the Word’s Footnote and Endnote functionality. Even after changes are made to the document, Word automatically moves the footnotes to the correct page and renumbers them accordingly.
Note: You can use footnotes and endnotes in the same document.
Insert a Footnote or Endnote
Word offers several useful features to insert footnotes and endnotes. You can:
- Insert the Footnote with the default format using the Insert Footnote button
- Insert the Endnote with the default format using the Insert Endnote button
- Insert the Footnote and Endnote using shortcut keys
- Insert the Footnote and Endnote using the custom format
Note: To reference a single footnote or endnote multiple times in the document text with the automatic numbering, you can use cross-references.
Insert the Footnote using the Insert Footnote button
To insert the Footnote with the format used by default (Word’s default format or last saved format for the footnotes in the document), do the following:
1. Place the cursor where you want to insert the reference to the footnote.
2. On the References tab, in the Footnotes group, click the Insert Footnote button:

Word inserts the footnote at the bottom of the current page with the format used by default (superscript number of the 1, 2, 3, … numbered list). The cursor is positioned next to the inserted footnote. E.g.:
3. Enter what you need in the footnote. You can modify text style, size, color as you want using the same features as for the regular text:

Note: See how to format footnotes and endnotes for more details.
4. Double-click the number or symbol at the beginning of the footnote to return to the place in the document where you inserted a reference mark.
Insert the Endnote using the Insert Endnote button
To insert the Endnote with the format used by default (Word’s default format or last saved format for the endnotes in the document), do the following:
1. Place the cursor where you want to insert the reference to the endnote.
2. On the References tab, in the Footnotes group, click the Insert Endnote button:

Word inserts the endnote at the end of the document with the format used by default (superscript number of the i, ii, iii, … numbered list). The cursor is positioned next to the inserted endnote. E.g.:

3. Enter what you need in the endnote.
Note: See how to format footnotes and endnotes for more details.
4. Double-click the number or symbol at the beginning of the endnote to return to the place in the document where you inserted a reference mark.
Insert the Footnote and Endnote using shortcut keys
You can use the following keyboard shortcuts to insert footnotes and endnotes in a Microsoft Word document:
- Press Alt+Ctrl+F to insert a footnote.
- Press Alt+Ctrl+D to insert an endnote.
Insert the Footnote and Endnote with custom format
To insert the Footnote and Endnote in the document with the custom format, do the following:
1. Place the cursor where you want to insert the reference to the footnote or endnote.
2. On the References tab, in the Footnotes group, click the dialog box launcher:

3. In the Footnote and Endnote dialog box:

- In the Location section:
- Select Footnotes and the location:
- Bottom of page (used by default)
- Below text – if there is a space between text and a bottom margin on the page, it can be placed right after text. For example:

- Select Endnotes and the location:
- End of section
- End of document (used by default)
To insert endnotes at the end of each chapter or other parts in the document, add a section break (see how to work with breaks in Word) for each chapter or part and select the End of section option.
- Click the Convert… button to convert all footnotes to endnotes, or vice versa (see converting footnotes and endnotes below).
- Select Footnotes and the location:
- In the Footnote layout section (available only if the Footnote is selected in the Location section), select the layout from the Columns dropdown list.
As for the regular text, Word offers to create columns for the footnotes and endnotes.
- Match section layout – use the same number of columns as the document text
- 1 column
- 2 column
- 3 column
- 4 column
For example:
- Match section layout:

- 1 column:
- In the Format section:
- Choose the format you need from the Number format dropdown list:

- 1, 2, 3, … (used by default for footnotes)
- a, b, c, …
- A, B, C, …
- i, ii, iii, … (used by default for endnotes)
- I, II, III, …
- *, †, ‡, §, …
- Type the Custom mark or select it by clicking the Symbol… button to open the Symbol dialog box:

Select the symbol you need in the Symbol dialog box and click the OK button.
In English, a footnote or endnote is usually indicated by a superscript number immediately following the text or phrase to which the note refers. For some requirements, a superscript number should be placed between parentheses, for example: [1].
Note: We strongly recommend checking the requirements you need to follow. For example:
- The Chicago style allows using symbols, such as the asterisk (*) or the dagger (†), instead of numbers if there are a few footnotes in the document (see how to add different reference marks for more details).
- The American Psychological Association (APA) style and Modern Language Association (MLA) style don’t recommend using symbols as footnote identifiers.
- Optionally, select the number you need to start numbering in the Start at field.
For example, if you have several documents containing different chapters or parts of the voluminous project, you can start footnotes from a specific number in the current document.
- From the Numbering dropdown list, select one of the options:
- Continuous (used by default)
- Restart each section
- Restart each page
- Choose the format you need from the Number format dropdown list:
- In the Apply changes section, from the Apply changes to dropdown list, select one of the options:
- This section
- Whole document


4. Enter the text you need in the footnote or endnote:
5. Double-click the number or symbol at the beginning of the note to return to the document content.
Converting Footnotes and Endnotes
Word can convert footnotes to endnotes, and vice versa:
- To convert one footnote to an endnote, right-click the footnote, then click Convert to Endnote in the popup menu:

- To convert one endnote to a footnote, right-click the endnote, then click Convert to Footnote in the popup menu.
- To convert all footnotes to endnotes or convert all endnotes to footnotes, do the following:
1) Right-click any of the footnotes or endnotes, then select Note Options… in the popup menu:
2) In the Footnotes and Endnotes dialog box, click the Convert… button:

3) In the Convert Notes dialog box, choose the option you need:

- Convert all footnotes to endnotes (is active if there is at least one footnote in the document)
- Convert all endnotes to footnotes (is active if there is at least one endnote in the document)
- Swap footnotes and endnotes (is active if there are at least one footnote and one endnote in the document)


Select all footnotes in the document
To select all footnotes in the document, click inside any footnote, then press Ctrl+A.
To select all endnotes in the document, click inside any endnote, then press Ctrl+A:

Edit and move footnotes and endnotes
To edit a footnote or endnote, click inside the note and make corrections.
To move a footnote or endnote from one location in the document to another, do the following:
1. Select the reference mark in the document.
2. Do one of the following to cut the selection:
- On the Home tab, in the Clipboard group, click the Cut button:

- Right-click the selection and choose Cut in the popup menu.
- Press Ctrl+X.

3. Place the cursor in the new location.
4. Do one of the following to paste selection:
- On the Home tab, in the Clipboard group, click the Paste button.
- Right-click and choose Paste in the popup menu.
- Press Ctrl+V.
Word moves the reference mark and the note to the correct place; also, it renumbers footnotes and endnotes.
Move among footnotes and endnotes
To move among footnotes and endnotes, on the References tab, in the Footnotes group, click the Next Footnote button, then select one of the options:

- Next Footnote,
- Previous Footnote,
- Next Endnote,
- Previous Endnote.
Notes:
- To move to the next footnote, you can just click the Next Footnote button in the Footnotes group on the Reference tab.
- See more about navigating in the document.
Display footnotes or endnotes
To display the note’s content in the Word document, do one of the following:
- On the References tab, in the Footnotes group, click the Show Notes button to display the list of footnotes or endnotes:

If there are footnotes and endnotes in the document, Word asks which type of notes you want to see:

- Double-click a reference mark in the document’s body to display its corresponding footnote or endnote.


Note: If you hover the mouse over a reference mark in the document text, a tooltip appears with a full footnote or endnote text, so you don’t need to scroll up and down to check footnotes and endnotes as you read or write:

Remove the Footnote and Endnote
To delete the footnote or endnote in the Word document, select its reference mark (number or symbol that refers to the footnote or endnote), and press the Delete key.
Note: If you delete the text and the number from the footnote or endnote pane, it does not delete the number in the document text itself. Word still thinks the deleted footnote or endnote is still active. You need to delete the original reference mark in the document.
After removing any note, Microsoft Word automatically renumbers the footnotes and endnotes.
In this article, there will be 2 tips to help you with inserting footnotes to multi-column pages in your Word document.
To insert a single footnote is easy, but it’s a different thing when you try to insert footnotes for a multi-column page. There are 2 main problems you may run into:
- First, if only a part of your Word document is set in columns, when you insert a footnote for the rest part, such as the document title, you will see the text in columns will jump to next page, just as below:

- Second, if you insert a footnote to a text in multi-column, then the footnote will be in columns, too.


The fact is you may want to have the footnote shown without being affected by columns.
If you ever had the above troubles, please read on to see how you can address them.
Tip 1: Modify “Layout Options”
The following steps are dedicated to fixing problem 1:
- Firstly, open your Word and click “File” tab and click “Options” to open the “Word Options” dialog box open.

- Then, click “Advanced”.
- Next, scroll down to the end of the box to the “Compatibility options for” part.
- And click “Layout Options”.

- Then check “Lay out footnotes the way Word 6.x/95/97 does” box.
- Last but not the least, click “OK” to save your modification.


Now, if you have previously inserted a footnote, you will find everything is back to normal now. Next time, you won’t have the same issue.
Tip 2: Use Cross-reference
- To begin with, repeat the steps in tip 1 to change the layout options. And make sure you don’t insert a footnote for text now.
- Then, if you want to insert a footnote “1” for a text in columns, you should now insert it somewhere outside the column text, say, behind the title. And the footnote content you type, the multiple letter “x” here, should be the words to illustrate the column text. After this, you can see the footnote in the normal way.

- Next, place your cursor at the correct place where footnote “1” should actually goes.
- Now, click “References” tab first.
- Then click “Cross-reference” in “Captions” group.

- In “Cross-reference” dialog box, choose “Footnote” for “Reference type” and “Footnote number” for “Insert reference to”.
- Next, click to select the footnote you just create.
- And click “Insert”. Close the dialog box when finish this.

- Then go to select the footnote number “1” behind the title.
- Right click and choose “Font”.

- In “Font” dialog box, make sure “Font” tab is on.
- Choose a font color which is the same as the document background color. Here we should choose “White”. Or you can check “Hidden” box to hide the number. Both operations make the number invisible.
- Lastly, click “OK”.


Quickly Restore Word Files
As you can see, we can solve various tricky issues in Word by making use of different features. Some of them may not be customized to meet the exact demand, but we still can use them to do our job. This is one of the reasons that Word is popular. Apart from this, Word is also susceptible to user errors and virus attacks. Thus, you should purchase a Word file damage recovery tool to quickly restore corrupted files.
Author Introduction:
Vera Chen is a data recovery expert in DataNumen, Inc., which is the world leader in data recovery technologies, including corrupt Excel file recovery tool and pdf repair software products. For more information visit www.datanumen.com
-

1
Open Microsoft Word. Its icon resembles a blue background with a white «W» on top.
- If you’d rather edit an existing document, simply double-click the document in question.
-
2
Click Blank document. It’s in the top-left corner of the templates page.
- If you’re editing an existing document, skip this step.
Advertisement
-
3
Click the Layout tab. It’s at the top of the Word window, to the right of the Home, Insert, and Design tabs.
-
4
Click Columns. This option is below and to the left of the Layout tab. Clicking it will prompt a drop-down menu with the following options:
- One — Default setting for Word documents.
- Two — Splits the page into two distinct columns.
- Three — Splits the page into three distinct columns.
- Left — Concentrates most of the text on the right side of the document, leaving a narrow column on the left.
- Right — Concentrates most of the text on the left side of the document, leaving a narrow column on the right.
- If you highlight a part (or all) of your document before clicking a column option, your document will be reformatted to appear in columns.
-
5
Click a column option. Doing so will apply invisible columns to your document; as you type, you’ll notice that your text jumps to a new line before reaching the standard right-most margin. Once you reach the bottom of the page, your text will continue in the next column until you reach the bottom of the page again, and so on.


Advertisement
-
1
Open Microsoft Word. Its icon resembles a blue background with a white «W» on top.
- If you’d rather edit an existing document, simply double-click the document in question.
-
2
Click Blank document. It’s in the top-left corner of the templates page.
- If you’re editing an existing document, skip this step.
-
3
Click the Layout tab. It’s at the top of the Word window, to the right of the Home, Insert, and Design tabs.
-
4
Click Columns. You’ll find this option below and to the left of the Layout tab.
-
5
Click More Columns. It’s at the bottom of the Columns drop-down menu.
-
6
Click a number of columns. You’ll see options like One, Two, Three, and so on at the top of this window. Clicking an option will apply it to your document.
- If you highlighted text, your settings will be applied only to the highlighted text.
-
7
Modify the column width and separation. You can do this by clicking the up or down arrow to the right of «Width» and the «Spacing» values, respectively.
- You can also uncheck the box next to «Equal column width» in order to make one column wider than the other.
-
8
Check the box next to «Line between» to draw a divider. Doing so will place a visible line between your columns.
- If you don’t want a visible divider, leave this option unchecked.
-
9
Click the «Apply to» drop-down menu. Doing so will allow you to click Selected text or Whole document to apply your column settings to the respective amounts of text.
-
10
Click OK. This will apply your settings and divide any selected text as per your customized column rules.


Advertisement
Add New Question
-
Question
How do I add columns to the middle of the document without changing the format of the entire document?

In Word, type the lines of text in a single column anywhere in the document. Then, select the lines of text and click the Page Layout tab. In the Page Setup options, click Columns and select the desired number of columns. Word automatically creates continuous section breaks before and after the columns. In some cases, it may be impossible to do without changing the format of the document.
-
Question
How do I rotate a page in Word?
Select the pages or paragraphs whose orientation you want to change. Click Page Layout > Page Setup Dialog Box Launcher. In the Page Setup box, under Orientation, click Portrait or Landscape. Click the Apply to box and click Selected text.
Ask a Question
200 characters left
Include your email address to get a message when this question is answered.
Submit
Advertisement
Thanks for submitting a tip for review!
About This Article
Article SummaryX
1. Open Microsoft Word or an existing Word document.
2. Click Blank document.
3. Click Layout.
4. Click Columns.
5. Click a number of columns.
Did this summary help you?
Thanks to all authors for creating a page that has been read 533,587 times.
Is this article up to date?
 Please Note:
This article is written for users of the following Microsoft Word versions: 2007, 2010, 2013, 2016, 2019, and Word in Microsoft 365. If you are using an earlier version (Word 2003 or earlier), this tip may not work for you. For a version of this tip written specifically for earlier versions of Word, click here: Footnotes in Two Columns.
![]()
Written by Allen Wyatt (last updated April 24, 2021)
This tip applies to Word 2007, 2010, 2013, 2016, 2019, and Word in Microsoft 365
Word includes the ability to place footnotes at the bottom of each page in your document. By default, the footnotes are placed into the same number of columns as you are using in the document. Thus, if your document uses two columns, then the footnotes will be placed into two columns, as well. In general, each of the footnotes appears under the same column in which the footnote reference appears.
Word 2013 added the ability to have your footnotes appear using a different number of columns than the main body of your text. (This is a huge formatting boon for those using footnotes.) Insert your footnotes as normal, but then follow these steps:
- Display the References tab of the ribbon.
- Click the small icon at the bottom-right of the Footnotes group. Word displays the Footnote and Endnote dialog box. (See Figure 1.)
- Make sure that the Footnotes radio button is selected.
- Use the Columns drop-down list to indicate how many columns you want Word to use to display the footnotes.
- Click OK.
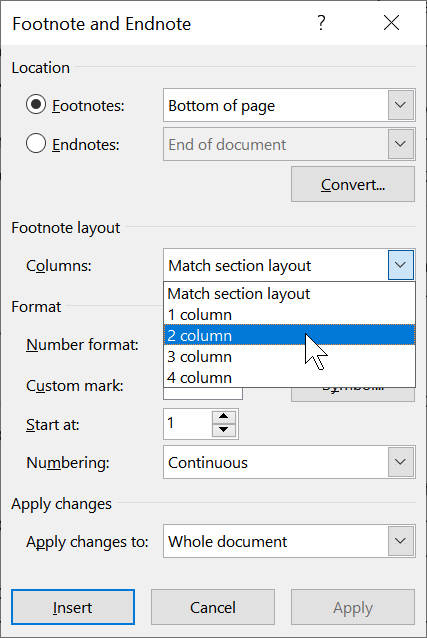
Figure 1. The Footnote and Endnote dialog box.
At this point Word reformats any existing footnotes so that they match whatever number of columns you specified in step 4. You don’t have any control over the width of the individual columns; Word makes them all of equal width.
If you are using an older version of Word and you want your footnotes to appear in a different number of columns than your document does (for instance, two columns of footnotes when the body is a single column), you are out of luck; Word can’t handle it. You could work around the problem by «faking» the footnotes, meaning to enter them manually (as regular text) and placing the notes themselves in a multi-column table placed at the bottom of the page. Of course, your footnotes won’t automatically renumber, and they won’t flow from page to page as you add or remove text from the body of the document.
If your desire is to have your footnotes in a single column while your text body is in multiple columns, the folks at the Word MVP site have come up with a workaround. You can find it here:
http://wordfaqs.ssbarnhill.com/FootnotesSpanColumns.htm
WordTips is your source for cost-effective Microsoft Word training.
(Microsoft Word is the most popular word processing software in the world.)
This tip (8961) applies to Microsoft Word 2007, 2010, 2013, 2016, 2019, and Word in Microsoft 365. You can find a version of this tip for the older menu interface of Word here: Footnotes in Two Columns.
Author Bio
With more than 50 non-fiction books and numerous magazine articles to his credit, Allen Wyatt is an internationally recognized author. He is president of Sharon Parq Associates, a computer and publishing services company. Learn more about Allen…
MORE FROM ALLEN
After Pressing Enter, Text Becomes a Heading
Word provides several built-in tools that can affect how what you type is formatted. One of those tools can even change …
Discover More
Who Has the File Open?
Open a workbook that someone else is working on, and you won’t be able to save your changes back into the same file. …
Discover More
Making Sure Num Lock is On
The Num Lock key controls how your numeric keypad behaves and, possibly, a few other behaviors. Here’s how to adjust …
Discover More
More WordTips (ribbon)
Getting Rid of Hyperlinks in Footnotes
When you add hyperlinks to a document, Word makes them active, meaning you can click them to open the target of the …
Discover More
Sequentially Numbering Footnotes
If you have a document with lots of footnotes, you might notice that some of those footnotes are not in numerical order, …
Discover More
Using Cross-References in Footnotes
Need to make a cross-reference from one footnote to another footnote? You can do it if you throw bookmarks into the mix, …
Discover More