
Cause: The cell is formatted as Text, which causes Excel to ignore any formulas. This could be directly due to the Text format, or is particularly common when importing data from a CSV or Notepad file. Fix: Change the format of the cell(s) to General or some other format.
How do you add a value to a column?
Just select an empty cell directly below a column of data. Then on the Formula tab, click AutoSum > Sum. Excel will automatically sense the range to be summed. (AutoSum can also work horizontally if you select an empty cell to the right of the cells to be summed.)
Why is my SUM in Excel wrong?
Without seeing your worksheet, the most likely cause is some of the cells contain text instead of numbers. The SUM function is designed to ignore any text cells. Without seeing your worksheet, the most likely cause is some of the cells contain text instead of numbers.
Why is my Excel not calculating correctly?
The most common reason for an Excel formula not calculating is that you have inadvertently activated the Show Formulas mode in a worksheet. To get the formula to display the calculated result, just turn off the Show Formulas mode by doing one of the following: Pressing the Ctrl + ` shortcut, or.
Why is AutoSum wrong?
AutoSum can also fail when one number in your range contains a SUM formula. The provisional formula will offer to sum a formula extending up to but not including the previous SUM formula. Excel does not show the provisional formula, so check one formula to see that it is correct.
What is the addition formula in Excel?
The simplest type of Excel addition formula is made up of the = sign, followed by two or more numbers, with the + operator in between them. which returns the result 10. As with all Excel formulas, instead of typing the numbers directly into your addition formula, you can use references to cells containing numbers.
Why is my auto sum not working?
The most common reason for AutoSum not working in Excel is numbers formatted as text. To fix such text-numbers, select all problematic cells, click the warning sign, and then click Convert to Number.
Why is AutoSum not working?
Excel AutoSum not working The most common reason for AutoSum not working in Excel is numbers formatted as text. To fix such text-numbers, select all problematic cells, click the warning sign, and then click Convert to Number.
How do I use AutoSum?
On your Android tablet or Android phone
- In a worksheet, tap the first empty cell after a range of cells that has numbers, or tap and drag to select the range of cells you want to calculate.
- Tap AutoSum.
- Tap Sum.
- Tap the check mark. You’re done!
What is the short cut key to insert columns or rows?
Ctrl++ (plus character) is the keyboard shortcut to insert rows or columns. If you are using a laptop keyboard you can press Ctrl+Shift+= (equal sign).
How do you add an addition formula in Excel?
If you need to sum a column or row of numbers, let Excel do the math for you. Select a cell next to the numbers you want to sum, click AutoSum on the Home tab, press Enter, and you’re done. When you click AutoSum, Excel automatically enters a formula (that uses the SUM function) to sum the numbers.
How do you add multiple cells in Excel?
Select the cell, or the range of cells, to the right or above where you want to insert additional cells. Tip: Select the same number of cells as you want to insert. For example, to insert five blank cells, select five cells. Hold down CONTROL, click the selected cells, then on the pop-up menu, click Insert.
What is the addition function?
Adding two functions is like plotting one function and taking the graph of that function as the new x-axis. Points of the second function are then plotted with respect to the new axis. Addition of functions is commutative and associative: f + g = g + f and (f + g) + h = f + (g + h).
Why does AutoSum equal zero?
It only comes the number zero. You’re trying to sum numbers that are actually text. Tex that look like numbers will have a default left alignment; true numbers have a default right alignment in the cell.
How do I do a Countif with multiple conditions?
The COUNTIFS function takes multiple criteria in pairs — each pair contains one range and the associated criteria for that range. To generate a count, all conditions must match. To add more conditions, just add another range / criteria pair.
How would you add a new column at the right if you needed it?
If your task is to quickly insert one column, these steps are by far the quickest and simplest.
- Click on the letter button of the column immediately to the right of where you want to insert the new column.
- Now just press Ctrl + Shift + + (plus on the main keyboard).
Type = (press the equals key to start writing your formula) Click on the first cell to be added (B2 in this example) Type + (that’s the plus sign) Click on the second cell to be added (A3 in this example)
How do you add a column?
Click in a cell to the left or right of where you want to add a column. Under Table Tools, on the Layout tab, do one of the following: To add a column to the left of the cell, click Insert Left in the Rows and Columns group. To add a column to the right of the cell, click Insert Right in the Rows and Columns group.
What are the 2 easiest steps to delete a column?
Select the columns by clicking on the first one, then find and press on the keyboard the ‘Ctrl’ key. While holding it, select any column you need by simply clicking on it. Let’s pick columns C, E and G, now. Use the right-click, choose ‘Delete’, and we’re done!
How to add an additional column to an if function?
To begin with, you can add an additional column (E) with the following formula that sums numbers in columns C and D: =C2+D2. And now, let’s write a nested IF function based on the above conditions. It’s considered a good practice to start with the most important condition and make your functions as simple as possible.
How to add a column to a table in Excel?
Convert your data into Excel table to get total for your column 1 Press Ctrl + T on yourkeyboardto format the range of cells as Excel Table. 2 You will see the new Design tab appear. Navigate to this tab and tick the checkbox Total Row. 3 A new row will be added at the end of your table. …
How to use SumIf to add up rows in Excel?
You can use SUMIF to add up one column where the value in another column matches a text value in another column. This might be useful in the previous example where we wanted to add up all rows where the Day column included “Monday”.
How to add multiple columns to alter table?
If you want to add multiple columns to a table at once using a single ALTER TABLE statement, you use the following syntax: column_name_n data_type_n column_constraint_n; In this syntax, you specify a comma-separated list of columns that you want to add to a table after the ADD clause. SQL Server ALTER TABLE ADD column examples.
I’m using Office 2013 on Windows 7. Few times, I have not been able to insert rows / columns in a some of the Excel spreadsheets. I tried the following before searching on the internet.
- Use right-click on the column border to select «Insert» option — the
option is not grayed out — but it does no action — no rows/columns inserted - Click on the «Insert» icon (which is under the «Cells» group of the
«Home» tab) — select the «Insert sheet rows / Insert sheet columns»
option from the sub-menu — nothing happens - Tried using a keyboard shortcut
Ctrl+Shift++ to add rows / columns
after selecting a particular column or row — no rows/columns
inserted.
When I googled, I found lot of search results pointing to the error What does ‘To prevent possible loss of data, Excel cannot shift nonblank cells off of the worksheet» mean? But I’m not getting any such error message when I attempt the insertion of row / column.
There are no patterns of files for which this row/column insert operation fails. Sometimes, it happens to a file on a network server or sometimes to the files on my PC.
The present workaround is to restart Excel and most times it allows row/column insertion on the same file. Has anyone come across similar issues? Any fixes found so far?
asked Nov 10, 2014 at 18:52
![]()
6
I am using Office 2013 Pro Plus and I have also lost my «Insert» option and even «Cut» option along with that.
To overcome that, go to following file path:
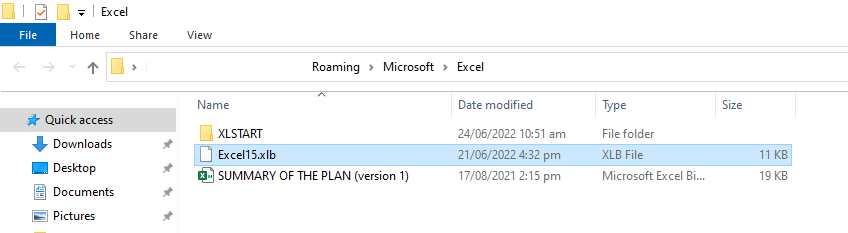
C:Users(user ID)AppDataRoamingMicrosoftExcelExcel15.xlb
rename Excel15.xlb file to Excel15.db.
P.S : Keep Excel off while change.
![]()
techraf
4,83211 gold badges24 silver badges40 bronze badges
answered Aug 31, 2015 at 7:45
![]()
RahulRahul
511 bronze badge
4
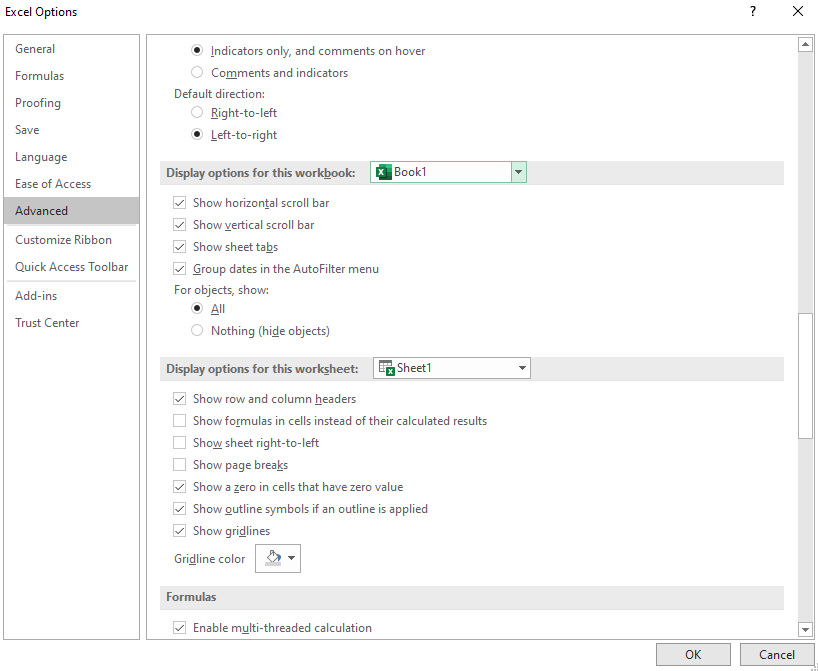
The «Cannot shift objects off worksheet» message occurs when you attempt to insert rows or columns in a worksheet, and the option Nothing (hide objects) is selected under the For objects, show section in the Excel Options dialog box. This is a known bug in Microsoft Office Excel 2007. Although this option is not selected by default, it’s possible to set it accidentally by pressing a particular keyboard shortcut (CTRL+6).
To work around the bug, you must change the setting from Nothing (hide objects) to All. The fastest way to do this is by pressing CTRL+6.
Alternatively, you can change the setting in the Excel Options dialog box. To do so, click the Microsoft Office Button , and then click Excel Options. On the Advanced tab, scroll to Display options for this workbook settings. Under For objects, show, select All instead of Nothing (hide objects).
answered Feb 5, 2015 at 7:04
![]()
2
MS Excel -2013 — Adding a Column or Row — Problem
- File-> Options
- Click on ‘Customize Ribbon’
- Click ‘New Tab’, Rename if you want, Say ‘X’. Click ‘Insert Sheet
Columns’. This action will add this to ‘New Tab’ created. - Click ‘Insert Sheet Rows’. This action will add this to ‘New Tab’
created. - Click ‘Close’.
- Select any Column.
- You will see a new tab, ‘X’.
- Click on ‘Insert Sheet Columns’, from the new tab ‘X’.
This will Add a Ribbon on the top to help you in inserting a row or column, alternate to Right click to add a row or column. Not fixing the issue. Just a workaround.
![]()
answered Aug 20, 2015 at 6:09
![]()
2
Contents
- Why Can’t I Create New Cells in Excel on Windows 10?
- Any of the following factors can prevent the creation of new cells in Microsoft Excel:
- How to Fix “Cannot Add New Cells in Excel”
- Here are the solutions to the problem:
- Fix 1: Remove Cell Protection
- Fix 2: Unmerge the Rows/Columns
- Fix 3: Unfreeze the Panes
- Fix 4: Copy Your Data to a New Sheet
- Fix 5: Choose a Shorter File Path
- Fix 6: Change the File Format
- Fix 7: Format the Table as a Range
- Fix 8: Set the File Source as Trusted
- Fix 9: Clear the Formatting in Unused Rows/Columns
- Fix 10: Customize the Used Range Using VBA
- Fix 11: Use Office Online
![Microsoft Excel cannot add new cells [Fixed]](https://www.auslogics.com/en/articles/wp-content/uploads/2020/07/fix-excel-cant-add-new-cells.jpg)
While working on an Excel spreadsheet, you may run into the problem of not being able to add new cells. This issue is very common and can be easily resolved. Keep reading to find out how.
Why Can’t I Create New Cells in Excel on Windows 10?
In most cases, the supposed ‘problem’ serves the purpose of preventing the loss of data on your sheet. However, exceptions do exist, such as in the case of corrupt files or due to the file format you are using.
Any of the following factors can prevent the creation of new cells in Microsoft Excel:
- Cell protection: In Excel, there are different types of cell protection for your data. If you have one active, it could be the reason why you cannot create a new cell.
- Merged rows/columns: When you merge entire rows or columns to make a single cell, you won’t be able to insert a new row/column.
- Formatting applied to an entire row/column: You may have unintentionally formatted an entire row/column. This could be the cause of the problem you are facing.
- Freeze Panes: The Freeze Panes option helps facilitate data entry and management. However, it can prevent you from adding new cells.
- Entries in the last rows/columns: If you are trying to replace entries in the last row/column of the sheet, Excel will restrict the addition of new cells so as to avoid data loss.
- A data range formatted as a table: You may experience the problem in question when you try to add cells in a selected area that includes a table and a blank space.
- File format limitations: Different file formats are available in different versions of Excel. Each file format has its unique purpose and limitations. You may thus encounter a problem when trying to add new cells if you are using a file format with limited functionality.
- Files from untrusted sources: For your protection, Excel often prevents the execution of files from untrusted sources. It may well be that the error you are currently facing stems from the file itself.
Now that we have seen the various reasons why you can’t add a column or line in Microsoft Excel, let us now go ahead and dive into how to get the issue resolved.
How to Fix “Cannot Add New Cells in Excel”
Here are the solutions to the problem:
- Remove cell protection
- Unmerge the rows/columns
- Unfreeze the panes
- Copy your data to a new sheet
- Choose a shorter file path
- Change the file format
- Format the table as a range
- Set the file source as trusted
- Clear the formatting in unused rows/columns
- Customize the used range using VBA
- Use Office Online
By the time you have tried the solutions listed above, you are sure to get on with your work without further trouble. So let’s get started:
Fix 1: Remove Cell Protection
The cell protection functionality in Excel preserves the current state of your sheet or workbook by locking the cells so that your data can’t be wiped or edited. Therefore, if you have cell protection active, the creation of new cells will not be allowed in order to preserve your existing data. So all you have to do is deactivate the functionality. Follow these easy steps to get it done:
- Select all the cells on your worksheet by pressing Ctrl + A on your keyboard.
- On the Home tab, click the Format drop-down.
- Select Format Cells under Protection at the bottom of the menu.
- In the window that opens, click on the Protection tab and unmark the option that says ‘Locked.’
- Click OK.
- Now, go to the Review tab and click on Protect workbook or Protect Sheet.
- Enter your password to remove protection from the sheet or workbook.
- Press Ctrl + S to save your file. Close the window and then open it again. You can now try inserting a new row/column. See if it works.
Fix 2: Unmerge the Rows/Columns
As already mentioned, you may have merged an entire row or column rather than just a few cells. In this case, Excel is programmed to restrict the addition of new cells so as to keep your data from getting lost. Merging all the cells in a row prevents the addition of another column, and merging all the cells in a column prevents the addition of new rows. Unmerging the columns/rows can resolve the issue. Here’s what you should do:
- Look through your worksheet and locate the merged rows/columns.
- If it is a column that is merged, click the column header (for example A, B, C, etc.).
- Now, on the Home tab, click on Merge and Center to unmerge the highlighted column.
- Repeat Steps 2 and 3 for any other merged column(s).
- If there is any merged row, click on the row header (for example 1, 2, 3, etc.) and then click Merge and Center displayed in the Home tab.
- Press Ctrl + S on your keyboard to save your file. Close the workbook and then open it again. You can now check whether the issue in question has been resolved.
Fix 3: Unfreeze the Panes
The Freeze Panes feature makes referencing easier by keeping a selected area of your worksheet visible as you scroll to other areas of the worksheet. However, the functionality can prevent the addition of new rows or columns to the sheet. Follow these steps to unfreeze the frozen panes:
- Go to the View tab.
- Click the Freeze Panes drop-down.
- Select Unfreeze Panes from the menu.
- Save your file by pressing Ctrl + S and then close it.
- Reopen the file and see if the problem has been fixed.
Fix 4: Copy Your Data to a New Sheet
It could well be that the file you are working with is corrupt. Thus, try copying your data to a new file. Here’s how:
- Open the sheet you are having problems with.
- Press Ctrl + A to select your data and then press Ctrl + C to copy it.
- Go to the File tab.
- Click on New and select Blank Workbook.
- Click Create.
- Click the Paste drop-down arrow in the Home tab.
- Click ‘Paste Special…’
- Click on ‘Values’ and then click OK.
- Save the new file and then close it. Reopen the file and check whether the problem you are facing has been resolved.
Fix 5: Choose a Shorter File Path
The address of your file in your OS is referred to as the file’s path. When it is too long, it could prevent the creation of new cells. Save the file in a location where the file path will be shorter. Follow these steps:
- Open the file you are having trouble with.
- Click on the File tab and select Save as.
- In the dialogue box that opens, select Desktop as the location for the file to be saved and then click the Save button.
- Close the workbook.
- Open the newly saved file and check whether the problem you were facing will occur again.
Fix 6: Change the File Format
The file format you are using may be the cause of the error. Using a different format may help resolve the issue. For instance, you can switch from XLSM to CSV, XLS, or XLSX. Let’s take a look at how to do that:
- Open the file you are having trouble with.
- Go to the File tab and click on Save as.
- In the Save as dialogue box that opens, expand the ‘Save as type:’ drop-down and choose a different file format. For instance, you can choose XLS if CSV is the current format.
- Click the Save button.
- Close the workbook.
- Reopen the newly saved file and see if the issue has been resolved.
Fix 7: Format the Table as a Range
Although Excel supports the creation of tables, in some cases, tables can cause the problem of not being able to add or delete rows/columns in a worksheet. When that happens, try converting the table to a range. Follow these easy steps to do so:
- Click on any area in the table you created.
- Go to Design, which is under Table Tools, and click on Convert to Range.
- Press Ctrl + S on your keyboard to save the file.
- Close the file and reopen it.
- Check whether you can now successfully create a new cell.
Fix 8: Set the File Source as Trusted
Excel is programmed not to support the execution of files from untrusted sources. This built-in functionality is meant to enhance your security and display an error message when you try to create new rows/columns in a sheet. The solution available to you is to set the location of the file as trusted. Here’s how:
- Open the file you are having problems with.
- Go to the File tab and click on Options.
- Click on Trust Center. It is the last item in the left-hand pane of the Excel Options page.
- Click on ‘Trust Center Settings…’ displayed on the right-hand side of the page.
- In the left-hand pane of the new page that opens, click on Trusted Locations.
- Now click the “Add new location…” button displayed on the right-hand side of the page. You will now be presented with the Microsoft Office Trusted Location window.
- Click the ‘Browse…’ button and then navigate to the location where your Excel file is saved.
- Click OK.
- Click OK and then click OK once again.
- Close Excel and then reopen the file you were having problems with. See if you can now add new cells to the sheet.
Fix 9: Clear the Formatting in Unused Rows/Columns
Does it seem that you have no content in the last row/column of your worksheet? That may not be the case. If you have highlighted the entire row/column by clicking the header and then applied some formatting (for example, introduced color or cell borders), Excel will assume that there’s content in the row/column and will therefore prevent you from creating new cells so as to prevent the loss of data. You can fix this by clearing the formatting in the entire row/column.
To insert a new column, here’s what you have to do:
- Open the problematic file.
- Go to the column on the right-hand side of the last column that contains data in your sheet. Click the header to highlight the entire column and then press Shift + Ctrl + Right Arrow on your keyboard. This will highlight all the columns that do not contain data on your sheet but may have formatting.
- In the Home tab, under Font, click the drop-down arrow to reveal the Borders menu.
- Select ‘No Border.’
- While still under Font in the Home tab, click the drop-down arrow for Theme Colors and then select ‘No fill.’
- Press the Delete key on your keyboard to wipe any data that you may have mistakenly entered in the unused cells.
- Now, under the Editing category in the Home tab, click the Clear drop-down arrow and select Clear Formats.
- Click the Clear drop-down arrow again and select Clear All.
- Click Ctrl + S on your keyboard to save the file.
- Close Excel and then reopen the file.
To insert a new row, here’s what you have to do:
- Open the sheet you are having problems with.
- Go to the row next to the last row that contains data. Click the header to highlight it and then press Shift + Ctrl + Down Arrow to highlight all the unused rows right to the end of the sheet.
- In the Home tab, under Font, click the drop-down arrow to reveal the Borders menu.
- Select ‘No Border.’
- While still under Font in the Home tab, click the drop-down arrow for Theme Colors and then select ‘No fill.’
- Press the Delete key on your keyboard to wipe any data that you may have mistakenly entered in the unused cells.
- Now, under the Editing category in the Home tab, click the Clear drop-down arrow and select Clear Formats.
- Click the Clear drop-down arrow again and select Clear All.
- Click Ctrl + S on your keyboard to save the file.
- Close Excel and then reopen the file. See if you can now insert a new row.
There’s a suggestion that one should not use the Ctrl + V shortcut to paste data into an Excel sheet as that might cause a number of problems, including not being able to add new rows/columns. Instead, use this method:
- Click the Paste drop-down arrow in the Home tab.
- Click ‘Paste Special…’
- Click on ‘Values’ and then click OK.
Fix 10: Customize the Used Range Using VBA
Don’t lose heart if you have come this far and you are still unable to create new rows/columns on your Excel worksheet. VBA (Visual Basic for Applications) is Excel’s (and other Microsoft Office programs’) programming language. We can use it to solve the issue you are currently facing. Simply follow these easy steps:
- Open the problematic file.
- Right-click on the worksheet tab at the bottom of the screen (for example Sheet 1).
- Click on View Code from the context menu.
- In the page that opens, press Ctrl + G on your keyboard to display the ‘Immediate’ window.
- Now type ‘ActiveSheet.UsedRange’ (don’t include the inverted commas) and press Enter. This ensures that the used range of your worksheet will lie only within the area where your data is.
- Now, click on the File tab and select ‘Close and Return to Microsoft Excel.’
- Press Ctrl + S to save the file. Close Excel and then reopen the file. Check whether you can now add new columns or rows.
Fix 11: Use Office Online
If the problem persists after you’ve tried all the above fixes, there’s one more option left. It could be that there is an issue with your system. You can use Office Online to get rid of the setback you are facing. Follow these easy steps:
- Go to your browser and log in to OneDrive.
- Click the Upload button.
- Click on Files.
- Navigate to the location where your problematic Excel file is stored.
- Select the file.
- Click Open.
- Try adding new rows/columns to the sheet.
- If successful, you can then download the file to your system.
There you have it. By the time you’ve tried these fixes, you will have succeeded in fixing the ‘Microsoft Excel Cannot Add New Cells’ problem.
If you have any further suggestions, questions, or comments, please feel free to leave them in the comments section below. We’ll be glad to hear from you.
To ensure that you don’t run into unnecessary problems while trying to complete important tasks on your PC, we recommend you run regular scans with a trusted antivirus program. Get Auslogics Anti-Malware today and be rest assured that your system is in good hands.
This happened to me some time ago as well, so when I stumbled across this question I thought I might share my experience.
Approach #1: Deleting rows and columns
As Matt B mentions in his answer, the first thing to try is to delete the columns which are taking up place.
Let us assume that your data uses columns A to T and rows 1 to 20.
First off, select cell U1 and press CTRL+SHIFT+RIGHT to mark all cells from T1 to XFD1 (the right-most column Excel can display). Right-click any cell, choose «Delete» and «Entire column». Now you have gotten rid of the columns.
Next, select cell A21 and press CTRL+SHIFT+DOWN to mark all cells from A21 to A1048576 (the highest row number Excel displays). Right-click any cell, choose «Delete» and «Entire row». This will remove the rows.
Now it should work, as you have gotten rid of all excess columns and row.
Approach #2: using VBA
When I encountered this issue, the above solution did not work for me. However, I eventually found a solution that did work.
- Right-click the sheet that is causing problems.
- Choose «View Code»
- Press CTRL+G to open box «Immediate»
- Type in
ActiveSheet.UsedRange. This will force Excel to «drop» all cells not currently in use, thus freeing up the space you need to create new columns or rows.
I hope this helps you or any other soul out there desperate to create new rows or columns in Excel.
Can’t figure out why the insert cell column option is greyed out on Excel?
Microsoft Excel is powerful spreadsheet software used for data analysis and documentation. It features pivot tables, calculation formulas, graphing tools, and more. Without a doubt, Excel is one of the most useful applications in the Microsoft Office suite.
However, like any software or tool, Microsoft Excel can suffer from occasional errors and problems.
Recently, users were encountering a weird issue on the app, which prevents them from inserting additional cell columns. Based on the reports, the insert cell column option is greyed out on Excel.
Based on what we know, there are a handful of reasons why this problem occurs. Most of the time, this problem is caused by a corrupted ‘.xlb’ file in your directory. On the other hand, it can also be due to improper configurations and incorrect usage.
In this guide, we’ll show you what to do if the insert cell column option is greyed out on Microsoft Excel.
1. Reset Microsoft Excel XLB File.
The most effective way to address this problem on Microsoft Excel is to reset the XLB file in your storage. This should reset Excel’s app data and eliminate errors that may have occurred during use.
Here’s what you need to do:
- First, press the Windows + R keys on your keyboard to launch the Run window.
- After that, type ‘%appdata%MicrosoftExcel’ and hit Enter to open the path.
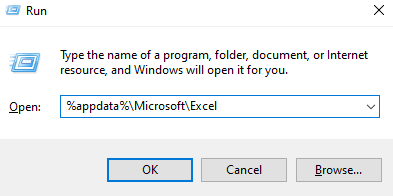
- Lastly, look for the .XLB file inside the folder and move it somewhere else.
Restart your system afterward and check if the problem is solved.
2. Unprotect Your Excel File.
A protected workbook or worksheet will cause the insert cell column option to be greyed out since any modification on the Excel file is prohibited. To fix this, unprotect your file to allow modifications.
Follow the guide below to unlock your file:
- Launch Microsoft Excel on your computer and open the file.
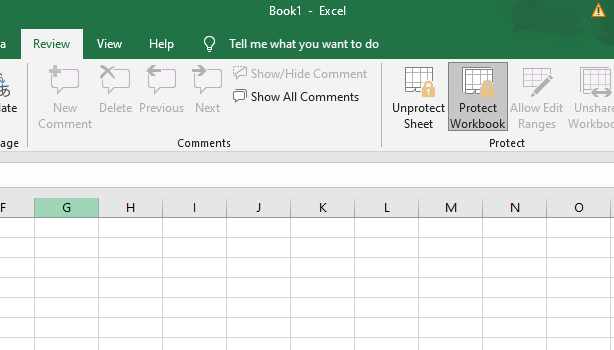
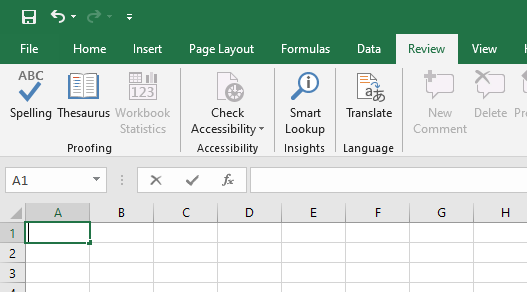
- Next, click on the Review tab in the navigation bar.
- Finally, click on Unprotect Sheet and Unprotect Workbook.
Restart Excel and see if the insert cell column option is available.
3. Check for Selected Columns.
When you need to insert a new column, you must select an existing column and insert the new one below or above it. However, if you have selected a row in your spreadsheet, the insert cell option will be greyed out.
If the insert cell column option is greyed out on Excel, ensure that you have not selected a row in the spreadsheet.
4. Exit Cell Edit Mode.
If you want to insert a new column in Microsoft Excel, your cursor should not be in Cell Edit mode. If you are in cell editing mode, you should exit the mode by pressing the ESC button on your keyboard.
Once done, you’ll notice that the insert cell column option will be available.
5. Check Your Configurations.
The insert column option might not be enabled in your settings, explaining why the feature is greyed out in the toolbar.
Here’s what you need to do:
- First, open Microsoft Excel.
- After that, click on File > Options.
- Go to the Advanced tab afterward and look for the Display Options section.
- Lastly, select All and click OK to save the changes.
Go back to your file and see if the insert cell column option is available.
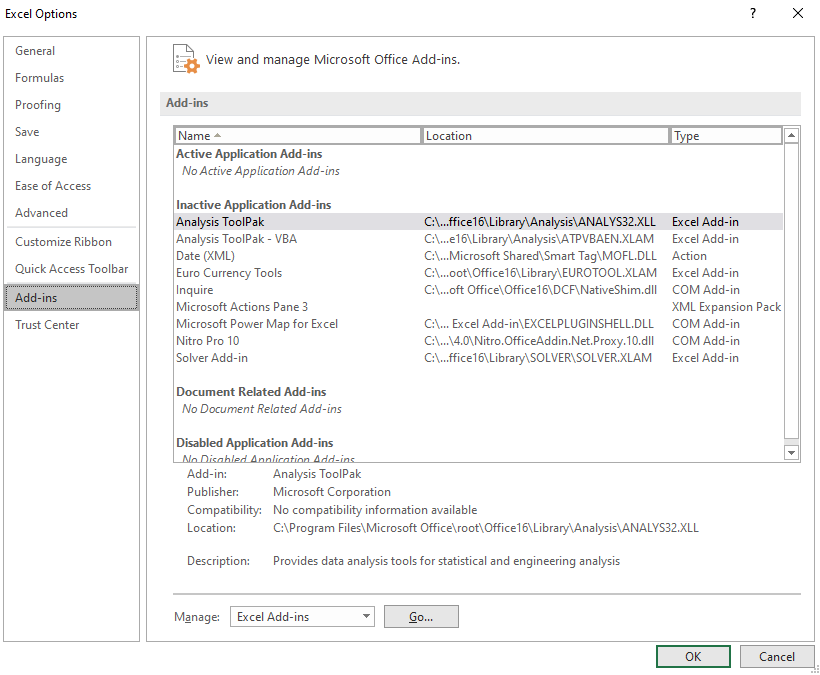
6. Disable Excel Add-ins.
Microsoft Excel Add-ins are third-party tools that provide extra functionality to your spreadsheet. They can perform various functions, which makes your overall experience better. However, you might be using an add-in that disables the insert cell option.
To rule this out, we suggest disabling any add-in you are using on Excel.
- Launch Microsoft Excel on your computer.
- Next, click on the File tab and choose Options.
- Access the Add–ins tab afterward and disable your add-ins.
Restart Microsoft Excel and see if the problem is solved.
That ends our guide on what to do if the insert cell column option is greyed out on Microsoft Excel. If you have questions, please drop a comment below, and we’ll do our best to help.
If this guide helped you, please share it. 🙂
Join 50,000+ subscribers
Stay updated on the latest discounts, exclusive promos, and news articles from Saint.
-
#2
There’s row 24 which is minimized and it houses a 1
dg092163
New Member
- Joined
- Nov 22, 2014
- Messages
- 13
-
#3
I can’t find where it’s minimized. Can you help with that as well? Thanks.

MARK858
MrExcel MVP
- Joined
- Nov 12, 2010
- Messages
- 15,081
- Office Version
-
- 365
- Platform
-
- Windows
- Mobile
-
#4
You will see it goes row 23 and then row 25. Row 24 is very narrow in between, either widen it or autofit the rows.
dg092163
New Member
- Joined
- Nov 22, 2014
- Messages
- 13
-
#5
You will see it goes row 23 and then row 25. Row 24 is very narrow in between, either widen it or autofit the rows.
Thanks! I feel silly now!
Excel Add Column (Table of Contents)
- Add Column in Excel
- How to Add Column in Excel?
- How to Modify a Column Width?
Add Column in Excel
Excel allows a user to add columns, whether left or right, of the column in the worksheet, which is called Add Column in Excel. Of course, there is more than one way to accomplish a task, as in all Microsoft programs. These instructions cover how rows and columns can be added and modified in an Excel worksheet using a keyboard shortcut and using the context menu with the right-click.
How to Add Column in Excel?
Adding a column in Excel is very easy and convenient whenever we want to add data to the table. There are different Methods to Insert or add Column which is as follows:
- Manually we can do this by just right-clicking on the selected column> then click on the insert button.
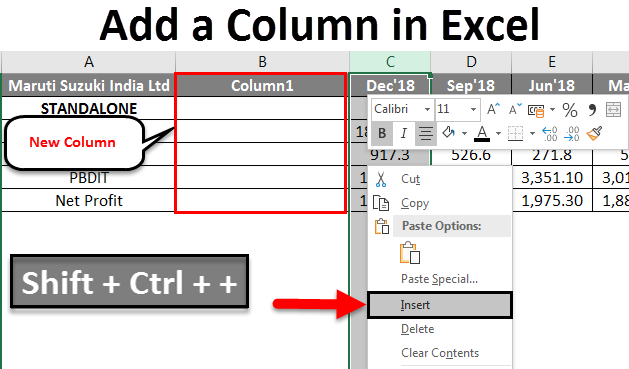
- Use Shift + Ctrl + + shortcut to add a new column in the Excel.
- Home tab >> click on Insert >> Select Insert Sheet Columns.
- We can add N number of columns in the Excel sheet; a user needs to select that many columns which number of columns he wants to insert.
Let’s understand How to Add Column in Excel with a few examples.
Example #1
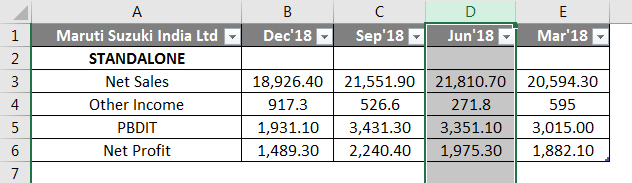
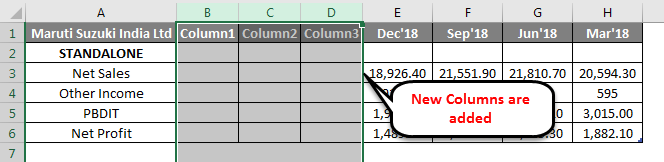
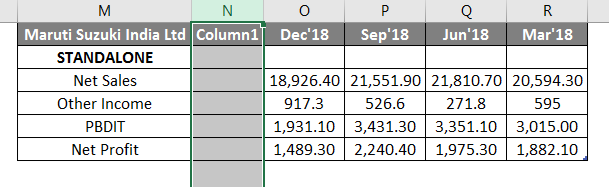
A user has a standalone book data of sales, income, PBDIT, and Profit details of each quarter of Maruti Suzuki India Pvt Ltd in sheet1.
You can download this Add a Column Excel Template here – Add a Column Excel Template
Step 1: Select the column where a user wants to add the column in the excel worksheet (The new column will be inserted to the left of the selected column, so select accordingly)
Step 2: A user has selected the D column where he wants to insert the new column.
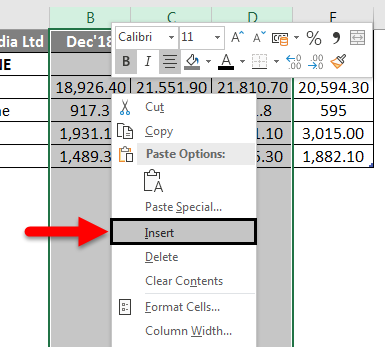
Step 3: Now Right-click and select Insert button or use shortcut Shift + Ctrl + +

Or

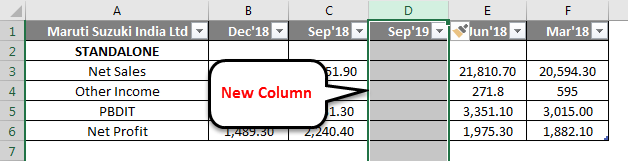
As we can see, as it was required to insert a new column between C and D column, in the above example, we have added a new column. So, as a result, it will move the D column data to the next column, which is E, and it will take the place of D.
Example #2
Let’s take the same data to analyze this example. A user wants to insert three columns left of the B column.
Step 1: Select B, C, and D columns where a user wants to insert new 3 columns in the worksheet (The new column is inserted to the left of the selected column, so select accordingly)
Step 2: A user has selected the B, C, and D columns where he wants to insert a new column
Step 3: Now Right-click and select Insert button or use shortcut Shift + Ctrl + +
Or
As we can see, as it was required to insert a new column left of the B, C, and D column, we added a new column in the above example. As a result, it will move B, C, and D column data to the next column, which are E, F, and G; it will take the place of the B, C, and D column.
Example #3
Step 1: Go to Worksheet >> Select the column’s heading where a user wants to insert a new column.
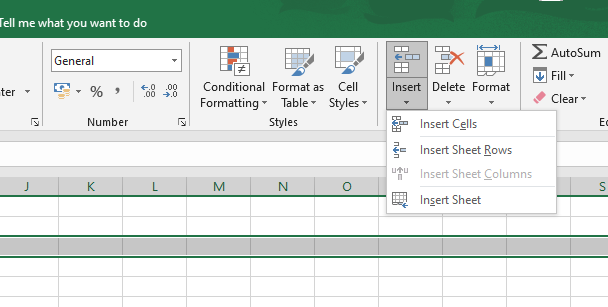
Step 2: Click on the Insert button.
Step 3: One drop-down will be open; click on the Insert Sheet Columns.

As the user wants to use the Insert toolbar to insert a new column, as in the above example, it added.
Example #4
The user can insert a new column in any version of Excel; in the above examples, we can see that we had selected one or more columns in the worksheet then >Right click on the selected column> then clicked on the Insert button.
To add a new column in the excel worksheet.
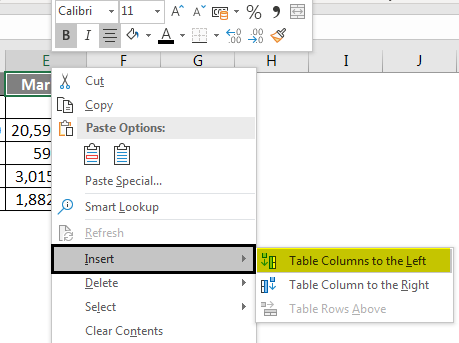
Click in a cell to the left or right of where you want to add a column. If the user wants to add a column to the left of the cell, then follow the below process:
- Click on Table Columns to the Left from the Insert option.
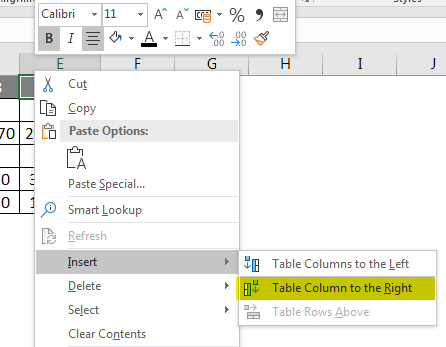
And if a user wants to insert the column to the right of the cell, then follow the below process:
- Click on Table Columns to the Right from the Insert option.
How to Modify a Column Width?
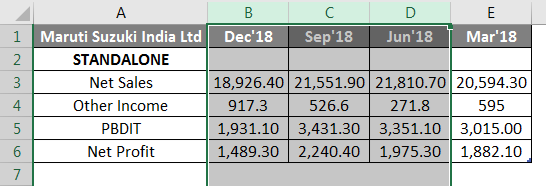
A user can modify the width of any column. Let’s take an example as some of the content in column A cannot be displayed. We can make all this content visible by changing the width of column A.
Step 1: Position the mouse over the column line in the column heading to the Black Cross. (As shown below)
Step 2: Click, hold and drag the mouse to increase or decrease the column width.
Step 3: Release the mouse. The column width will be changed.
A user can auto fit the width of the column. The AutoFit feature will allow you to set a column’s width to fit its content automatically.
Step1: Position the mouse over the column line in the column heading to the Black Cross.
Step2: Double-click the mouse. The column width will be changed automatically to fit the content.
Things to Remember About Add a Column in Excel
- The user needs to select that column where the user wants to insert the new column.
- By default, every row and column have the same height and width, but a user can modify the width of the column and the height of the row.
- The user can insert multiple columns at a time.
- You can also AutoFit the width for several columns at the same time. Simply select the columns you want to AutoFit, and then select the AutoFit Column Width command from the Format drop-down menu on the Home. This method can also be used for row height.
- All the rules will also be applied for rows, as applied to column insertion.
- Excel allows the user to wrap text and merging cells.
- For deleting also, we can go to Home Tab >> Delete >> Delete Sheet Columns; either we can select the column which we want to delete or >> Right Click >> click on Delete.
- After adding the insert column, all the data will be shifted to the right side after that column.
Recommended Articles
This is a guide to add a column in excel. Here we have discussed How to Add a column in excel by using different methods and How to modify a column in Excel along with practical examples and a downloadable excel template. You can also go through our other suggested articles –
- COLUMNS Formula in Excel
- Switching Columns in Excel
- Excel COLUMN to Number
- Freeze Columns in Excel
-
04-26-2016, 05:40 AM
#1
Can’t add Column and row in excel
Hello Friend,
i am trying to add a column but my excel not adding it
i also make clear all non blank cells.but i get error msg like: «can’t shift object off sheet»
Please suggest.
Last edited by mohan.r1980; 04-26-2016 at 05:53 AM.
-
04-26-2016, 05:46 AM
#2
Re: Can’t add Column and row in excel
Highlight any unused columns to the right of your data and any unused rows below your data.
Then save the workbook and try again.BSB
-
04-26-2016, 05:52 AM
#3
Re: Can’t add Column and row in excel
thanks reply
it solved by another way
i just tick All in «for object show» in «Excel option»
Microsoft Excel вызывает проблемы при добавлении новых элементов из-за защиты ячеек, слишком длинного пути к имени файла, объединенных строк / столбцов и из-за других внутренних компонентов Excel. Это очень распространенное явление, и его можно устранить, выполнив несколько очень простых шагов, перечисленных ниже.
Microsoft Excel не может добавить новые ячейки
Почему Microsoft Excel не добавляет новые ячейки?
- Защита ячеек: пользователи применяют различные виды защиты ячеек для защиты своих данных и листов / файлов. Если к листу / файлу применяется какой-либо тип защиты ячеек, это может вызвать текущую проблему.
- Применяемое форматирование ко всей строке / столбцу. Пользователи, как правило, непреднамеренно применяют форматирование ко всей строке / столбцу, что не разрешено в Excel.
- Содержимое в последних строках / столбцах. Если в последней строке / столбце листа содержится некоторое содержимое, которое вы пытаетесь заменить, то во избежание потери данных Excel ограничит вас от добавления новых ячеек.
- Слишком длинный путь к имени файла: Путь к имени файла — это адрес вашего файла для Windows, и если он слишком длинный, он может вызвать проблему, с которой вы столкнулись.
- Объединить строки / столбцы: если пользователи объединяют всю строку / столбец в одну ячейку, то Excel не позволит вам вставить новые строки / столбцы и показать текущую проблему.
- Панели стоп-кадра. Панели стоп-кадра на листе помогают пользователю вставлять данные и управлять ими. Если пользователь применил стоп-кадры, он столкнется с текущей проблемой.
- Формат диапазона в виде таблицы: появилось множество случаев, когда добавление новых ячеек в выбранную область, которая включала пустое пространство и таблицу, вызывает проблему невозможности добавления новых ячеек.
- Ограничения формата файлов: Excel имеет разные форматы файлов для разных версий и разных целей, и у каждого формата есть свои ограничения. Если вы используете версию с ограниченными функциональными возможностями, вы можете столкнуться с текущей проблемой.
- Ненадежный источник: Excel по умолчанию ограничивает выполнение файлов из ненадежных источников. Если файл, который вы используете, не из надежного источника, он может вызвать Excel в текущей ошибке.
Прежде чем пробовать решения, раскройте скрытые в листе строки и столбцы. Кроме того, если вы используете какие-либо макросы на листе, который сообщает в другую скрытую электронную таблицу, убедитесь, что скрытый лист не достиг максимального количества строк / столбцов.
1. Снять защиту клетки
Excel имеет встроенную функцию защиты ячеек, которая позволяет пользователям защищать свои данные и листы. Если к листу применен какой-либо тип защиты, это может привести к тому, что Excel предотвратит добавление новых ячеек для сохранения существующих данных. В этом случае снятие защиты ячеек может решить проблему.
- Нажмите Ctrl + A, чтобы выбрать все ячейки листа, затем на вкладке «Главная» нажмите «Формат», а затем в раскрывающемся меню выберите «Формат ячеек».
- Теперь нажмите на вкладку «Защита», а затем снимите флажок «Заблокировано».
Снимите флажок с заблокированных ячеек в защите
- Теперь нажмите на вкладку «Рецензирование» и нажмите «Защитить лист» или «Защитить рабочую книгу» и введите нужный пароль, чтобы снять защиту с листа или рабочей книги.
- Сохраните и закройте файл, снова откройте файл и проверьте, можно ли вставить новые строки / столбцы.
2. Уменьшите путь к длинному имени файла
Путь к имени файла — это адрес файла в Windows. Если имя файла Excel слишком длинное, это может привести к тому, что Excel запретит вам добавлять новые ячейки. В этом случае сохранение файла в месте, где путь к имени файла не слишком длинный, может решить проблему.
- Откройте проблемный файл.
- Перейдите на вкладку «Файл», а затем на правой панели нажмите «Сохранить как».
Сохранить как файл Excel
- Теперь в диалоговом окне «Сохранить как» перейдите в удобное место, для тестирования желательно на рабочий стол.
- Закройте Excel и откройте файл, сохраненный в новом месте, и проверьте, можно ли вставить строки / столбцы на лист.
3. Раскройте ряды / колонны
Пользователи имеют тенденцию непреднамеренно объединять всю строку и столбец в один файл, тогда как они хотят объединить всего несколько ячеек. Это объединение всей строки / столбца может привести к тому, что Excel ограничит добавление новых ячеек обоснованием «Чтобы предотвратить возможную потерю данных», поскольку при объединении всех ячеек в одной строке (тогда другой столбец не может быть добавлен) или Вы объединили все ячейки в одном столбце (тогда нельзя было добавить другую строку). В этом случае удаление строки / столбца может решить проблему.
- Найдите объединенные строки / столбцы. Возможно, вам придется просмотреть свой рабочий лист, чтобы найти объединенный столбец / строку.
- Для столбца щелкните верхнюю ячейку «Заголовок» объединенного столбца, а затем на вкладке «Главная» щелкните «Слияние и центр», что приведет к удалению столбца. Повторите процесс для любых других объединенных столбцов.
UnMerge Column
- Для строки щелкните левую ячейку «Заголовок» объединенной строки, а затем на вкладке «Главная» нажмите «Слияние и центр», что приведет к удалению строки. Повторите процесс для любых других объединенных строк.
Unmerge Rows
- Теперь сохраните и закройте файл. Затем откройте файл и проверьте, можете ли вы вставить новые строки / столбцы на лист.
4. Разморозить стекла
Замораживающие панели помогают пользователю в достижении больших результатов с их данными. Если вы используете функцию стоп-панели Excel, то она не позволит вставлять новые строки и столбцы на лист. Разморозка стекол может решить проблему.
- Нажмите на вкладку «Вид», а затем на «Стоп-кадр».
- Теперь в раскрывающемся списке нажмите Разморозить панели.
Разморозить стекла
- Сохраните и закройте файл.
- Откройте файл и проверьте, можете ли вы вставить новые строки / столбцы.
5. Формат таблицы как диапазон
Таблицы являются отличным способом хранения данных в Excel. Если вы используете таблицу в листе Excel, то в некоторых случаях пользователь не может добавлять или удалять строки / столбцы на листе. В этом случае преобразование таблицы в диапазон может решить проблему.
- Нажмите в любом месте таблицы, чем в инструментах таблицы, нажмите на дизайн.
- Теперь в группе «Инструменты» нажмите «Преобразовать в диапазон».
Преобразовать таблицу в диапазон
- Сохраните и закройте файл.
- Откройте файл и проверьте, можете ли вы без проблем вставить новые строки / столбцы.
6. Очистить содержимое и форматы из неиспользуемых строк / столбцов
Хотя вы думаете, что у вас нет данных в последней строке / столбце, Microsoft Excel так «не думает». Иногда пользователи непреднамеренно блокируют всю строку / столбец, щелкая «Номер строки / столбца» в левой / верхней части листа, а затем применяя форматирование, изменяя цвет или применяя границу и т. Д. И когда пользователи пытаются вставить новую строку / столбец, то возникает текущая проблема. Это происходит из-за форматирования, используемого для всей строки / столбца, поскольку Excel вынужден «думать», что эта строка / столбец не пустая. В этом случае очистка форматирования от целых строк / столбцов может решить проблему.
Для вставки столбца
- Откройте проблемную рабочую книгу.
- Нажмите на ячейку заголовка (ячейка заголовка является первой ячейкой в каждом столбце и указывает, в каком столбце вы находитесь). Столбца рядом с последним столбцом данных, а затем нажмите Shift + Ctrl + стрелка вправо, чтобы сделать выбор до последний столбец листа.
- На вкладке «Главная страница» нажмите «Границы», а затем «Без границ».
Прикладное форматирование без границ
- На вкладке «Главная страница» нажмите «Цвета темы», а затем «Без заливки».
Применяется без заполнения к клеткам
- Нажмите «DELETE» на клавиатуре, чтобы удалить любое значение из ячеек.
- На вкладке «Домой» нажмите «Очистить», а затем нажмите «Очистить форматы».
- Снова нажмите Очистить, а затем нажмите Очистить все.
Очистить форматы и все
- Теперь щелкните правой кнопкой мыши в верхней части любого столбца, чтобы выделение не изменилось. И в появившемся меню нажмите «Удалить».
Удалить столбцы
- Сохраните и закройте файл, а затем снова откройте файл.
Для ввода строки
- Откройте проблемный лист.
- Щелкните по левой ячейке заголовка (которая указывает, в какой строке вы находитесь) строки рядом с вашей последней строкой данных, а затем нажмите Shift + Ctrl + Стрелка вниз, чтобы сделать выбор до последней строки листа.
- Выполните шаги с 3 по 7 метода вставки столбцов.
- Теперь щелкните правой кнопкой мыши слева от любой строки, чтобы выбор остался без изменений. И в появившемся меню нажмите «Удалить».
Удалить содержимое строк
- Сохраните и закройте файл, а затем снова откройте файл. И проверьте, можете ли вы вставить новую строку / столбец в лист.
Кроме того, чтобы избежать проблем подобного характера, всегда полезно не вставлять данные в электронную таблицу, используя Ctrl + V, если это возможно, в противном случае. Затем выполните следующие действия:
- На вкладке Главная нажмите Вставить
- Теперь нажмите на Специальную вставку
- Затем нажмите на Значения.
Специальная паста
- Нажмите OK
7. Измените формат файла
Эта ошибка также может возникать из-за ограничения формата файла Excel, который вы используете, например, если вы используете XLS, затем преобразуйте его в XLSX, XLSM или CSV или наоборот. Таким образом, изменение формата файла Excel может решить проблему.
- Откройте проблемный файл.
- Перейдите на вкладку «Файл», а затем в правой части окна нажмите «Сохранить как».
- В диалоговом окне «Сохранить как» нажмите раскрывающийся список «Сохранить как тип» и выберите другой формат файла, который используется в данный момент, например, если вы используете XLS, выберите формат файла XLSX и нажмите кнопку «Сохранить».
Выберите формат файла, чтобы сохранить как
- Теперь закройте файл и Excel, а затем откройте вновь сохраненный файл и проверьте, можно ли вставить новые строки / столбцы в лист.
8. Доверься Источнику
Excel имеет встроенную функциональность, чтобы остановить выполнение файлов Excel из ненадежных источников. Если файл, который вы используете, взят из ненадежного источника, встроенная функция безопасности Excel отобразит сообщение об ошибке, когда пользователь попытается вставить новые строки / столбцы. В этом случае добавление местоположения файла в надежное расположение может решить проблему.
- Откройте проблемный файл и перейдите на вкладку «Файл», а затем нажмите «Параметры».
Открыть параметры Excel
- Теперь нажмите на Центр управления безопасностью, а затем нажмите на Настройки центра управления безопасностью.
Настройки Траст-центра
- Теперь нажмите на Надежные местоположения, а затем нажмите Добавить новое местоположение.
Добавить новое надежное местоположение
- Теперь в окне «Надежное расположение» нажмите «Обзор».
Просмотреть местоположение
- Теперь перейдите к местоположению файла Excel и нажмите кнопку «ОК».
- Снова нажмите Ok и еще раз нажмите Ok.
- Теперь закройте файл и Excel, а затем снова откройте файл и проверьте, можете ли вы добавить новые строки / столбцы на лист.
9. Используйте VBA для принудительного использования диапазона
Если из-за сбоя Excel не может добавлять новые строки или столбцы, и до сих пор нам ничего не помогло, то пришло время испачкать руку некоторым VBA. Не волнуйтесь! Шаги довольно простые и понятные.
- Откройте лист, в который вы не можете добавить новые строки / столбцы, а затем щелкните правой кнопкой мыши вкладку листа (название листа внизу) и в появившемся меню выберите «Просмотреть код».
Просмотреть код после щелчка правой кнопкой мыши по имени листа Excel
- В редакторе VBA нажмите Ctrl + G, чтобы открыть окно «Немедленно».
- В немедленном окне введите UsedRange и нажмите клавишу ВВОД.
Открыть немедленное окно
- Хотя после выполнения вышеуказанной команды ничего не будет отображаться, это заставит Excel изменить используемый диапазон проблемного листа, чтобы он соответствовал только области, в которой находятся пользовательские данные.
- Теперь нажмите «Файл», затем нажмите «Закрыть» и «Вернуться в Microsoft Excel».
Сохраните файл VBA
- Сохраните и закройте файл и Excel, а затем снова откройте файл и проверьте, можно ли добавить в файл новые строки или столбцы.
10. Копировать на новый лист
Если вам ничего не помогло, то, скорее всего, файл, который вы редактируете, поврежден. В этом случае копирование данных из этого файла в новый — это решение, оставленное нам.
- Откройте проблемный лист и выберите и скопируйте необходимые данные.
- Теперь перейдите на вкладку «Файл», нажмите «Создать», а затем нажмите «Пустой лист».
Создать новую пустую книгу
- Теперь вставьте скопированные данные.
- Сохраните и закройте новый файл, откройте новый файл и проверьте, можно ли вставить новые строки / столбцы на лист.
11. Используйте офис онлайн
Если ни один из вышеперечисленных способов не помог вам, то решение проблемы может быть решено с помощью Office Online, так как проблема может быть связана с какой-то проблемой в вашей системе.
- Откройте и войдите в свой OneDrive в интернет-браузере.
- Нажмите на кнопку Загрузить, а затем нажмите на файлы.
Загрузить файл в OneDrive
- Теперь перейдите и выберите проблемный файл Excel и нажмите «Открыть».
- Теперь в OneDrive щелкните недавно загруженный файл Excel, чтобы открыть его в Excel Online.
Открыть файл Excel в OneDrive
- Теперь попробуйте добавить новые строки / столбцы в файл.
- Если получилось, скачайте файл и используйте его в своей системе