

Newspaper columns are a great way to format content in brochures, flyers, newsletters and so on. They’re especially useful in a document that is text-heavy because the narrow columns are more readable. Fortunately, it’s easy to create newspaper columns in a Microsoft Word document.
In this tutorial, I’ll show you how to format an entire document or part of a document with newspaper columns. I’ll also point out a few problems that you’ll need to deal with.
I’m using Microsoft 365 Desktop on a Windows 10 64-bit system, but you can use older versions. Word for the web doesn’t support columns. You can make changes to the document without harming the columns, but you won’t see them, nor can you add or change them in the web version. You will see them noted however, as “column break” in the document. You can download the Microsoft Word demo file for this tutorial.
SEE: Become a Microsoft Office pro with this training certification bundle (TechRepublic Academy)
How to enable newspaper columns for an entire document in Word
Newspaper columns allow content to flow from one column to the next. You read the content in the first column and then continue to the beginning of the second column.
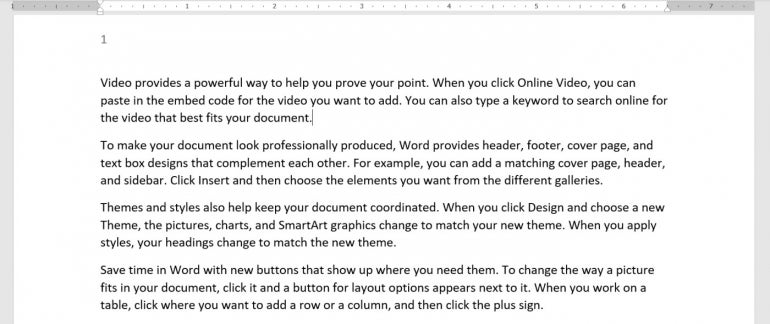
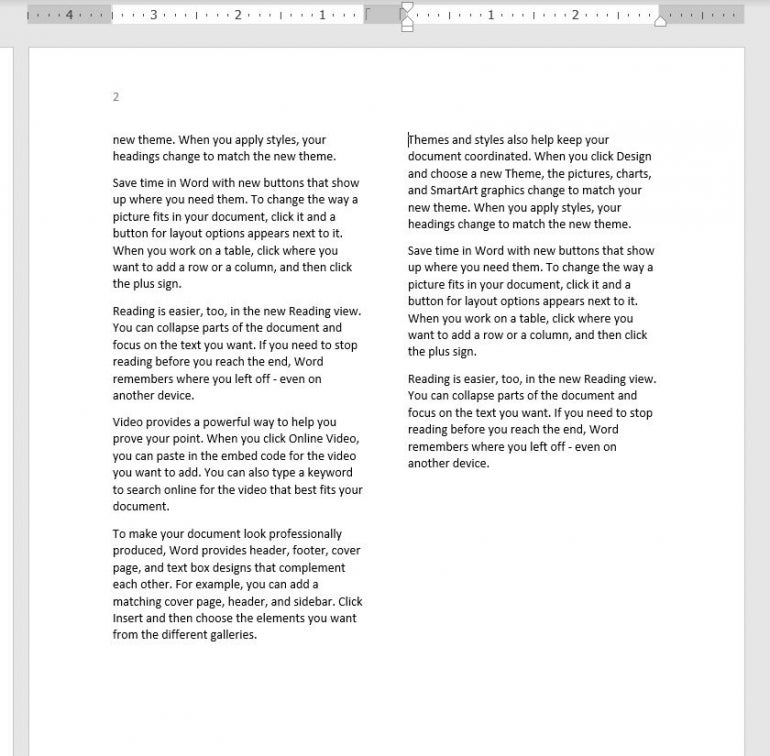
You see these columns everywhere, and depending on the document type, narrow columns are easier to read than text that stretches from the left to right margins. Figure A shows a simple document with default margins of one inch.
Figure A
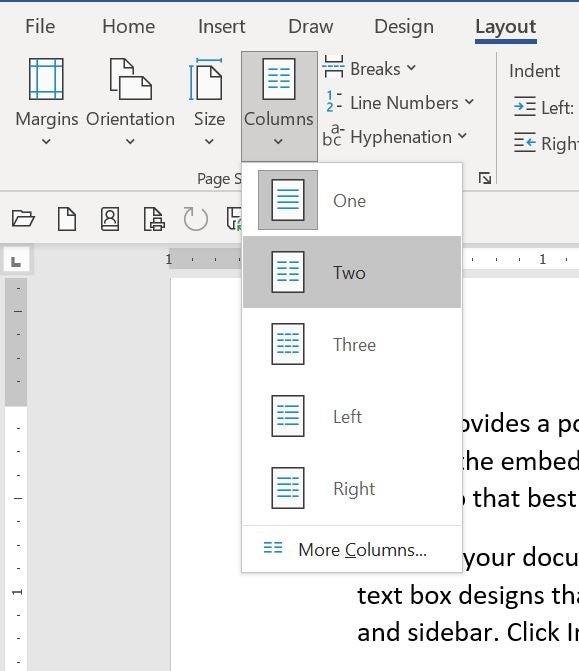
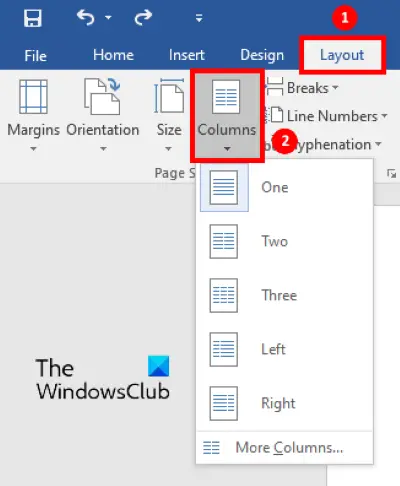
To layout the entire document in columns, click the Layout tab, and then click the Columns dropdown in the Page Setup group. Choose the number of columns you want (Figure B). As you can see, you can choose up to three.
Figure B
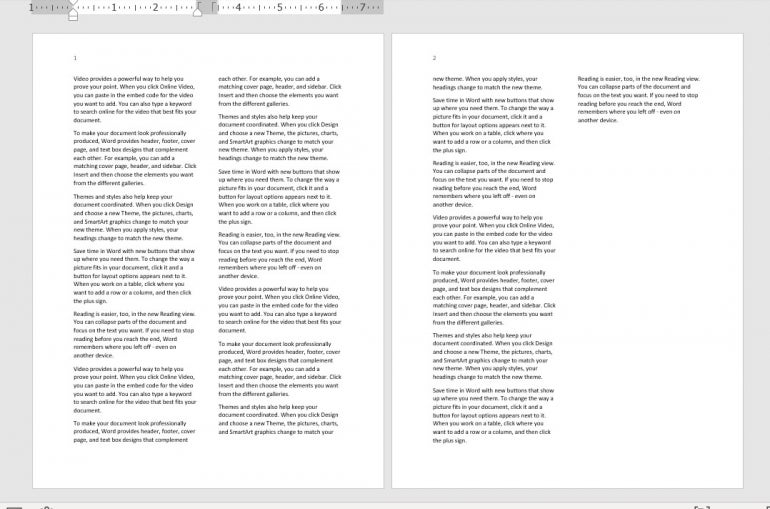
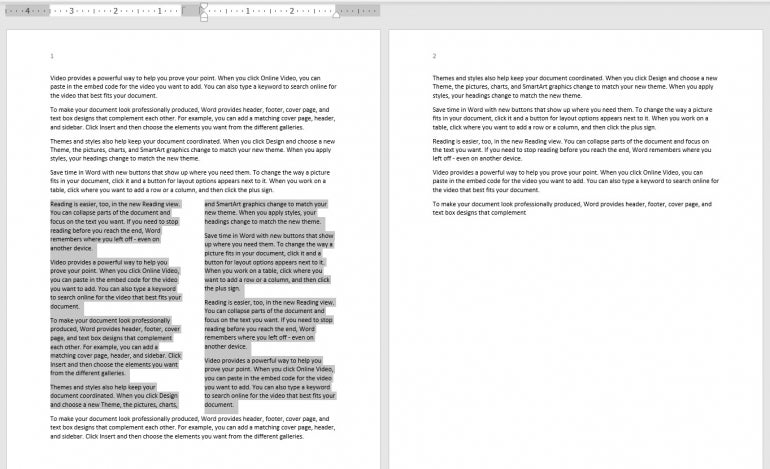
In Figure C, the content for the entire document now flows through two columns on each page. Page two doesn’t look balanced because the second column is so short. This is one of those problems I alluded to earlier, but the fix—a column break—is easy.
Figure C
How to insert a column break in Word
When you format content into columns, Word completely fills the columns until it runs out of text. Consequently, the last column is often shorter than the others. Sometimes that won’t matter because you plan to insert a graphic or some other content to fill the column.
If you want the last column to be of similar length as the others, you can add a column break. Doing so is easy, but you might not get it right on the first try. It’s unrealistic to try for an exact match; even when the columns are full, both margins won’t always match.
The bottom of page one is a good example. The bottom lines are close, but the right column is a bit shorter. That’s because Word automatically pushes a line to the next column to avoid a widow—the last line of a paragraph that’s alone at the top of a page.
When trying to decide where to insert the column break, you’ll usually want the two columns to be about the same length. That means pushing content in the left column into the right column. As a general guideline, when the lengths don’t match exactly, you’ll want the left column to be the longer column. That’s a rule you can break if you can offset the imbalance.
Now, let’s add a column break to the first column on page two:
- Position the cursor at the beginning of the fifth full paragraph. It starts with “Themes and styles also help keep your … .”
- Click the Layout tab if necessary.
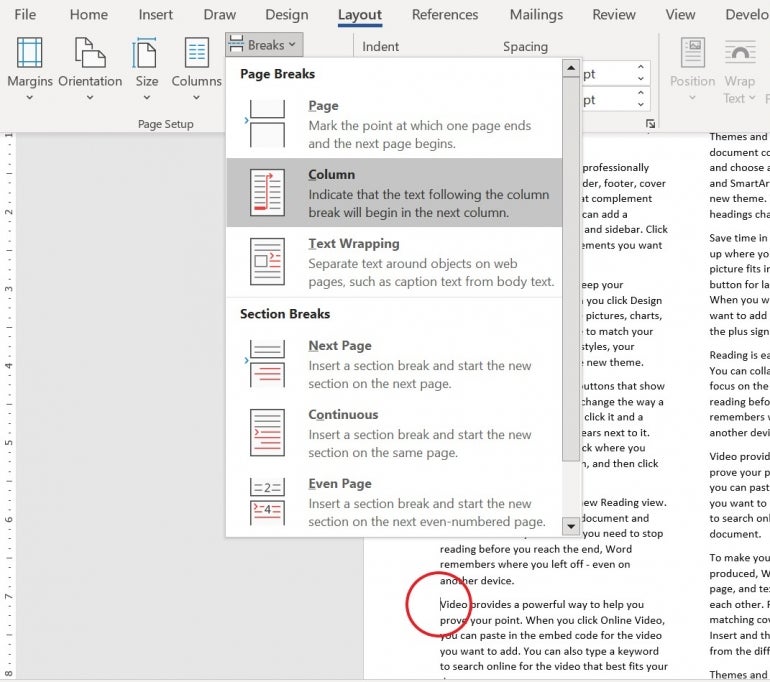
- In the Page Setup group, click the Breaks dropdown.
- Choose Column Break (Figure D).
Figure D
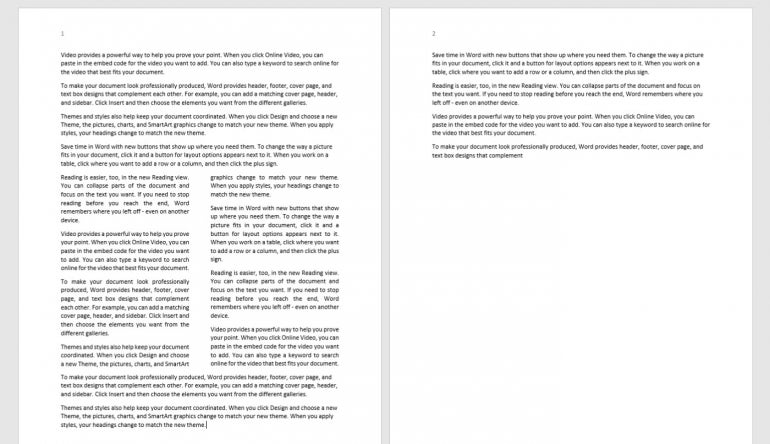
The results might not be as close as you might like, as shown in Figure E, but Word didn’t break a paragraph between the bottom of the left column and the top of the right, which you should avoid when possible.
Figure E
If you want the bottom margins more even, and in this case, you’ll have to split a paragraph. If so, click the Undo button to reset both columns. Then, do the following:
- Position the cursor in the fourth full paragraph at the beginning of the fourth line. It begins with “each other. For example, you can add a … .”
- Add a column break as you did earlier.
Figure F shows the results. This is about as close as you can get. If you go up another line, the left column will be longer than the right.
Figure F

You can also create newspaper columns with some of the content, but before we do so, let’s look at how to remove newspaper columns.
How to remove newspaper columns in Word
You might not realize it, but by default, your content is a single column. Remember when you set the content to two columns and the dropdown list included a One option? That’s the default. To remove columns, choose it as follows:
- Click the Layout tab.
- In the Page Setup group, click the Columns dropdown.
- Choose One.
Word will remove the two columns and stretch the content between the left and right margins—it’s one column.
Now, let’s turn a few paragraphs into multiple columns.
How to enable newspaper columns for part of a document in Word
Occasionally, you’ll see a document with a section that’s more than one column in the middle of a document. To achieve this look, simply select the content you want to display as columns before choosing the number of columns. For example:
- Select paragraphs five through 11 on page one.
- Click the Layout tab.
- In the Page Setup group, click the Columns dropdown, and select Two.
Figure G shows the results. Right away you might notice that the results look off balance. That’s because you have a wrapped margin next to a flush margin.
Figure G
It just looks odd, but there is a quick fix. With the columns still selected, click the Home tab, and then, click Justify in the Paragraph group. Doing so stretches the content of both columns between the left and right margins of each column, as shown in Figure H.
Figure H
Stay tuned
Enabling columns in a Word document can add a bit of focus to a section or improve the readability of the entire document. Once you have the columns in place, there are more options for fine-tuning the look. In a future article, we’ll review these options.

Newspaper-style columns, which are also called newsletter columns, allow text and images to flow from one column to the next. This tutorial shows how to create newspaper-style columns in Microsoft Word. We’ll also look at how to create column breaks and how to return to a single column.
Quick Links:
- How to Create Newspaper-Style Columns
- How to Create Column Breaks
- How to Return to a Single Column
This tutorial is available as a YouTube video showing all the steps in real time.
Watch more than 100 other writing-related software tutorials on my YouTube channel.
The images below are from Word for Microsoft 365. These steps also apply to Word 2021, Word 2019, and Word 2016.
Important Note: The steps to create columns are the same in Word 2013 and Word 2010. However, the steps to add column breaks are different in Word 2013 and Word 2010. In addition, your interface may look slightly different in those older versions of the software.
These steps show how to convert your current section or selected text into multiple columns. If your document doesn’t have section breaks or you don’t select specific text, the columns will be applied to the entire document.
- Place your cursor in the section where you want to create columns. Or, select the text you want formatted as columns. If you want the entire document formatted as columns, you can place your cursor anywhere in the text.
- Select the Layout tab in the ribbon.

- Select Columns in the Page Setup group.

- Select an option from the drop-down menu:
-
- Two
- Three
- Left (This option creates a thin column on the left side of the page.)
- Right (This option creates a thin column on the right side of the page.)
Alternatively, you can select More Columns for additional options.

- If you selected More Columns, use the Columns dialog box to create and customize your columns:
A. Use the menu arrows to enter a specific number of columns.
Important Note: The other options in the Columns dialog box only respond to numbers entered with the “Number of columns” menu arrows; they won’t respond to numbers typed into the text box.
B. Use the menu arrows to choose a column width and spacing between columns. (Uncheck Equal column width if you want to enter specific widths for individual columns.)
C. Select Line between to add a vertical line between the columns.

- Select the OK button to close the Columns dialog box.

Your text should now be formatted with columns.
Pro Tip: Add Images after Creating Columns
If your document contains images when you create columns, the images may need to be manually resized to fit in the columns, which can be difficult if the images are large.
Instead, add images after creating the columns; Word will automatically resize the images to fit within the existing columns.

How to Create Column Breaks
The following steps show how to create a column break that will move the text after the break to the next column.
Important Note: The steps to create column breaks are different in Word 2013 and Word 2010. Please see the Microsoft Support website for more information.
- Insert your cursor where the break should begin.
- Select the Layout tab in the ribbon (see figure 1).
- Select Breaks in the Page Setup group.

- Select Column in the drop-down menu.

The content after the break should move to the next column.
How to Return to a Single Column
The following steps show how to return your text to the normal one-column format.
- Insert your cursor into the text formatted with multiple columns.
- Select the Layout tab in the ribbon (see figure 1).
- Select Columns in the Page Setup group (see figure 2).
- Select One from the drop-down menu.

Your text should return to a single column.
Important Note: If you selected specific text to be converted to columns, Word automatically created section breaks before and after the columns. Those section breaks may stay in your text unnecessarily after you return to a single-column format. Continue with step 5 to locate and remove those breaks.
- Select the Home tab in the ribbon.

- Select the Show/Hide button in the Paragraph group.

- Place your cursor at the start of the section break where the columns began.

- Press the Delete key on your keyboard to delete the break.
- Repeat steps 7 and 8 for the section break where the columns ended.
Related Resources
How to Adjust Page Margins in Microsoft Word
How to Create Drop Caps in Microsoft Word
How to Create, Change, and Modify Tabs in Microsoft Word
Updated January 13, 2022
How to Create a Newspaper in Microsoft Word
- Start Word.
- Click the “Columns” button on the ribbon.
- Click the “Insert” tab.
- Click into the “Type Text” section of the header.
- Highlight the newspaper name text.
- Click the “Insert” tab again.
Contents
- 1 How do you create a newspaper?
- 2 Can you create a newspaper column in Word?
- 3 What is the design of newspaper?
- 4 How do you create a newspaper layout?
- 5 Which feature do you use to create a newspaper like document?
- 6 How do I create a newspaper-style column?
- 7 How do you write a newspaper column?
- 8 What word font looks like a newspaper?
- 9 What is Page making in newspaper?
- 10 How do you make a newspaper PDF?
- 11 What is a newspaper format?
- 12 How do I make text look like a newspaper article?
- 13 Which software is used to design newspaper?
- 14 How do you start a newspaper article?
- 15 Which would you use to display the statistics about a document?
- 16 How many columns can you insert in a Word document in maximum?
- 17 Which items are placed at the end of the document?
- 18 What is newspaper columns in MS Word?
- 19 How do I create columns in a Word document?
- 20 How many words are in a newspaper column?
Newspaper Design
- Write Interesting Titles. Your titles need to be interesting and even intriguing.
- Use White Space. White space is essential part of design for two reasons.
- Design for Readability.
- Pictures Tell a Story.
- Keep It Simple.
- Design around Articles.
Can you create a newspaper column in Word?
To lay out the whole document in columns, select Layout > Columns. Choose the option you want, or choose More Columns to set your own column format.
What is the design of newspaper?
News design is the process of arranging material on a newspaper page, according to editorial and graphical guidelines and goals. Main editorial goals include the ordering of news stories by order of importance, while graphical considerations include readability and balanced, unobtrusive incorporation of advertising.
How do you create a newspaper layout?
9 Modern Newspaper Layout Design Tips
- Tip #1 – Minimalist Design.
- Tip #2 – Have Good Color Schemes.
- Tip #3 – Flat Look.
- Tip #4 – Grid or Geometric Patterns.
- Tip #5 – Choose Easy-on-the-Eyes Fonts.
- Tip #6 – Stay Consistent in Your Font Sizes.
- Tip #7 – Alignment Is Essential!
- Tip #8 – Manage Free Space.
Which feature do you use to create a newspaper like document?
| Q. | Which feature do you use to create a newspaper like document? |
|---|---|
| B. | Tables |
| C. | Columns |
| D. | Tab stops |
| Answer» c. Columns |
How do I create a newspaper-style column?
To create newspaper-style columns using a table:
- Open a new document.
- In Word 2007, from the Insert tab, click Table, and then select Insert Table….
- In the “Number of columns:” field, type the number of columns you want in your document.
- Click OK to create your table.
How do you write a newspaper column?
When writing a column, do
- Give the reader timely, helpful information.
- Develop a structure and keep it.
- Write simple and short sentences and paragraphs.
- In personal columns, use local names and places.
- Let others speak for you by use of quotes and references.
- Learn the difference between a column and a news story.
What word font looks like a newspaper?
Times New Roman is the most common ‘newspaper’ font. This will give it the authentic look.
What is Page making in newspaper?
Pages are one side of a sheet of paper in a collection of sheets bound together. In the page of the newspaper, the graphical considerations include read ability, balanced, unobtrusive incorporation of advertising.The main editorial goals include the ordering of the news stories and its importance.
How do you make a newspaper PDF?
First, get the newspaper file, such as Microsoft Word or even an image file, so that you can convert it. Next, open Adobe Acrobat DC and go to the File menu. Choose Create and then PDF From File. From here, navigate to the location of the newspaper file and click Open.
What is a newspaper format?
Newspapers can be found across a variety of formats. The three most common formats are print, microfilm and electronic, which are usually accessible online. Another format is newspapers in CD-ROM or DVD format. These are usually only available on computers in the Library Reading Rooms.
How do I make text look like a newspaper article?
Highlight a section of text in the paper, click the “Home” tab, and then click the “Justify” button on the Paragraph section of the ribbon. This gives your paper the full-justification look most newspapers have rather than Word’s default left alignment.
Which software is used to design newspaper?
To create compelling and professional magazines and newspapers, the best choice is Adobe InDesign. For beginners and less demanding users, Lucidpress might the best solution. YUDU is another newspaper maker software that deserves your attention, so you might want to consider it.
How do you start a newspaper article?
Want to Hook Your Readers? Apply These 10 Principles to Create Captivating News Stories
- Begin with the most important facts first.
- Make your text thorough but succinct.
- Use the active tense.
- Communicate what’s new or different.
- Focus on human interest.
- Avoid jargon.
- Write acronyms out in full in the first reference.
Which would you use to display the statistics about a document?
Viewing Document Statistics
- Click the File tab of the ribbon and then click Info | Properties | Advanced Properties. Word displays the Properties dialog box.
- Click on the Statistics tab.
- Click on OK when you are done reviewing the statistics.
How many columns can you insert in a Word document in maximum?
In Microsoft Word you can insert a table with up to 63 columns, that is the limit to the number of columns allowed in a Word document.
Which items are placed at the end of the document?
A works cited list is a list of sources, usually placed at the end of a document, that you referred to (or “cited”) in the document. A works cited list is different from a bibliography, which is a list of sources that you consulted when you created the document.
What is newspaper columns in MS Word?
Newspaper-style columns, which are also called newsletter columns, allow text and images to flow from one column to the next. This tutorial shows how to create newspaper-style columns in Microsoft Word. We’ll also look at how to create column breaks and how to return to a single column.
How do I create columns in a Word document?
On the Page Layout tab, click Columns, then click the layout you want.
- To apply columns to only part of your document, with your cursor, select the text that you want to format.
- On the Page Layout tab, click Columns, then click More Columns.
- Click Selected text from the Apply to box.
How many words are in a newspaper column?
Reporters usually refer to story lengths in inches, which actually refers to how many column inches a story takes up. Although it varies, it is generally agreed upon that there are 25-35 words in a column inch.
— Advertisement —
Newspaper columns are a good way to format content material in brochures, flyers, newsletters and so forth. They’re particularly helpful in a doc that’s text-heavy as a result of the slim columns are extra readable. Fortunately, it’s simple to create newspaper columns in a Microsoft Word doc.
In this tutorial, I’ll present you ways to format a complete doc or a part of a doc with newspaper columns. I’ll additionally level out just a few issues that you just’ll want to cope with.
I’m utilizing Microsoft 365 Desktop on a Windows 10 64-bit system, however you should utilize older variations. Word for the net doesn’t assist columns. You could make modifications to the doc with out harming the columns, however you gained’t see them, nor are you able to add or change them in the net model. You will see them famous nonetheless, as “column break” in the doc.
SEE: Become a Microsoft Office professional with this coaching certification bundle (TechRepublic Academy)
How to allow newspaper columns for a complete doc in Word
Newspaper columns permit content material to circulation from one column to the subsequent. You learn the content material in the primary column after which proceed to the start of the second column.
You see these columns in all places, and relying on the doc sort, slim columns are simpler to learn than textual content that stretches from the left to proper margins. Figure A reveals a easy doc with default margins of 1 inch.
Figure A

To structure the whole doc in columns, click on the Layout tab, after which click on the Columns dropdown in the Page Setup group. Choose the variety of columns you need (Figure B). As you may see, you may select up to three.
Figure B

In Figure C, the content material for the whole doc now flows by way of two columns on every web page. Page two doesn’t look balanced as a result of the second column is so quick. This is a type of issues I alluded to earlier, however the repair—a column break—is straightforward.
Figure C

How to insert a column break in Word
When you format content material into columns, Word fully fills the columns till it runs out of textual content. Consequently, the final column is usually shorter than the others. Sometimes that gained’t matter since you plan to insert a graphic or another content material to fill the column.
If you need the final column to be of comparable size because the others, you may add a column break. Doing so is straightforward, however you won’t get it proper on the primary attempt. It’s unrealistic to attempt for an actual match; even when the columns are full, each margins gained’t all the time match.
The backside of web page one is an efficient instance. The backside traces are shut, however the appropriate column is a bit shorter. That’s as a result of Word mechanically pushes a line to the subsequent column to keep away from a widow—the final line of a paragraph that’s alone on the high of a web page.
When making an attempt to determine the place to insert the column break, you’ll normally need the 2 columns to be about the identical size. That means pushing content material in the left column into the appropriate column. As a basic guideline, when the lengths don’t match precisely, you’ll need the left column to be the longer column. That’s a rule you may break in the event you can offset the imbalance.
Now, let’s add a column break to the primary column on web page two:
- Position the cursor in the beginning of the fifth full paragraph. It begins with “Themes and styles also help keep your … .”
- Click the Layout tab if essential.
- In the Page Setup group, click on the Breaks dropdown.
- Choose Column Break (Figure D).
Figure D

The outcomes won’t be as shut as you may like, as proven in Figure E, however Word didn’t break a paragraph between the underside of the left column and the highest of the appropriate, which it’s best to keep away from when attainable.
Figure E

If you need the underside margins extra even, and in this case, you’ll have to cut up a paragraph. If so, click on the Undo button to reset each columns. Then, do the next:
- Position the cursor in the fourth full paragraph in the beginning of the fourth line. It begins with “each other. For example, you can add a … .”
- Add a column break as you probably did earlier.
Figure F reveals the outcomes. This is about as shut as you will get. If you go up one other line, the left column will likely be longer than the appropriate.
Figure F

You may also create newspaper columns with a few of the content material, however earlier than we accomplish that, let’s have a look at how to take away newspaper columns.
How to take away newspaper columns in Word
You won’t notice it, however by default, your content material is a single column. Remember once you set the content material to two columns and the dropdown listing included a One possibility? That’s the default. To take away columns, select it as follows:
- Click the Layout tab.
- In the Page Setup group, click on the Columns dropdown.
- Choose One.
Word will take away the 2 columns and stretch the content material between the left and proper margins—it’s one column.
Now, let’s flip just a few paragraphs into a number of columns.
How to allow newspaper columns for a part of a doc in Word
Occasionally, you’ll see a doc with a bit that’s multiple column in the center of a doc. To obtain this look, merely choose the content material you need to show as columns earlier than selecting the variety of columns. For instance:
- Select paragraphs 5 by way of 11 on web page one.
- Click the Layout tab.
- In the Page Setup group, click on the Columns dropdown, and choose Two.
Figure G reveals the outcomes. Right away you may discover that the outcomes look off steadiness. That’s as a result of you’ve a wrapped margin subsequent to a flush margin.
Figure G

It simply appears odd, however there’s a fast repair. With the columns nonetheless chosen, click on the Home tab, after which, click on Justify in the Paragraph group. Doing so stretches the content material of each columns between the left and proper margins of every column, as proven in Figure H.
Figure H

Stay tuned
Enabling columns in a Word doc can add a little bit of focus to a bit or enhance the readability of the whole doc. Once you’ve the columns in place, there are extra choices for fine-tuning the look. In a future article, we’ll overview these choices.
Word 2013
You can format your document in a newspaper-style column layout by adding columns. On the Page Layout tab, click Columns, then click the layout you want.
-
To apply columns to only part of your document, with your cursor, select the text that you want to format.
-
On the Page Layout tab, click Columns, then click More Columns.
-
Click Selected text from the Apply to box.
Word 2016
You can format your document in a newspaper-style column layout by adding columns. On the Layout tab, click Columns, then click the layout you want.
-
To apply columns to only part of your document, with your cursor, select the text that you want to format.
-
On the Layout tab, click Columns, then click More Columns.
-
Click Selected text from the Apply to box.
Need more help?
Want more options?
Explore subscription benefits, browse training courses, learn how to secure your device, and more.
Communities help you ask and answer questions, give feedback, and hear from experts with rich knowledge.
Create and Format Newspaper-style Columns in Word Documents
by Avantix Learning Team | Updated September 6, 2022
Applies to: Microsoft® Word® 2013, 2016, 2019, 2021 and 365 (Windows)
You can make columns in Word documents in a few different ways. There are two types of columns you can create – newspaper-style columns where the text flows from column to column or tables with columns and rows. You can create documents that contain two, three or more columns. In this article, we’ll review how to set up newspaper-style columns. If you want to create a table, check out 4 Ways to Create a Table in Word.
The best way to create and manage newspaper-style columns is to create them in sections. In Word, each section can contain a different number of columns. You could, for example, create a two section document if you want a heading to span the top of a document in one column and the remaining text in two, three or more columns.
Note: Buttons and Ribbon tabs may display in a different way (with or without text) depending on your version of Word, the size of your screen and your Control Panel settings. For newer versions of Word, Ribbon tabs may appear with different names. For example, the Layout tab may appear as Page Layout.
Recommended article: 10 Microsoft Word Tips, Tricks and Shortcuts for Selecting in Tables
Create columns (basic method)
The Columns command appears on the Layout or Page Layout tab in the Ribbon:

To create newspaper-style columns in a Word document:
- Click in the document where you want to create columns.
- Click the Layout or Page Layout tab in the Ribbon.
- Click Columns in the Page Setup group. A drop-down menu appears.
- Click one of the column options (such as Two) or click More Columns. If you click More Columns, a dialog box appears.
- In the dialog box, click or enter the number of columns you want.
- If you don’t want your columns to all be the same width, uncheck or deselect the Equal column width checkbox (you will then be able to change the width of each column separately).
- Enter a width for each column if you want.
- In the area to the right of each column below Spacing, enter a gap amount if you want (gap is the space between the columns).
- Beside Apply To, select your preferred option – Whole document, This point forward, Selected text, or This section. This section appears only if you have inserted a section break. Selected text appears if you have selected text.
- Click OK.
The Columns dialog box appears as follows with 2 columns and Equal column width selected:

Insert a section to contain multiple columns
If you create sections to contain columns, you can combine different numbers of columns in your document (and easily return to one column). The default in a Word document is one section.
It’s a good idea to turn on Show / Hide Paragraph Marks when working with sections so you can see section breaks and other non-printing characters.
To turn on Show / Hide Paragraph Marks:
- Click the Home tab in the Ribbon.
- Click Show/Hide ¶ in the Paragraph group. Paragraph marks, tabs, spacing and section breaks will display but will not print.
The Show/Hide ¶ command appears on the Home tab in the Ribbon in the Paragraph group:

To insert a section to contain columns:
- Click in the Word document where you want to insert the section break.
- Click the Layout or Page Layout tab in the Ribbon.
- Click Breaks in the Page Setup group. A drop-down menu appears.
- Click the type of break you want. Typically, you would choose Continuous.
- Add another break (typically Continuous) at the end of the area where you want to end the columns.
The Breaks command appears on the Layout or Page Layout tab in the Ribbon:

Create columns in a section
To create columns in a section in a Word document:
- Click in the section where you want to create columns. There should be a section break at the beginning and end of this area.
- Complete steps 2-8 of the Create columns (basic method) using the dialog box.
- Beside Apply To, select This Section.
- Click OK.
In the following example, a document has been set up with 3 sections, each with a different number of columns:

Create columns for selected text
Another way to create columns is to select text and change it to columns.
To create columns for selected text:
- Select the text you want to change to multiple columns.
- Complete steps 2-8 of the Create columns (basic method) using the dialog box.
- Beside Apply To, Selected Text should appear.
- Click OK.
Create columns from a specific point in a document
You can also create columns starting at a specific location in a document.
To create columns starting at a specific point in a document:
- Click in the location in the Word document where you want to start columns.
- Complete steps 2-8 of the Create columns (basic method) using the dialog box.
- Beside Apply To, select This Point Forward.
- Click OK.
Insert a column break
If you have created multiple columns, you may want to add a column break to force a new column.
To insert a column break:
- Click in the Word document where you want to insert a column break.
- Click the Layout or Page Layout tab in the Ribbon.
- Click Breaks in the Page Setup group. A drop-down menu appears.
- Click Column.
You can also create a column break by pressing Ctrl + Shift + Enter.
When you insert a column break, the cursor will appear in the next column.
View column boundaries
You can display column boundaries when you are working with newspaper-style columns.
To display column boundaries:
- Click the File tab in the Ribbon.
- Click Options. A dialog box appears.
- Click Advanced in the categories on the left.
- Check or select Show text boundaries in the Show document content group.
- Click OK.
View column boundaries appears in the Options dialog box in Word:

Remove columns in a section
To remove columns in a section:
- Click in the section with the columns you want to remove.
- Click the Layout or Page Layout tab in the Ribbon.
- Click Columns in the Page Setup group. A drop-down menu appears.
- Click One.
At this point, you can select and delete the section breaks if you want.
Remove columns for selected text
To remove columns for selected text:
- Select the text with the columns you want to remove.
- Click the Layout or Page Layout tab in the Ribbon.
- Click Columns in the Page Setup group. A drop-down menu appears.
- Click One.
If you want to remove all newspaper-style columns in a document, press Ctrl + A for select all and then select One in the Columns drop-down menu.
Remove columns starting at a specific point in a document
To remove columns starting at a specific point in a document:
- Click in the location in the Word document where you want to remove columns.
- Click the Layout or Page Layout tab in the Ribbon.
- Click Columns in the Page Setup group. A drop-down menu appears.
- Click More Columns. A dialog box appears.
- In the dialog box, select One.
- Beside Apply To, select This Point Forward.
- Click OK.
Remove section or column breaks
If you have turned on Show/Hide ¶ in the Paragraph group, section breaks and column breaks will appear in the document. Simply drag over a break to select it and press Delete.
Newspaper-style columns are very different from tables with columns and rows and are used for different purposes. They are most often used in newsletters but can be used in any type of document.
Subscribe to get more articles like this one
Did you find this article helpful? If you would like to receive new articles, JOIN our email list.
More resources
14 Shortcuts to Quickly Select Text in Microsoft Word
10 Microsoft Word Shortcuts for Moving Around in Tables
How to Keep a Microsoft Word Table Together on One Page
How to Insert, Format and Update Cross-References in Word
Microsoft Word Tricks to Keep Text Together (Words, Lines or Paragraphs)
Related courses
Microsoft Word: Intermediate / Advanced
Microsoft Excel: Intermediate / Advanced
Microsoft PowerPoint: Intermediate / Advanced
Microsoft Word: Long Documents Master Class
Microsoft Word: Styles, Templates and Tables of Contents
Microsoft Word: Designing Dynamic Word Documents Using Fields
VIEW MORE COURSES >
Our instructor-led courses are delivered in virtual classroom format or at our downtown Toronto location at 18 King Street East, Suite 1400, Toronto, Ontario, Canada (some in-person classroom courses may also be delivered at an alternate downtown Toronto location). Contact us at info@avantixlearning.ca if you’d like to arrange custom instructor-led virtual classroom or onsite training on a date that’s convenient for you.
Copyright 2023 Avantix® Learning
Microsoft, the Microsoft logo, Microsoft Office and related Microsoft applications and logos are registered trademarks of Microsoft Corporation in Canada, US and other countries. All other trademarks are the property of the registered owners.
Avantix Learning |18 King Street East, Suite 1400, Toronto, Ontario, Canada M5C 1C4 | Contact us at info@avantixlearning.ca
Download PC Repair Tool to quickly find & fix Windows errors automatically
Microsoft Word comes with a feature that lets you create the newsletter or newspaper-style columns in the entire document. Converting your document into multiple columns not only gives it a traditional newspaper style look but also saves your printing cost by decreasing the page count. In this post, we will show you how to create newspaper-style or newsletter columns in Microsoft Word.

If you want your Word document looks like a Newspaper or a Newsletter, you can create multiple columns in it and customize the same. To create the newsletter columns in Microsoft Word, follow the below-listed steps:
- Launch Microsoft Word document.
- Click the Layout tab.
- Select Columns
- Select One, Two or Three
- Save your Word document.
Let’s see these steps in detail.
Launch Microsoft Word and open your document in it.
Now, click on the Layout tab and then click Columns in the Page Setup section. There, you will see the following options:
- Create 2 columns.
- Create 3 columns.
- Add a column to the right side.
- Add a column to the left side.
Select the option as per your requirement.
If you want to add more than 3 columns to your document, you have to click on the More Columns option.
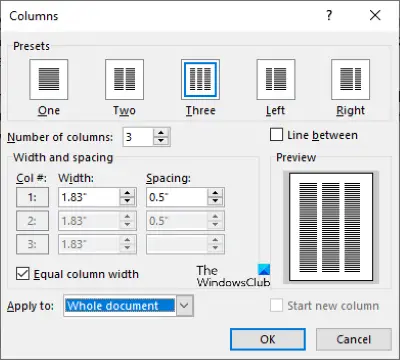
This will open a new window in which different customization options are available, have a look:
- If you want to separate the columns with a line, click on the checkbox adjacent to the Line between option.
- You can vary the width and spacing between the columns. By default, all the columns show equal spacing and width. But if you want the custom width and spacing for each column, you have to deselect the checkbox adjacent to the Equal column width option.
- In the Preview section, you can view all the changes that you make.
To insert images in your document, go to “Insert > Pictures” and select the image from your computer.
After inserting an image, you have to resize it manually. If you want, you can create a Drop Cap in your document.
When you are done, save your document.
You might be interested in reading:
- How to create a Drop-down List in Microsoft Word
- How to create a Restaurant Menu in Microsoft Word.

Nishant is an Engineering graduate. He has worked as an automation engineer in the automation industry, where his work included PLC and SCADA programming. Helping his friends and relatives fix their PC problems is his favorite pastime.