
In the article bellow, we will show you 4 ways to create a multi-column bulleted or numbered list in your Word document.
When we start a bulleted or numbered list, each list entry is considered as a paragraph. And there is no direct way to create 2 paragraphs side by side in Word document. This seems creating a multi-column list is not possible, either.
True. There is no direct way. But, you can always find effectual workarounds in our article.
Method 1: Format Lists as Multi-column Texts
- First and foremost, finish entering list items and select the list.
- Then click “Page Layout” tab.
- Next click “Columns” command in “Page Setup” group.
- On its drop-down menu, choose a column number.

- Now you see all list entries are in the first column.

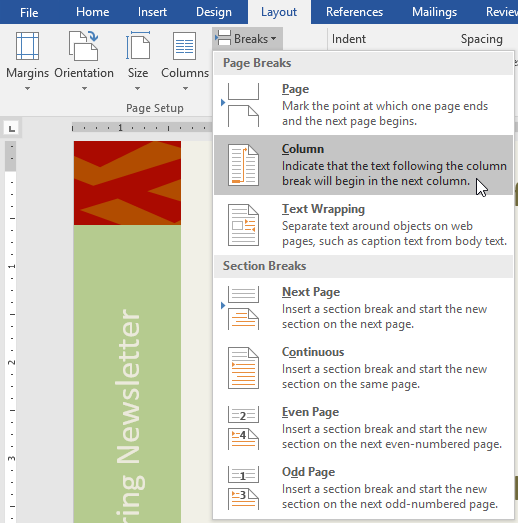
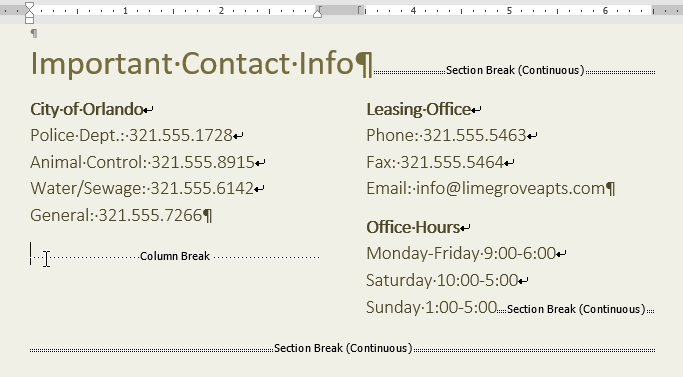
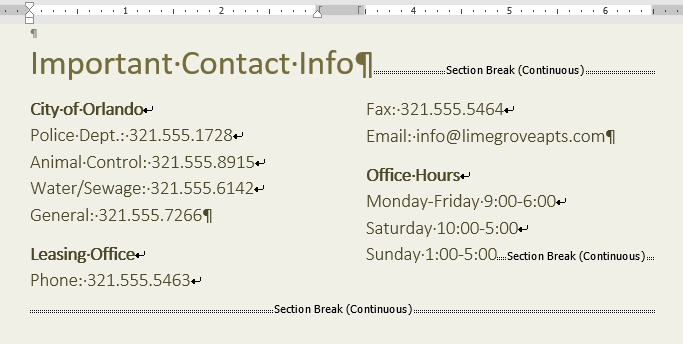
- Put cursor at the start of a list entry which you want to place in another column. For example, in this case, we position insertion pointer before the texts of the third list entry. Then click “Breaks” under “Page Layout” tab.
- And click “Column” on the drop-down menu of “Breaks”.

- This inserts a column break and distributes list entries to the second column.

- Repeat step 6 and 7 in case you have more than 2 columns and need to distribute list entries evenly. You can get a possible result as follows:


Method 2: Arrange a List in a Multi-column Table
- Firstly, put cursor at place where the multi-column list should go.
- Secondly, click “Insert” tab and click “Table”.
- Thirdly, click “Insert Table”.

- In the box open, enter the number of rows and columns.
- Click “OK”.

- Then select the table and click either “Bullets” or “Numbering” under “Home” tab. Each single cell will contain a bullet or be numbered in sequence.

- You can then enter one entry in a cell.
- Finally, remove table borders by clicking “Design” tab. Click to open the drop-down menu of “Borders” and choose “No Border”.


Method 3: Insert Text Boxes
- To begin with, click “Insert” tab and “Text Box”.

- Next click “Draw Text Box”.
- Then enter list entries into text boxes.
- Insert another text box in the same line with the previous one, following the first 3 steps.

- Lastly, remove the outline of all text boxes by clicking text box. Then click “Format” and “Shape Outline”. Choose “No Outline”.


Method 4: Insert Bullet Symbols
If you don’t need a live bulleted list, you can just use bullet symbols to create a seemingly like one.
- Click “Insert” tab then “Symbol”.
- Next choose “More Symbols”.

- In the “Symbol” dialog box, choose “General Punctuation” in the drop list of “Subset”.
- Then find and click the bullet symbol.
- Lastly, click “Insert” and close the box.
- Or you can also choose to press “Alt+ 0149” to quickly insert a bullet symbol.


Word Errors Exist
If you are an experienced user of Word, you must have encountered with errors some time. Different errors cast different levels of impact on your documents. In some luck day, a simple reopen action will be enough to address an issue. But in the rest of days, you find yourself in desperate need of a tool to recover doc. Under such scenario, you need to take time evaluating various products on the market before testing them on your document.
Author Introduction:
Vera Chen is a data recovery expert in DataNumen, Inc., which is the world leader in data recovery technologies, including excel corruption and pdf repair software products. For more information visit https://www.datanumen.com/
Word 2013
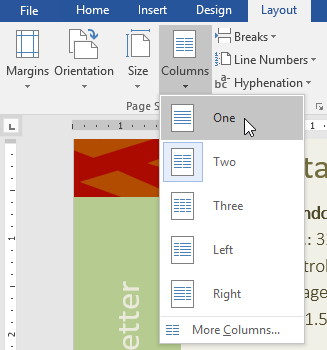
You can format your document in a newspaper-style column layout by adding columns. On the Page Layout tab, click Columns, then click the layout you want.
-
To apply columns to only part of your document, with your cursor, select the text that you want to format.
-
On the Page Layout tab, click Columns, then click More Columns.
-
Click Selected text from the Apply to box.
Word 2016
You can format your document in a newspaper-style column layout by adding columns. On the Layout tab, click Columns, then click the layout you want.
-
To apply columns to only part of your document, with your cursor, select the text that you want to format.
-
On the Layout tab, click Columns, then click More Columns.
-
Click Selected text from the Apply to box.
Need more help?
Typically, Word documents like books, reports, and letters have paragraphs that occupy the whole page width. In articles, newsletters, flyers, and brochures, all or only parts of the text may be arranged in two or more columns:

You don’t need to create tables to structure text into columns. Tables are useful for displaying translated versions of the legal document side-by-side, but table cells break the text flow and are not recommended for multi-column layouts. It is more convenient to use columns for text formatting in most other cases. Word also allows you to adjust your columns by adding column breaks.
Format text in columns
To format a text into columns, do the following:
1. Do one of the following:
- To use the same number of columns for an entire document, click anywhere in the document (empty or with content).
If you choose to format text in columns, Word fills the first column with text on the page and then moves to the beginning of the next column. When all columns on one page are filled, the text moves to the next page.
- To format only a part of the document, select the paragraphs that you want to wrap in columns.
If you select a part of the text and wrap it in columns, Word inserts section breaks at the beginning and end of the selected text to delineate the area where the column layout is applied:

See more about breaks and how to display them.

To manually specify where the text in each column should end, you can use a column break.
2. On the Layout tab, in the Page Setup group, click the Columns button:

3. In the Columns dropdown list, select one of the options:

- One (used by default),
- Two, Three to create two or three columns of equal width,
- Left, Right to create two columns of unequal width,
- More Columns… to specify more options in the Columns dialog box:

- In the Presets section, you can choose the same options as in the Columns dropdown list – One, Two, Three, Left, or Right.
- If you need more columns, type or select the number of columns you need in the Number of columns field. The maximum number of columns may vary depending on the font, font size, margins, etc. E.g., 13.
- The Line between checkbox inserts a vertical line between columns. This line clearly defines column borders, especially if you want to fit as much content on the page as possible (very handy for cheat sheets).
See more options below.

Format columns
I. It is recommended to justify the paragraphs in columns to give the page a clean and organized appearance. To justify the column text, select it and do one of the following:
- On the Home tab, in the Paragraph group, click the Justify button:

- Press Ctrl+J.

II. To change the width of columns or the space between them, do the following:
1. Click anywhere in the columnar text.
2. Do one of the following:
- On the Layout tab, in the Page Layout group, click the Columns button, then choose More Columns…
In the Columns dialog box, in the Width and spacing section:
In the Width box for any columns, enter or select a new width.
The Width measurements for the other columns change to match, and the width of all the columns changes.
See how the columns will be displayed in the Preview section.
- On the horizontal ruler, drag the margins to change the width of the columns:


III. To reduce white space on text lines, you can set up Word to hyphenate the text and break long words into syllables. See how to hyphenate automatically and manually for more details.
Remove columns
To remove column layout for the selected text or entire document, do the following:
1. Click anywhere in the columnar text.
2. On the Layout tab, in the Page Layout group, click the Columns button, then choose One.
Insert a column break
In the Word document, you can manually break columns. When you break a column, the text after the break moves to the top of the next column:

You can display column breaks as regular nonprintable symbols. Word displays them as ![]() .
.
To insert a column break, position the cursor at the beginning of the line you want to start in the new column, and then do any of the following:
- On the Layout tab, in the Page Setup group, click the Breaks button, and then click Column to insert a column break:

- Press Ctrl+Shift+Enter.

The column break is inserted, and the cursor moves to the beginning of the next column.
Remove a column break
To remove a column break, click at the left end of the break or select the break and press the Delete key.
Checklists and lists have become the staple of everything from grocery shopping to NASA launches. But they are boring.
Still, lists and checklists are also the simplest tools to reduce the complexity of information that assaults us every day. They are also the perfect antidote against forgetfulness. So, even as we swear to make perfect lists for productivity, let’s also get down to the basics with Microsoft Word and check off one daily office function—how to make those visually appealing lists and manage them.
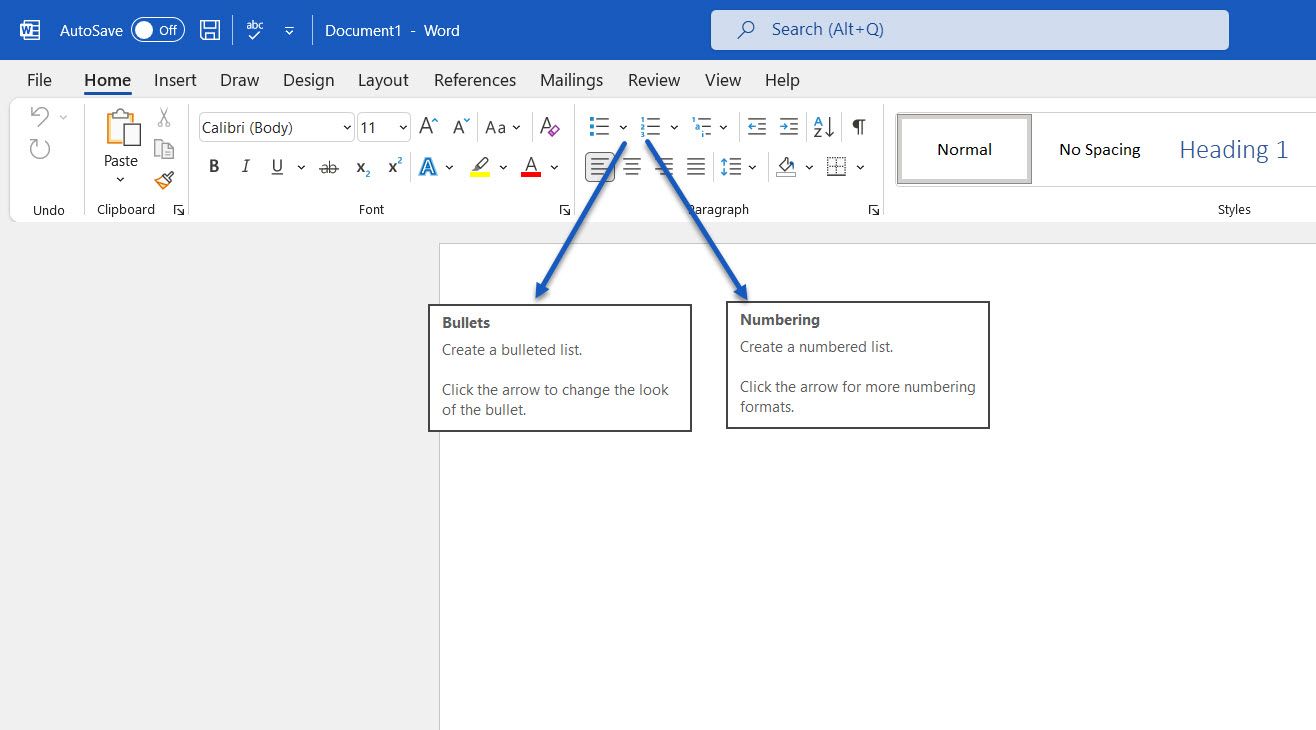
1. Create Your First List
Most of the list-making tricks and tips lie within the Ribbon’s Paragraph group on the Home tab.
Select the text to which you want to add the numbered list and click the down arrows next to the Bullet Lists icon or the Numbered List icon to access the libraries for both. Preview each list format by hovering over the selections available.
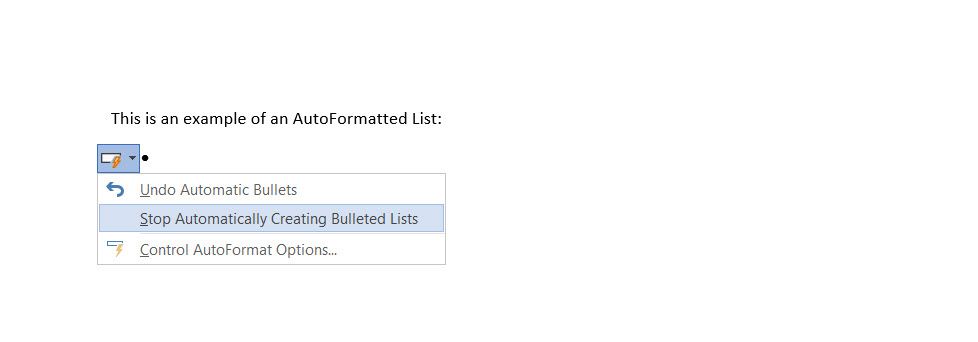
Microsoft Word also automatically creates a list for you when you start a paragraph with an asterisk or a number 1, period, and space followed by a press on the Enter key. With an asterisk, Word creates a bulleted list. Word senses that you are trying to create a numbered list with a number.
If you don’t want your text turned into a list, you can click the AutoCorrect options button image that appears. To disable or enable this option, go to File > Options > Proofing > AutoCorrect Options > AutoFormat As You Type.
To quickly change the style of a bulleted or numbered list, just click the style you want in the list that appears when you click the arrow next to Bullets or Numbering.
General Tip: You can change the format of just one or some of the bullet or number styles in a list. Place the cursor at the start of the line that you want to change before opening the Bullets and Numbering dialog box. Your changes will apply only to the selected lines.
2. Use Just the Keyboard to Create a List
Use a handy Microsoft Word shortcut to create numbered lists quickly with the keyboard alone.
The keyboard shortcut for a bulleted list: Press Ctrl + Shift + L to apply the default bullets to a list. Press Ctrl + Shift + N to remove the bullets.
To customize a keyboard shortcut for a numbered list, right-click anywhere on the Ribbon and select Customize the Ribbon from the popup menu. You can also open Word Options from File > Options > Customize Ribbon.

Click on the Customize button for Keyboard shortcuts.
Select All Commands in the Categories list. Scroll down the list on the left, and select FormatNumberDefault.
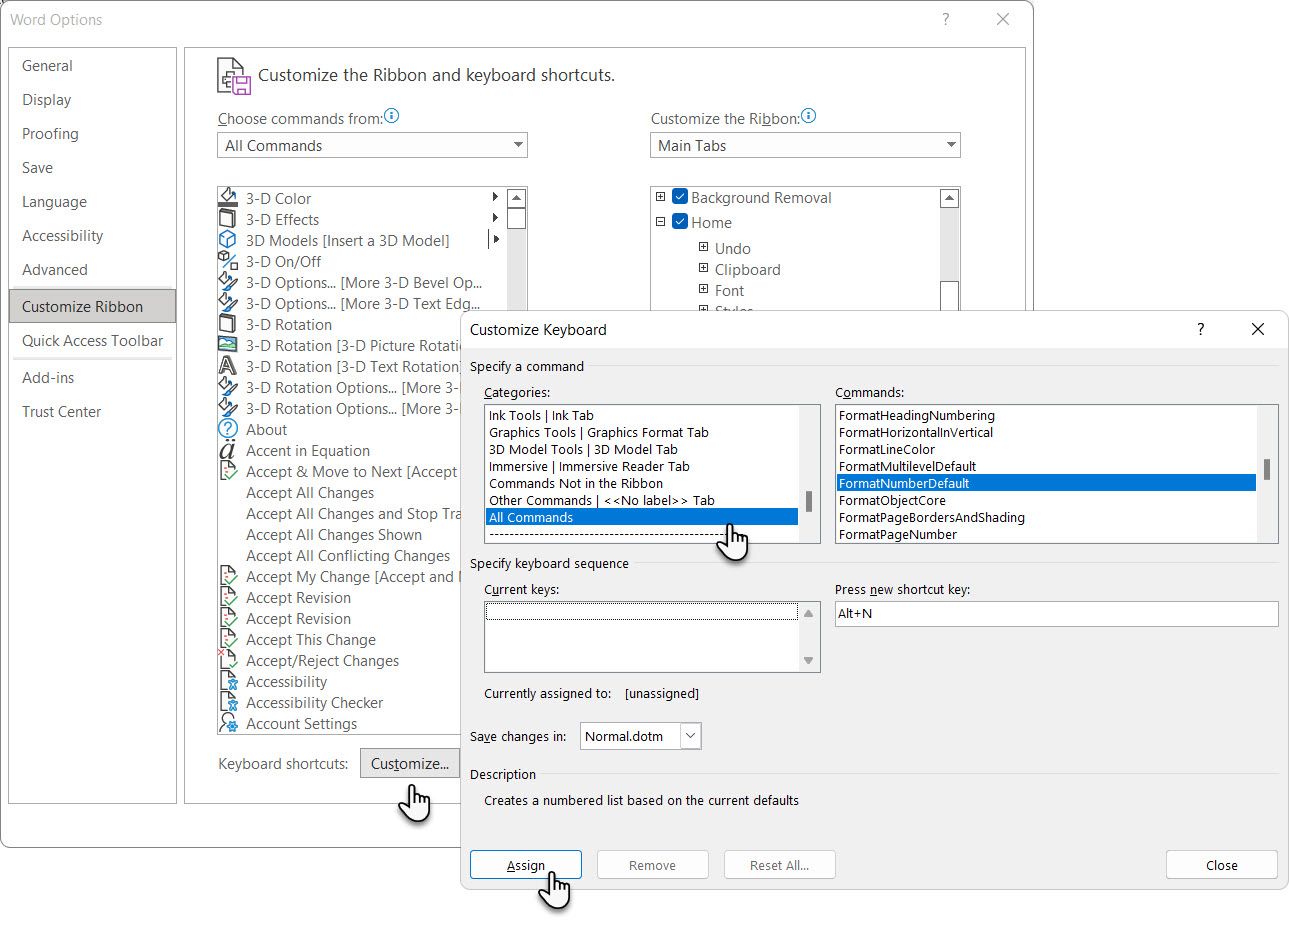
Place the cursor in the Press new shortcut key box and press the shortcut key combination you want to use to create a numbered list. For example, you could use Alt + N because it’s not assigned to anything else in Word. Click Assign.
The new keyboard shortcut is added to the Current keys list.
Click OK to exit the dialog box and test the new shortcut. Pressing «Alt + N» creates a numbered list. Pressing it again reverts it back to paragraph text.
General Tip: Do you want to skip numbering for a list item and convert it into a paragraph in the middle of a list? Select the specific list item and use the Alt + N shortcut to turn off the numbering.
3. Change the Default Numbered List Format
You can change, edit, or create a new numbered list. You have four Numbered List formats to choose from. But what if you want to use your own format other than the letters or Roman numerals, and it’s not available?
Go to Home > Paragraph group > Numbering. Click the down arrow. Choose Define New Number Format.
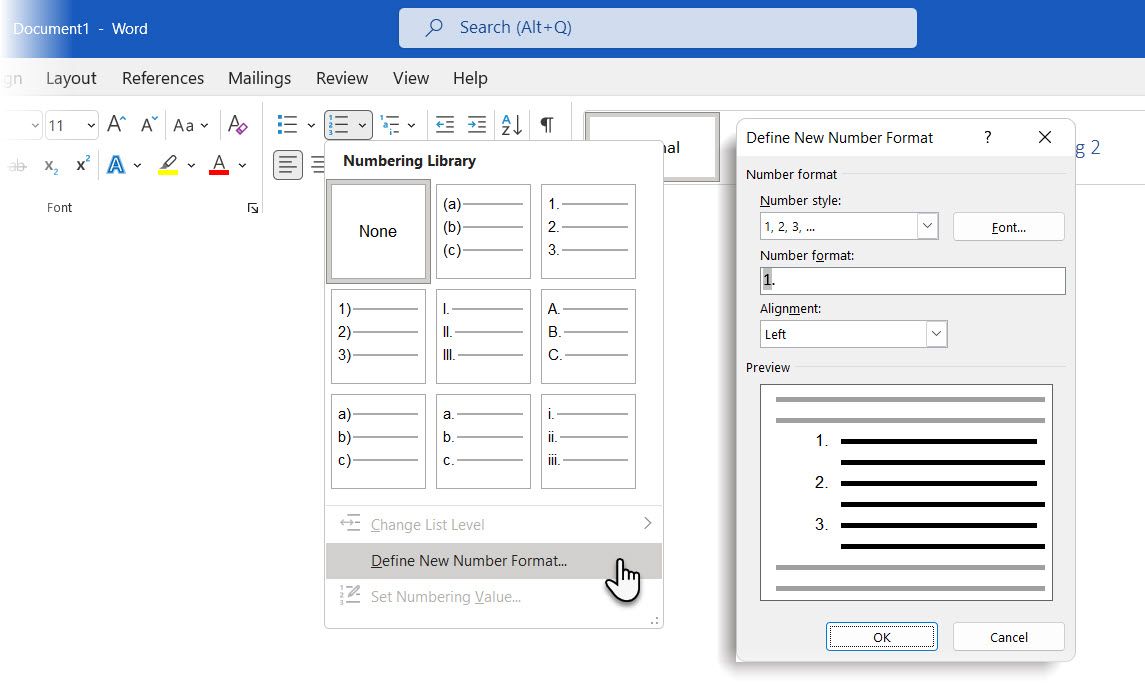
Choose any chronological format. To change the font size, style, and color, click Font and choose a setting on the Font or Advanced tab.
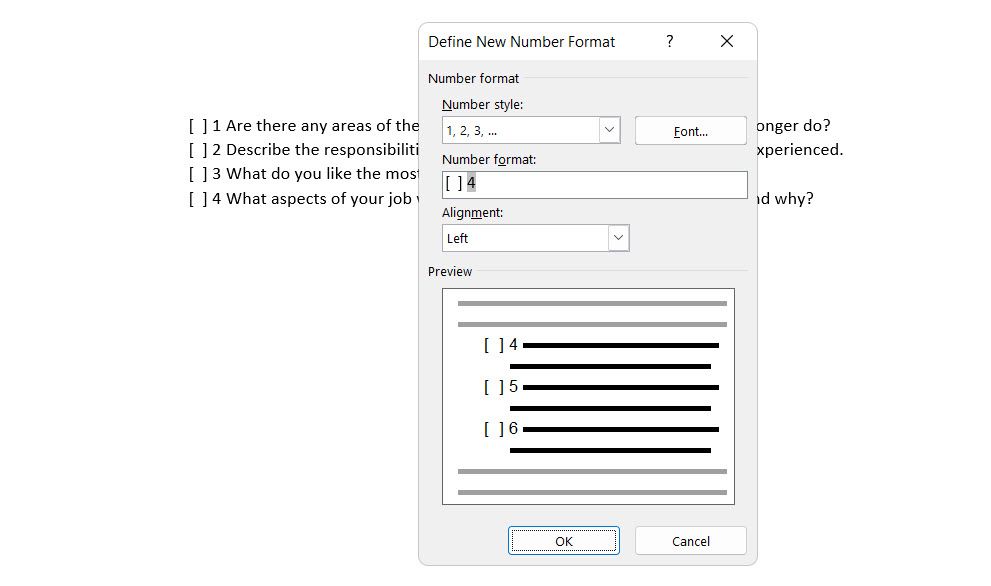
When you want to add a dash, parentheses, or another value like a pound sign to the number, enter it in the Number format field. The little preview displays the changes. You can see the square brackets for a list you can tick off in the screenshot below.
Choose Left, Centered, or Right under Alignment to change the number alignment. The default is Left-Aligned.
Click OK.
The new number format is applied to any selected text on your document.
General Tip: You can even prefix the numbered lists with descriptive text, e.g., Attendee 1, Attendee 2, Attendee 3…and so on.
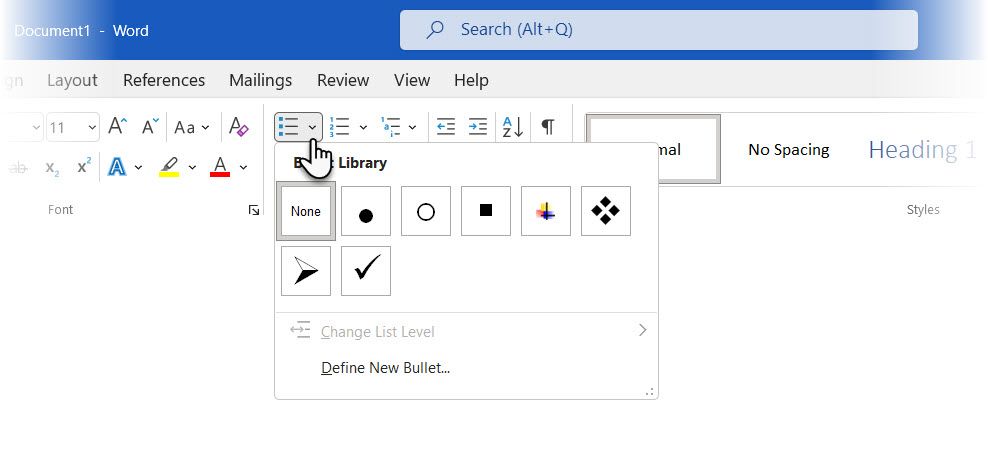
4. Change the Default Bullet List Format
Just like the numbered list, you can also change the default look of any bulleted list. Again, visually appealing bullets (other than the boring black solid dots) help your documents stand out from the mundane.

Select the text you want the bulleted list for and follow these steps.
Go to Home > Paragraph group. Click the arrow next to Bullets.
When the bullet you want isn’t in the library, click Define New Bullet.
The Define New Bullet dialog box opens. Under Bullet Character, choose Symbol.
Another dialog opens, which lets you choose appropriate symbols from your installed fonts.
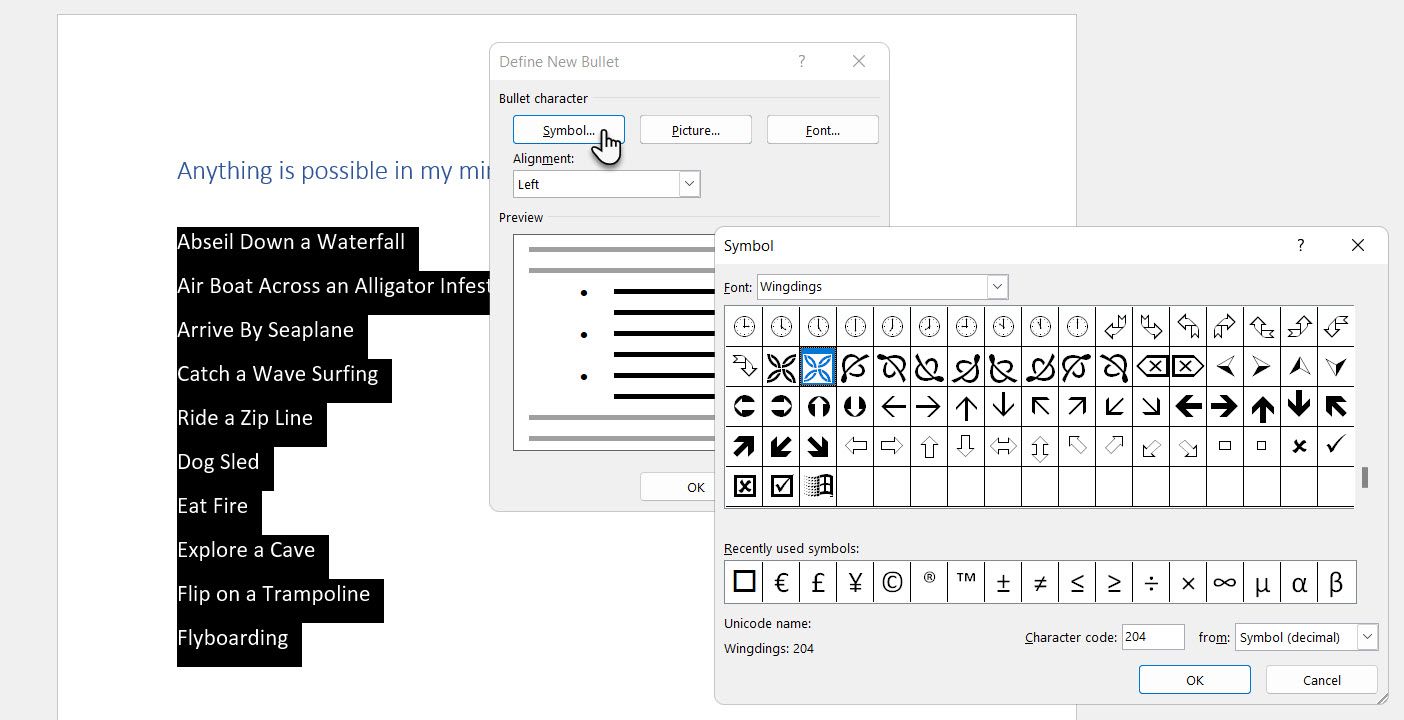
The Wingdings fonts have the best variety that makes for stylized bullet lists. Like any other font, you can change the color, size, style, and other characteristics of your chosen bullet font. Click the Font button in the Bullet character section to enter the Font dialog box.
General Tip: Use an open box (Open box) or a three-dimensional box (3D box) from the Wingdings character palette to create a Word document with neat checkboxes.
5. Use a Picture Instead of a Bullet
Sometimes all the mystic symbols in Webdings might not be enough. You can also use your own reusable graphics for bullet points. Though picture and SmartArt bullets look better on a PowerPoint slide, they work just as well in Word.

Select the bulleted list for which you want to change the bullets to pictures. Next, go to the Home tab > Paragraph group, click on the Bullets button, and select Define New Bullet from the dropdown menu. On the Define New Bullet dialog box, click Picture.
The Insert Pictures dialog box is displayed with different choices for your source file. You can insert a picture From a file on your PC or local network, from a Bing Image Search, or your OneDrive account.
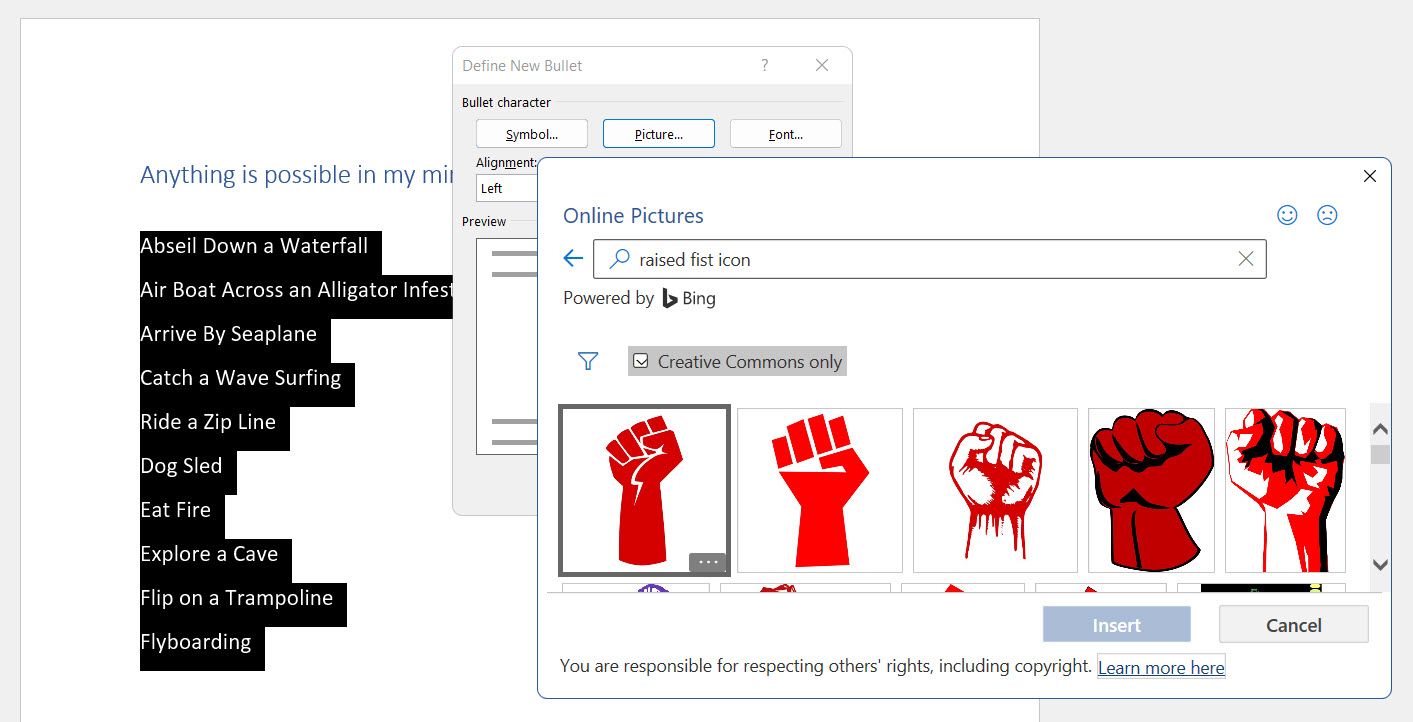
Navigate to the location of your source file and click on Insert. The Preview window shows the selection.
General Tip: You can choose a graphic that matches the «theme» of your list. For instance, display a banana as a picture bullet for a list of fruits. Make sure images are transparent and have a good background. In my experience, simple graphics work best.
6. Line Up the Numbers in a List
Sometimes, the smallest of tweaks can make a big visual difference. For example, note the screenshot below, which shows a numbered list with Word’s default Left alignment. As soon as the list reaches double digits, the default left alignment seems skewed as the decimal points do not line up neatly. Microsoft Word allows you to control this alignment and flush the double-digit numbers to the right.

Create your numbered list. Select the list items. Word can also control the alignment of a few selected items.
Go to Home > Paragraph. Then, click the dropdown arrow on Numbered list button.
Click on Define New Number Format. Choose Right alignment from the dropdown. Click OK.
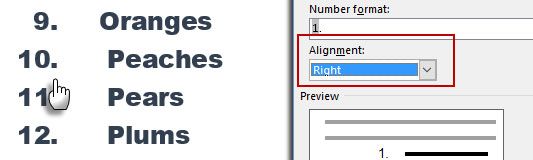
General Tip: Even if there is no decimal, it is preferable to have them aligned on the right edge of the number. Try it with brackets.
7. Adjust Microsoft Word’s Automatic List Indent
Every Word list comes with an automatic indent. Depending on the visual look you want, you may want to adjust the space.
Double-click any number in the list to select all of the numbers in the list.
Right-click the selection and choose Adjust List Indents from the context menu.
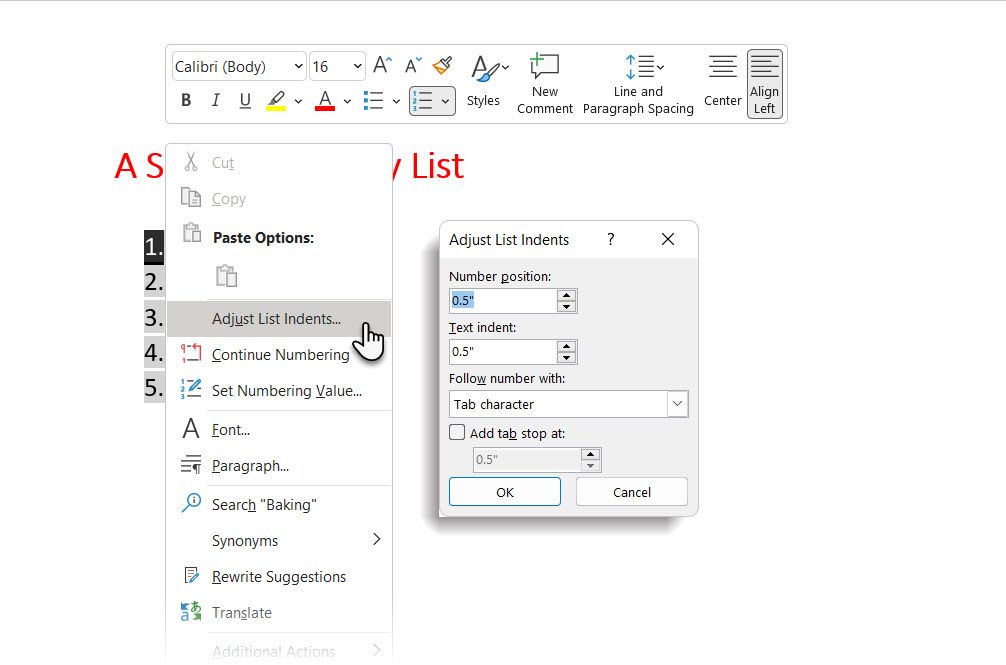
Change the distance of the bullet indent from the margin with the Number position box. Change the distance between the bullet and the text with the Text indent box.
Click OK.
8. Apply Formatting to a Single Number or Bullet on a List
You may want to format (changing the bullet style, color, or the size) a single bullet or number on a list without affecting any text on the list or any other succeeding bullets or numbers. Here’s an easy way.
Show formatting marks by clicking Home > Show/Hide.
Select just the paragraph marker (pilcrow) at the end for the list item whose bullet or number you want to change. Apply any formatting. The formatting affects only the bullet or number; the text in the list item retains its original format.
New bulleted or numbered items on the list coming after this will reflect this too. The text in the new list item will have the same font characteristics as the previous text, and the new bullet/number will have the same font characteristics as the previous bullet/number.
9. Create a Multilevel Numbered List
A multilevel list can be a mix of numbers, alphabets, and bullets arranged on different levels, as shown below. You can use multilevel lists to break down a list into its hierarchies or sub-points. Such an alignment is also used to create outlines. Word 2016 gives us a dedicated button on the Ribbon to create a multilevel list.
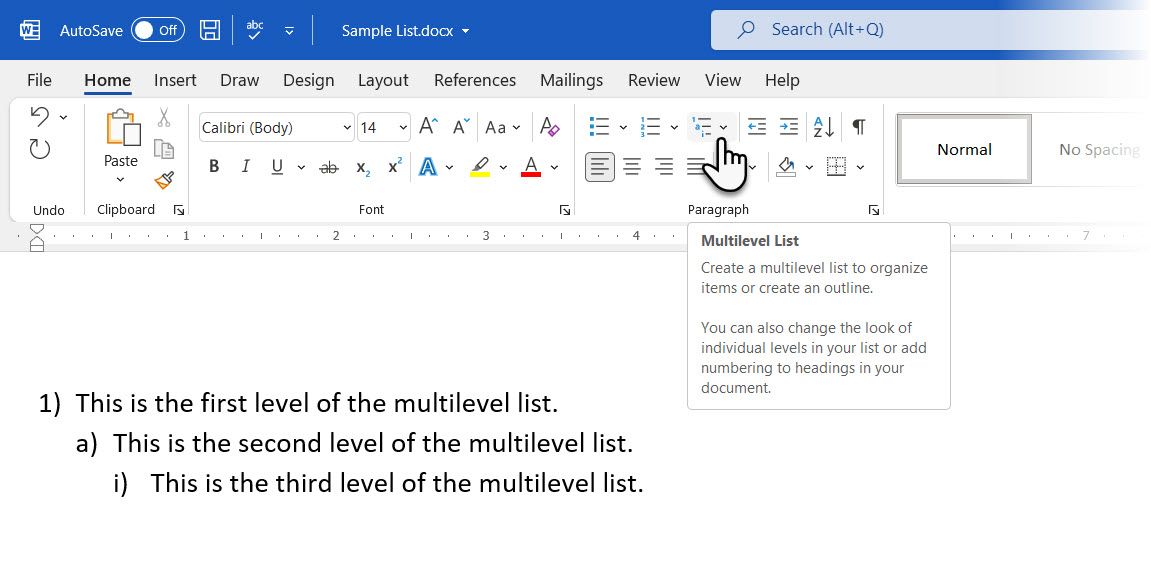
Click the Multilevel List button and type the list.
Press the Tab key to indent and create a sublevel. Press Shift + Tab to unindent and promote an item to a higher level.
General Tip: You can also write the entire list in advance. Select it, and click the Multilevel List button to align it using the Tab and Shift + Tab keys to organize the topics. You can also use the Increase or Decrease Indent commands on the Ribbon.
10. Create Reusable Styles for Multilevel Lists
You can change the bullets, letters, or numbers’ style, color, and alignment like any other list type. Save these changes as a new style and use it again and again.
Go to Ribbon > Home > click the arrow next to Multilevel List > Define New Multilevel List.
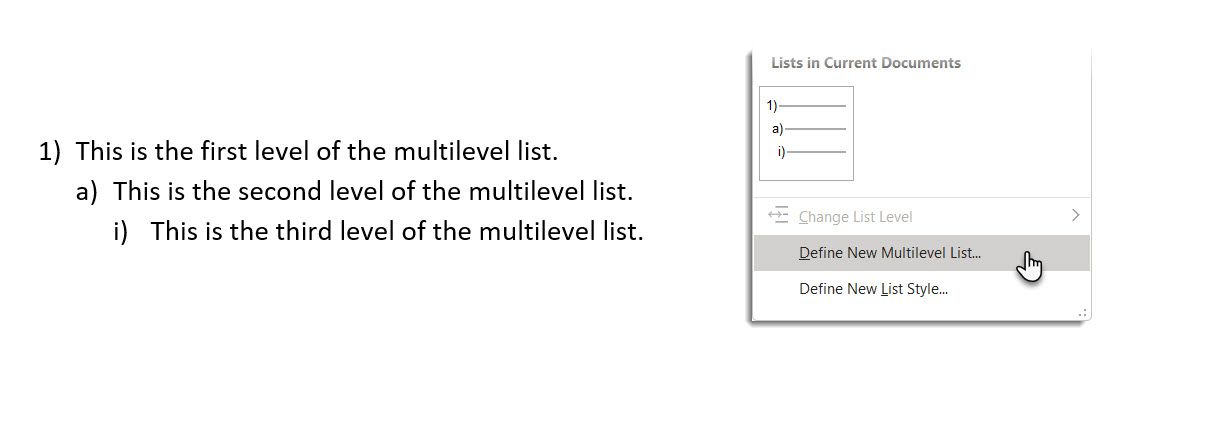
Click on More to expand the options.
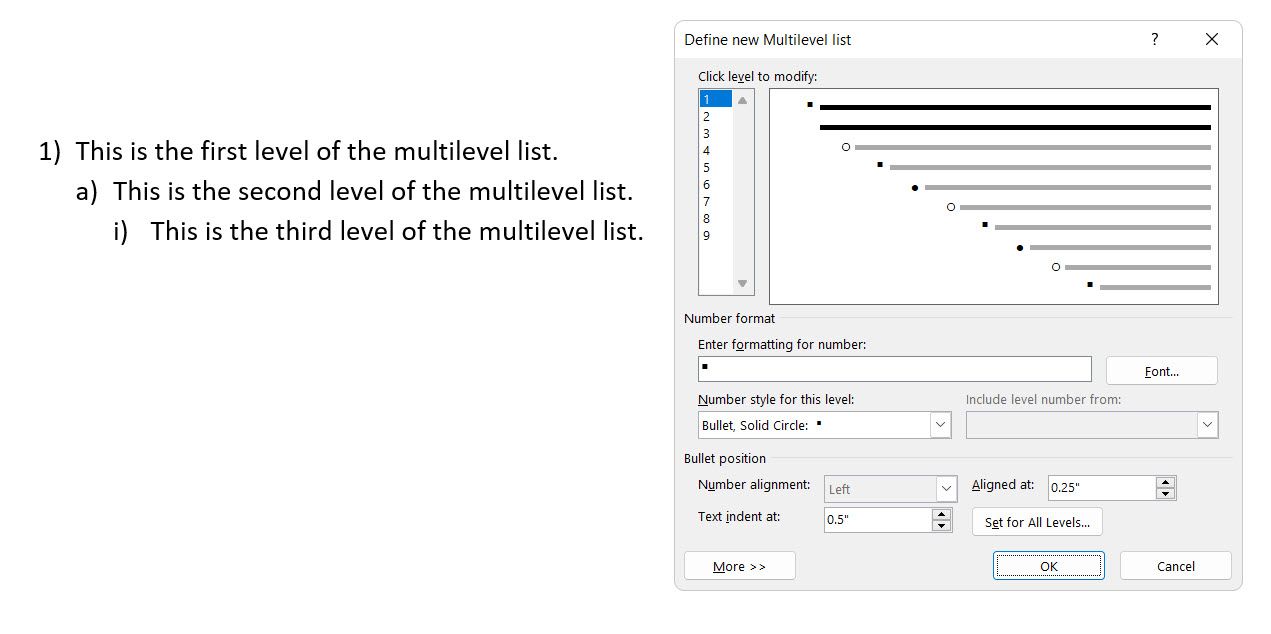
For customizing any of the levels, click the level number you want to modify. 1 is the default.
Use the options provided to change the appearance of the list. For example:
- In Number style for this level, type (1) if you want to style the numbers with parentheses or (A) to style the letters with parentheses.
- In Start at, choose the number, letter, or bullet where you want to start the list.
When you’ve finished the customizations, give the list a name under the ListNum field list name. This name will appear wherever you see the ListNum field.
Choose a style under Link level to style. This lets you use an existing style in Word for each level in the list.
Choose where you would like to apply your changes by clicking on Apply changes to and selecting from Selected text, Whole list, or This point forward.
11. Convert a List to a Table
First, select the list. Next, go to Home > Insert. Click the Table option in the Tables group.
Choose Convert Text to Table from the dropdown list.
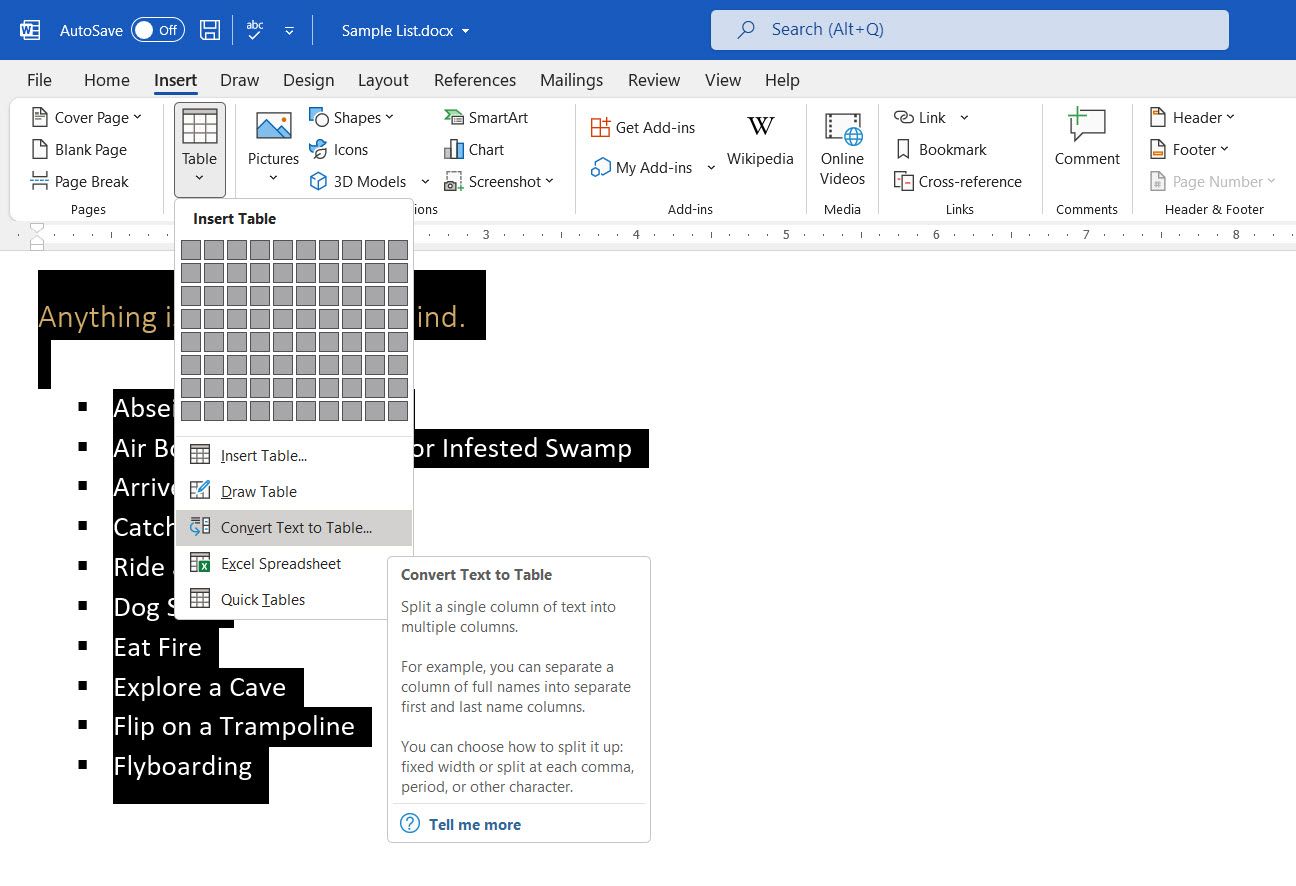
Microsoft Word estimates the table structure based on the list’s contents. Word creates the columns based on the separators between the items on the list.
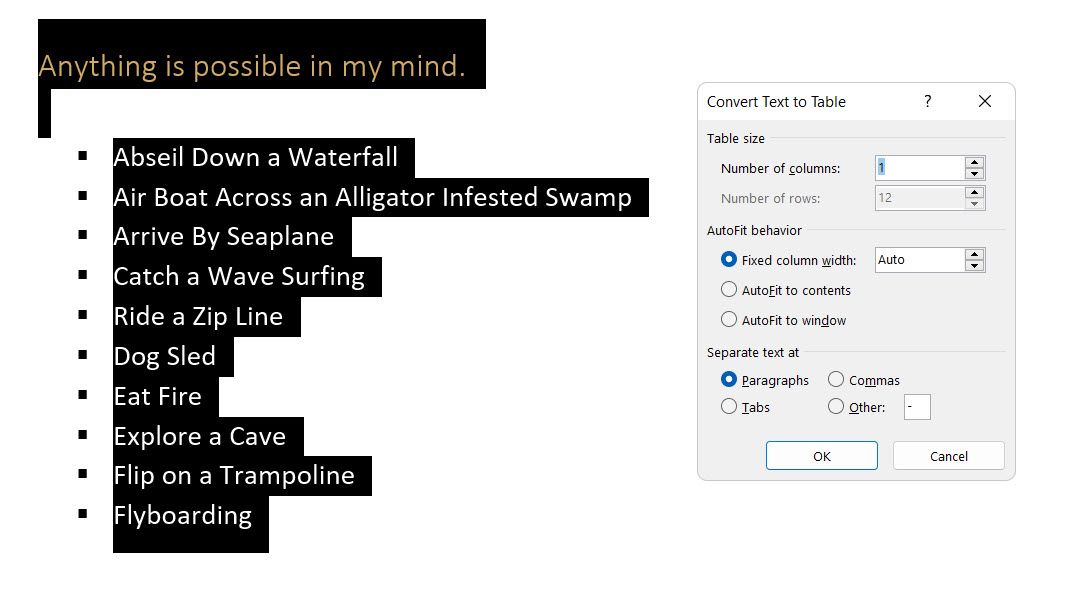
When Word doesn’t get it right, you have to modify the settings and make it easier for Word to convert the list. Once the table has been created, you can use the Table design tools to format the appearance.
General Tip: In most cases, the results aren’t perfect. The best way is to remove the numbering or the bullets and then create the table from the list of items. The serial numbers can easily be added to the table later.
12. Continue Your Numbering When a Paragraph Cuts It Short
Sometimes, a paragraph of text needs to interrupt the sequence of the list. Follow these steps to continue the list after the paragraph with the same number format.
Enter the rest of your numbered list after the paragraph and format it. The list begins with 1 again. Right-click on the list that comes after the paragraph. Choose Continue Numbering from the Context menu. The list is modified instantly.
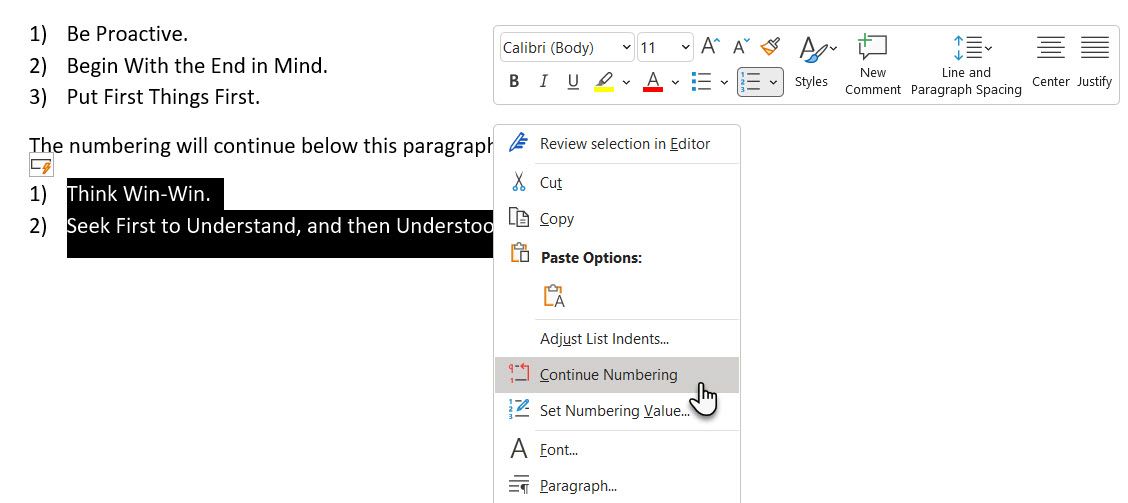
The list numbering continues from where the paragraph broke it off.
The Importance of Lists as Timesavers
Lists are time savers when a document has to be an exercise in economy. They instantly become a little less boring than blocks of text. Use them as the organizational backbone of a document and see your document better organized.
Showing the content in full width of a document may quickly bore the reader. Sometimes, it is a good idea to create your document like newspaper layout with multiple columns. This is one of the easy ways to show attractive content similar to newsletters and brochures. It helps to add different types of content in a single page and highlight the actionable part. In this article, we will explain how to insert columns in Word documents and arrange text using columns. If you have a long content, then make sure to add table of contents for easy accessibility of headings.
Using Default Templates with Columns
Though creating a custom column layout is easier, it takes
time to setup the layout. However, Microsoft offers predefined column templates
that you can choose for your use.
- Launch your Word application. On the backstage view, you can see the predefined layouts to select under “Featured” section. If you do not see backstage view, navigate to “File > New” menu and look under “Featured” section. You can also search for the column layouts using the search box.

- Select the template and Word will download it from the Microsoft Office library.
- As you can see, there are lot of beautiful columned layouts for resumes, brochures and events that you can choose from and modify.

Creating
Columns in Your Documents
If you do not want to use the template and start from the
scratch, you can create your column layout. It is possible to set a whole text,
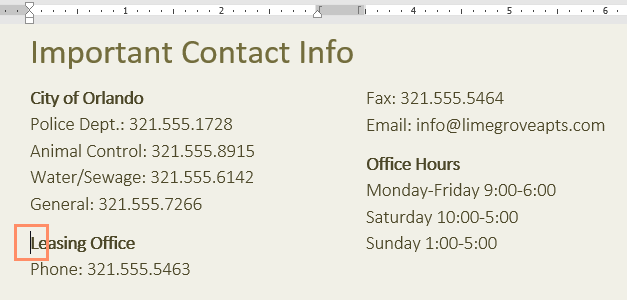
a selected area or a section into columns. Let us take an example document
having two text paragraph like below:

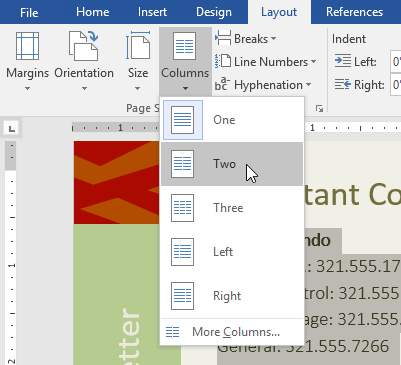
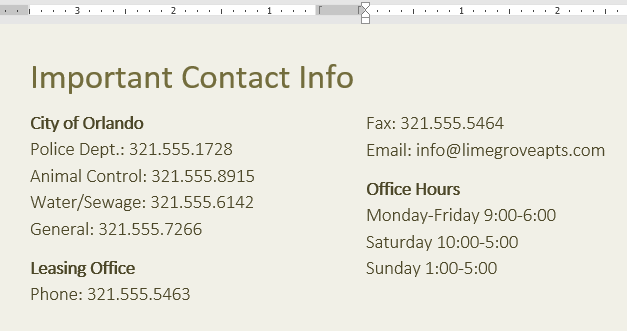
In order to break the two paragraphs into two columns, simply
go to “Layout” menu. Click on “Columns” dropdown and select “Two”. Word will
automatically split the two paragraphs into two columns as shown below.

Related: How to create eBook in Word?
Inserting
Manual Column Break
In the above example, you do not have to highlight the
section when you have two paragraphs. Just place the cursor in the section to
split into two columns based on the previous section break. If this does not
work for you or you want to manually decide the column break point, then follow
the below instructions.
- First click on the search box on the top menu and type
“show”. Select “Show All” option to show all formatting markups on your
document.

- Position your cursor where you want to create a column
break. - Switch to the “Layout” tab and click on the “Breaks”
list box. - Select “Columns” option to set a column break in the
selected cursor position.

- You can see the “Column Break” markup on your document
and Word will move the content below the column break to next page. - Now go to “Layout > Columns” and select “Two” to
create two columns at the column break point.

You will notice that Word continue the content from the first
column to next. The column break will make your document like a newsletter or
newspaper layout that continues from one column to next. However, you can also
manually type different content after creating columns.
Adjusting
the Column Width
By default, Word will adjust the columns to have equal width.
However, you can change the width of each column as per your need. In order to
adjust the column width, go to “Layout > Columns > More Columns” option.

You can customize the following options:
- Presets – choose one of the existing preset layout options.
- Number of columns – change the number of columns.
- Line between – enable the checkbox to insert a line between the columns.
- Equal column width – disable this checkbox and setup custom width and spacing for your columns.
- Apply to – apply the changes to whole document or only to this section.
After customizing your column layout, you can continue to
type in a columned layout.

Related: How to change embedded file name in Office?
Using
Markers in the Ruler
When you are working with columns, Word will split the
document into sections. You can view the width of the sections on the marker
available in top ruler.
Simply, double click on the ruler marker to open “Columns”
pop-up box to customize the options as explained above. Alternatively, you can
also set the width by dragging the markers in the ruler using mouse.

Undoing
Column Layout
If
you do not need the distribution into columns anymore, you can simply undo this
setting. Afterwards your text will appear in the original structure.
- In order to do so, open the “”Layout > Columns” list box and select the entry “One”.
- The formatting markups will remain intact. You can remove the column break by placing the cursor in front of the formatting symbol and remove it using the delete key.
Creating
Mixed Layout
You
can also easily create columns and full width layout sections in a single
document.
- In order to exit the column layout and go to full width section,
position your cursor at the end of the last column. - Go to “Breaks > Continuous” and apply a section break on the same
page. Now your cursor will go to next section and you can see a section break
in the formatting markup. - Go to “Columns” and select “One” to disable the columns and continue in
a full width.

Tips and Tricks
- In order to divide a section of your document into columns, select it with the mouse and create columns. When creating columns, Word defines the area automatically for individual sections.
- You can apply column break only to particular section of your document when your document has multiple sections.
- Use keyboard shortcuts, “Control + Shift + Enter” to create a column break.
- You can adjust the column width via the markers in the ruler only when you have selected “Equal column width” checkbox in the “Columns” dialogue window.
- Column changes are an important element to structure texts with multiple columns.
Lesson 15: Columns
/en/word/breaks/content/
Introduction
Sometimes the information you include in your document is best displayed in columns. Columns can help improve readability, especially with certain types of documents—like newspaper articles, newsletters, and flyers. Word also allows you to adjust your columns by adding column breaks.
Optional: Download our practice document.
Watch the video below to learn more about columns in Word.
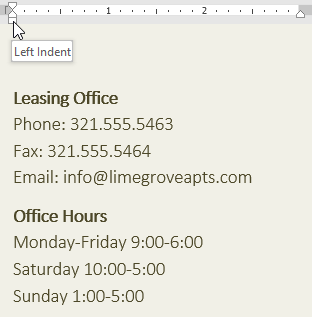
To add columns to a document:
- Select the text you want to format.

- Select the Layout tab, then click the Columns command. A drop-down menu will appear.
- Select the number of columns you want to create.
- The text will format into columns.
Your column choices aren’t limited to the drop-down menu that appears. Select More Columns at the bottom of the menu to access the Columns dialog box. Click the arrows next to Number of columns: to adjust the number of columns.

If you want to adjust the spacing and alignment of columns, click and drag the indent markers on the Ruler until the columns appear the way you want.
To remove columns:
To remove column formatting, place the insertion point anywhere in the columns, then click the Columns command on the Layout tab. Select One from the drop-down menu that appears.
Adding column breaks
Once you’ve created columns, the text will automatically flow from one column to the next. Sometimes, though, you may want to control exactly where each column begins. You can do this by creating a column break.
To add a column break:
In our example below, we’ll add a column break that will move text to the beginning of the next column.
- Place the insertion point at the beginning of the text you want to move.
- Select the Layout tab, then click the Breaks command. A drop-down menu will appear.
- Select Column from the menu.
- The text will move to the beginning of the column. In our example, it moved to the beginning of the next column.
To learn more about adding breaks to your document, review our lesson on Breaks.
To remove column breaks:
- By default, breaks are hidden. If you want to show the breaks in your document, click the Show/Hide command on the Home tab.
- Place the insertion point to the left of the break you want to delete.
- Press the delete key to remove the break.
Challenge!
- Open our practice document.
- Scroll to page 3.
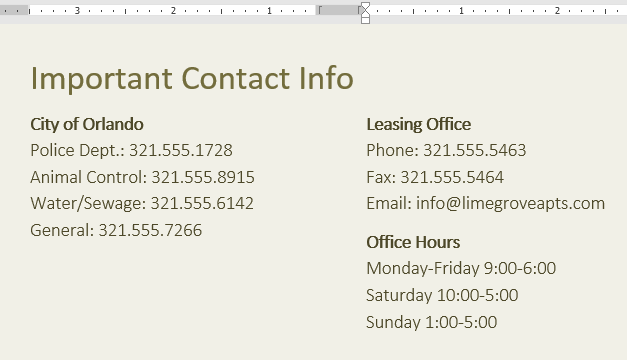
- Select all of the text in the bulleted list below Community Reminders and format it as two columns.
- Place your cursor at the beginning of the fourth bullet in front of the word Visitors.
- Insert a column break.
- When you’re finished, your page should look something like this:


/en/word/headers-and-footers/content/
I’ll admit it — I’m not a big fan of adding columns in Microsoft Word. Not that there’s anything wrong with columns, per se. Columns work fine (until they don’t). But in a legal office environment, I usually format blocks of information with tables because they’re a bit easier to control.
That said, I have seen lots of legal professionals insert multiple columns in Microsoft Word to format things like service lists in Certificates of Service. Hey, to each her [his] own.
So if you want to format text with columns in Microsoft Word documents, here’s what you need to know:
Inserting columns: the basic primer
Everything starts from the Layout tab (known as Page Layout in versions 2007-2010) on the Ribbon:

Click on More Columns, and you’re taken to a dialog box that allows you to set up your columns exactly the way you want them.
The default is one column — just a regular document. You can use one of the presets (the two-column layout is useful for the service list application I mentioned above). Or you can customize it within an inch of its life. Width? Space between columns 1 and 2, or 2 and 3, or …? How about a line between them (like a newsletter would have)? You decide!
(If you don’t want your columns to all be the same width, be sure to uncheck the “Equal column width” checkbox at the bottom of the dialog box. Then, you’ll be able to customize the width of each column separately.)

Navigating between columns
Once you’ve set up your columns, you come to the tricky part. This is part of the reason I usually opt for tables rather than columns. If you use tables, moving between the cells is easy — just use the Tab key. To insert a column, however, you need to know a few tricks.
Say you’re typing in the first column of your document and you want to end that column there and start typing in the second column. To do that, you have to insert a column break. You can insert a column break in one of two ways:
- Press CTRL-SHIFT-ENTER simultaneously; or
- Go to the Layout tab, click Breaks, and choose Column

Personally, I’d go with Option 1 (assuming I remember the key combination in the heat of the moment).
Once you’ve inserted a column break, your cursor is in the next column, ready for you to type. When you insert a column break in your last column (the one farthest to the right), the cursor will go to the first column on the next page.
Viewing column boundaries
To me, it’s tough to work with columns (or tables, for that matter) if I can’t really see them. To turn on the column boundaries so you can see your columns laid out on the page, go to the File tab (or click the Office button in version 2007) and click Options, then go to Advanced and check the box next to Show text boundaries:

When columns are only part of your document
But what if only part of your document consists of multiple columns?
If you go back to the Columns dialog box (via Layout > Columns > More Columns), you’ll notice a drop-down at the bottom of the box:

If you choose This Point Forward, that will allow you to insert columns at the point your cursor is sitting in. Once you’ve inserted your columnar data, then go back to the Format Columns dialog box and choose the One Column format (being careful to once again choose This Point Forward in that bottom drop-down), and your document will return to the single-column format without disturbing the multi-column insertion you’ve just worked so hard on.
But what if you want to insert a two- or three- (or more-) column block of text into the middle of a one-column, normal document?
You may want to use a slightly different procedure, depending on whether you’re creating a brand-new document or you’re inserting a multi-column layout into the middle of an existing single-column document. You’re using the same dialog box, but if you’re editing an existing document and placing a multi-column layout in the middle, you’ll need to take a couple of extra precautions to ensure you don’t inadvertently create a formatting nightmare.
Inserting multi-columns into a new document
Let’s say you’re typing along in a brand-new document and decide that the next bit of text needs to be in two (or more) columns. There’s no text after the point where your cursor is right now, so you can switch back to single-column format once you get done inserting the multi-column section.
If you go back to the Columns dialog box (via Layout > Columns > More Columns), you’ll notice a drop-down at the bottom of the box:
If you choose This Point Forward, that will allow you to insert columns at the point your cursor is sitting in. Once you’ve inserted your columnar data, then go back to the Format Columns dialog box and choose the One Column format (being careful to once again choose This Point Forward in that bottom drop-down), and your document will return to the single-column format without disturbing the multi-column insertion you’ve just worked so hard on.
Inserting columns into the middle of an existing document
If you’re editing an existing document and you want to insert a multi-column layout somewhere in the middle of text you’ve already got typed, the “this point forward” method may result in a temporary and fixable but still infuriating mess.
Here’s how to avoid it: Insert section breaks before and after the point at which you want to insert your columns:

… then in Apply to:, choose This section instead:

Here’s a video demonstration:
Video: Inserting a column into the middle of an existing document (without creating a mess)
How do you see yourself using columns in your documents?