
In Word, you can add newsletter style columns to a document. If you’d like to add a vertical line between the columns, open the Columns dialog box.
-
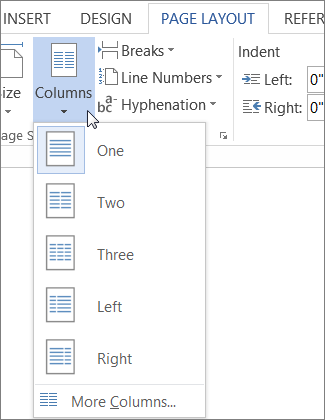
Choose Page Layout > Columns. At the bottom of the list, choose More Columns.

-
In the Columns dialog box, select the check box next to Line between.
Notes:
-
You can also use the Columns dialog box to adjust the column width and the spacing between columns.
-
If your document has more than one section, the new layout will only be applied to the current section.
-
Insert a column break to control how text flows between columns. For example, insert a column break to end a paragraph in one column and start a new paragraph at the top of the next column.
Need more help?
Choose “Format>Columns” from the drop-down menu at the upper left of the window and a dialog box will open. Select how many columns you want. Then click the “line between” button, and hit “OK.” A vertical line will appear between the columns.
How do you add a side line in Word?
Adding Vertical Lines at the Sides of a Word
- Make sure the insertion point is within the word for which there should be vertical lines on both sides.
- Choose Borders and Shading from the Format menu.
- Make sure the Borders tab is selected.
- Use the controls in the dialog box to add the desired border to both the left and right sides of the paragraph.
- Click on OK.
What is the horizontal line on the keyboard called?
backslash
Whats is a vertical line?
: a line perpendicular to a surface or to another line considered as a base: such as. a : a line perpendicular to the horizon. b : a line parallel to the sides of a page or sheet as distinguished from a horizontal line.
What is the name of vertical line in a bar graph?
Understanding a Bar Graph The vertical axis of the bar graph is called the y-axis, while the bottom of a bar graph is called the x-axis.
Is a straight vertical line a linear equation?
The graph of a linear function is a straight line, but a vertical line is not the graph of a function. All linear functions are written as equations and are characterized by their slope and y -intercept.
Can a straight line be a linear function?
A linear function is a function whose graph is a straight line. The line can’t be vertical, since then we wouldn’t have a function, but any other sort of straight line is fine.
What does a linear function look like on a table?
You can tell if a table is linear by looking at how X and Y change. If, as X increases by 1, Y increases by a constant rate, then a table is linear. You can find the constant rate by finding the first difference. This table is NOT linear.
How do you find the Y intercept with 2 points?
Steps
- Calculate the slope from 2 points. For Example, Two points are (3, 5) and (6, 11)
- Substitute the slope(m) in the slope-intercept form of the equation.
- Substitute either point into the equation. You can use either (3,5) or(6,11).
- Solve for b, which is the y-intercept of the line.
- Substitute b, into the equation.
Typically, Word documents like books, reports, and letters have paragraphs that occupy the whole page width. In articles, newsletters, flyers, and brochures, all or only parts of the text may be arranged in two or more columns:

You don’t need to create tables to structure text into columns. Tables are useful for displaying translated versions of the legal document side-by-side, but table cells break the text flow and are not recommended for multi-column layouts. It is more convenient to use columns for text formatting in most other cases. Word also allows you to adjust your columns by adding column breaks.
Format text in columns
To format a text into columns, do the following:
1. Do one of the following:
- To use the same number of columns for an entire document, click anywhere in the document (empty or with content).
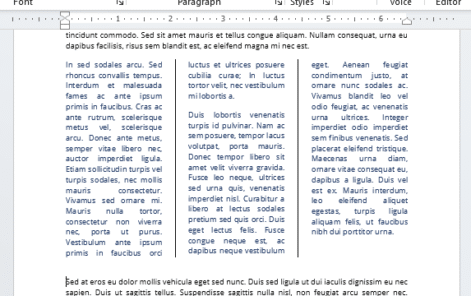
If you choose to format text in columns, Word fills the first column with text on the page and then moves to the beginning of the next column. When all columns on one page are filled, the text moves to the next page.
- To format only a part of the document, select the paragraphs that you want to wrap in columns.
If you select a part of the text and wrap it in columns, Word inserts section breaks at the beginning and end of the selected text to delineate the area where the column layout is applied:

See more about breaks and how to display them.

To manually specify where the text in each column should end, you can use a column break.
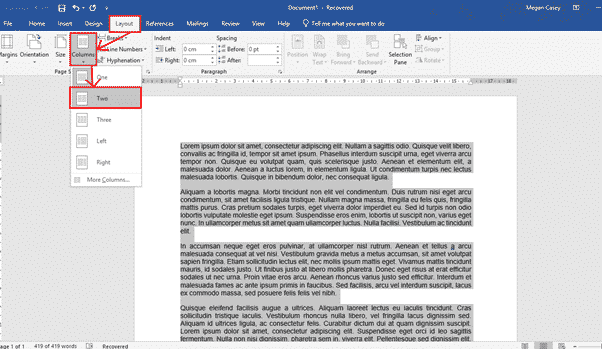
2. On the Layout tab, in the Page Setup group, click the Columns button:

3. In the Columns dropdown list, select one of the options:

- One (used by default),
- Two, Three to create two or three columns of equal width,
- Left, Right to create two columns of unequal width,
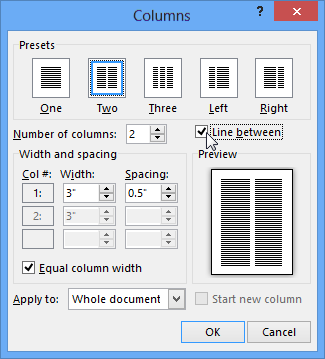
- More Columns… to specify more options in the Columns dialog box:

- In the Presets section, you can choose the same options as in the Columns dropdown list – One, Two, Three, Left, or Right.
- If you need more columns, type or select the number of columns you need in the Number of columns field. The maximum number of columns may vary depending on the font, font size, margins, etc. E.g., 13.
- The Line between checkbox inserts a vertical line between columns. This line clearly defines column borders, especially if you want to fit as much content on the page as possible (very handy for cheat sheets).
See more options below.

Format columns
I. It is recommended to justify the paragraphs in columns to give the page a clean and organized appearance. To justify the column text, select it and do one of the following:
- On the Home tab, in the Paragraph group, click the Justify button:

- Press Ctrl+J.

II. To change the width of columns or the space between them, do the following:
1. Click anywhere in the columnar text.
2. Do one of the following:
- On the Layout tab, in the Page Layout group, click the Columns button, then choose More Columns…
In the Columns dialog box, in the Width and spacing section:
In the Width box for any columns, enter or select a new width.
The Width measurements for the other columns change to match, and the width of all the columns changes.
See how the columns will be displayed in the Preview section.
- On the horizontal ruler, drag the margins to change the width of the columns:


III. To reduce white space on text lines, you can set up Word to hyphenate the text and break long words into syllables. See how to hyphenate automatically and manually for more details.
Remove columns
To remove column layout for the selected text or entire document, do the following:
1. Click anywhere in the columnar text.
2. On the Layout tab, in the Page Layout group, click the Columns button, then choose One.
Insert a column break
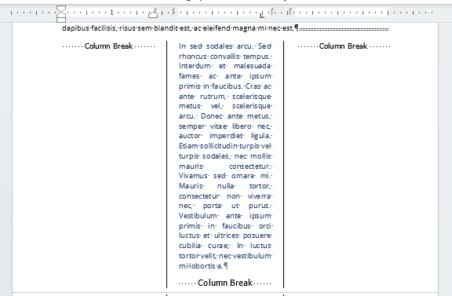
In the Word document, you can manually break columns. When you break a column, the text after the break moves to the top of the next column:

You can display column breaks as regular nonprintable symbols. Word displays them as ![]() .
.
To insert a column break, position the cursor at the beginning of the line you want to start in the new column, and then do any of the following:
- On the Layout tab, in the Page Setup group, click the Breaks button, and then click Column to insert a column break:

- Press Ctrl+Shift+Enter.

The column break is inserted, and the cursor moves to the beginning of the next column.
Remove a column break
To remove a column break, click at the left end of the break or select the break and press the Delete key.
There are at least five six ways to add a vertical line in Word. Vertical lines can help accentuate a piece of text in Word, but knowing how to add them is not as intuitive as adding a horizontal line.
- Adding a border
- Or a Page Border
- Using the shape tool
- Adding a bar tab
- Adding lines to columns
- Add lines either side of text
These are most common options available. With all the features in Word there are other more complicated choices. We thought of four more vertical formatting tricks in Word
Adding a Border
Add a vertical line next to a paragraph is to simply add a side border to the paragraph.
Highlight the paragraph you wish to add a line to, go to Home | Paragraph, and click the Borders dropdown.

This gives you options to insert borders in various locations. To insert a vertical line to the left or right of the text, select Left Border or Right Border.
The Left or Right border options insert a plain black line next to the text. If you want to have more control over the color or style of your line, instead select Borders and Shading at the bottom of the list.
Custom Borders
Click Custom on the left-hand side of the dialog box, to enable you to choose individual borders to add. In the middle section, you can select the style, color and width of the line. On the right-hand side, click the box to indicate where you want the border to appear (top, bottom, left or right). The preview will give you an indication of how your line will appear.
Note that the boxes for the border positions are toggle keys, so if a border that you don’t want is appearing in the preview, just click the appropriate box to remove it.
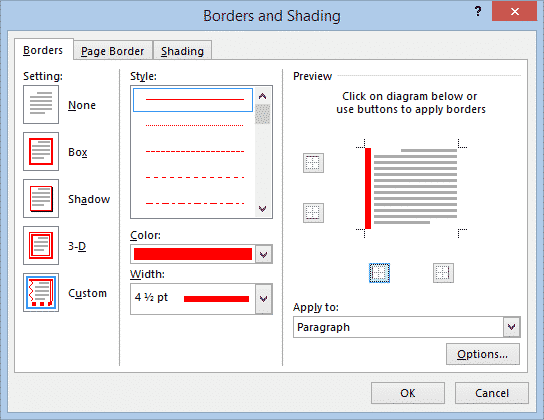
A line inserted by this method is anchored to the paragraph(s) it is applied to and will move if you move a paragraph.
Add a Page Border
The same thing can be done at the page level.
Design | Page Background } Page Borders | Page Border.

Like a paragraph border, select the style of border you want then click the Preview sides. Remove the top and bottom borders, leaving left or right depending on your needs.
To add a vertical line using the shape tool, go to Insert | Shapes and select the Line tool.
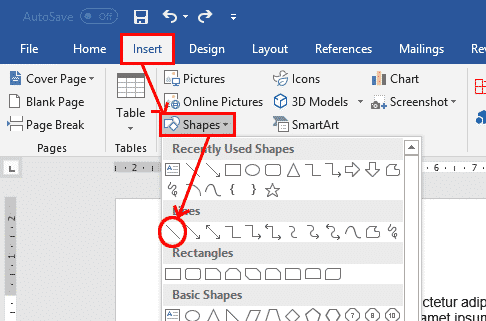
Place the cursor where you want the line to start, and drag to where you want the other end of the line to be. Holding the Shift key while you drag will ensure that the line is straight.
Once you have finished creating the line, the Format tab becomes live on the ribbon, where you can change the color, shape and style of the line.
Click the Layout button next to the line to see options regarding how you want the line to interact with your text.
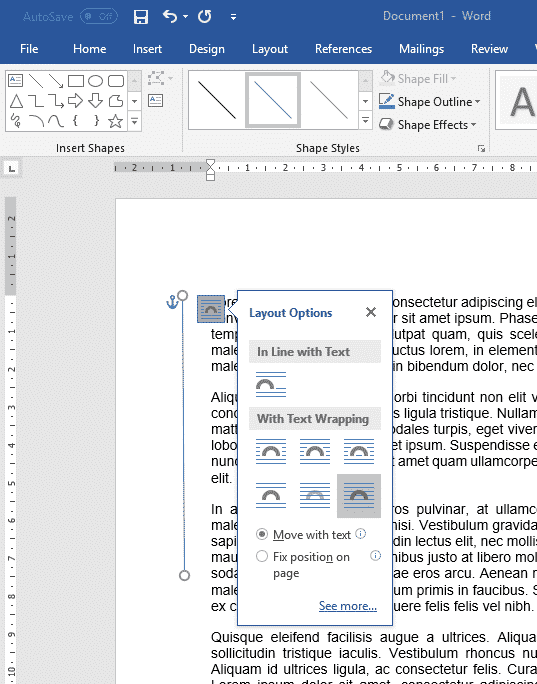
To move or resize the line, grab one of the end points and move it. If you hold the Control key while you move, both ends of the line will move as if around a fulcrum.
Adding a Bar Tab
Another way to add a vertical line to text is to use the Tab feature, but instead of inserting a tab, you will add a ‘bar’ or vertical line. Bar tabs are the lesser known Tab formatting option which separate tabbed items with a visible bar like this:
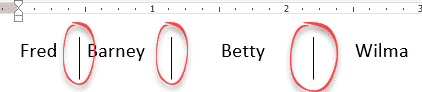
The shape tool can be used to add a line in any location and of any length, a bar tab can only be applied to whole paragraphs.
Make the ruler is visible at the top of your document, to help you find the correct position for the bar tab. If you cannot see the ruler, go to View | Show, and tick the Ruler box.
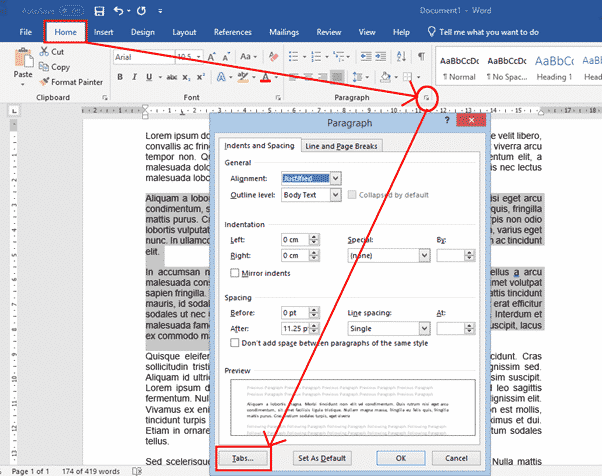
To insert a bar tab, select the paragraphs that you want the bar to appear beside, go to Home | Paragraph and open the Paragraph dialog box. Then click the Tabs button at the bottom of the dialog box.
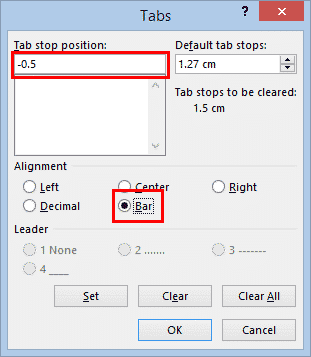
Tab Stop Positions
In the Tab Stop Position box, enter the position where you want the line to appear. You can use the ruler at the top of the screen to work out what value to enter. In the example pictured, the text starts at 0 on the ruler, so if you want the line to appear to the left of the existing text, you may enter “-0.5”. If you want it to appear to the right of the text, you may enter “17”.
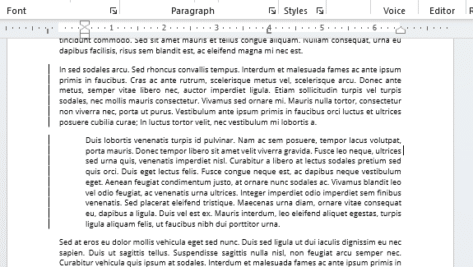
Then select Bar under Alignment and click OK.
With the values entered in the above figure, the text would then look like this:
Note that a line inserted by this method is anchored to the paragraph(s) it is applied to. If you move a paragraph around, the line will go with the paragraph to its new location.
If you wish to later delete the line, highlight the paragraph, open the tab dialog again and click Clear.
Adding Lines to Columns
If you are arranging your text into columns, you can insert a vertical line between the columns.
To arrange your text into columns, select the text, go to Layout | Columns and select the number of columns you want.
Now that your text is arranged into columns, click anywhere within the columns, and go to Layout | Columns again, but this time select More Columns at the bottom of the list. In the dialog box, simply tick the Line Between box, and click OK.

Vertical lines either side of text
One way to put vertical lines on both sides of text is to add empty columns either side using Layout | Breaks | Column Break. Three column breaks will do the job, two to make empty columns plus one at the bottom of the middle text column.
Note that if you wish to add a line to the left or right of the columns, this can be done using any of the other methods described above.
See Color the Column dividing line in Word
Four more vertical formatting tricks in Word
-
1
Open Microsoft Word. Its icon resembles a blue background with a white «W» on top.
- If you’d rather edit an existing document, simply double-click the document in question.
-
2
Click Blank document. It’s in the top-left corner of the templates page.
- If you’re editing an existing document, skip this step.
Advertisement
-
3
Click the Layout tab. It’s at the top of the Word window, to the right of the Home, Insert, and Design tabs.
-
4
Click Columns. This option is below and to the left of the Layout tab. Clicking it will prompt a drop-down menu with the following options:
- One — Default setting for Word documents.
- Two — Splits the page into two distinct columns.
- Three — Splits the page into three distinct columns.
- Left — Concentrates most of the text on the right side of the document, leaving a narrow column on the left.
- Right — Concentrates most of the text on the left side of the document, leaving a narrow column on the right.
- If you highlight a part (or all) of your document before clicking a column option, your document will be reformatted to appear in columns.
-
5
Click a column option. Doing so will apply invisible columns to your document; as you type, you’ll notice that your text jumps to a new line before reaching the standard right-most margin. Once you reach the bottom of the page, your text will continue in the next column until you reach the bottom of the page again, and so on.


Advertisement
-
1
Open Microsoft Word. Its icon resembles a blue background with a white «W» on top.
- If you’d rather edit an existing document, simply double-click the document in question.
-
2
Click Blank document. It’s in the top-left corner of the templates page.
- If you’re editing an existing document, skip this step.
-
3
Click the Layout tab. It’s at the top of the Word window, to the right of the Home, Insert, and Design tabs.
-
4
Click Columns. You’ll find this option below and to the left of the Layout tab.
-
5
Click More Columns. It’s at the bottom of the Columns drop-down menu.
-
6
Click a number of columns. You’ll see options like One, Two, Three, and so on at the top of this window. Clicking an option will apply it to your document.
- If you highlighted text, your settings will be applied only to the highlighted text.
-
7
Modify the column width and separation. You can do this by clicking the up or down arrow to the right of «Width» and the «Spacing» values, respectively.
- You can also uncheck the box next to «Equal column width» in order to make one column wider than the other.
-
8
Check the box next to «Line between» to draw a divider. Doing so will place a visible line between your columns.
- If you don’t want a visible divider, leave this option unchecked.
-
9
Click the «Apply to» drop-down menu. Doing so will allow you to click Selected text or Whole document to apply your column settings to the respective amounts of text.
-
10
Click OK. This will apply your settings and divide any selected text as per your customized column rules.


Advertisement
Add New Question
-
Question
How do I add columns to the middle of the document without changing the format of the entire document?

In Word, type the lines of text in a single column anywhere in the document. Then, select the lines of text and click the Page Layout tab. In the Page Setup options, click Columns and select the desired number of columns. Word automatically creates continuous section breaks before and after the columns. In some cases, it may be impossible to do without changing the format of the document.
-
Question
How do I rotate a page in Word?
Select the pages or paragraphs whose orientation you want to change. Click Page Layout > Page Setup Dialog Box Launcher. In the Page Setup box, under Orientation, click Portrait or Landscape. Click the Apply to box and click Selected text.
Ask a Question
200 characters left
Include your email address to get a message when this question is answered.
Submit
Advertisement
Thanks for submitting a tip for review!
About This Article
Article SummaryX
1. Open Microsoft Word or an existing Word document.
2. Click Blank document.
3. Click Layout.
4. Click Columns.
5. Click a number of columns.
Did this summary help you?
Thanks to all authors for creating a page that has been read 533,587 times.
Is this article up to date?
When creating a newsletter or brochure, a large block of text can be boring and even irritating to read. Instead, the text should run in space-saving and visually pleasing columns. Microsoft Word has a feature that allows you to create neat, uniform columns separated by a vertical white space, which can even include thin vertical lines for that sharp newspaper look.
Save your Word document before making any changes. If some sections will need to have different numbers of columns (one through five), break the document into sections by choosing Insert>Break>Section Break Types>Continuous.
Place the cursor in the section where you want to create columns. Click and drag to highlight the text you want to put into columns. From the standard toolbar, select the «Columns» button, which looks like two little columns of text; alternatively, you can choose «Format>Columns» from the drop-down menu at the top of the document window.
From the Standard toolbar, when you select the «Columns» button, four little columns drop down. Drag to choose how many columns you want. From the drop-down menu, a Columns dialog box opens. Click to choose the number of columns you want, and then click «OK.»
To add vertical lines between columns, you cannot use the Standard toolbar. Choose «Format>Columns» from the drop-down menu at the upper left of the window and a dialog box will open. Select how many columns you want. Then click the «line between» button, and hit «OK.» A vertical line will appear between the columns.
References
Tips
- Highlight your text and choose «Format>Paragraph>Alignment>Justify» to get the straight margins you would see in a newspaper.
To add columns to a document:
- Select the text you want to format.
- Click the Page Layout tab.
- Click the Columns command. A drop-down menu will appear. Adding columns.
- Select the number of columns you want to insert. The text will then format into columns.
Contents
- 1 How do I start and stop a column in Word?
- 2 How do I write in the second column of a Word document?
- 3 How do I insert a column in Word 2019?
- 4 How do you start a column?
- 5 How do I make two columns into one in Word?
- 6 How do I fix columns in Word?
- 7 How do I show column lines in Word?
- 8 What is column example?
- 9 What is an Op Ed page?
- 10 How do I make columns uneven in Word?
- 11 How do I keep columns separate in Word?
- 12 How would you add a new column at the right if you needed it?
- 13 How do I make columns in a text box in Word?
- 14 How do you add columns and rows in Word?
- 15 What is column in MS Word?
- 16 How do you add dot leaders in Word?
- 17 How do you add a line in the middle of a word document?
- 18 Which way is a column?
- 19 What is a column in writing?
- 20 What is column button?
How do I start and stop a column in Word?
Here’s how:
- Place the insertion pointer wherever you want your columns to stop.
- Summon the Columns dialog box.
- In the Columns dialog box, choose One from the Presets area.
- From the Apply To drop-down list, select This Point Forward.
- Click OK. The columns stop, and regular, one-column text is restored.
How do I write in the second column of a Word document?
Say you’re typing in the first column of your document and you want to end that column there and start typing in the second column. To do that, you have to insert a column break. You can insert a column break in one of two ways: Press CTRL-SHIFT-ENTER simultaneously; or.
How do I insert a column in Word 2019?
To create columns in Word, place your cursor where you want the columns to start. Alternatively, you can select the text to separate into columns. Then click the “Layout” tab in the Ribbon. Then click the “Columns” drop-down button.
Tips on column writing
- Write the way you talk.
- Try to uncover a “lead” or opening that will catch the interest of your readers.
- Use a variety of material, not just one subject.
- Write about people.
- Write simply.
- Don’t weigh your column down with too much detail.
How do I make two columns into one in Word?
Select the Page Layout tab, then click the Columns command. A drop-down menu will appear. Select the number of columns you want to create. The text will format into columns.
How do I fix columns in Word?
To fit the columns to the text (or page margins if cells are empty), click [AutoFit] > select “AutoFit Contents.” To fit the table to the text, click [AutoFit] > select “AutoFit Window.” To keep Word from automatically adjusting your column size, click [AutoFit] > select “Fixed Column Width.”
How do I show column lines in Word?
Choose Page Layout > Columns. At the bottom of the list, choose More Columns. In the Columns dialog box, select the check box next to Line between.
What is column example?
8. The definition of a column is a vertical arrangement of something, a regular article in a paper, magazine or website, or a structure that holds something up. An example of column is an Excel list of budget items. An example of column is a weekly recipe article.
What is an Op Ed page?
An op-ed, short for “opposite the editorial page” or as a backronym the “opinions and editorials page,” is a written prose piece, typically published by a North-American newspaper or magazine, which expresses the opinion of an author usually not affiliated with the publication’s editorial board.
How do I make columns uneven in Word?
Adjust column widths on a page
- On the Page Layout or Layout tab, click Columns.
- In the Columns dialog box, adjust the settings under Width and spacing to choose your column width and the spacing between columns.
- If you want columns of varying widths, deselect the checkbox next to Equal column width.
How do I keep columns separate in Word?
You can insert your own column breaks for more control over the document format.
- Place your cursor where you want the column to break.
- Click Layout > Breaks. In Word 2013 or Word 2010, click Page Layout > Breaks.
- A menu with options will appear. Click Column.
- A column break is inserted. Click Home > Show/Hide. to see it.
How would you add a new column at the right if you needed it?
If your task is to quickly insert one column, these steps are by far the quickest and simplest.
- Click on the letter button of the column immediately to the right of where you want to insert the new column.
- Now just press Ctrl + Shift + + (plus on the main keyboard).
How do I make columns in a text box in Word?
Office 2011
- Right-click the text box, placeholder, or shape border, and click Format Text .
- In the Format Text dialog box, on the left side, select the Columns tab.
- Enter a numeral in the Number of columns box, and enter the space you want between each column (in inches) in the Spacing between columns box.
- Select OK .
How do you add columns and rows in Word?
You can add a row above or below the cursor position.
- Click where you want in your table to add a row or column and then click the Layout tab (this is the tab next to the Table Design tab on the ribbon).
- To add rows, click Insert Above or Insert Below and to add columns, click Insert Left or Insert Right.
What is column in MS Word?
Essential to formatting many documents, columns help break up the layout of a page full of text. You can set columns just about any way you like with the ability to specify the number, size, and borders. The following articles explain how to do that and more with columns in a Word document.
How do you add dot leaders in Word?
Show dots or leaders between tabs
- Select Layout or Page Layout.
- Select the Paragraph dialog launcher. and then select Tabs.
- Add or select a tab stop, and then select leader character option under Leader you want displayed.
How do you add a line in the middle of a word document?
Insert a line
- On the Insert tab, select Shapes.
- Under Lines, select any line style you like.
- Select a location in the document, hold and drag your pointer to a different location, and then release the mouse button.
Which way is a column?
Columns run vertically, up and down. Most spreadsheet programs mark columns headings with letters. Rows, then, are the opposite of columns and run horizontally.
What is a column in writing?
A column is a recurring piece or article in a newspaper, magazine or other publication, where a writer expresses their own opinion in few columns allotted to them by the newspaper organisation.
What is column button?
1) When you open a new blank document in Word, you begin typing at the left side of the screen/page and continue typing to the right margin, where Word wraps your text back to the left so you can start again.2) Word gives you several different ways of lining up columns of text. Hope it helps you dear.
Lines are an essential design element. In Microsoft Word, a horizontal or vertical line can divide a document and guide the flow of the text. You can insert a line in Word and format it differently to change a humble line into something more appealing.
It’s so simple, after all. But if you don’t know all the ways to do it, then this primer on how to insert a line in Word is for you.
How Do You Insert a Straight Line in Word With the Keyboard?
Did you know that you can quickly add a line in Word by typing a few characters? Word’s AutoFormat feature types stuff for you as you type it. You may have already seen it in action when it creates automatic bulleted lists.
You can insert not only a straight line but also add lines with different designs. Here’s how it works:
- Place the cursor in the spot where you would like to start your horizontal line.
- Then, type three characters for any possible line styles you see in the screenshot below—press Enter. For example, to draw a dotted line, type *** and press Enter.
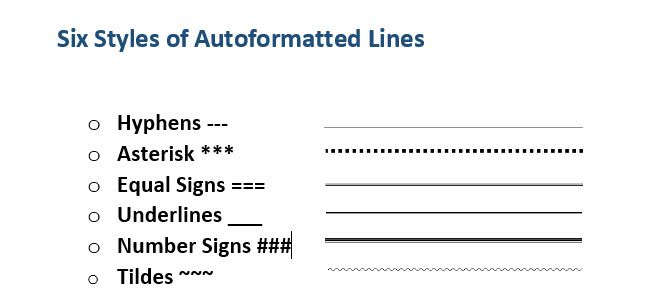
As you will see, you will get six variations of the standard horizontal line.
- Plain single line with three hyphens (—)
- Broken or dotted line with three asterisks (***)
- Plain double line with three equal signs (===)
- Bold single line with three underline symbols (___)
- Triple line with a thick center with Three number signs (###)
- Wavy line with three tildes (~~~)
The line takes up the entire width of the page. When added inside a column, the line is inserted to match the width of the column. If you want to add text above or below the line, put your cursor where you want the text and begin typing.
You will also notice a tiny AutoCorrect Options button pop up next to the line. This is a shortcut that allows you to undo the automatic line when you don’t need it, stop them altogether, or dive into the AutoFormat options dialog.
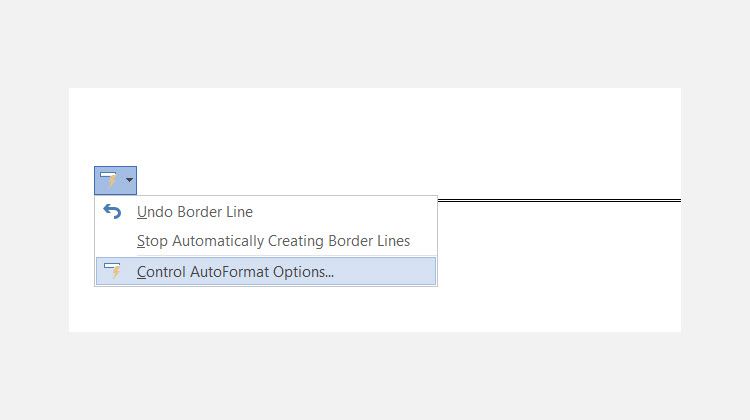
You can turn off these lines permanently from the AutoFormat options dialog.
Go to AutoFormat As You Type tab > Apply as you type section > uncheck Border lines.
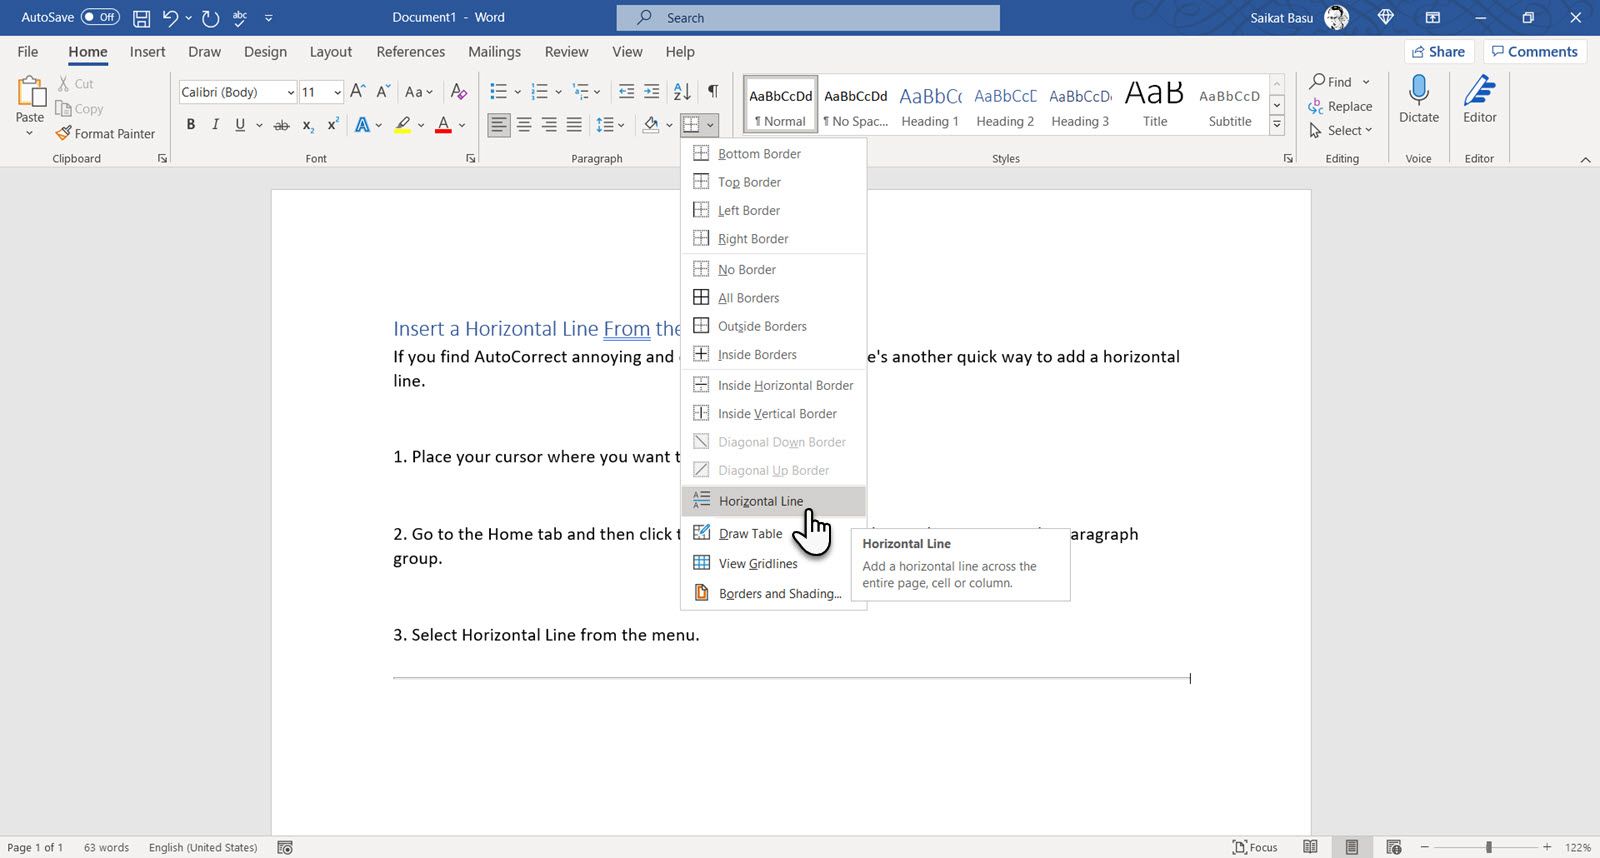
Insert a Horizontal Line From the Ribbon
If you find AutoCorrect annoying and disabled the option, there’s another quick way to add a horizontal line.
1. Place your cursor where you want to insert the line.
2. Go to the Home tab and then click the dropdown arrow for the Borders option in the Paragraph group.
3. Select Horizontal Line from the menu.
4. To tweak the look of this horizontal line, double-click the line. The Format Horizontal Line dialog box enables you to modify the width, height, color, and alignment of the line.
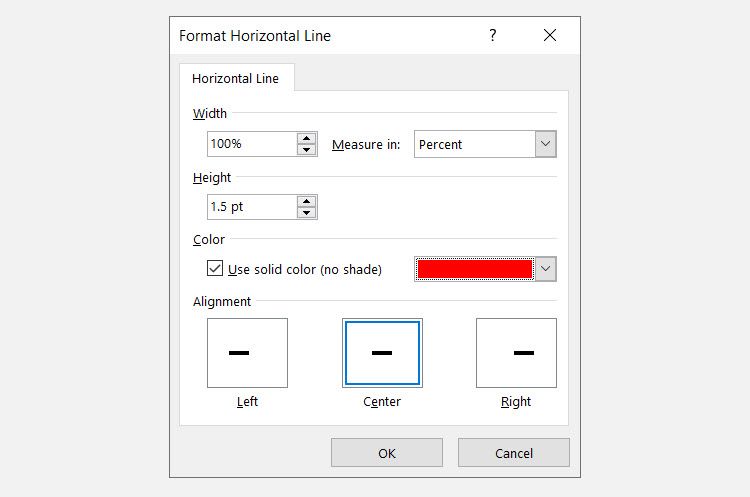
5. To resize a line, select the line with a double click and then drag any of the resizing points to change the length or width.
6. To remove the line, select it and press Delete on your keyboard.
Use Borders to Add Horizontal and Vertical Lines
The Borders option in the Paragraph group also gives you another way to insert a top or bottom border that resembles a horizontal line in the document.
1. Click on the paragraph of text where you want the line to appear.
2. Got to Home and the Paragraph group. Click on the Border button. The Bottom border is usually the default. This places a line below the selected text on the page, or the paragraph if you haven’t selected any text.
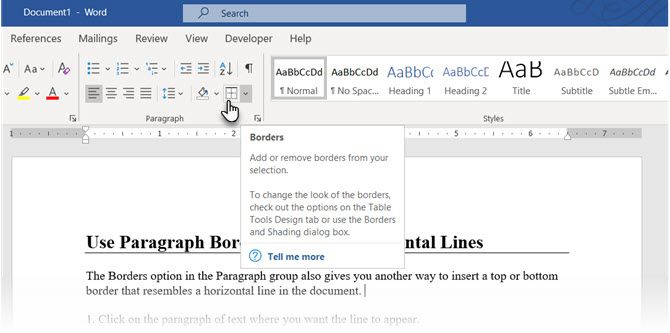
3. For other options (like a vertical border), you can click on the tiny dropdown arrow on the Borders button to access a list of options.
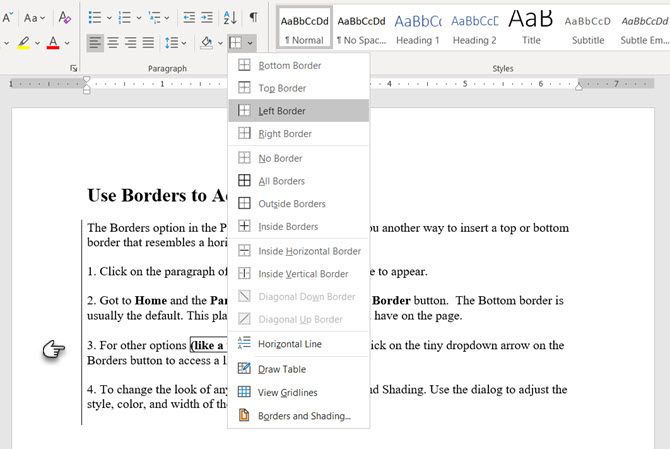
4. To change the look of any border, click on Borders and ShadiThen, use Use the dialog to adjust the border’s style, color, and width.
5. Deleting this horizontal line in your Word document may not be obvious but it easy enough.
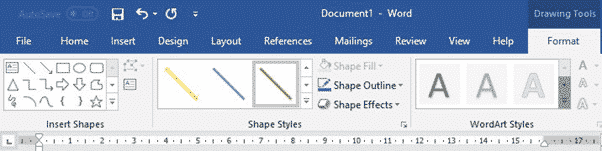
Use Shapes to Insert a Horizontal or Vertical Line in Word
The Shapes menu contains several line options. These line shapes come with one crucial difference—you can draw them at different angles. Then, after you draw the line, you can customize the color and appearance to make decorative horizontal or vertical lines even in the middle of a Word document.
1. Position the cursor where you want to insert a line.
2. Go to Insert > Illustrations group > Shapes dropdown arrow.
3. In the Lines group, choose the shape of the line.
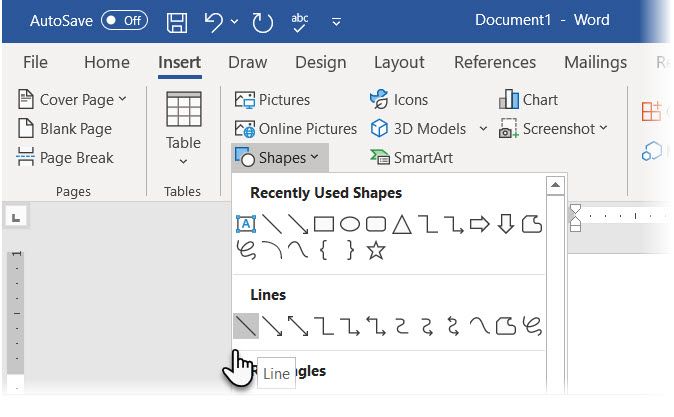
4. Click and drag across the document with the mouse pressed till the endpoint. (Tip: Hold down the Shift key to insert a straight line that is either horizontal or vertical)
5. Keep the line selected to customize the appearance of the line with the Shape Format tab on the Ribbon.
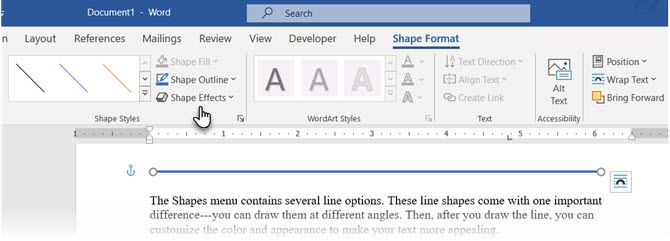
6. Go to the Shape Styles tab, change the color, use a different line style, or apply effects.
7. You can also right-click on the line and choose Format Shape from the context menu to open more options for changing the look.
How to Add a Vertical Line and Separate Text into Columns
Text arranged into columns is a basic layout technique. For example, you can separate text blocks into multiple columns and insert a vertical line between them.
1. Select the text.
2. Go to Ribbon > Layout > (Page Setup group) Columns. Click on the dropdown and select the number of columns you want.
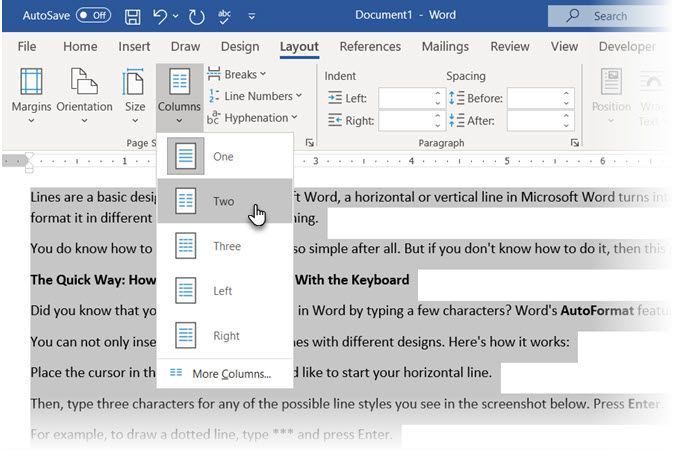
3. The text is now arranged into columns. Click on any column and go to Layout > Columns > More Columns.
4. In the Columns dialog box, check the Line Between box and click OK.
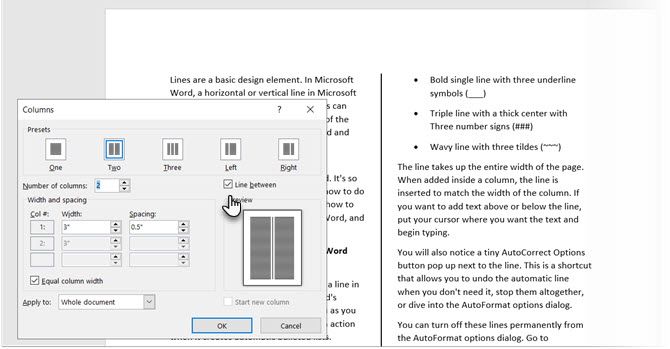
Note that you can also change the number of columns and the spacing between them from this dialog.
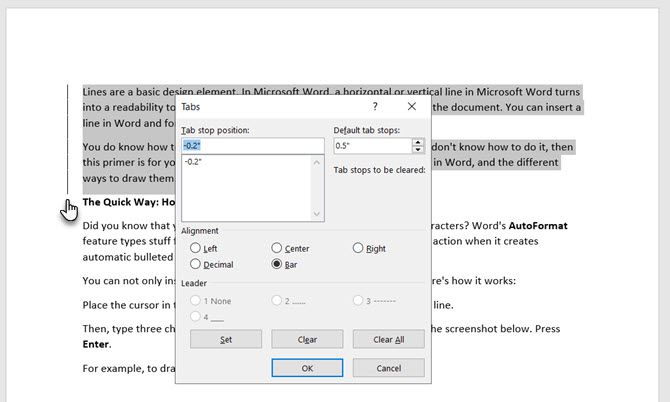
How to Use a Bar Tab to Insert a Vertical Line
Tab stops in Word help align lines and paragraphs. The bar tab, on the other hand, doesn’t set a tab. Instead, it. It inserts a vertical line and demarcates your paragraph into columns.
1. Select the paragraph where you want to add the vertical line.
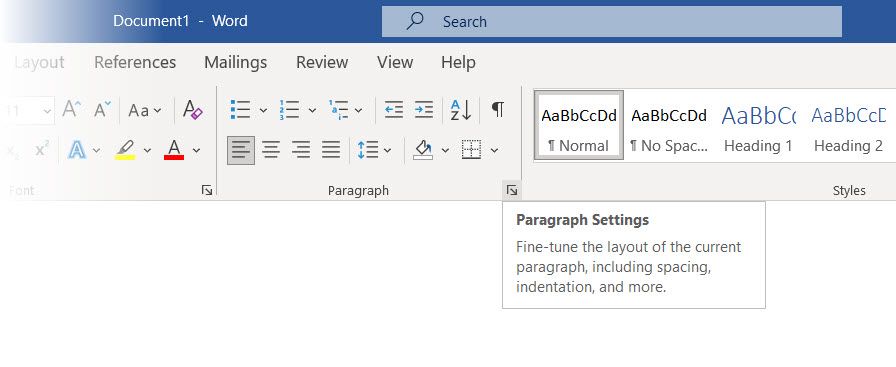
2. Go to Ribbon > Home. In the Paragraph group click the tiny arrow to open the Paragraph Settings.
3. Click the Tabs button at the bottom of the dialog.
4. In the Tab stop position box, enter the position where you want the vertical line to appear. You can use the ruler at the top of the screen to gauge a value to enter.
5. Click the Bar button in the Alignment section. Click on Set and OK.
As you can see, I have set it to «-0.2» to make it appear just to the left of the first paragraph. To delete the vertical line, delete the bar tab.
Also: Want to make blank lines where the reader can fill in some information? You can use tabs to quickly create empty lines in forms with Microsoft Word.
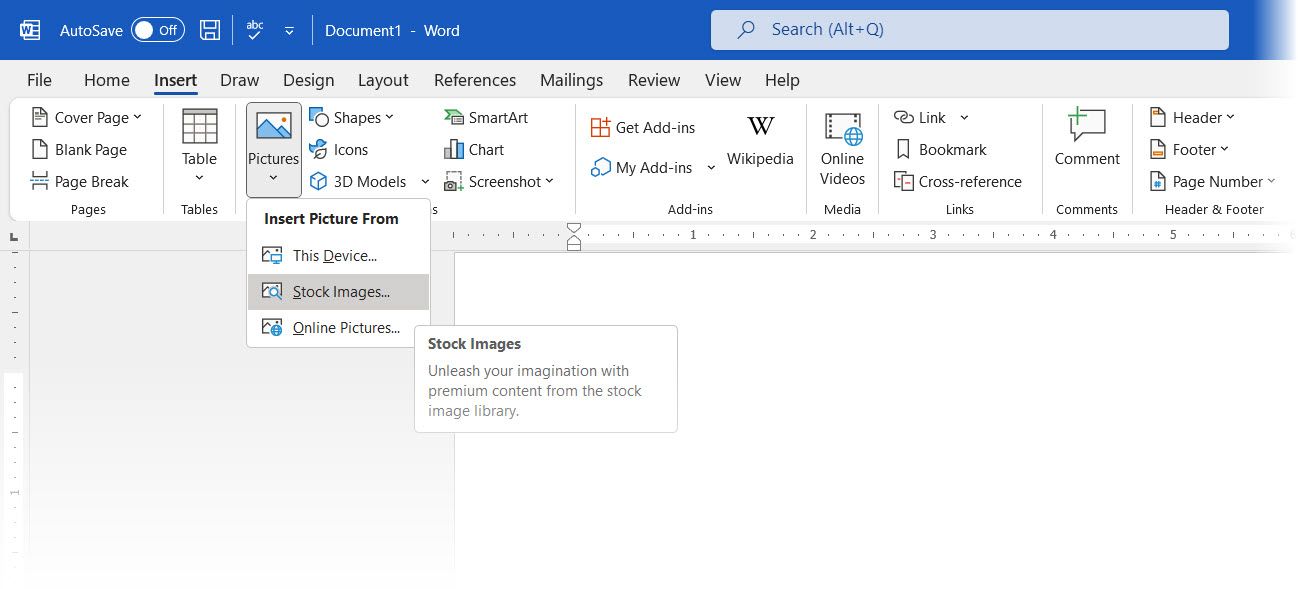
How to Insert a Graphic for Creative Lines in Word
Using pictures for horizontal and vertical lines can be a creative workaround. But use them with care and avoid overusing them in a document as a stretched or condensed image can end up looking back on paper or the screen.
A graphic can be used as a straight line horizontally and vertically. Here’s how:
- Go to Ribbon > Insert > Picture.

- Choose one of the image sources from the dropdown. For instance, select This device to upload a line graphic you created in another program.
- The screenshot below sources an illustration from Stock Images. The anchor points around the image help compress and stretch the image to something that resembles a straight line. Use the rotation handle to flip the graphic for a vertical line.

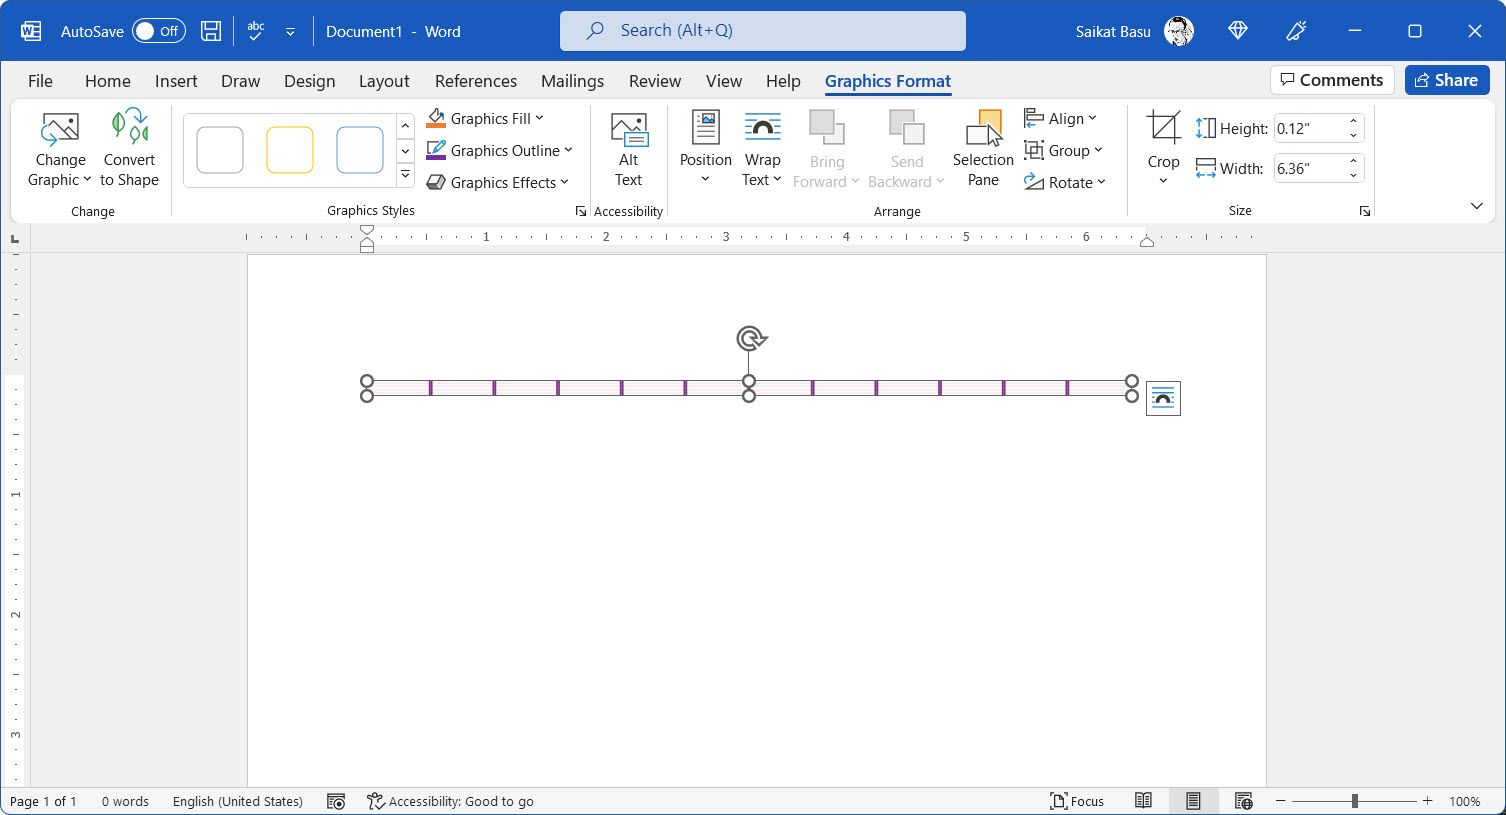
You can use these pseudo-lines as separators or as parts of the header or footer of your document. Use the Graphics Format toolbar on the Ribbon to format this illustration with Graphics Fill, Graphics Outline, and Graphics Effects.
Draw a Line in Your Word Document
Horizontal lines are more obvious and familiar. But adding vertical lines at the right place can boost the visual appeal of your content. Lines aren’t mere decorations… they can lead your eye to the most critical part of a document when used with subtlety.
Think about lines and use these methods the next time you sit down to write a professional report with Microsoft Word.