
Excel for Microsoft 365 PowerPoint for Microsoft 365 PowerPoint for Microsoft 365 for Mac Excel 2021 PowerPoint 2021 PowerPoint 2021 for Mac Excel 2019 PowerPoint 2019 PowerPoint 2019 for Mac Excel 2016 PowerPoint 2016 PowerPoint 2016 for Mac Excel 2013 PowerPoint 2013 More…Less
You can arrange your text into columns in a Text Box or shape. You can also specify the spacing (in inches) between the columns. Here’s how:
-
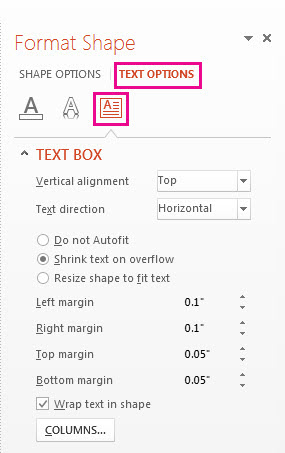
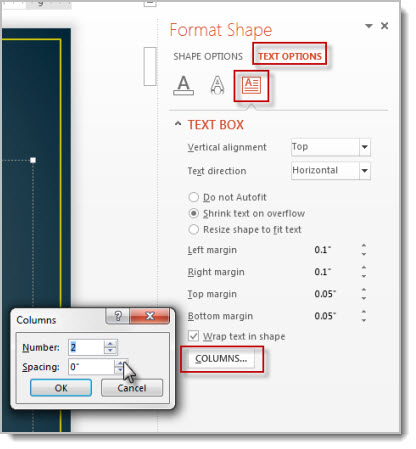
Right-click the text box, placeholder, or shape border, and click Format Shape.
-
On the right side of the window, click Text Options > Textbox
 .
. -
Click Columns, enter the number of columns in the Number box, and the space between each column (in inches) in the Spacing box.
If the Columns button is grayed out, it’s likely because you are working on a table. Columns for tables are described in a separate article. See Add or delete table rows and columns.
-
Any text you now enter will appear in columns. If the object you right-clicked in step 1 already contained text, you’ll see that the text now appears in columns.
You can adjust balance of text in your columns by adding or remove line breaks: Press Enter to add blank lines and move text to the next column, or press Backspace or Delete or remove blank lines and move text to the previous column.
You can also resize the box that contains the columns to make the columns more even, if you like.
 .
.
-
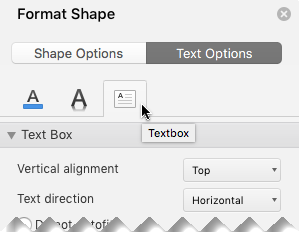
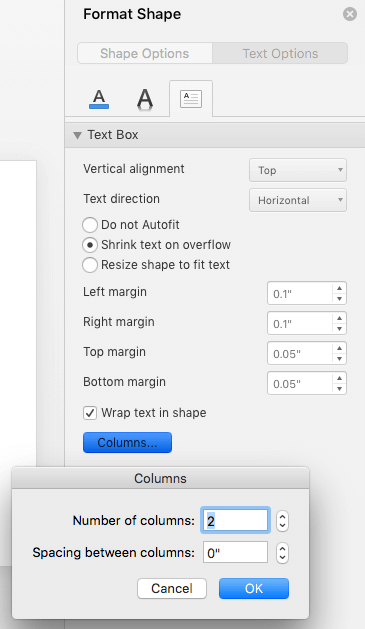
Right-click the text box, placeholder, or shape border, and click Format Shape.
-
On the right side of the window, click Text Options > Textbox.
. -
Click Columns, enter the number of columns in the Number box, and the space between each column (in inches) in the Spacing box.
If the Columns button is grayed out, it’s likely because you are working on a table. Columns for tables are described in a separate article. See Add or delete table rows and columns.
-
Any text you now enter will appear in columns. If the object you right-clicked in step 1 already contained text, you’ll see that the text now appears in columns.
You can adjust balance of text in your columns by adding or remove line breaks: Press Enter to add blank lines and move text to the next column, or press Backspace or Delete or remove blank lines and move text to the previous column.
You can also resize the box that contains the columns to make the columns more even, if you like.
 .
.
Column breaks
You can’t insert a column break in a multi-column text box. If this is a feature you’d like to request, please send us your feedback to help us prioritize new features in future updates. See How do I give feedback on Microsoft Office? for more information.
Making columns in a table
If you’re using a table, the feature for making columns is different. Read Add or delete table rows and columns instead of this article.
See Also
Add a table to a slide
Move or resize a table
Change the look of a table
Need more help?
 Please Note:
This article is written for users of the following Microsoft Word versions: 2007, 2010, 2013, 2016, 2019, and Word in Microsoft 365. If you are using an earlier version (Word 2003 or earlier), this tip may not work for you. For a version of this tip written specifically for earlier versions of Word, click here: Columns in a Text Box.
![]()
Written by Allen Wyatt (last updated July 27, 2019)
This tip applies to Word 2007, 2010, 2013, 2016, 2019, and Word in Microsoft 365
When you plan the layout of your document, you can utilize columns by using the Columns tool on the Page Layout (Layout if you are using Word 2016 or a later version) tab of the ribbon. You can also use text boxes to place «special» information into your document. What if you want to place columns within a text box, though?
Unfortunately, this cannot be done. The reason is rather simple, based on an understanding of how Word documents are constructed. Columns are a feature available on a section-by-section basis within a document. Sections (and therefore columns) reside on the text layer of a document. Text boxes, however, are independent elements that reside on the graphics layer of a document. They are graphics-based, not text-based, even though you can include formatted text within a text box.
There are ways around the problem, however. Since text boxes are designed to contain limited amounts of text, you could place a table within the text box and place your text within the columns of the table. This will, of course, require you to manipulate the text by hand since it won’t automatically «snake» from one table column to another. For limited text it can do the trick quite nicely, however.
Another possible solution is to use multiple text boxes. Follow these general steps:
- Create your first text box so that it is the width of a single «column» in your layout.
- Copy the text box to the Clipboard and paste it back into the document multiple times.
- Move the multiple text boxes so that they are next to each other. These text boxes serve as your «columns.»
- Select the left-most text box.
- Make sure the Format tab of the ribbon is displayed. (This tab is only available once you perform step 4.)
- Click the Create Link tool, in the Text group. The mouse pointer changes to a small cup shape. (It looks like a small measuring cup, pouring things to the right.)
- Click in the text box you want to serve as your second column. The two text boxes are now linked, and text will flow from one to the other.
- If you have more than two «columns,» repeat steps 6 through 7 with the other text boxes in your layout.
- Enter your text in the left-most text box, and it will naturally flow into the other text boxes.
It is interesting to note that if you are using Word 2007, there is an even quicker way to accomplish the above steps. Instead of steps 5 and 6, you can simply right-click on the left-most text box and select Create Text Box Link from the resulting Context menu. This displays the «measuring cup» tool mentioned in step 6. This Context-menu shortcut is not available in Word 2010 or later versions.
WordTips is your source for cost-effective Microsoft Word training.
(Microsoft Word is the most popular word processing software in the world.)
This tip (7070) applies to Microsoft Word 2007, 2010, 2013, 2016, 2019, and Word in Microsoft 365. You can find a version of this tip for the older menu interface of Word here: Columns in a Text Box.
Author Bio
With more than 50 non-fiction books and numerous magazine articles to his credit, Allen Wyatt is an internationally recognized author. He is president of Sharon Parq Associates, a computer and publishing services company. Learn more about Allen…
MORE FROM ALLEN
Changing Default Tab Stops
If you don’t explicitly set tab stops in a paragraph, Word relies upon a default tab stop distance. You can adjust that …
Discover More
Inserting a Sound File in Your Worksheet
Some worksheets are better understood through the spoken word or with musical accompaniment. Sound files can be easily …
Discover More
Finding the Path to the Desktop
Figuring out where Windows places certain items (such as the user’s desktop) can be a bit frustrating. Fortunately, there …
Discover More
Newer versions
- Right-click the text box, placeholder, or shape border, and click Format Shape .
- On the right side of the window, click Text Options > Textbox .
- Click Columns , enter the number of columns in the Number box, and the space between each column (in inches) in the Spacing box.
Contents
- 1 Can you create columns in a text box?
- 2 How do I insert a column in a box in Word?
- 3 How do I split a text box in Word?
- 4 How do I add columns to a text box in InDesign?
- 5 How do I make two columns in a text box in Word?
- 6 Can you have columns in a text box in Word?
- 7 How do I make columns in a column in Word?
- 8 How do you insert columns?
- 9 How do I create text columns in Word?
- 10 How do I separate Columns in Word?
- 11 How do I make 3 Columns in Word?
- 12 How do I make two Columns in Word 2020?
- 13 How do I insert columns in InDesign?
- 14 How do I create columns and rows in InDesign?
- 15 How do you shape a text box in InDesign?
- 16 How do I make columns and rows in Word?
- 17 Why are my columns not working in Word?
- 18 How do I make columns parallel in Word?
- 19 How do you insert lines in Word?
- 20 How do I show Columns in Word?
Can you create columns in a text box?
Fact of the matter is, there is no way to create multiple columns within a text box. However, you can use multiple text boxes, side-by-side, that are linked. This allows your text to freely flow from the left text box to the neighboring right text box, just as text would flow within columns.
How do I insert a column in a box in Word?
On the Layout tab, click Columns, then click the layout you want.
- To apply columns to only part of your document, with your cursor, select the text that you want to format.
- On the Layout tab, click Columns, then click More Columns.
- Click Selected text from the Apply to box.
How do I split a text box in Word?
Splitting text boxes
- Select the Object tool ( ) from the tool bar.
- Click on each of the text box you want to split.
- Choose Text->Text Box->Split Paragraphs.
How do I add columns to a text box in InDesign?
Add columns to a text frame
- Using the Selection tool, select a frame, or using the Type tool, click inside the text frame or select text.
- Choose Object > Text Frame Options.
- Specify the number of columns, the width of each column, and the spacing between each column (gutter) for the text frame.
How do I make two columns in a text box in Word?
To add columns to a document:
- Select the text you want to format. Selecting text to format.
- Select the Page Layout tab, then click the Columns command. A drop-down menu will appear.
- Select the number of columns you want to create. Formatting text into columns.
- The text will format into columns. The formatted text.
Can you have columns in a text box in Word?
When you plan the layout of your document, you can utilize columns by using the Columns tool on the Page Layout (Layout if you are using Word 2016 or a later version) tab of the ribbon. You can also use text boxes to place “special” information into your document.
How do I make columns in a column in Word?
More videos on YouTube
- Select the text you want to format.
- Click the Page Layout tab.
- Click the Columns command. A drop-down menu will appear. Adding columns.
- Select the number of columns you want to insert. The text will then format into columns.
How do you insert columns?
Insert or delete rows and columns
- Select any cell within the column, then go to Home > Insert > Insert Sheet Columns or Delete Sheet Columns.
- Alternatively, right-click the top of the column, and then select Insert or Delete.
How do I create text columns in Word?
To add columns to a document:
- Select the text you want to format.
- Select the Layout tab, then click the Columns command. A drop-down menu will appear.
- Select the number of columns you want to create.
- The text will format into columns.
How do I separate Columns in Word?
You can insert your own column breaks for more control over the document format.
- Place your cursor where you want the column to break.
- Click Layout > Breaks. In Word 2013 or Word 2010, click Page Layout > Breaks.
- A menu with options will appear. Click Column.
- A column break is inserted. Click Home > Show/Hide. to see it.
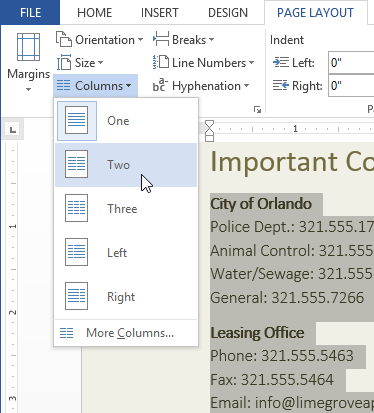
How do I make 3 Columns in Word?
If two columns are not enough, you can also create three or even more columns in your Word document. Write your text, select it, and go to the Layout tab. Click Columns, and choose Three or click or tap More Columns if you need even more.
How do I make two Columns in Word 2020?
To create columns in Word, place your cursor where you want the columns to start. Alternatively, you can select the text to separate into columns. Then click the “Layout” tab in the Ribbon. Then click the “Columns” drop-down button.
How do I insert columns in InDesign?
Use InDesign to add columns to an existing document.
- Go to the “Pages” menu and double-click the page you want to open.
- Select the text area where you want to add columns.
- Go to the “Layout” menu.
- In the “Columns” window, enter the number of columns you want.
- You also can add columns from the “Object” menu.
How do I create columns and rows in InDesign?
Click inside a cell, choose Table > Insert Table, specify the number of rows and columns, and then click OK.
How do you shape a text box in InDesign?
Create text frames with the Type tool
- Select the Type tool in the Tools panel and place the tool over the page. The Type tool cursor is an I-bar.
- Drag diagonally to create a text frame. When you click, the mouse has a cross-like appearance.
- Release the mouse button when the frame is the correct size.
How do I make columns and rows in Word?
Add a row or column
- Click where you want in your table to add a row or column and then click the Layout tab (this is the tab next to the Table Design tab on the ribbon).
- To add rows, click Insert Above or Insert Below and to add columns, click Insert Left or Insert Right.
Why are my columns not working in Word?
Double-check the column settings you have in place to make sure the formatting is configured as required. Select the section of the text you’re working with, then choose “Columns” and “More Columns” from the Page Layout menu tab.
How do I make columns parallel in Word?
Use Word tables to create your parallel columns.
- Select the entire table by clicking anywhere inside it. Then, choose Select from the Table menu and choose Table.
- With the table selected, choose Borders And Shading from the Format menu and click the Borders tab.
- Click the None option under Setting.
How do you insert lines in Word?
Insert a line
- On the Insert tab, select Shapes.
- Under Lines, select any line style you like.
- Select a location in the document, hold and drag your pointer to a different location, and then release the mouse button.
How do I show Columns in Word?
To enable columns, click the Page Layout tab, choose the number of columns from the Columns drop-down in the Page Setup section, and start typing. In Word 2003, click the Columns tool on the Standard toolbar and choose up to four columns or choose Columns from the Format menu.
In this article, we will demonstrate you 3 effective ways to create a two-column Word document where the first column text is independent of the second one.
Naturally, when we create a document in columns, the text of the first column is always linked to that of the next one on the same page. Yet, in some cases, we may need to connect it to the first column text on next page. For example, to compile a translation work in bilateral languages will need to set the source contents and targeted translation in parallel columns on one page. Besides, some people could just prefer to make notes on the column next to the body text.
Luckily, the following 3 methods will enable you to achieve that goal.
Method 1: Insert a Table
- First and foremost, click “Insert” tab.
- Then click “Table”.
- On the drop-down menu, choose a table in size of one row and two columns.

- Next, click the plus sign on the upper-left corner to select the table.
- Right click and choose “Table Properties”.

- Now click “Row” tab first.
- And ensure the “Specify height” box is cleared and the “Allow row to break across pages” box is checked.
- Then click “OK”.

- You can click and drag the line between 2 columns to adjust the column width.

- Then select the table again.
- Right click and choose “AutoFit”.
- Then choose “Fixed Column Width” on the extend menu.

- If you want no border for the table, just select it and click “Borders” under “Design” tab. Then choose “No Border”.


Method 2: Insert Linked Text Boxes
- First off, open a new document.
- Then click “Insert” and click “Blank Page” to insert a new page.

- Now go back to the first page and click “Text Box” under “Insert” tab.
- Choose “Draw Text Box”.

- Next draw 2 text boxes on the first page, with one on the left and another on the right. Here we just name them A1 and B1.
- Repeat step 2 to insert another new page that is page 3. This is to guarantee that you can always to insert a new page on a blank page without cut the link between text boxes.
- On page 2, draw 2 text boxes. Here we name them A2 and B2.
- Make sure all text boxes are empty. Now click on text box A1 and then click “Create Link” under “Format” tab.

- You shall observe that the cursor changes to a shape like teapot. Go to click on the text box you want to link. In this case, it’s text box A2. And then use the same way to link text boxes on the other side, such as B1 and B2. When the first text box is full, contents will automatically flow to the linked one.
- To remove box lines, you can right click on text box line and choose “Format Shape”. Then choose “No line” under “Line Color” and close the “Format Shape” dialog box.


Method 3: Use Text Box in a Two-column Document
For those documents which have the final contents settled, you can take method 3.
- At first, click “Page Setup” tab and then click “Columns”.
- Next choose “Two” to set the document in 2 columns.

- Now put cursor at the end of the first column on the first page and click “Insert” tab.
- Then click “Page Break”. You shall see the second column text on first page just jump to the left on the second page, leaving the right side of the first page in blank.

- Apply the same way to move the second column on second page to the left side on the third page, and so on. The aim is to keep the right side of all pages in empty.
- Then you can insert text box on the right side of each page and link them by taking steps in method 2.


Manage Long Word Documents
Due to all reasons, processing long documents is inevitable in office work. Since we know Word is susceptible to corruption, long files just increase its risk of being compromised. Thus, to back up files on a regular routine seems never more important. It allows you to turn to the latest version of data in case Word damage happens.
Author Introduction:
Vera Chen is a data recovery expert in DataNumen, Inc., which is the world leader in data recovery technologies, including corrupt Excel xls fix and pdf repair software products. For more information visit www.datanumen.com
-
1
Open Microsoft Word. Its icon resembles a blue background with a white «W» on top.
- If you’d rather edit an existing document, simply double-click the document in question.
-
2
Click Blank document. It’s in the top-left corner of the templates page.
- If you’re editing an existing document, skip this step.
Advertisement
-
3
Click the Layout tab. It’s at the top of the Word window, to the right of the Home, Insert, and Design tabs.
-
4
Click Columns. This option is below and to the left of the Layout tab. Clicking it will prompt a drop-down menu with the following options:
- One — Default setting for Word documents.
- Two — Splits the page into two distinct columns.
- Three — Splits the page into three distinct columns.
- Left — Concentrates most of the text on the right side of the document, leaving a narrow column on the left.
- Right — Concentrates most of the text on the left side of the document, leaving a narrow column on the right.
- If you highlight a part (or all) of your document before clicking a column option, your document will be reformatted to appear in columns.
-
5
Click a column option. Doing so will apply invisible columns to your document; as you type, you’ll notice that your text jumps to a new line before reaching the standard right-most margin. Once you reach the bottom of the page, your text will continue in the next column until you reach the bottom of the page again, and so on.


Advertisement
-
1
Open Microsoft Word. Its icon resembles a blue background with a white «W» on top.
- If you’d rather edit an existing document, simply double-click the document in question.
-
2
Click Blank document. It’s in the top-left corner of the templates page.
- If you’re editing an existing document, skip this step.
-
3
Click the Layout tab. It’s at the top of the Word window, to the right of the Home, Insert, and Design tabs.
-
4
Click Columns. You’ll find this option below and to the left of the Layout tab.
-
5
Click More Columns. It’s at the bottom of the Columns drop-down menu.
-
6
Click a number of columns. You’ll see options like One, Two, Three, and so on at the top of this window. Clicking an option will apply it to your document.
- If you highlighted text, your settings will be applied only to the highlighted text.
-
7
Modify the column width and separation. You can do this by clicking the up or down arrow to the right of «Width» and the «Spacing» values, respectively.
- You can also uncheck the box next to «Equal column width» in order to make one column wider than the other.
-
8
Check the box next to «Line between» to draw a divider. Doing so will place a visible line between your columns.
- If you don’t want a visible divider, leave this option unchecked.
-
9
Click the «Apply to» drop-down menu. Doing so will allow you to click Selected text or Whole document to apply your column settings to the respective amounts of text.
-
10
Click OK. This will apply your settings and divide any selected text as per your customized column rules.


Advertisement
Add New Question
-
Question
How do I add columns to the middle of the document without changing the format of the entire document?

In Word, type the lines of text in a single column anywhere in the document. Then, select the lines of text and click the Page Layout tab. In the Page Setup options, click Columns and select the desired number of columns. Word automatically creates continuous section breaks before and after the columns. In some cases, it may be impossible to do without changing the format of the document.
-
Question
How do I rotate a page in Word?
Select the pages or paragraphs whose orientation you want to change. Click Page Layout > Page Setup Dialog Box Launcher. In the Page Setup box, under Orientation, click Portrait or Landscape. Click the Apply to box and click Selected text.
Ask a Question
200 characters left
Include your email address to get a message when this question is answered.
Submit
Advertisement
Thanks for submitting a tip for review!
About This Article
Article SummaryX
1. Open Microsoft Word or an existing Word document.
2. Click Blank document.
3. Click Layout.
4. Click Columns.
5. Click a number of columns.
Did this summary help you?
Thanks to all authors for creating a page that has been read 533,587 times.
Is this article up to date?
Typically, Word documents like books, reports, and letters have paragraphs that occupy the whole page width. In articles, newsletters, flyers, and brochures, all or only parts of the text may be arranged in two or more columns:

You don’t need to create tables to structure text into columns. Tables are useful for displaying translated versions of the legal document side-by-side, but table cells break the text flow and are not recommended for multi-column layouts. It is more convenient to use columns for text formatting in most other cases. Word also allows you to adjust your columns by adding column breaks.
Format text in columns
To format a text into columns, do the following:
1. Do one of the following:
- To use the same number of columns for an entire document, click anywhere in the document (empty or with content).
If you choose to format text in columns, Word fills the first column with text on the page and then moves to the beginning of the next column. When all columns on one page are filled, the text moves to the next page.
- To format only a part of the document, select the paragraphs that you want to wrap in columns.
If you select a part of the text and wrap it in columns, Word inserts section breaks at the beginning and end of the selected text to delineate the area where the column layout is applied:

See more about breaks and how to display them.

To manually specify where the text in each column should end, you can use a column break.
2. On the Layout tab, in the Page Setup group, click the Columns button:

3. In the Columns dropdown list, select one of the options:

- One (used by default),
- Two, Three to create two or three columns of equal width,
- Left, Right to create two columns of unequal width,
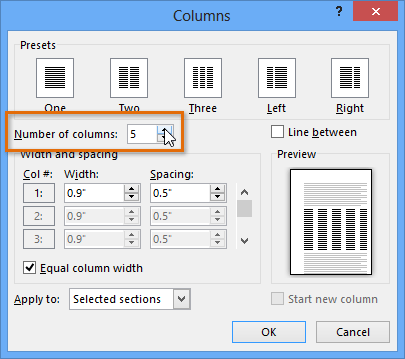
- More Columns… to specify more options in the Columns dialog box:

- In the Presets section, you can choose the same options as in the Columns dropdown list – One, Two, Three, Left, or Right.
- If you need more columns, type or select the number of columns you need in the Number of columns field. The maximum number of columns may vary depending on the font, font size, margins, etc. E.g., 13.
- The Line between checkbox inserts a vertical line between columns. This line clearly defines column borders, especially if you want to fit as much content on the page as possible (very handy for cheat sheets).
See more options below.

Format columns
I. It is recommended to justify the paragraphs in columns to give the page a clean and organized appearance. To justify the column text, select it and do one of the following:
- On the Home tab, in the Paragraph group, click the Justify button:

- Press Ctrl+J.

II. To change the width of columns or the space between them, do the following:
1. Click anywhere in the columnar text.
2. Do one of the following:
- On the Layout tab, in the Page Layout group, click the Columns button, then choose More Columns…
In the Columns dialog box, in the Width and spacing section:
In the Width box for any columns, enter or select a new width.
The Width measurements for the other columns change to match, and the width of all the columns changes.
See how the columns will be displayed in the Preview section.
- On the horizontal ruler, drag the margins to change the width of the columns:


III. To reduce white space on text lines, you can set up Word to hyphenate the text and break long words into syllables. See how to hyphenate automatically and manually for more details.
Remove columns
To remove column layout for the selected text or entire document, do the following:
1. Click anywhere in the columnar text.
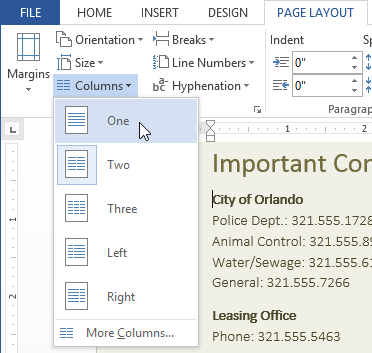
2. On the Layout tab, in the Page Layout group, click the Columns button, then choose One.
Insert a column break
In the Word document, you can manually break columns. When you break a column, the text after the break moves to the top of the next column:

You can display column breaks as regular nonprintable symbols. Word displays them as ![]() .
.
To insert a column break, position the cursor at the beginning of the line you want to start in the new column, and then do any of the following:
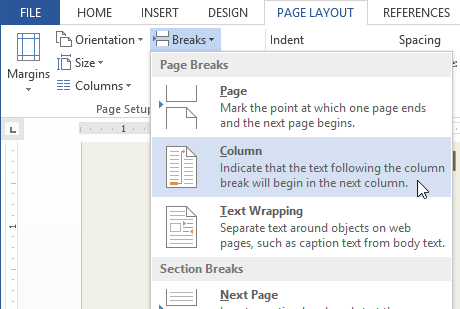
- On the Layout tab, in the Page Setup group, click the Breaks button, and then click Column to insert a column break:

- Press Ctrl+Shift+Enter.

The column break is inserted, and the cursor moves to the beginning of the next column.
Remove a column break
To remove a column break, click at the left end of the break or select the break and press the Delete key.
Lesson 16: Columns
/en/word2013/breaks/content/
Introduction
Sometimes the information you include in your document is best displayed in columns. Not only can columns help improve readability, but some types of documents—like newspaper articles, newsletters, and flyers—are often written in column format. Word also allows you to adjust your columns by adding column breaks.
Optional: Download our practice document.
To add columns to a document:
- Select the text you want to format.
 Selecting text to format
 - Select the Page Layout tab, then click the Columns command. A drop-down menu will appear.
- Select the number of columns you want to create.
 Formatting text into columns
 - The text will format into columns.
 The formatted text

To remove column formatting, place the insertion point anywhere in the columns, then click the Columns command on the Page Layout tab. Select One from the drop-down menu that appears.
 Removing column formatting
Your column choices aren’t limited to the drop-down menu that appears. Select More Columns… at the bottom of the menu to access the Columns dialog box. Click the arrows next to the Number of columns: to adjust the number of columns.
 The Columns dialog box
If you want to adjust the spacing and alignment of columns, click, hold, and drag the indent markers on the Ruler until the columns appear the way you want.
 Adjusting the column
Adding column breaks
Once you’ve created columns, the text will automatically flow from one column to the next. Sometimes, though, you may want to control exactly where each column begins. You can do this by creating a column break.
To add a column break:
In our example below, we’ll add a column break that will move text to the beginning of the next column.
- Place the insertion point at the beginning of the text you want to move.
 Placing the insertion point
 - Select the Page Layout tab, then click the Breaks command. A drop-down menu will appear.
- Select Column from the menu.
 Adding a column break
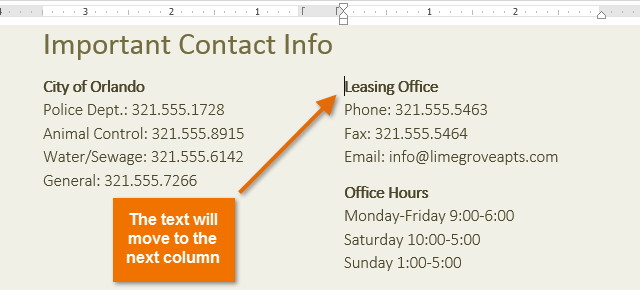
 - The text will move to the beginning of the column. In our example, it moved to the beginning of the next column.
 After adding a column break
To learn more about adding breaks to your document, visit our lesson on Breaks.
Challenge!
- Open an existing Word document. If you want, you can use our practice document.
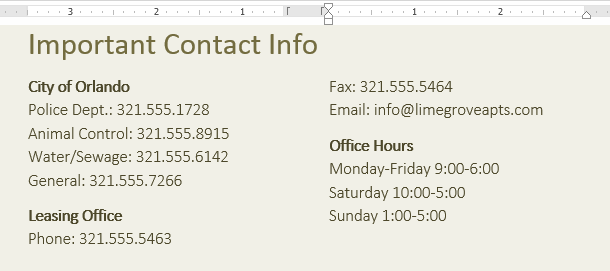
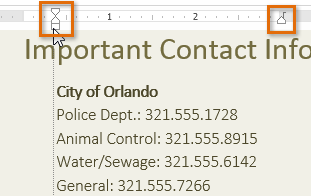
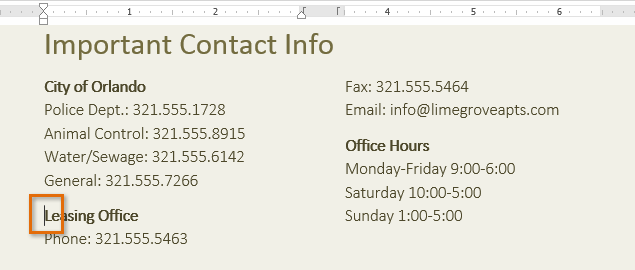
- Select the text you want to format into columns. If you’re using the example, select the two bulleted lists in the New Online Resident Portal section.
- Format the selected text into two columns.
- Add a column break. If you’re using the example, add a column break before Communicate with Lime Grove staff.
/en/word2013/headers-footers-and-page-numbers/content/
I’ll admit it — I’m not a big fan of adding columns in Microsoft Word. Not that there’s anything wrong with columns, per se. Columns work fine (until they don’t). But in a legal office environment, I usually format blocks of information with tables because they’re a bit easier to control.
That said, I have seen lots of legal professionals insert multiple columns in Microsoft Word to format things like service lists in Certificates of Service. Hey, to each her [his] own.
So if you want to format text with columns in Microsoft Word documents, here’s what you need to know:
Inserting columns: the basic primer
Everything starts from the Layout tab (known as Page Layout in versions 2007-2010) on the Ribbon:

Click on More Columns, and you’re taken to a dialog box that allows you to set up your columns exactly the way you want them.
The default is one column — just a regular document. You can use one of the presets (the two-column layout is useful for the service list application I mentioned above). Or you can customize it within an inch of its life. Width? Space between columns 1 and 2, or 2 and 3, or …? How about a line between them (like a newsletter would have)? You decide!
(If you don’t want your columns to all be the same width, be sure to uncheck the “Equal column width” checkbox at the bottom of the dialog box. Then, you’ll be able to customize the width of each column separately.)

Navigating between columns
Once you’ve set up your columns, you come to the tricky part. This is part of the reason I usually opt for tables rather than columns. If you use tables, moving between the cells is easy — just use the Tab key. To insert a column, however, you need to know a few tricks.
Say you’re typing in the first column of your document and you want to end that column there and start typing in the second column. To do that, you have to insert a column break. You can insert a column break in one of two ways:
- Press CTRL-SHIFT-ENTER simultaneously; or
- Go to the Layout tab, click Breaks, and choose Column

Personally, I’d go with Option 1 (assuming I remember the key combination in the heat of the moment).
Once you’ve inserted a column break, your cursor is in the next column, ready for you to type. When you insert a column break in your last column (the one farthest to the right), the cursor will go to the first column on the next page.
Viewing column boundaries
To me, it’s tough to work with columns (or tables, for that matter) if I can’t really see them. To turn on the column boundaries so you can see your columns laid out on the page, go to the File tab (or click the Office button in version 2007) and click Options, then go to Advanced and check the box next to Show text boundaries:

When columns are only part of your document
But what if only part of your document consists of multiple columns?
If you go back to the Columns dialog box (via Layout > Columns > More Columns), you’ll notice a drop-down at the bottom of the box:

If you choose This Point Forward, that will allow you to insert columns at the point your cursor is sitting in. Once you’ve inserted your columnar data, then go back to the Format Columns dialog box and choose the One Column format (being careful to once again choose This Point Forward in that bottom drop-down), and your document will return to the single-column format without disturbing the multi-column insertion you’ve just worked so hard on.
But what if you want to insert a two- or three- (or more-) column block of text into the middle of a one-column, normal document?
You may want to use a slightly different procedure, depending on whether you’re creating a brand-new document or you’re inserting a multi-column layout into the middle of an existing single-column document. You’re using the same dialog box, but if you’re editing an existing document and placing a multi-column layout in the middle, you’ll need to take a couple of extra precautions to ensure you don’t inadvertently create a formatting nightmare.
Inserting multi-columns into a new document
Let’s say you’re typing along in a brand-new document and decide that the next bit of text needs to be in two (or more) columns. There’s no text after the point where your cursor is right now, so you can switch back to single-column format once you get done inserting the multi-column section.
If you go back to the Columns dialog box (via Layout > Columns > More Columns), you’ll notice a drop-down at the bottom of the box:
If you choose This Point Forward, that will allow you to insert columns at the point your cursor is sitting in. Once you’ve inserted your columnar data, then go back to the Format Columns dialog box and choose the One Column format (being careful to once again choose This Point Forward in that bottom drop-down), and your document will return to the single-column format without disturbing the multi-column insertion you’ve just worked so hard on.
Inserting columns into the middle of an existing document
If you’re editing an existing document and you want to insert a multi-column layout somewhere in the middle of text you’ve already got typed, the “this point forward” method may result in a temporary and fixable but still infuriating mess.
Here’s how to avoid it: Insert section breaks before and after the point at which you want to insert your columns:

… then in Apply to:, choose This section instead:

Here’s a video demonstration:
Video: Inserting a column into the middle of an existing document (without creating a mess)
How do you see yourself using columns in your documents?