
Word 2013
You can format your document in a newspaper-style column layout by adding columns. On the Page Layout tab, click Columns, then click the layout you want.
-
To apply columns to only part of your document, with your cursor, select the text that you want to format.
-
On the Page Layout tab, click Columns, then click More Columns.
-
Click Selected text from the Apply to box.
Word 2016
You can format your document in a newspaper-style column layout by adding columns. On the Layout tab, click Columns, then click the layout you want.
-
To apply columns to only part of your document, with your cursor, select the text that you want to format.
-
On the Layout tab, click Columns, then click More Columns.
-
Click Selected text from the Apply to box.
Need more help?
Want more options?
Explore subscription benefits, browse training courses, learn how to secure your device, and more.
Communities help you ask and answer questions, give feedback, and hear from experts with rich knowledge.
Typically, Word documents like books, reports, and letters have paragraphs that occupy the whole page width. In articles, newsletters, flyers, and brochures, all or only parts of the text may be arranged in two or more columns:

You don’t need to create tables to structure text into columns. Tables are useful for displaying translated versions of the legal document side-by-side, but table cells break the text flow and are not recommended for multi-column layouts. It is more convenient to use columns for text formatting in most other cases. Word also allows you to adjust your columns by adding column breaks.
Format text in columns
To format a text into columns, do the following:
1. Do one of the following:
- To use the same number of columns for an entire document, click anywhere in the document (empty or with content).
If you choose to format text in columns, Word fills the first column with text on the page and then moves to the beginning of the next column. When all columns on one page are filled, the text moves to the next page.
- To format only a part of the document, select the paragraphs that you want to wrap in columns.
If you select a part of the text and wrap it in columns, Word inserts section breaks at the beginning and end of the selected text to delineate the area where the column layout is applied:

See more about breaks and how to display them.

To manually specify where the text in each column should end, you can use a column break.
2. On the Layout tab, in the Page Setup group, click the Columns button:

3. In the Columns dropdown list, select one of the options:

- One (used by default),
- Two, Three to create two or three columns of equal width,
- Left, Right to create two columns of unequal width,
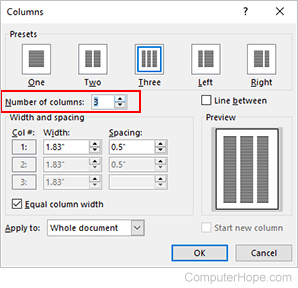
- More Columns… to specify more options in the Columns dialog box:

- In the Presets section, you can choose the same options as in the Columns dropdown list – One, Two, Three, Left, or Right.
- If you need more columns, type or select the number of columns you need in the Number of columns field. The maximum number of columns may vary depending on the font, font size, margins, etc. E.g., 13.
- The Line between checkbox inserts a vertical line between columns. This line clearly defines column borders, especially if you want to fit as much content on the page as possible (very handy for cheat sheets).
See more options below.

Format columns
I. It is recommended to justify the paragraphs in columns to give the page a clean and organized appearance. To justify the column text, select it and do one of the following:
- On the Home tab, in the Paragraph group, click the Justify button:

- Press Ctrl+J.

II. To change the width of columns or the space between them, do the following:
1. Click anywhere in the columnar text.
2. Do one of the following:
- On the Layout tab, in the Page Layout group, click the Columns button, then choose More Columns…
In the Columns dialog box, in the Width and spacing section:
In the Width box for any columns, enter or select a new width.
The Width measurements for the other columns change to match, and the width of all the columns changes.
See how the columns will be displayed in the Preview section.
- On the horizontal ruler, drag the margins to change the width of the columns:


III. To reduce white space on text lines, you can set up Word to hyphenate the text and break long words into syllables. See how to hyphenate automatically and manually for more details.
Remove columns
To remove column layout for the selected text or entire document, do the following:
1. Click anywhere in the columnar text.
2. On the Layout tab, in the Page Layout group, click the Columns button, then choose One.
Insert a column break
In the Word document, you can manually break columns. When you break a column, the text after the break moves to the top of the next column:

You can display column breaks as regular nonprintable symbols. Word displays them as ![]() .
.
To insert a column break, position the cursor at the beginning of the line you want to start in the new column, and then do any of the following:
- On the Layout tab, in the Page Setup group, click the Breaks button, and then click Column to insert a column break:

- Press Ctrl+Shift+Enter.

The column break is inserted, and the cursor moves to the beginning of the next column.
Remove a column break
To remove a column break, click at the left end of the break or select the break and press the Delete key.
Updated: 01/18/2023 by

Columns are a great organizational tool. In a document, they can divide a page to present specific content in an orderly fashion. Microsoft Word accommodates 1 to 13 columns on one page. The following sections show you how to create, add, and delete columns in Word documents.
Creating columns
- Open the Word document where you want to add columns.
- In the Ribbon, click the Layout tab.
- In the Page Setup section, click the down arrow under Columns, then select More Columns.
- For Number of columns, you can type in a number or use the up and down arrows to select a number. If the Equal column width option is checked, Word automatically sets the columns to be evenly spaced.
- Click OK to add the columns to the Word document.
- In Image 1 below, you can see how the text «The quick brown fox jumped over the lazy dog» looks with three columns. In Image 2 below, you can see what the same text looks like with the maximum 13 columns.
Image 1
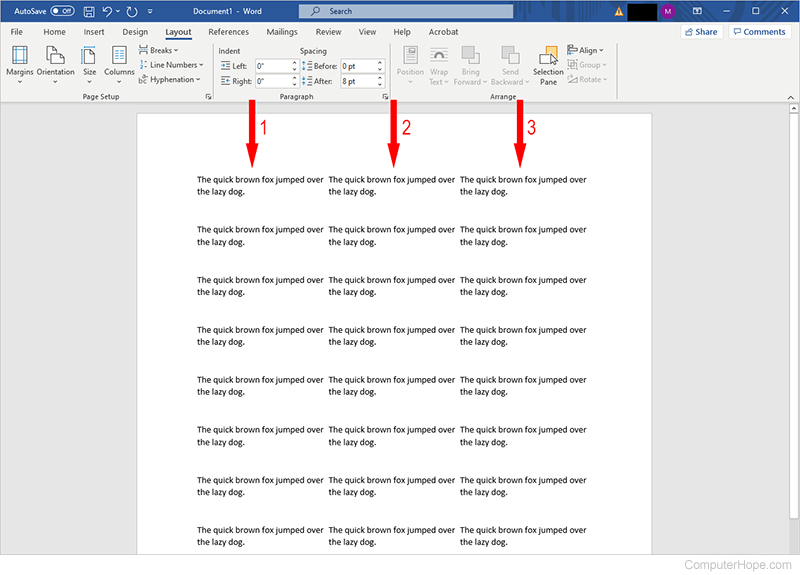
Image 2

Inserting column breaks
After creating a document with multiple columns, it may be necessary to enter column breaks into the text to move text to the next available column.
To insert a column break, move your cursor to where you want to insert the break and press Ctrl+Shift+Enter shortcut key. Alternatively, you can go to the Layout tab on the Ribbon, click Breaks, and then select Column.
Removing columns
If you need to delete columns in a Word document, follow the steps below.
- Open the Word document where you need to remove columns.
- In the Ribbon, click the Layout tab.
- In the Page Setup section, click the down arrow under Columns, then select More Columns.
- For Number of columns, you can type in a number or use the up and down arrows to select a number. The number entered or selected must be less than the current number of columns, if you want to remove columns.
- Click OK to remove the columns in the Word document.
Tip
If you don’t want the document to have any columns, click Layout, Columns, and select One.
While adding a table to Microsoft Word is accomplished from the Insert tab, simply adding the table may not be enough.
Complex Word documents can often need to take advantage of various settings like line and page breaks and settings found on menus like the Paragraph dialog box to make their documents look the way they need.
One place where you can run into trouble in Word concerns tables. While you might be comfortable making changes in a Excel spreadsheet, like how to change a table boundary, row boundary, or column boundary, or how to perform basic data alignment so that you get the right cell spacing, the table adjusting tolls in Word are a little less extensive.
Microsoft Excel and Word integrate very well with one another, which is convenient when you are copying and pasting data between the programs. You can even learn how to create tables in Excel for an easy way to sort and filter your data.
But Excel does not work with the same page size limitations that Word does, which can make it difficult to copy large amounts of data from Excel into Word.
This is especially problematic when you need to copy an area from Excel with a lot of columns, as the columns that do not fit in the Word document are simply not displayed on the page.
Fortunately, there is a simple way to fix this problem and make your Excel table columns fit on one page in Word 2010.
You can make a Microsoft Word table fit onto one page by clicking inside the table, choosing the Layout tab, selecting Autofit, then Autofit Contents.
Use these steps to make a table fit to one page in Word 2010. We also discuss some other options that you can use to customize your desired Word document so that you can make your entire table look the way that you want it to in the Microsoft Office word processor.
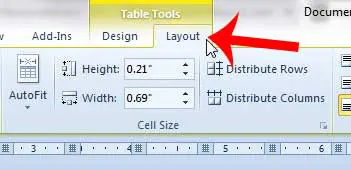
How to Adjust Table Columns in Word with Autofit
- Click inside the table.
- Choose the Layout tab under Table Tools tab at the top of the window.
- Click the Autofit button.
- Select Autofit Contents.
Our guide continues below with additional information on how to get a table to fit on one page in Word, including pictures of these steps.
Last update on 2023-04-13 / Affiliate links / Images from Amazon Product Advertising API
| As an Amazon Associate, I earn from qualifying purchases.
You can read this article if you would like to quickly expand all of the rows in an Excel spreadsheet to make all of your data visible.
How to Fit an Excel Table to One Page in Word 2010 (Guide with Pictures)
This tutorial will focus specifically on making a table from Excel fit on one page in Word 2010, but the method below will work on tables from any program that you paste into Word, as everything that we will be doing is occurring within Microsoft Word.
This will also only make it possible to fit all of the columns of the table on one page.
If there are too many rows, then the table will still extend to a second page.
You can read this article to learn how to paste your Excel table as an image, which can be a much simpler solution when you are working with a very large table where you need to fit all of the rows and columns on one page.
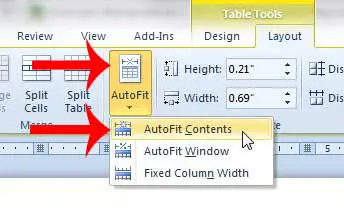
Step 1: Open the Microsoft Word document containing the table that is too large to fit on one page.
Step 2: Click somewhere inside the table so that the Table Tools tabs appear at the top of the window.
Step 3: Click the Layout tab under Table Tools.
Step 4: Click the AutoFit button in the Cell Size section of the ribbon at the top of the window, then click the AutoFit Contents option.
Our tutorial continues below with more information on using some of the other table autofit options for your MS Word document.
Would you like to edit your table in a spreadsheet? Our export Word table to Excel article can help you to do it.
What Happens If I Use Fixed Column Width for a Table in a Microsoft Word Document?
If you are curious about what happens if you choose Fixed Column Width from that drop down list, then you might be looking for a solution to distribute columns or adjust column width in a different manner than what is accomplished with the autofit setting.
The Fixed Column Width option will stop Microsoft Word from automatically resizing the table to fit your content, and any column width you enter will not be adjusted, even if the cell content doesn’t fit inside that column.
The only major difference between these two options is that it can make it difficult to fit all of your columns on one page if they are too wide, as Word displays the columns with the width that you specify.
This means that when you choose Fixed Column Width, the table will automatically adjust to accommodate the value that you enter. If that corresponding adjustment will make a table cell go to another page, then you would need to change the width or click Cell Margins to automatically resize the document until it fits again.
Our tutorial continues below with additional discussion about making a table fit to a single page if it’s currently on two pages in a Word document.
More Information on How to Use the AutoFit Window to Adjust Tables in an existing or New Word Document
Making a table fit to one page in Microsoft Word is a much more common problem when the table has been added from a different location, such as a Microsoft Excel table. Specifically, these large tables often extend off the side of the page, which can be resolved by using the steps above to fit the table to the document.
However, large tables added through Word may extend to multiple pages if there are too many rows.
While there isn’t a simple solution to making a Microsoft Word table fit to one page in a document, you can try different options, such as selecting all of the content in the table and making it a smaller font or adjusting the padding of the cells.
Alternatively, you may want to try adding a page break before the table, so that it’s on its own page. This allows the table to be the top element on its own page, providing additional space to try and fit it on one page.
you probably noticed that there are Distribute Rows and Distribute Columns buttons in the Cell Size group on the Layout tab.
If you have multiple rows or multiple columns in your table that don’t seem to be sized properly then this can be a convenient way to make all the rows or all the columns fit better.
Learn how to print two pages of your document on one sheet in Word 2010 to help save paper.
See also
- How to insert a check mark in Microsoft Word
- How to do small caps in Microsoft Word
- How to center text in Microsoft Word
- How to merge cells in Microsoft Word tables
- How to insert a square root symbol in Microsoft Word

Matthew Burleigh has been writing tech tutorials since 2008. His writing has appeared on dozens of different websites and been read over 50 million times.
After receiving his Bachelor’s and Master’s degrees in Computer Science he spent several years working in IT management for small businesses. However, he now works full time writing content online and creating websites.
His main writing topics include iPhones, Microsoft Office, Google Apps, Android, and Photoshop, but he has also written about many other tech topics as well.
Read his full bio here.
Several times you have observed that some articles or text documents divided into columns on the same page which looks nice, and if you want to apply the same settings on your Microsoft Word 2007 or Word 2010 document then how you can do that?
So, here is the method to create columns in Word 2007 / 2010 document. Just continue reading below to know the complete process to create columns in Word.
How to create columns in Word 2010 or 2007
Step 1
Open an existing Word document or create a new document in Microsoft Word 2010 or 2007
Step 2
Just type your text in that file whatever you want. Now there are two options either you want to apply columns to whole document or to a specific portion of document.
Create two columns whole Word document.
Click on “Page Layout” tab > “Columns” and select the number of columns according to your requirement

Output: 2 columns in word.

Create columns on one page or portion of text in word document
Select the text of one page or specific portion that you want to convert to columns and click on “Page Layout” tab > “Columns” and select the number of columns as show below in screen shot.

Output: 3 Columns of specific text of word document
")
See also:
how to adjust width, Spacing and put line between columns in Word
I’ll admit it — I’m not a big fan of adding columns in Microsoft Word. Not that there’s anything wrong with columns, per se. Columns work fine (until they don’t). But in a legal office environment, I usually format blocks of information with tables because they’re a bit easier to control.
That said, I have seen lots of legal professionals insert multiple columns in Microsoft Word to format things like service lists in Certificates of Service. Hey, to each her [his] own.
So if you want to format text with columns in Microsoft Word documents, here’s what you need to know:
Inserting columns: the basic primer
Everything starts from the Layout tab (known as Page Layout in versions 2007-2010) on the Ribbon:

Click on More Columns, and you’re taken to a dialog box that allows you to set up your columns exactly the way you want them.
The default is one column — just a regular document. You can use one of the presets (the two-column layout is useful for the service list application I mentioned above). Or you can customize it within an inch of its life. Width? Space between columns 1 and 2, or 2 and 3, or …? How about a line between them (like a newsletter would have)? You decide!
(If you don’t want your columns to all be the same width, be sure to uncheck the “Equal column width” checkbox at the bottom of the dialog box. Then, you’ll be able to customize the width of each column separately.)

Navigating between columns
Once you’ve set up your columns, you come to the tricky part. This is part of the reason I usually opt for tables rather than columns. If you use tables, moving between the cells is easy — just use the Tab key. To insert a column, however, you need to know a few tricks.
Say you’re typing in the first column of your document and you want to end that column there and start typing in the second column. To do that, you have to insert a column break. You can insert a column break in one of two ways:
- Press CTRL-SHIFT-ENTER simultaneously; or
- Go to the Layout tab, click Breaks, and choose Column

Personally, I’d go with Option 1 (assuming I remember the key combination in the heat of the moment).
Once you’ve inserted a column break, your cursor is in the next column, ready for you to type. When you insert a column break in your last column (the one farthest to the right), the cursor will go to the first column on the next page.
Viewing column boundaries
To me, it’s tough to work with columns (or tables, for that matter) if I can’t really see them. To turn on the column boundaries so you can see your columns laid out on the page, go to the File tab (or click the Office button in version 2007) and click Options, then go to Advanced and check the box next to Show text boundaries:

When columns are only part of your document
But what if only part of your document consists of multiple columns?
If you go back to the Columns dialog box (via Layout > Columns > More Columns), you’ll notice a drop-down at the bottom of the box:

If you choose This Point Forward, that will allow you to insert columns at the point your cursor is sitting in. Once you’ve inserted your columnar data, then go back to the Format Columns dialog box and choose the One Column format (being careful to once again choose This Point Forward in that bottom drop-down), and your document will return to the single-column format without disturbing the multi-column insertion you’ve just worked so hard on.
But what if you want to insert a two- or three- (or more-) column block of text into the middle of a one-column, normal document?
You may want to use a slightly different procedure, depending on whether you’re creating a brand-new document or you’re inserting a multi-column layout into the middle of an existing single-column document. You’re using the same dialog box, but if you’re editing an existing document and placing a multi-column layout in the middle, you’ll need to take a couple of extra precautions to ensure you don’t inadvertently create a formatting nightmare.
Inserting multi-columns into a new document
Let’s say you’re typing along in a brand-new document and decide that the next bit of text needs to be in two (or more) columns. There’s no text after the point where your cursor is right now, so you can switch back to single-column format once you get done inserting the multi-column section.
If you go back to the Columns dialog box (via Layout > Columns > More Columns), you’ll notice a drop-down at the bottom of the box:
If you choose This Point Forward, that will allow you to insert columns at the point your cursor is sitting in. Once you’ve inserted your columnar data, then go back to the Format Columns dialog box and choose the One Column format (being careful to once again choose This Point Forward in that bottom drop-down), and your document will return to the single-column format without disturbing the multi-column insertion you’ve just worked so hard on.
Inserting columns into the middle of an existing document
If you’re editing an existing document and you want to insert a multi-column layout somewhere in the middle of text you’ve already got typed, the “this point forward” method may result in a temporary and fixable but still infuriating mess.
Here’s how to avoid it: Insert section breaks before and after the point at which you want to insert your columns:

… then in Apply to:, choose This section instead:

Here’s a video demonstration:
Video: Inserting a column into the middle of an existing document (without creating a mess)
How do you see yourself using columns in your documents?
-

1
Open Microsoft Word. Its icon resembles a blue background with a white «W» on top.
- If you’d rather edit an existing document, simply double-click the document in question.
-
2
Click Blank document. It’s in the top-left corner of the templates page.
- If you’re editing an existing document, skip this step.
Advertisement
-
3
Click the Layout tab. It’s at the top of the Word window, to the right of the Home, Insert, and Design tabs.
-
4
Click Columns. This option is below and to the left of the Layout tab. Clicking it will prompt a drop-down menu with the following options:
- One — Default setting for Word documents.
- Two — Splits the page into two distinct columns.
- Three — Splits the page into three distinct columns.
- Left — Concentrates most of the text on the right side of the document, leaving a narrow column on the left.
- Right — Concentrates most of the text on the left side of the document, leaving a narrow column on the right.
- If you highlight a part (or all) of your document before clicking a column option, your document will be reformatted to appear in columns.
-
5
Click a column option. Doing so will apply invisible columns to your document; as you type, you’ll notice that your text jumps to a new line before reaching the standard right-most margin. Once you reach the bottom of the page, your text will continue in the next column until you reach the bottom of the page again, and so on.


Advertisement
-
1
Open Microsoft Word. Its icon resembles a blue background with a white «W» on top.
- If you’d rather edit an existing document, simply double-click the document in question.
-
2
Click Blank document. It’s in the top-left corner of the templates page.
- If you’re editing an existing document, skip this step.
-
3
Click the Layout tab. It’s at the top of the Word window, to the right of the Home, Insert, and Design tabs.
-
4
Click Columns. You’ll find this option below and to the left of the Layout tab.
-
5
Click More Columns. It’s at the bottom of the Columns drop-down menu.
-
6
Click a number of columns. You’ll see options like One, Two, Three, and so on at the top of this window. Clicking an option will apply it to your document.
- If you highlighted text, your settings will be applied only to the highlighted text.
-
7
Modify the column width and separation. You can do this by clicking the up or down arrow to the right of «Width» and the «Spacing» values, respectively.
- You can also uncheck the box next to «Equal column width» in order to make one column wider than the other.
-
8
Check the box next to «Line between» to draw a divider. Doing so will place a visible line between your columns.
- If you don’t want a visible divider, leave this option unchecked.
-
9
Click the «Apply to» drop-down menu. Doing so will allow you to click Selected text or Whole document to apply your column settings to the respective amounts of text.
-
10
Click OK. This will apply your settings and divide any selected text as per your customized column rules.


Advertisement
Add New Question
-
Question
How do I add columns to the middle of the document without changing the format of the entire document?

In Word, type the lines of text in a single column anywhere in the document. Then, select the lines of text and click the Page Layout tab. In the Page Setup options, click Columns and select the desired number of columns. Word automatically creates continuous section breaks before and after the columns. In some cases, it may be impossible to do without changing the format of the document.
-
Question
How do I rotate a page in Word?
Select the pages or paragraphs whose orientation you want to change. Click Page Layout > Page Setup Dialog Box Launcher. In the Page Setup box, under Orientation, click Portrait or Landscape. Click the Apply to box and click Selected text.
Ask a Question
200 characters left
Include your email address to get a message when this question is answered.
Submit
Advertisement
Thanks for submitting a tip for review!
About This Article
Article SummaryX
1. Open Microsoft Word or an existing Word document.
2. Click Blank document.
3. Click Layout.
4. Click Columns.
5. Click a number of columns.
Did this summary help you?
Thanks to all authors for creating a page that has been read 533,587 times.
Is this article up to date?
Showing the content in full width of a document may quickly bore the reader. Sometimes, it is a good idea to create your document like newspaper layout with multiple columns. This is one of the easy ways to show attractive content similar to newsletters and brochures. It helps to add different types of content in a single page and highlight the actionable part. In this article, we will explain how to insert columns in Word documents and arrange text using columns. If you have a long content, then make sure to add table of contents for easy accessibility of headings.
Using Default Templates with Columns
Though creating a custom column layout is easier, it takes
time to setup the layout. However, Microsoft offers predefined column templates
that you can choose for your use.
- Launch your Word application. On the backstage view, you can see the predefined layouts to select under “Featured” section. If you do not see backstage view, navigate to “File > New” menu and look under “Featured” section. You can also search for the column layouts using the search box.

- Select the template and Word will download it from the Microsoft Office library.
- As you can see, there are lot of beautiful columned layouts for resumes, brochures and events that you can choose from and modify.

Creating
Columns in Your Documents
If you do not want to use the template and start from the
scratch, you can create your column layout. It is possible to set a whole text,
a selected area or a section into columns. Let us take an example document
having two text paragraph like below:

In order to break the two paragraphs into two columns, simply
go to “Layout” menu. Click on “Columns” dropdown and select “Two”. Word will
automatically split the two paragraphs into two columns as shown below.

Related: How to create eBook in Word?
Inserting
Manual Column Break
In the above example, you do not have to highlight the
section when you have two paragraphs. Just place the cursor in the section to
split into two columns based on the previous section break. If this does not
work for you or you want to manually decide the column break point, then follow
the below instructions.
- First click on the search box on the top menu and type
“show”. Select “Show All” option to show all formatting markups on your
document.

- Position your cursor where you want to create a column
break. - Switch to the “Layout” tab and click on the “Breaks”
list box. - Select “Columns” option to set a column break in the
selected cursor position.

- You can see the “Column Break” markup on your document
and Word will move the content below the column break to next page. - Now go to “Layout > Columns” and select “Two” to
create two columns at the column break point.

You will notice that Word continue the content from the first
column to next. The column break will make your document like a newsletter or
newspaper layout that continues from one column to next. However, you can also
manually type different content after creating columns.
Adjusting
the Column Width
By default, Word will adjust the columns to have equal width.
However, you can change the width of each column as per your need. In order to
adjust the column width, go to “Layout > Columns > More Columns” option.

You can customize the following options:
- Presets – choose one of the existing preset layout options.
- Number of columns – change the number of columns.
- Line between – enable the checkbox to insert a line between the columns.
- Equal column width – disable this checkbox and setup custom width and spacing for your columns.
- Apply to – apply the changes to whole document or only to this section.
After customizing your column layout, you can continue to
type in a columned layout.

Related: How to change embedded file name in Office?
Using
Markers in the Ruler
When you are working with columns, Word will split the
document into sections. You can view the width of the sections on the marker
available in top ruler.
Simply, double click on the ruler marker to open “Columns”
pop-up box to customize the options as explained above. Alternatively, you can
also set the width by dragging the markers in the ruler using mouse.

Undoing
Column Layout
If
you do not need the distribution into columns anymore, you can simply undo this
setting. Afterwards your text will appear in the original structure.
- In order to do so, open the “”Layout > Columns” list box and select the entry “One”.
- The formatting markups will remain intact. You can remove the column break by placing the cursor in front of the formatting symbol and remove it using the delete key.
Creating
Mixed Layout
You
can also easily create columns and full width layout sections in a single
document.
- In order to exit the column layout and go to full width section,
position your cursor at the end of the last column. - Go to “Breaks > Continuous” and apply a section break on the same
page. Now your cursor will go to next section and you can see a section break
in the formatting markup. - Go to “Columns” and select “One” to disable the columns and continue in
a full width.

Tips and Tricks
- In order to divide a section of your document into columns, select it with the mouse and create columns. When creating columns, Word defines the area automatically for individual sections.
- You can apply column break only to particular section of your document when your document has multiple sections.
- Use keyboard shortcuts, “Control + Shift + Enter” to create a column break.
- You can adjust the column width via the markers in the ruler only when you have selected “Equal column width” checkbox in the “Columns” dialogue window.
- Column changes are an important element to structure texts with multiple columns.
If you’re tired of the tedious layout of Word, try adding more columns in one page in your document.
Open the file, place your cursor in front of the initial character of the article. Switch to Layout tab and click Columns in Page Setup. Choose the number of columns you want to set, or select More Columns to customize the format of columns.


Now your document has been divided into multiple columns.

Copyright Statement: Regarding all of the posts by this website, any copy or use shall get the written permission or authorization from Myofficetricks.