
When you add newsletter style columns to a document, Word automatically sets the width of each column to fit your page. If the default formatting doesn’t work for your layout, open the Columns dialog box to make adjustments.
-
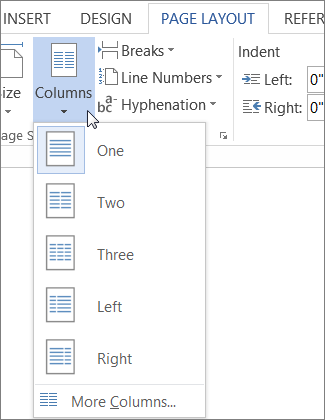
On the Page Layout or Layout tab, click Columns. At the bottom of the list, choose More Columns.

-
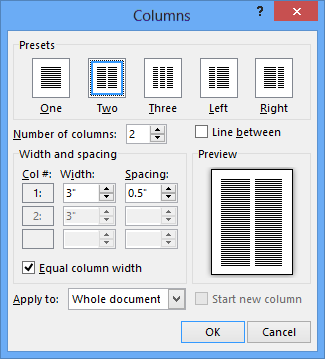
In the Columns dialog box, adjust the settings under Width and spacing to choose your column width and the spacing between columns.
-
If you want columns of varying widths, deselect the checkbox next to Equal column width.
Notes:
-
Insert a column break to control how text flows between columns. For example, insert a column break to end a paragraph in one column and start a new paragraph at the top of the next column.
-
To add a vertical line between columns, select the Line between check box in the Columns dialog box (shown above).
You can see newsletter-style columns in your document in Word for the web, but you can’t create or resize them there.
You can add and manage columns of text in Word. If you have the Word desktop application, click the Open in Word command (or Edit Document > Edit in Word), and follow the steps in Adjust column widths on a page. When you’re done and you save the document, it’ll continue to be stored where you opened it in Word for the web, and when you reopen it, you’ll see the new column widths.

When you create multiple columns in Word, they default to a set width. It’s easy to change that default width for each column. Let’s look at two ways you can do that.
Set Up Column Width Precisely with the Columns Dialog Box
When you set a Word document to use multiple columns, Word assigns a default column width that depends on the number of columns you choose. Here are those default widths:
- One Column: 6.5″ width for the column. This is the standard setup you’re used to seeing when you start typing in a blank document with default page settings. Start with an 8.5″ width for the paper size, take away 1″ on either side for the default page margins, and you’re left with 6.5″ for the actual text.
- Two Columns: 3″ width for each column, with a 0.5″ space between columns.
- Three Columns: 1.83″ width for each column, with a 0.5″ space between columns.
And it goes on like that. Word lets you have up to 13 columns, and the more you add, the less space each column gets.
If you’re happy with the defaults, you can just set the number of columns you want and go about your business. But, you can change things up if you want. Maybe you want smaller columns, with more space in between those columns. Or, maybe you two columns to be a similar size, and then have a smaller column off to the right.
Let’s take a look at how to do all that using the “Columns” dialog box. This is the best way to set up columns if you don’t yet have any text in your document, or if you know the precise measurements you want to hit.
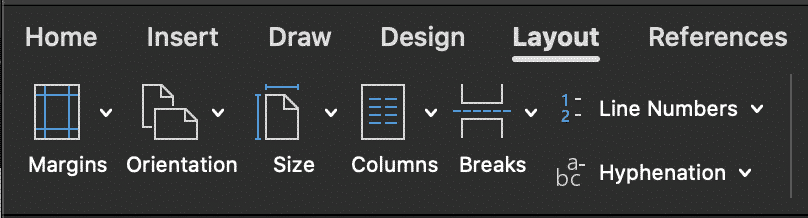
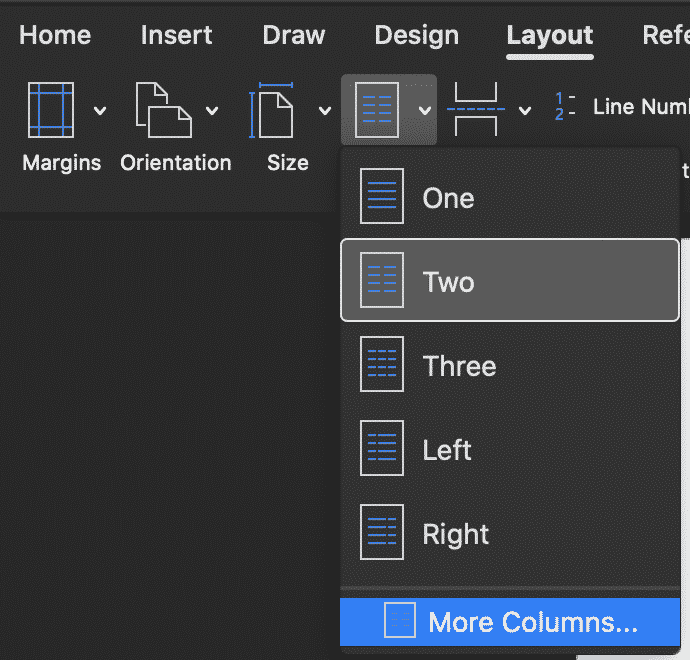
In Word, switch to the “Layout” tab on the Ribbon. That’s where the column magic happens. Click the “Columns” button and a dropdown menu opens with a number of options. Choose any of the numbers on the list to create that many columns with their default widths. Choose the “Left” or “Right” options to create a two-column layout where the column you chose (left or right) is smaller—about half the size of the other column. It’s the “More Columns” option we’re after here. Click that to set up your own custom column widths.

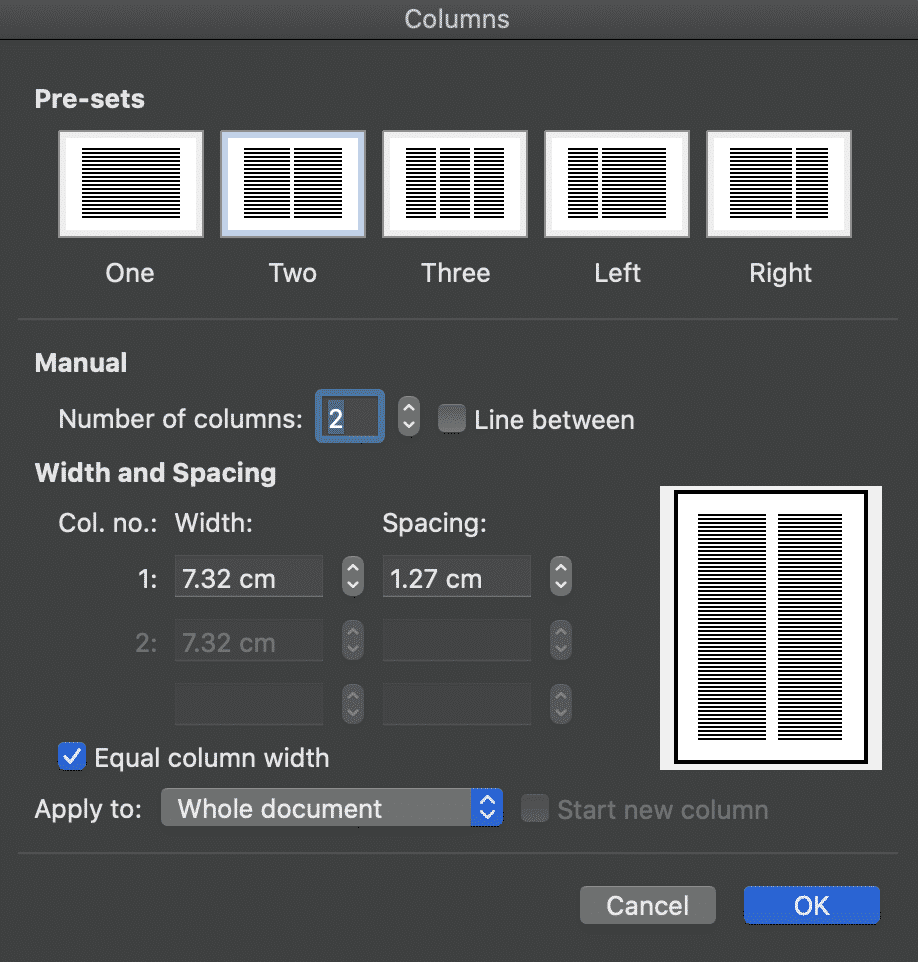
The “Columns” window that pops up lets you perform your customization. The “Presets” section contains the same options you saw on the “Columns” menu. You can also use the “Number Of Columns” box to set a specific number of columns from 1 to 13. So, start by choosing how many columns you want.
Select the “Line Between” option to have Word put a vertical line between columns.
And now, on to actually adjusting the column width. If you want your columns to all stay the same width as one another, you can just adjust the number in the “Width” box for column #1. Changes you make there apply to all columns, no matter how many you have. Same goes for spacing. Adjust the number in the “Spacing” box for column#1 to change the spacing between all columns.
Note that as you change one value (width or spacing), the other value changes as well. Bump up the width, and the spacing goes down. Bump up the spacing, and the width goes down. You only have so much page width to work with, after all. Here, we set the width down to 1″ and the spacing went up to 1.75″ to compensate.
If you want to control the width of each column individually (making some wider and some narrower), disable the “Equal Column Width” check box. When you do that, the width and spacing boxes for each column become available, and you can change them however you see fit. Keep in mind that you still have a fixed page width to work with, so adjust the width or spacing for one column will cause the others to change. You may have to work with it a bit to get things how you want them.
Here, we’ve set up three columns. The first two are 2″ in width and the third is smaller at 1.5″. We left a .5″ spacing between all columns.
Note also that you don’t get to adjust spacing for your final column. This makes sense, because the spacing only happens between columns.
Change Column Width on the Fly with Word’s Rulers
Now that you’ve seen how to set up column widths using the dialog box , let’s take a look at how you can change them on the fly with the Word ruler. This method is great if you already have columns in your document and you want to play around with widths to see what looks right to you.
RELATED: How to Use Rulers in Microsoft Word
First, you need to make sure that your document rulers are visible. If you can’t see them, switch to the “View” tab on the Ribbon, and then select the “Ruler” option. Word’s rulers are great for lining things up, keeping tabs on measurements, and controlling indentation and margins. You should really leave them on all the time.
Assuming you’ve already got your document set up for two or more margins, look at the horizontal ruler at the top of the page. You can see that there’s a gray space in the middle of the ruler between the two columns.
That represents the spacing between columns that we talked about in the previous section, and it’s defined by two margin markers (the upside-down “L”).
Dragging either one of the margin markers changes the size of the spacing, and the margins for the columns themselves. For example, if you slide the left margin marker to the left, the right maring marker automatically moves to the right, increasing the size of the spacing between those margins. The columns of text in your document change as you do this, too, giving you instant feedback on how the changes will look.
Here, we’ve dragged it it so the spacing is much greater than the default, leaving a wide space between columns.
You probably noticed that the ruler also contains a small white triangle (although where it appears changes based on which column you’ve selected text in. That’s the indent marker, and it lets you control the interior indent on paragraphs in each column—the right indent for the left column and the left indent for the right column. If you’re interested in learning more about how to use indents, be sure to check out that guide to using rulers in Word we mentioned earlier. Indent control works the same whether you have multiple columns or just one.
READ NEXT
- › How to Make Columns in Microsoft Word
- › This New Google TV Streaming Device Costs Just $20
- › Google Chrome Is Getting Faster
- › HoloLens Now Has Windows 11 and Incredible 3D Ink Features
- › The New NVIDIA GeForce RTX 4070 Is Like an RTX 3080 for $599
- › How to Adjust and Change Discord Fonts
- › BLUETTI Slashed Hundreds off Its Best Power Stations for Easter Sale
- Free Courses
- Microsoft Word
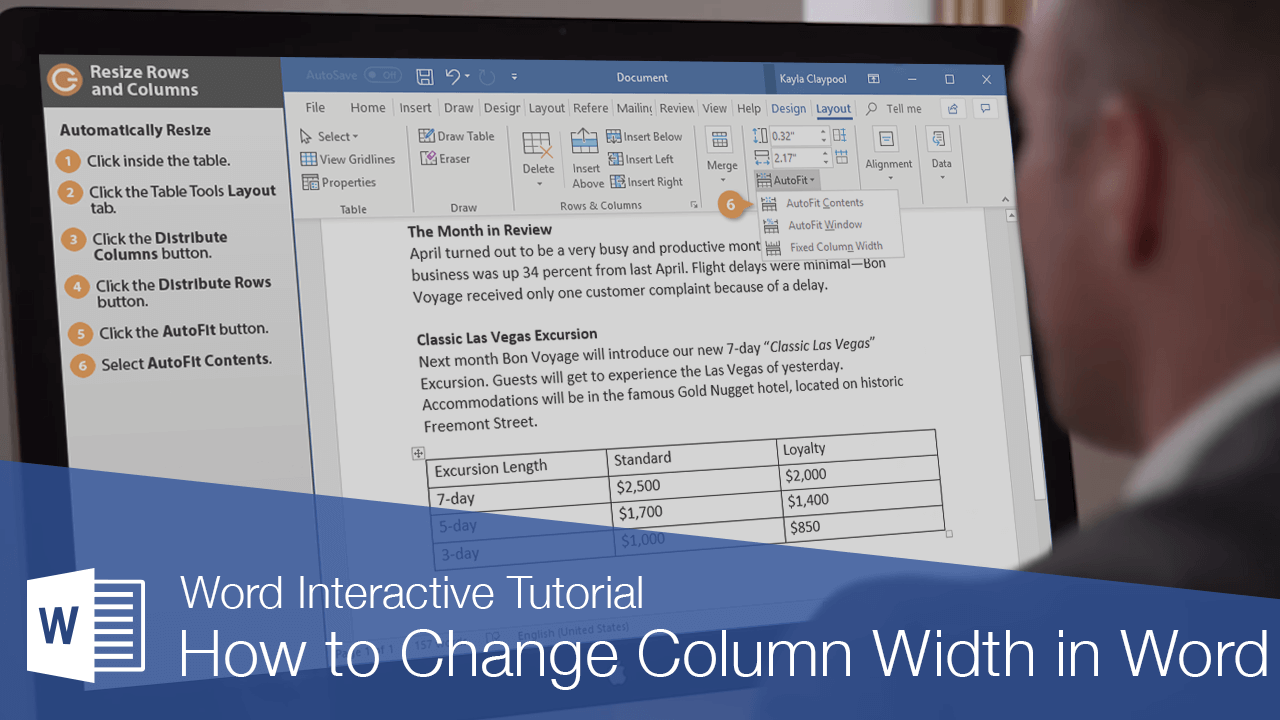
- How to Change Column Width in Word Table

How to Resize Rows and Columns in Word
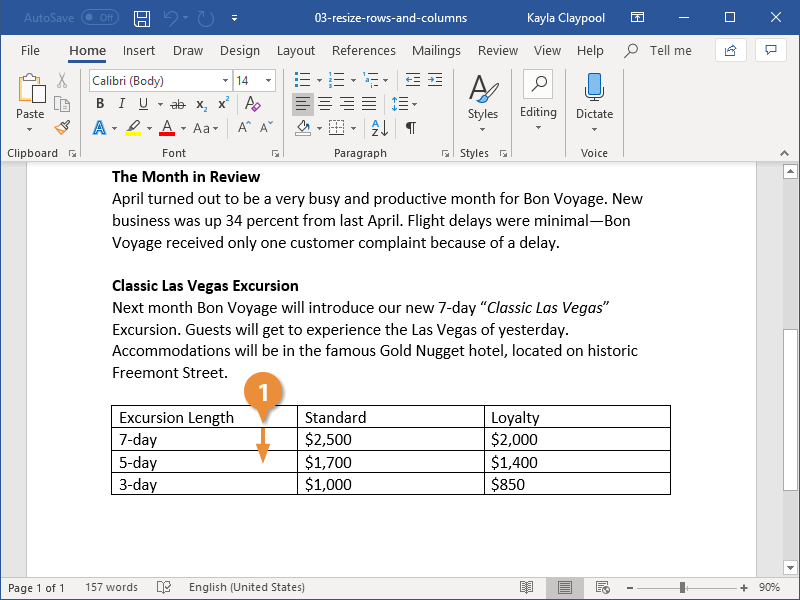
When you first create a table, all the rows and columns will start the same size. As you add information to the table, you’ll likely find that some rows and columns will need to be bigger than others. You can adjust the size of rows and columns manually, or automatically resize them.
Manually Resize
The most direct way to manually adjust the width of a column or the height of a row is by directly adjusting them with the mouse.
- Click and drag a cell border until the row or column is the size you need.

The columns or rows adjust to the new size.
Distribute Rows and Columns
If your table has columns and rows of different sizes, you can distribute them so that they’re all the same width or height.
- Click the Layout tab in the Table Tools ribbon group.
- Click the Distribute Columns button or the Distribute Rows button.
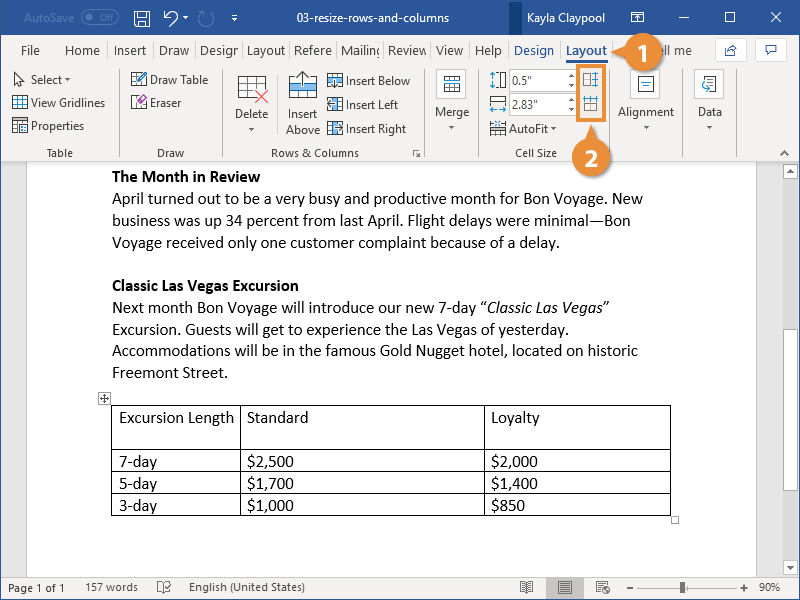
The columns or rows in the table are all set to the same width or height.
Automatically Resize
You can also have rows and columns resize automatically to fit the table’s contents.
- Click the AutoFit button.
- AutoFit Contents will automatically resize the rows and columns to fit the content in the cells. The table will automatically adjust to new content, resizing the columns and rows as you type.
- AutoFit Window will resize the table to fill the available space on the page.
- Fixed Column Width will stop the columns and rows from resizing as new content is added if you’ve previously enabled an AutoFit setting.
- Select an AutoFit option.
The AutoFit menu has three options:
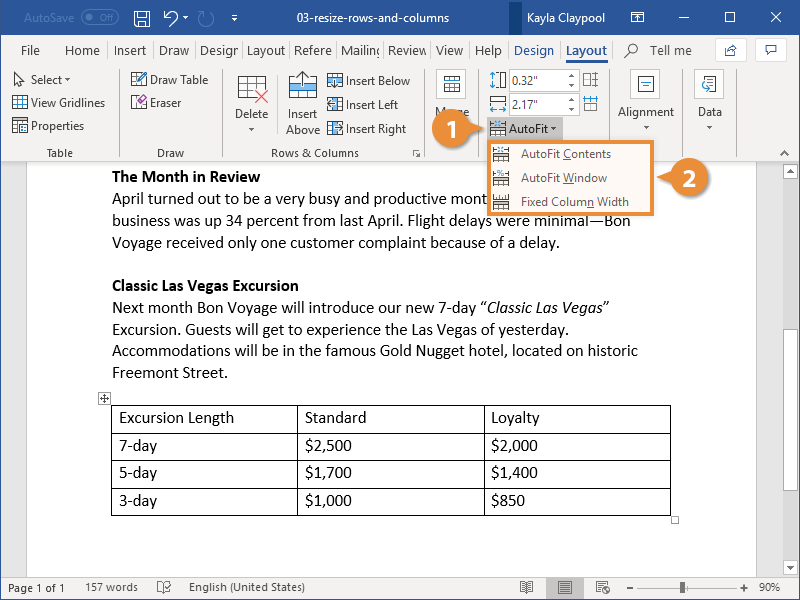
The table’s rows and columns are resized according to the option you selected.

FREE Quick Reference
Click to Download
Free to distribute with our compliments; we hope you will consider our paid training.
You’ve successfully added columns to your Microsoft Word Document, but the column width and standard layout just aren’t right…
Rather than trying to make your document fit perfectly into the standard columns provided by Word, why not customise them? Changing the width of each column to perfectly suit the needs of your document.

Microsoft does give you the option to resize your columns to better suit your document, you can update the size of all columns keeping them equal or manually change the size of each column to customise their widths to better suits the layout of your document.
If you would like to change the size of the columns in your Microsoft Word document, follow the steps below.
Changing the width of the columns in Word
- Open Microsoft Word
- Click the Insert Tab
- Under the Insert Tab, Click Columns
- Select More Columns
- In the More Columns pop-out window, find Width and Spacing
- Update the Width of your columns
- Press OK
To create uneven column widths simply untick the ‘Equal column width‘ box and select the size of each column under Width and Spacing.
Once you have updated the spacing press OK.
You have now successfully changed the size of your columns in Word. These steps can be repeated or updated at any stage.
Looking for a between way to Collaborate in Microsoft Word?
While Word does make collaborating easy with features such as tracked changes, comments and the ability to review changes. It leaves some pretty big gaps when it comes to working on a document simultaneously, version control and shareability with more than a few team members.

This is where purpose-built collaboration tools such as Simul Docs can jump in and help.
If you are looking for a better way to collaborate in Word, look no further than Simul Docs.
Simul automatically tracks your changes, regardless of whether you remembered to turn on tracked changes or not.

Simul automatically saves your file as you go, so you will never lose another document again.
Simul also manages version control for you, saving each new version of your document under a new, easy to track version list such as 0.0.1, 0.0.2 and so on. Making it easy for you to refer back to old versions at any time while knowing which document is the most recent file and who owns it.
When it comes to collaboration there really isn’t anyone that can beat Simul Docs.
It was built to make your life easier, and it does just that.
So, if you are an avid Microsoft Word user who would struggles with version control or collaborating, give Simul a try.
They are currently offering a free trial, head over to simuldocs.com to check it out.
Table Properties are used to change or set table options in Microsoft Word or Outlook. The Table Properties are used to control different table options. In the Table Properties, dialog box users can change Table, Column, Row, and Cell settings.
How do I open the Table Properties dialog box in Word?
To open the Properties dialog box is easy to open. This tutorial will discuss opening the Table Properties dialog box to modify the table to your desired look.
What Type of settings is in the Table Properties dialog box?
In the Table Properties dialog box, there are several settings, such as:
- Table: This is used to apply settings to your entire table.
- Row: changes the settings for the rows of the table.
- Column: changes the settings of the columns of the table.
- Cell: change settings for the cells of the table.
- Alt-Text: creates alternative text, especially for people with poor visions or cognitive impairments who cannot see or understand the object.
To display and modify table properties in Microsoft Word, follow the steps below.
- Launch Word
- Create Table Properties
- Create Row Properties
- Create Column Properties
- Create Cell Properties
- Create Alt-Text.
1] Table Properties
Launch Microsoft Word.
Create a table or use an existing table

Right-click the table in the document and select Table Properties from the context menu.
A Table Properties dialog box will appear.
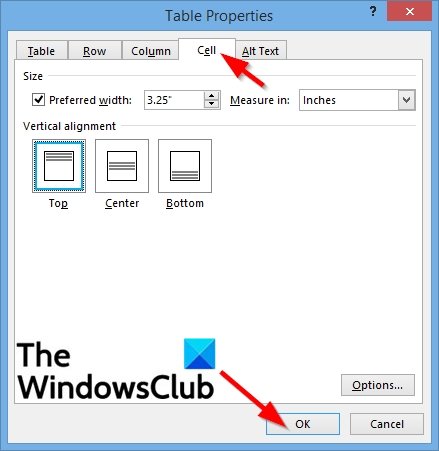
You can change the Table, Row, Column, Cell, and Alt-text settings in the Table Properties dialog box by clicking their tabs.
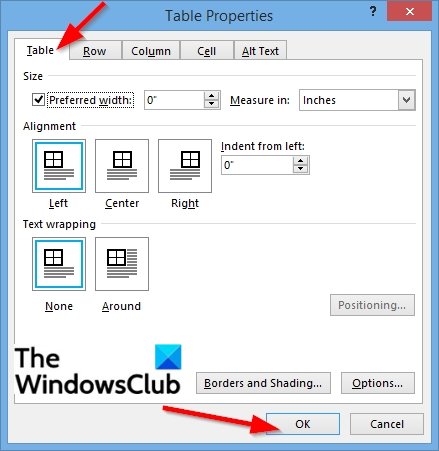
We will discuss the Table tab.
You can set the overall table width on the table settings by clicking the checkbox for Preferred width and choosing a size from the box by clicking the arrows within the box.
In the Measuring in box, you can measure the table’s width in Inches or a Percentage of the page.
Under the Alignment section, you can align the table Left, Right, and Center of the page.
If you choose to select Left, you can select an indentation distance in the Indent from left box.
Under the Text Wrapping, if you want the nearby text to wrap around your table, you can select Around.
If you want the Text Wrapping to be more detailed, click the Positioning button and then choose the options you want from the Table Positioning dialog box.
If you do not want a Text Wrapping, click None.
You can change the table’s Border style, Line color, and Line width by clicking the Border and Shading button.
To set more table properties, including Top and Bottom Cell margins, Cell spacing, and Automatic resizing of cell contents, click the Options button.
Click OK.
2] Row Properties
Click the row or highlight rows you want to change and then right-click and select Table Properties.
A Table Properties dialog box will pop up.
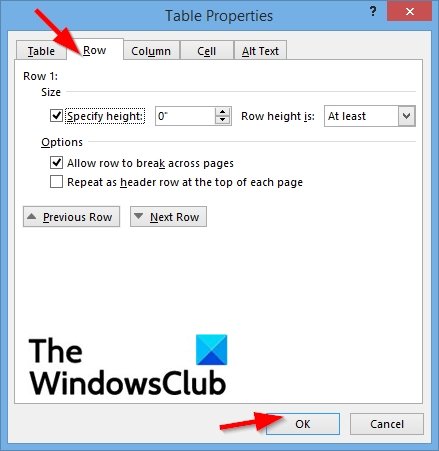
Click the Row tab to change the settings of the rows.
Under the Size section, check the checkbox for Specify height to set the height of the row.
Choose the height from the Specify height box.
You can choose an option from the Row height box, which includes At least and Exactly.
Under Options, you choose to check the checkboxes for Allow row to break across pages or Repeat as header row at the top of each page.
To navigate between rows in your table without leaving the Table Properties dialog box, you can click the Previous row and Next row buttons.
Then click OK.
3] Column Properties
Click the column or highlight columns you want to change and then right-click and select Table Properties.
A Table Properties dialog box will appear.
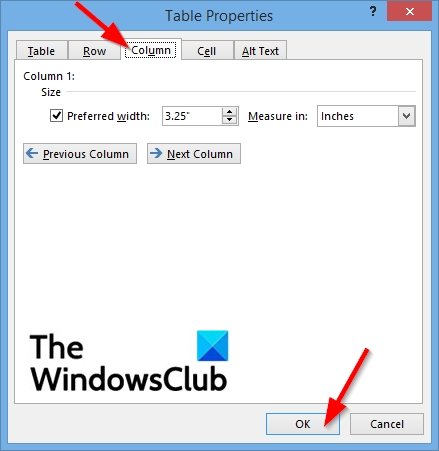
Click the Column tab to change the settings of the columns.
Under Size, check the checkbox for Preferred width and choosing a size from the box.
Within the Measuring in the box, you can choose an option such as Inches or Percent.
To navigate between columns in your table without leaving the Table Properties dialog box, you can click the Previous column and Next column buttons.
Click OK.
4] Cell Properties
Click the cell you want to change, then right-click and select Table Properties from the context menu.
A Table Properties dialog box will appear.
Then click the Cell tab
Under Size, check the checkbox for Preferred width and choose a size from the box.
Within the Measuring box, you can choose an option such as Inches or Percent.
Under Vertical alignment, you can choose an alignment option for the cell contents, such as Top (default), Center, and Bottom.
To set more cell properties, including Top and Bottom cell margins and options such as Text Wrapping and Fit, click the Options button on the bottom right.
Then click OK.
5] Alt-Text
To create alternative text, especially for people with poor visions or cognitive impairments who cannot see or understand the object.
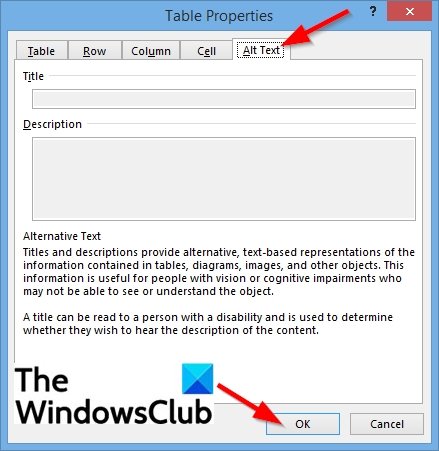
Click the Alt Text tab.
In the Title box, enter a summary of the table.
In the Description box, enter an explanation of the table.
Then click OK.
We hope this tutorial helps you understand how to display and modify table properties in Word; if you have questions about the tutorial, let us know in the comments.
 Please Note:
This article is written for users of the following Microsoft Word versions: 2007, 2010, 2013, 2016, 2019, Word in Microsoft 365, and 2021. If you are using an earlier version (Word 2003 or earlier), this tip may not work for you. For a version of this tip written specifically for earlier versions of Word, click here: Changing Column Width.
![]()
Written by Allen Wyatt (last updated January 29, 2022)
This tip applies to Word 2007, 2010, 2013, 2016, 2019, Word in Microsoft 365, and 2021
Once you add columns to your document, you may decide you want to adjust the width of the columns. (I’m talking about document columns here, not about table columns.) Word allows you to quickly adjust the width of individual columns in your document, as well as the space between columns. You can change the width of columns in your document in the following manner:
- Position the insertion pointer somewhere within the text that is already formatted for columns.
- Display the Layout (Page Layout in earlier versions of Word) tab of the ribbon.
- Click the Columns tool in the Page Setup group. Word displays a drop-down list of options.
- Choose More Columns. Word displays the Columns dialog box. (See Figure 1.)
- Clear the Equal Column Width check box if you don’t want your columns to be an equal width. (The Equal Column Width check box is only accessible if you set the Number of Columns control to some value other than 1.)
- In the Width and Spacing area of the dialog box, adjust the width and spacing (the space between columns) for each column to reflect your desired page appearance. As you adjust one number, other columns and widths may be adjusted automatically. All these numbers are inter-related.
- Click on OK.
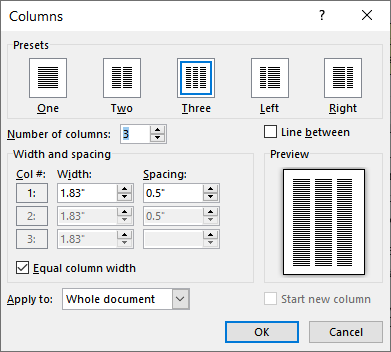
Figure 1. The Columns dialog box.
WordTips is your source for cost-effective Microsoft Word training.
(Microsoft Word is the most popular word processing software in the world.)
This tip (9658) applies to Microsoft Word 2007, 2010, 2013, 2016, 2019, Word in Microsoft 365, and 2021. You can find a version of this tip for the older menu interface of Word here: Changing Column Width.
Author Bio
With more than 50 non-fiction books and numerous magazine articles to his credit, Allen Wyatt is an internationally recognized author. He is president of Sharon Parq Associates, a computer and publishing services company. Learn more about Allen…
MORE FROM ALLEN
Adding Drop Shadows
Want your shapes to really «pop» off the page? Add a drop shadow to them, as described in this tip.
Discover More
Tracking Down Invalid References
When you discover that there is an invalid reference in a workbook, you can have a bear of a time tracking down the …
Discover More
Changing Roman Numerals to Arabic
In some documents Roman numerals might be used quite a bit. If you ever want to change the Roman numerals to their Arabic …
Discover More

Comprehensive VBA Guide Visual Basic for Applications (VBA) is the language used for writing macros in all Office programs. This complete guide shows both professionals and novices how to master VBA in order to customize the entire Office suite for their needs. Check out Mastering VBA for Office 2010 today!
More WordTips (ribbon)
How to Stop a Table Row from Splitting Over Two Pages
Do you want your table rows to be split between pages? Word allows you to format the table so that rows stay together and …
Discover More
Copying Rows and Columns with the Mouse
Word allows you to do quite a few editing tasks using the mouse. If you want to copy rows or columns in a table, you can …
Discover More
Adjusting Column Widths on Joined Tables
Each table in a document can have different numbers of columns and different widths for columns. If you want to join two …
Discover More
Subscribe
FREE SERVICE: Get tips like this every week in WordTips, a free productivity newsletter. Enter your address and click «Subscribe.»
View most recent newsletter.