
Excel for Microsoft 365 Word for Microsoft 365 Outlook for Microsoft 365 PowerPoint for Microsoft 365 Project Online Desktop Client Publisher for Microsoft 365 Excel 2021 Word 2021 Outlook 2021 PowerPoint 2021 Project Professional 2021 Project Standard 2021 Publisher 2021 Excel 2019 Word 2019 Outlook 2019 PowerPoint 2019 Project Professional 2019 Project Standard 2019 Publisher 2019 Excel 2016 Word 2016 Outlook 2016 PowerPoint 2016 Project Professional 2016 Project Standard 2016 Publisher 2016 Excel 2013 Word 2013 Outlook 2013 PowerPoint 2013 Project Professional 2013 Project Standard 2013 Publisher 2013 Word 2010 More…Less
In a text box or shape, you can quickly change the color of text, the inside (fill) color, or the color of the border.
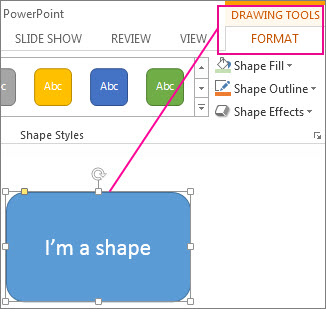
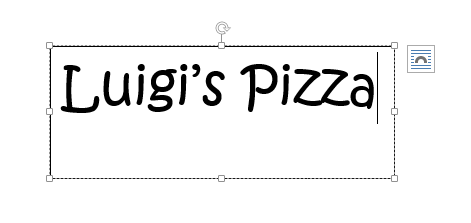
Let’s select the shape—the Drawing Tools appear in the ribbon, with the Format tab active.
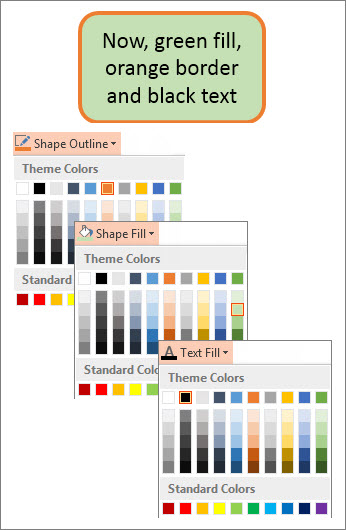
Here’s the same shape after we changed the border to orange, the fill to a light green, and the text to black. We used the Shape Outline, Shape Fill, and Text Fill commands, available on the Format tab under Drawing Tools.
Although the changes we’ll make below are shown in Microsoft PowerPoint, they work the same way in Excel, Word, Outlook, and Project.
Change the text color
-
Select the shape or text box border. When you do that, the Drawing Tools appear.
To change multiple shapes or text boxes, click the first shape or text box, and then press and hold Ctrl while you click the other shapes or text boxes.
-
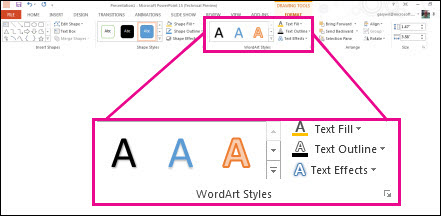
On the Drawing Tools Format tab, click Text Fill and, under Theme Colors, pick the color you want.
Note: The Text Fill and Text Outline menus might not be active until you start typing in your shape.

To change the text to a color that isn’t in the theme colors
-
Select the shape or text box.
-
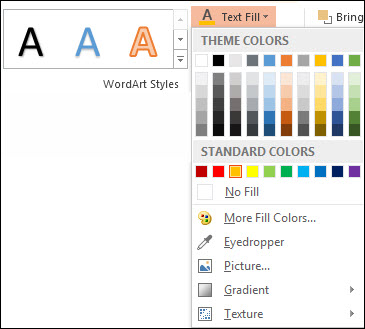
On the Drawing Tools Format tab, click Text Fill > More Fill Colors.
-
In the Colors box, either click the color you want on the Standard tab, or mix your own color on the Custom tab. Custom colors and colors on the Standard tab aren’t updated if you later change the document theme.
-
Change the inside (fill) color
-
Select the shape or text box to change. When you do that, the Drawing Tools appear.
To change multiple shapes or text boxes, click the first shape or text box, and then press and hold Ctrl while you click the other shapes or text boxes.
-
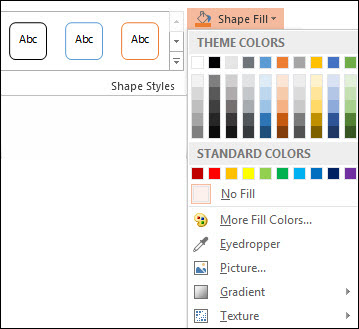
Click Shape Fill, and under Theme Colors, pick the color you want.
To change the fill color to a color that isn’t in the theme colors
-
Select the shape or text box.
-
On the Drawing Tools Format tab, click Shape Fill > More Fill Colors.
-
In the Colors box, either click the color you want on the Standard tab, or mix your own color on the Custom tab. Custom colors and colors on the Standard tab aren’t updated if you later change the document theme.
-

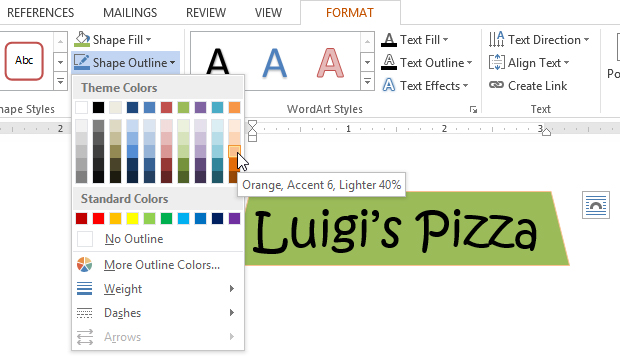
Change the border color
-
Select the shape or text box border. When you do that, the Drawing Tools appear.
If you want to change multiple shapes or text boxes, click the first shape or text box, and then press and hold Ctrl while you click the other shapes or text boxes.
-
On the Drawing Tools Format tab, click Shape Outline and, under Theme Colors, pick the color you want.
To change the border to a color that isn’t in the theme colors
-
Select the shape or text box.
-
On the Drawing Tools Format tab, click Shape Outline, and then click More Outline Colors.
-
In the Colors box, either click the color that you want on the Standard tab, or mix your own color on the Custom tab. Custom colors and colors on the Standard tab aren’t updated if you later change the document theme.
-

Tip: In PowerPoint, you can also change the border color by clicking Shape Outline (on the Home tab, in the Drawing group).
See Also
Remove or change the border on a text box or shape
Add a fill or effect to a shape
Change the font color (text color)
Change the background or color in Word
Change a message background in Outlook
Change the background color of your slides in PowerPoint
Insert WordArt
Add shapes
Need more help?
Want more options?
Explore subscription benefits, browse training courses, learn how to secure your device, and more.
Communities help you ask and answer questions, give feedback, and hear from experts with rich knowledge.
Select the shape or text box. On the Drawing Tools Format tab, click Text Fill > More Fill Colors. In the Colors box, either click the color you want on the Standard tab, or mix your own color on the Custom tab. Custom colors and colors on the Standard tab aren’t updated if you later change the document theme.
Subsequently, How do you create an outline in paint?
Click the ‘Select’ tool and create an outline around the object that you want to include in the image. Use Paint. Click the ‘Select’ tool and create an outline around the object that you want to include in the image.
Accordingly How do you add color to a table in Word?
To use the Design tab to add any color to a table:
- Highlight the table cells to which you want to apply the background color.
- Select the Design tab.
- In the Page Background group, select Page Borders.
- Select the Shading tab.
- Select the Fill drop-down arrow, then choose a color from the color chart.
Beside above, How do you make a text box transparent in Word 2020? Word
- Right-click the text box that you want to make invisible. …
- On the shortcut menu, click Format Text Box.
- On the Colors and Lines tab, in the Fill section, click the arrow next to Color, and then click No Color.
- On the Colors and Lines tab, in the Line section, click the arrow next to Color, and then click No Color.
How do I fill a text box with color in Adobe?
Once you have the text field…
- Right-click on it and choose Properties.
- Switch to the Appearance tab.
- Click the swatch beside Fill Color and choose or mix your field fill color.
- Click Close.
also How do you make an outline of a picture? To outline an image in Photoshop, double click on your layer to open the Layer Styles panel. Select the “Stroke” style and set the stroke type to “Outside”. From here simply change the color and width of your outline to suit the look you want!
How do I make rows alternate colors in Word?
Apply color to alternate rows or columns
- Select the range of cells that you want to format.
- Click Home > Format as Table.
- Pick a table style that has alternate row shading.
- To change the shading from rows to columns, select the table, click Design, and then uncheck the Banded Rows box and check the Banded Columns box.
How do I GREY cells in a table in Word?
Add or remove shading in a table
- Select the cells you want to change. …
- On the Table Tools Design tab (the Table Tools Layout tab in OneNote), click the Shading menu.
- Under Theme Colors or Standard Colors, select the shading color you want.
How do I change the color of the outline in a table in Word?
Method 1: Using the Borders and Shading option.
- Step 1: Open Word document.
- Step 2: Prompt the Borders and Shading dialogue box. Click anywhere in the table. A Table Selection Icon will appear at the top corner. …
- Step 3: Choose the color of your border. You will see a Color Dropdown under the Borders Tab.
Why is there a white box behind my text in Word?
It is obviously a bug in Word. Right-click the text box that you want to make invisible. If you want to change multiple text boxes, click the first text box or shape, and then press and hold SHIFT while you click the other text boxes. On the shortcut menu, click Format Text Box.
Why does my text box disappear in Word?
Provided you are still viewing the document in Print Layout view, you should be able to see any text boxes. If you still can’t see it, it could be possible that the text box is formatted for no line and no fill and that the text it contains is formatted as hidden (and you have the display of hidden text turned off).
How do I change text color in Adobe?
How can I change the font colour using Adobe Reader?
- Click on the Edit menu, then Preferences.
- Under Categories, click on Accessibility.
- Put a tick next to Replace Document Colours.
- Choose Custom Colour.
- Choose Document Text colour.
- Click OK.
How do you color in Adobe?
Apply a fill color using the Tools panel or the Properties panel. Select a fill color by doing one of the following: Click a color in the Control panel, Color panel, Swatches panel, Gradient panel, or a swatch library. Double-click the Fill box and select a color from the Color Picker.
How do I make a text box transparent in Adobe?
If you’re using the Text Box tool under Comment > Drawing Markups, then after you’ve entered the text just right-click on either the comment itself or the entry in the Comments List panel, and choose Properties. On the dialog box, change the Fill Color to something other than ‘none’.
What app do you use to outline pictures?
Sketch Me! is a simple, fun app that lets you convert your photos into sketches by applying up to six different image effects.
How do I outline an image in Word?
Add a border to a picture
- Select the picture that you want to apply a border to. …
- On the Page Layout tab, in the Page Background group, select Page Borders.
- In the Borders and Shading dialog box, on the Borders tab, choose one of the border options under Settings.
- Select the style, color, and width of the border.
How do I insert a copyright symbol in Word?
To add symbols, on the Insert tab, and then in the Symbols group, click Symbol, and then click the symbol that you want. Copyright and trademark symbols can be added by using a keyboard shortcut. For example: To insert the copyright symbol, press Ctrl+Alt+C.
How do you add a shade in Word?
Apply shading to words or paragraphs
- Select the word or paragraph that you want to apply shading to.
- On the Home tab, in the Paragraph group, click the arrow next to Shading.
- Under Theme Colors, click the color that you want to use to shade your selection.
How do I select alternate lines in Word?
To select items that are not next to each other, follow these steps:
- Select the first item that you want. For example, select some text.
- Press and hold CTRL.
- Select the next item that you want. Important Be sure to press and hold CTRL while you select the next item that you want to include in the selection.
How do you AutoFit a table in Word?
Adjust Table Columns in Word (Auto Fit)
- Click anywhere in the table.
- In “Table Tools” click the [Layout] tab > locate the “Cell Size” group and choose from of the following options: To fit the columns to the text (or page margins if cells are empty), click [AutoFit] > select “AutoFit Contents.”
How do you insert a cell in Word?
Inserting Cells in a Table
- Select the cell before which you want a cell inserted.
- Choose Insert Cells from the Table menu. You will see the Insert Cells dialog box.
- Select which way you want the cells to be adjusted.
- Click on OK.
How do I change the color of an outline in paint?
Click the eyedropper-shaped icon in the “Tools” section at the top of the Paint window. Click the color you want to replace. This will assign the color to the “Color 1” section at the top of the Paint window.
How do I thicken table lines in Word?
Add or change the line width
Click the table or select the cells where you want to add or change borders. On the Tables tab, under Draw Borders, on the Line Weight pop-up menu, click the line weight that you want. , and then click the borders that you want.
Lesson 21: Text Boxes and WordArt
/en/word2013/shapes/content/
Introduction
Text boxes can be useful for drawing attention to specific text. They can also be helpful when you need to move text around in your document. Word allows you to format text boxes and the text within them as WordArt.
Optional: Download our practice document.
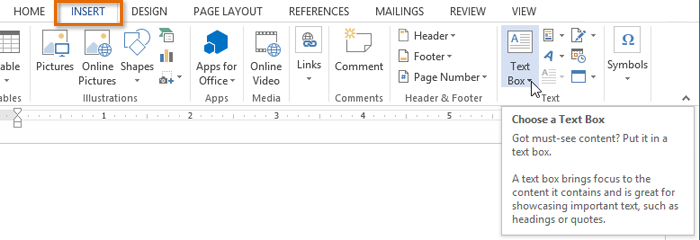
To insert a text box:
- Select the Insert tab, then click the Text Box command in the Text group.
 Clicking the Text Box command
 - A drop-down menu will appear. Select Draw Text Box.
 Clicking Draw Text Box
 - Click, hold, and drag to create the text box.
 Drawing a text box
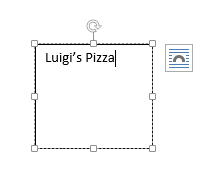
 - The insertion point will appear inside the text box. You can now type to create text inside the text box.
 Creating text
 - If you want, you can select the text and then change the font, color, and size by using the commands on the Home tab.
 The formatted text
 - Click anywhere outside of the text box to return to your document.

You can also select one of the built-in text boxes that have predefined colors, fonts, positions, and sizes. If you choose this option, the text box will appear automatically, so you will not need to draw it.
 A built-in text box
To move a text box:
- Click the text box you want to move.
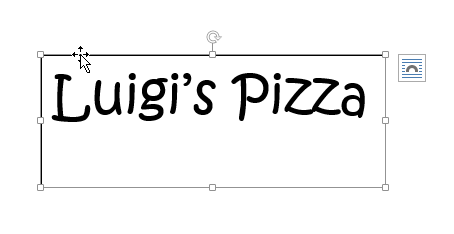
- Hover the mouse over one of the edges of the text box. The mouse will change into a cross with arrows .
- Click, hold, and drag the text box to the desired location.
 Moving a text box
 .
.
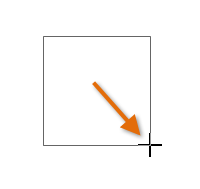
To resize a text box:
- Click the text box you want to resize.
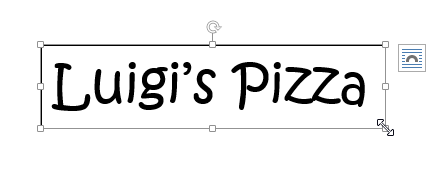
- Click, hold, and drag any of the sizing handles on the corners or sides of the text box until it is the desired size.
 Resizing a text box
Modifying text boxes
Word offers many options for changing the way text boxes appear in your document. You can change the shape, style, and color of text boxes. Additionally, when you want to add a little more dimension you can add a shadow effect.
To change the text box shape:
Changing the shape of a text box can be a useful option for creating an interesting look in your document.
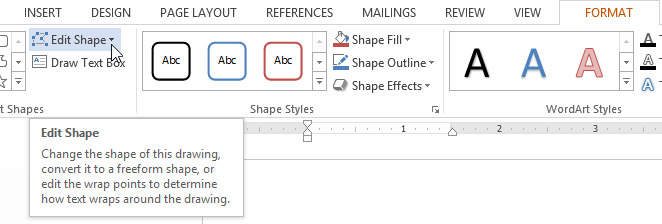
- Select the text box you want to change. The Format tab will appear.
- From the Format tab, click the Edit Shape command.
 Clicking the Edit Shape command
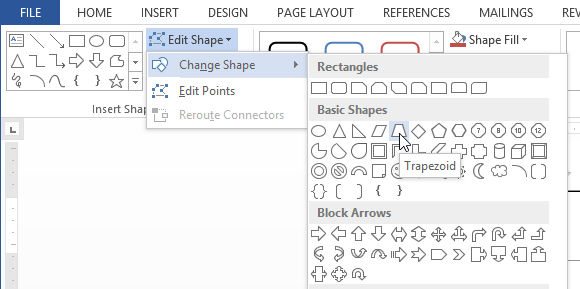
 - Hover the mouse over Change Shape, then select the desired shape from the menu that appears.
 Selecting a shape
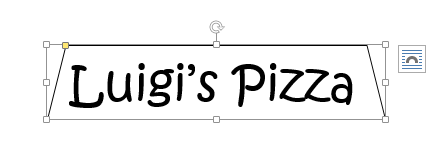
 - The text box will appear formatted as the shape.
 The text box formatted as a shape
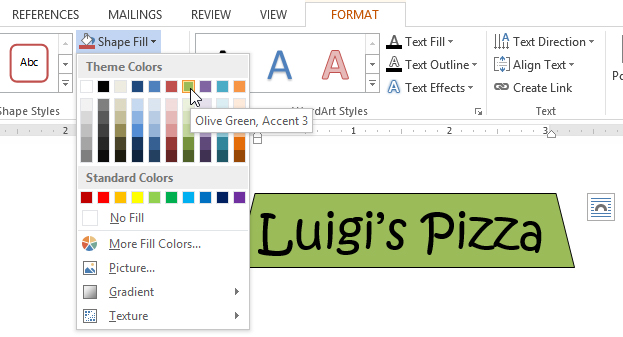
To change the fill color:
- Select the text box you want to change.
- On the Format tab, click the Shape Fill drop-down arrow. The Shape Fill menu will appear.
- Select the color you want to use. To view more color options, select More Fill Colors.
 Changing the shape fill color
 - The text box will appear in the selected fill color.
If you want to use a different type of fill, select Gradient or Texture from the drop-down menu. You can also select No Fill to make it transparent.
To change the shape outline:
- Select the text box you want to change.
- On the Format tab, click the Shape Outline drop-down arrow. The Shape Outline menu appears.
- Select the color you want to use. If you want to make the outline transparent, select No Outline.
 Changing the text box outline color
 - The text box will appear in the selected outline color.
From the drop-down menu, you can change the outline color, weight (thickness), and whether or not it is a dashed line.
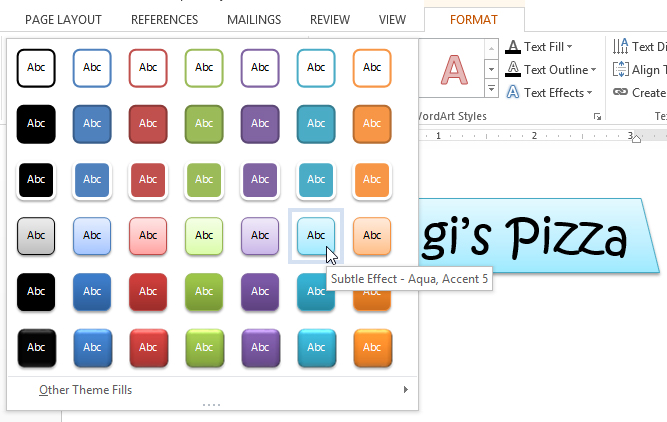
To change the shape style:
Choosing a shape style allows you to apply preset colors and effects to quickly change the appearance of your text box.
- Select the text box you want to change.
- On the Format tab, click the More drop-down arrow in the Shape Styles group.
 Clicking the More drop-down arrow
 - A drop-down menu of styles will appear. Select the style you want to use.
 Changing the text box style
 - The text box will appear in the selected style.
 The new style

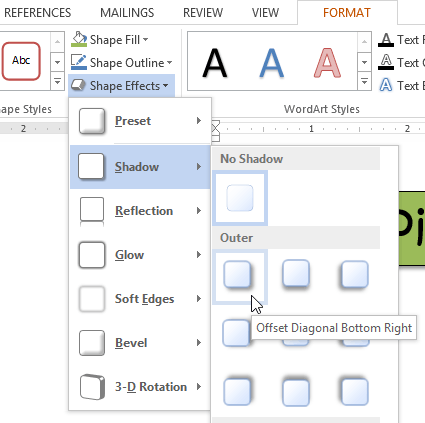
To change shadow effects:
Adding a shadow to a shape can make it appear as though it is floating above the page, and it can help to add contrast between the shape and the background.
- Select the text box you want to change.
- On the Format tab, click the Shape Effects drop-down arrow. In the menu that appears, select the shadow you want to use.
 Choosing a shadow type
 - The shape will appear with the selected shadow.
 The text box with a shadow

To adjust the shadow color, size, distance, and more, select Shadow Options from the drop-down menu. The Format Shape pane will appear.
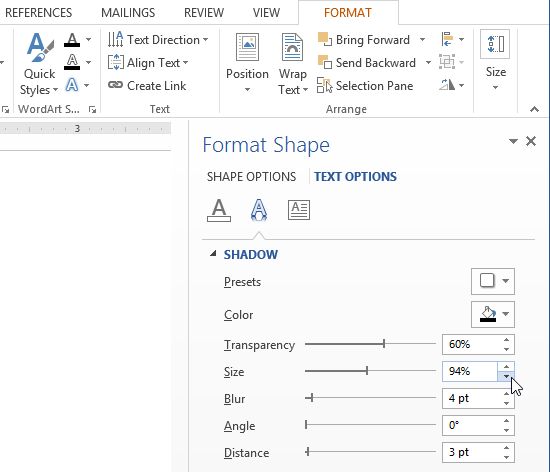 The Format Shape pane
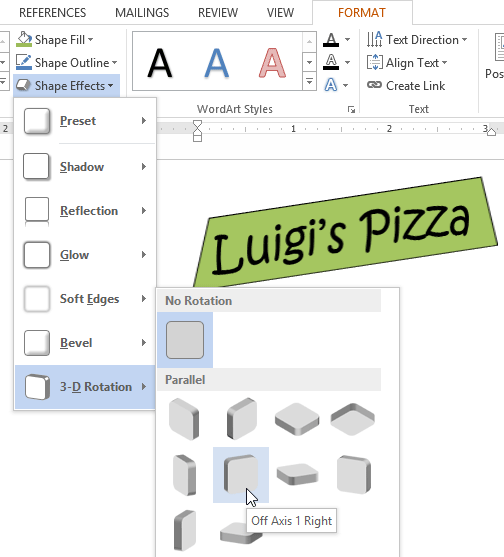
3D effects
There are two kinds of effects you can apply to text boxes to give them a 3D appearance: 3-D Rotation and Bevel. 3-D Rotation makes text boxes appear as if you are viewing the text box from a different angle. Bevel adds thickness and a rounded edge to text boxes.
To use 3-D Rotation:
- Select the text box you want to change.
- On the Format tab, click the Shape Effects drop-down arrow. In the menu that appears, select the desired 3-D Rotation effect.
 Choosing a 3-D effect
 - The text box will appear in the selected 3-D Rotation effect.
If you want, you can customize the 3-D Rotation. Select 3-D Rotation Options… from the drop-down menu and the Format Shape pane will appear. From here, you can adjust the rotation values.
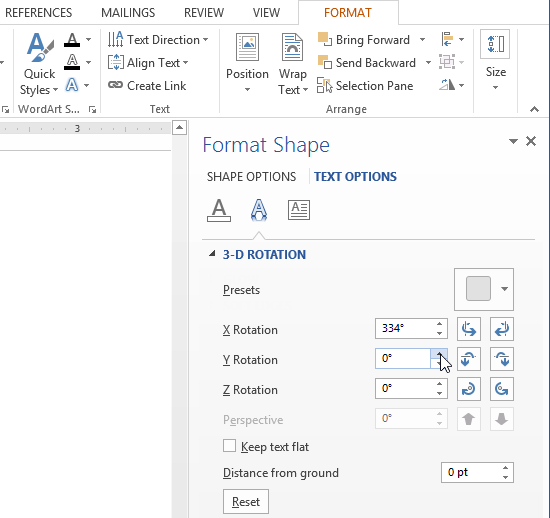 Customizing the 3-D rotation
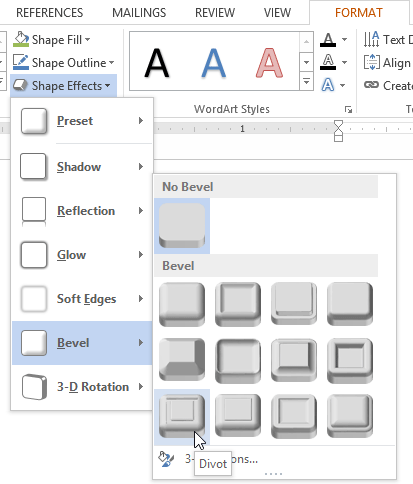
To use Bevel:
- Select the text box you want to change.
- On the Format tab, click the Shape Effects drop-down arrow. In the menu that appears, select the desired bevel preset.
 Choosing a bevel preset
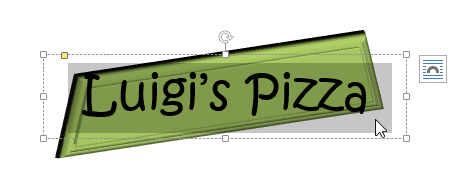
 - The text box will appear in the selected bevel effect.
 The text box with a bevel effect

If you’ve changed the shape of your text box, it’s important to note bevel doesn’t work with every type of shape.
If you want, you can customize the bevel effect. Select 3-D Options… from the drop-down menu. The Format Shape pane will appear. From here, you can modify the width, height, and depth of a bevel.
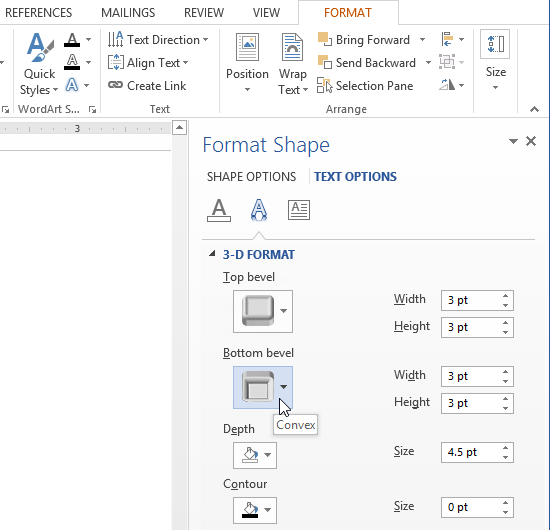 Customizing the bevel
Creating WordArt
In addition to adding effects to a text box, you can add effects to the text inside the text box, which is known as WordArt. For the most part, the types of effects you can add are the same as the ones you can add to shapes or text boxes (shadow, bevel, etc.). However, you can also Transform the text to give it a wavy, slanted, or inflated look.
Generally, you shouldn’t use WordArt in more formal documents like resumes and cover letters because it may appear too casual.
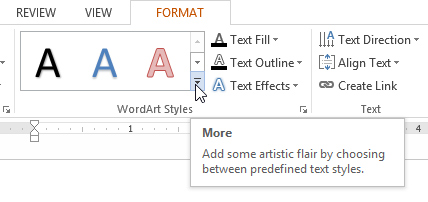
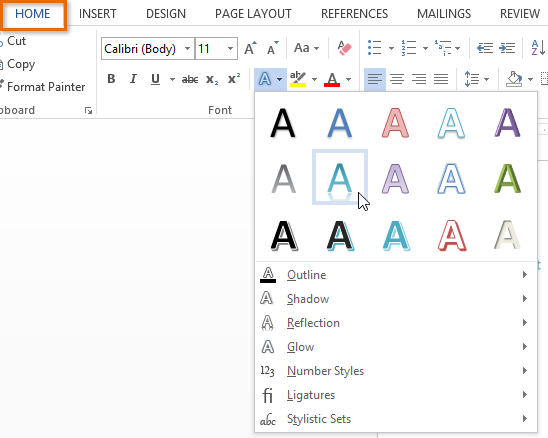
To apply a quick style to text:
A quick style will automatically apply several effects to your text at once. You can then refine the look of your text by adding or modifying text effects.
- Select the text box, or select some text inside of the text box.
 Selecting text inside of a text box
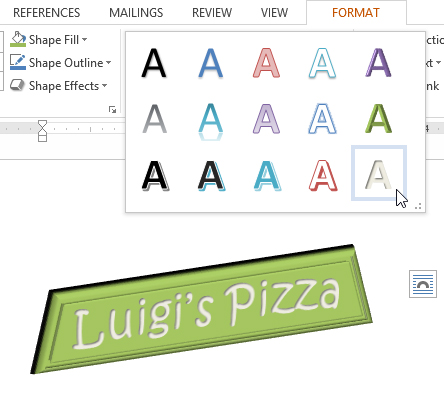
 - On the Format tab, click the Quick Styles command in the WordArt Styles group. A drop-down menu of text styles will appear. Select the style you want to use.
 Selecting a Quick Style
 - The text will appear in the selected style. If you want, you can change the font or font color from the Home tab.
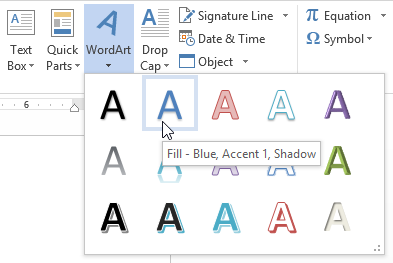
To convert regular text into WordArt:
For text to be formatted as WordArt, it must be inside a text box. However, there is a shortcut that allows you to convert text into WordArt even if it’s not in a text box.
- Select the text you want to convert, then click the Insert tab.
 Clicking the Insert tab
 - Click the WordArt drop-down arrow in the Text group. A drop-down menu of WordArt styles will appear. Select the style you want to use.
 Changing the text to WordArt
 - Word will automatically create a text box for the text, and the text will appear in the selected style. If you want, you can change the font or font color from the Home tab.
 Text as WordArt

Some effects, such as shadows, can be added from the Text Effects menu in the Home tab. When you add effects in this way, it will not place the text in a text box.
 Additional text effects
To transform text:
- Select the text box, or select some text inside of the text box.
 Selecting text inside of a text box
 - On the Format tab, click the Text Effects drop-down arrow in the WordArt Styles group.
 Clicking the Text Effects command
 - A drop-down menu of effects will appear. Hover the mouse over Transform and select a transform effect from the menu that appears.
 Selecting a transform effect
 - The text will transform into the selected style.
 The transformed text

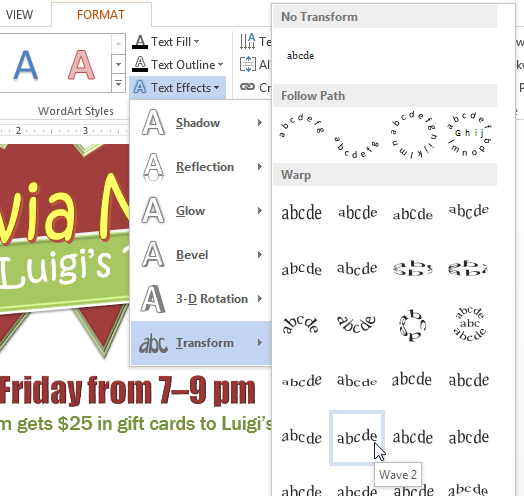

If desired, you can add additional effects such as shadow, bevel, and more to the transformed text.
Challenge!
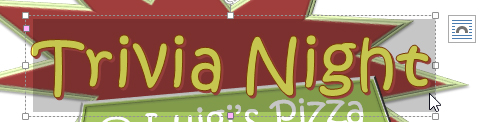
- Create a new Word 2013 document. If you want, you can use our practice document.
- Insert a text box.
- Enter some text into the text box. If you’re using the example, enter the text Every Friday from 7-9 pm.
- Move the text box to a new location.
- Try changing the shape of the text box.
- Change the fill color of the text box.
- Change the outline of the text box to No Outline.
- Try applying some effects to the text box.
- Add some WordArt effects to the text.
/en/word2013/arranging-objects/content/
Text boxes in an MS Word document are a very useful feature. Text within a box acts as a highlight for the reader. Here, we will show you how to:
- Add a Text Box
- Remove a Text Box
- Customize a Text Box Border
- Change Border Color
- Create Dashed Border
- Change Border Thickness
Let us begin.
Step #1: Open the Word document.
Open the Word document where you want to add the text box.
Step #2: Add the Text Box
Position the cursor where you want the text box to appear.
In the top menu bar, click on the Insert tab to change the ribbon.

In the section Text, click on the Text Box icon to open a dialog box for Built-In text boxes.

Click on the text box you find suitable. We select the Simple Text Box.

Word adds the text box in the document.

Remove a Text Box
Step #1: Open the Word document.
Open the Word document that has at least one text box.
Step #2: Remove the text box
Click on the text box boundary to select it.

Press the Delete button on your keyboard.
Word will delete the text box from your document.
Customize a Text Box Border
Step #1: Open the Word document.
Open the Word document that has at least one text box.
Step #2: Customize the text box border
Click on the text box boundary to select it.

Right-click on the text box boundary to open a menu.
Click on Format AutoShape/Picture.

This opens a dialog box for Format Text Box.
Click on the Colors and Lines tab.

Change Border Color
Under Line, click on the down arrow on the right-hand side of Color:.

This opens a dialog box for Theme Colors and Standard Colors.
Click on the color of your choice.

The chosen color will appear against the Color: tab under Line.

Note: At this point, you can click on OK at the bottom of the dialog box to exit. Word will change the color of the box to your chosen color. Else, move to the next step to make more changes.
Create Dashed Border
In the Format Text Box dialog box, under Line, click on the down arrow on the right side of Dashed:.

This opens a choice for different dashed lines.
Select the most suitable dashed line.

The chosen dashed line will appear against the Dashed: tab under Line.

Note: At this point, you can click on OK at the bottom of the dialog box to exit. Word will make the changes to the text box as per your choices above. Else, move to the next step to make more changes.
Change Border Thickness
In the Format Text Box dialog box, under Line, click on the down arrow on the right side of Style:.

This opens a choice for lines of a different style.
Each line style has its weight in points on its left.
Select the line most suitable to you.

The chosen line style will appear against the Style: tab.
The weight of the chosen line style will appear against the Weight: tab under Style:.

The choice of line styles offers only a few discrete weights.
To change the line weight, select the number next to Weight:.
Change the number as you like.

Click on OK at the bottom of the Format Text Box dialog box to exit.
Word will make the changes to the text box according to all your choices.

Conclusion
Follow our step-by-step instructions to add or delete text boxes in your Word document. Beautify your text boxes with our instructions. We have shown you how to change the border color, style of the border line, and the thickness of the border.
Achieve more control and flexibility with your documents
Updated on September 11, 2022
What to Know
- Select Insert > Text Box > choose a text box template. Select and drag box to the position you want.
- To resize text, select and drag circles around the edge. To rotate text, select and drag the circular arrow.
- Place the cursor inside the text box and type the information you want to appear.
This article explains how to use text boxes in Microsoft Word. Instructions apply to Word for Microsoft 365, Word 2019, Word 2016, and Word 2013.
How to Insert a Text Box in Word
Start by opening the document you want to add a text box to. Then follow the steps below.
-
On the ribbon, select Insert.
-
In the Text group, select Text Box, then choose a text box template.
-
The new text box appears in the middle of the text, and the Shape Format tab is automatically selected.
-
Select and drag the box to the position you want. To resize the text box, select and drag the circles around the edge. To rotate the text box, select and drag the circular arrow at the top of the box.
-
Place the cursor inside the text box and type the information you want to appear there.
Why Use Text Boxes?
When you type text in Microsoft Word, you have options for making it look a particular way on the page (such as changing the page margins), but those options are limited. Text boxes expand your formatting repertoire by offering additional control and flexibility for how your text appears. You can place a text box anywhere within a document and format it with different colors and fonts. This feature is especially helpful for creating a blockquote or a sidebar.
Customize a Text Box
After you create a text box, you can customize it in a number of ways.
-
To bring up options, place the cursor inside the text box and right-click. Choose an option and follow the screen prompts to add a border, change the style, or adjust the way the text box interacts with the other text on the page.
Alternatively, use the controls on the Shape Format tab.
-
To go directly to the Layout Options menu, select the text box, then select the Layout Options icon (it looks like a horseshoe and is located to the right of the text box).
-
Change the text, make more adjustments, or move the box to another location at any time. To delete a text box, select its border, then press Delete on the keyboard.
Thanks for letting us know!
Get the Latest Tech News Delivered Every Day
Subscribe
 Please Note:
This article is written for users of the following Microsoft Word versions: 2007, 2010, 2013, 2016, 2019, and Word in Microsoft 365. If you are using an earlier version (Word 2003 or earlier), this tip may not work for you. For a version of this tip written specifically for earlier versions of Word, click here: Creating See-through Text Boxes.
![]()
Written by Allen Wyatt (last updated November 9, 2019)
This tip applies to Word 2007, 2010, 2013, 2016, 2019, and Word in Microsoft 365
Word allows you to create text boxes in your document. These can be used to create special document elements, such as sidebars or boxed text. There may be times when you want the text box to be transparent, meaning that whatever is behind the text box shows through. There are two ways you can handle this: you can either make the text box partially transparent or make it fully transparent. How you accomplish this depends on the version of Word you are using.
If you are using Word 2007, follow these steps to control the transparency:
- Place your text box, as normal.
- Right-click on the text box. Word displays a Context menu.
- Choose Format Text Box from the Context menu. Word displays the Format Text Box dialog box.
- Make sure the Colors and Lines tab is selected. (See Figure 1.)
- Click the Semitransparent check box if you want a «ghost image» of what is behind the text box to show through.
- If you want the text box to be fully transparent, use the Color setting in the Fill area to choose No Fill.
- Display the Layout tab. (See Figure 2.)
- Make sure the wrapping style is set to In Front of Text.
- Click on OK.
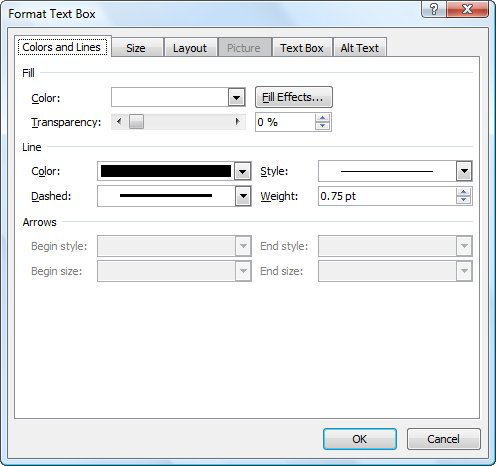
Figure 1. The Colors and Lines tab of the Format Text Box dialog box.
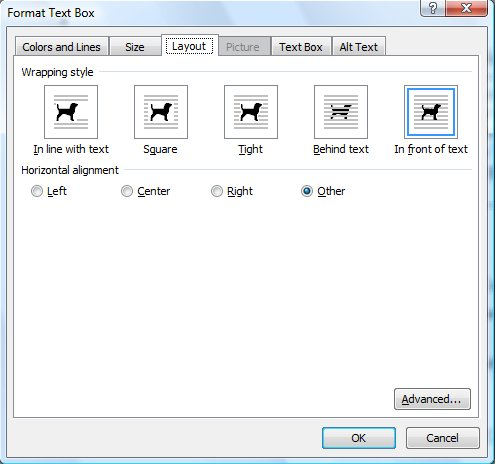
Figure 2. The Layout tab of the Format Text Box dialog box.
In Word 2010 the steps are a bit different:
- Place your text box, as normal.
- Right-click on the text box. Word displays a Context menu.
- Choose Format Shape from the Context menu. Word displays the Format Shape dialog box.
- At the left side of the dialog box click Fill. (See Figure 3.)
- Use the Transparency slider to adjust how transparent you want the Text Box to be. (If you want the Text Box to be fully transparent, slide the control all the way to 100%. You can also make it fully transparent by clicking the No Fill radio button.)
- At the left side of the dialog box click Line Color. (See Figure 4.)
- Either choose No Line or use the Transparency slider to adjust how transparent you want the line to be.
- Click on OK.
- Again right-click the text box to display the Context menu.
- Choose Wrap Text option and then choose In Front of Text.
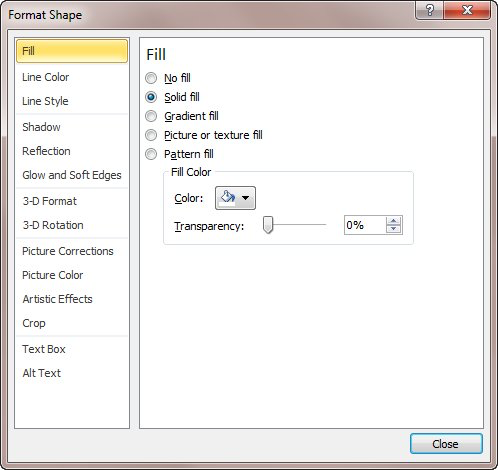
Figure 3. The Fill options of the Format Shape dialog box.
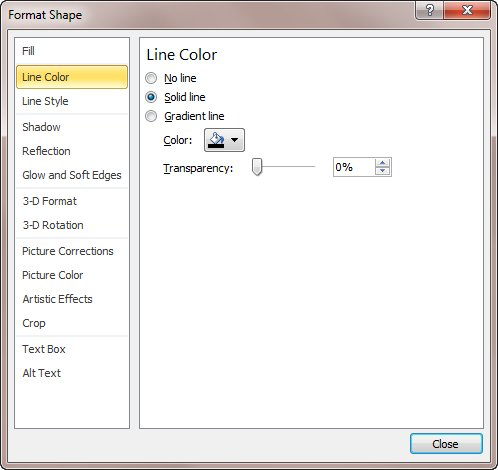
Figure 4. The Line Color options of the Format Shape dialog box.
In Word 2013 or a later version, the steps are even more different:
- Place your text box, as normal.
- Right-click on the text box. Word displays a Context menu.
- Choose Format Shape from the Context menu. Word displays the Format Shape pane at the right side of the screen.
- Click the Fill and Line icon (it looks like a spilling paint bucket).
- Click on the Fill option to expand it. (See Figure 5.)
- Use the Transparency slider to adjust how transparent you want the Text Box to be. (If you want the Text Box to be fully transparent, slide the control all the way to 100%. You can also make it fully transparent by clicking the No Fill radio button.)
- Again, right-click the text box to display the Context menu.
- Choose Wrap Text option and then choose In Front of Text.
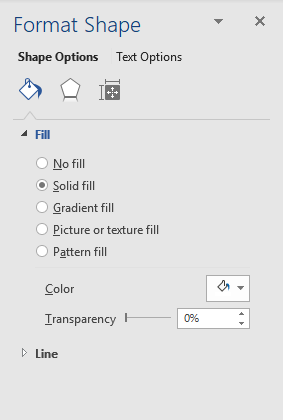
Figure 5. The Format Shape task pane.
WordTips is your source for cost-effective Microsoft Word training.
(Microsoft Word is the most popular word processing software in the world.)
This tip (12687) applies to Microsoft Word 2007, 2010, 2013, 2016, 2019, and Word in Microsoft 365. You can find a version of this tip for the older menu interface of Word here: Creating See-through Text Boxes.
Author Bio
With more than 50 non-fiction books and numerous magazine articles to his credit, Allen Wyatt is an internationally recognized author. He is president of Sharon Parq Associates, a computer and publishing services company. Learn more about Allen…
MORE FROM ALLEN
PRIVATE Fields in WordPerfect Documents
Did you ever convert a document from WordPerfect and see PRIVATE fields in it? Here’s what those fields mean.
Discover More
Printing AutoText Entries
If you want to print a list of the AutoText entries on your system, you can do so quickly by making one change on the …
Discover More
Typing Check Marks into Excel
Need to enter a check mark into a cell? There are a number of ways you can get the desired character, depending on the …
Discover More
More WordTips (ribbon)
Adding Sidebars
When designing your document, you may want to use sidebars like you see in magazines and some books. This tip explains …
Discover More
Finding Text Boxes
Need to search for various text boxes in your document? It’s easy to do with the handy macro provided in this tip.
Discover More
Wrapping Text around a Graphic in a Text Box
Word allows you to wrap text around a graphic or around a text box, but it won’t allow you to wrap text in a text box …
Discover More
Adding a text box to a Microsoft Word document is an effective way to make certain sections of text stand out on the page; for example, the text for an image caption, flyout or a pull quote. You can add gray text boxes to a Microsoft Word document with the program’s “Text Box” and “Shape Styles” features.
Adding the Text Box
-
After opening the document to which you want to add the text box in Microsoft Word, click anywhere on the page. You can move the text box to your preferred page location after you’ve created and formatted the object with the gray color scheme. Click the “Insert” tab in the main program menu Ribbon. In the “Text” tools group, click “Text Box,” followed by “Draw Text Box.” Draw the text box to your preferred size by dragging the placeholders at the corners and sides of the box object. You can adjust the text box’s size later on if you need a larger or smaller box to fit the amount of text.
Creating the Text Box Text
-
Once you’ve added the text box to the document page, click inside the text box and type or paste the text that you want to include in the text box. Word includes many text-formatting features that you can access from the “Font” tools group from the “Home” tab. The tools allow you to change the font face, font size and font style for the text, including bold, underlined and italic styles. You can also change the text alignment and text color. For a gray text box, choose a color that will display clearly on a gray background. White text works well on a dark gray background and black text is clearly legible on a light gray background.
Styling the Text Box
-
Now that you’ve created the text box and formatted the text, you can style the text box with a gray fill color from the “Shape Styles” options in the “Drawing Tools” group under the “Format” tab. Select and highlight the text box, and then select your preferred shape style for the text box. To apply a gray fill color, click the “Shape Fill” button and click on your preferred shade of gray in the color-picker tool. You can also change the color of the text box outline by clicking “Shape Outline” and selecting your preferred outline color. Once you’re happy with the gray color scheme for the text box, save the Word document to store your changes.
Considerations
-
Although gray text boxes can highlight key sections of text on each page, using too many text boxes can give a cluttered, unprofessional look to the document. Use gray text boxes sparingly, with perhaps just one or two boxes per page to give the document a clean look and to retain the impact of the text boxes. You might also vary the color scheme and assign different color text boxes to different types of text. Color-coding the document ensures consistency and can help readers find important information quickly.