
Excel for Microsoft 365 Word for Microsoft 365 Outlook for Microsoft 365 PowerPoint for Microsoft 365 Project Online Desktop Client Publisher for Microsoft 365 Excel 2021 Word 2021 Outlook 2021 PowerPoint 2021 Project Professional 2021 Project Standard 2021 Publisher 2021 Excel 2019 Word 2019 Outlook 2019 PowerPoint 2019 Project Professional 2019 Project Standard 2019 Publisher 2019 Excel 2016 Word 2016 Outlook 2016 PowerPoint 2016 Project Professional 2016 Project Standard 2016 Publisher 2016 Excel 2013 Word 2013 Outlook 2013 PowerPoint 2013 Project Professional 2013 Project Standard 2013 Publisher 2013 Word 2010 More…Less
In a text box or shape, you can quickly change the color of text, the inside (fill) color, or the color of the border.
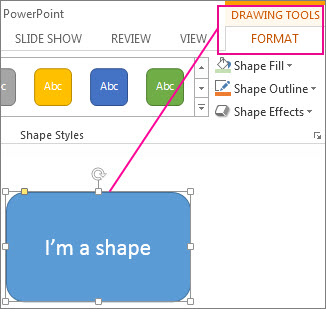
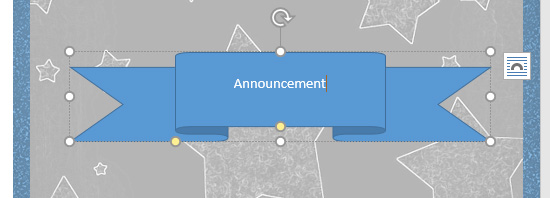
Let’s select the shape—the Drawing Tools appear in the ribbon, with the Format tab active.
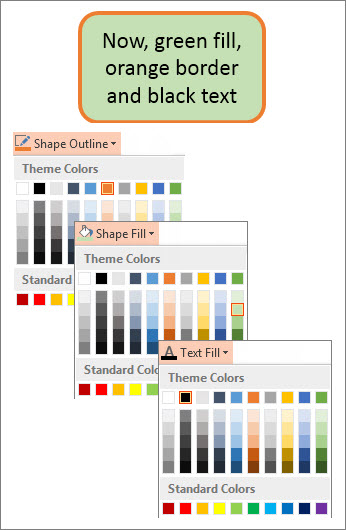
Here’s the same shape after we changed the border to orange, the fill to a light green, and the text to black. We used the Shape Outline, Shape Fill, and Text Fill commands, available on the Format tab under Drawing Tools.
Although the changes we’ll make below are shown in Microsoft PowerPoint, they work the same way in Excel, Word, Outlook, and Project.
Change the text color
-
Select the shape or text box border. When you do that, the Drawing Tools appear.
To change multiple shapes or text boxes, click the first shape or text box, and then press and hold Ctrl while you click the other shapes or text boxes.
-
On the Drawing Tools Format tab, click Text Fill and, under Theme Colors, pick the color you want.
Note: The Text Fill and Text Outline menus might not be active until you start typing in your shape.

To change the text to a color that isn’t in the theme colors
-
Select the shape or text box.
-
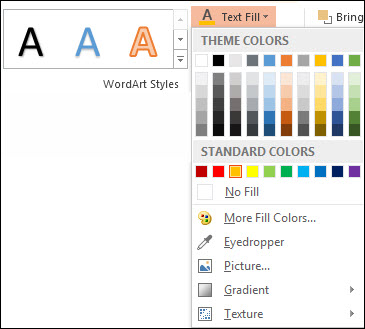
On the Drawing Tools Format tab, click Text Fill > More Fill Colors.
-
In the Colors box, either click the color you want on the Standard tab, or mix your own color on the Custom tab. Custom colors and colors on the Standard tab aren’t updated if you later change the document theme.
-
Change the inside (fill) color
-
Select the shape or text box to change. When you do that, the Drawing Tools appear.
To change multiple shapes or text boxes, click the first shape or text box, and then press and hold Ctrl while you click the other shapes or text boxes.
-
Click Shape Fill, and under Theme Colors, pick the color you want.
To change the fill color to a color that isn’t in the theme colors
-
Select the shape or text box.
-
On the Drawing Tools Format tab, click Shape Fill > More Fill Colors.
-
In the Colors box, either click the color you want on the Standard tab, or mix your own color on the Custom tab. Custom colors and colors on the Standard tab aren’t updated if you later change the document theme.
-

Change the border color
-
Select the shape or text box border. When you do that, the Drawing Tools appear.
If you want to change multiple shapes or text boxes, click the first shape or text box, and then press and hold Ctrl while you click the other shapes or text boxes.
-
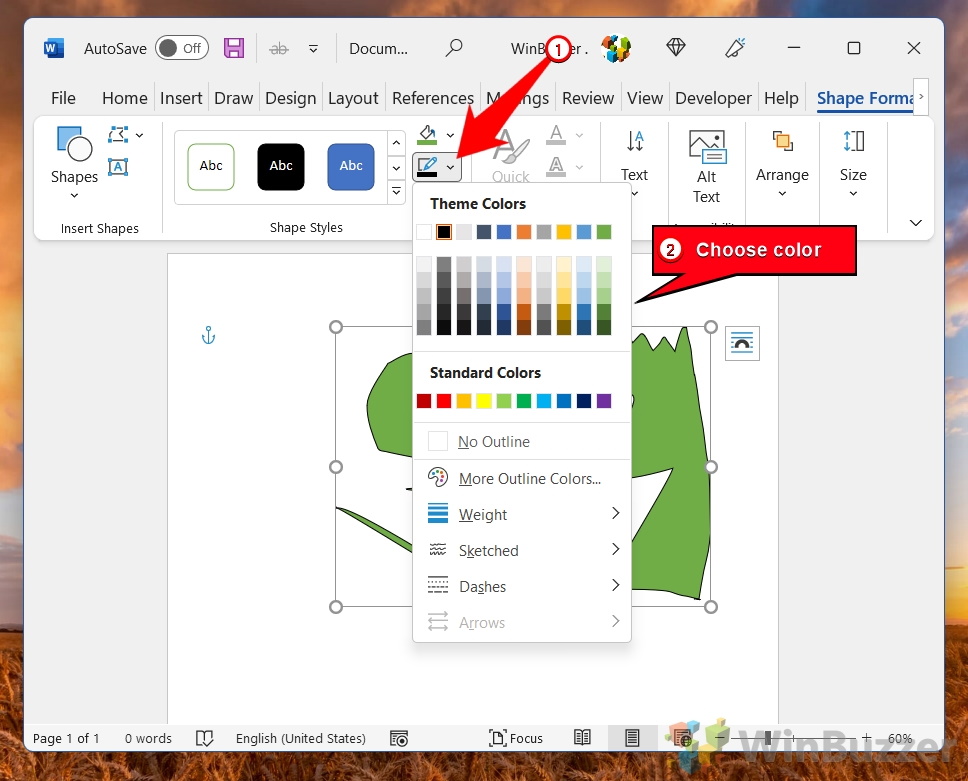
On the Drawing Tools Format tab, click Shape Outline and, under Theme Colors, pick the color you want.
To change the border to a color that isn’t in the theme colors
-
Select the shape or text box.
-
On the Drawing Tools Format tab, click Shape Outline, and then click More Outline Colors.
-
In the Colors box, either click the color that you want on the Standard tab, or mix your own color on the Custom tab. Custom colors and colors on the Standard tab aren’t updated if you later change the document theme.
-

Tip: In PowerPoint, you can also change the border color by clicking Shape Outline (on the Home tab, in the Drawing group).
See Also
Remove or change the border on a text box or shape
Add a fill or effect to a shape
Change the font color (text color)
Change the background or color in Word
Change a message background in Outlook
Change the background color of your slides in PowerPoint
Insert WordArt
Add shapes
Need more help?
Want more options?
Explore subscription benefits, browse training courses, learn how to secure your device, and more.
Communities help you ask and answer questions, give feedback, and hear from experts with rich knowledge.
In the previous article, I showed you in detail how to draw shapes, transform shapes, move shapes, etc., in Word. If you have not read through part 1, you can review it here: Instructions for drawing shapes in Word: Part 1
And in this article, I will guide you through part 2 on how to format drawings, as well as how to write content and format content for drawings.
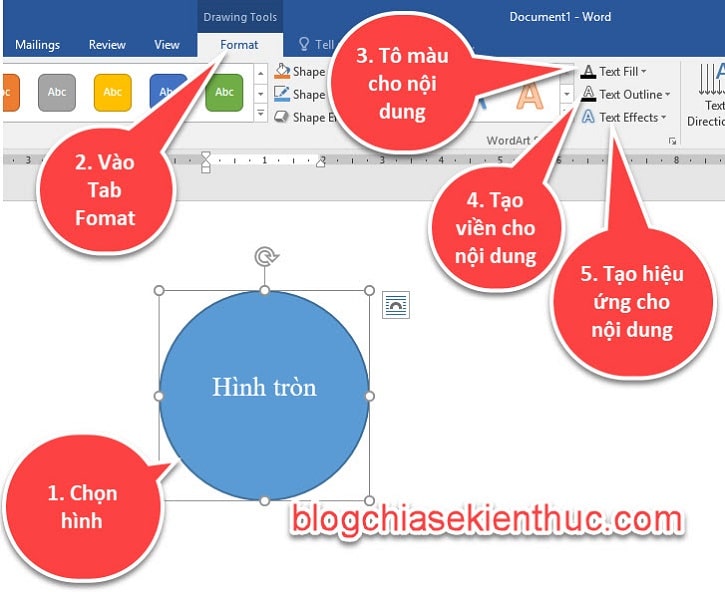
Attention: In the whole tutorial, if I say something in Tab Format then you can double click (left click twice on the object) it will go straight to Tab Format always for fast.
I. Format for drawings in Word
We can format the drawing by going to the tool group Shape Style. In this group we can change the color of the image, create a border for the image, an effect for the image, etc., and clouds.
Read more:
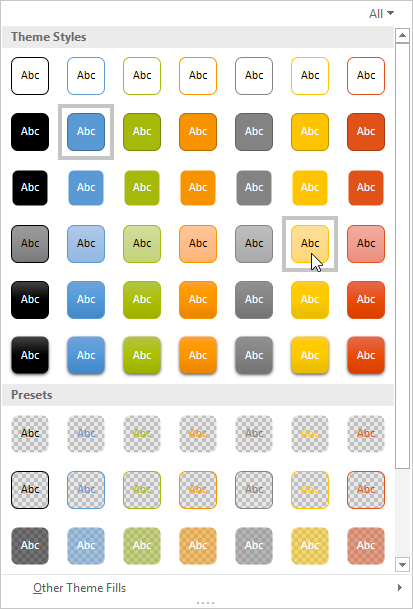
#first. Change the color, border of the drawing based on the available template
In Word, there are templates available such as shape colors and borders… you can choose which template you like to use.
Perform:
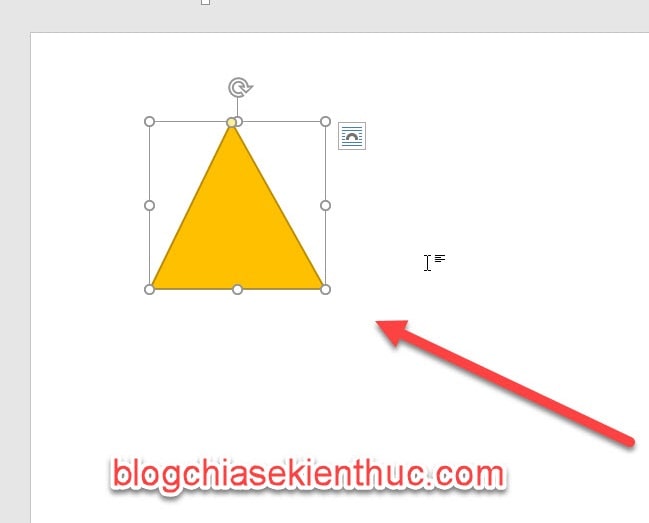
+ Step 1: Select the drawing you want to change.
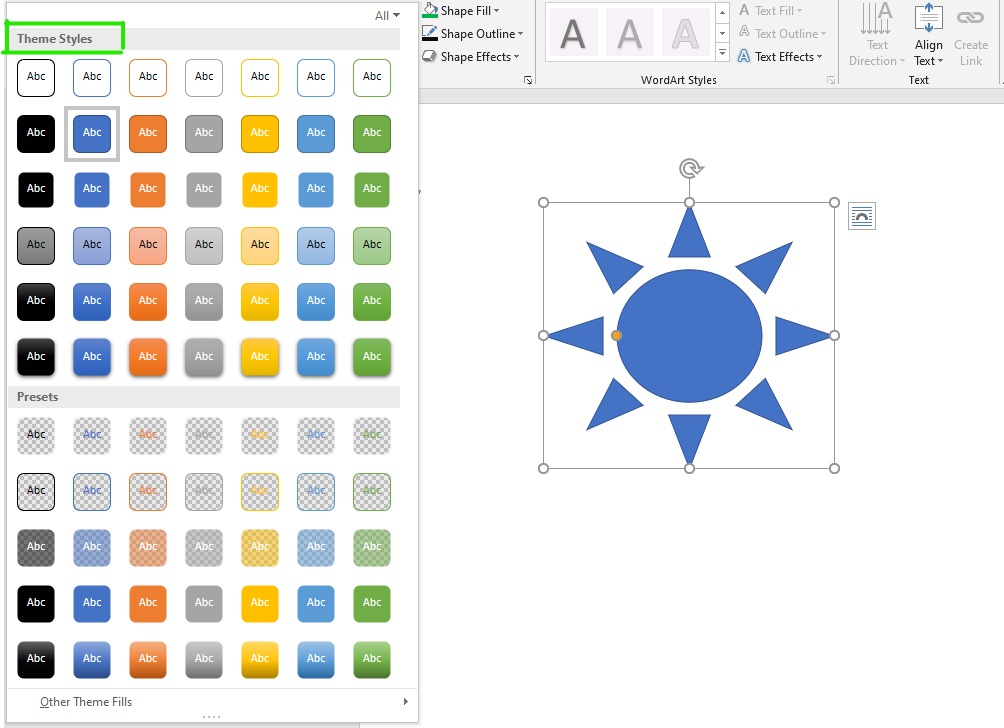
+ Step 2: On the tab Format, click the drop-down arrow in the group Shape Styles as shown below.

Result: The shape will appear in the style you selected.
#2. Paint the picture
You can also color the drawing you like by:
Perform:
+ Step 1: Select the image to color.
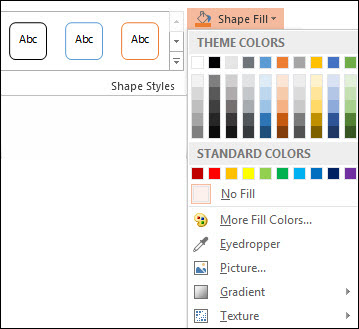
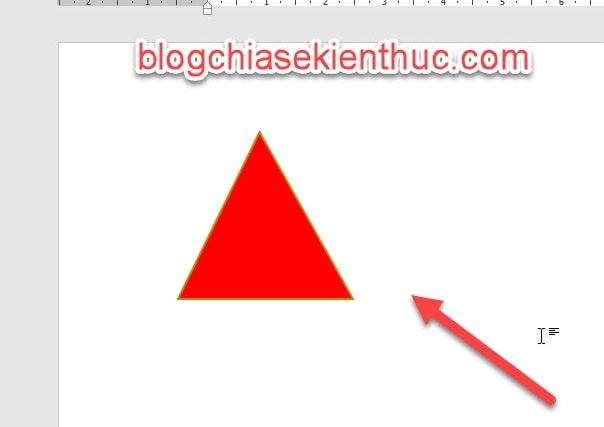
+ Step 2: On Tab Format, click the drop-down arrow under Shape Fill. Now the colors will appear => now you just have to choose the color you want.
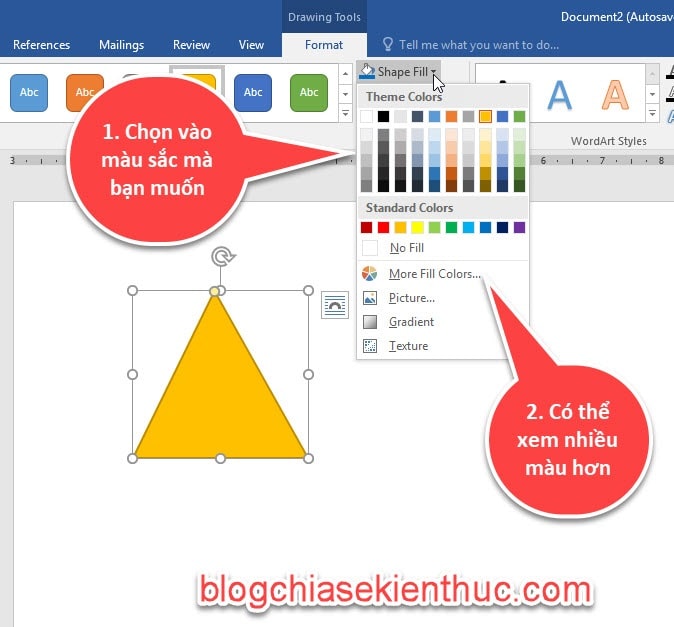
Result: The drawing will be filled with the color you selected.
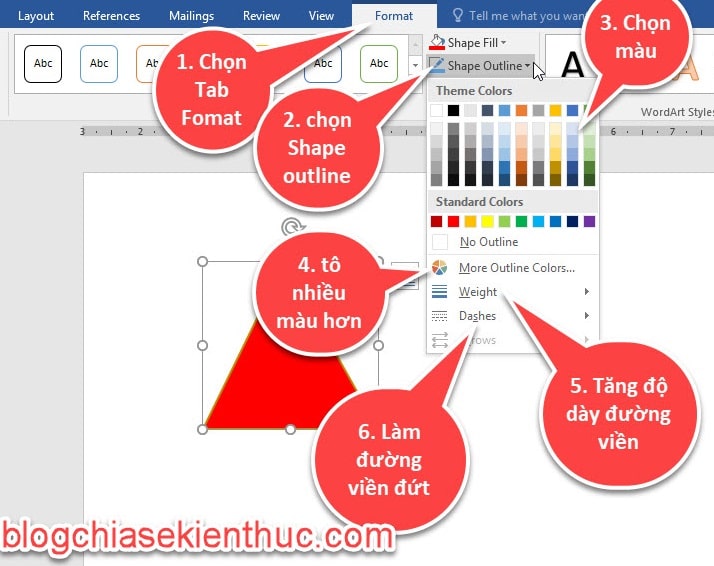
#3. Fill the outline for the picture
You can also outline a drawing, to make your drawing stand out by:
Perform:
+ Step 1: Select the image you want to change.
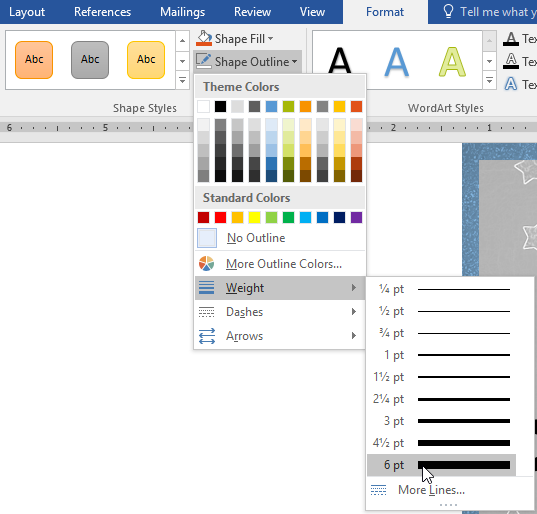
+ Step 2: On Tab Format, click the drop-down arrow of the section Shape Outline. The border colors appear => you choose the 1 color you like best to use.
If you want to paint in other colors, choose More Outline Colors… also adjust the bold border select Weight, selected dashed Dashes.
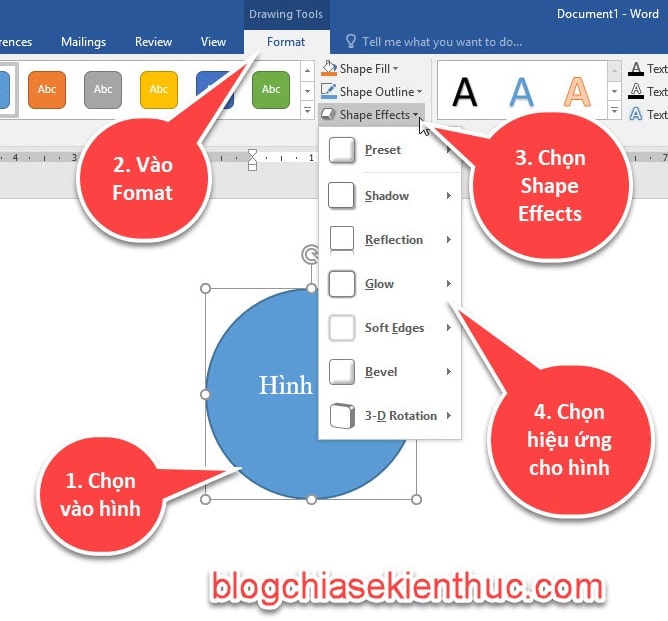
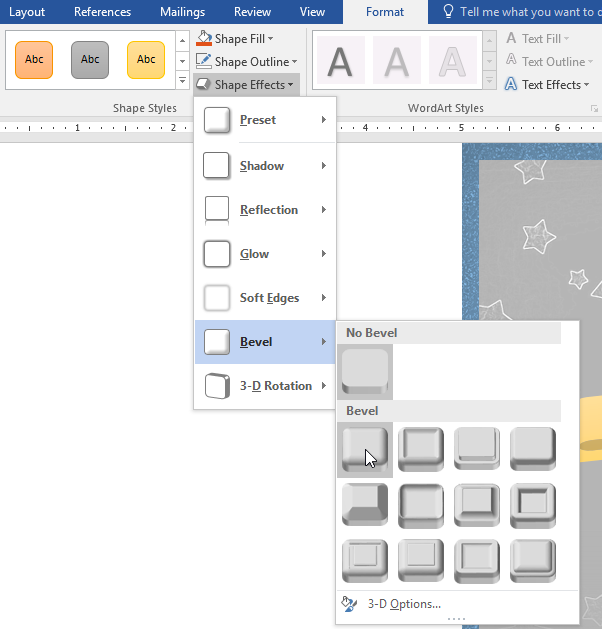
#4. Create effects for drawings
We can also animate the drawing by:
+ Step 1: Select the drawing.
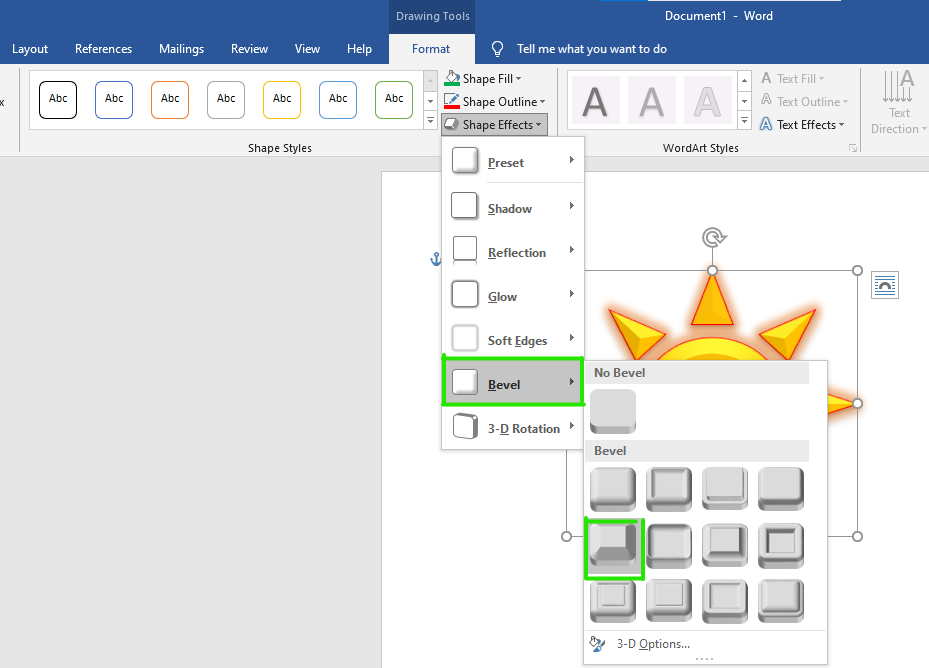
+ Step 2: Go to Tab Fomat => select Shape Effect => then select the effect you like. Here are effects like: Shadow (shaded), 3D (floating block)…
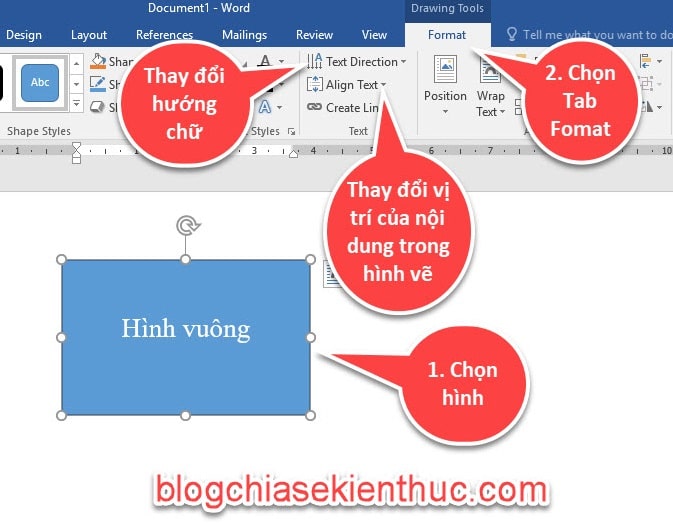
II. Add content to a drawing in Word
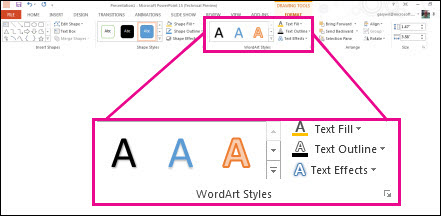
Write content for images to annotate for others to understand, and to make your drawings more vivid. In this section you will learn about the tool group WordArtStyles and Text Customize text effects, text positions ….
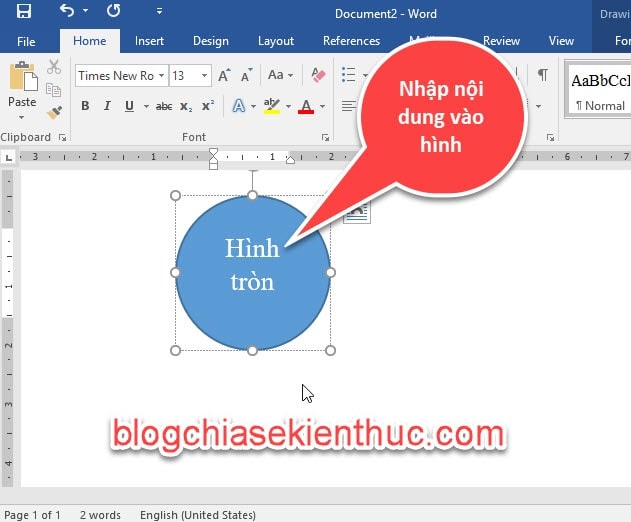
#first. Write content for the picture
Perform:
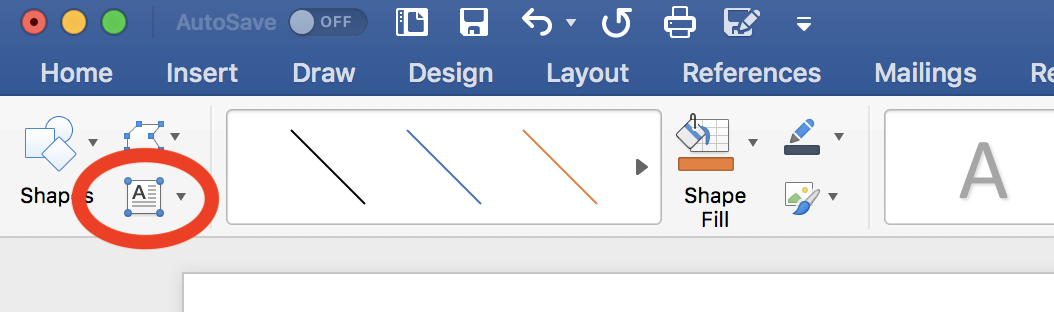
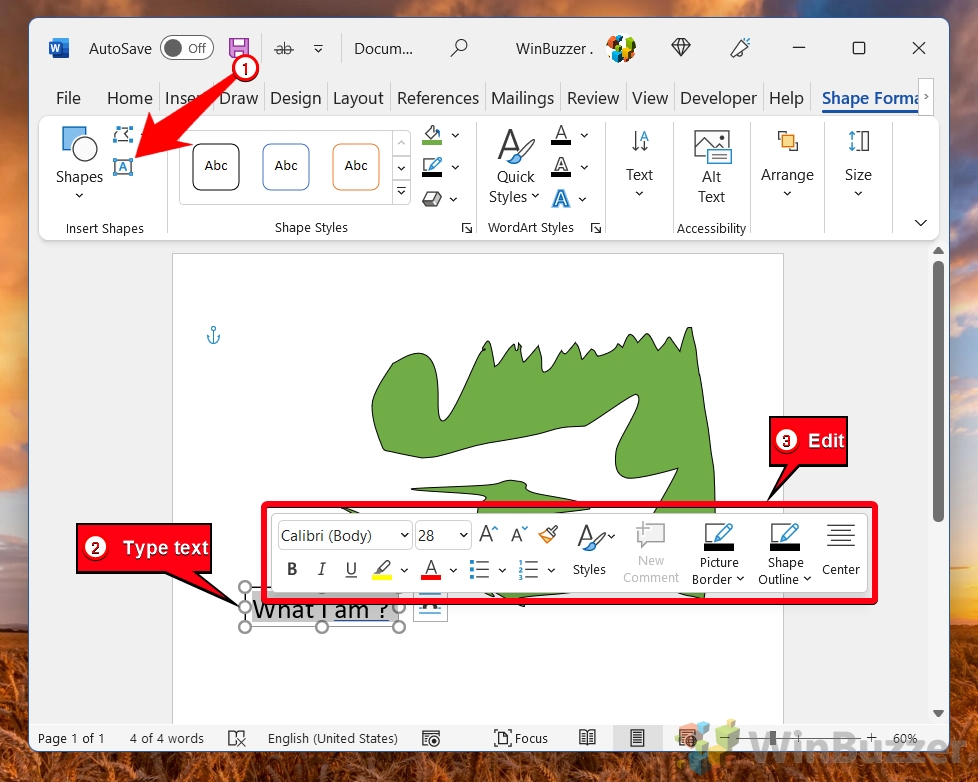
+ Step 1: Select the image you want to write content on => then right click => select Add Text.

+ Step 2: Enter text in the image.
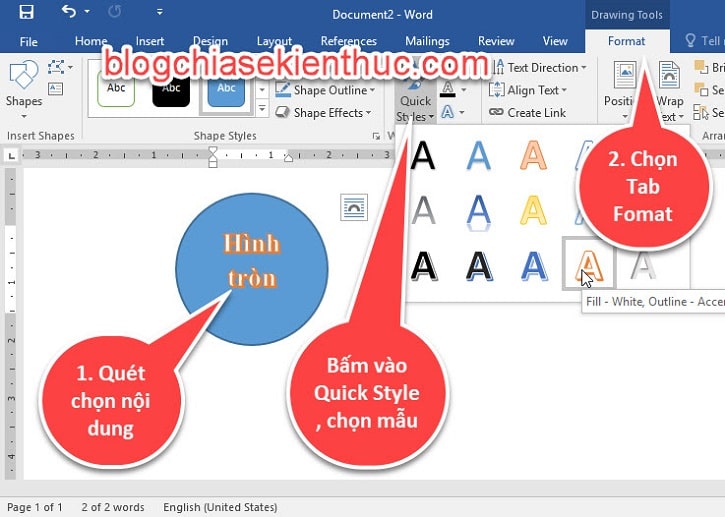
#2. Create content and border colors available in Word
In Word, there are already content types and borders available, if you find it appropriate, you can also choose to use it.
Perform:
+ Step 1: Select the drawing.
+ Step 2: Go to Tab Fomat => choose Quick Style => then select the template you like.
#3. Text color, border color, effects for content
Similar to image coloring, Word also supports text coloring, border coloring and effects for content. The method is similar to the picture.
#4. Change the location of the content
To change the position of the content, we will learn about the tool group Text, here you can change the text direction and display position of the content in the drawing.
III. Conclude
Yes ! So, in this article, I have guided you in quite detail How to format drawings in Word, such as: fill color, create borders, add effects.., as well as how to add content and format content in drawings.
In the next article, I will show you how to align drawing objects, grouping, ungrouping …. Please keep an eye on it.
Hope this article will be useful to you. Good luck !
CTV: Ngoc Cuong – techtipsnreview
The article achieved: 5/5 stars – (There are 3 reviews)
Note: Was this article helpful to you? Don’t forget to rate the article, like and share it with your friends and family!
Lesson 20: Shapes
/en/word2016/formatting-pictures/content/
Introduction
You can add a variety of shapes to your document, including arrows, callouts, squares, stars, and flowchart shapes. Want to set your name and address apart from the rest of your resume? Use a line. Need to create a diagram showing a timeline or process? Use flowchart shapes. While you may not need shapes in every document you create, they can add visual appeal and clarity.
Optional: Download our practice document.
Watch the video below to learn more about shapes in Word.
<span id=»selection-marker-1″ class=»redactor-selection-marker»></span>
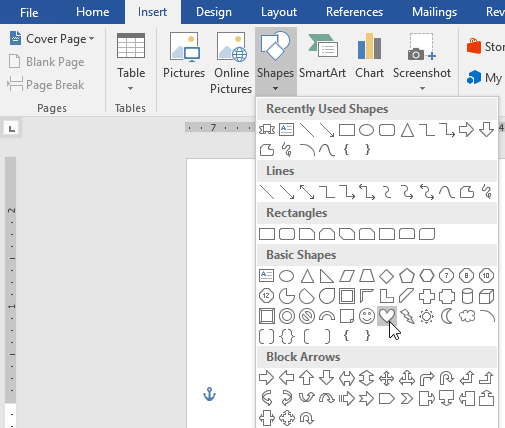
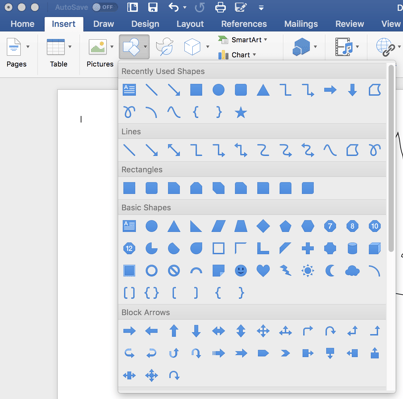
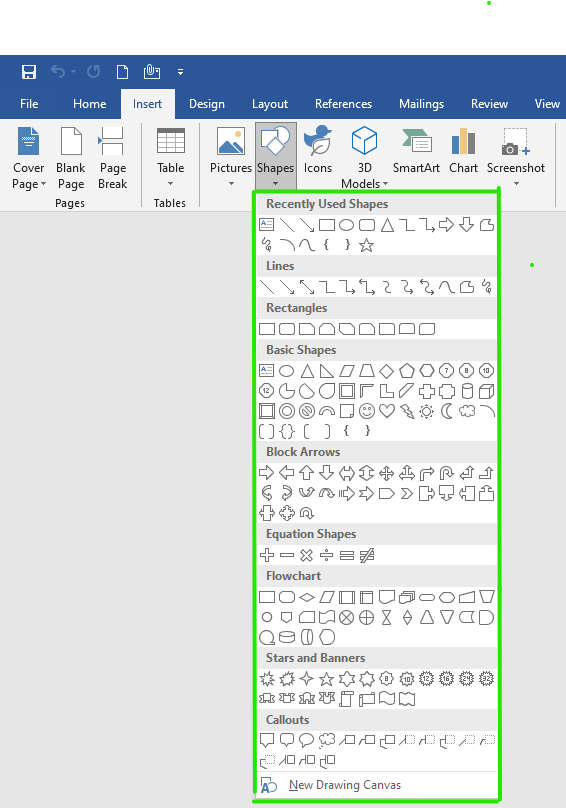
To insert a shape:
- Select the Insert tab, then click the Shapes command. A drop-down menu of shapes will appear.
- Select the desired shape.
- Click and drag in the desired location to add the shape to your document.
If you want, you can enter text in a shape. When the shape appears in your document, you can begin typing. You can then use the formatting options on the Home tab to change the font, font size, or color of the text.
To change the order of shapes:
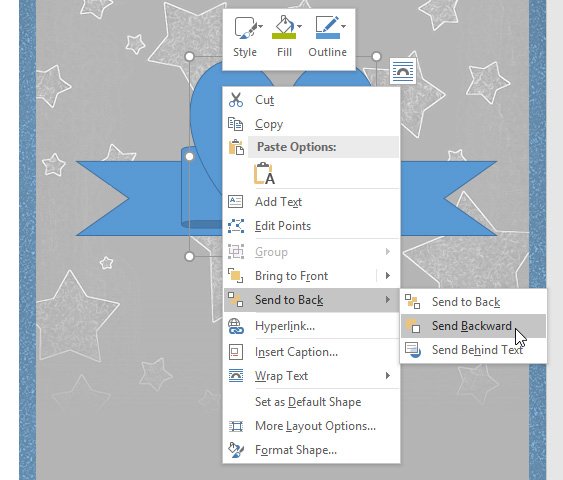
If one shape overlaps another, you may need to change the ordering so the correct shape appears in front. You can bring a shape to the front or send it to the back. If you have multiple images, you can use Bring to Front or Send to Back to fine tune the ordering. You can also move a shape in front of or behind text.
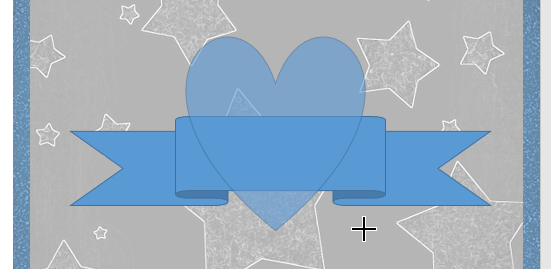
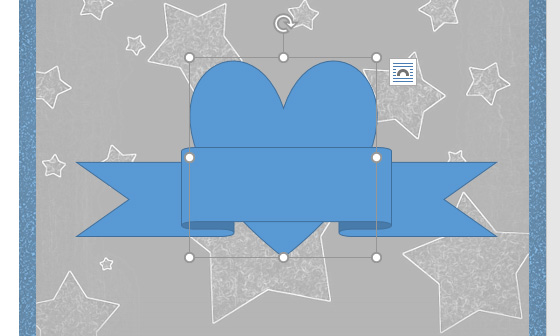
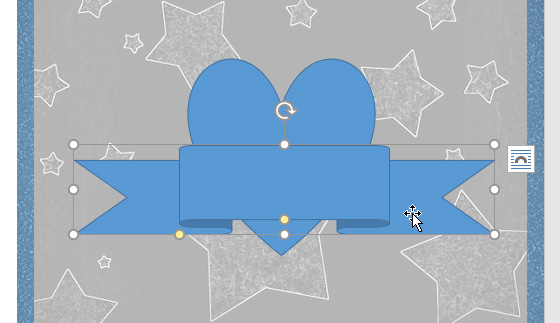
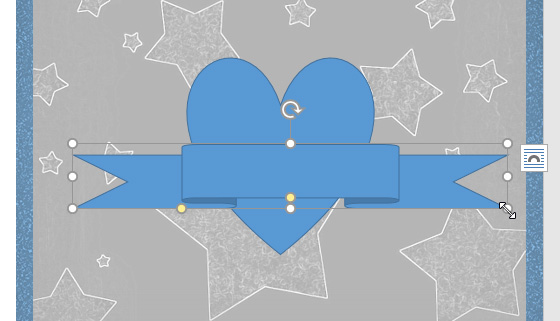
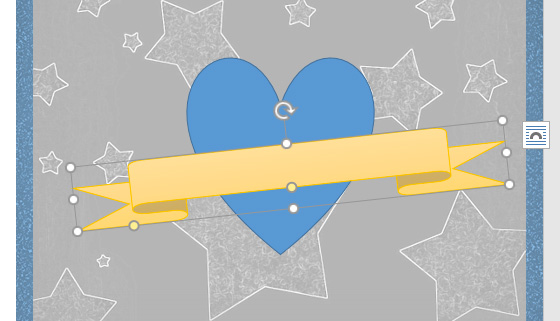
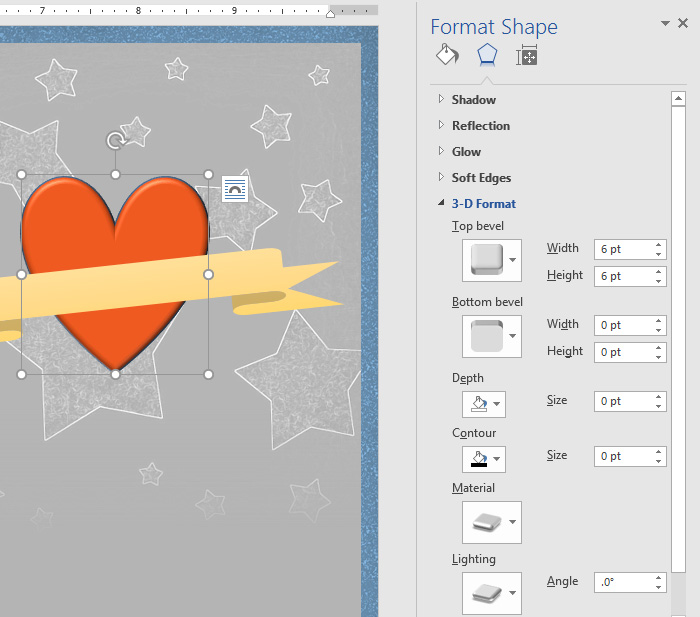
- Right-click the shape you want to move. In our example, we want the heart to appear behind the ribbon, so we’ll right-click the heart.
- In the menu that appears, hover over Bring to Front or Send to Back. Several ordering options will appear. Select the desired ordering option. In this example, we’ll choose Send to Back.
- The order of the shapes will change.

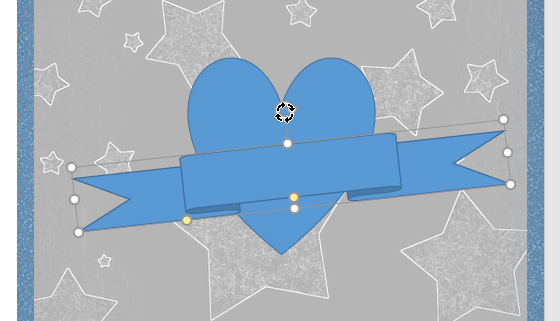
In some cases, the ordering option you select will not affect the ordering of the shapes. If this happens, try selecting the same option again or try a different option.
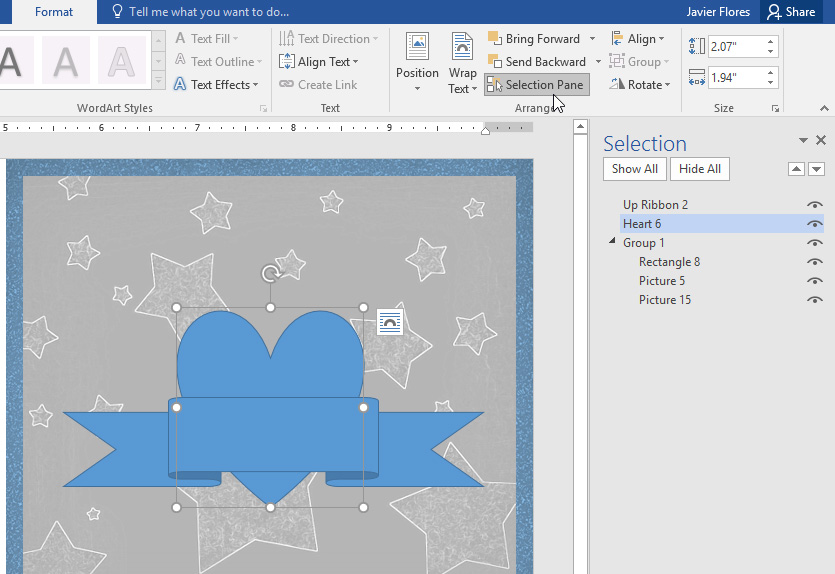
If you have several shapes placed on top of each other, it may be difficult to select an individual shape. The Selection pane allows you to select a shape and drag it to a new location. To access the Selection pane, click Selection Pane on the Format tab.
To resize a shape:
- Select the shape you want to resize. Sizing handles will appear on the corners and sides of the shape.
- Click and drag the sizing handles until the shape is the desired size. You can use the corner sizing handles to change the shape’s height and width at the same time.
- To rotate the shape, click and drag the rotation handle.
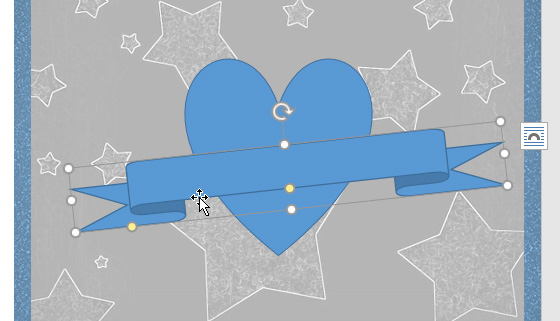
Some shapes also have one or more yellow handles that can be used to modify the shape. For example, with banner shapes you can adjust the position of the folds.

Modifying shapes
Word allows you to modify your shapes in a variety of ways so you can tailor them to your projects. You can change a shape into a different shape, format a shape’s style and color, and add various effects.
To change the shape style:
Choosing a shape style allows you to apply preset colors and effects to quickly change the appearance of your shape.
- Select the shape you want to change.
- On the Format tab, click the More drop-down arrow in the Shape Styles group.
- A drop-down menu of styles will appear. Select the style you want to use.
- The shape will appear in the selected style.

To change the shape fill color:
- Select the shape you want to change.
- On the Format tab, click the Shape Fill drop-down arrow. Select the color you want to use. To view more color options, select More Fill Colors.
- The shape will appear in the selected fill color.

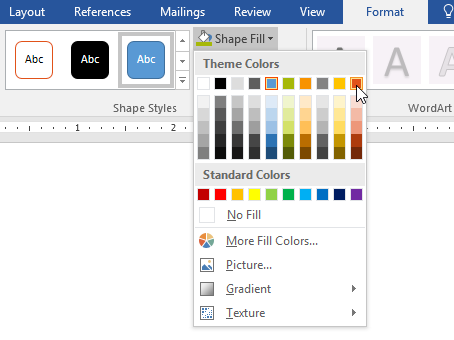

If you want to use a different type of fill, select Gradient or Texture from the drop-down menu. You can also select No Fill to make it transparent.
To change the shape outline:
- Select the shape you want to change.
- On the Format tab, click the Shape Outline drop-down arrow. The Shape Outline menu will appear.
- Select the color you want to use. If you want to make the outline transparent, select No Outline.
- The shape will appear in the selected outline color.

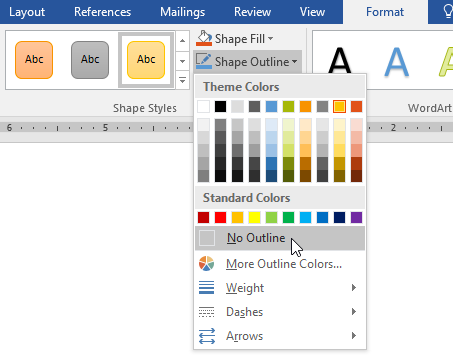

From the drop-down menu, you can change the outline color, weight (thickness), and whether it is a dashed line.
To add shape effects:
- Select the shape you want to change.
- On the Format tab, click the Shape Effects drop-down arrow. In the menu that appears, hover the mouse over the style of effect you want to add, then select the desired preset effect.
- The shape will appear with the selected effect.


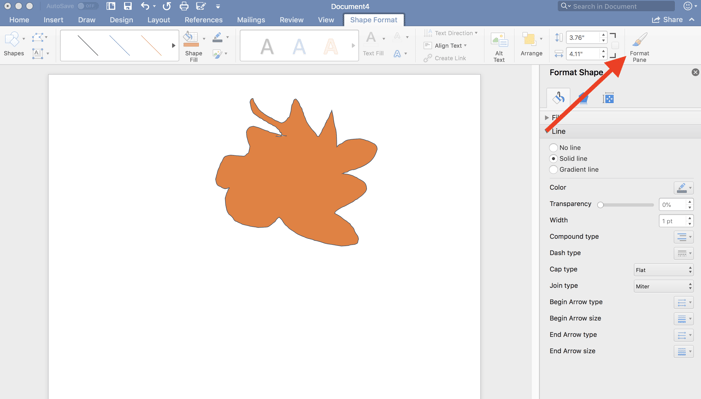
To further adjust your shape effects, select Options at the end of each menu. The Format Shape pane will appear, allowing you to customize the effects.
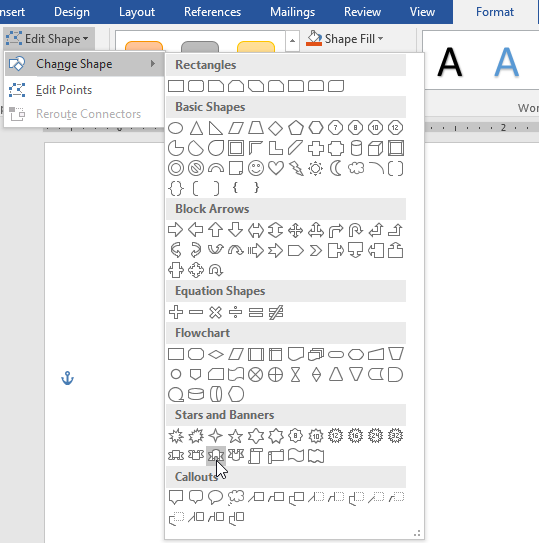
To change to a different shape:
- Select the shape you want to change. The Format tab will appear.
- On the Format tab, click the Edit Shape command. In the menu that appears, hover the mouse over Change Shape, then select the desired shape.
- The new shape will appear.


Challenge!
- Open our practice document.
- On the right side of the page, insert a cloud shape from the Basic shapes group. Hint: Shape names appear when you hover over them.
- Change the shape outline to gray.
- Change the shape fill to white.
- Under the Shape Effects drop-down menu, add a Round Bevel.
- On top of the cloud, insert a Sun shape from the Basic shapes group.
- Change the shape style to your choice of a Gold style. Hint: Style names appear when you hover over them. Make sure the style name has the word Gold in it.
- Send the sun shape backward so it is behind the cloud shape.
- If needed, move the cloud shape so the sun is peeking out from behind it.
- When you’re finished, your image should look something like this:

/en/word2016/text-boxes/content/
How to insert a shape in a Word document?
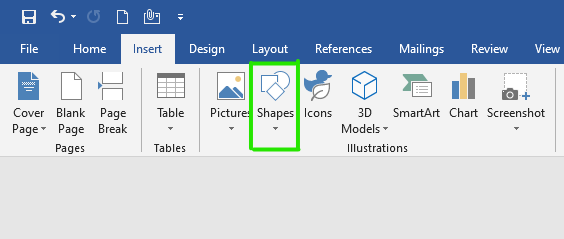
To insert a shape
- On the ribbon menu, under the tab Insert, within the group illustrations, click icon Shapes. A drop-down list appears with various shapes.
- Click a shape, the mouse cursor changes to a ‘+’ sign.
- Draw the shape in your document.
- Resize the shape by dragging the resize handles.
To add/remove fill color and outline color of a shape
- Select the shape in the document.
- Click tab Format under Drawing Tools.
- Within group Shape Styles, click icon Shape Fill and then
- Select a fill color from the palette.
- Click ‘No Fill’ to remove fill color.
- Within group Shape Styles, click Shape Outline, and then
- Select an outline color for the shape.
- Click ‘No Outline’ to remove the outline color of the shape.
How add text to a shape in Word
- Select a shape and right-click.
- From the right-click menu, select option Add Text.
How to change a shape?
- Select the shape in the document.
- Click tab Format under Drawing Tools from the ribbon menu.
- Within group Insert Shape, click Edit Shape.
- From the drop-down list, select option Edit Shape.
- Select a new shape.
How to group shapes in a document
- On the ribbon menu, under the tab Insert, within the group illustrations, click Shapes.
- Press and hold the keys CTRL or SHIFT or CTRL+SHIFT and click the shapes one by one.
- Right-click and click Group and the click Group from the sub menu.
How to rotate a shape
- Select the shape.
- Click tab Format under Drawing Tools from the ribbon menu.
- Within the group Arrange, click Rotate.
- From the drop-down menu, select any of the options or click ‘More Rotation Option’.
- In the Layout dialog box, under the tab Size, enter the angle of rotation.
- Click OK.
How to rotate text inside a shape
- Select text inside a shape.
- Click tab Format under Drawing Tools from the ribbon menu.
- Within the group Text, click Text Direction.
- Select an option from the drop-down list.
About me

About wordknowhowhttp://wordknowhow.comThis blog site was started to help people with Microsoft Word. I use Word a lot at work, and I understand that some features are difficult to use. There were no simplified instructions online to help me use these features. It is for this reason that this site exists; to make your life easier with Word.
Feel free to post your comments, queries, suggestions, etc. I will do my best to help you!
Sometimes, you can’t express yourself in words and numbers alone.
Sometimes, you need to express yourself through art. Luckily, Microsoft Word recognizes this need and gives users the option to draw on a document.
If you want a new way to showcase your ideas, give drawing a try! It’s easy, adds some flair to your document and might be a more effective way to communicate your thoughts.
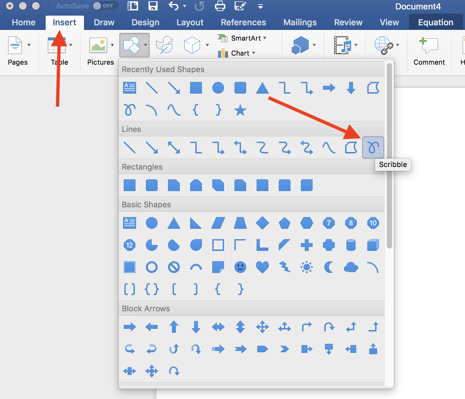
- In the ‘Insert tab,’ click the ‘Shapes’ button, and in the drop-down menu select ‘Scribble’
- Click and hold down your mouse to draw the shape you want
- Release the mouse when you’ve finished drawing
- Go to the ‘Shape Format’ tab to edit your shape

How to draw in Word
For all my visual learners in the house, follow along as I go through the drawing process step-by-step. I also include some formatting and editing tips and tricks to consider.
1. Click the ‘Shapes’ button and select ‘Scribble’
Open up your Microsoft Word document. It can be an empty document or it can be filled with an essay — you can draw over words if you want.
Navigate to the ‘Insert’ tab. From there, select ‘Shapes.’ A drop-down menu will appear. Under the ‘Lines’ options, select the very last button. It looks like a scribble and is aptly named ‘Scribble.’
2. Hold down your mouse to draw
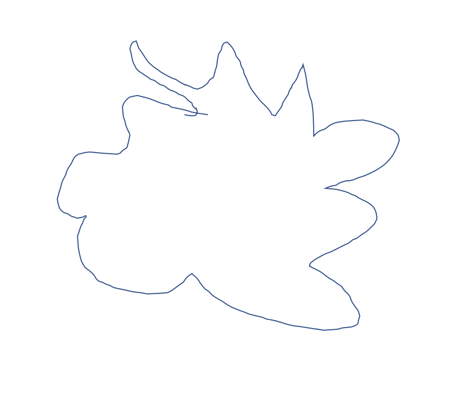
Click and hold down your mouse to draw. Admittedly, this isn’t the most intuitive thing in the world and your drawings probably won’t look like they do on paper. That’s okay, you do get a chance to tweak and sculpt your drawing later — as well as adjust the line coloring, width, fill color, and more.
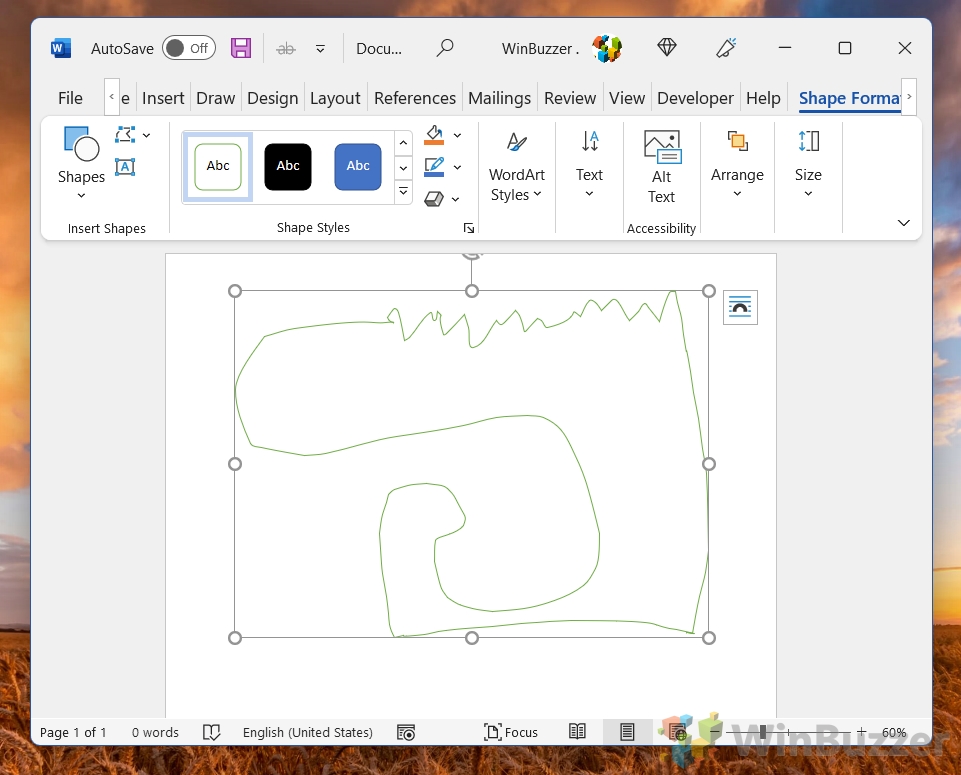
Here’s the strange shape I chose to draw (don’t ask me what it is):
3. Release the mouse
As soon as you release your mouse, the drawing will be finished. You’ll no longer be able to continue drawing, like you would if it were pen and paper.
If you released the mouse too early, you can delete the shape and start over. If you want to add another shape to complement the one you just drew, go ahead and click the ‘Scribble’ button and go through the drawing process once more.
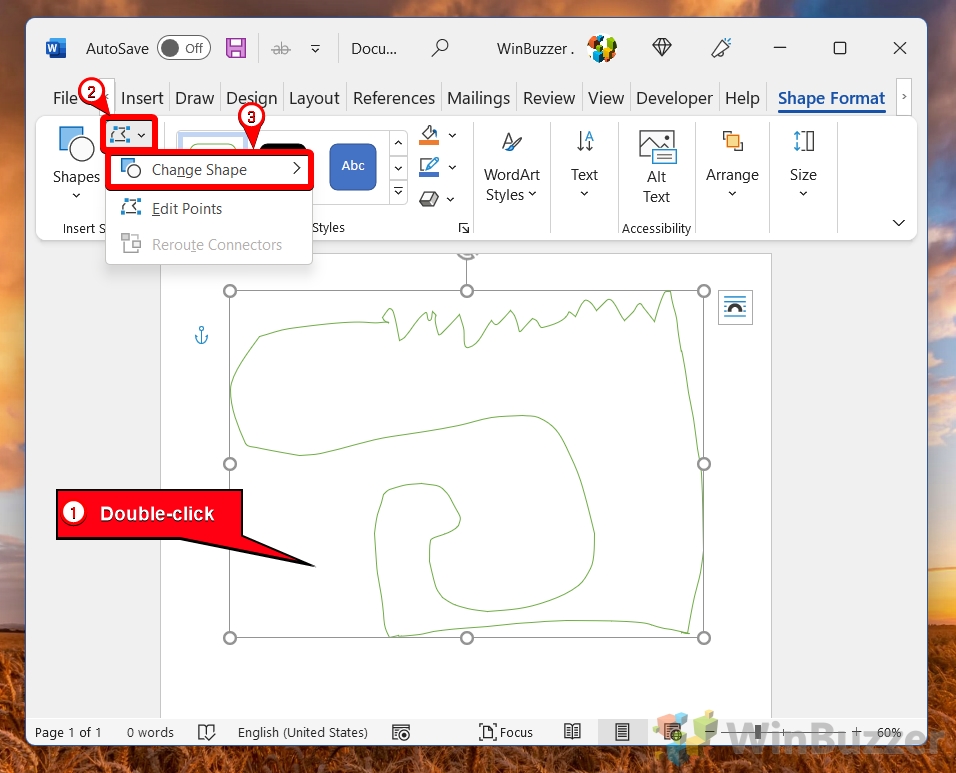
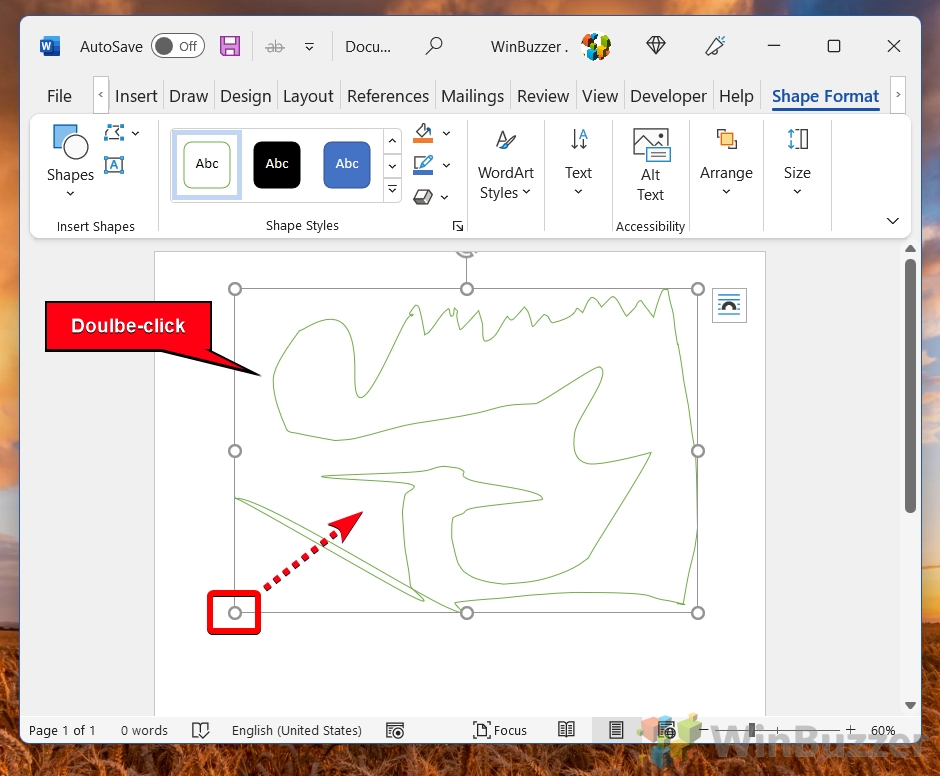
If you have the basic idea of the drawing done but it’s not exactly what you wanted, you can tweak the lines a bit. Double-click on the drawing. Click on the small ‘Edit Shape’ button in the top left corner. Then, select ‘Edit Points.’

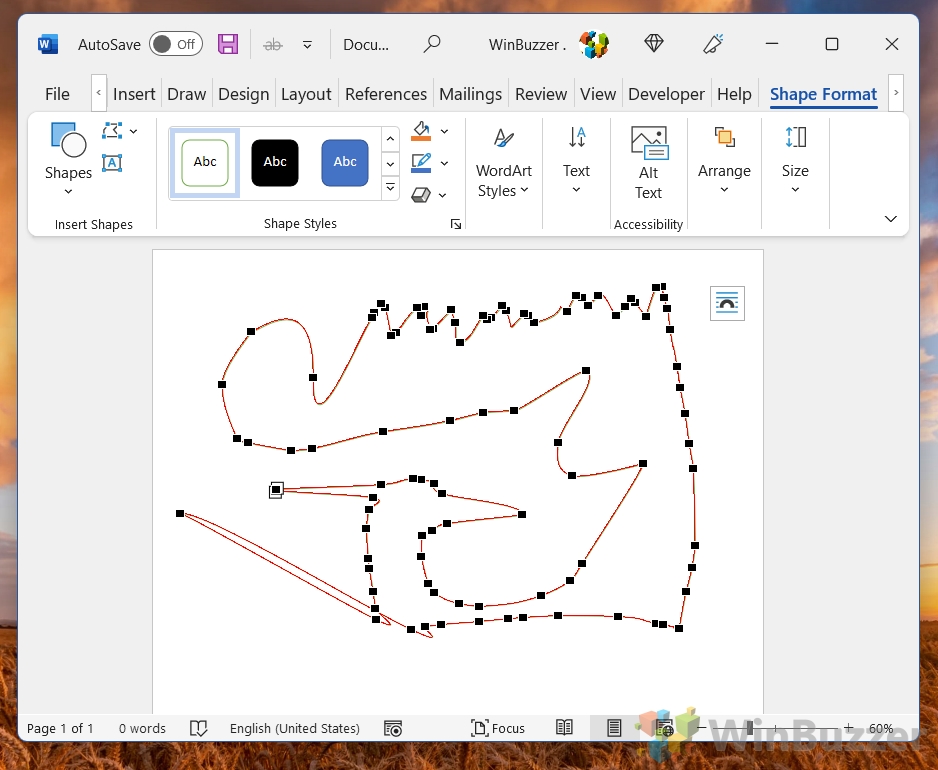
A bunch of, you guessed it, points will appear on your drawing. Dragging a point out, in, or sideways effectively drags the line of the drawing with it. When you click off of the point, the drawing will be altered accordingly.
4. Edit your drawing
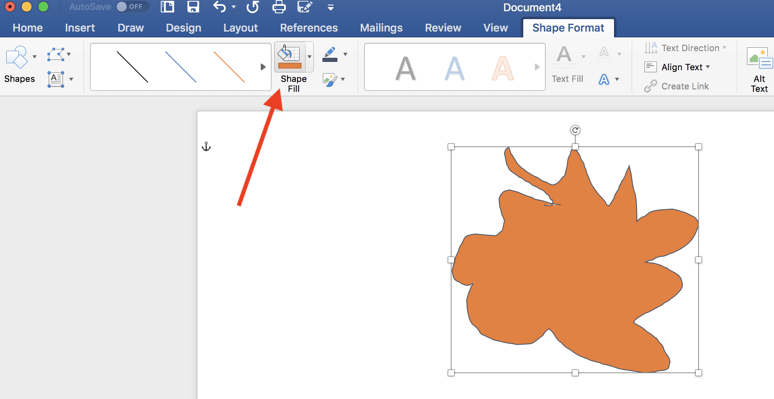
Double-click your drawing. A new tab will appear in the menu banner called ‘Shape Format.’ Now you can resize your shape by dragging the corners of the box around it. You can use the ‘Shape Fill’ button to add color inside your shape.
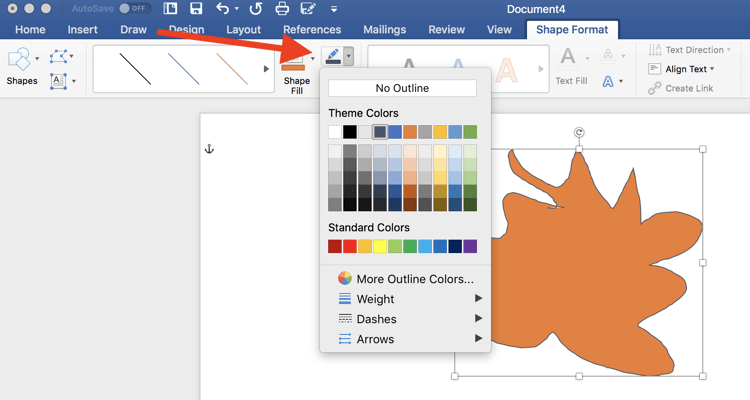
You can change the color of the outline by clicking the pencil button, located next to the ‘Shape Fill’ button. You can also choose to have ‘No Outline’ if you want.
Another way to make your drawing stand out is by adding text to it. Click on the ‘Draw a Text Box’ icon located next to the ‘Shapes’ button.
Drag your mouse over where you want the text box to live inside your shape. You can play with all the text editing options and include hanging indents, if you want.
To unlock more editing options, select the ‘Format Pane’ on the far right. This will open a sidebar where you can edit the line type of the outline, play with color effects for the fill color, and more!
Once you’ve manipulated your shape into a final product that you’re happy with, go ahead and ‘Save As.’ Now you’re ready to share your creativity with the world!

Other things to know about drawing in Word
It will be very difficult for you to draw straight lines in Word. That’s simply due to the impossibility of dragging a mouse precisely. If that’s frustrating you to no end, there are work arounds.
How to draw a line in Word
If you want to have a very straight line, maybe the ‘Scribble’ tool is not the right one for you. Go back to the ‘Shapes’ drop-down menu under the ‘Insert’ tab and go through the different line options available to you. Select what’s best for your vision and go from there!
You’ll also notice that Word offers a variety of pre-made shapes to choose from. If you’re struggling to draw a star that doesn’t look like a sad blob, maybe try select the pre-made star shape. You can still play with the coloring, size, lines and more.
TIP: If you are dead-set on drawing freehand but Word isn’t working out for you, try drawing in Microsoft Paint. You can always insert that image into Word later on.
Want to put your artistry to the test in other ways? Discover how to make a brochure in Word.

Holly is the director of content marketing at G2. An avid reader and writer, Holly graduated from the University of Missouri with a dual major in Journalism and English. She firmly believes in the power of content and is constantly seeking ways to better engage and delight readers.

Contents
- 1 How to Draw in Word with the Shapes Tool
- 2 How to Draw on a Word Document with the Microsoft Word Drawing Tool
- 3 Extra: How to Draw on Google Docs
- 4 Extra: How to Annotate Screenshots with Snip and Sketch
The instances where you’d want to draw in Word in a professional environment are slim, but that doesn’t mean you shouldn’t do it.
Drawings can add some extra flavor to your documents while remaining suitable for certain audiences. We’re going to show you how to draw on Word documents using two tools: the freehand tool and the shapes tool.
Drawings in Word
The Shapes tool lets you create illustrations using a variety of preset shapes or its line tool. It’s best suited for those using a keyboard and mouse, as it allows you to get passable drawings without having a steady hand.
Freehand drawing in Word is primarily designed for those with touchscreens or tablets. It forgoes shapes for a series of more traditional pens and markers. You can choose whichever of these suits you and follow along below:
Drawing with the shapes tool doesn’t produce the best results, but it’ll definitely do in a pinch. You can even use the freeform: scribble tool to draw any shape you want. Here’s how to use it:
- Open the “Insert” tab of your ribbon and click “Illustrations > Shapes > Freeform: scribble”

- Click and drag on your canvas to draw

- Modify your drawing by double-clicking it and pressing “Edit points icon > Change shape”

- Move the points around to edit your drawing
Click away when you’re done to apply the changes.

- Double-click the shape and drag a corner or other anchor point to resize it
Step description

- With the shape selected, press the paint bucket and choose a color to fill it in

- Click the pencil icon to choose a stroke color

- Click the “A” in a box on the left to add text and use the pop-up menu to adjust its formatting

- Click the “WordArt Styles” link in the ribbon and add gradients, shadows, and textures
Once you’re done, you can right-click it and press “Save as Picture…” to save it as a shareable image file.


How to Draw on a Word Document with the Microsoft Word Drawing Tool
The Microsoft Word drawing tool uses the Microsoft Ink engine for a very competent drawing and annotation experience. It supports advanced features like pressure sensitivity and allows you to choose between a variety of pen/pencil textures for your brush. Here’s how you use it:
- Open the “Draw” tab of the ribbon and click on the pen tool
Click and drag with your cursor, finger, or tablet pen to draw.

- Add some color via the colored pen icon
Technically, you can change the color of the regular pen, but having a separate tool helps you to quickly switch between different colors and thicknesses.
- Press the down arrow on the colored pen to modify color and thickness

- Press one of the images to use it as a pen texture

- Use the highlighter pen for a square brush

- Press the eraser icon and use it to clean up your image
You can just click and drag over lines with this tool to remove them.

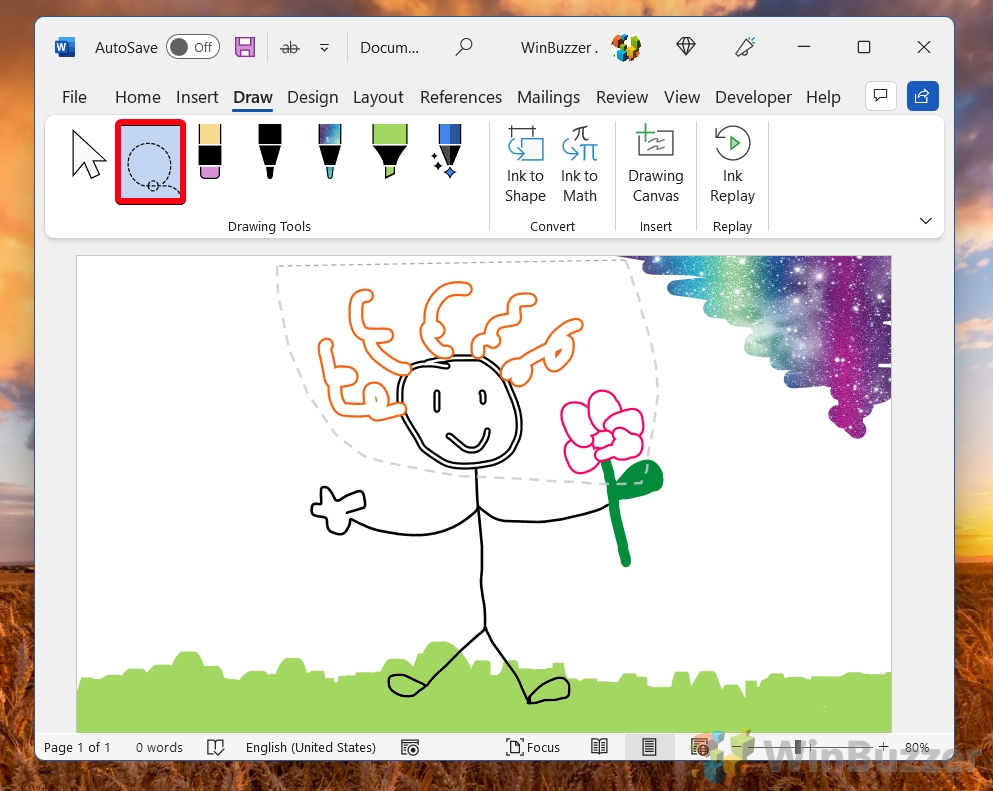
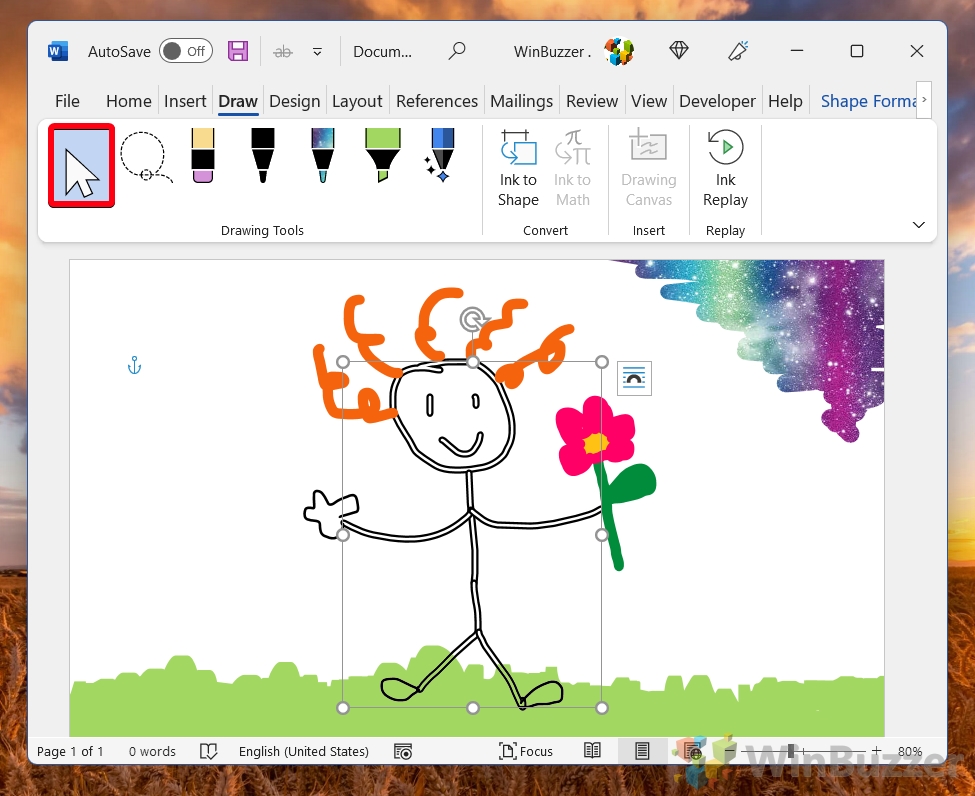
- Select shapes by clicking the lasso tool and dragging around them

- Click and drag with the cursor tool to move your lines

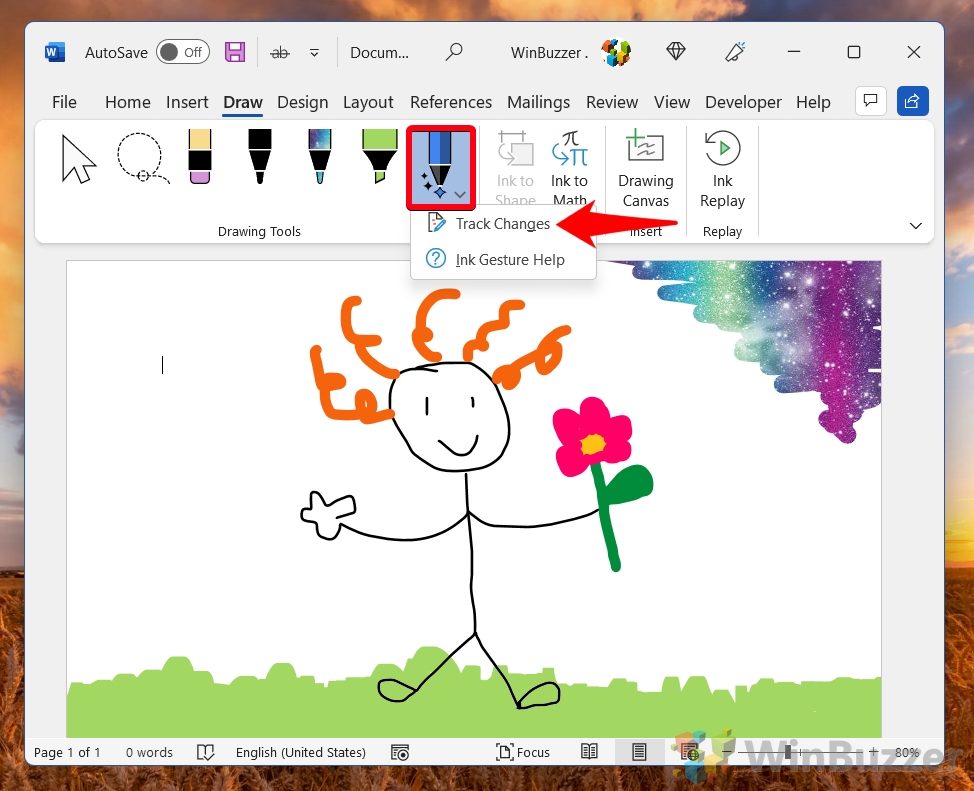
- Click on the action pen and choose “Track Changes”

- Annotate on text with typical editing marks to modify it

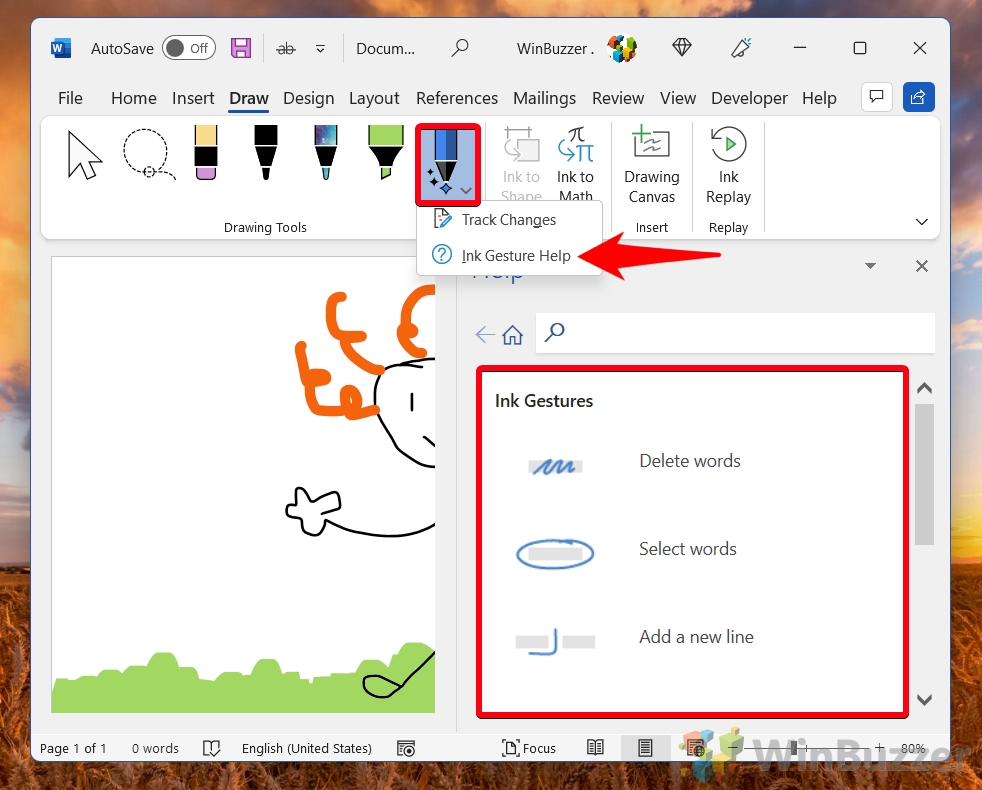
- For editing mark tips, click the action pen and press “Ink Gesture Help”


If you prefer to use Google’s text editing tools, drawing gets a bit less intuitive, but it’s still entirely possible. Here’s our existing guide on how to draw on Google Docs.

Extra: How to Annotate Screenshots with Snip and Sketch
You can also take a screenshot and annotate on it directly using Microsoft’s Snip and Sketch tool. Here’s our tutorial on the matter.

With Microsoft Word drawings, users are able to convey complex concepts through illustrations. Whether you are an artist or not, Word’s drawing features are quite simple to use, making it easy for users to add intriguing visuals to supplement the text in your Word document. You have the option to choose between two types of drawing tools: pen tools (optimal for text markup) and shapes (optimal for simple drawings).
In this step-by-step guide, you will learn about these two different approaches to drawing in Word.
- How to draw in Word using shapes
- How to draw in Word using pen tools
How to draw in Word using shapes
1. Use lines to draw on a Word document
- Open your Word document. Place your cursor where you would like to start your Word drawing and click.
- Click the “Insert” tab, then select the down caret on the “Shapes” button to open shape options.
![]()
Click the “Insert” tab, then select the down caret on the “Shapes” button. Source: All screenshots taken are from author’s account.
- Hover over the icons in the drop down menu to reveal their labels. Then, from the “Lines” section of the “Shapes” drop down menu, select either the second to last (freeform) icon or the last (scribble) icon.
- Click the Word document to place either the freeform or scribble, and begin drawing.

Select “Freeform” or “Scribble” from the “Lines” section of the “Shapes” menu. Source: Screenshot
- Once the shape is placed, locate the “Shape Format” bar for additional shape formatting options.

Navigate to the “Shape Format” bar for more shape options. Source: Screenshot
2. Adjust shape and outline fill to customize drawing color
To change the fill color of a shape, click the “Shape Fill” button. Select no fill, a standard color, a theme color, or a custom color to fill in your Word drawing. You may also choose a gradient fill, texture fill, or a picture.

Use the “Shape Fill” panel to customize the color of drawings. Source: Screenshot
3. Use shape effects to customize drawing appearance
Click the 3D box icon underneath the “Shape Effect” panel to apply dimension to your drawing. Select your drawing, and then click your desired shape effect to apply the effect.

Use the “Shape Effect” panel to customize the look of your drawing. Source: Screenshot
4. Adjust your drawing by editing points
Select the “Edit Shape” button, and click “Edit Points”. Use your cursor to manually adjust the placement of pixels on your drawing.

Select the “Edit Shape” button then click “Edit Points.” Source: Screenshot
How to draw in Word using pen tools
You may notice that drawing with shapes in Word can be difficult, especially when attempting to mark up a document. In situations like this, make use of the pen tools in Microsoft Word to create art instead of drawing with shapes. Pen tools offer a variety of digital pens, highlighters, and pencils for illustrations such as document markups that require a more delicate brush stroke.
- Click on the “Draw” tab to open the pen tools.

Select the “Draw” tab to access pen tools. Source: Screenshot
- Right click any of the pen icons, then click “Modify Tool” to modify pen tool settings.
![]()
Right click the pen icon, then select “Modify Tool”. Source: Screenshot
- Change the size, color, and effect of the pen tool by clicking any of the given options.

Change the size, color, and effect of the pen tool using the “Modify Tools” panel. Source: Screenshot
- Click the green “+” icon to select the desired drawing tool. Pick from a pen, highlighter, or pencil tool.

Click the green “+” button to add a new drawing tool. Source: Screenshot
Adjust your drawing using the eraser tool
Under the “Draw” tab, click the eraser tool. Select your desired eraser size from the drop down menu, then drag the eraser over the drawing you would like to remove.

Select an eraser from the drop down menu. Source: Screenshot
Benefits of drawing in Word
When creating lengthy reports, including visuals helps keep your audience engaged with the material you are presenting. With Microsoft Word, creators no longer need to use multiple forms of software to create stimulating illustrations to help convey complex information.
Word offers drawing features that allow users to create freeform drawings, use shapes to create complex illustrations, and even scribble directly on the Word document itself.
For tablet users, instead of using your mouse to draw in Word, you can use your finger as a cursor to form shapes or guide the pen tool to create captivating illustrations, which is optimal for on-the-go document creation.
Next steps
The scribble tool can be difficult when using Microsoft Word to draw on a desktop. Thankfully, Word offers a variety of premade shapes that can be utilized to create illustrations.
For additional information regarding software that aids in document creation, take a look at document generation software.
Call them “doodles,” “sketchnotes,” or “visual notetaking.” Whatever the name, simple hand drawings have become more popular than ever. They’re as welcome in the classroom as they are in the boardroom.


Why? Maybe it’s because they’re quick to create. You don’t have to be an artist to draw stick figures. Yet they communicate everything from how viruses replicate to how a manufacturing supply chain works. They’re a good and unique way to enhance your Word documents.
Hand drawings also allow you to express your personality and stand out from your competition. And because you’re creating your own drawings, you don’t have to worry about using copyrighted materials.


Freeform Word drawings also help you better understand and assimilate the concepts you’re trying to convey. That’s because you’re forced to simplify the concepts and come up with visual metaphors for them.
You may be wondering «How do I draw on Microsoft Word?» While Word might not be the first drawing tool that comes to mind, there are drawing tools in Word that you can learn to use.
This article shows you, step-by-step, how to draw in Word so that you, too, can harness the power of simplified drawings in your projects. As you’ll see, you don’t have to be a professional artist or to use expensive tools and software because you can draw right within Word.
Let’s get started!
(Note: In the examples below, I’m using Microsoft Word for Mac version 16. If you’re using a different version, then the interface may be different.)
How to Draw in Word: Freehand With the Shapes Freeform Tool
There are several ways for you to draw by hand on your Word document. These include the Freeform and Scribble tools in the Shape tab. Both these two tools are very similar because they let you draw in Word using your mouse or trackpad.
1. Use the Freeform or Scribble Tool
You can draw objects and handwritten lines with either one. One difference is that the Freeform tool lets you draw perfectly straight lines, while the Scribble tool draws exactly what you draw.
To draw with Freeform, click on the Insert tab.


Click Shapes > Freeform.


To draw, click, hold, and drag the cursor on the page. Word stops drawing when you either bring the cursor back to your point of origin or double-click on the page. In this example, I’ll draw a check mark.


To draw perfectly straight lines with the Freeform tool, click on your starting point. Then, release the mouse, move the cursor to the end of the line, click there, and repeat until you finish your drawing. Double-click at your end-point. Using this technique, my check mark looks like this:


Notice that the lines are perfectly straight, even though my hands were unsteady. That’s because the Freeform tool draws straight lines between two consecutive points where you click on your mouse.
Don’t worry that the text runs straight through the drawing. We can fix this with text wrap because Word treats the drawing as an image.
2. Format the Text Wrapping Around Your Drawing
Click on the Shape Format tab. Then click Arrange > Wrap Text. Select one of the text wrapping options. In this case, let’s select Square.


Now the text wraps around the drawing.


Microsoft Word also lets you wrap text around an irregularly shaped drawing. Go to Shape Format > Arrange > Wrap Text > Edit Wrap Boundary.


Click and drag the boundary points to change the boundary.


By doing this, you’ve got more granular control over how text wraps around your drawing.


3. Refine Your Drawing
Refine the drawing you’ve made. Click on your drawing to select it. Under the Shape Format tab, click Edit Shape > Edit Points.


Click and drag any of the points to change the drawing as you wish.
.jpeg)
.jpeg)
.jpeg)
You can also use the Shape Format tab to edit other aspects of your drawing. Change its color, weight, and in the case of closed shapes, add a filling color.
To change the look of your drawing, from the Shape Format tab, expand the Theme Styles and Presets selection. Choose one of the styles you want to use.


You’ll have more choices by going to Shape Outline. From there, select a color.
To change the weight or thickness of your drawing, go to Shape Format > Shape Outline > Weight.


You can also apply special effects to your drawing. On the Shape Format tab, go to Shape Effects, then choose the effect you want to apply.
-A.jpeg)
-A.jpeg)
-A.jpeg)
Here’s the check mark now, after I added a shadow.


How to Draw in Word: Using the Scribble Tool
The Scribble tool is like the Freeform tool. The only difference I’ve seen is that the Scribble tool doesn’t draw straight lines between clicks. To draw, you’ve got to click, hold, and drag the mouse. If you release the mouse button, Word will stop drawing.
To draw using the Scribble tool, click Insert > Shapes > Scribble.


Click, hold, and drag the mouse to draw the shape. If you bring the cursor back to your point of origin, Word closes and fills the shape. In this case, let’s draw a cloud.


Now the drawing can be edited by using the tools in the Shape Format ribbon.
1. Change the Fill Color of Your Drawing
For example, to change the fill color, click on the drawing then on the Shape Fill button. Choose the color you wish to use.


2. Change the Outline Color of Your Drawing in Word
To change the shape’s outline color, click on the drawing, click Shape Outline, then choose the outline color or style you desire.


For this example, I selected No Outline.


3. Fill Your Drawing with a Picture
You could even fill the drawing with an image. Go to Shape Fill > Picture.


Find the image in your computer. Select the image file, then click Insert.


The resulting shape is pretty neat!


Follow the steps described earlier to change the text wrapping around your drawing, as well as its other attributes.
How to Draw With Microsoft Word Pen Tools
Either Freeform or Scribble are adequate tools for creating simple Word drawings that have only a single element, such as a single line or shape.
But what if you want to draw something slightly more complicated, such as a stick figure? It’s made up of a circle for the head and several lines for the arms, body, and legs.
1. Draw With the Microsoft Word Pen
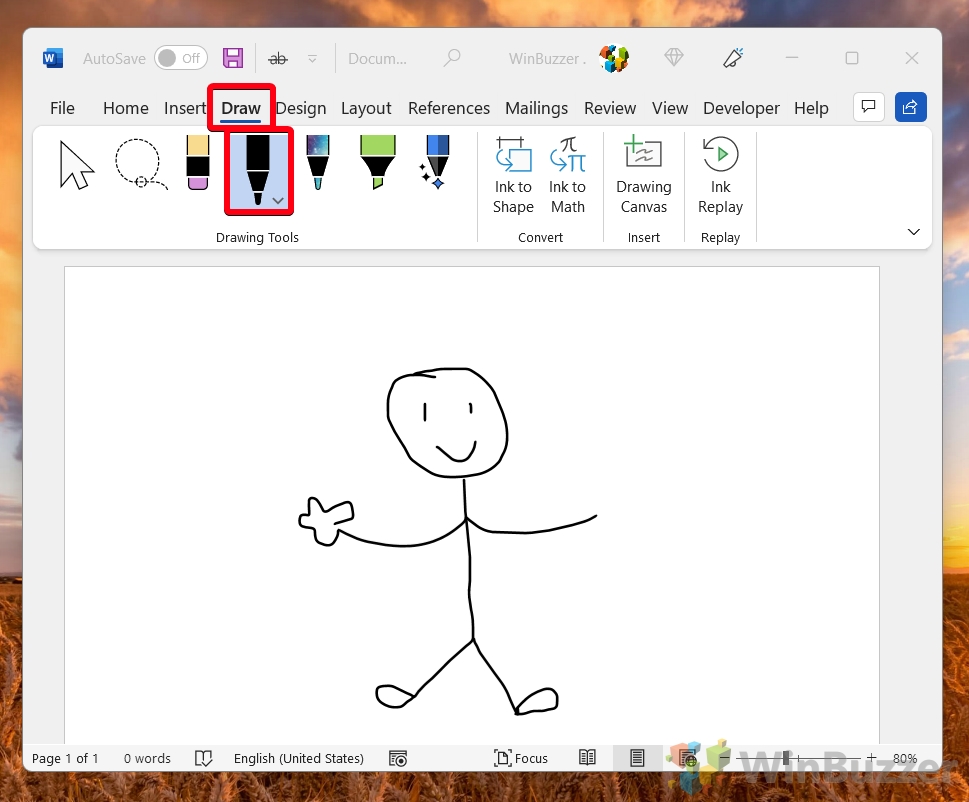
In this case, it would be better to use Word’s Draw tools. To access them, click on the Draw tab.


As you can see, the Draw tab gives you some ink types:
- Pen
- Pencil
- Highlighter
Each ink type gives your drawing a different look. To select an ink, click the Draw button on the ribbon, and select either a Pen, Pencil, or Highlighter.
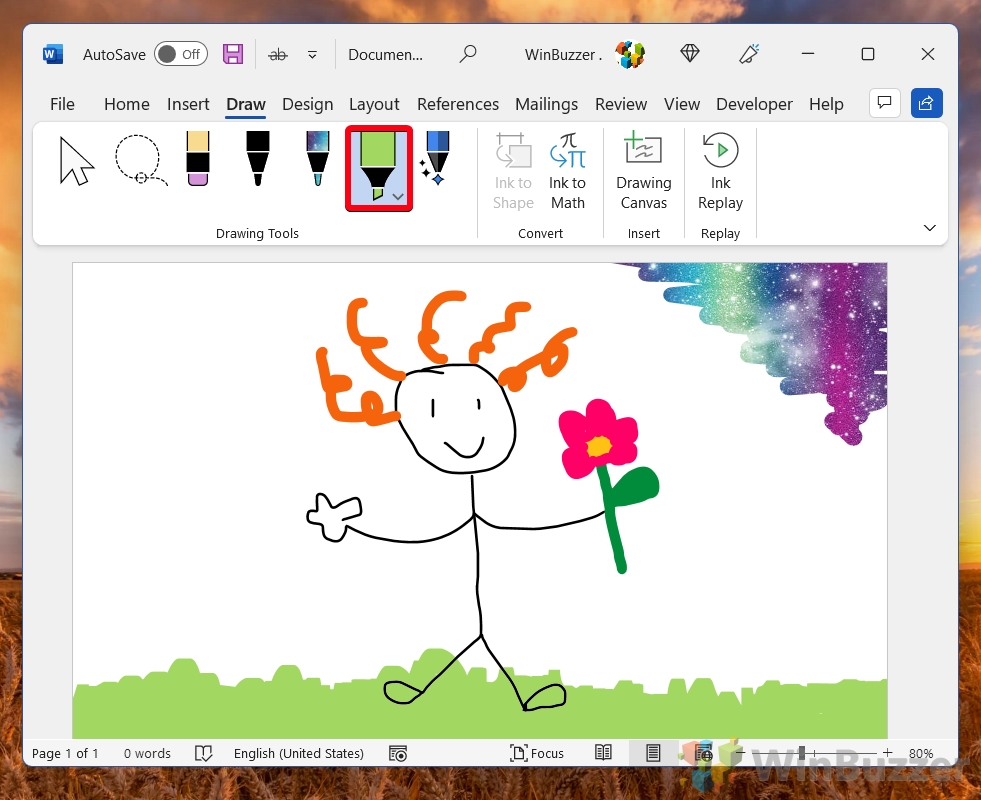
Click, hold, and drag to draw with your mouse. Notice that even when you release the mouse, Word stays in drawing mode. This means you can keep adding elements to your drawing. When you’re done, click the Draw button again.


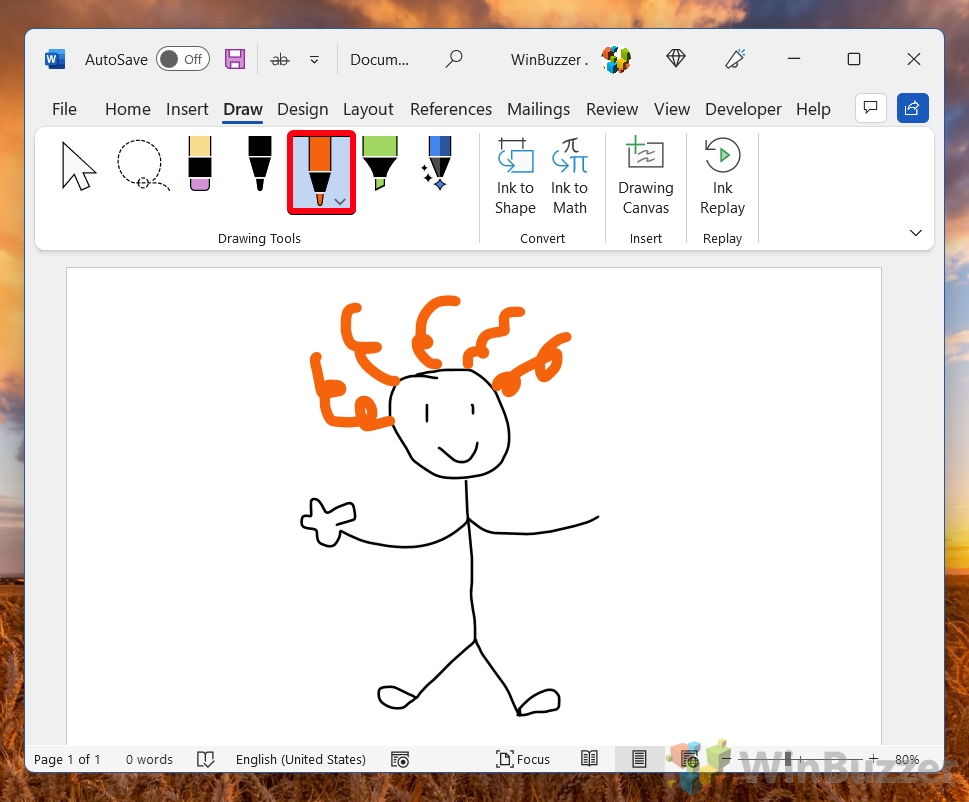
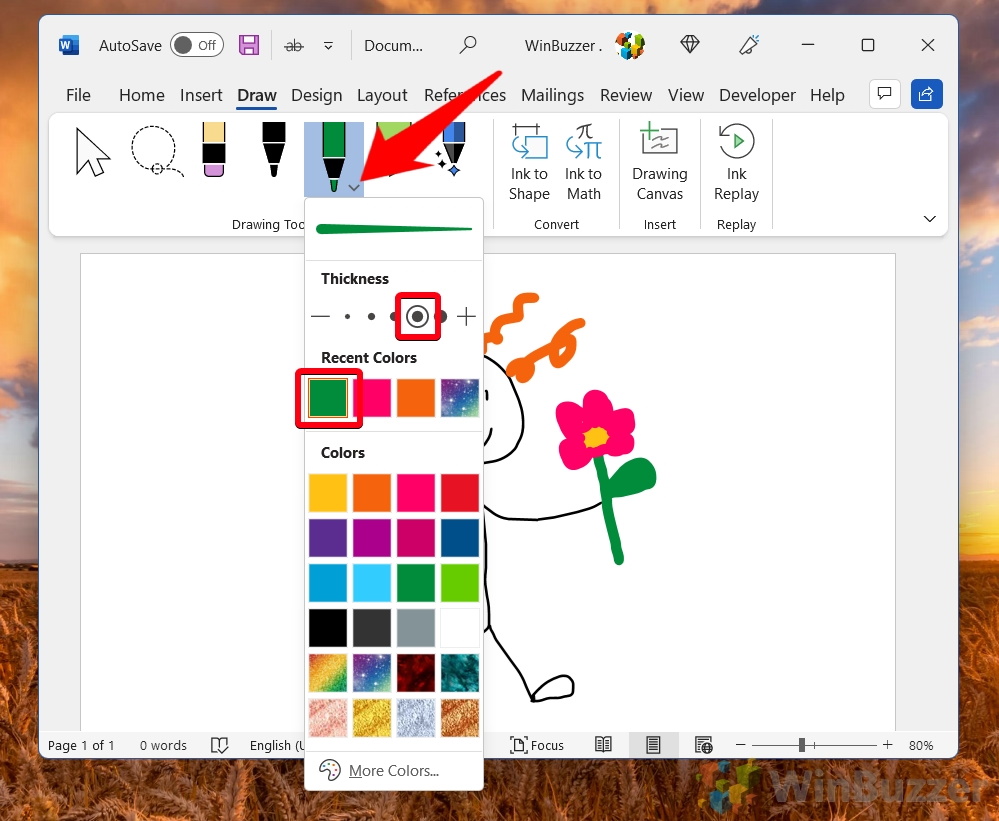
To change the color and thickness of any tool, click on the drop-down menu, and make your selections. A total of 16 standard colors are available, and you can access many more by clicking on More Colors….
.jpeg)
.jpeg)
.jpeg)
Plus, for the pen ink, there are eight special effects:
- Rainbow
- Galaxy
- Lava
- Ocean
- Rose Gold
- Gold
- Silver
- Bronze


If your drawing has several parts, you’ll have to group them so that Word will treat them as one object. Click, press, and hold the Shift key as you click all the elements of your drawing. When you’re done, click Shape Format > Arrange > Group > Group.


Now you can treat the drawing as a single object. (Note: Once drawing elements are grouped, they can’t be ungrouped anymore.)
Click on the drawing, Shape Format. Then use the tools in the Shape Format tab. (Note that not all the features on the Shape Format ribbon can be applied to your drawing.) From here, we’ll change the text wrap setting of the drawing.
Go to the Shape Format tab. Click Wrap Text. then select a wrap setting.


I chose the Top and Bottom text wrap.


2. Erase Your Drawing
The Draw tab provides an Eraser tool so you can erase mistakes. First, format the tool by clicking on the drop-down arrow. You’ve got three choices:
- Stroke Eraser. Erases an entire stroke when you click on it.
- Small Eraser. Erases a small area when you click, hold, and drag your mouse.
- Medium Eraser. Erases a larger area when you click, hold, and drag your mouse.


If you selected the Stroke Eraser, click on any line to delete it. If you selected either the Small or Medium Eraser, click, hold, and drag your mouse over any areas you want to delete.
3. Draw With the Trackpad
Draw in Microsoft Word without a mouse by using the Draw with Trackpad tool.
First, choose the ink type you want to use. Then click the toggle to switch on Draw with Trackpad.


A window appears on top of your document. Use two fingers on your trackpad to move it anywhere on your document.
Pressing the Command key, move one finger on your trackpad to where you wish to draw. Pause, then draw with your finger. You don’t have to press down on the trackpad to draw.


How to Draw … Without Drawing!
So far, you’ve learned how to create your own images in Word by hand-drawing with either the mouse or the trackpad.
But what if you really can’t draw? Not even stick figures?
You can still “draw” by using the pre-made lines and shapes in Word. If you think about it, most objects can be broken down into shapes and lines. By putting these together, you can create your very own sketches — without drawing by hand.
Read on to see what I mean.
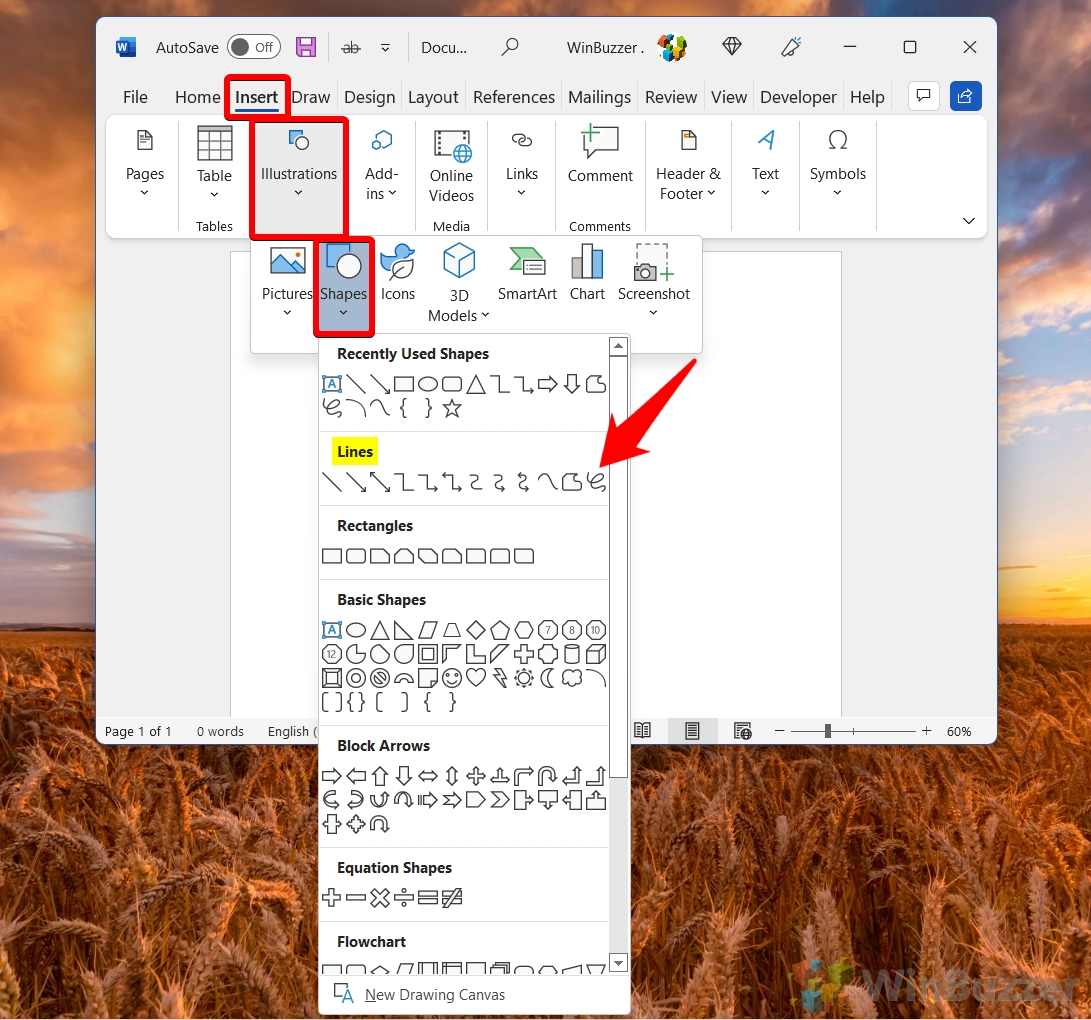
1. Draw With Lines in Microsoft Word
The simplest images are made up of lines. In this example, we’ll make a trellis, which is a grid like what you’d use to play Tic-Tac-Toe.
Go to Insert > Shapes > Line. This tool makes a simple straight line with a starting point and an endpoint.


Click on the page. That’s the starting point of your line. Drag your mouse to where you want the line to end, then click again.
Go to the Shape Format tab and use the buttons to edit the line. For this example, I changed the color and the weight of the line. I also added a shadow.


When you’re happy with how the line looks, copy and paste it as many times as needed to create your image. Click on the line, then go to Edit > Copy, then Edit > Paste. Or, use the shortcuts Command + C to copy and Command + V to paste.


Click, hold, and drag the lines into place. It may be helpful to display gridlines. To do so, click on the View tab, then check the box for Gridlines. This will help you to properly align the different elements of your drawing.


To change the angle of a line, click on the line, then go to Shape Format > Arrange > Rotate. Choose from one of the available rotation options or set your own. You can also click on one end of the line, hold, and drag it in place.


If you want the elements to line up precisely, select the lines, then go to Shape Format > Arrange > Align. Select an alignment option.


In this example, I’ll use Distribute Horizontally for the vertical lines, and Distribute Vertically for the horizontal lines.


These same steps apply to block arrows and other shapes, too.
2. Draw on Microsoft Word Using Shapes and Block Arrows
Now we’re ready to make more complicated pictures!
Let’s draw a bicycle by combining circles and triangles. Go to Insert > Shapes > Oval. Hold the Shift key as you click, hold, and drag your mouse to make a perfect circle. (But, if you want to draw an oval, then don’t use the Shift key.)


With the shape selected, go to Shape Format, and use the buttons on that tab to edit the shape you made.


To make the bicycle wheels, I’ll remove the Shape Fill and change the outline of the circle.


Next, copy and paste the circle. And then follow the same steps to add the triangles.
Use the triangle’s turning handle to change its orientation. Click on the turning handle, hold, and drag the mouse to the desired angle.


Add and edit more lines and shapes to make the image look just like a bicycle. The bike below is made up of circles, triangles, lines, an oval, and a half-circle (for the handlebar).
Remember, you can make your drawing as simple or as detailed as you like. It’s all up to you!
Find Professional Graphics for Your Microsoft Word Project
Now you know how to draw on a picture in Word. But perhaps you don’t have time to create your own Word drawings from scratch. And you still would rather not use stock photos.
What to do?
You can use premium graphic images from Envato Elements.


An Elements subscription brings thousands of creative tools at your fingertips. This includes print templates for Word, graphics, fonts, photos, and a lot more. And you get unlimited downloads for one flat monthly subscription.
Another great source of premium graphics is GraphicRiver. As with Elements, this marketplace gives you access to thousands of Word templates and other creative tools. These are also professionally designed for maximum impact. The difference is, at GraphicRiver, you pay for each use of every item.
Use each premium graphic on its own in your Word document. Or better yet, incorporate them with your own or other graphics to create something original.
Learn More About Working In Word
As you can see, Microsoft Word has many robust features. Some of them are little-known functionalities such as the various drawing tools in Word that I showed you in this article. It pays to learn how to use Microsoft Word so you can maximize its potential. Not only will you be able to realize the vision you’ve got for your Word documents, but you’ll also optimize your workflow.
If you aim to produce the most visually compelling materials using Word, then you may find these articles helpful:
You Can Draw in Microsoft Word
Even though Microsoft Word wasn’t built for graphic design, it’s got some tools to help you draw right inside your Word document.
You can make anything from simple line and stick drawings, to more detailed freehand drawings and line illustrations. Use the Freeform, Scribble, or Draw tools to draw by hand. Or combine lines and shapes to create original Word drawings without drawing from scratch.
You can also find hand-drawn graphics and Word templates in Envato Elements and GraphicRiver. If you want unlimited downloads of premium graphics and other design components, then Elements is the place for you. For one-off projects, GraphicRiver is the place to go to access top-quality templates for Microsoft Word and graphics on a pay-per-use basis.
You’ve just learned how to draw on Microsoft Word. Now, it you’re turn to create your best Word drawings.
Everyday in business or in another field there are lots of information or documentation files that are required to store for future use. For anyone, it is very difficult to store that information for a long time. Earlier letters, office files, documents, projects, and information are stored in a form of a registrar, file, or by paperwork but finding it may be difficult for us. It takes a lot of time. To resolve this issue Microsoft brings software called MS Word.
Microsoft Word is a software tool that allows users to create documents like articles, letters, projects files very easily. It has various features like editing and formatting, graphics, designs, fonts styles, printing documents, etc.

Features of MS Word
- Various Page Designs, page numbers, border
- Tables
- 3D models, charts, and icons
- WordArt
- Page Layout formats
- Inserting Online pictures and video
- Text color and many more.
- Date and Time
- Page Designs
- Different text fonts
What are Shapes in MS Word?
Microsoft Word has a special feature called shapes in which users can insert many different types of shapes in the document. A shape highlights the important item of the document. It attracts the attention of the readers for a better understanding of the content of the document.
MS Word contains many different types of shapes such as boxes, rectangles, callouts, circles, arrows, lines, triangles, curves, equations shapes, and many more. Once the shape is added, you can modify it by changing features like color, style format, size, outline, etc.
So you should use different types of shapes in your document. The figure below shows the different types of shapes that are available in MS Word.
Some examples of shapes are:


Steps to Add Shapes in MS Word
Step 1: On the navigation menu click on the insert option.

Step 2: In the illustration section select the shapes option as shown in the figure:
Step 3: A list of shapes will pop up on the screen where you can select different types of shapes.
There are total of 8 sections in shapes:
- Lines
- Rectangles
- Basic Shapes
- Block Arrows
- Equation Shapes
- Flowcharts
- Stars and Banners
- Callouts
Step 4: Now select a shape as per your need.

Step 5: Next drag the cursor on your current page to draw the shape.
Step 6: Finally shape is added on the current page of the document as shown in the figure:

Step 7: Now click on the drag button to set the size of the shape as shown in the figure:

Step 8: On the navigation menu click on the format option to give color, layout, style to the shape.

Step 9: Under the shape style section click on the drop-down arrow to open the style panel.

Step 10: A theme style color panel will open where you can select different types of color styles for the shape as shown in the figure:
Step 11: Select the color of your choice.

Step 12: You can also choose a different color pattern from other theme fills options as shown in the figure:

Step 13: You can also select a different color from the shape fill option.

Step 14: Next click on the shape outline option to give an outline to the shape.

Step 15: Select the color from the theme colors panel as shown in the figure:

Step 16: Next click on the shape effects option.

Step 17: Now select the option from the menu as per your requirement.

Finally, the shape is inserted in your document.
These are some of the steps to insert a shape in an MS Word document.
When you can’t find the right clip art for your Word document, draw your own. Microsoft Word contains a variety of shapes that can be used alone or in combination to create stunning graphics.
You can choose from a basic line, circle, and square shapes to create simple graphics, or use arrow, callout, banner, and star shapes to make information stand out. Draw with the flowchart shapes to illustrate a process, or use the freeform line and shape to create your own images.
These directions work for all PC versions of Word (from Word 2010 to Word 2016) and Word for Mac. You cannot add shapes in Word Online.
Draw Basic Lines and Shapes
When you want to draw a simple shape in your Word document, use one of the predefined shapes to do the job for you.
Here’s how to draw a basic shape:
- Select Insert > Shapes.
- Choose the shape you want to draw.
- Select the location in the document where you want to start the shape and drag to the ending point. To create a perfect square or circle, press and hold Shift while you drag the cursor.
Create a Freestyle Drawing
Can’t find the shape you want? Draw your own with the Freeform shapes. Use Freeform: Scribbles to draw a shape that looks hand-drawn, or use Freeform: Shape to draw a shape that has curved and straight segments. You’ll find both of these shapes in the Line section of the Shapes list.
The Freeform shape tools can be a little awkward to work with; you may want to practice in a blank document first.
To draw with the Scribble shape, select Insert > Shapes > Freeform: Scribble, then select the location where you want to start the shape and drag in any direction to draw.
To Draw a Freeform Shape:
- Select Insert > Shapes > Freeform: Shape.
- To draw a series of straight lines, select the beginning point of the first segment, then move the mouse pointer and select a space to finish the first segment. Create as many segments as you need.
- To draw a curve segment, select the beginning point and drag to the ending point.
- To close the shape, select the beginning point.
Format Shapes With the Drawing Tools in Word
When you select a shape, the Drawing Tools Format tab is added to the Word menu. The Format tab gives you a variety of options to change the look, color, and style of the shapes you’ve added to your Word document.
To change the color and appearance of a shape, select it, then select Format. Here are a few ways you can change a shape so it fits the color and design of your document:
- Choose a predefined style: Select a theme from the Shape Styles list to change the color, outline, and text.
- Change the color of the shape: Select Shape Fill and select a color, gradient, or texture.
- Use a different outline color or width: Select Shape Outline and choose a color or weight.
- Add shadows and other effects: Select Shape Effects and choose an effect. If you hover over the effect, you’ll see a preview in your document.
- Type text in a shape: Select the shape and start typing.
Edit a Shape
There are two ways to change the shape of a shape: either switch to a different shape or move the endpoints.
To switch to a different shape, select Format > Edit Shape > Change Shape and choose the shape you want.
To move the endpoints to change the shape of a shape:
- Select the shape you want to change.
- Select Format > Edit Shape > Edit Points.
- Select a point on the shape and drag it to adjust the size of the shape.
Create Shapes on the Drawing Canvas
If you’re looking for an effortless way to group shapes together, create a drawing canvas. After you’ve added shapes to the drawing canvas, you can move the canvas wherever you want within your document and the shapes move with it.
To create a drawing canvas:
- Select Insert > Shapes > New Drawing Canvas.
- Drag the sizing handles to resize the drawing canvas.
- Select the frame and move it to a new location in your document.
- Add shapes to the drawing canvas.
To make your drawing canvas stand out, select the canvas and select Format. Give your canvas an outline shape or fill color.
Thanks for letting us know!
Get the Latest Tech News Delivered Every Day
Subscribe