
Excel for Microsoft 365 Word for Microsoft 365 Outlook for Microsoft 365 PowerPoint for Microsoft 365 Project Online Desktop Client Publisher for Microsoft 365 Excel 2021 Word 2021 Outlook 2021 PowerPoint 2021 Project Professional 2021 Project Standard 2021 Publisher 2021 Excel 2019 Word 2019 Outlook 2019 PowerPoint 2019 Project Professional 2019 Project Standard 2019 Publisher 2019 Excel 2016 Word 2016 Outlook 2016 PowerPoint 2016 Project Professional 2016 Project Standard 2016 Publisher 2016 Excel 2013 Word 2013 Outlook 2013 PowerPoint 2013 Project Professional 2013 Project Standard 2013 Publisher 2013 Word 2010 More…Less
In a text box or shape, you can quickly change the color of text, the inside (fill) color, or the color of the border.
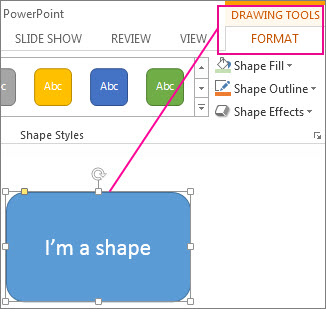
Let’s select the shape—the Drawing Tools appear in the ribbon, with the Format tab active.
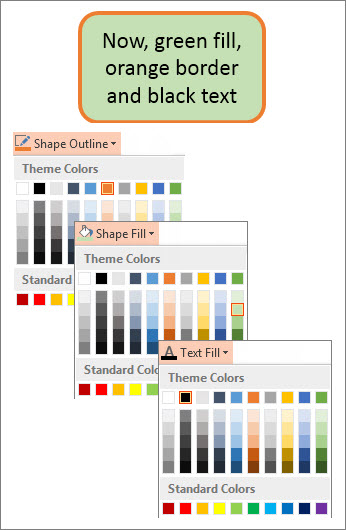
Here’s the same shape after we changed the border to orange, the fill to a light green, and the text to black. We used the Shape Outline, Shape Fill, and Text Fill commands, available on the Format tab under Drawing Tools.
Although the changes we’ll make below are shown in Microsoft PowerPoint, they work the same way in Excel, Word, Outlook, and Project.
Change the text color
-
Select the shape or text box border. When you do that, the Drawing Tools appear.
To change multiple shapes or text boxes, click the first shape or text box, and then press and hold Ctrl while you click the other shapes or text boxes.
-
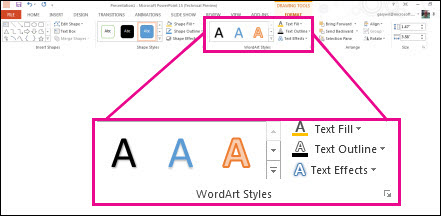
On the Drawing Tools Format tab, click Text Fill and, under Theme Colors, pick the color you want.
Note: The Text Fill and Text Outline menus might not be active until you start typing in your shape.

To change the text to a color that isn’t in the theme colors
-
Select the shape or text box.
-
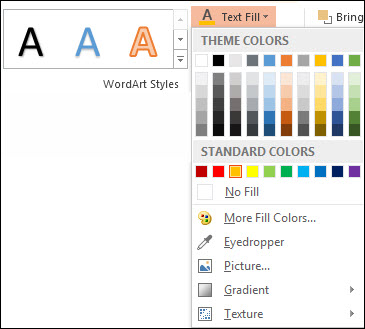
On the Drawing Tools Format tab, click Text Fill > More Fill Colors.
-
In the Colors box, either click the color you want on the Standard tab, or mix your own color on the Custom tab. Custom colors and colors on the Standard tab aren’t updated if you later change the document theme.
-
Change the inside (fill) color
-
Select the shape or text box to change. When you do that, the Drawing Tools appear.
To change multiple shapes or text boxes, click the first shape or text box, and then press and hold Ctrl while you click the other shapes or text boxes.
-
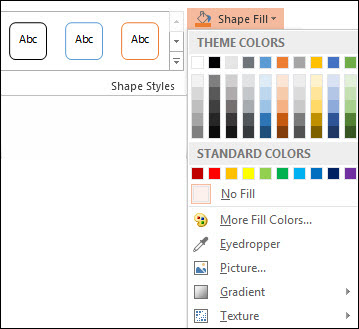
Click Shape Fill, and under Theme Colors, pick the color you want.
To change the fill color to a color that isn’t in the theme colors
-
Select the shape or text box.
-
On the Drawing Tools Format tab, click Shape Fill > More Fill Colors.
-
In the Colors box, either click the color you want on the Standard tab, or mix your own color on the Custom tab. Custom colors and colors on the Standard tab aren’t updated if you later change the document theme.
-

Change the border color
-
Select the shape or text box border. When you do that, the Drawing Tools appear.
If you want to change multiple shapes or text boxes, click the first shape or text box, and then press and hold Ctrl while you click the other shapes or text boxes.
-
On the Drawing Tools Format tab, click Shape Outline and, under Theme Colors, pick the color you want.
To change the border to a color that isn’t in the theme colors
-
Select the shape or text box.
-
On the Drawing Tools Format tab, click Shape Outline, and then click More Outline Colors.
-
In the Colors box, either click the color that you want on the Standard tab, or mix your own color on the Custom tab. Custom colors and colors on the Standard tab aren’t updated if you later change the document theme.
-

Tip: In PowerPoint, you can also change the border color by clicking Shape Outline (on the Home tab, in the Drawing group).
See Also
Remove or change the border on a text box or shape
Add a fill or effect to a shape
Change the font color (text color)
Change the background or color in Word
Change a message background in Outlook
Change the background color of your slides in PowerPoint
Insert WordArt
Add shapes
Need more help?
In this tutorial , we will discuss 2 methods to change table border color of a word document.

- Using the Borders and Shading option.
- Using the Border Styles button.
Method 1: Using the Borders and Shading option.
This is a simple method which lets you quickly change the border colors of the whole table.
Step 1: Open Word document.

Step 2: Prompt the Borders and Shading dialogue box.
Click anywhere in the table. A Table Selection Icon will appear at the top corner.
Click on this icon to select the whole table.
Selecting the table will display a horizontal context menu.
You will find Borders and Shading Button there.
Click on this button to open the Borders and Shading dialogue box.

Step 3: Choose the color of your border.
You will see a Color Dropdown under the Borders Tab.
Simply select the color of your choice.
By default the Border color will apply to the whole table.
You can use the “Apply to” Setting to apply the color to a cell or a paragraph.

Method 2: Using the Border Styles button.
This method lets you select certain borders to apply color too.
Step 1: Open Word document.

Step 2: Locate the Border Styles Button.
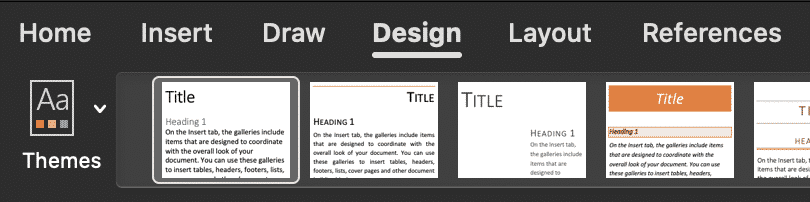
Click anywhere on the table and go to Table Tools -> Design – Border Styles.

Step 3: Choose your border style.
Click on Border Styles Button. It will show a selection of border styles.
Select the border style of your choice.

At this point, the cursor is changed to a Border Painter tool.
Clicking on specific borders will apply color with the style of your choosing. You can also click and drag to apply through borders with intersections.

Conclusion
Changing borders colors is quite simple. We hope you’ve found this article helpful!
Method 1: Using the Borders and Shading option.
- Step 1: Open Word document.
- Step 2: Prompt the Borders and Shading dialogue box. Click anywhere in the table. A Table Selection Icon will appear at the top corner.
- Step 3: Choose the color of your border. You will see a Color Dropdown under the Borders Tab.
Contents
- 1 How do I change the color of my border line?
- 2 How do I fill a border with color in Word?
- 3 How do I change borders in Word?
- 4 Which tool is used to change the border Colour?
- 5 How do I change the color of an outline in paint?
- 6 How do you put a decorative border around text in Word?
- 7 How do I change the border color in Word 2021?
- 8 How do you change the border color in HTML?
- 9 How can you apply border to a table and change its Colour?
- 10 Which tool allows you to change the border color of a cell row or column?
- 11 Which option is used to change the border style?
- 12 How do I put a red box around a picture in Word?
- 13 How do you make your Word document colorful?
- 14 How do I put different borders on each page in Word?
- 15 How do you change the color of a border in CSS?
- 16 How do you change the border color of a text box in HTML?
- 17 How do you change the border color in flutter?
- 18 How can we change the border of a table?
- 19 Which tool is used to apply different background colors in a table?
- 20 How can you apply border to a table Class 6?
How do I change the color of my border line?
Changing the Color of a Cell Border
- Select the cells whose border colors you want to change.
- Choose Cells from the Format menu.
- Make sure the Border tab is selected.
- Using the Color drop-down list, specify a color you want to use for borders.
How do I fill a border with color in Word?
Change the inside (fill) color
- Select the shape or text box.
- On the Drawing Tools Format tab, click Shape Fill > More Fill Colors.
- In the Colors box, either click the color you want on the Standard tab, or mix your own color on the Custom tab.
How do I change borders in Word?
Modify a border
- Open Microsoft Word.
- Click the Page Layout tab.
- In the Page Background group, click the Page Borders option.
- In the Borders and Shading window (shown below), if not already selected, click the Page Border tab.
- Make the desired changes to the border that is currently set for the document or page.
Which tool is used to change the border Colour?
Answer: Select the table cells that you want to add a border to (or change the border of). Select the Table Tools / Design tab on the ribbon. Select one of the following in the Draw Borders group: Use Pen Color to change the color of the border.
How do I change the color of an outline in paint?
Click the eyedropper-shaped icon in the “Tools” section at the top of the Paint window. Click the color you want to replace. This will assign the color to the “Color 1” section at the top of the Paint window.
How do you put a decorative border around text in Word?
Go to Home > Borders, and then open the menu of border choices.
Add a border to selected text
- Select a word, line, or paragraph.
- On the Home tab, click the arrow next to the Borders button.
- In the Borders gallery, click the border style that you want to apply.
How do I change the border color in Word 2021?
Method 1: Using the Borders and Shading option.
- Step 1: Open Word document.
- Step 2: Prompt the Borders and Shading dialogue box. Click anywhere in the table. A Table Selection Icon will appear at the top corner.
- Step 3: Choose the color of your border. You will see a Color Dropdown under the Borders Tab.
How do you change the border color in HTML?
Style borderColor Property
- Change the color of the four borders of a element to red: getElementById(“myDiv”).
- Change the color of the top and bottom border to green, and left and right border to purple, of a element: getElementById(“myDiv”).
- Return the border color of a element:
How can you apply border to a table and change its Colour?
Answer: Select the table cells that you want to add or change the table border for. Under Table Tools, on the Design tab, in the Draw Borders group, do one or more of the following: To change the color of the border, click the arrow next to Pen color, and then click the color that you want.
Which tool allows you to change the border color of a cell row or column?
Another way you can change the border color is to use the border drawing tools Excel provides. Just display the Home tab of the ribbon and then click the down-arrow next to the Borders tool (in the Font group). Excel displays a whole bunch of choices for applying borders.
Which option is used to change the border style?
Go to Table Tools >Design > Table Styles > Borders, and then click the border option that you want to change.
How do I put a red box around a picture in Word?
To add a border to a picture:
- Select the picture you want to add a border to, then click the Format tab.
- Click the Picture Border command. A drop-down menu will appear.
- From here, you can select a color, weight (thickness), and whether the line is dashed.
- The border will appear around the image.
How do you make your Word document colorful?
Go to Design > Page Color. Choose the color you want under Theme Colors or Standard Colors. If you don’t see the color you want, select More Colors, and then choose a color from the Colors box.
How do I put different borders on each page in Word?
different borders on each page
- Click anywhere in your document and do Format Borders and Shading.
- On the Page Borders tab, choose the border you want for all but the first. page of the document, make sure the “Apply to” box says “Whole document” and.
- Now, back to the Page Borders tab. This time, choose the border you want.
How do you change the color of a border in CSS?
CSS Border Color
- name – specify a color name, like “red”
- HEX – specify a HEX value, like “#ff0000”
- RGB – specify a RGB value, like “rgb(255,0,0)”
- HSL – specify a HSL value, like “hsl(0, 100%, 50%)”
- transparent.
How do you change the border color of a text box in HTML?
3 Answers. Attach blur event to the input . You can add a class through Jquery and give the styles in CSS. It will also help you later when you try to add validations then you can just change class name for showing red borders to indicate errors.
How do you change the border color in flutter?
Flutter – Change Container Border’s Color & Width
To change the color and width of Container’s border, use its decoration property. Set decoration property with BoxDecoration() object. Set the border property of BoxDecoration() object, with required color and width as per your applications specifications.
How can we change the border of a table?
Add or change the line style
- Click the table or select the cells where you want to add or change borders.
- On the Tables tab, under Draw Borders, on the Line Style pop-up menu, click the line style that you want.
- On the Tables tab, under Draw Borders, click Borders, and then click the borders that you want.
Which tool is used to apply different background colors in a table?
The Shading tool is used to apply different background colours in a table.
How can you apply border to a table Class 6?
Answer:
- Click in the table, and then click the Table Move Handle to select the table. The Table Tools Design tab appears.
- Click Border Styles and choose a border style.
- Click Borders and choose where you want to add the borders.
Every time you insert a table in Word document, the color of borders is black by default. If you want to make some changes to express your personal style, try these methods below.
1. Borders and Shading
Select the whole table. Click Home tab, find the button of Borders in the lower right corner of Paragraph section. Then select Borders and Shading… in the drop-down list.
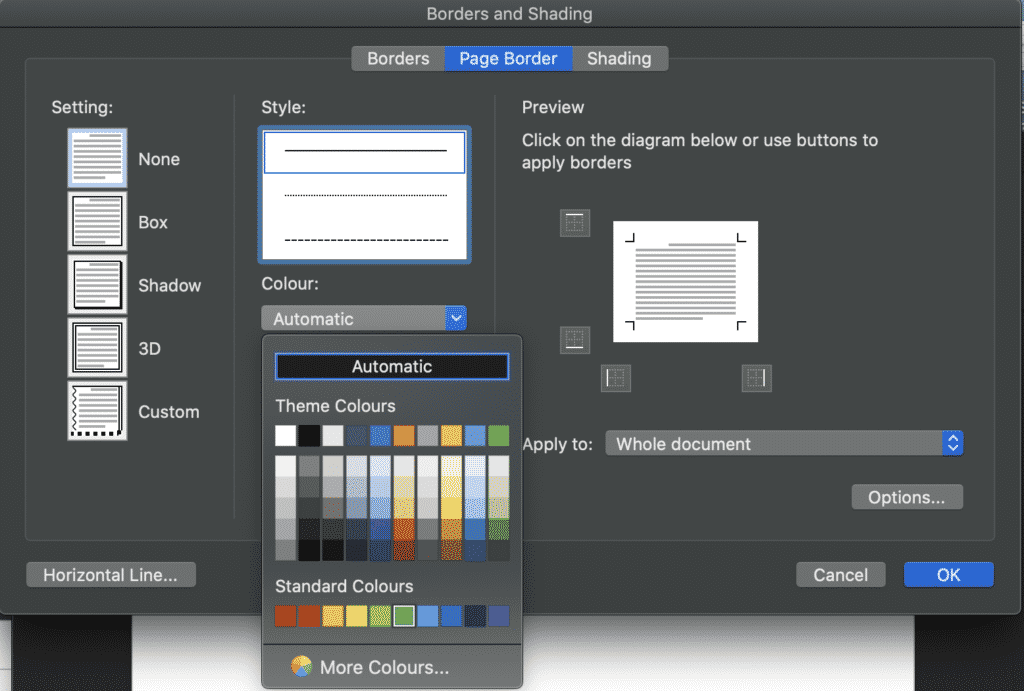
Click the drop-down arrow beside Automatic color in Borders tab, choose the one you like in the list or click More Color to customize it. Then hit OK to confirm your choice.
Now the change has been made to your table.

2. Borders Styles
Right click any section of the borders, put your cursor at the selection of Border Styles. You can see a list of Theme Borders.

Choose a style of borders you like and your cursor will become an icon of paintbrush. You can then click any section of borders to turn it into the style you choose. In this way, you can make your table more vivid with multiple different colors.

Copyright Statement: Regarding all of the posts by this website, any copy or use shall get the written permission or authorization from Myofficetricks.
Launching a Microsoft Word document is akin to starting with a clean slate, or a fresh piece of digital paper. While all of that white real estate can give you lots of space for your typed text, the default black on white can get a little monochromatic for some requirements. Liven up a Word document by adding a colorful border. With Word’s auto-formatted borders, you won’t have to create lines or adjust anything to fit the page’s margins, as it’s all done for you. Just choose a design and get colorful.
-
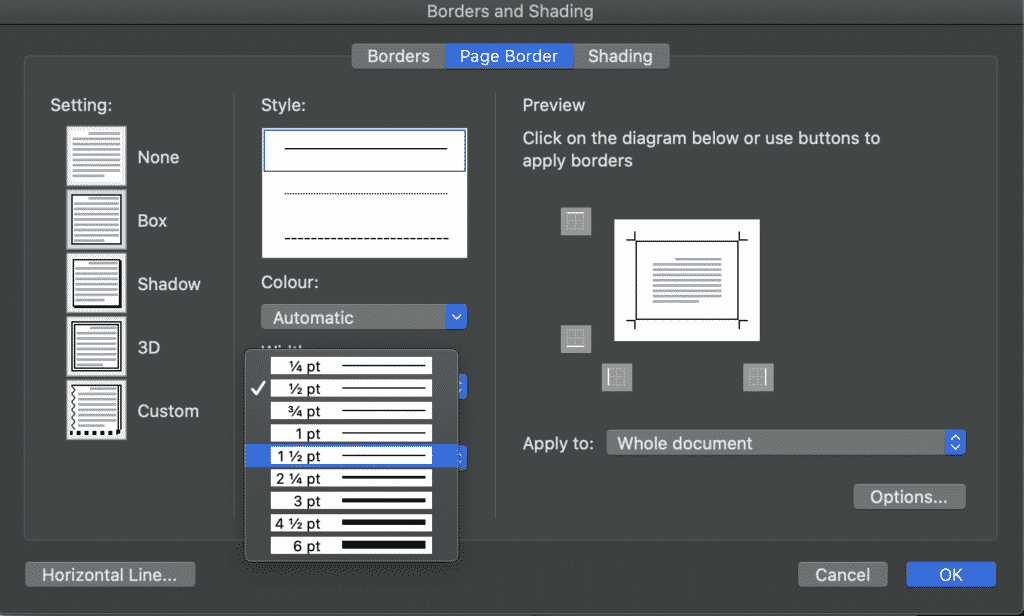
Start Microsoft Word. Click the “Page Layout” tab at the top of the screen.
-
Click the “Page Borders” button in the middle of the ribbon below the tab.
-
Click the “Box” button on the left of the “Page Border” tab’s window. Click the “Color” drop-down menu and choose a color for the border. This color will apply to any black default borders under the “Style” or “Art” drop-down menus, but you can still get more colorful.
-
Click the “Art” drop-down menu in the middle of the window. Scroll through the options, which include colorful flowers, Aztec-like patterns and holiday themes, all in multi-color shades.
-
Select one of the borders. Note that even if you chose a color in the “Color” drop-down menu, one of these “Art” borders will override that choice and use the full-color scheme it was created with.
-
Check the “Apply to” menu on the right side of the window. If it does not say “Whole Document,” select that option.
-
Click “OK” to close the window and return to the Word document, now with a new colorful border.
Changing the colour, width or style of your page border in Microsoft Word is a creative way to customise your document.
Microsoft offers hundreds of different border styles, including art works (pictures) that can be used to add flowers, stars, pumpkins, musical notes and more into your border.

The standard border style in Microsoft is a single black line.
The standard border width in Microsoft is 1/2pt.
Therefore, updating this may result in a more suitable border for your project, allowing your document to stand out.
In this post we will walk you through how to change the style and size of your border.
Changing the Style and Size of your Border in Word
- Open Microsoft Word
- Press the Design tab
- Press Page Borders

- In the Border pop-out window, select the style of border you would update to
- Press the Art drop-down to insert a pictured border e.g. Christmas trees
- In the same Borders pop-out window, select the border colour you would like to update to.
- Finally, update the width of your border in the same pop-out window by pressing Width
- Press OK
Changing your border colour, style or artwork is a fun way to bring your Word Document to life.
You have now successfully customised your border.
Looking for a better way to Collaborate in Microsoft Word?
You’re not the only one!
If you are facing the frustrations that seem to come hand in hand with collaborating in Microsoft Word. Frustrations such as version control, tracking changes, merging documents, saving over old versions, missing edits…this list could go on forever but you know as well as we do that there has to be a better solution.
With technology making our lives so much easier, why hasn’t Microsoft clocked onto this yet and updated Word to never save over an existing file without asking, or to automatically track changes and keep a backup version of your old file – just in case you want to revert back to it later.
Well while we wait for Microsoft, i’d like to introduce you to a a new software that solves ALL of our collaboration issues…
Meet Simul Docs.

Simul Docs was built with collaboration in mind, they personally faced the same frustrations as you and I and decided to create a nifty, easy to use solution that integrates directly into your existing Microsoft Office.
Firstly, Simul Docs will automatically track every change you make to any document.

Simul knows you need them tracked and doesn’t expect you to remember to turn tracked changes, it’s automatic. You can focus on making the changes, while Simul Docs focuses on tracking them without you having to think about it.
Open the document, Simul will track all changes. Close the document and Simul will save it as a new version for you.

Simul also has your version control covered.
When a document is created Simul will automatically give this document a version number of 0.0.1. From there, every time the document is opened, edited and closed a new version will be created, named 0.0.2 followed by 0.0.3 and so on.
A versions list will appear on the left hand side of your document, making it easy for you to refer back to older versions at any time or track who in your team made edits where.

Once you are a Simul user, there are two ways you can use the Simul solutions with your existing or new Word Document.
Either edit your document directly in Simul’s user-friendly web page or download the document and edit in Word as you would if Simul wasn’t in the background making your life a whole lot easier.
All of Simul’s features will be working no matter where you decide to edit.
So Simul Docs is the solution you have been searching for, now it’s over to you to give it a try!
![]()
Download Article
Learn how to insert a lined or art border in Microsoft Word documents on desktop
![]()
Download Article
- Adding a Page Border (Windows)
- Adding a Page Border (Mac)
- Adding a Text Border
- Q&A
|
|
|
Do you want to make an outside border in your Microsoft Word documents? You can easily add a solid or dotted border to an entire page or selected content. You can also use Microsoft Word’s included designs to create an artistic border for themed event flyers. This wikiHow will show you how to create a border around text, images, or pages in Microsoft Word using your Windows or Mac computer.
Things You Should Know
- To add a page border, click «Design» → «Page Borders». Select a border setting, style, and page application. Click «OK».
- To add a border around text or images, select the content. Click the «Home» tab and click the arrow next to the border icon. Click «Borders and Shading…»
- Select a border setting, style, and page application. Click «OK».
-
1
Open a project in Microsoft Word. This looks like a W on top of a blue square. Microsoft Word is available to install for Windows.[1]
- You must have a subscription to use Office 365.
- Use this method to add a lined border around a Microsoft Word document. This is different from changing the margins.
-
2
Click Design. This will be in the top toolbar, between Draw and Layout.
Advertisement
-
3
Click Page Borders. You can find this at the left side of the Design section, next to Page Color. It will have an icon of a page with a yellow border.
- A new window will open.
-
4
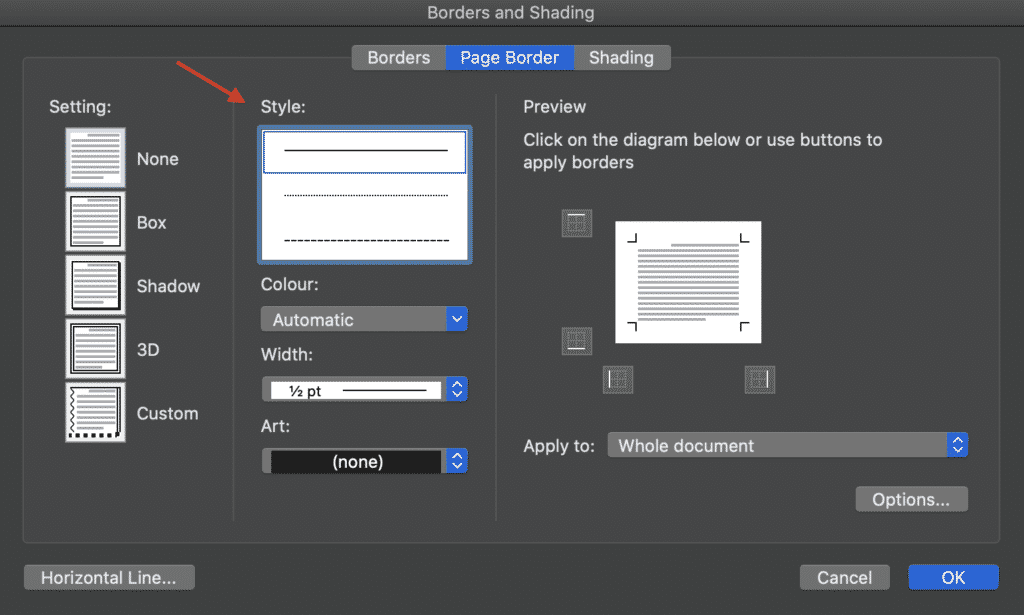
Click Page Border. This is the middle tab on the Borders and Shading window. You may already be on this tab.
-
5
Select a border setting. In the left-most column, click the border option that you want to use. Select from: None, Box, Shadow, 3-D, and Custom.
- If you want a simple border to go all the way around your page, select Box.
- To add a border with fun images, click the Art drop-down menu and select from Word’s art gallery. This border can be used for themed flyers for holidays and events.
-
6
Select a border style. In the «Style» column, scroll down until you find the border style you want to use, then click the style. Select from the various solid and dotted line styles.
- If needed, you can also change the border’s color and width from the Color and Width drop-down menus, respectively.
-
7
Select pages to use. If you created a new section earlier in this method, click the «Apply to» drop-down box, then click the section to which you want to apply the border in the resulting drop-down menu.
- To apply the border to the first page of your section, click This section — first page only in the drop-down menu.
-
8
Click OK. It’s at the bottom of the page. This will apply the border to your document’s specified page(s).

Advertisement
-
1
Open a project in Microsoft Word. This looks like a W on top of a blue square. Microsoft Word is available to install for Mac.[2]
- You must have a subscription to use Office 365.
-
2
Click Design. This will be in the top toolbar, between Draw and Layout.
-
3
Click Page Borders. You can find this at the left side of the Design section, next to Page Color. It will have an icon of a page with a yellow border.
- The Borders and Shading window will open, set to the Page Border tab. If it isn’t already on the Page Border tab, click it now.
-
4
Select a border setting. In the left-most column, click the border option that you want to use. Select from: None, Box, Shadow, 3-D, and Custom.
- If you want a simple border to go all the way around your page, select Box.
- To add a border with fun images, click the Art drop-down menu and select from Word’s art gallery. This border can be used for themed flyers for holidays and events.
-
5
Select a border style. In the «Style» column, scroll down until you find the border style you want to use, then click the style. Select from the various solid and dotted line styles.
- If needed, you can also change the border’s color and width from the Color and Width drop-down menus, respectively.
-
6
Select pages to use. If you created a new section earlier in this method, click the «Apply to» drop-down box, then click the section to which you want to apply the border in the resulting drop-down menu.
- To apply the border to the first page of your section, click This section — first page only in the drop-down menu.
-
7
Click OK. This is the blue button. This will apply the border to your document’s specified page(s).
Advertisement
-
1
Open a project in Microsoft Word. This looks like a W on top of a blue square.
-
2
Click Home. This is in the top toolbar, between File and Insert.
-
3
Select content. Click and drag your mouse across the text or image(s) around which you want to place a border.
- This method will place a border around an entire selection of images and text together.
- If you want to place a border around a single image, double-click the image. Select a preset style from the Picture Styles section, or click Picture Border to set the color, weight, and design of the border.[3]
-
4
Click
next to the «Borders» button. The Borders button resembles a square divided into four smaller squares; you’ll find it in the «Paragraph» section of options in the toolbar, just right of the paint bucket icon. A drop-down menu will open.
- On a Mac, click the Format menu item at the top of the screen instead.
-
5
Click Borders and Shading…. It’s at the bottom of the drop-down menu. A new window will open.
- On a Mac, you’ll find this option in the middle of the Format drop-down menu.
-
6
Select a border setting. In the left-most column, click the border option that you want to use. Select from: None, Box, Shadow, 3-D, and Custom.
- If you want a simple border to go all the way around your text, select Box.
-
7
Select a border style. In the «Style» column, scroll down until you find the border style you want to use, then click the style. Select from the various solid and dotted line styles.
- If needed, you can also change the border’s color and width from the Color and Width drop-down menus, respectively.
- To add a border with images, click the Art drop-down menu and select a design.
-
8
Select pages to use. If you created a new section earlier in this method, click the «Apply to» drop-down box, then click the section to which you want to apply the border in the resulting drop-down menu.
- To apply the border to the first page of your section, click This section — first page only in the drop-down menu.
-
9
Click OK. This will apply the border to your document’s specified page(s).
- Be sure to save your document when you’re finished.
- You can also use Microsoft Word to create a booklet or another handout flyer.


Advertisement
Add New Question
-
Question
How can I place a border around a picture I’ve inserted into a document?

You do what is shown above, but instead, you click on the picture before you go through the steps.
-
Question
How do I put a border around a table in Microsoft Word?
Go into Format —> Borders and Shading. There you’ll find options for borders you can apply to the table.
-
Question
What three options can I set regarding a picture border?
The three option you can set are: small, medium and large.
Ask a Question
200 characters left
Include your email address to get a message when this question is answered.
Submit
Advertisement
Thanks for submitting a tip for review!
About This Article
Thanks to all authors for creating a page that has been read 971,313 times.
Is this article up to date?
Microsoft Word 2010 is a complex program that has a wide array of tools and settings to help you create business documents for your employees and clients. You can add some interesting effects to your Word documents, including borders. Add borders to single pages or to the entire document, and use a different border color for each page to make your document stand out or to emphasize certain elements within it.
Step 1
Launch Microsoft Word and open a saved document or new blank one.
Step 2
Click the «Page Layout» tab, and then click the «Page Borders» button in the Page Background group. The «Borders and Shading» window opens with the Page Border tab selected by default.
Step 3
Click «Box» in the Setting pane to apply a box-like border.
Step 4
Select the style of your border in the Style pane and its width in the «Width» box.
Step 5
Select the color for the border in the «Color» box; select where to apply the border in the «Apply To» box. Select either «Whole document» to apply the border to the entire document, or «This section» to apply it to the selected page.
Step 6
Click «OK» to make the border and close the «Borders and Shading» window.
Step 7
Press «Ctrl-S» to save the latest version of your document.
References
Resources
Tips
- Select the «This section» option in the «Apply To» box, go to a different page and create another border with a different color.
Writer Bio
Kirk Bennet started writing for websites and online publications in 2005. He covers topics in nutrition, health, gardening, home improvement and information technology.
Word and PowerPoint allow you to not only put a colored border around a picture, instead try a pretty gradient effect for single color or multi-colored rainbow effects.
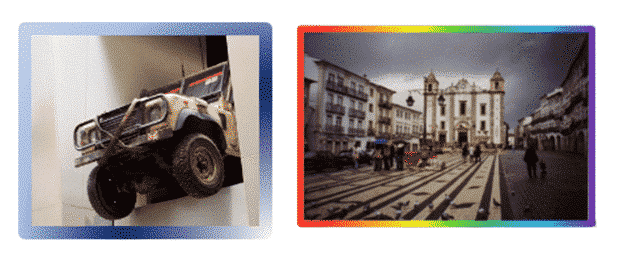
Like most of the fancier border effects, you can access gradient border settings in the Format Picture pane, by going to Picture Format | Picture Border | Weight | More Lines.

In the Format Picture pane, under Line, click Gradient Line, and pick a width large enough so that your gradient can be seen.

There are some preset gradients you can choose from, all of which are fairly subtle color schemes.

We, however, will jump down to the Gradient Stops settings, which is where you can get really creative. Here you can set how many colors you want to appear in your gradient, and select which colors to use.
Add Gradient Stops
First, click the Add Gradient Stops button to add in extra stops according to how many colors or shadings you want.

Then drag the stops to create the spacing you want.
I want six evenly spaced colors or shadings of the same color, so have dragged the stops/tags so they are more or less the same distance apart. You can also use the Position setting below the slider to set more exact positioning if you prefer.

Rainbow or multi-colored gradient borders
Let’s go to the next step and create a rainbow picture frame using six different colors.
Gradients don’t have to be all the same color. You can mix different shades to the extent of a full rainbow border.

Start with a single color gradient, like the one we made above. Now, click on each of the stops, and select a different color for each one.

Continue on each of the stops until you have assigned a color to each one.

Above the Gradient Stops slider, there are some settings for type, direction, and angle. These settings affect the position of the colors in the frame, which way the gradient flows, and how much of each color shows. Play around with them till you find a setting you like.

Two ways to add Gradient or Rainbow text or background effects in Word
Framing pictures, graphics, logos in Word and PowerPoint
Add the US Flag into Word, Excel or PowerPoint
Insert the British ‘Union Jack’ flag into Word, Excel or PowerPoint
Borders and shading are used in Word Documents when we want some text/paragraph to grab the attention of the viewers, making it the First Impression. In MS Word we can apply the Borders and Shading to the written text, paragraph, etc. to make them look good and appealing like they pop out of the page.
Applying Borders
The border as the name suggests provides an outer/inner lining on the selected text/paragraph. A Border is a good alternative to the Fonts Styles such as Bold, Italics, and Underline and grabs much attention quickly without hardcore techniques.
In MS Word there are multiple types of borders which are as follows:
- Bottom Border– Border at the bottom of the Paragraph.
- Top Border– Border at the top of the Paragraph.
- Left Border– Border on the left side of the Paragraph.
- Right Border– Border on the right side of the Paragraph.
- No Border– Removes all the borders.
- All Borders– Border on all sides of the Paragraph.
- Outside Borders– Border outside the Paragraph.
- Inside Borders– Border inside the Paragraph.
- Inside Horizontal Border– Horizontal borders on both sides inside the Paragraph.
- Inside Vertical Border– Vertical borders on both sides inside the Paragraph.
Steps to Apply:
Step 1: Select the text/Paragraph to apply Border.

Step 2: Now, go to the Borders tab in the Paragraph menu under the Home bar.

Step 3: Select the border of your choice.

Applying Shades
Another way of grabbing the attention of the viewers more likely is by using the Shading feature in the Word Document. It is similar to highlighting the text/Paragraph.
In MS Word there are multiple colors available in the Shading tab, which you can apply to your text or paragraph like: red, blue, black, etc.
Steps to Apply:
Step 1: Select the text to apply the Shading.

Step 2: Now, go to the Shading tab in the Paragraph menu under the Home bar.

Step 3: Select the Shading Color of your choice.

However, we can apply both at the same time (Border and Shading), thus making our paragraph more appealing.
