
I have the below message (slightly changed):
«Enter the competition by January 30, 2011 and you could win up to
$$$$ — including amazing summer trips!»
I currently have:
<p style="font-size:14px; color:#538b01; font-weight:bold; font-style:italic;">
formatting the text string, but want to change the color of «January 30, 2011» to #FF0000 and «summer» to #0000A0.
How do I do this strictly with HTML or inline CSS?
![]()
Sam R.
15.9k11 gold badges68 silver badges122 bronze badges
asked Jan 7, 2011 at 5:38
![]()
<p style="font-size:14px; color:#538b01; font-weight:bold; font-style:italic;">
  Enter the competition by
  <span style="color: #ff0000">January 30, 2011</span>
  and you could win up to $$$$ — including amazing
  <span style="color: #0000a0">summer</span>
  trips!
</p>
Or you may want to use CSS classes instead:
<html>
  <head>
    <style type="text/css">
      p {
        font-size:14px;
        color:#538b01;
        font-weight:bold;
        font-style:italic;
      }
      .date {
        color: #ff0000;
      }
      .season { /* OK, a bit contrived... */
        color: #0000a0;
      }
    </style>
  </head>
  <body>
    <p>
      Enter the competition by
      <span class="date">January 30, 2011</span>
      and you could win up to $$$$ — including amazing
      <span class="season">summer</span>
      trips!
    </p>
  </body>
</html>
answered Jan 7, 2011 at 5:41
![]()
JacobJacob
77.1k24 gold badges147 silver badges228 bronze badges
3
You could use the HTML5 Tag <mark>:
<p>Enter the competition by
<mark class="red">January 30, 2011</mark> and you could win up to $$$$ — including amazing
<mark class="blue">summer</mark> trips!</p>
And use this in the CSS:
p {
    font-size:14px;
    color:#538b01;
    font-weight:bold;
    font-style:italic;
}

mark.red {
    color:#ff0000;
    background: none;
}

mark.blue {
    color:#0000A0;
    background: none;
}
The tag <mark> has a default background color… at least in Chrome.
![]()
bad_coder
10.8k20 gold badges44 silver badges68 bronze badges
answered Dec 14, 2012 at 23:58
![]()
5
<p style="font-size:14px; color:#538b01; font-weight:bold; font-style:italic;">
    Enter the competition by <span style="color:#FF0000">January 30, 2011</span> and you could win up to $$$$ — including amazing <span style="color:#0000A0">summer</span> trips!
</p>
The span elements are inline an thus don’t break the flow of the paragraph, only style in between the tags.
answered Jan 7, 2011 at 5:41
![]()
Damien-WrightDamien-Wright
7,2064 gold badges27 silver badges23 bronze badges
use spans. ex) <span style='color: #FF0000;'>January 30, 2011</span>
answered Jan 7, 2011 at 5:41
![]()
brian_dbrian_d
11.1k5 gold badges47 silver badges72 bronze badges
<font color="red">This is some text!</font>
This worked the best for me when I only wanted to change one word into the color red in a sentence.
![]()
Josh Lee
169k38 gold badges268 silver badges273 bronze badges
answered Sep 10, 2017 at 15:01
![]()
user8588011user8588011
2833 silver badges2 bronze badges
3
You can also make a class:
<span class="mychangecolor"> I am in yellow color!!!!!!</span>
then in a css file do:
.mychangecolor{ color:#ff5 /* it changes to yellow */ }
![]()
Muds
3,9645 gold badges32 silver badges51 bronze badges
answered Nov 20, 2015 at 15:34
![]()
JayMcpeZ_JayMcpeZ_
511 silver badge1 bronze badge
Tailor this code however you like to fit your needs, you can select text? in the paragraph to be what font or style you need!:
<head>
<style>
p{ color:#ff0000;font-family: "Times New Roman", Times, serif;}
font{color:#000fff;background:#000000;font-size:225%;}
b{color:green;}
</style>
</head>
<body>
<p>This is your <b>text. <font>Type</font></strong></b>what you like</p>
</body>
![]()
Wtower
18.4k11 gold badges106 silver badges80 bronze badges
answered Jun 19, 2016 at 11:23
![]()
You could use the longer boringer way
<p style="font-size:14px; color:#538b01; font-weight:bold; font-style:italic;">Enter the competition by</p><p style="font-size:14px; color:#ff00; font-weight:bold; font-style:italic;">summer</p> you get the point for the rest
answered Nov 17, 2015 at 19:51
![]()
I ask about ‘Standard’, not ‘Theme’, Colors.

asked May 15, 2018 at 15:30
1
For .docx documents, you can add via themes additional colors to the
Office color-picker as a new section called «Custom Colors» :

This is how to do that :
- In Word, go to the Design pane
- Click the down-arrow below Themes
- Choose «Save Current Theme…»
- Give a name and save the
.thmxfile, say asmytheme.thmx - Close Word
- Open the save folder, normally
C:Users{USER}AppDataRoamingMicrosoftTemplatesDocument Themes - Copy your theme file elsewhere
- Rename the file to
mytheme.thmx.zip - Open the file and drill-down to
theme,theme(again) - Copy the file
theme1.xmland open it in a text editor -
At the end of the file, just before the tag
</a:theme>, add a
a:custClrLsttag. Below is the text that produced the «Custom Colors»
section in my above image :<a:custClrLst> <a:custClr name="Dark Blue"> <a:srgbClr val="1F497D" /> </a:custClr> <a:custClr name="Mint Green"> <a:srgbClr val="99DB73" /> </a:custClr> <a:custClr name="Girly Pink"> <a:srgbClr val="FF99FF" /> </a:custClr> </a:custClrLst> -
Save the
theme1.xmland replace it inmytheme.thmx.zip - Rename the
mytheme.thmx.zipback tomytheme.thmxand replace it in its
original folder - Open Word. If the Custom Colors have not appeared, re-apply the
template in the Design pane by clicking the down-arrow below Themes
and re-assigning your template.
This new theme can be assigned to any Office document, not only Word.
References :
- PPT 2007 custom colors
This contains a link to a modified THMX file that you can examine. - XML Hacking: Custom Colors
- XML Hacking: An Introduction
answered May 15, 2018 at 18:21
![]()
harrymcharrymc
439k30 gold badges506 silver badges885 bronze badges
You cannot change the standard colors.
You can however add colors to the quick access colors (the grid below the color picker) when choosing a custom color (available through the «More Colors…» option). When you use these custom colors, they should appear in the main color dropdown below the standard colors under the caption «Recent Colors».
answered May 15, 2018 at 16:10
![]()
 Please Note:
This article is written for users of the following Microsoft Word versions: 2007, 2010, 2013, 2016, 2019, and Word in Microsoft 365. If you are using an earlier version (Word 2003 or earlier), this tip may not work for you. For a version of this tip written specifically for earlier versions of Word, click here: Using Different Colors with Tracked Changes.
![]()
Written by Allen Wyatt (last updated March 30, 2019)
This tip applies to Word 2007, 2010, 2013, 2016, 2019, and Word in Microsoft 365
Deborah uses Track Changes to note edits made in a document. She made corrections in a document with Track Changes turned on, so her changes were in one color. Her boss reviewed the document and gave it back to her, asking that the next round of changes be in a different color than the first round was. Deborah wonders if there is a way to specify that her next set of changes be in a different color.
Word’s Track Changes feature chooses markup colors based on the user name. To make future changes you need to alter the user name slightly. Here are the steps if you are using Word 2007 or Word 2010:
- Display the Review tab on the ribbon.
- Click the down-arrow under the Track Changes option in the Tracking group.
- Choose Change User Name. Word displays the Popular options of the Word Options dialog box if you are using Word 2007. If you are using Word 2010 then it displays the General options of the Word Options dialog box. (See Figure 1.)
- Change the User Name field value by adding or deleting a middle initial or name or by adding a number to the end of the name.
- Change the Initials field to correspond more closely to the change you made in the User Name field.
- Click OK.
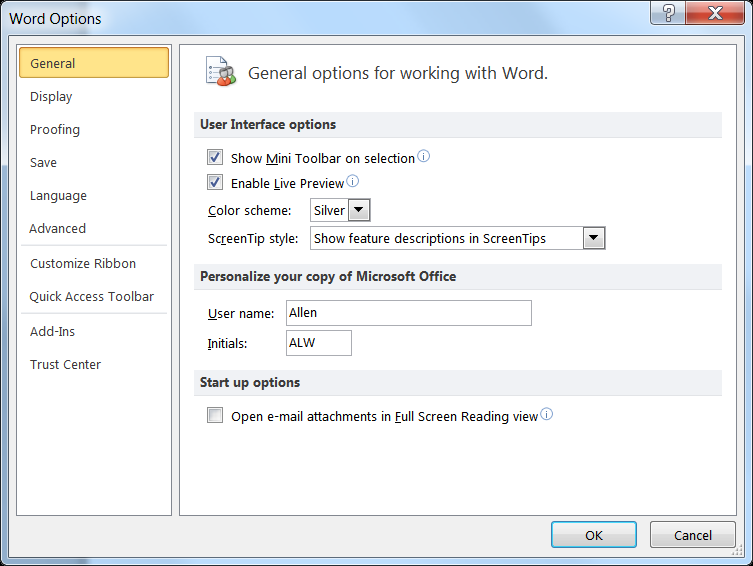
Figure 1. The General options of the Word Options dialog box.
If you are using Word 2013 or a later version, then the steps are a bit different:
- Display the Review tab on the ribbon.
- Click the small arrow at the bottom-right of the Tracking group. Word displays the Track Changes Options dialog box. (See Figure 2.)
- Click the Change User Name button. Word displays the General options of the Word Options dialog box.
- Change the User Name field value by adding or deleting a middle initial or name or by adding a number to the end of the name.
- Change the Initials field to correspond more closely to the change you made in the User Name field.
- Make sure the Always Use These Values Regardless of Sign in to Office checkbox is selected. (This step is very important.) (See Figure 3.)
- Click OK.
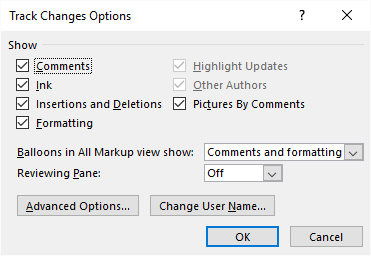
Figure 2. The Track Changes Options dialog box.
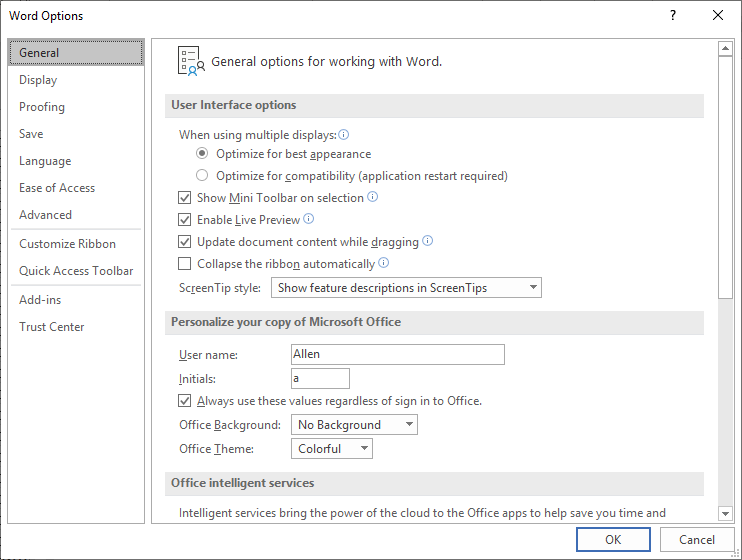
Figure 3. The General options of the Word Options dialog box.
Edits with Track Changes will now be in a new color. When the mouse hovers over a change, the new user name will be displayed. If you change the user name back to the original value, future edits will revert to color that was first assigned to that name.
When you are done, be sure to change your user name back to the original value so that other documents will be labeled with that name instead of a convoluted name for editing purposes.
WordTips is your source for cost-effective Microsoft Word training.
(Microsoft Word is the most popular word processing software in the world.)
This tip (6083) applies to Microsoft Word 2007, 2010, 2013, 2016, 2019, and Word in Microsoft 365. You can find a version of this tip for the older menu interface of Word here: Using Different Colors with Tracked Changes.
Author Bio
With more than 50 non-fiction books and numerous magazine articles to his credit, Allen Wyatt is an internationally recognized author. He is president of Sharon Parq Associates, a computer and publishing services company. Learn more about Allen…
MORE FROM ALLEN
Consistent Formatting Between Word Versions
When you upgrade from one version of Word to another, you may be surprised to find that your documents, all of a sudden, …
Discover More
Recovering Macros from Corrupted Workbooks
Workbooks get corrupted from time to time; that’s a fact of life in an Excel world. If those corrupted workbooks contain …
Discover More
Extracting a State and a ZIP Code
Excel is often used to process or edit data in some way. For example, you may have a bunch of addresses from which you …
Discover More
More WordTips (ribbon)
Stopping Automatic Changes from Being Tracked
Track Changes is a great feature for keeping track of what gets changed in a document. There are some things (such as …
Discover More
Making Simple Markup the Default for Track Changes
Word allows you to view any tracked changes in your documents in a variety of ways. Here’s how you can make one of those …
Discover More
Track Changes Thinks the Editor Has Changed
Track changes is a great feature to use when you want to show what has changed in a document. Word should note which …
Discover More
Multicolor texts can make your website more attractive and interesting for visitors. This snippet will help you to learn how to create such texts for your website.
There are 3 ways of creating a multicolor text. Let’s dive in and try it together.
You can create a multicolor text with the help of image editors such as Pixelmator, Photoshop and so on. So, you can create a multicolor image and embed it into your website.
The multicolor text will not be searchable with this method.
As a result, your code will look like the following:
<img src="multicolortext.png" alt="multi color text"/>Another way is creating a text with separate elements by using the HTML <span> tag, which is an empty container. This means that you create a multicolor text by putting each letter in a separate element to define a different color for each letter of your text.
Example of creating a multicolor text with separate elements in HTML:
<!DOCTYPE html>
<html>
  <head>
    <title>Title of the document</title>
  </head>
  <body>
    <span style="color:#FF0000">H</span>
    <span style="color:#66CC66">e</span>
    <span style="color:#FF9966">l</span>
    <span style="color:#FFCCCC">l</span>
    <span style="color:#FF0066">o</span>
  </body>
</html>
Result
And finally, you can use CSS. This is the easiest way of creating such kind of text.
Put your text in a <span> tag and give it a class name «multicolortext». Then, you need the CSS background-image property to add a gradient background to your text with its «linear-gradient» value, where you put the names of your preferred colors.
To get multicolor text instead of the multicolor background, you need to use the background-clip property, which lets you control how far a background image or color extends beyond the element’s padding or content. This step gives some colors to your text, but not exactly what you want.
You can get the final result by making your text color transparent with the color property so that the background color will be reflected in the text.
Example of creating a multicolor text with HTML and CSS:
<!DOCTYPE html>
<html>
  <head>
    <title>The title of the document</title>
    <style>
      .multicolortext {
        background-image: linear-gradient(to left, violet, indigo, green, blue, yellow, orange, red);
        -webkit-background-clip: text;
        -moz-background-clip: text;
        background-clip: text;
        color: transparent;
      }
    </style>
  </head>
  <body>
    <h1>
      <span class="multicolortext">Let’s be creative!</span>
    </h1>
  </body>
</html>
Let’s get modern!
I think you’re like me in that previous examples are not something we want to do in this day and age (Although they were good enough to grasp ways to do it).
So let’s do it in a more modern way. Here comes the magic of linear-gradient! Now we start our example, going step by step, and extend this!
We have just one h1 tag and will make it alive soon with an animation!
Also, you can read the comments in front of each closing line of CSS styles to help you understand even better.
We start implementing our text with some basic styling.
<!DOCTYPE html>
<html lang="en">
  <head>
    <title>Linear Gradient</title>
  </head>
  <body>
    <style>
      h1 {
        font-size: 10vw; /* make our h1 tag larger */
        font-family: sans-serif; /* choosing our font */
      }
    </style>
    <h1>W3DOCS</h1>
  </body>
</html>
Here we’ll add background and our linear-gradient value.
h1 {
  font-size: 10vw;
  /* make our h1 tag larger */
  font-family: sans-serif;
  /* choosing our font */
  background: linear-gradient(to right, rgba(255, 215, 255, 0) 0%, rgba(225, 255, 255, 0.5) 20%, rgba(255, 255, 255, 0) 61%), linear-gradient(rgb(97, 183, 217) 52%, rgb(224, 246, 255) 60%, rgb(78, 99, 132) 61%);
  /* you can change the colors based on your preference */
}
Let’s see what we’ve got now:

Now, let’s add background-clip and -webkit-text-fill-color properties to have the linear-gradient take effect on our text.
h1 {
  font-size: 10vw;
  /* make our h1 tag larger */
  font-family: sans-serif;
  /* choosing our font */
  background: linear-gradient(to right, rgba(255, 215, 255, 0) 0%, rgba(225, 255, 255, 0.5) 20%, rgba(255, 255, 255, 0) 61%), linear-gradient(rgb(97, 183, 217) 52%, rgb(224, 246, 255) 60%, rgb(78, 99, 132) 61%);
  /* you can change the colors based on your preference */
  background-clip: text;
  /*add this line, it defines how far the background should extend within an element, here we set it to text */
  -webkit-background-clip: text;
  /* add this line, for browsers compatibility */
  -webkit-text-fill-color: transparent;
  /* specifies the fill color of text characters. We use transparent to use the background value as our text fill */
}
Now it looks like this:

Much better. Let’s take it a step further and give it some wavy animation to make it even cooler!
h1 {
  font-size: 10vw;
  /* make our h1 tag larger */
  font-family: sans-serif;
  /* choosing our font */
  background: linear-gradient(to right, rgba(255, 215, 255, 0) 0%, rgba(225, 255, 255, 0.5) 20%, rgba(255, 255, 255, 0) 61%), linear-gradient(rgb(97, 183, 217) 52%, rgb(224, 246, 255) 60%, rgb(78, 99, 132) 61%);
  /* you can change the colors based on your preference */
  background-clip: text;
  /*it defines how far the background should extend within an element, here we set it to text */
  -webkit-background-clip: text;
  /*for browsers compatibility */
  -webkit-text-fill-color: transparent;
  /* specifies the fill color of text characters. We use transparent to use the background as our text fill */
  animation: wave 2000ms ease alternate infinite;
  /* add this line */
  transition: all 0.4s ease;
  /* add this line */
}
@keyframes wave {
  0% {
    background-position: 0 0;
  }
  100% {
    background-position: 50vw 10px;
  }
}
/* add this line */
We defined a custom animation named wave here, which will be run every 2 seconds, and during this time, it will change our background-position 50vw on the x-axis and 10px on the y-axis. You’re free to change that values and get your desired result as well!
We also declared a transition to smooth this movement a little bit!
Here’s the final code and result:
<!DOCTYPE html>
<html lang="en">
  <head>
    <title>Linear Gradient</title>
  </head>
  <body>
    <style>
      h1 {
        font-size: 10vw; /* make our h1 tag larger */
        font-family: sans-serif; /* choosing our font */
        background: linear-gradient(to right, rgba(255, 215, 255, 0) 0%, rgba(225, 255, 255, 0.5) 20%, rgba(255, 255, 255, 0) 61%), linear-gradient(rgb(97, 183, 217) 52%, rgb(224, 246, 255) 60%, rgb(78, 99, 132) 61%); /* you can change the colors based on your preference */
        background-clip: text; /*it defines how far the background should extend within an element, here we set it to text */
        -webkit-background-clip: text; /*for browsers compatibility */
        -webkit-text-fill-color: transparent; /* specifies the fill color of text characters. We use transparent to use the background as our text fill  */
        animation: wave 2000ms ease alternate infinite;
        transition: all 0.4s ease;
      }
      @keyframes wave {
        0% {
          background-position: 0 0;
        }
        100% {
          background-position: 50vw 10px;
        }
      }
    </style>
    <h1>W3DOCS</h1>
  </body>
</html>
Cool! I hope you’ve enjoyed it!
Excel for Microsoft 365 Word for Microsoft 365 Outlook for Microsoft 365 PowerPoint for Microsoft 365 Project Online Desktop Client Publisher for Microsoft 365 Excel 2021 Word 2021 Outlook 2021 PowerPoint 2021 Project Professional 2021 Project Standard 2021 Publisher 2021 Excel 2019 Word 2019 Outlook 2019 PowerPoint 2019 Project Professional 2019 Project Standard 2019 Publisher 2019 Excel 2016 Word 2016 Outlook 2016 PowerPoint 2016 Project Professional 2016 Project Standard 2016 Publisher 2016 Excel 2013 Word 2013 Outlook 2013 PowerPoint 2013 Project Professional 2013 Project Standard 2013 Publisher 2013 Word 2010 More…Less
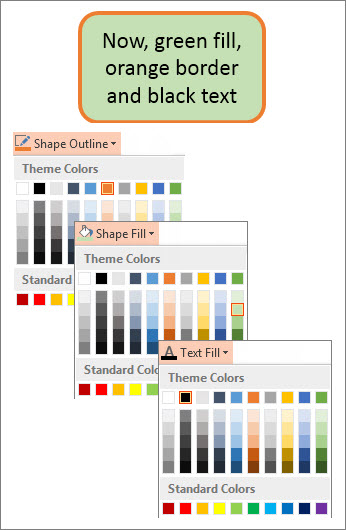
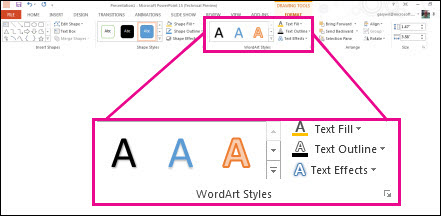
In a text box or shape, you can quickly change the color of text, the inside (fill) color, or the color of the border.
Let’s select the shape—the Drawing Tools appear in the ribbon, with the Format tab active.
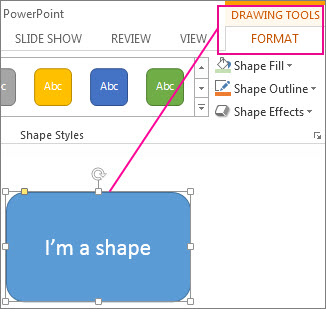
Here’s the same shape after we changed the border to orange, the fill to a light green, and the text to black. We used the Shape Outline, Shape Fill, and Text Fill commands, available on the Format tab under Drawing Tools.
Although the changes we’ll make below are shown in Microsoft PowerPoint, they work the same way in Excel, Word, Outlook, and Project.
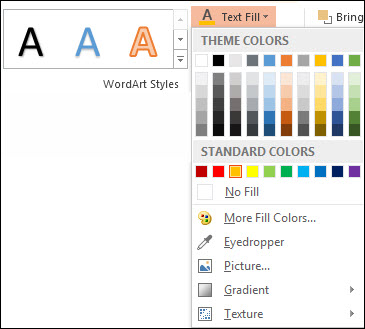
Change the text color
-
Select the shape or text box border. When you do that, the Drawing Tools appear.
To change multiple shapes or text boxes, click the first shape or text box, and then press and hold Ctrl while you click the other shapes or text boxes.
-
On the Drawing Tools Format tab, click Text Fill and, under Theme Colors, pick the color you want.
Note: The Text Fill and Text Outline menus might not be active until you start typing in your shape.

To change the text to a color that isn’t in the theme colors
-
Select the shape or text box.
-
On the Drawing Tools Format tab, click Text Fill > More Fill Colors.
-
In the Colors box, either click the color you want on the Standard tab, or mix your own color on the Custom tab. Custom colors and colors on the Standard tab aren’t updated if you later change the document theme.
-
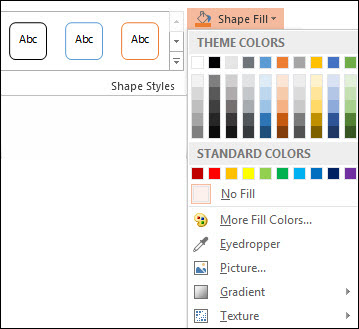
Change the inside (fill) color
-
Select the shape or text box to change. When you do that, the Drawing Tools appear.
To change multiple shapes or text boxes, click the first shape or text box, and then press and hold Ctrl while you click the other shapes or text boxes.
-
Click Shape Fill, and under Theme Colors, pick the color you want.
To change the fill color to a color that isn’t in the theme colors
-
Select the shape or text box.
-
On the Drawing Tools Format tab, click Shape Fill > More Fill Colors.
-
In the Colors box, either click the color you want on the Standard tab, or mix your own color on the Custom tab. Custom colors and colors on the Standard tab aren’t updated if you later change the document theme.
-

Change the border color
-
Select the shape or text box border. When you do that, the Drawing Tools appear.
If you want to change multiple shapes or text boxes, click the first shape or text box, and then press and hold Ctrl while you click the other shapes or text boxes.
-
On the Drawing Tools Format tab, click Shape Outline and, under Theme Colors, pick the color you want.
To change the border to a color that isn’t in the theme colors
-
Select the shape or text box.
-
On the Drawing Tools Format tab, click Shape Outline, and then click More Outline Colors.
-
In the Colors box, either click the color that you want on the Standard tab, or mix your own color on the Custom tab. Custom colors and colors on the Standard tab aren’t updated if you later change the document theme.
-

Tip: In PowerPoint, you can also change the border color by clicking Shape Outline (on the Home tab, in the Drawing group).
See Also
Remove or change the border on a text box or shape
Add a fill or effect to a shape
Change the font color (text color)
Change the background or color in Word
Change a message background in Outlook
Change the background color of your slides in PowerPoint
Insert WordArt
Add shapes
Need more help?
Want more options?
Explore subscription benefits, browse training courses, learn how to secure your device, and more.
Communities help you ask and answer questions, give feedback, and hear from experts with rich knowledge.
Given the requirements:
1) A User inserts some text in a RichTextBox Control.
2) If the word entered is part of a pre-defined list of words, that word should change color (so, define a relation between a word and a color).
3) When a mouse Click event is generated on a colored word, an event is raised, to notify which word was clicked.
Possible result (to replicate what’s in the visual example):
Define a custom EventHandler with custom EventArgs:
public class WordsEventArgs : EventArgs
{
    private string m_word;
    public WordsEventArgs(string word) { m_word = word; }
    public string Word { get { return m_word; } set { m_word = value; } }
}

public delegate void WordsEventHandler(object sender, WordsEventArgs e);
public event WordsEventHandler WordClicked;

protected void OnWordClicked(WordsEventArgs e) => WordClicked?.Invoke(this, e);
Subscribe to the event:
this.WordClicked += new WordsEventHandler(this.Word_Click);
Simple Class for the list of words:
public class ColoredWord
{
    public string Word { get; set; }
    public Color WordColor { get; set; }
}

public List<ColoredWord> ColoredWords = new List<ColoredWord>();
Fill the list with some words an related color, then bind it to a ListBox, calling the FillColoredWords() method (in other words, handle a collection of objects that relate pieces of text with Color values):
public void FillColoredWords()
{
    ColoredWords.Add(new ColoredWord { Word = "SIMPLE", WordColor = Color.Goldenrod });
    ColoredWords.Add(new ColoredWord { Word = "COLORED", WordColor = Color.Salmon });
    ColoredWords.Add(new ColoredWord { Word = "TEXT", WordColor = Color.DarkCyan });
    this.listBox1.DisplayMember = "Word";
    this.listBox1.DataSource = ColoredWords;
}
In the KeyPress event, evaluate whether the last entered word is part of the list of words to color:
private void richTextBox1_KeyPress(object sender, KeyPressEventArgs e)
{
    int currentPosition = richTextBox1.SelectionStart;

    if (e.KeyChar == (char)Keys.Space && currentPosition > 0 && richTextBox1.Text.Length > 1) {
        int lastSpacePos = richTextBox1.Text.LastIndexOf((char)Keys.Space, currentPosition - 1);
        lastSpacePos = lastSpacePos > -1 ? lastSpacePos + 1 : 0;

        string lastWord = richTextBox1.Text.Substring(lastSpacePos, currentPosition - (lastSpacePos));
        ColoredWord result = ColoredWords.FirstOrDefault(s => s.Word == lastWord.ToUpper());

        richTextBox1.Select(lastSpacePos, currentPosition - lastSpacePos);
        if (result != null) {
            if (richTextBox1.SelectionColor != result.WordColor) {
                richTextBox1.SelectionColor = result.WordColor;
            }
        }
        else {
            if (richTextBox1.SelectionColor != richTextBox1.ForeColor) {
                richTextBox1.SelectionColor = richTextBox1.ForeColor;
            }
        }
        richTextBox1.SelectionStart = currentPosition;
        richTextBox1.SelectionLength = 0;
        richTextBox1.SelectionColor = richTextBox1.ForeColor;
    }
}
In the MouseClick event, verify whether the event is generated on a colored word.
In that case, raise the custom OnWordClicked() event:
private void richTextBox1_MouseClick(object sender, MouseEventArgs e)
{
    if (richTextBox1.SelectionColor.ToArgb() != richTextBox1.ForeColor.ToArgb()) {
        try {
            int wordInit = richTextBox1.Text.LastIndexOf((char)32, richTextBox1.SelectionStart);
            wordInit = wordInit > -1 ? wordInit : 0;
            int wordEnd = richTextBox1.Text.IndexOf((char)32, richTextBox1.SelectionStart);
            string wordClicked = richTextBox1.Text.Substring(wordInit, wordEnd - wordInit) + Environment.NewLine;
            OnWordClicked(new WordsEventArgs(wordClicked));
        }
        catch (Exception) {
            //Handle a fast DoubleClick: RTB is a bit dumb.
            //Handle a word auto-selection that changes the `.SelectionStart` value
        }
    }
}
In the custom event, you can append the clicked word to a TextBox (or do whatever else you want to do with it):
private void Word_Click(object sender, WordsEventArgs e)
{
    textBox1.AppendText(e.Word);
}
TheTechieSenior.com is reader supported. We may earn a commission if you buy through links on this site. As an Amazon Associate, we earn from qualifying purchases. Learn more here.
If your chosen communication method is through written documents, changing text color is probably the easiest way to have a word or section stand out. I’ll show you how to change text color in Microsoft Word.
Table of Contents
Change text color in Microsoft Word
As with most formatting features in MS Word, you can either change a setting prior to typing your text or you can type it and change the color, size, font, etc. later.

Let’s say you’ve already typed your document and you want to change the color of a single word from the default black to red. Click your mouse just before the first letter of the word or words that you wish the alter the color, then drag your mouse or your finger on a trackpad across until your target text is selected. Once you’ve selected the text, use one of the following methods to change the color.
You can use any of these methods to change your font color for an entire document. If you haven’t typed anything into your document yet, you’d simply use one of the methods given below to change the text color at the beginning of the document.
If your document is fully typed and you decide to change the text color, say from black to dark grey, just select the entire text before you use the methods given below.
Hint: Click anywhere in the document with your mouse. Then, Control + A on Windows computers or Command + A on Mac computers will select the text of the entire document.
Method one – change text color in Word
Leave your text selected and select the Home tab in the ribbon.
- The second section from the left is the text section. Look for a capital A icon with a colored underline. Click that A icon to change your text to the color of the underline under that icon.
- If you want a different color, click the small arrow just on the right of that A icon. An options panel will open where you can select from a number of colors.
- If you don’t see the color you’re looking for, click More Colors… to open a color wheel that will allow you to choose from many more colors.
Method two – change text color in Word
Leave your text selected.
- Right-click on the text and choose “Font….”
- Be sure the Font tab is selected, then in the second section down (Font and Underline), click in the drop-down box below Font Color….
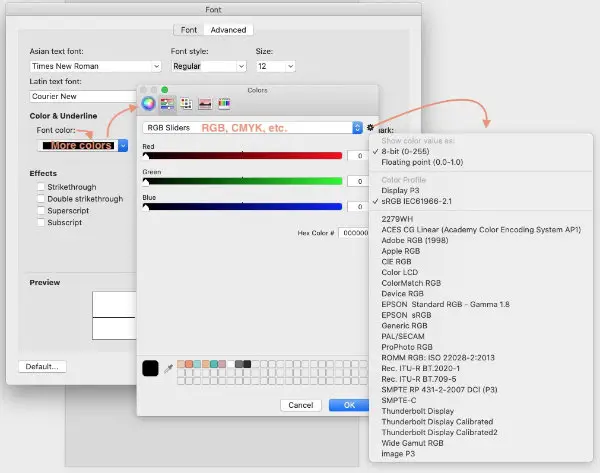
In Microsoft Word for Mac, you could possibly have a huge assortment of font colors available to you. The exact number depends on whether you have other software such as graphic design or photo editing software on your computer that might install additional colors.
When you open the Font panel from the right-click menu, then open the Font color drop-down box, you will see an assortment of color pickers – wheels, etc.. Any of those may present your with more colors to select from.
In the panel that you see when you click the font color drop-down box, there is another drop-down at the top that lets you choose the type of sliders that you want to use. You can RGB, CMYK and more.
To the right of that option, there is a tiny gear icon. If you click on that gear icon, you will see a long list of color profiles to select from. In most cases, writers will not need to change those, but they are available if needed.
Set your font color before typing text in Microsoft Word
You can also set the font color prior to typing the words in MS Word. To do that, just follow the previous instructions except that you will not select your text before you choose the color. Instead, when you come to the place in your document where you want the different colored word, stop just prior to the different colored word. Use the instructions above to set the font color. The menu/ribbon and right-click options will work.
When you’re ready to return to black or whatever your basic document text color is, follow the instructions again and choose black. Continue typing. You should see your colored word in line with your black text.
Personally, if I know ahead of time that I want one or more upcoming words to be a different color, I find it easier to just do it as I type than to return and change it later.
You’ll find more of our tips for styling your text in Microsoft Word here.
You can learn more about styling text in the Microsoft Style Guide.
In this article, we will give you 5 ways to set different background colors for different pages in your Word document.
Word allows us to set a background color for our document. However, it will apply the same color for all pages. But, sometimes we may need to print a document with multiple background colors, or highlight important pages with different background colors. In such cases, we need some workarounds to set different background colors for different pages.
Method 1: Insert a Text Box
- First and foremost, click “Insert” and choose “Text Box”.
- Next choose “Draw Text Box” on the drop-down menu.

- Then draw a text box to cover the entire page.
- Now right click on the outline of text box. Move cursor on “Wrap Text” and click “Behind Text” on its submenu. You will be able to see the texts then.

- Next, right click on text box outline again. This time choose “Format Shape”.
- In “Format Shape” dialog box, click “Fill” and then choose a fill color.

- Then in the same box, click “Line Color” tab.
- And select “No line”. Close the box.


Now if you need to print the document, go to open “Word Options” by clicking “File” and “Options”. Next click “Display” and check “Print drawings created in Word” and “Print background colors and images” boxes. Click “OK”.
Here is the effect:
Method 2: Insert a Shape
- Firstly, click “Insert” and choose “Shapes”.
- Then select “Rectangle”.

- Next your cursor will change to a cross sign. Use it to draw a rectangle to cover the page.
- Likely, right click on the shape.
- Repeat from step 4 to 8 in method 1.

Ensure the print options are properly set if you need to print the document.
The above 2 methods are best used to apply colors for individual pages. If you have multiple pages which need to be in the same color, you may consider the following solutions.
Method 3: Copy the Color to More Pages
- After employing method 2, click on colored page and press “Ctrl+ D” to copy the color.
- Next drag the shape to another page and release your cursor. You will see the color is perfectly pasted.


Method 4: Insert Section Breaks
- If you need to apply a color for a number of pages in order, you can create a section first. Move cursor to the start of the first page in the section, click “Page Layout”, click “Breaks” and choose “Continuous”. This inserts a section break.

- Move cursor to the end of the last page in the section. Use the same way to insert a section break.
- Then double click on the header of the first page in the section to enter header and footer mode.
- Deselect the “Link to Previous”.

- Go to the first header of the next section. Repeat step 4.
- Then use either method 1 or 2 to color the pages.
- Lastly, click “Design” and click “Close Header and Footer” to exit header mode.


Method 5: Split a Document
There is one last way that is to split a document into several subdocuments. Then click “Page Layout”, click “Page Color”, and choose a color.
Fix the Annoying Word Issues
As most Word users have noticed, Word is susceptible to errors and mistakes. This is excusable but something needs to be fixed. Otherwise our treasurable data would be on the line. Thus, it’s necessary to find a utility to fix Word.
Author Introduction:
Vera Chen is a data recovery expert in DataNumen, Inc., which is the world leader in data recovery technologies, including fix xls and pdf repair software products. For more information visit www.datanumen.com