
Excel for Microsoft 365 Word for Microsoft 365 PowerPoint for Microsoft 365 Excel 2016 Word 2016 PowerPoint 2016 Excel 2013 Word 2013 PowerPoint 2013 Excel 2010 Word 2010 PowerPoint 2010 More…Less
-
Select the picture whose color you want to change.
-
Click the Format tab, and then click Color.

If the Format tab is not visible, make sure you selected a picture.
-
Do one of the following:
-
Choose from one of the many Color Saturation, Color Tone, or Recolor options in the Color gallery.
-
Click Picture Color Options at the bottom of the Color gallery.
In the Format Picture pane manually adjust Color Saturation, Color Tone, and Recolor for the picture you selected.
-

Note: You can undo an edit by clicking the corresponding Undo command on the Edit menu. The edits to the pictures will not be saved until you explicitly save them.
Need more help?
Want more options?
Explore subscription benefits, browse training courses, learn how to secure your device, and more.
Communities help you ask and answer questions, give feedback, and hear from experts with rich knowledge.

on
April 2, 2019, 3:11 AM PDT
How to add color or a picture to a Word document’s background
There’s nothing wrong with a white background, but Microsoft Word lets you change the color of a document’s background. You can even use a picture, but don’t get carried away.
We may be compensated by vendors who appear on this page through methods such as affiliate links or sponsored partnerships. This may influence how and where their products appear on our site, but vendors cannot pay to influence the content of our reviews. For more info, visit our Terms of Use page.
Editor’s note: In the video, Brandon Vigliarolo uses Microsoft Office 365 and walks through the steps of adding colors or images to the background of your Word documents. In the following tutorial, Susan Harkins explains the process when using Word 2010. This article was first published in December 2011 and was updated in March 2019.
Most documents are rather boring–the same black text on a white background. That’s the way it should be though because most documents don’t require special graphics and colors. However, when a document requires more, Word offers many visual possibilities. For instance, you might want to change the background’s color or even use a picture as the document’s background. Both are easy to accomplish, technically speaking, and in this article, I’ll show you how to do both.
Keep in mind that adding a background color or picture to a document is much easier than designing a visually effective document. I’ll share only the mechanical process; how you implement the feature is up to you.
I’m using Office 365 Word (desktop) on a Windows 10 64-bit system, but you can use older versions. You’ll find these options on the Design tab in the Page Background group. (In earlier versions, look for the Page Layout tab.) The browser edition doesn’t support the background feature.
LEARN MORE: Office 365 Consumer pricing and features
Add color
Adding a bit of color is probably the easiest way to liven up an otherwise boring document. You might decide to add a sedate color to a promotional letter or resume. To add color to a document’s background, you’ll work from the Design tab, as follows.
- Click Page Color in the Page Background group.
- Choose a color from the gallery (palette) as shown in Figure A.
Figure A

It doesn’t get much easier than that. You can click More Colors to fine-tune a gallery color. Choose No Color to remove a colored background.
Although simple, you could create some ghastly backgrounds. There’s a lot to consider when introducing color into a document. Color-wise, there are several attributes, hue, chroma, and so on.
Your main consideration should be legibility. In that regard, contrast is usually the most important factor: the higher the contrast, the more legible the text. It also adds to the layers of separation, as shown in the illustration in Figure B. The more contrast, the more depth, which improves readability. I’m not suggesting that you take a crayon-box attitude to your documents though. This illustration is just that, an illustration–not a recommendation for these particular colors.
Figure B

Limiting your choices will produce the best results. Limit your color palette to two or three colors. Use different shades (hue) and saturation (chroma) to add variation. And remember, even in digital form, there’s nothing wrong with a white background.
Add a picture
The process for adding a picture to a document’s background is similar to inserting a picture into an AutoShape–you use the Fill Effects option.
Note:This feature has the potential to produce more ghastly results, so just because you can add a picture doesn’t mean you should.
You’ll use the same Page Color option on the Page Layout tab (in the Page Background group) to add a picture, as follows.
- Click the Page Color option and choose Fill Effects.
- Click the Picture tab.
- Click Select Picture.
- Locate the picture you want to insert and click Insert.
- Click OK.
Figure C
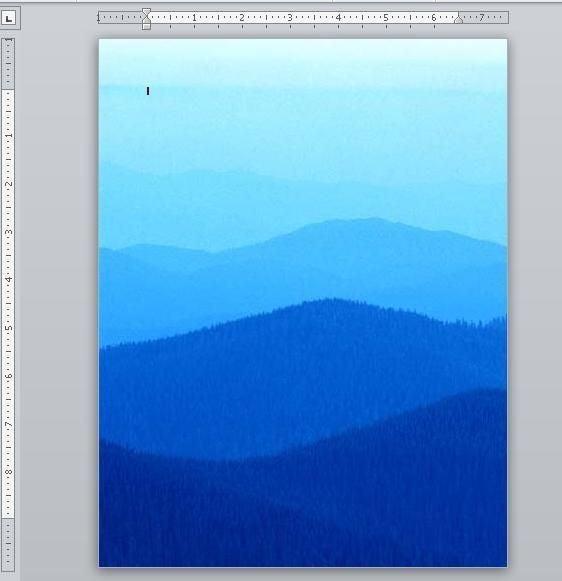
Figure C shows an interesting background that might work well with the right subject matter, but it presents quite a challenge. What color font would you use? How much text could you add? Balancing all the requirements takes skill, but most of us can learn those skills with the right training. If you change your mind, it’s easy to remove, albeit not intuitive: Choose No Color from the Page Color dropdown.
As I mentioned, adding color or a picture to a document’s background is easy. Producing a visually effective document takes specialized knowledge.
Send me your question about Office
I answer readers’ questions when I can, but there’s no guarantee. Don’t send files unless requested; initial requests for help that arrive with attached files will be deleted unread. You can send screenshots of your data to help clarify your question. When contacting me, be as specific as possible. For example, “Please troubleshoot my workbook and fix what’s wrong” probably won’t get a response, but “Can you tell me why this formula isn’t returning the expected results?” might. Please mention the app and version that you’re using. I’m not reimbursed by TechRepublic for my time or expertise when helping readers, nor do I ask for a fee from readers I help. You can contact me at susansalesharkins@gmail.com.
Affiliate disclosure: TechRepublic may earn a commission from the products and services featured on this page.
Also See
-
How to become a cloud engineer: A cheat sheet
(TechRepublic) -
How to add a drop-down list to an Excel cell
(TechRepublic) -
20 pro tips to make Windows 10 work the way you want
(TechRepublic download) -
System update policy
(Tech Pro Research) -
Microsoft Office 365 for business: Everything you need to know
(ZDNet) -
6 ways to delete yourself from the internet
(CNET) -
Best to-do list apps for managing tasks on any platform
(Download.com) -
Get more must-read Microsoft coverage
(TechRepublic on Flipboard)
-
Microsoft
-
Software
How change the color of images in Word?
Many students may not be able to find an image with the desired color in search engines when they want to design a graphical abstract. That’s why they need to change the color of images in Word . In this article, we’ll teach you how to change the whole or part of an image in Word.
Selecting the appropriate images for the graphical abstract design
The most difficult part of this work is to find the images you need in a PNG format that do not have a background (Transparent). If you use JPEG images, you need to delete them owing to having white or colored backgrounds, as it is taught in the article.
Change the color of images in Word
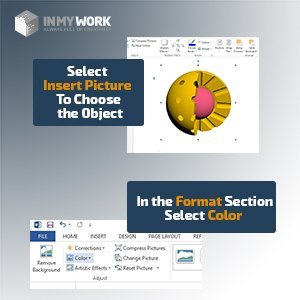
- First, go to the INSERT section, click on the PICTURES option, and select the image you want to appear in Word.
- The FORMAT section is activated by clicking on the image. In this section, click on the COLOR option to open the drop-down box.
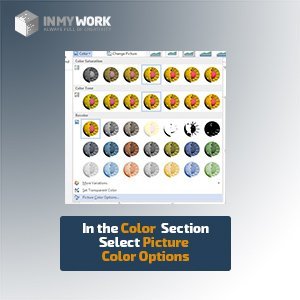
- If your image is in JPEG format or in the formats that have a background, the background image will be deleted by selecting the SET TRANSPARENT COLOR option and then clicking on the background.
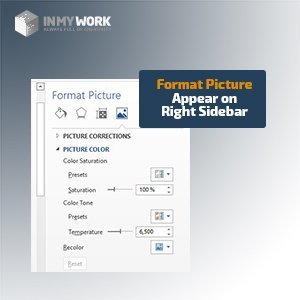
- In the COLOR section, click on the PICTURE COLOR OPTION to display the FORMAT PICTURE section on the right side of the Word.
- In the FORMAT PICTURE section, you can apply various options such as CONTRAST AND BRIGHTNESS, SHARPNESS, SATURATION and more.
- In the FORMAT PICTURE section, selecting the RECOLOR option can change the entire image to a single color structure.
Color change of the only part of a picture
- In the FORMAT section, select the IN FRONT OF TEXT option in WRAP TEXT to remove the image from the locked state. With this, you can move the image anywhere in Word.
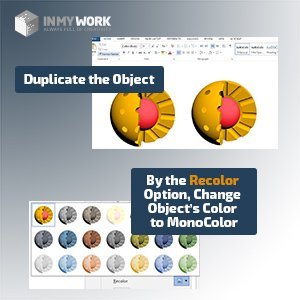
- Then make another copy of your image.
- Select one of the images and in the RECOLOR section, change the color of the image to a mono-color.
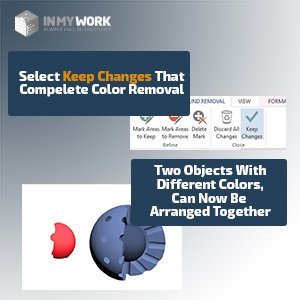
- By click on the image go to the FORMAT section and select the REMOVE BACKGROUND OPTION.
- If you select the MARK AREAS TO REMOVE option, you can delete the parts of the shape you do not need by dragging the mouse.

- Finally, click on the KEEP CHANGE.
- At this point, you have two images with two different colors that you can arrange (see the educational arrangement of images in Word)
- It can also be used for more complex images.
If the graphical abstract design is taken a long time or you want to have a very professional design, it’s suggested that you trust the Inmywork team for your design.
Related Posts
In addition to using existing themes and style sets, you can make your own. You can create new themes and style sets from scratch or tweak existing ones. By using custom styles and themes, you can easily control exactly how your document looks.
Create Custom Color Sets
You can create your own color set to give your document a fresh, unique look or comply with your organization’s brand standards.
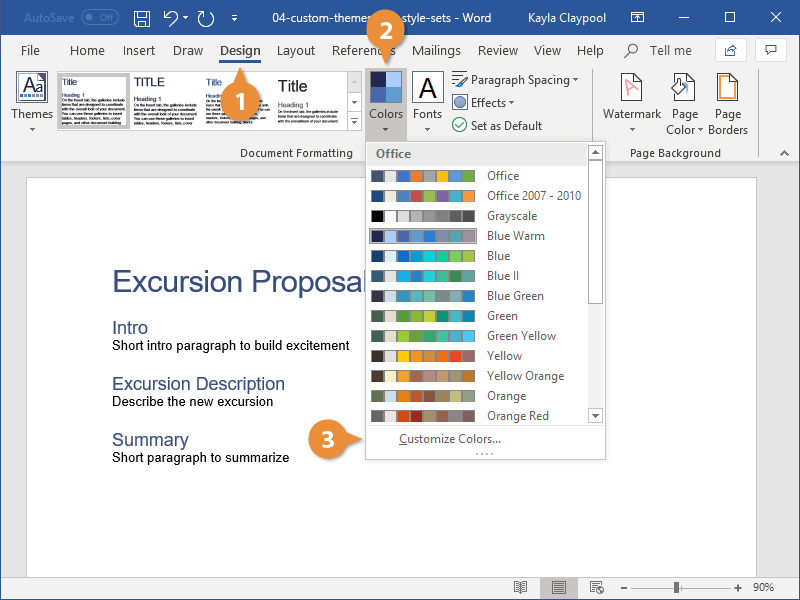
- Click the Design tab.
- Click the Colors button.
This menu shows previews of all the existing color sets, but you can also create your own.
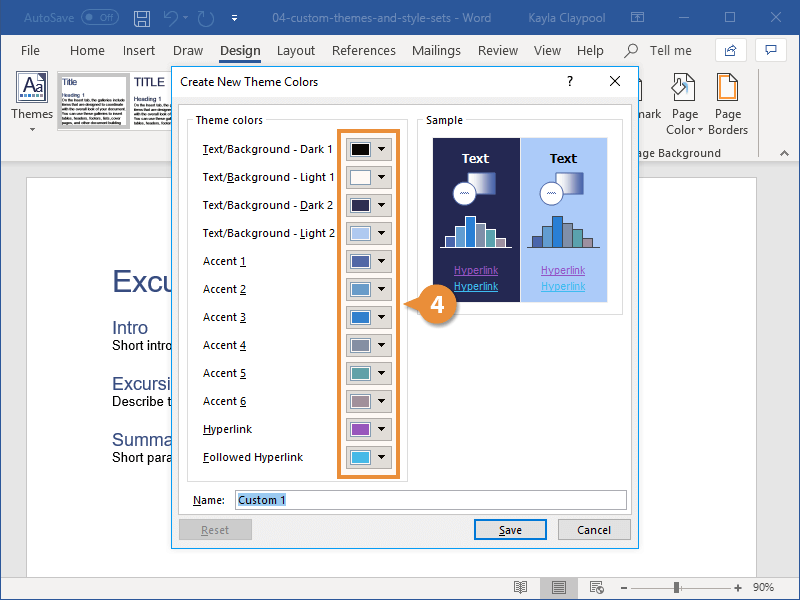
- Select Customize Colors.

In this dialog box, you can set the text, background, and accent colors.
- Click a color’s button.
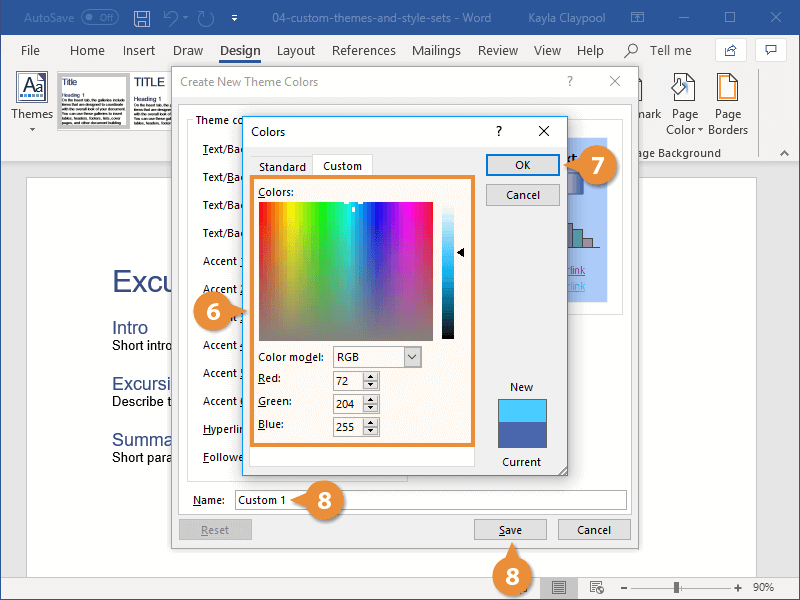
- Select More Colors.
Here, you can choose a color from the color picker or enter the exact color value in the text fields.
- Specify a color.
- Click OK.
The color is changed. Continue changing the other colors in the set the same way.
- When you’ve finished setting colors, give the color set a name and click Save.
You can switch the colors with another from the current theme or a variant of one of those colors.
If you’d prefer to create a new color set entirely, rather than shuffling existing theme colors around, you can.

The new color set is saved and automatically applied.
Create Custom Font Sets
You can also create custom font sets to use in custom themes.
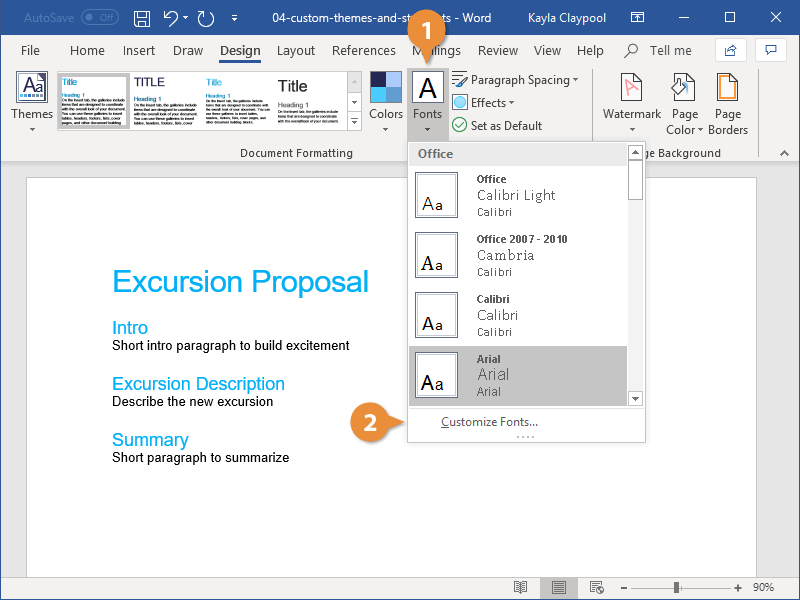
- Click the Fonts button on the Design tab.
This menu lists all the font sets available, but you can also create your own.
- Select Customize Fonts.
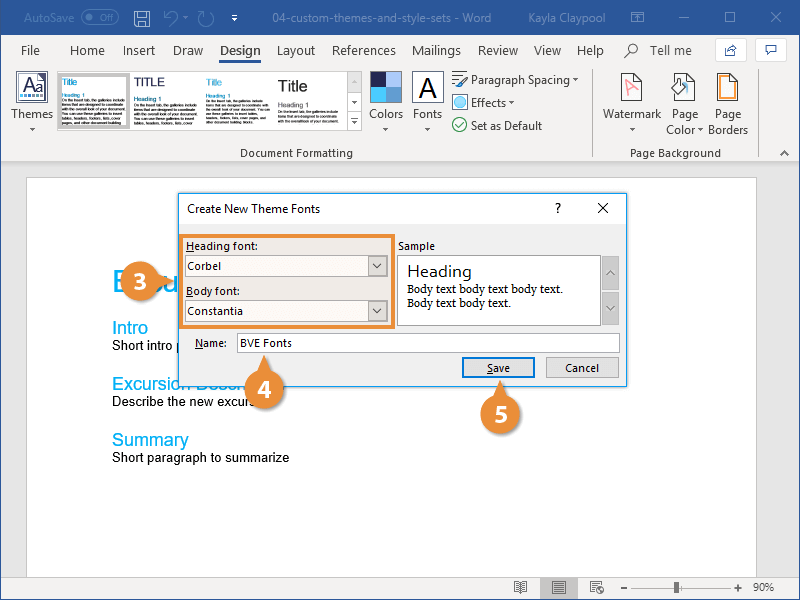
In this dialog box, you can select new Heading and Body fonts. A preview, showing the two current fonts, also appears.
- Customize the Heading and Body fonts.
Once you’ve selected two fonts that look good in the preview, you’re ready to save the font set.
- Give the font set a name and click Save.
The font set is saved and automatically applied.
Create Custom Themes
When you have a color set and font set combination that you like, you can save it as a theme to use in other documents.
- Apply the theme colors, fonts, and effects you want to use in new documents, then click the Design tab.
- Click the Themes button.
- Select Save Current Theme button.
- Type a name for your theme and click Save.
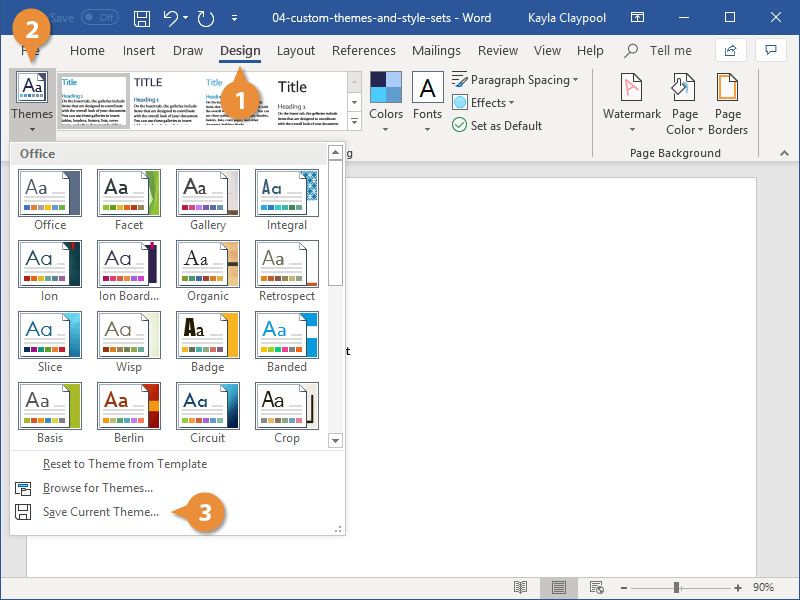
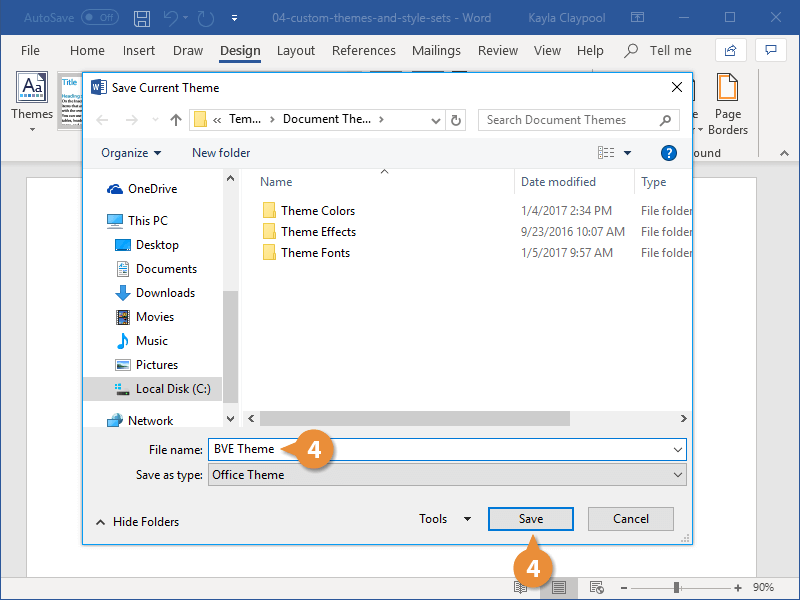
Your theme is saved and will be found in a special Custom group in the Themes menu.
Custom themes you’ve saved will be available for use in all your documents. You can even share the theme file with others so they can also use your new theme.
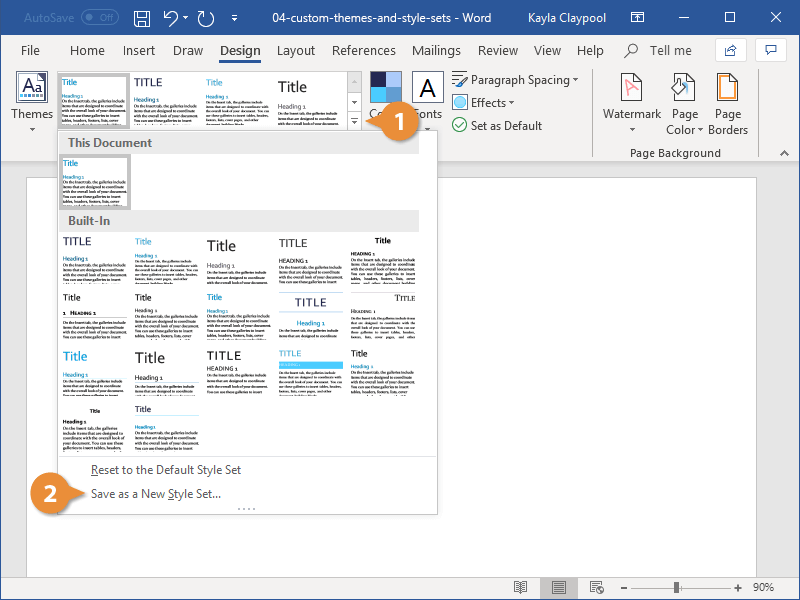
Create Custom Style Sets
If you’ve customized the basic styles in a document, you can create a custom style set.
- Click the Style Set gallery menu button on the Design tab.
You can select an existing style set here or save your custom style set currently in use.
- Select Save as a New Style Set.
- Give the style set a name and click Save.
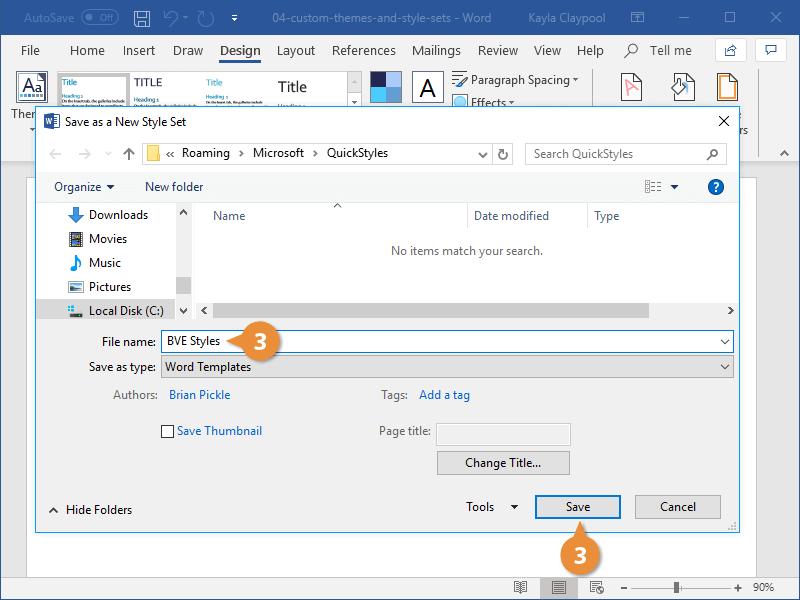
The style set is saved. Just like with themes, a new Custom group will appear in the Styles gallery, above the built-in style sets.

FREE Quick Reference
Click to Download
Free to distribute with our compliments; we hope you will consider our paid training.
Working with color themes in Microsoft Office can open up a whole world of possibilities for customizing your documents. Most people don’t realize how much they are already interacting with themes in Office, or how much control they can have with just a couple clicks. Let’s check it out. But first, a special thank you to Sheree for having some excellent color palette questions in an Excel Essentials session a couple weeks ago and inspiring this Byte.

Exercise File
You can follow along on one of your existing documents, or if you would like a starting place, here is a Word document you can start with:
This is a Word document with a few visual elements that incorporate theme colors. These are all things that will be effected by altering the color theme.
What does it mean to apply a color theme? In most of your Office programs, you are already using a color theme, whether you realize it or not. The default is the Office color theme. You see your theme colors in everything from the color options for your fonts, to your default headers, to tables and charts… and more.
In the test file you downloaded, you are seeing it in the headers, the chart, the icons and the table…

One of the easiest ways to check your current palette is to visit the Home tab, Font group, and click on the dropdwon arrow next to the Font Color.

Notice how there are Theme colors, and Standard Colors. The Theme colors display your current color palette. There are gradations underneath each main theme color…. lighter and darker versions of each of the theme colors to create contrast.
Change the Color Theme
Changing your color theme is simple!
1. Go to the Design tab, Document Formatting group. (By the way, this is also where you can go to change your default font settings for the document).

2. Select the Colors dropdown to see a full list of themes. Hover your mouse over each color palette to see a preview.

3. Select a color theme by clicking on it.
Because theme colors are utilized in so many ways in this document, we really see a change in appearance!

Custom Color Palettes
If you are artistically inclined, you might be interested in creating your own custom color themes.
1. In the Design tab, Document Formatting group, click on the Colors dropdown again, but instead of selecting a predefined color set, select Customize Colors…

2. Click on the dropdown beside any of the accent colors to make an alteration. Typically Accent 1 is the color you will see the most in a document.

3. You have the ability to select colors from a color wheel, or select More Colors to enter an exact RGB color.

4. When you are finished, name the color palette and click Save.
5. The new color set will appear in a new section at the top of the Colors dropdown called Custom.

You will be able to access this color palette anytime you create a new document on this computer.
Accessing Custom Color Themes in other Microsoft Programs
Once you have created a color theme that you like, you may want to access it in other programs. Microsoft knows this, so has made them accessible to you in many of your Office programs. They are in slightly different locations though, so let’s take a look.
PowerPoint
In PowerPoint, you often see color themes even more prominently than in Word. Here is one popular theme called Berlin, that features a red and yellow color set.

1. In PowerPoint, visit the Design tab, Variants group.
2. Select the dropdown arrow in the lower right:

3. Here is where you will see your color theme options, plus the new custom color you just created in Word. Neat!

This definitely changes the look of this document…

Excel
In Excel, Color themes affect features like tables, charts, shapes, and fonts. The default in Excel is the Office color set as well. These colors should look familiar:

1. In Excel, visit the Page Layout tab, Themes group.
2. Select the Colors dropdown.

3. Here is your custom color theme again… no need to reinvent the wheel.

Outlook
Outlook? Did you read that right? Yep! Outlook also has the same themes and color sets you know and love from your other Office programs.
1. Open up a new email.
2. Visit the Options tab, Themes group.
3. Click on the Colors dropdown, and there you are…

Thoughts?
What do you think? Do you think you will utilize custom color themes in your Office documents? By the way, if you create a cool WSU themed color theme, I would love it if you would share it with me!
Congratulations, Power Users!
Congratulations to our newest Power Users! For the full gallery, and more information about the WSU Microsoft Office Power User Program, please visit: wichita.edu/poweruser
Madelyne Toney

Linda Claypool

Susan Johnson

Karen Wilson

Jaime Scherer

Jessica Casper

Cara Tucker

Linda Young (not pictured)