
-

1
Obtain the labels you need. Labels come in different sizes and for different purposes, for everything from regular, no. 10 envelopes to legal-sized mailings and CD covers. Get the labels that are best-suited for your project.
-
2
Create a new Microsoft Word document. Double-click the blue app that contains or is shaped like a «W«, then double-click Blank Document» in the upper-left part of the opening window.
Advertisement
-
3
Click the Mailings tab. It’s at the top of the window.
-
4
Click Labels under the «Create» menu. It’s at the far-left of the toolbar.
- If prompted, click OK to grant Word access to your contacts.
-
5
Add text to the label. Do so by typing a recipient’s address, name badge text, CD label, etc., in the Delivery Address field or by clicking the address book icon to the right of the field, selecting a recipient and clicking Insert.
-
6
Click Font…. This dialog box allows you to customize the look of the labels by selecting a font, text size, text color, and style.
-
7
Customize the label text and click OK.
-
8
Click Options…. It’s a button in the Label section of the dialog box.
-
9
Click the radio button next to your printer type.
-
10
Click the «Label products» drop-down menu.
-
11
Select your label manufacturer.
- If your manufacturer isn’t listed, examine the label packaging for the label dimensions and the number per sheet. With this information, you can select an equivalent product.
-
12
Click the «Product number» drop down.
-
13
Click the product number for your label. It should be clearly marked on the packaging.
-
14
Click OK.
-
15
Select the number of labels you’re printing.
- Click Full page of the same label to print a full sheet of the label
- Click Single label and then identify the row and the column on the label sheet where you’d like the label to be printed.
-
16
Insert the blank label sheet into your printer. Make sure you have them aligned correctly for your printer.
-
17
Click Print….
- Make sure the print preview of the labels looks the way you want it to.
-
18
Click Print. Your label(s) will print.
- Click File in the menu bar and Save if you want to save this label template for future use.


Advertisement
-
1
Obtain the labels you need. Labels come in different sizes and for different purposes, for everything from regular, no. 10 envelopes to legal-sized mailings. Get the labels that are best-suited for your project.
-
2
Prepare your mailing list. Word can pull names and addresses from an Excel spreadsheet, an Access database, your Outlook contacts, or on Mac, your Apple contacts or a FileMaker Pro database. You can also type a new mailing list during the merge, if you prefer.
-
3
Create a new Microsoft Word document. Double-click the blue app that contains or is shaped like a «W«, then double-click Blank Document» in the upper-left part of the opening window.
-
4
Click the Mailings tab. It’s at the top of the window.
-
5
Click Start Mail Merge and Labels…. It’s at the far-left of the toolbar.
- If prompted, click OK to grant Word access to your contacts.
-
6
Click the radio button next to your printer type.
-
7
Click the «Label products» drop-down menu.
-
8
Select your label manufacturer.
- If your manufacturer isn’t listed, examine the label packaging for the label dimensions and the number per sheet. With this information, you can select an equivalent product.
-
9
Click the «Product number» drop down.
-
10
Click the product number for your label. It should be clearly marked on the packaging.
-
11
Click OK.
-
12
Click Select Recipients…. It’s at the left of the toolbar.
-
13
Select your mailing list. Click on the source of the addresses you want to put on the labels.
- If you want to create a new list at this point, click Create a new List….
- If you don’t want to create labels for your entire mailing list, click Edit Recipient List and select the recipients you want to include.
-
14
Click Address Block.
- On Mac, click a line near the top of the first label, and click Insert Merge Field, then select a field you want to include, such as «First_Name.» Repeat this process for each field you want to include, adding the appropriate spacing and address formatting.
-
15
Select the elements you want to include on the labels. These include name format, business, name, etc.
-
16
Click OK.
-
17
Click Update Labels. It’s an icon in the toolbar with a green «refresh» symbol.
-
18
Click Preview Results in the toolbar. Make sure the labels look the way you want them to.
-
19
Insert the blank label sheets into your printer. Make sure you have them aligned correctly for your printer.
-
20
Click Finish & Merge and Print Documents…. It’s at the far right of the toolbar.
-
21
Click Print. Your label(s) will print.
- Click File in the menu bar and Save if you want to save this label template for future use.


Advertisement
Add New Question
-
Question
When I type a sheet of labels, sometimes a second blank page appears. How do I remove the second page?

Go to the bottom of the first page, and hit the ‘delete’ key — it should go away.
-
Question
How do I print labels that are all different addresses?
Use a mail merge. Add all of the different addresses, then print each one.
-
Question
How do I make a full page of address labels?
There should be an option called «mail merge.» You need a mailing list and your document; the list can be a spreadsheet, an Outlook directory etc.
See more answers
Ask a Question
200 characters left
Include your email address to get a message when this question is answered.
Submit
Advertisement
Thanks for submitting a tip for review!
About This Article
Article SummaryX
1. Create a new Word document.
2. Click Mailings.
3. Click Labels.
4. Add the label text.
5. Customize the printing layout.
6. Choose your label manufacturer.
7. Click OK.
8. Click Print.
Did this summary help you?
Thanks to all authors for creating a page that has been read 702,236 times.
Is this article up to date?
Create and print labels

Create and print a page of identical labels
-
Go to Mailings > Labels.
-
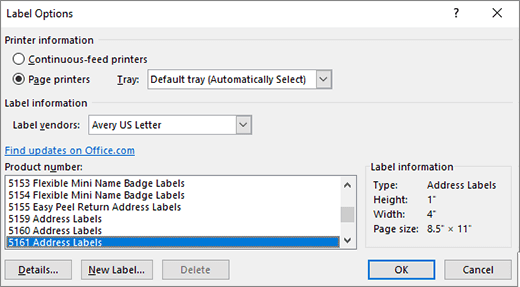
Select Options and choose a label vendor and product to use. Select OK.
If you don’t see your product number, select New Label and configure a custom label.
-
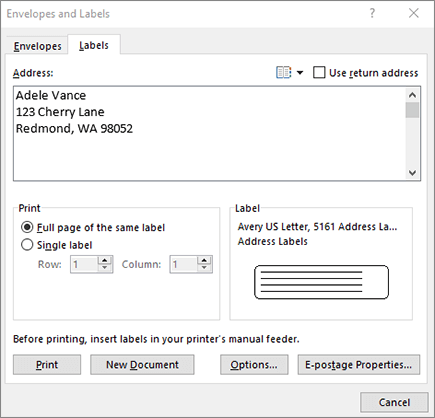
Type an address or other information in the Address box (text only).
To use an address from your contacts list select Insert Address
. -
To change the formatting, select the text, right-click, and make changes with Font or Paragraph.
-
Select OK.
-
Select Full page of the same label.
-
Select Print, or New Document to edit, save and print later.
 .
.If you need just one label, select Single label from the Mailings > Labels menu and the position on the label sheet where you want it to appear. Select OK, the destination, and Save.
Create and print a page of the same label
-
Go to Mailings > Labels.
-
In the Address box, type the text that you want.
To use an address from your contacts list select Insert Address
. -
To change the formatting, select the text, right-click, and make changes with Home > Font or Paragraph.
-
In the Label Options dialog box, make your choices, and then select OK.
If you don’t see your product number, select New Label and configure a custom label.
-
Select OK.
-
Select Full page of the same label.
-
Select Print, or New Document to edit, save and print later.
 .
.Set up and print a page of the same label
-
Go to Mailings > Labels.
-
Select Options.
-
Choose Printer type, Label products, and Product number.
If you don’t see your product number, select New Label and configure a custom label.
-
Select OK.
-
Type an address or other information in the Delivery Address box.
To use an address from your contacts list select Insert Address
. -
To change the formatting, select the text and then select Font to make changes.
-
Select Full page of the same label.
-
Select OK.
-
Select Print, or New Document to edit, save and print later.
 .
.For info about merging data with labels, see Create mailing labels in Word by using mail merge or Mail merge in Word for Mac.
If you want to make return address labels, see Create return address labels.
Word for the web doesn’t support directly creating labels. However you can create labels from a template.
-
Open Word for the web.
-
Select a label template when you create a new document. Select More templates if you don’t see what you want.
You can also go to templates.office.com, and search for label.
-
For a sheet of identical labels, fill out one label, and then copy/paste for the rest.
Tip: Print your labels to a sheet of paper before loading labels into the printer to make sure the text aligns with the labels.
See also
To create a page of different labels, see Create a sheet of nametags or address labels
To create a page of labels with graphics, see Add graphics to labels
To print one label on a partially used sheet, see Print one label on a partially used sheet
To create labels with a mailing list, see Print labels for your mailing list
To create labels using a template, see Microsoft label templates
Need more help?
Want more options?
Explore subscription benefits, browse training courses, learn how to secure your device, and more.
Communities help you ask and answer questions, give feedback, and hear from experts with rich knowledge.
Learn how to create pretty, custom labels in Microsoft Word that can be printed in just about any shape, size, or color scheme!
This post contains affiliate links. For more information, see my disclosures here.
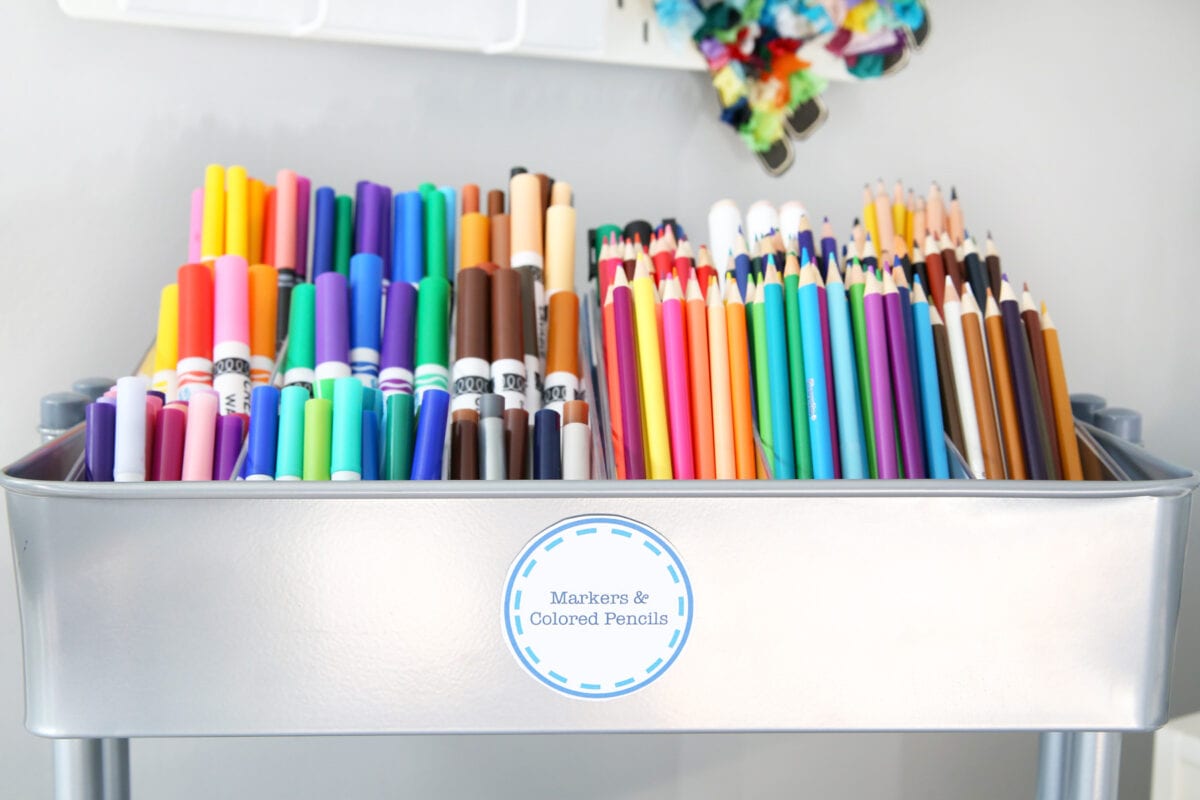
I must admit, I am just a teensy bit obsessed with labels. I put them on just about everything in our house. They’re perfect for getting organized, helping the boys find what they need, and adding a pretty touch to a basket or gift.
If I’m making labels with adhesive vinyl, I typically use my Cricut cutting machine. When it comes to creating pretty paper labels, though, I can’t help but head back to my old stand by, Microsoft Word, for all of my label-making needs.
Word is great because it’s super-simple to use. And almost everybody has it, so it’s really easy to email and share projects. I’m sure there are about a million ways to create pretty labels in Microsoft Word, but here is my tried-and-true method.

Get 300+ pages of free printables!
Become one of our VIP newsletter subscribers and gain access to our exclusive free printables vault!
How to Make a Label in Word Step-by-Step
1. Choose your shape.
Beginning with a blank document, click on the “Insert” tab, select “Shapes,” and choose the desired shape for your label. I picked the circle.

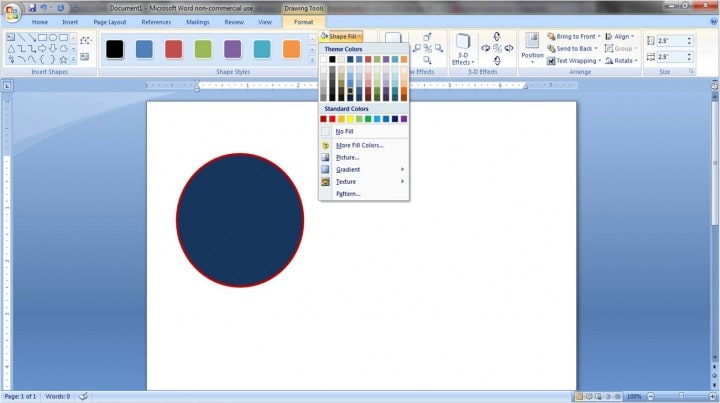
2. Adjust your outline and fill settings.
Once you’ve drawn your shape to your desired size (I chose 2.5″ x 2.5″.), you’ll want to make it look pretty! I usually like to make the outline of my shape a little thicker so that it is well defined when I print it out.
To do that, go to the “Format” tab, and under the “Shape Outline” drop down, you will see “Weight.” I chose 3 pt; you can make yours thinner or thicker depending on your preference.
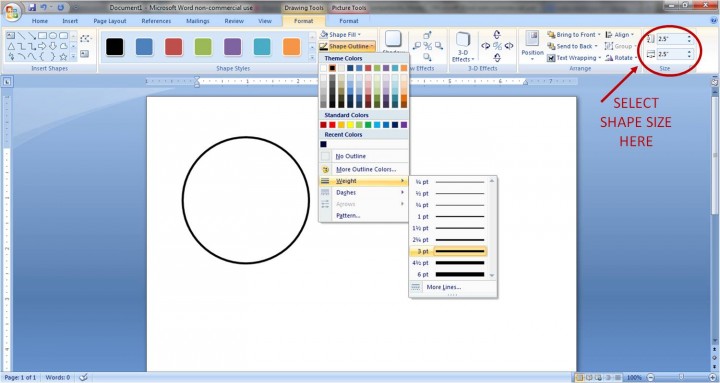
You can also change the color of your outline in the “Shape Outline” drop down. I picked dark red.
While we’re changing colors, let’s go ahead and change our fill color as well. Right above “Shape Outline,” you’ll see the “Shape Fill” option. You have a few choices here. You can fill your shape with a solid color.
Or you may want to put a design inside your shape. By choosing the “Picture” option from the “Shape Fill” drop down, you can use any picture file on your computer as your shape’s background.
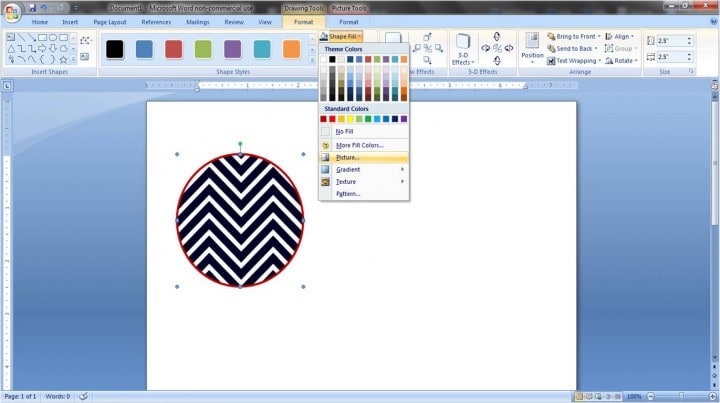
You can also play with the “Gradient” and “Texture” options until you find the background of your choice.
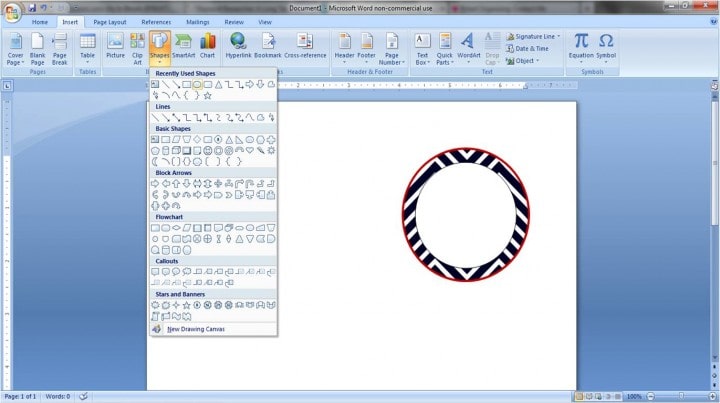
3. Add a layer, if desired.
I think it always looks nice to add a second layer to your label. You get to have a fun color or pattern in the background, but you also get a clean white surface for your wording. To add a layer, you’ll go through a similar process: choose your shape (“Insert” tab, “Shapes” button), and size it correctly. I did 2″ x 2″.
Then adjust your outline width and outline and fill colors. I went with the 3 pt dark red outline again, and I chose to keep the fill color white, but you could always pick a color.
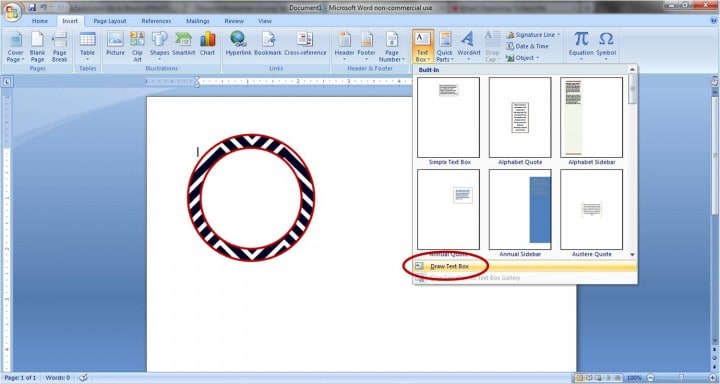
4. Add your text.
To do this, you’ll want to go to the “Insert” tab and select “Text Box.” Choose the “Draw Text Box” option at the bottom of the drop down menu.
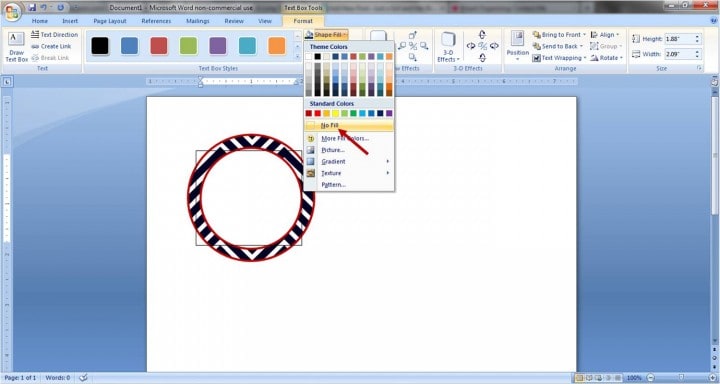
Draw your text box over your existing shape. Then, so the text box doesn’t block the beautiful label you’ve made, you’ll want to make it transparent. With the text box selected, go to the “Text Box” tab, and under “Shape Fill” choose “No Fill.” You will also want to choose “No Fill” for the “Shape Outline.”
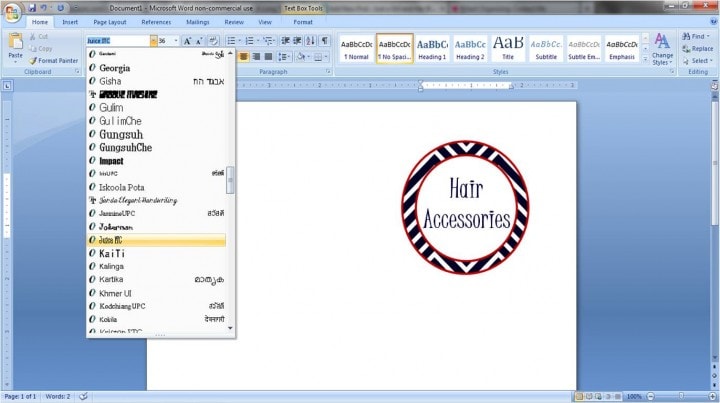
Once your text box is transparent, you’re ready to type. Add your words, and change the size, font, and alignment like you would in a regular Word document. You can also play with color! I used a 36 pt font called “Juice ITC” in dark blue.
5. “Group” your label.
The last thing I like to do when I get the label the way I want it is to group it together. This allows me to move it around the page as one unit rather than trying to move each piece individually.
To use the group feature, hold down the “Ctrl” key on a Windows computer or “Command” on Mac and click on each element of your label so they are all selected.

Next you’ll want to right click on your selection and under “Grouping” choose “Group.”
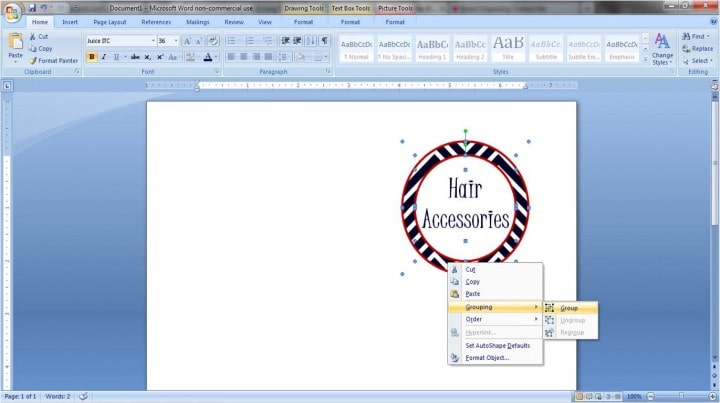
TA-DA! Your label is now one cohesive unit! You can move it around the page, copy and paste it, change the text, go crazy with it!
Now for all you overachievers out there…
Making Labels in Microsoft Word: The Bonus Round
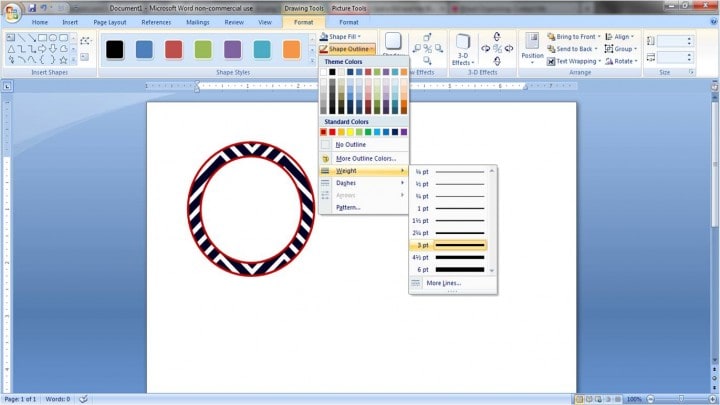
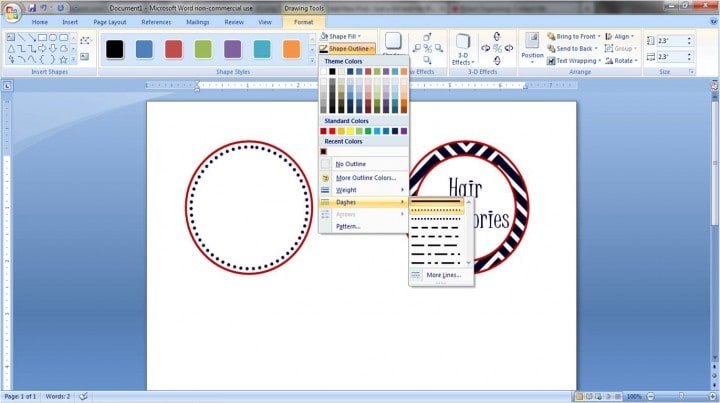
Another fun thing to play with is the outline style. I’ll start out with the same white circle with a dark red outline, but instead of using a colored background, I’ll add interest with the second layer.
For the “Shape Outline” of the inner circle, go down to “Dashes.” You will be able to choose dots (as I did), squares, dashed lines, etc. Just another cute dimension to add to your labels!
Though fancy programs and machines can be really great, it is possible to make pretty labels just using Microsoft Word. In my opinion, it is the simplest program to navigate, and it still gives beautiful, fully-custom results.
How to Print Labels From Word
After you’ve created your cute labels, what’s next? I typically print mine out (with my home ink jet printer) on white card stock so that they’re sturdy, and then cut them out by hand.
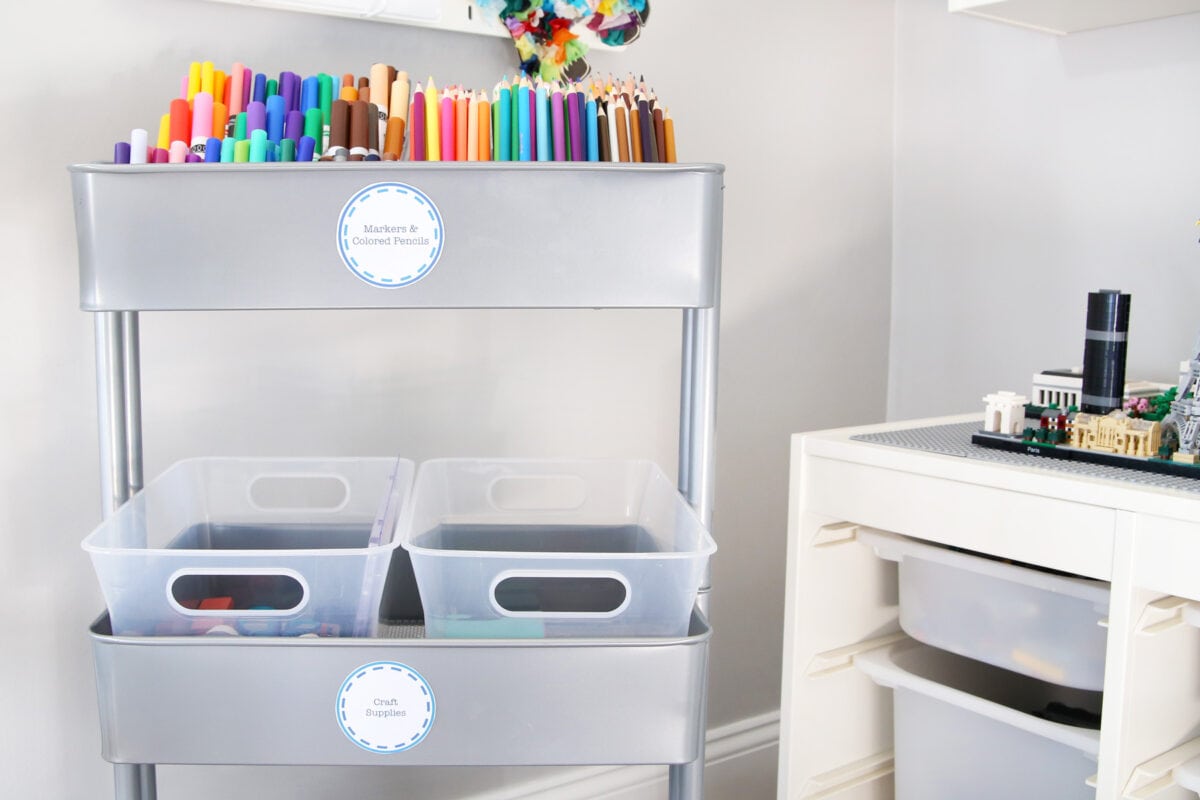
If my labels are going to be in a higher traffic area, I’ll laminate them to protect them a little bit more. Laminated or not, I typically just attach my labels with tape or velcro dots.
My Favorite Laminator
I have used this laminator for years, and it is always my go-to when I want to make my labels or other printables a little sturdier.

![]()
If you want to use a label that is more like a sticker, Avery has many templates for their stickers. You would simply head to their website, find the template that matches the stickers that you purchased (you can search by the number on the pack), download the template, and create your design within the guides they provide.
My Favorite Labeling Supplies
- Printer
- White Card Stock
- Laminator + Laminating Pouches
- Velcro Dots
- Sticker Sheets
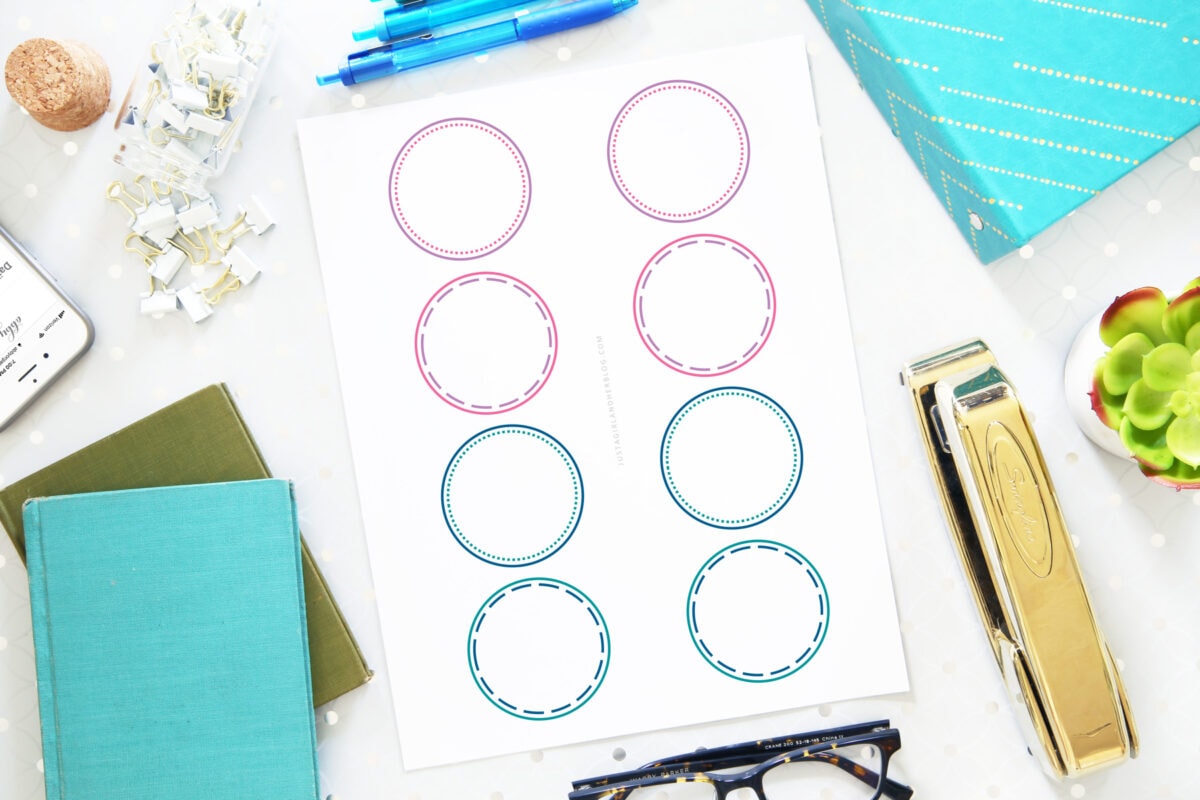
And just for fun, I’ve included a page of simple printable labels to get you started. Happy labeling!
Making Labels in Microsoft Word: Frequently Asked Questions
Want to save this post to revisit later? Be sure to pin the image below so you can find it easily!
- How to Make DIY Iron On Labels
- How to Make Your Own Party Invitations
- How to Make Vinyl Labels with a Cricut Cutting Machine
- 16 Creative Projects for Label Lovers {The Thinking Closet}
- How to Create a Monogram in Word
- How to Make Pretty Labels with a Silhouette Machine
- How to Use Labels to Organize Your Whole House
What is your favorite way to make labels?

This post contains affiliate links. For more information, see my disclosures here.
1. Right-click the image that you want to label and click the option Format Picture. 2.In the Format Picture window, click this icon.
- Click the picture you want to add a caption to.
- Click References > Insert Caption.
- To use the default label (Figure), type your caption in the Caption box.
Contents
- 1 How do I label my photos?
- 2 How do I create a picture label in Word?
- 3 How do I label digital photos?
- 4 Can you write on photos?
- 5 How do I fill a label in Word?
- 6 How do I create labels in Word 2016?
- 7 What is label in MS Word?
- 8 How do you label a JPEG?
- 9 How do I scan photos into labels?
- 10 How do I write on a JPEG image?
- 11 How do you write on photo paper?
- 12 How do you put captions on pictures?
- 13 How do I edit text in a picture in Word?
- 14 How do I make labels the same in Word?
- 15 How do I make decorative address labels in Word?
- 16 How can I turn a jpeg into a PDF?
- 17 How do I add text to a JPEG image in paint?
- 18 Can you write on a scanned document?
How do I label my photos?
Sorry for the confusion, but the original post was about Android.
Add a description.
- Select and open a photo in Google Photos.
- Select the overflow : menu in the upper right.
- Select Info.
- Add a description and exit to save.
How do I create a picture label in Word?
Create a single label with a graphic
- Start by creating a New Document of labels. For more info, see Create a sheet of nametags or address labels.
- Insert a graphic and then select it.
- Go to Picture Format > Text Wrapping, and select Square.
- Drag the image into position within the label.
- Save or print your label.
How do I label digital photos?
First of all, make sure that your open window is large enough to display the metadata at the bottom. Navigate to the folder where your photos reside. Select a photo or photos, find the “Title” field at the bottom of the screen (and also the “tag” field if you want to add tags or keywords), and type in your caption.
Can you write on photos?
Write on the back of your photos, along the edge, and keep your notes succinct. There are two main reasons why professional archivists recommend using a regular #2 pencil. It is reversible—it can usually be easily erased. Pen and marker ink is not reversible—it can’t be erased or undone.
How do I fill a label in Word?
Formatting Labels
- Click or tap the “Mailings” tab on the command ribbon and then click or tap “Labels” in the Create group.
- Enter the text for your label in the Address box on the Labels tab.
- Click or tap the radio button for “Full page of the same label.”
- Click or tap “Options” to open the dialog box.
How do I create labels in Word 2016?
Follow these steps:
- Click the Mailings tab.
- In the Create group, click the Labels button.
- Ensure that the proper label format is chosen in the lower-right part of the dialog box.
- Type the label’s text into the Address box.
- Ensure that the item Full Page of the Same Label is chosen.
- Click the New Document button.
What is label in MS Word?
Labels refer to the information or Address (in particular) we want to get displayed on products, banners, etc. We can also set the quantity of the labels we want and can print them instantly. Follow the steps to get labels in MS Word: Step 1: Go to the Mailings bar and select the Labels option under the Create bar.
How do you label a JPEG?
Select “Markup,” tap the “+” icon and select “Text.” When the text box appears on the photo, double-tap it to raise the keyboard. Type the caption and use the options at the bottom of the screen to change the font, color and size. Drag the caption to wherever you want it and tap “Done.”
How do I scan photos into labels?
Get started scanning your pictures in five easy steps.
- Buy the Right Equipment. You’ll need a computer and a scanner to scan your old family photos.
- Clean Your Scanner and Prepare Photos for Scanning.
- Adjust Your Settings.
- Start Scanning.
- Label and Edit Your Images.
How do I write on a JPEG image?
How to Add Text to an JPG Image
- Open your photo editing program. How you open programs will depend on your operating system.
- Open the JPEG image.
- Click your program’s “Text” tool.
- Click on the image where you want to insert the text.
- Type your text.
- Select your font color, size and typeface.
How do you write on photo paper?
When it comes to writing on glossy paper, it’s best to go for those with alcohol or oil-based ink since they dry faster. It’s best to avoid gel pens when writing on photos. Gel pen ink, made from an oil and water emulsion, will likely smear on photographs.
How do you put captions on pictures?
- Choose a Photo Caption That Fits the Platform.
- Use a Conversational Tone and Present Tense.
- Decide on the Purpose of Your Caption.
- Know Who Your Audience Is.
- Identify the Main People in Your Photo.
- Use a Quote or Lyrics Wisely.
- Add Value with Your Photo Caption.
- Create Involvement With Your Photo Caption.
How do I edit text in a picture in Word?
Click the picture to reveal the “Format” tab. Press the “Corrections” option to reveal the dropdown. This will reveal to you how to edit image text in word. Apply the required correction to complete the process in full.
How do I make labels the same in Word?
Microsoft Word: Create a Sheet of the Same Label
- From the Mailings tab, click the Labels button in the Create group on the left.
- In the Address box at the top, type the address or other information that will be on each label.
- In the Print box on the left, select Full page of the same label.
How do I make decorative address labels in Word?
- Choose your shape. Beginning with a blank document, click on the “Insert” tab, select “Shapes,” and choose the desired shape for your label.
- Adjust your outline and fill settings.
- Add a layer, if desired.
- Add your text.
- “Group” your label.
How can I turn a jpeg into a PDF?
How to convert JPG to PDF online:
- Upload your image to the JPG to PDF converter.
- Adjust the letter size, orientation, and margin as you wish.
- Click ‘Create PDF now!’ and wait for the conversion to take place.
- And that’s all there is. Save the converted PDF to your computer.
How do I add text to a JPEG image in paint?
To add a text box in Paint, open an image with the program and locate the “A” symbol in the “Tools” group of the “Home” tab. Click the “A” and then click on the image and drag the mouse pointer to place a text box. To resize the text box, click and drag one of the small squares around the edge of the box.
Can you write on a scanned document?
Browse to the scanned document and double-click it, then click the “OK” button to insert it. Format the text in the text box the same way you would when typing text in a Word document, using the Font section of the ribbon. You can try to match the text in your text box with any text already on your scanned document.
If you rely on Microsoft Word’s time-saving templates and ease of editing capabilities, don’t rule out the program’s capability for hard-copy help as well. Creating labels in Microsoft Word lets you customize everything from envelopes to file folders to outgoing packages, with the added benefit of being able to return to the same file each time you need it. With a single setup, boosted by Word’s included label template collection, you can quickly generate a variety of labels.
-
Launch Word, and then type your label’s term — such as “Address labels” or “Shipping labels” — into the search box on the main startup screen. The more specific you get, the fewer template results you’ll receive. You can also search for a specific label size, such as Avery 8160.
-
Scroll through the results and double-click a template that suits your needs. Everything on the template is customizable, so start with one that has your preferred label setup, such as the three column, 10 row layout for standard address labels. The chosen template opens in a new Word window. Note that when the labels open, a new yellow Table Tools tab opens at the top of the Word work area.
-
Review the label template setup to get a feel for what you need to change, such as the placeholder generic text and images that come with the template. In almost all Word label templates, the same text and image is repeated on all the labels.
-
Click into one of the labels on the template. It doesn’t matter which one, but it may be easiest to click into the top-left label. Highlight the text on the label, and then type your label information. For example, if you’re making return address labels for business mailings, you may want to type your company name, street address, city, state and zip, as well as add a line for your company slogan or website.
-
Resize the lines of text to best fit the label, if needed, by clicking the «Home» tab, and then using the Font and Font Size menus. You can also change the color of the text, which is usually black by default, to one of your company colors using the Font Color menu.
-
Click any graphical element included as decoration on the label, and then press the “Delete” key to remove it. If you chose a label with clip art or another graphic, right-click the picture and choose “Change Picture” from the context menu, browse to your company logo, and then double-click it. You can also add your logo to the label area by clicking the “Insert” menu, choosing “Pictures,” browsing to the logo, and then double-clicking it.
-
Highlight all of the lines you just typed as well as any just-added logos or images, and then press “Ctrl-C” to copy the new label contents.
-
Click into one of the other generic labels on the page, highlight all of the contents, and then press “Ctrl-V” to paste in the new custom label. Repeat this for the rest of the labels on the template page.
-
Edit any label data as needed, such as if you want 29 of the same label and a single different label, and then save the Word file so that you can reuse it when you need to reprint or change the labels.