- Remove From My Forums
-
Вопрос
-
Hello, I work for a NFP organization that does work with local school in the community and provides field trip opportunities to students of all grade levels. I want to create a form that as I fill it out with the different schools information, that
data gets saved to a excel data sheet. I am going to need about 10-12 data fields that I can extract the data from the form and then have it saved in a excel file. Examples: Organization,Date of program, Contact person, Cell Phone, Email , Program
Booked, Time of program, Cost, Amount of Students…I create these registration forms for over 150 programs every year so I need to have all of it saved to one data sheet if at all possible.
I have a paper copy form that we have been using from Publisher 2010 and I have also created a similar document in infoshare 2010 but don’t know what to do with that now that it is created.
Any help would be much appreciated
Thanks
Cameron
Ответы
-
From what you’ve posted, it seems you might do better to input the data directly into Excel and use mailmerge, for example, to populate the Word (or Publisher) documents. That’s far easier to implement and maintain than trying to go the other way, as a
mailmerge doesn’t require any programming.
Cheers
Paul Edstein
[MS MVP — Word]-
Предложено в качестве ответа
24 февраля 2016 г. 9:40
-
Помечено в качестве ответа
Melon ChenMicrosoft contingent staff
26 февраля 2016 г. 9:12
-
Предложено в качестве ответа
How to Export Data From a Word Form to Excel
You can easily export Word form data to Excel in just a few simple steps
Updated on August 20, 2021
Microsoft Word doesn’t have an option to directly save form data as an Excel worksheet. However, by going through just a few extra steps, it’s very easy to export data from a Word form into Excel.
Instructions in this article apply to Excel 2019, 2016, 2013, 2010; Excel for Mac, and Excel Online.
Understand Word Forms
A Word form contains fill-in blanks that make it easy for people to fill in important information. Usually, these forms are distributed so that many people can fill them out and return them. Collecting all of the information from those forms and transferring them to an Excel spreadsheet is a tedious manual process. Thankfully, it’s very easy to export Word form data to Excel using comma-delimited files.
Use Options to Select Comma-Delimited Format
It only takes a few adjustments in your Word form document to save the form data as a comma-delimited (CSV) file. This file format separates each form record with commas. Use CSV files to import data into Excel.
Microsoft Word is smart enough to only save the data from the form into the CSV file. The extra text in the document is not added to the CSV file.
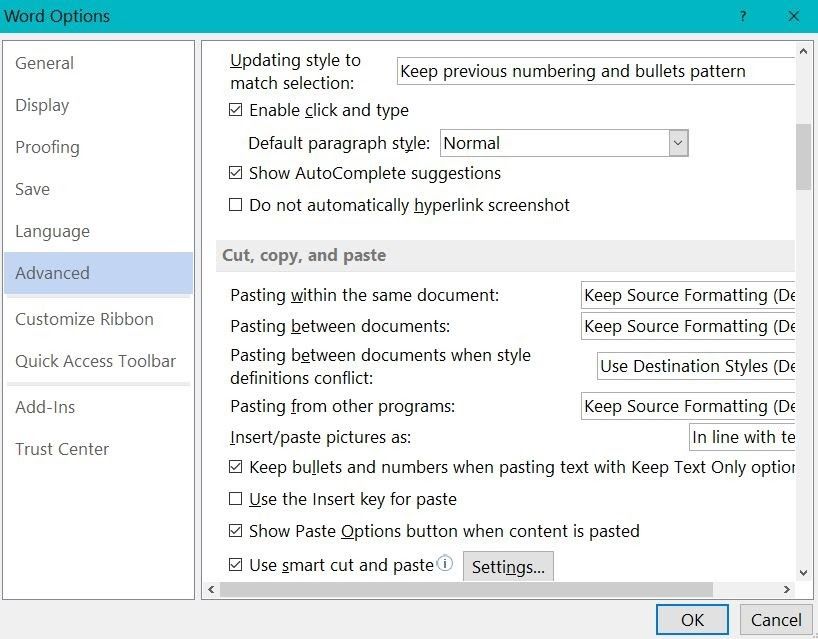
With the form document open and filled in with data, select File > Options.
-
Select Advanced in the panel to the left of the Options dialog box.
-
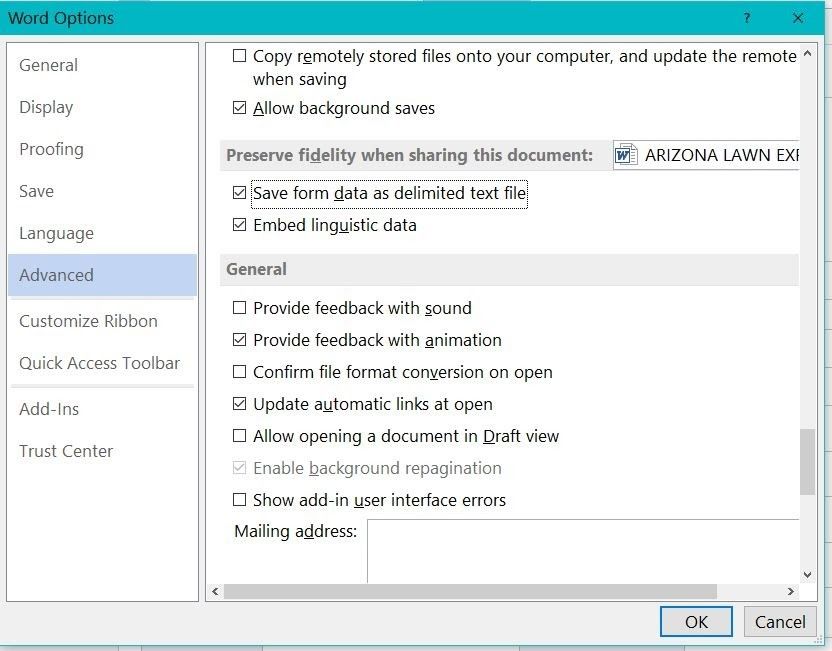
In the Preserve fidelity when sharing this document section, place a check in the box next to Save form data as delimited text file.
-
Press OK to close the Word Options dialog box.
At this point, there are two ways to export the data to Excel. Either save the document or export the data.
Use Save As to Export to CSV
To save the document to CSV format:
-
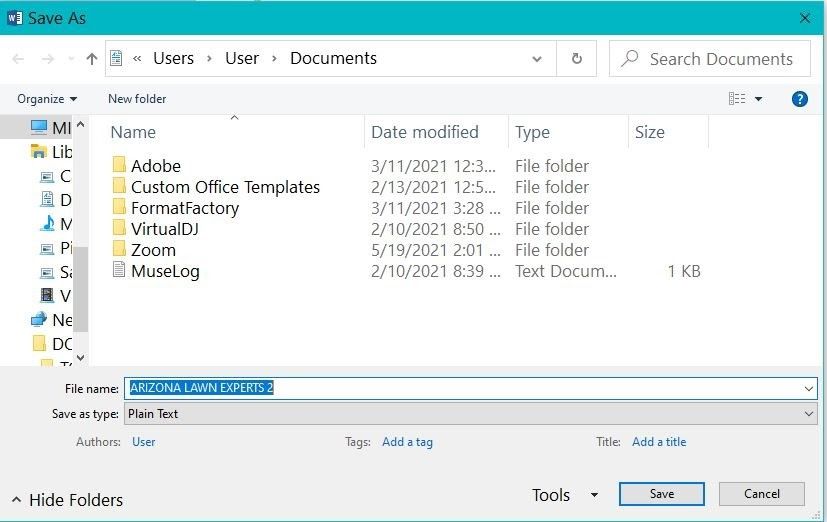
From the File menu, select Save As. The Save As dialog box opens with the TXT file format already selected.
-
Name the file, and select OK.
-
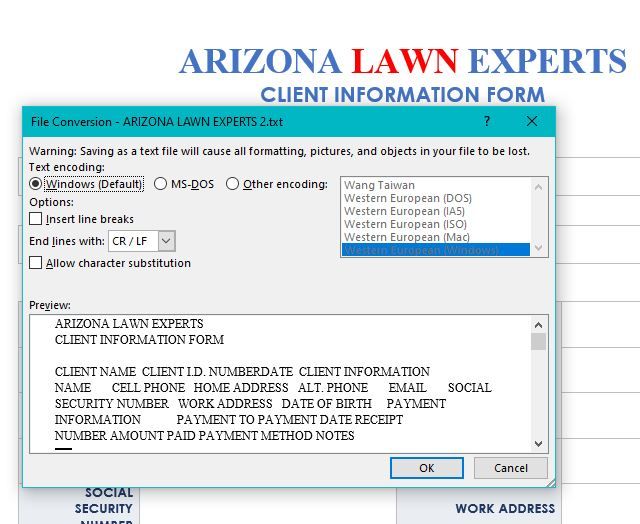
A dialog box appears with a preview of the data you’re exporting from the form into CSV format.
-
Press OK to export the data.
Word extracts the form data that was typed into the form as a .csv file, which can be opened with Excel. Word inserts commas between the fields. Excel uses the commas to separate the data into specific cells.
Use Export to Save to CSV
To export the data to a CSV file:
-
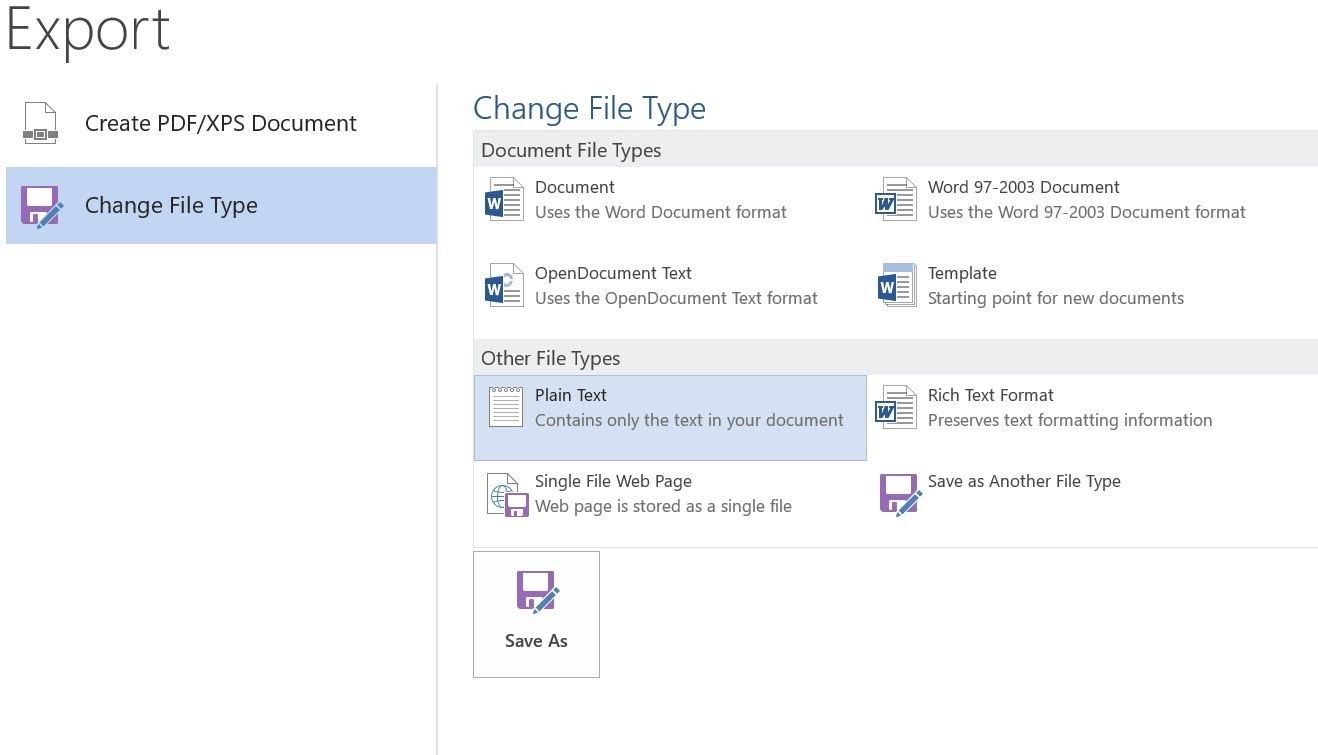
Select File > Export.
-
Select Change File Type.
-
Under Document File Types, select Plain Text (*.txt).
-
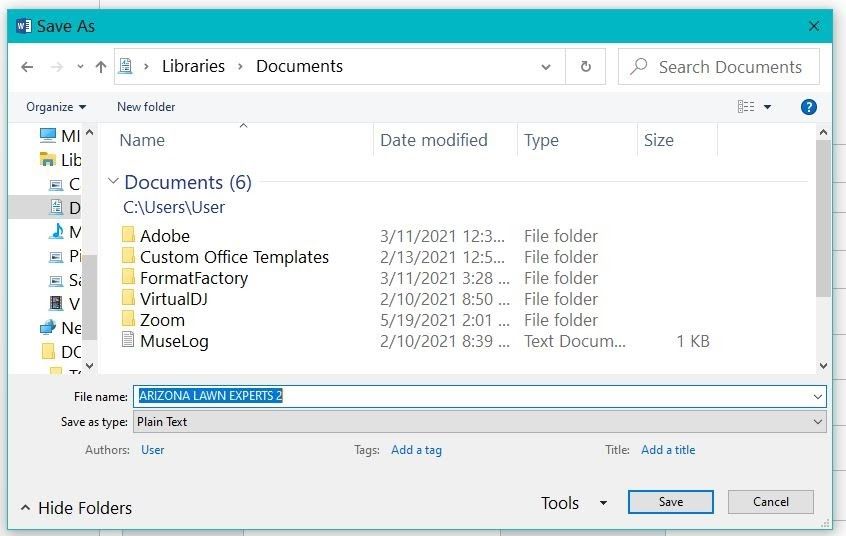
Select Save As to open the Save As dialog box.
-
Choose the location where you want to save the file, enter a filename, and select Save to export the data.
Import Form Data Into Excel
After the Word form data is exported to CSV format, the data is ready to import into Microsoft Excel.
If you open the file using Excel, you won’t see the file in the folder where you saved it because Excel defaults to showing you only Excel files.
Open the CSV file following these steps:
-
Open a blank Excel document.
-
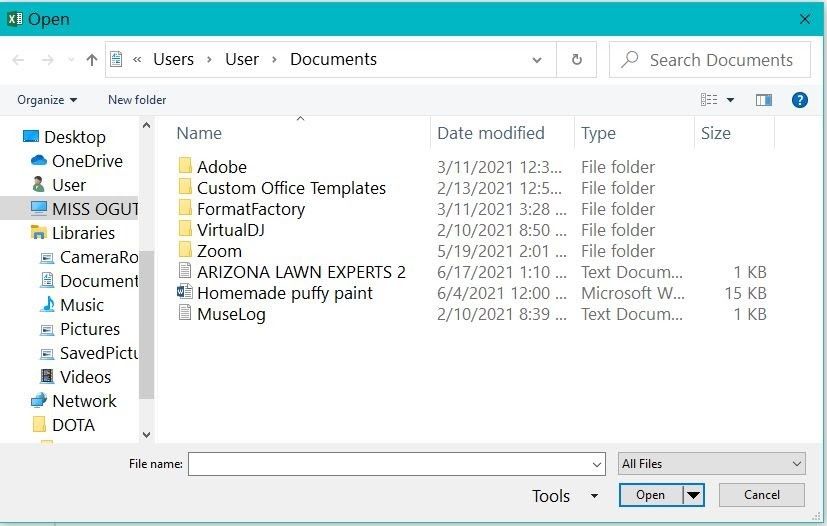
Select File > Open.
-
Select Browse.
-
In the file type drop-down list, choose All Files (*.*).
-
Browse to the folder where the exported Word form data is located, and select the CSV text file.
-
Select Open.
-
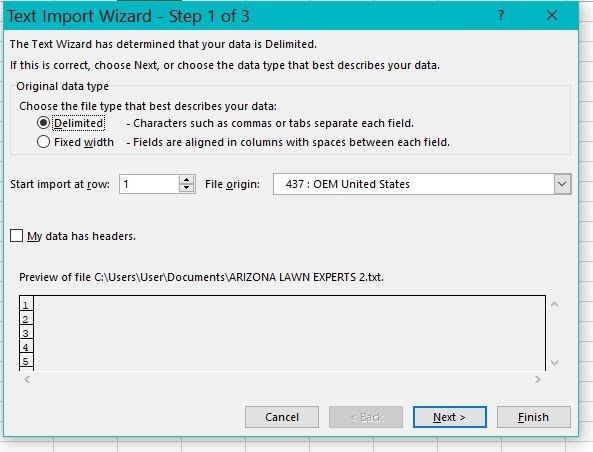
Excel opens the Text Import Wizard. Choose Delimited, and select Next.
-
Deselect the Tab checkbox, and select the Comma check box. Then, select Next.
-
Select Finish.
The data from your Word form appears in your Excel sheet.
Import Form Data Into Existing Spreadsheet With Excel 2019 and 2016
If you want to bring data from new Microsoft forms into the same spreadsheet, follow these steps:
-
Open your saved Excel file.
-
Create a new sheet by pressing the + symbol at the bottom of the existing sheet.
-
Select cell A1.
-
In the Data menu, select Get Data > From File, > From Text/CSV (In Microsoft 2010 or 2013, select From Text).
-
Select the new text file with the form data, and select Import.
-
In the Wizard, select Load > Load To.
-
Under Where do you want to put the data, select Existing worksheet, and make sure A1 is selected.
-
Press OK.
Once the form data is imported, add the new Word form data to your primary worksheet:
-
In Word, highlight the entire row with just the data.
-
Right-click, and select Copy.
-
In Excel, select your main worksheet.
-
Highlight the cell just below the last record in the sheet.
-
Right-click, and select Paste.
Import Form Data Into Existing Spreadsheet With Excel 2013 and 2010
To bring data from new Microsoft forms into Excel 2013 or 2010, follow these steps:
-
Open your saved Excel file.
-
Select the cell in the first column just below your existing data.
-
Select Data > From Text.
-
Select the new text file with the form data, and select Import.
-
In the Wizard, choose Delimited, and press Next.
-
Deselect the Tab checkbox, select the Comma check box, and select Next.
-
Press Finish.
-
Under Where do you want to put the data, select Existing worksheet. Make sure the cell where you want the new row to go is selected.
-
Press OK.
This adds the new Word form data to the very next row in your primary worksheet.
Thanks for letting us know!
Get the Latest Tech News Delivered Every Day
Subscribe
Importing a Word form into an Excel spreadsheet is something that you can do with a particular built-in tool. Here’s how!

Using forms in Microsoft Word to gather information is pretty simple and convenient. The major challenge lies in transferring the collected data to your Excel spreadsheet.
It can be overwhelming to manually enter all the data you have collected. Fortunately, there are several ways to automatically fill in data from your Microsoft Word forms into your Excel spreadsheet.
Understanding Forms in Microsoft Word
Before we begin, let’s discuss forms in Microsoft Word documents. You may be wondering how Word forms work, but it is pretty straightforward.
With Word, you can create standardized documents that can be used to collect data. It does this by providing you with a template of your choice.
The template includes all the relevant fields that you may want your users to fill in. Once you specify the questions, users will have the option of filling out these templates. These responses are then stored in Word forms, which can be accessed at any time.
Creating an Excel Spreadsheet From a Microsoft Word Form
You can use any of these methods depending on the number of forms you have or the kind of data you want to export from your Word forms.
Method 1: Single Cell Import
It’s best to use this method if you want to import data from an individual cell to an Excel spreadsheet. Here are the steps you need to follow to use this method.
- On your computer, open a new Excel spreadsheet.
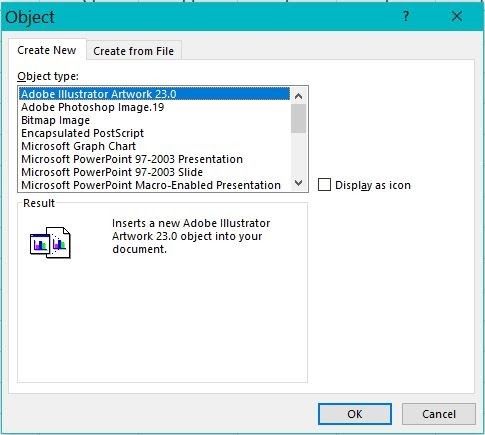
- Click on the Insert tab and select the Object option.
- Upon clicking it, the Object option will lead you to a window, as seen in the screenshot.

- There, select the Create From File option.
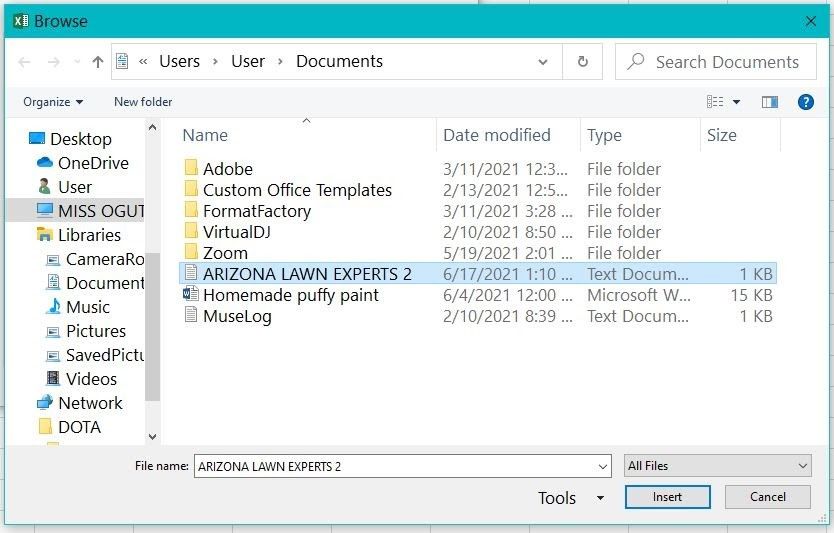
- Search through Microsoft Word documents to import your desired file.
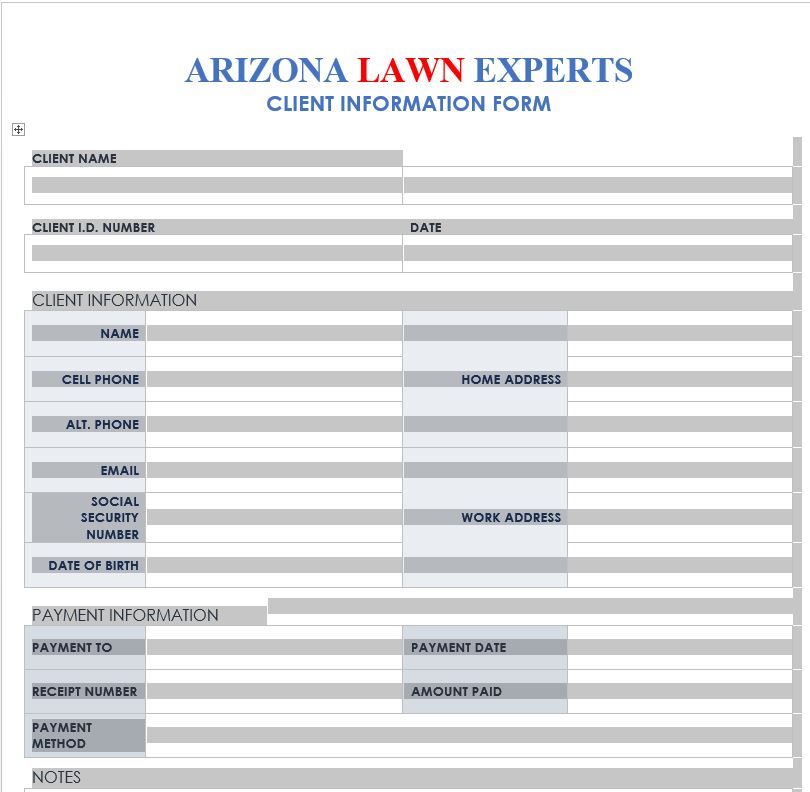
- Select it by double-clicking the file name, then close the window by clicking on the OK button. This process will merge the Word file to your Excel spreadsheet.

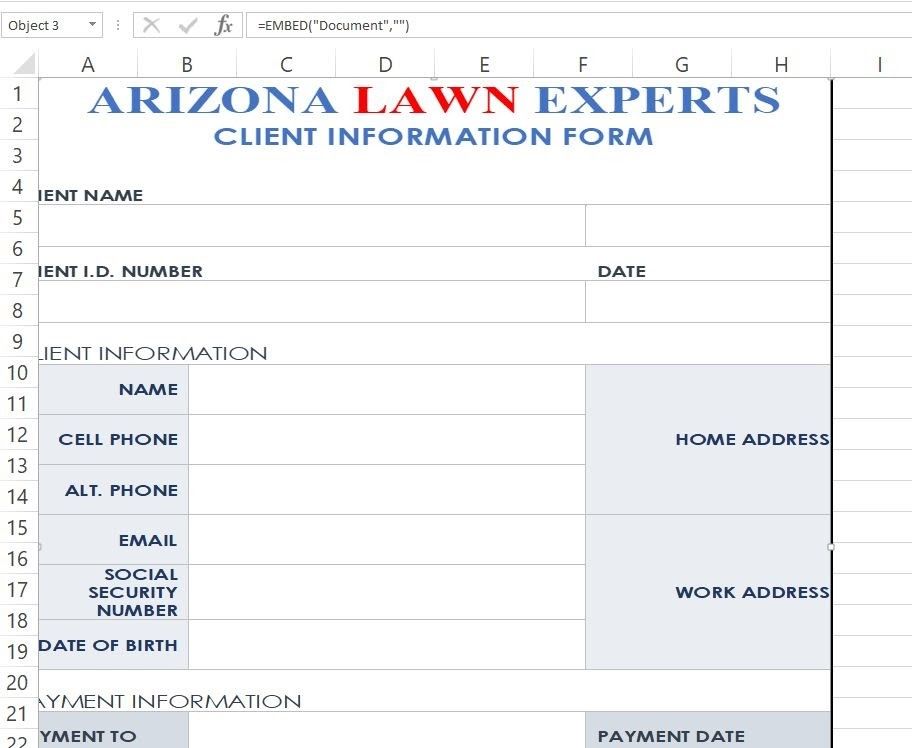
- Your cell text box should now display =EMBED («Document») under it, as shown in the picture. This can only be performed if the source Word document editing permissions are enabled.

- Click on the File tab > Save As, and rename your Excel file instead of overwriting your previous unmerged document.
- Click on Save again to finish the process.
Method 2: Cell by Cell Data Import
This second method allows you to import your data cell by cell. Here are some steps to guide you through.
- Open the Word document with the intended data for transfer.
- Click on the hatch marks that are on the table.

- Copy the table by pressing Ctrl+C.
- You can then close your word document.
- Open an Excel spreadsheet and click on the first cell grid.
- Paste the data you copied by pressing Ctrl+V. Your data will be pasted as seen in this picture.

If you choose to use this method, please ensure that the Excel table has the same layout as the Word table that has the details.
This means that if your word table has ten columns, your Excel table should have the same.
Method 3: Convert Word to Excel Using CSV Files
Another simple method of converting information from your Word form into your Excel spreadsheet is using a comma-separated values (CSV) file. A CSV file is a delimited text file that uses commas to separate values in a file.
Using this method is simple. Word distinguishes relevant data from other text within your form. This means that your client’s responses can not get mixed up with additional details from the template.
Converting Word to CSV
Before using CSV to transfer data into your Excel spreadsheets, you may need to convert your Word form into the CSV format. To convert your files, you can use either of the following methods.
Option 1: Using Options to Convert Your Word to CSV
You can use the Options tab to convert your form into CSV by following these steps.
- Open your Word form. Make sure it contains all the information you need.
- Select File > Options.
- On the Options panel, select Advanced. You will find this on the left side of the dialogue box, as shown in the picture below.
4. Check Save form data as delimited text file.
5. Finally, close the dialogue box by clicking on OK.
You can now either export your data to Excel or save the document as you like.
Option 2: Using «Save As» to Export Your Data to CSV
Alternatively, you can use the Save As option to save your document in CSV format. If this is your ideal method, then here are some steps to guide you through.
- While still on your Word form, click on the File menu > Save As option.
- You will see a dialogue box containing Plain text selected by default, as shown in the picture.

- If you made any changes, you need to rename your file and click Save.
- A preview dialogue box like the one in the screenshot will pop up, displaying the data you intend to export into your CSV format. To export the data, click OK.

By following these steps, Word will extract the data within the form into a .csv file. CSV files are compatible with Excel. They give you the freedom to access them on any version of Excel.
To separate the different fields within the document, Word inserts commas. Excel uses these commas to separate data belonging to various cells.
Option 3: Using Export to Save Data to CSV
If you do not want to use the Save As option, you may want to consider the Export option. Here is how to export data to a CSV file.
- While still on your form, click on File.
- Select the Export option.
- Click on Change the File Type, then on the File Types, and choose Plain Text (*.txt). It is as simple as it looks in the screenshot.

- Click on Save As. By doing this, you will open the Save As dialog box, which will allow you to edit the file’s properties.

- Select the preferred location for your file.
- Name your file as desired and click on Save. This will then export the data.
Importing Form Data Into Excel
Now that you have converted your Word form data to its CSV format, the next step is to import it into your Excel spreadsheet.
Your file may not be visible on Excel because Excel only displays Excel files by default. To access your CSV file, follow these steps.
- Open up a new Excel spreadsheet.
- Click on File > Open.
- Choose the Browse icon and select All Files in the types drop-down list.

- Find the location of the file and select it.
- Click on Open. This will prompt Excel to open the Text Import Wizard, as shown below. Click on Delimited > Next.
Dealing With Many Forms
Sometimes you may need to convert plenty of forms in a single day. Going through this entire process may be strenuous in this case.
The best option is to create code connections to the spreadsheet using ADO when dealing with many forms. ADO (ActiveX Data Object) will automate the transfer process. This way, it becomes easier to transfer data.
Why Use These Methods
Even though learning these new techniques can be intimidating, they will pay off in the long run. You can save a lot of time by using these methods.
They also increase your accuracy when it comes to data entry. This way, the risk of errors becomes slightly lower since data is lifted from one software to another rather than keying it manually.
Hello, I know a little about Word and practically nothing about Access.
I send out surveys as Word documents with formfields. I collect the
response in a common directory and compile the results in a Word table.
At the bottom of this message is a bit of code that I cobbled together
and currently use that extracts data from the forms and stores it is a
DataObject (I am not sure if it has anything to do with Access or not).
I then use the data in the dataobject to fill in the Word table.
What I would like to do is elimiate the Word table and have the data
compiled in a permanent Access database. So in laymans terms, I need
code that I can plug into my existing Word macro that will:
Create and open new database
Create the fields and heading rows
For Each File in the folder
Extract the data from the fields
Write data to database fields
Next File
Save database as: C:myResults.mdb
Close database
I would use that code to replace the following existing code:
‘Prepare the database
Set DataList = CreateObject(«ADOR.Recordset»)
DataList.Fields.Append «Name», adVarChar, MaxCharacters
DataList.Fields.Append «FavFood», adVarChar, MaxCharacters
DataList.Fields.Append «FavColor», adVarChar, MaxCharacters
DataList.Open
‘Retrieve the data
For i = 1 To UBound(FileArray)
Set myDoc = Documents.Open(FileName:=oPath & FileArray(i), _
Visible:=False)
DataList.AddNew
With myDoc
DataList(«Name») = .FormFields(«Text1»).Result
DataList(«FavFood») = .FormFields(«Text2»).Result
DataList(«FavColor») = .FormFields(«Text3»).Result
.Close
End With
DataList.Update
Next i
I appreciate the help any of you can provide. If I have posted to the
wrong group, please advise. Thanks
Sub TallyData3()
Const adVarChar = 200
Const MaxCharacters = 255
Dim DataList As Object
Dim oPath As String
Dim FileArray() As String
Dim oFileName As String
Dim i As Long
Dim oTbl As Word.Table
Dim myDoc As Word.Document
oPath = GetPathToUse
If oPath = «» Then
MsgBox «A folder was not selected»
Exit Sub
End If
‘Identify and count files
oFileName = Dir$(oPath & «*.doc»)
ReDim FileArray(1 To 1000) ‘A number larger the expected number of
replies
‘Add file name to the array
Do While oFileName <> «»
i = i + 1
FileArray(i) = oFileName
‘Get the next file name
oFileName = Dir$
Loop
‘Resize and preserve the array
ReDim Preserve FileArray(1 To i)
Application.ScreenUpdating = False
‘Add the data table with headings
ActiveDocument.Tables.Add Selection.Range, i + 1, 3
Set oTbl = ActiveDocument.Tables(1)
With oTbl
.Cell(1, 1).Range.Text = «Name»
.Cell(1, 2).Range.Text = «Favorite Food»
.Cell(1, 3).Range.Text = «Favorite Color»
End With
‘Prepare the database
Set DataList = CreateObject(«ADOR.Recordset»)
DataList.Fields.Append «Name», adVarChar, MaxCharacters
DataList.Fields.Append «FavFood», adVarChar, MaxCharacters
DataList.Fields.Append «FavColor», adVarChar, MaxCharacters
DataList.Open
‘Retrieve the data
For i = 1 To UBound(FileArray)
Set myDoc = Documents.Open(FileName:=oPath & FileArray(i), _
Visible:=False)
DataList.AddNew
With myDoc
DataList(«Name») = .FormFields(«Text1»).Result
DataList(«FavFood») = .FormFields(«Text2»).Result
DataList(«FavColor») = .FormFields(«Text3»).Result
.Close
End With
DataList.Update
Next i
‘Display the data
i = 1
DataList.MoveFirst
Do Until DataList.EOF
i = i + 1
oTbl.Cell(i, 1).Range.Text = DataList.Fields.Item(«Name»)
oTbl.Cell(i, 2).Range.Text = DataList.Fields.Item(«FavFood»)
oTbl.Cell(i, 3).Range.Text = DataList.Fields.Item(«FavColor»)
DataList.MoveNext
Loop
Application.ScreenUpdating = True
End Sub
Private Function GetPathToUse() As Variant
‘Get the folder containing the files
‘Note uses the «Copy Dialog» which enables the «open» option
With Dialogs(wdDialogCopyFile)
If .Display <> 0 Then
GetPathToUse = .Directory
Else
GetPathToUse = «»
Exit Function
End If
End With
If Left(GetPathToUse, 1) = Chr(34) Then
GetPathToUse = Mid(GetPathToUse, 2, Len(GetPathToUse) — 2)
End If
Latest Articles for Microsoft
-

Image: Farknot Architect/Adobe Stock
SoftwareHow to access Microsoft Remote Desktop on your Mac
If you need to access Windows applications or PCs using your Mac, a remote desktop connection is the way to go. Here’s how to set up and use the connection.
-
Image: PhotoGranary/Adobe Stock
SoftwareMicrosoft PowerToys: A cheat sheet
Users are always searching for ways to make their computing lives better, and the Microsoft PowerToys are made specifically for this purpose.
-
Image: StackCommerce
Tech & WorkRun Windows programs at native speed on macOS, Linux or ChromeOS for just $50
Ditch those clunky emulators and run your Windows software on other operating systems as quickly and easily as on a Windows computer.
-
Image: Microsoft
SoftwareGet lifetime access to Microsoft Office 2021 for just $50
Whether you’re starting a new business venture and need Microsoft Office’s help or you just want to get better organized in your personal life, it’s a good time to take advantage of this limited-time deal.
-
Image: PhotoGranary/Adobe Stock
DeveloperNew ways to bring MongoDB data and apps to Azure Cosmos DB
Microsoft is making it easier to move existing MongoDB workloads to its Cosmos database.
-
Image: wachiwit/Adobe Stock
Tech & WorkTurbocharge your company’s productivity with advanced Excel skills for only $10
Learn all of Excel’s features, plus how to program and streamline your workflow with automated tasks in this Excel Training bundle.
-
Image: Adobe Stock/alvaher
SecurityMicrosoft adds GPT-4 to its defensive suite in Security Copilot
The new AI security tool, which can answer questions about vulnerabilities and reverse-engineer problems, is now in preview.
-
Image: Pixabay
SoftwareLoop components make collaboration easier in Office and Microsoft 365 apps
Structured chunks of data you can share and update in multiple places are showing up in different Office applications. Here’s what you can do with these Loop components.
-
Image: Andy Wolber/TechRepublic
SoftwareGoogle Workspace pricing (2023): How to choose the right plan for your business
Moving to Google Workspace? Understand the differences between business and enterprise plans so you can choose the right one for your business.
-
Image: gguy/Adobe Stock
SecurityMassive adversary-in-the-middle phishing campaign bypasses MFA and mimics Microsoft Office
Microsoft has already seen millions of phishing emails sent every day by attackers using this phishing kit. Learn how to protect your business from this AitM campaign.
-
Image: Hugo Baeta
CloudRunning WordPress on Azure for secure, fast and global content delivery
Learn about Microsoft’s WordPress on Azure App Service, as well as an interesting alternative from WP Engine.
-
Image: PhotoGranary/Adobe Stock
CloudAzure Monitor’s Change Analysis helps you troubleshoot problems quickly
Azure Monitor’s Change Analysis helps you troubleshoot problems quickly.
-
Image credit: Microsoft
Artificial IntelligenceMicrosoft adds Copilot AI productivity bot to 365 suite
Copilot, a natural language bot that can pull from data across the Microsoft 365 suite, is now in testing with select commercial customers.
-
Image: gguy/Adobe Stock
Artificial IntelligenceOpenAI debuts GPT-4 after year of training on Azure supercomputer
The GPT-4 language model is now available for ChatGPT Plus subscribers. Developers can join an API waitlist.
-
Image: Karolina Grabowska/Pexels
SoftwareHow to customize Outlook for Mac mail
Microsoft recently made Outlook for Mac free, a move sure to encourage adoption. If you’re using Outlook for Mac, or thinking of making the change, here’s how to customize the app’s email views.