
We often encounter situations where many employees contribute to data and at your end, you need to collate the data into a single file.
The usual practice is , excel workbooks are sent to employees to fill in data.
When excel sheets come back with data, they are manually collated by cut and paste.
A simple solution to avoid this manual labour is «sharing excel sheets».
Follow the simple process given below to help you collate data from multiple excel files from employees just with a click of a button!
OK.. may not be one click. May be few clicks!
First things first:
First, you need to prepare the worksheet you wish to share (to collect data)
- Open the workbook you want to share
- Go to Tools >> Share Workbook

- Now save the workbook and give it a name ( eg: Cust_Nos.xls) save the file in a separate folder
- Now make as many copies of the workbook as you would need to distribute by using Save as a command from the file menu.
- Give a specific name for each Copy like Cust_Nos_John.xls;Cust_Nos_Mary.xls etc to identify
- Now send each specific file to a concerned employee for their Input
The last step is to merge files ( Received with input from employees)
- Save each file from the employee in the same folder where your base file is stored
- Open the base file
- Go to Tools >> Compare and Merge Workbooks
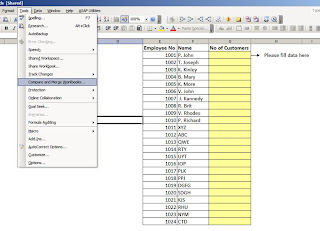
- Browse to the file from employee — select the first file “Cust_Nos_John.xls
- You will observe that the data given by John in his file appears in your base file!
- Repeat the same by Opening all files from each employee.
Watch this video for a demo
Boom! You have merged data from Many files with ease and no errors!
This post is the first of a few where we look at how easy the Office 365 stack integrates. In this series, we will:
- Create a Form and have the data save directly in Excel (this post)
- Add the Form to Microsoft Teams
- Notify the Team a submission was made
- How does this look like on the phone
I came across this neat little feature and instantly fell in love. We know about Microsoft Forms, the Office 365 quiz and polls tool. We know this can be easily exported to Excel. However, if you have an existing Excel file, you can use Forms to import directly into your existing Excel file!
Yes. Import. Directly. Into. Your. Existing. Excel. File.
I find this as a big deal. There have been numerous use cases for this over my last 20 years of consulting. People just want to collect data, in a clean manner, and then analyze it in Excel. This also comes in handy when you want to use the form for more than just a survey tool. I’ve set up a Form as a request tool for the intranet. Users submit intranet requests it in Forms, it writes to my Excel file, then I can triage the request, manage that data in my Excel file, without having to download it, or writing a Flow to write the data to the Excel file.
If Excel isn’t enough, check out this other post and you can save your Forms into anything else, like Planner, Trello, Slack, etc.
Start with Excel in SharePoint Online
Create your Excel file, if you don’t have one already. Any Excel file will do, make sure it’s the xslx file extension (if you created it in O365 or Office 2016, you should be fine). Now throw that file up in SharePoint or Teams.
Here I have a basic Excel file, with the goal of managing a booth at a trade show. I need 3 people at the booth, and I want to collect who wants to man it when.

Alternatively, you can create a fresh new Excel file, with a Forms front end, from your SharePoint library!

press the New menu and select Forms for Excel. Name your Excel file and you’ll be sent to the Forms designer.
Will this work with OneDrive?
Great question! Thanks for asking. I don’t know. Use SharePoint. I have normally used a shared Excel file in Teams/SharePoint, but for my first round through this post I decided to use OneDrive. I got through creating the form, but no results would save in the Excel file. Really weird. I’m guessing there’s a connection missing somewhere. If you try it in OneDrive, let me know how it goes!!
Open Excel file in Office Online and create the Form
Go open up your file in a browser. A fast way to do this is to click File menu, then click the path and click Copy path to clipboard.

Now paste that in a browser. Any modern browser will work, I’m using Chrome.
Edit your file, click Edit Workbook, then Edit in Browser.

Create your Form
Up in the HOME ribbon, in the Tables section, click Forms then New Form. This only appears in Excel Online, maybe it’ll be in Office 2019?

Did you know that was there? I found it one day and clicked it. Awesomeness
And now you’re in FORMS!! It’s awfully nice of Microsoft to assume the same name of the form to the Excel file. Yes you can change that.

Click Add Question and start creating your form! Add your first question and navigate back to the Excel file in the browser and see what’s happening.

This might take a few moments to catch up, sometimes it’s immediate, sometimes I had to refresh the browser to effectively see the columns.
First off, a new worksheet has been added, called Form1.
Each question gets added automatically, and you’ll see a bunch of additional columns get added like Start Time, Completion Time, Email, and Name. These auto-generate, which is awesome.
Finish throwing your questions in, here’s my impressive form:

Yes, XXLT is a size, and my perfect size. No one ever offers it.
You can test it real quick, press the Preview button at the top and fill it out and watch Excel load!

Once this data is in Excel, you can then treat it like any other data table. Use vlookups, functions, etc. to continue your analysis.
In my example, I used a vlookup to populate the Mobile Number of each person. Now we have a single page view of who’s working the booth, when and how to reach them.


Couple of things…
If you want to change the form, you’re best bet is to access it via the Forms button. You’ll probably get assaulted with something like this to remind you:

If you go to Forms, depending on where you stored the Excel file, you may see it either under My forms or Recent group forms. Since I accessed this via a Team (a Group) it’s a group form

I’ve noticed that the data is pushed into Excel, if you delete rows in Excel, it still exist in Forms, BUT not sure how to get it out after the fact. I deleted a bunch of rows from Excel, and they still exist in the Forms app. I think that’s great, but there doesn’t appear a way to refresh, download, or otherwise get that data from Forms. If this is a need, we can use a Flow to write the data to another datasource.
When Forms writes to Excel, the Last Modified By is SharePoint App. It’s nice something uses a service account in Office 365 (which Flow doesn’t support yet).
Do you have an existing Form you’d like to hook up to Excel? Check out my other post Saving data from Microsoft Forms into Excel using Power Automate (flow)
Done!
This was relatively painless right? Stay tuned to my next post on how to add this form to Teams!
Microsoft Excel is a useful instrument for organizing and structuring very different data. It can be used to process information by various methods and edit data arrays.
Let us see its tools for generation and processing web applications files. Using a particular example, we will learn the basics of work with XML in Excel.
How to create XML-file in Excel
XML is a file standard for transferring files over the Internet. Excel supports its export and import.
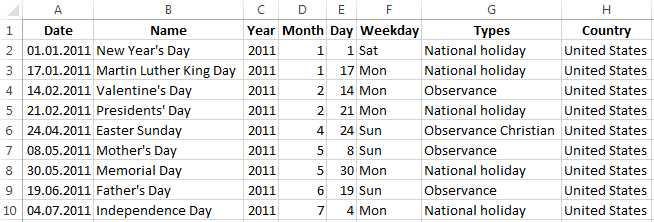
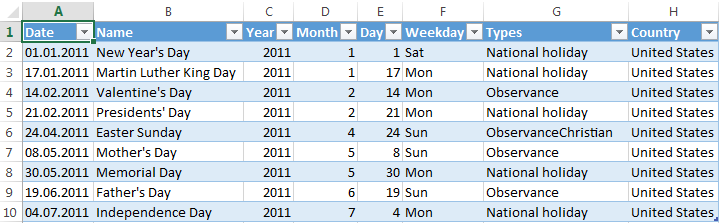
We are going to look through the process of creation an XML-file using factory calendar as a particular example.
- Create a table on which you want to create an XML file in Excel and fill it with data.
- Create and insert a map with the required XML document structure.
- Export the table data in XML format.
Altogether.
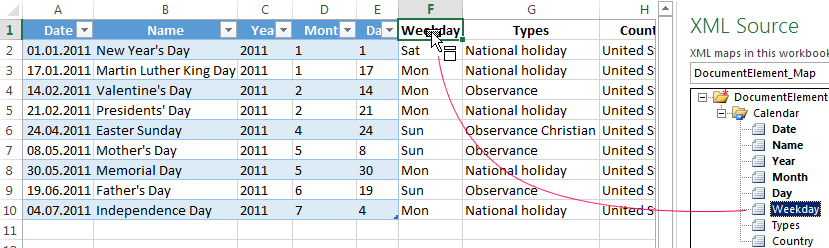
- Our table is a Holiday calendar.
- Create any text editor (such as «Notepad») the desired XML structure to generate a map file is saved. In this example, use the map structure:
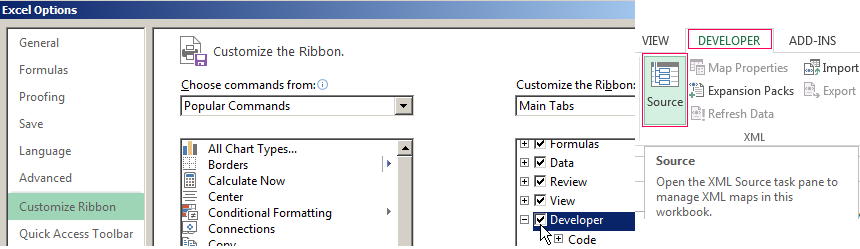
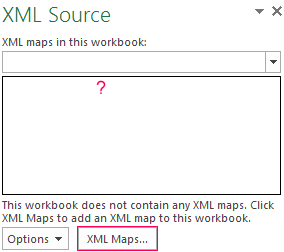
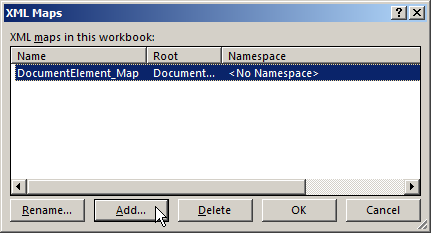
- Open the tool «DEVELOPER». Choose the dialog box «Source» in the XML tab.
- If Excel cannot see XML maps, they have to be added. Press «XML Maps» button.
- Press «Add». Find your XML file – press ОК.
- Elements of the schema will appear in the right column. They have to be dragged to the corresponding column names of the table.
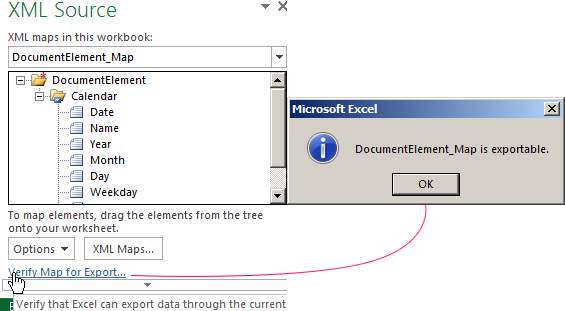
- Check whether the export is possible.
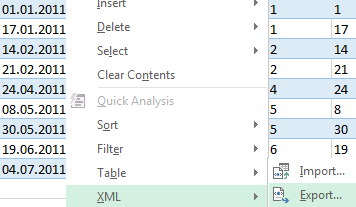
- When all of the elements will be associated, right click any cell on the table and choose XML – Export.
Save the file.
How to save an Excel file in XML format
One of the options:
- Press CTRL+S, choose «Save as» — «Other formats».
- Set the name. Choose the file destination and type – XML.
Press «Save» button.
If you get any errors, try to save the workbook as XML 2003 table or web page. Usually, there are no problems with these formats.
Other options:
- Download XLC to XML converter, or find a service, which exports files online.
- Download XML Tools Add-in from the official Microsoft web site. It is available free of charge.
- Open a new workbook. Press CTRL+O «Open».
How to open an XML file in Excel
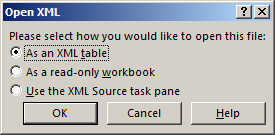
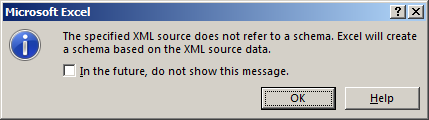
- Change the format to XML file. Choose the desired file. Press CTRL+O.
- Open it as an XML-table. Press OK.
- Similar notification will appear.
- Press OK. You can work with this table the same way as with any Excel file.
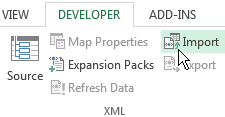
How to convert XML file to Excel
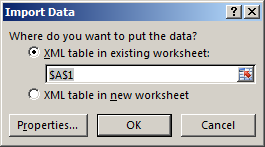
- Open the tool «DEVELOPER». Choose the dialog box «Import».
- Choose a file in the dialog box, that you want to convert.
- Press «Import». Excel will offer to create a scheme automatically based on the data received. Press OK. A window will open, where you will need to choose a destination for the importing file.
- Set the range for import. It is better to add extra cells for future entries. Press «OK».
From now on, the created table is being edited and saved in Excel format.
How to collect data from XML-files to Excel
The principle of collecting data from several XML-files is the same as the principle of conversion. When we import data to Excel, the XML map transfers at the same time. You can also transfer other data in this schema.
Each new file will be linked to the existing map. Every element of the table structure binds to an element from XML map. Only one data link is allowed.
In order to configure binding settings, in the «DEVELOPER» menu choose the «Map Proparties» instrument.
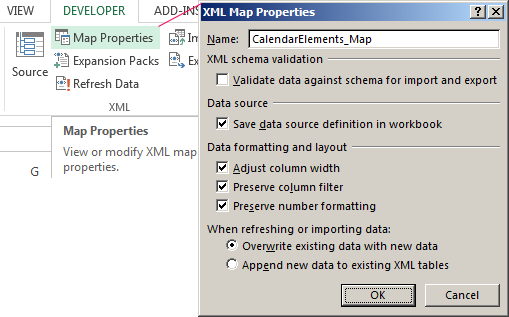
Features:
- Excel will check every new file for compliance with the existing map (if you check the box next to this line).
- The data can be update. Also, new information can be added to the existing table (it makes sense, if you need to collect data from similar files).
Other ways to get structure data (schema):
- Download it from a database of a specialized business application. Commercial sites and services may provide schemas. Simple options are in the public domain.
- Use prepared examples in order to validate the maps. Examples contain the basic elements and structure data. Copy and paste it into the program «Notepad» – and save it with the desired extension.
These are all manual methods of import and export files structure data.
This tutorial provides examples of how Excel can be
used to create data collection templates that might be used in a classroom
laboratory.
Those who are unfamiliar with Excel may wish to first read The
Basics of Using Excel.
The fundamentals of graphing data with Excel are described
in Graphing with
Excel.
Those interested in another application of Excel in the curriculum should
read Grading with Blackboard
and Excel.
Preformatted templates can be useful in lower-level
lab courses to hide the complexities of Excel.
- A Data Collection
Template - Template Formatting
Options
A Data Collection
Template
Excel has a number of features that make it useful
for designing data collection templates.
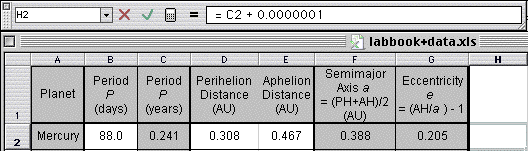
- An introductory astronomy lab uses a planetarium program to calculate
positions of planets and compare them with some famous predictions by
Kepler:
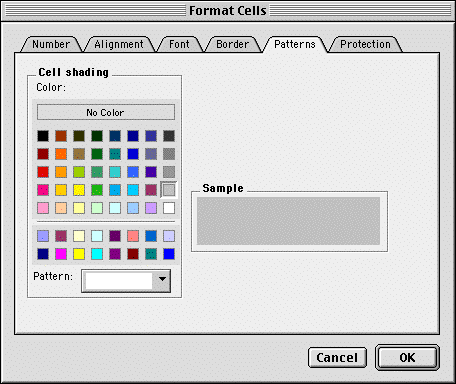
- The data that the students collect are to be entered into the white
cells; the others contain formulae that automatically calculate the
desired results.
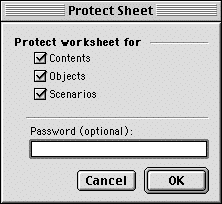
To indicate their special status, they are selected and then changed
to a different background using the Format Cells dialog:�


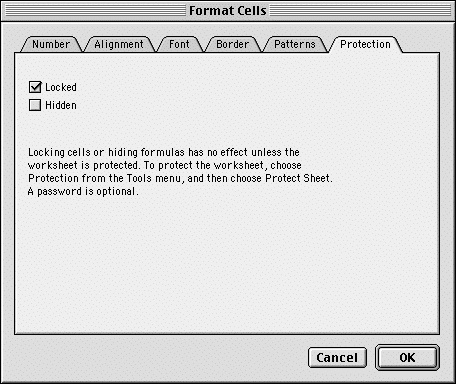
- This, of course, will not prevent them from being messed up,
so we can also lock them:
Note that you can also hide formulas if you choose (but not their
results).
- Once the template has been set up and the calculation verified,
a duplicate can be made where the input data is cleared and the protection
is turned on:

Clearing the data doesn’t affect the structure of the formulae or
the graph; they remain ready to calculate or display the data.
Template Formatting Options
Excel provides a lot of flexibility for setting up
templates.
- The planetarium program provides the data in days for the first
four planets (because they are relatively short), and in years for
the last five planets:

However, for our calculations we need the period to be consistently
expressed in years.
So, the template can be organized to convert days to years for just
these four planets but not the others (note the formula for cell C2).
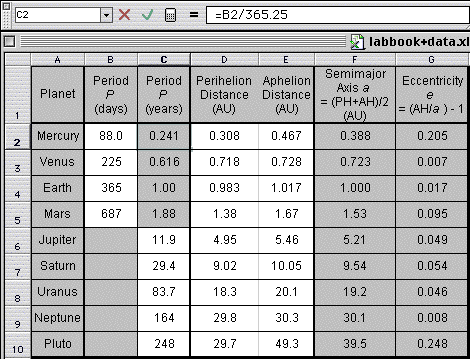
- One thing that students always want to do is write down too many
digits of information.
The cells can therefore be formatted
to display only the appropriate number of digits for the quantity
in question (see the picture above)
Any extra digits «disappear» in the display, reinenforcing
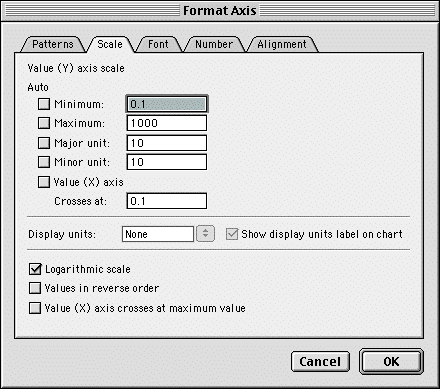
the notion that they are meaningless. - Kepler’s Third Law equates the square of a planet’s orbital period
P to the cube of its semimajor axis a (its average distance
from the Sun).
It is therefore useful to graph P and a on a log-log
plot, as they should then fall along a straight line with a 2/3 slope:

Excel allows you to easily set a logarithmic scale:

Note that the minimum and maximum values must be positive for this
type of scale.
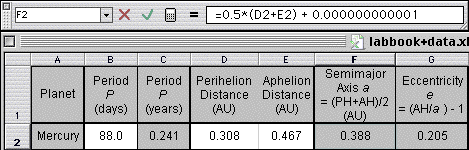
- This brings up an interesting dilemma when data hasn’t been entered
yet.
The input to the graph will be zero, and Excel complains vociferously.
To get around this, the calculation of the semimajor axis a
can have a small number added to it, as in cell F2 below:

Because the representation of the number has been limited to a few
digits, the calculation shows up as 0.000 when there is no input data. - This approach doesn’t work for the period P because its data
is partially entered directly, which would be deleted when saving
it without input data.
As an alternative, you may set up a masked calculation field, used
only by the graph, by setting its font to white on a white background,
as in cell H2 below:

If the cell is hidden as well as locked, then
its formula also won’t show up when the template is protected. - You can download this template by clicking here.
Are you tired of having to manually collect and consolidate data, from various people, into your Excel spreadsheet? If so, chances are you have yet to discover Excel Survey.

Are you tired of having to manually collect and consolidate data, from various people, into your Excel spreadsheet? If so, chances are you have yet to discover Excel Survey.
Microsoft introduced Excel Survey a few years ago along with Office Online. However, you may not have noticed it if you haven’t ventured outside of the desktop version of Office. The survey feature is only available in the online version, which makes sense considering you will need your survey to be available to users via the Internet.
What Is an Excel Survey?
An Excel Survey is a Web form, that you design to collect and store structured data, into an Excel spreadsheet. You have many options when it comes to Web surveys or forms. Alternatives such as Google Forms and Survey Monkey may have more robust features, but when you have a need for collecting simple datasets from several people, this tool will do the job seamlessly in the Microsoft ecosystem.
Create an Excel Survey
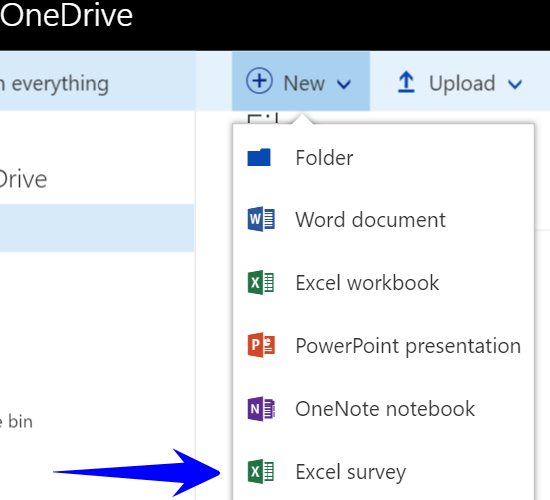
If you don’t already have a personal or business Microsoft Online account, you will need to create one in order to log into OneDrive. From there you have two ways to create a survey:
1. Create a New Survey from OneDrive
From the menu, select New > Excel Survey
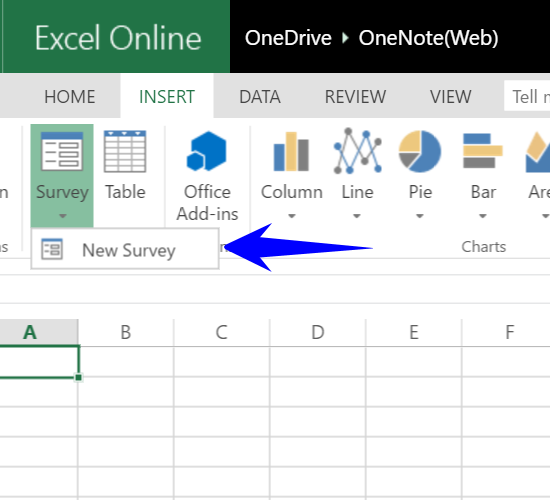
2. Add a Survey to an Existing Excel Spreadsheet
From within an existing Excel Online spreadsheet, select Home > Survey > New Survey
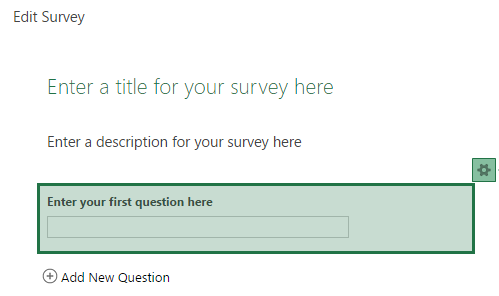
Design Your Survey Form
You will want to give your survey a good title and description, so your responders will understand quickly why they are being asked to provide data. Next, you will add a question for each piece of information you will require.
Questions from your survey will correspond to columns in your spreadsheet, and each response will be represented as a row.
Explore Your Options
It’s important to be clear how you will want to use the results before setting up the question types. If you have data that you will need to sort or filter, you most likely should use a «choice» field in order to control the input. A «text» field should be used for dynamic information that cannot be predefined, such as a person’s name.
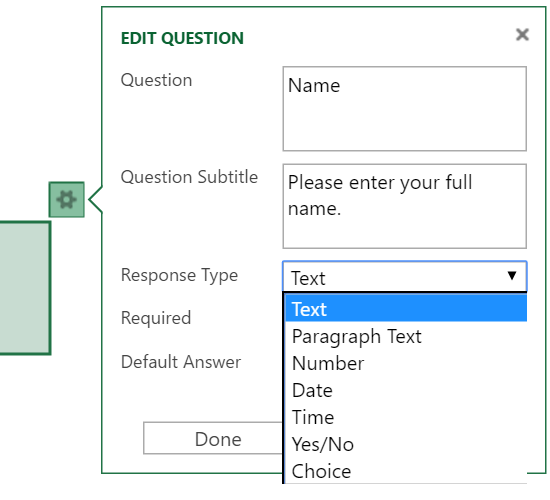
Look through the available types of fields and select the best one for each column. Then decide if you want the question to be required or optional, and if you want a default value to be displayed automatically on the form.
- Text – A short text field.
- Paragraph Text – A long text field.
- Number – Numerical data.
- Date – Date values.
- Time – Time values.
- Yes/No – Dropdown box that only allows a «Yes» or «No» choice.
- Choice – Dropdown box with choices defined by you.
Know the Limitations
As you can see, Excel Survey is a very basic tool that will likely get the job done for a majority of situations. However, it has some limitations to take into consideration. If any of these are a deal breaker, then you might want to look at some alternative solutions.
- Anonymous Access – You have no way to require a login or limit the access to a survey once it’s shared. If you have the link, you can submit a response.
- Branching aka Skip Logic – What you see is what you get. You cannot present different information to user based on the answers they provide to a question.
- Input Validation – You cannot validate data that is entered into the form outside of using one of the «choice» field types.
Preview Your Survey
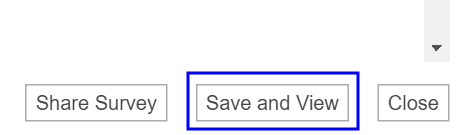
Now that you have completed the design, you should preview your work to see how it will display when you send it. To do this, select the Save and View button on the bottom of the form.
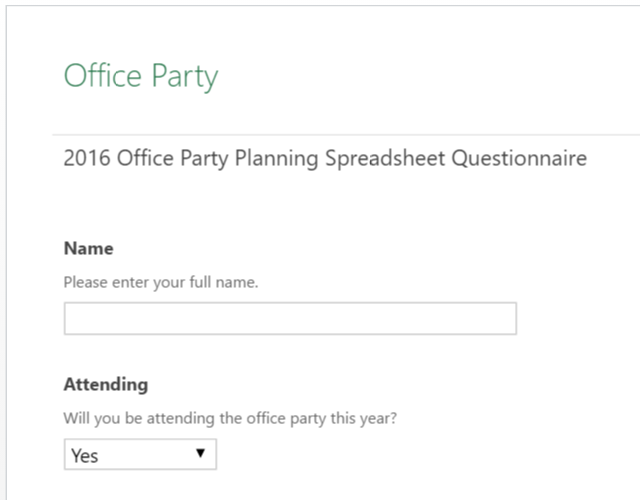
This is what your survey recipients will see when you share the link with them:
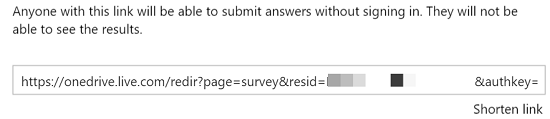
Once you are happy with how everything looks, it’s time to share! Click the Share Survey button and you will be presented with a link that you can send to your target audience.
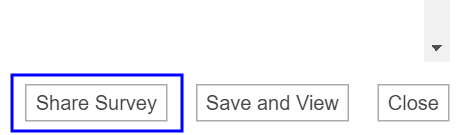
You have the option to shorten the link. This is optional, but if you want to do this, just click on Shorten link.
View Your Responses
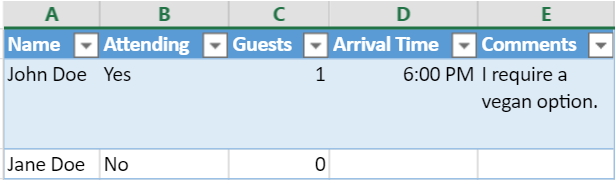
The survey in this example is gathering data to help plan an office party, but the possibilities for how you can use it are endless. You could create a survey to have your team track their time on a particular project, gather feedback on performance, or even to have your family help decide on the location of your next reunion!
After your survey link has been sent, you can start monitoring your spreadsheet for responses and analyzing the results. The data will be stored in the spreadsheet that the survey is linked to. If you want to combine datasets to help with data analysis, you can do that with the Power Query tool built into Excel.
Image Credits:Market Research Survey by Pixsooz via Shutterstock