
Пример создания пользовательской формы в редакторе VBA Excel для начинающих программировать с нуля. Добавление на форму текстового поля и кнопки.
Начинаем программировать с нуля
Часть 4. Первая форма
[Часть 1] [Часть 2] [Часть 3] [Часть 4]
Создание пользовательской формы
Создайте или откройте файл Excel с расширением .xlsm (Книга Excel с поддержкой макросов) или с расширением .xls в старых версиях приложения.
Перейдите в редактор VBA, нажав сочетание клавиш «Левая_клавиша_Alt+F11».
В открывшемся окне редактора VBA выберите вкладку «Insert» главного меню и нажмите кнопку «UserForm». То же подменю откроется при нажатии на вторую кнопку (после значка Excel) на панели инструментов.

На экране редактора VBA появится новая пользовательская форма с именем «UserForm1»:

Добавление элементов управления
Обычно вместе с пользовательской формой открывается панель инструментов «Toolbox», как на изображении выше, с набором элементов управления формы. Если панель инструментов «Toolbox» не отобразилась, ее можно вызвать, нажав кнопку «Toolbox» во вкладке «View»:

При наведении курсора на элементы управления появляются подсказки.
Найдите на панели инструментов «Toolbox» элемент управления с подсказкой «TextBox», кликните по нему и, затем, кликните в любом месте рабочего поля формы. Элемент управления «TextBox» (текстовое поле) будет добавлен на форму.
Найдите на панели инструментов «Toolbox» элемент управления с подсказкой «CommandButton», кликните по нему и, затем, кликните в любом месте рабочего поля формы. Элемент управления «CommandButton» (кнопка) будет добавлен на форму.
Кликнув по элементу управления на форме, вы можете изменять его размер, перетягивая границы за белые квадратики, и перетаскивать по форме, ухватив за одну из границ. Кликнув по заголовку формы или по ее рабочему полю, вы можете также изменять ее размер, перетягивая границы за белые квадратики.

Нажатием клавиши «F4» вызывается окно свойств, с помощью которого можно вручную задавать значения свойств пользовательской формы и элементов управления. В окне свойств отображаются свойства выбранного элемента управления или формы, если выбрана она. Также окно свойств можно вызвать, нажав кнопку «Properties Window» во вкладке «View».
Отображение формы на экране
Чтобы запустить пользовательскую форму для просмотра из редактора VBA, необходимо выбрать ее, кликнув по заголовку или свободному от элементов управления полю, и совершить одно из трех действий:
- нажать клавишу «F5»;
- нажать на треугольник на панели инструментов (на изображении выше треугольник находится под вкладкой «Debug»);
- нажать кнопку «Run Sub/UserForm» во вкладке «Run».
Для запуска пользовательской формы с рабочего листа Excel, можно использовать кнопки, описанные в этой статье. Например, чтобы отобразить форму с помощью «кнопки – элемента ActiveX», используйте в модуле рабочего листа следующий код:
|
Private Sub CommandButton1_Click() UserForm1.Show End Sub |

Для «кнопки – элемента управления формы» можно использовать следующий код, размещенный в стандартном программном модуле:
|
Sub ShowUserForm() UserForm1.Show End Sub |

В результате вышеперечисленных действий мы получаем на рабочем листе Excel пользовательскую форму с мигающим курсором в текстовом поле:

Добавление программного кода
Программный код для пользовательской формы и элементов управления формы записывается в модуль формы. Перейти в модуль формы можно через контекстное меню, кликнув правой кнопкой мыши на поле формы или на ссылке «UserForm1» в проводнике слева и нажав кнопку «View Code».
Переходить между открытыми окнами в редакторе VBA можно через вкладку «Window» главного меню.
Изменить название пользовательской формы и элементов управления, их размеры и другие свойства можно через окно свойств (Properties Window), которое можно отобразить клавишей «F4». Мы же это сделаем с помощью кода VBA Excel, записанного в модуль формы.
Откройте модуль формы, кликнув правой кнопкой мыши по форме и нажав кнопку «View Code» контекстного меню. Скопируйте следующий код VBA, который будет задавать значения свойств формы и элементов управления перед ее отображением на экране:
|
1 2 3 4 5 6 7 8 9 10 11 12 13 14 15 16 17 18 19 20 21 22 23 24 25 26 27 28 29 30 31 32 33 34 35 36 37 38 39 40 41 42 43 44 45 |
Private Sub UserForm_Initialize() ‘Me — это обращение к форме в ее модуле With Me ‘Присваиваем форме заголовок .Caption = «Новая форма» ‘Задаем ширину формы .Width = 300 ‘Задаем высоту формы .Height = 150 End With With TextBox1 ‘Задаем ширину текстового поля .Width = 200 ‘Задаем высоту текстового поля .Height = 20 ‘Задаем расстояние от внутреннего края ‘формы сверху до текстового поля .Top = 30 ‘Задаем расстояние от внутреннего края ‘формы слева до текстового поля, чтобы ‘текстовое поле оказалось по центру .Left = Me.Width / 2 — .Width / 2 — 6 ‘Задаем размер шрифта .Font.Size = 12 ‘Присваиваем текст по умолчанию .Text = «Напишите что-нибудь своё!» End With With CommandButton1 ‘Задаем ширину кнопки .Width = 70 ‘Задаем высоту кнопки .Height = 25 ‘Задаем расстояние от внутреннего края ‘формы сверху до кнопки .Top = 70 ‘Задаем расстояние от внутреннего края ‘формы слева до кнопки, чтобы ‘кнопка оказалось по центру .Left = Me.Width / 2 — .Width / 2 — 6 ‘Задаем размер шрифта .Font.Size = 12 ‘Присваиваем кнопке название .Caption = «OK» End With End Sub |
Вставьте скопированный код в модуль формы:

Познакомьтесь еще с одним способом отображения на экране пользовательской формы в процессе тестирования: установите курсор внутри процедуры UserForm_Initialize() и нажмите клавишу «F5» или треугольник на панели инструментов. Все предыдущие способы (с выбором формы в редакторе и кнопками на рабочем листе) тоже работают.
В результате мы получаем следующую форму:

Теперь перейдите в редактор VBA, откройте проект формы «UserForm1» и дважды кликните по кнопке «CommandButton1». В результате откроется модуль формы и будет создан шаблон процедуры CommandButton1_Click(), которая будет запускаться при нажатии кнопки:
|
Private Sub CommandButton1_Click() End Sub |
Вставьте внутрь шаблона процедуры CommandButton1_Click() следующую строку кода, которая будет копировать текст из текстового поля в ячейку «A1» активного рабочего листа:
|
Range(«A1») = TextBox1.Text |

Отобразите пользовательскую форму на экране и проверьте работоспособность кнопки «OK».
Visual Basic is an excellent language for automating repetitive tasks in Excel. Imagine taking your automation up a notch by creating highly functional user forms that also look tidy to the end-users.
User forms in VBA present you with a blank canvas; you can design and organize the forms to fit your needs at any given time.
In this guide, you will learn to create a student-based data entry form that captures relevant information in linked Excel sheets.
Creating a User Form With Excel VBA
Open a new Excel workbook and perform a few preliminary steps before you start creating your data-entry form.
Save your workbook with the desired name; don’t forget to change the file’s type to an Excel Macro-Enabled Workbook.
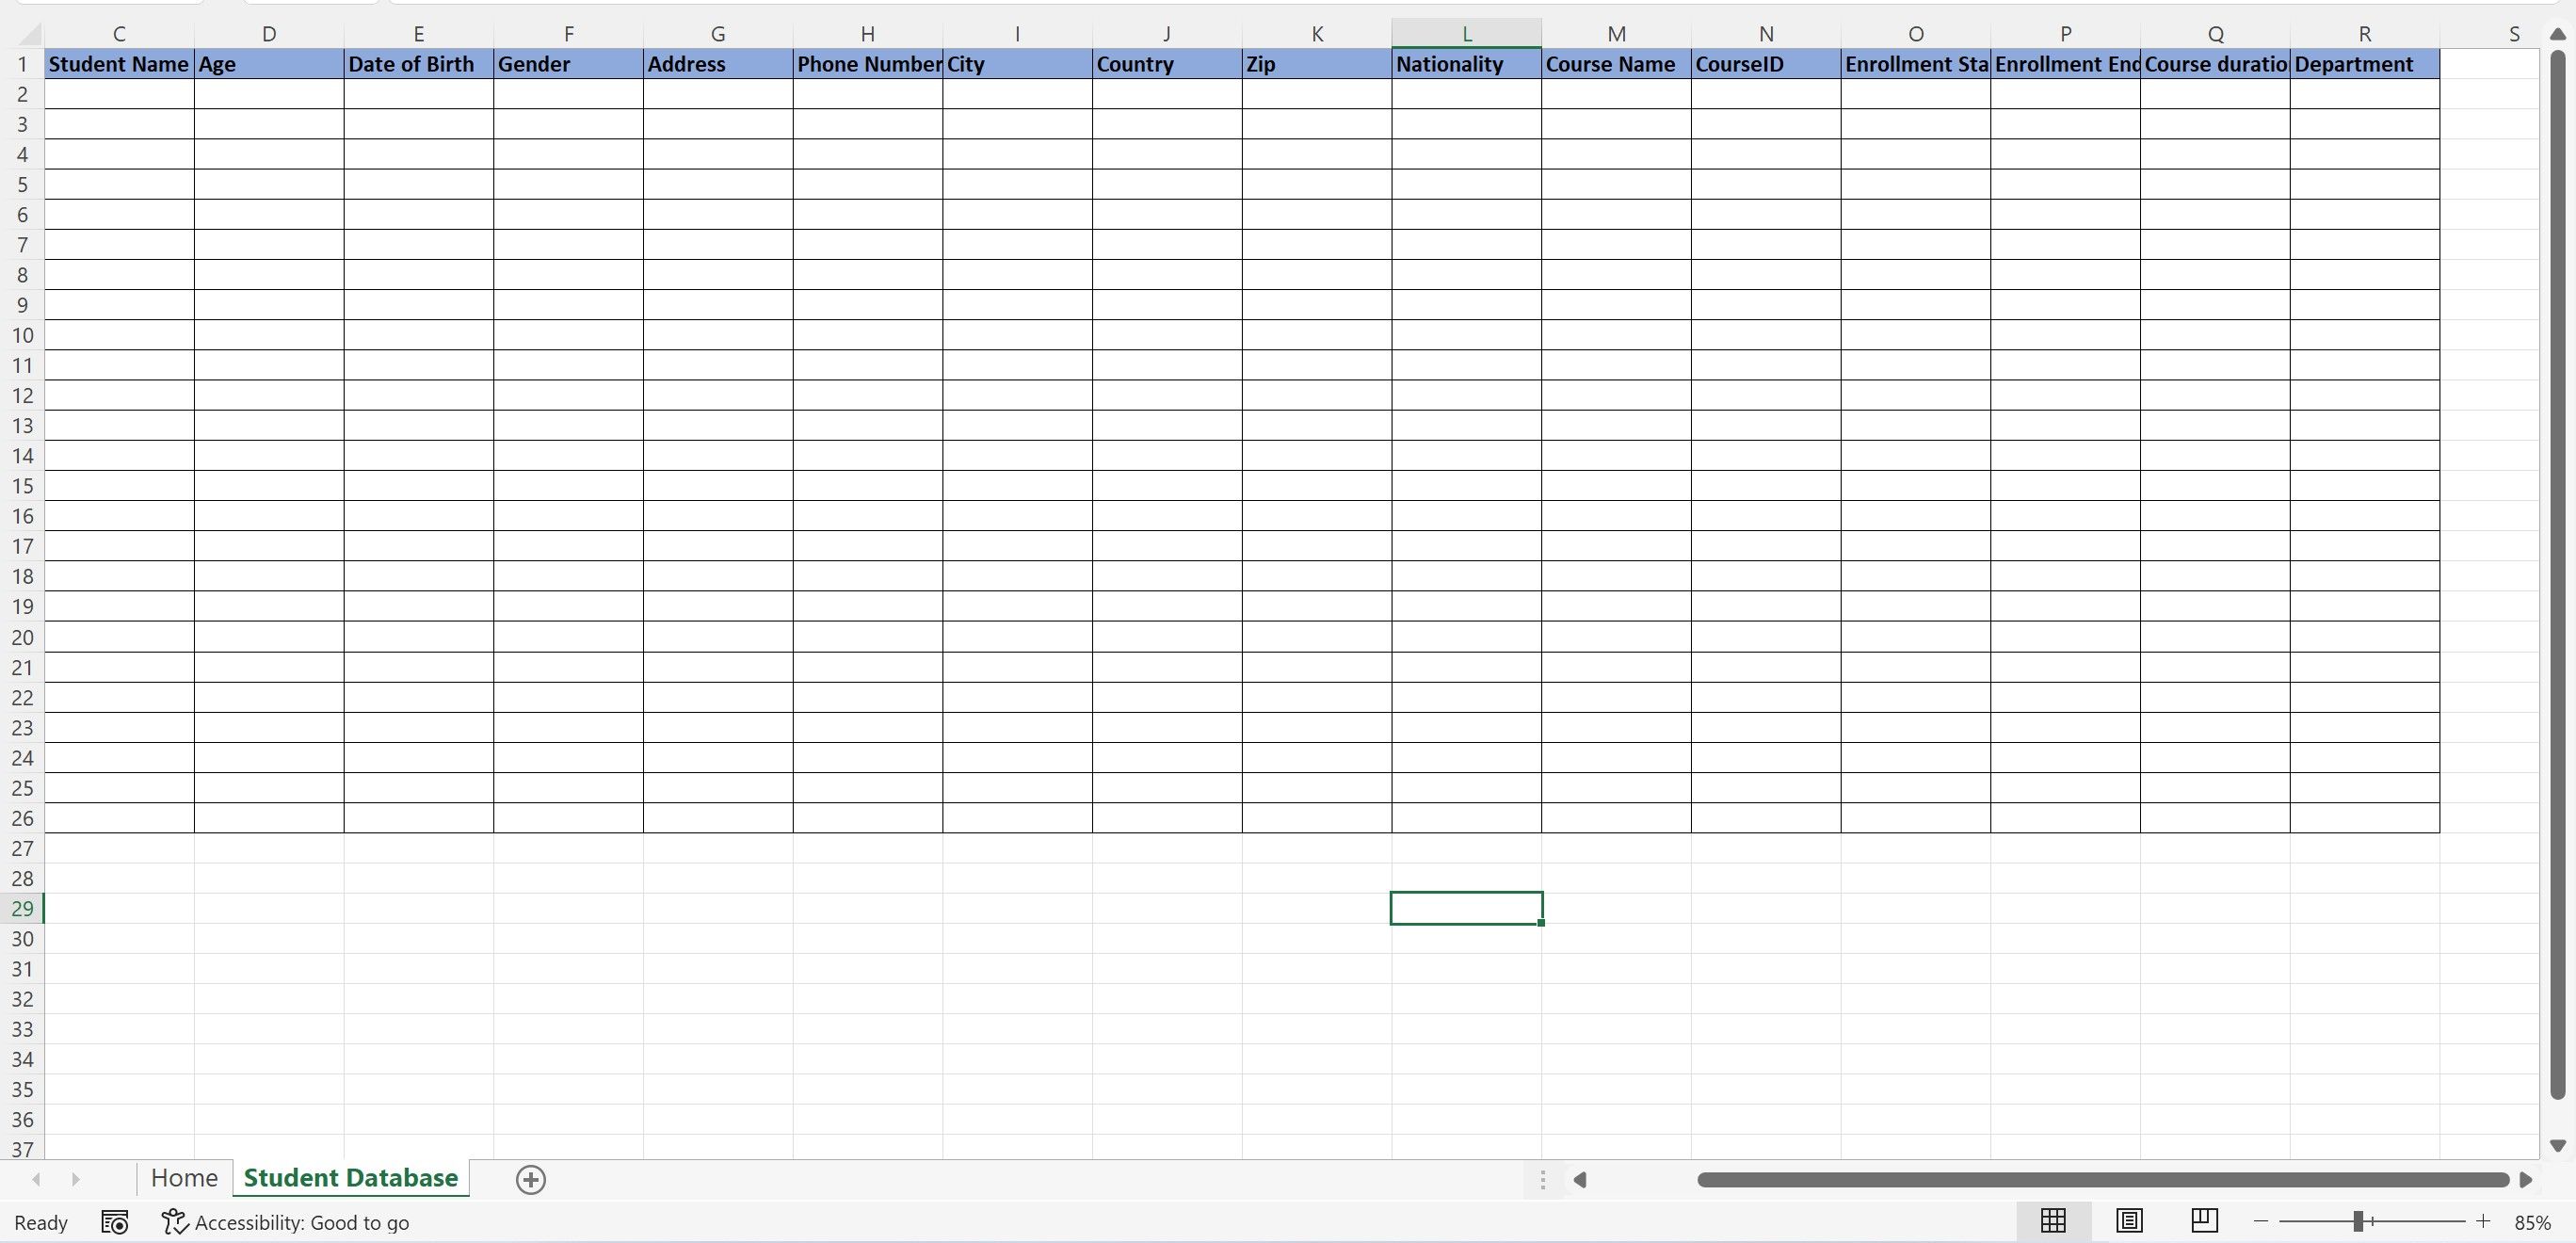
Add two sheets to this workbook, with the following names:
- Sheet1: Home
- Sheet2: Student Database
Feel free to change these names as per your requirements.
In the Home sheet, add a button to control the user form macro. Go to the Developer tab and click on the Button option from the Insert drop-down list. Place the button anywhere on the sheet.

Once you’ve placed the button, rename it. Right-click on it, and click on New to assign a new macro to show the form.
Enter the following code in the editor window:
Sub Button1_Click()UserForm.ShowEnd Sub
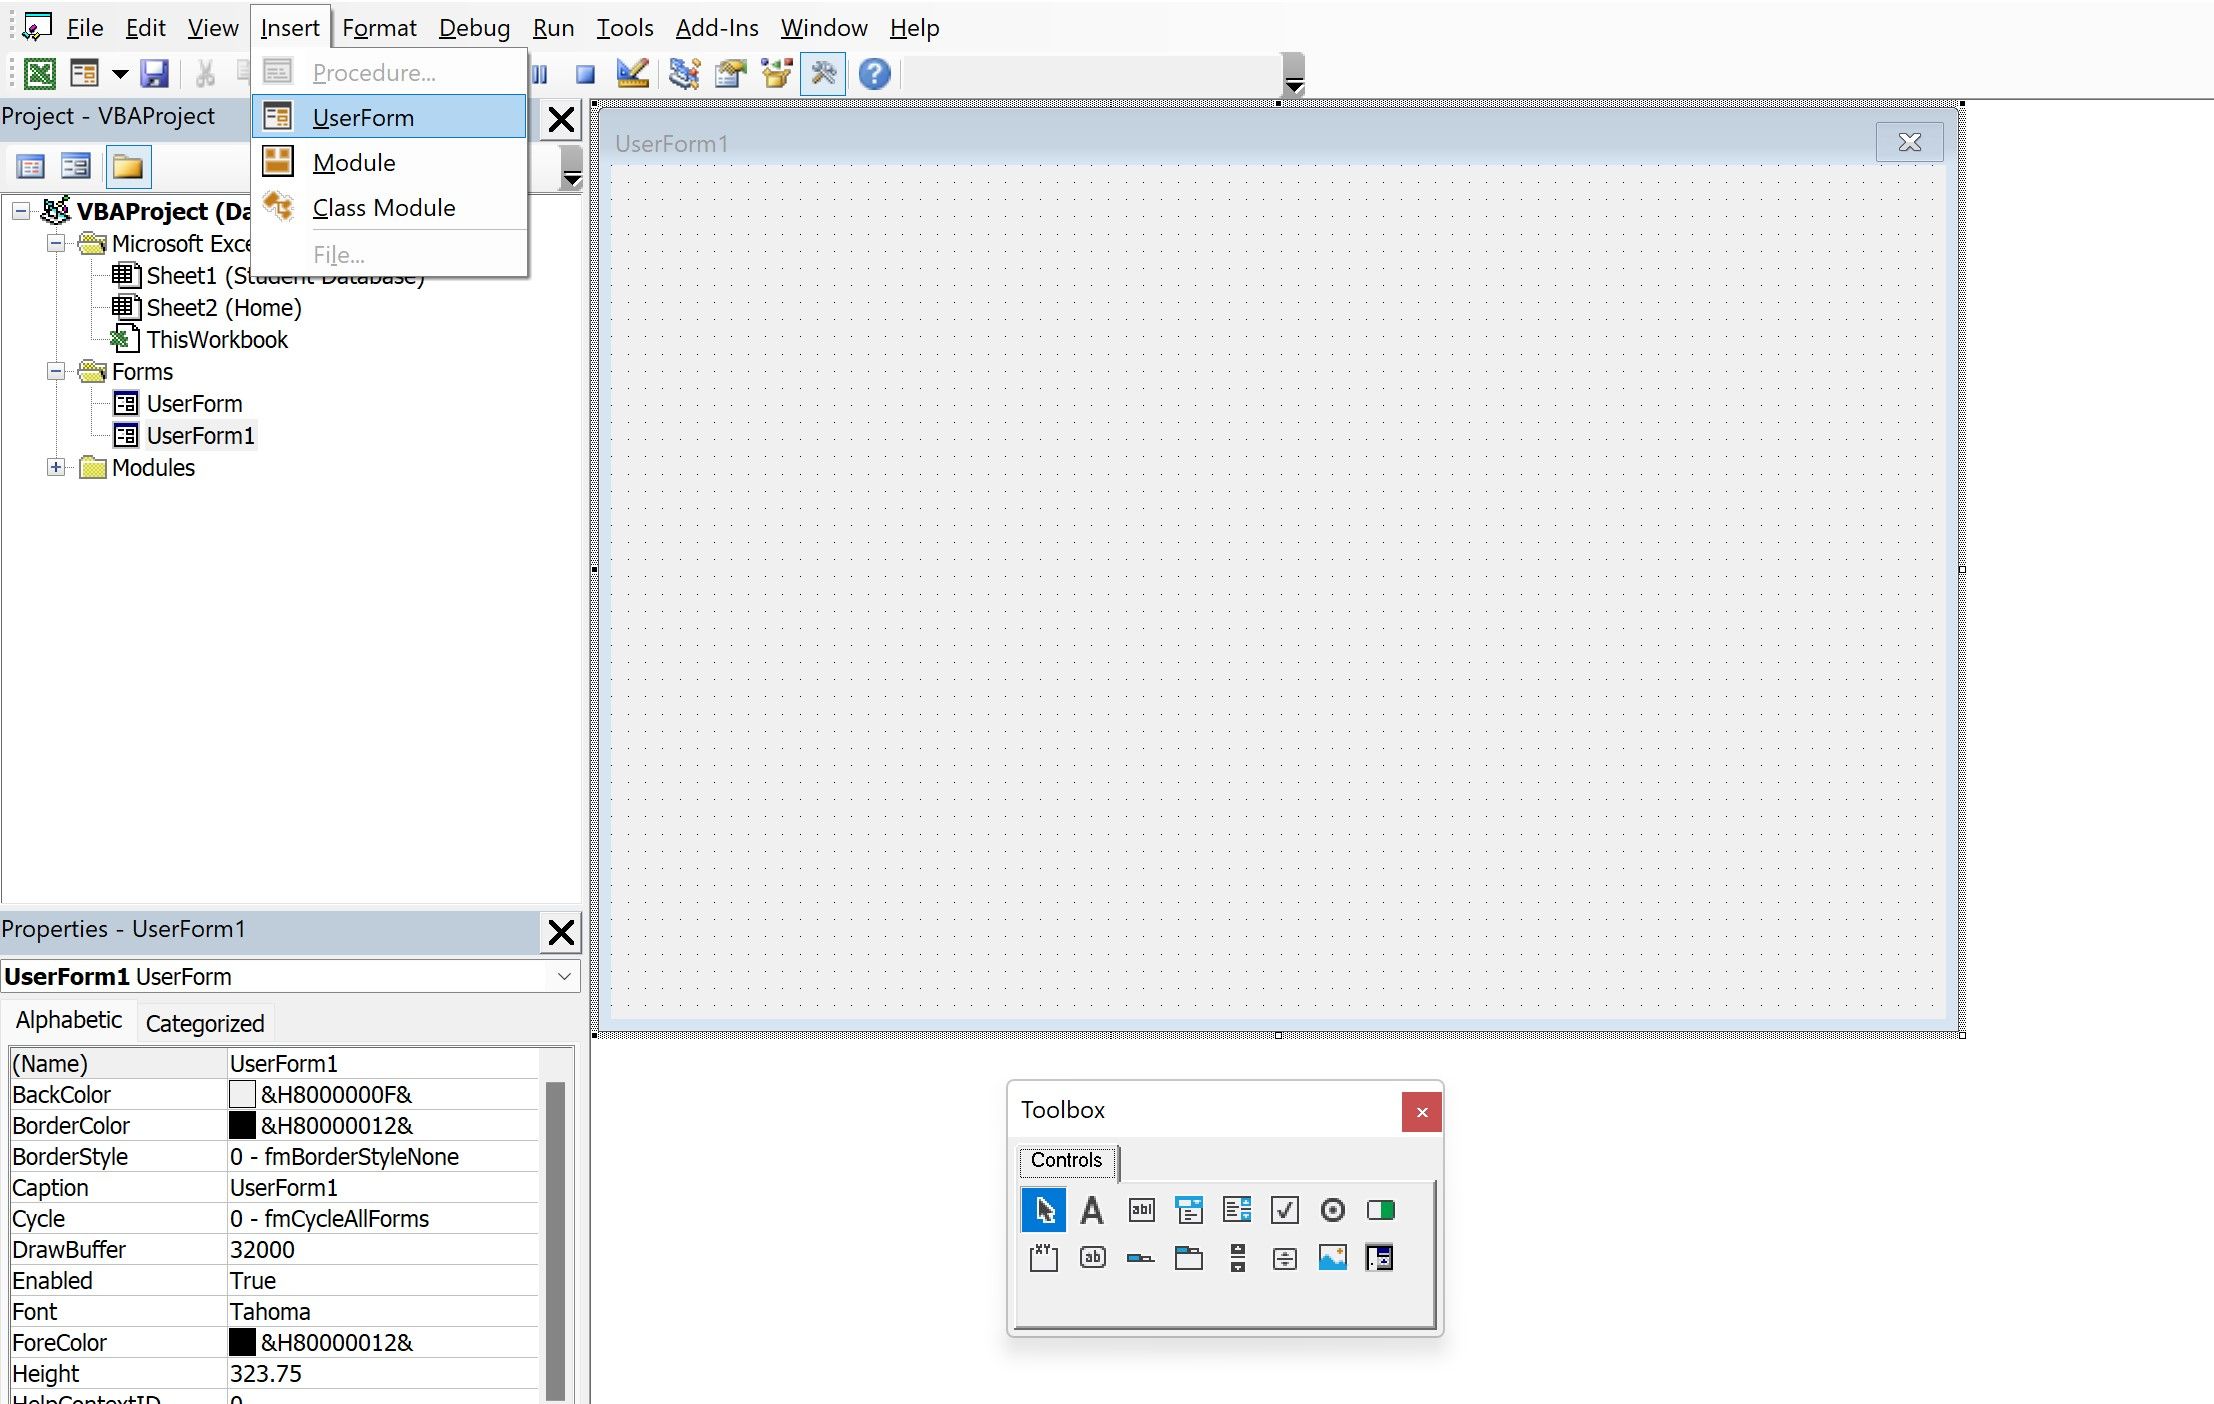
Once the Home and Student Database sheets are ready, it’s time to design the user form. Navigate to the Developer tab, and click on Visual Basic to open the Editor. Alternatively, you can press ALT+F11 to open the editor window.
Click on the Insert tab and select UserForm.
A blank user form is ready for use; an accompanying toolbox opens along with the form, which has all the essential tools to design the layout.
From the toolbox, select the Frame option. Drag this to the user form and resize it.
In the (name) option, you can change the name of the frame. To showcase the name on the front-end, you can change the name in the Caption column.
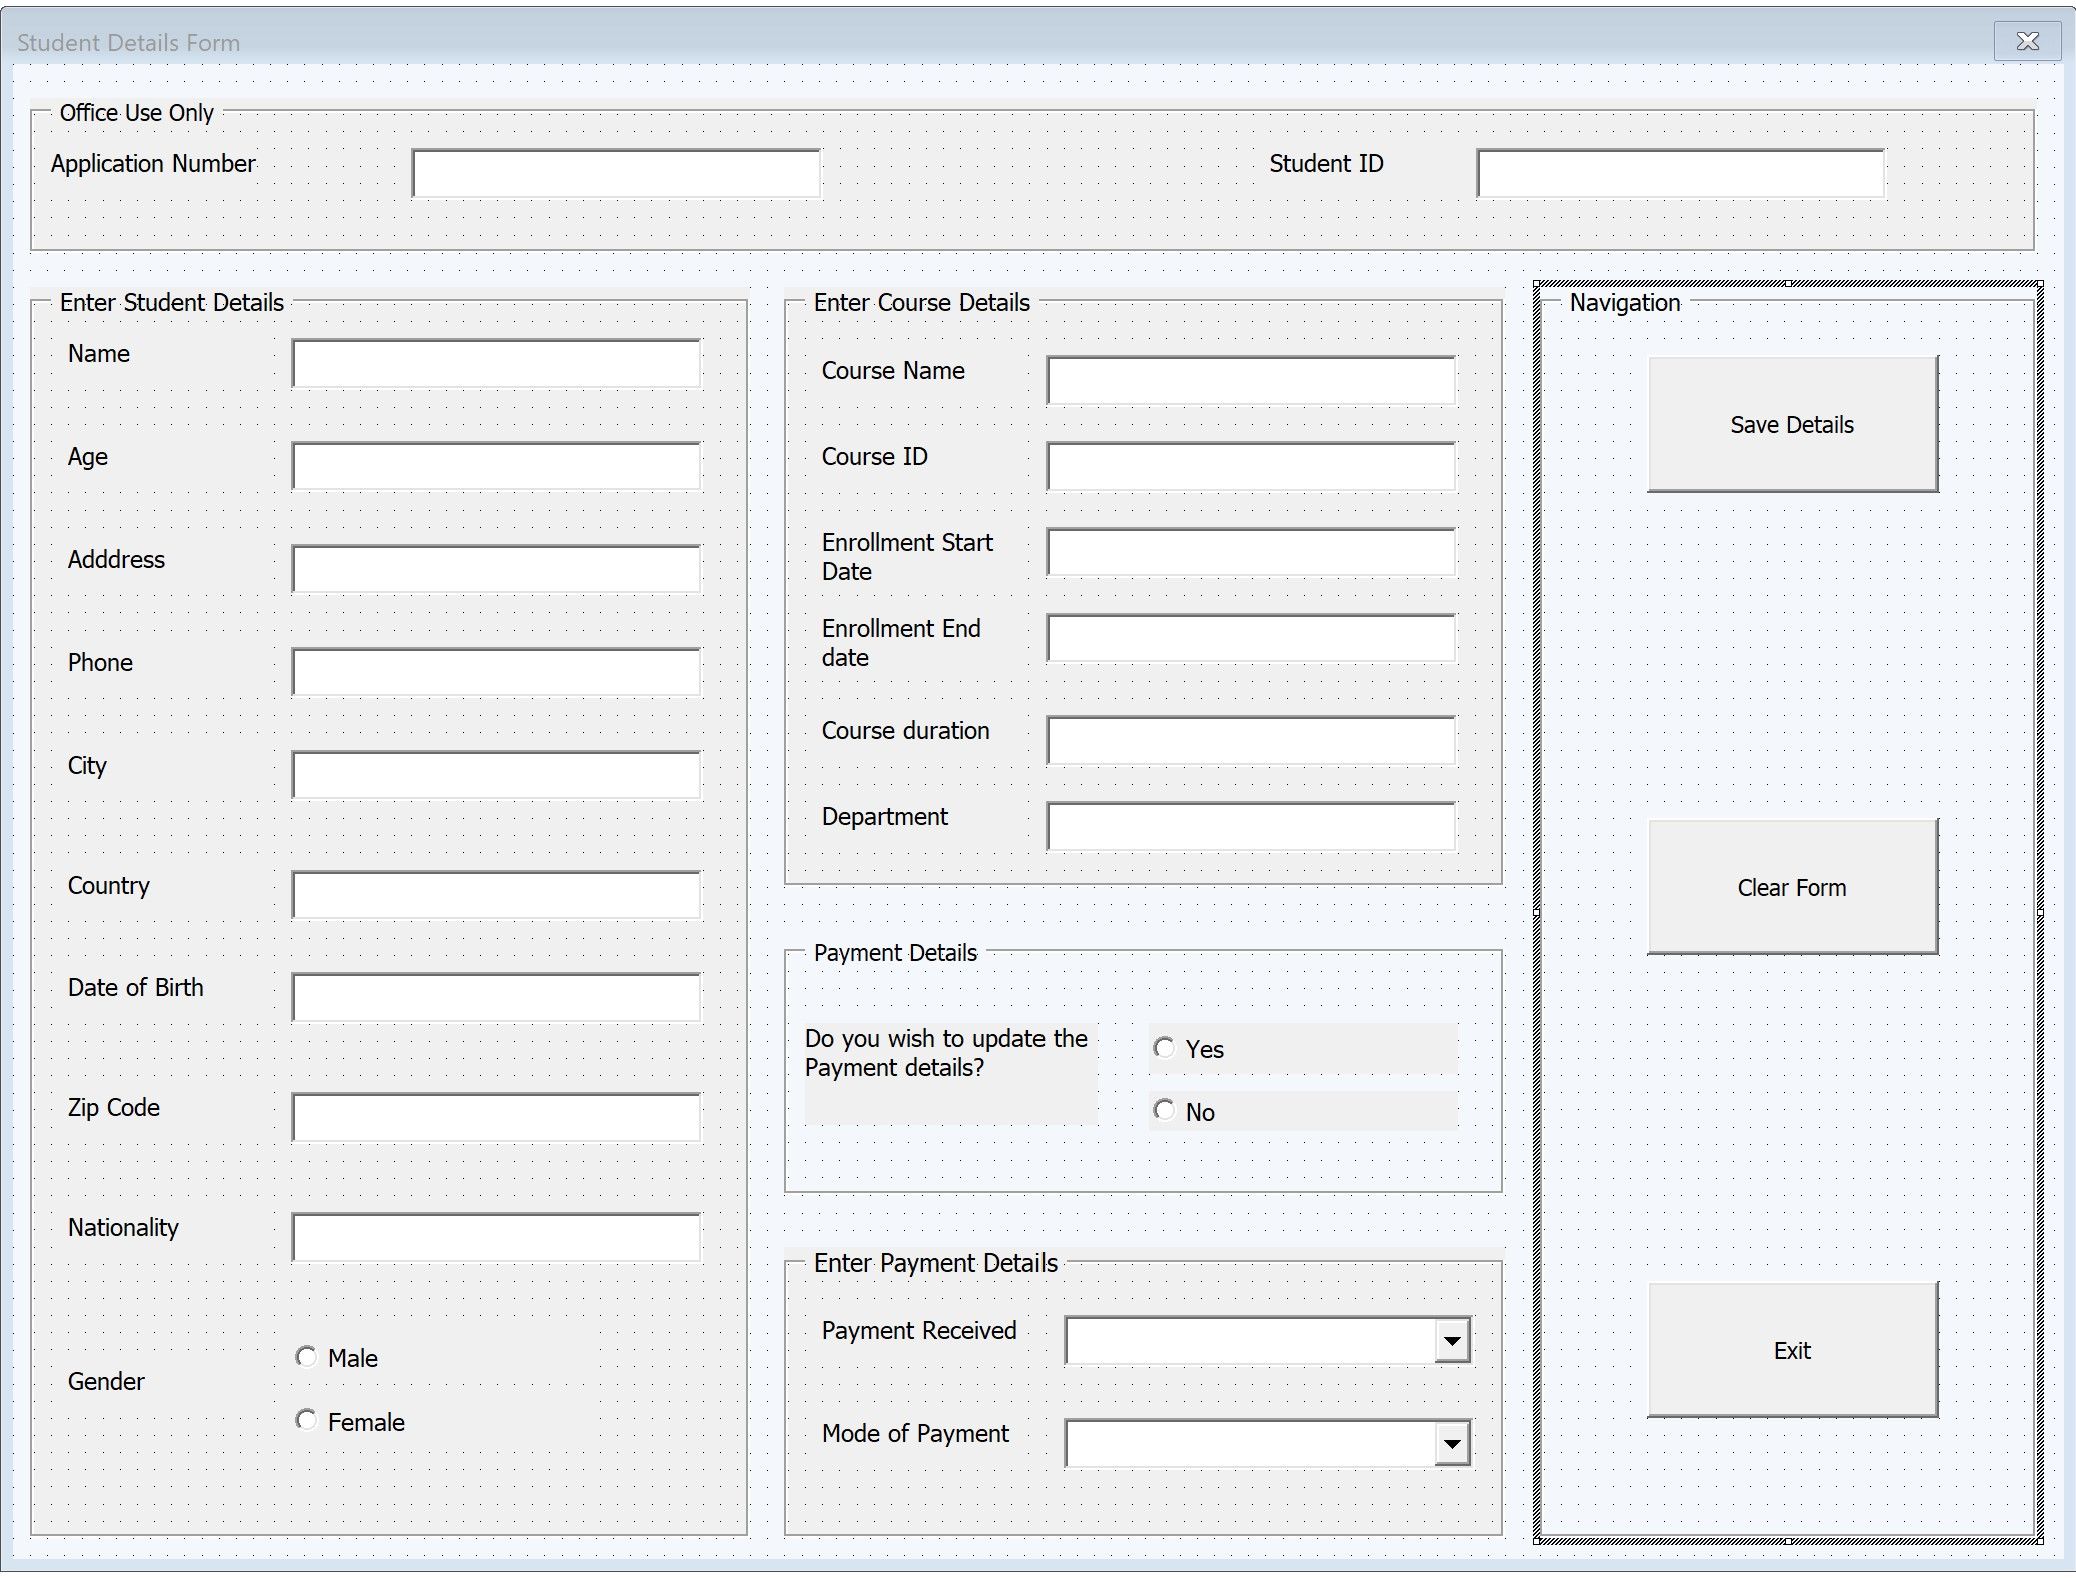
Next, select the Label option from the toolbox and insert two labels within this frame. Rename the first one as Application Number and the second as Student ID.
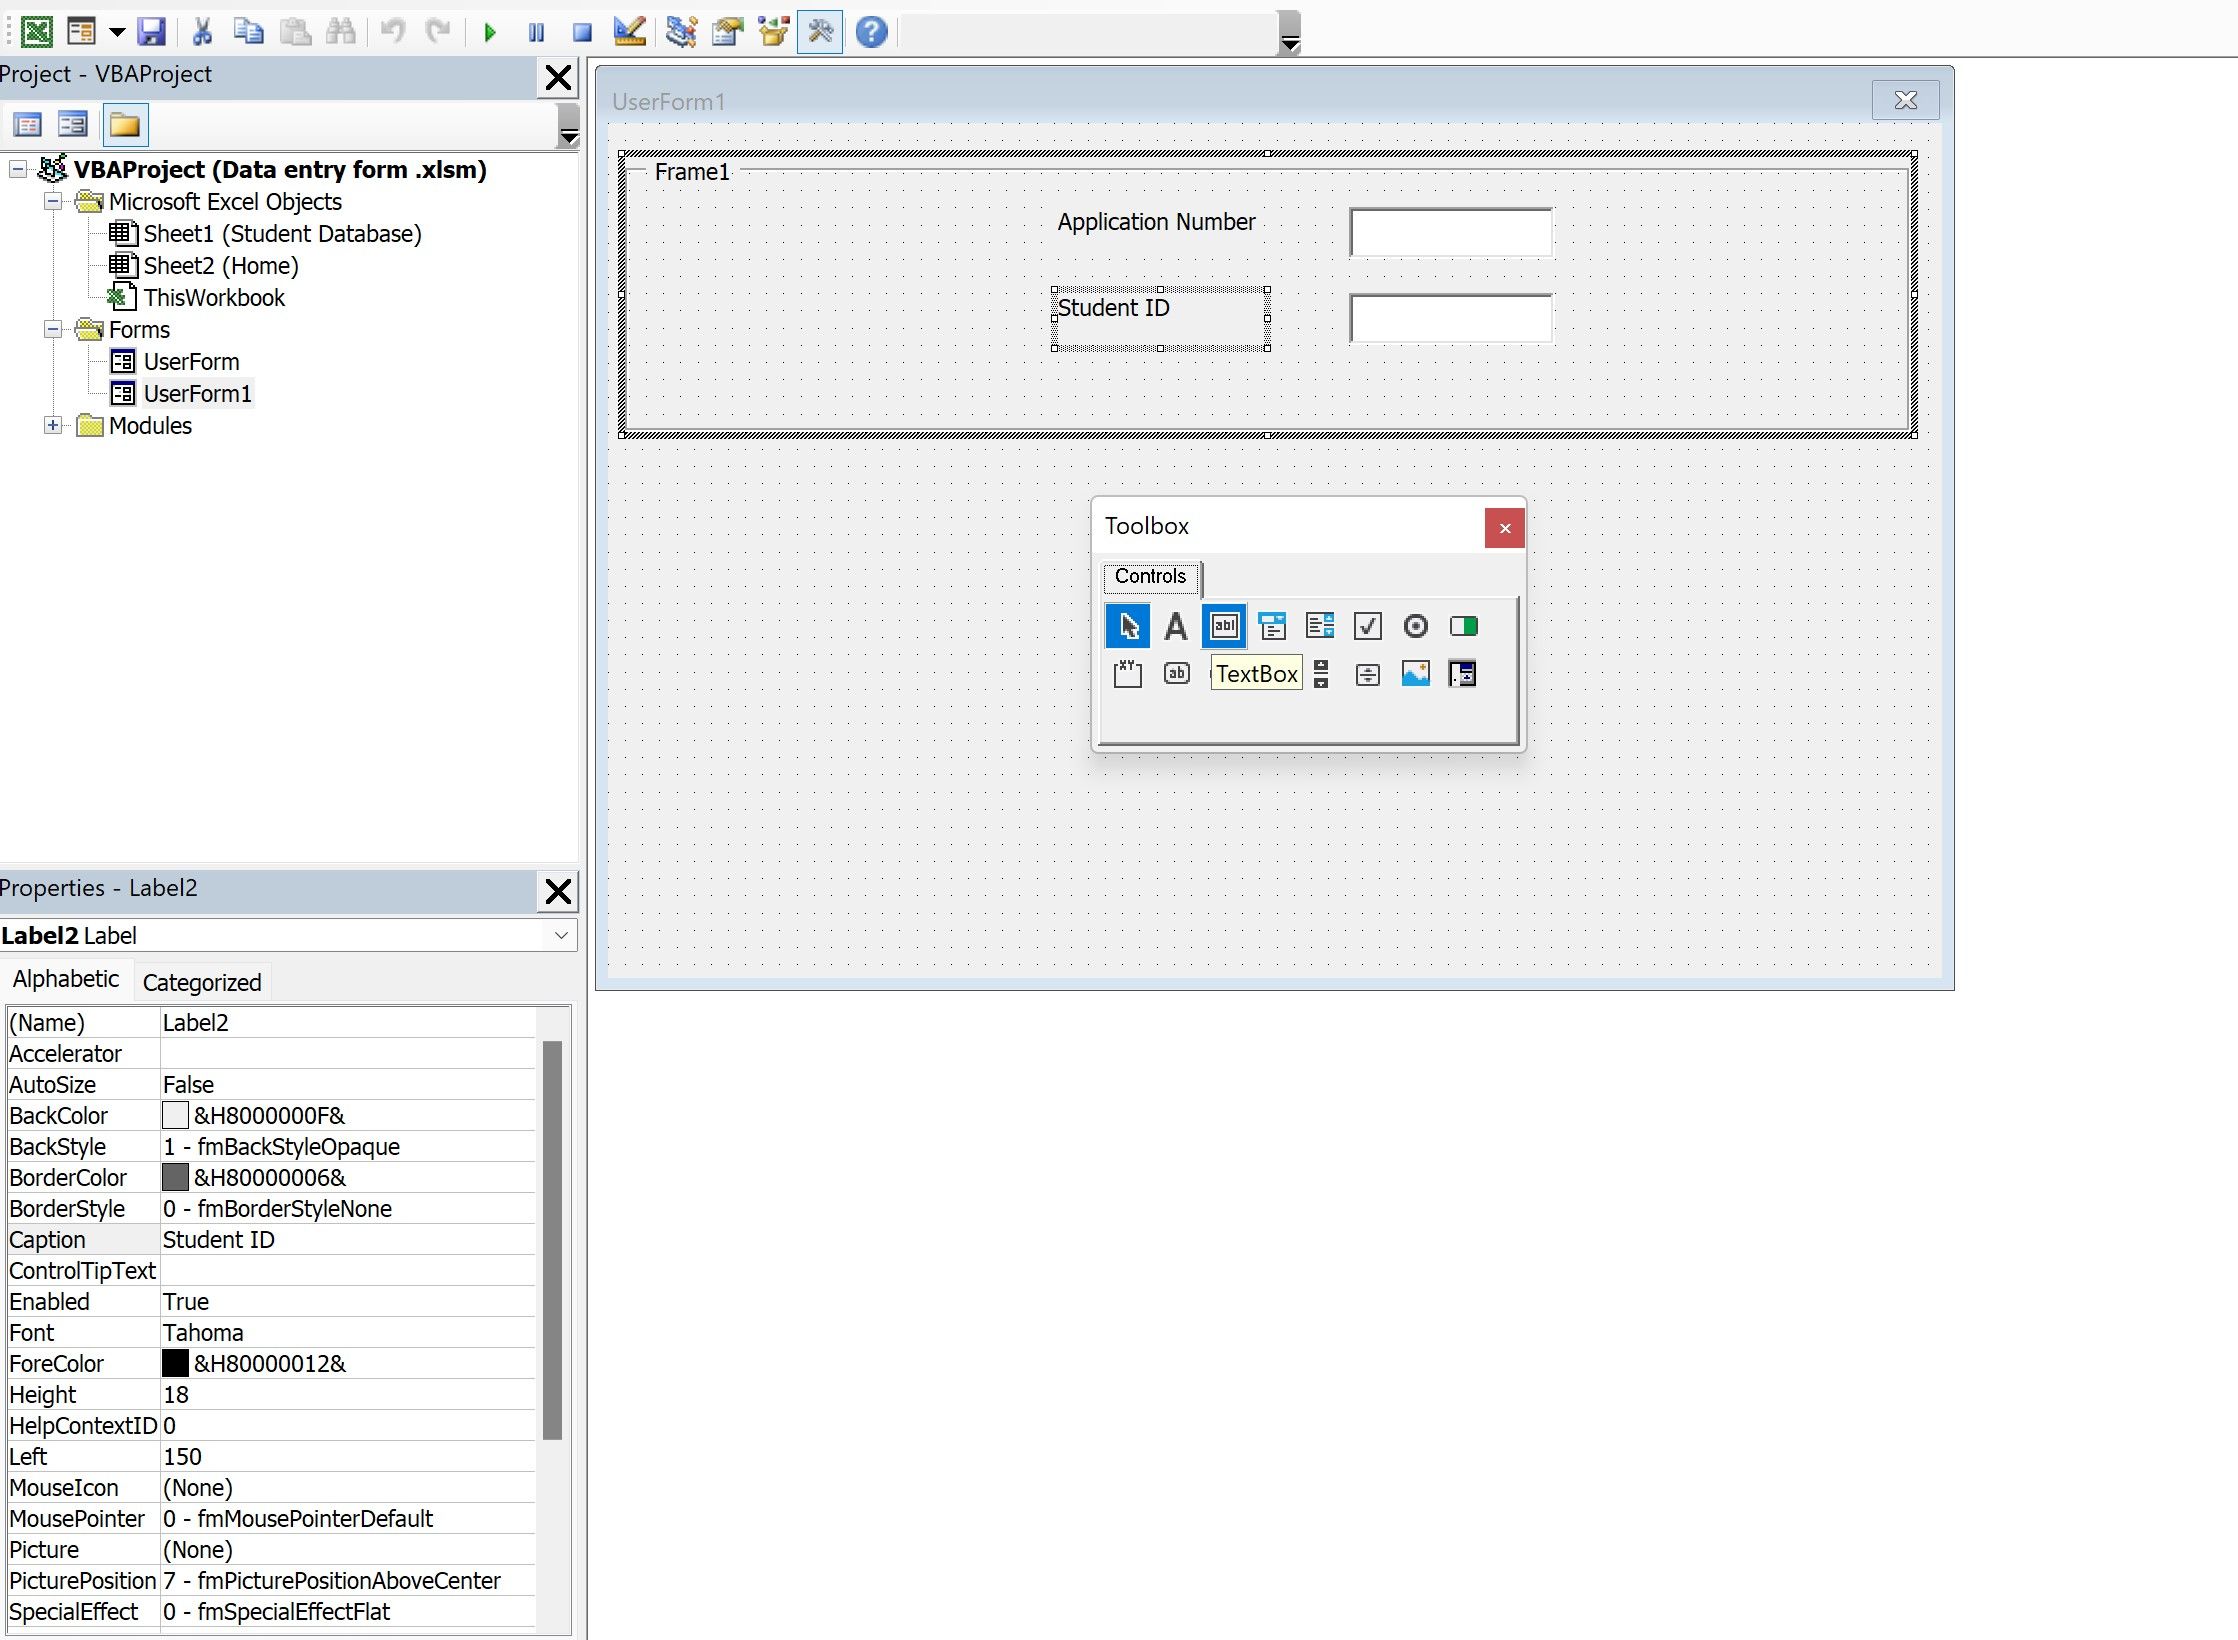
The same renaming logic applies; change the names via the Caption option within the Properties window. Make sure you select the respective label before changing its name.
Next, insert two text boxes next to the label boxes. These will be used to capture the user’s inputs. Change the names of two text boxes via the (Name) column within the Properties window. The names are as follows:
- Textbox1: txtApplicationNo
- Textbox2: txtStudentID
Designing the Student Details Frame
Insert a vertical frame and add 10 labels and 10 text boxes. Rename each of them in the following manner:
- Label3: Name
- Label4: Age
- Label5: Address
- Label6: Phone
- Label7: City
- Label8: Country
- Label9: Date of Birth
- Label10: Zip Code
- Label11: Nationality
- Label12: Gender
Insert corresponding text boxes next to these labels; insert two (or more) optionbutton boxes from the user form toolbox next to the gender label. Rename them Male and Female (along with Custom), respectively.
Designing the Course Details Frame
Add another vertical frame and insert six labels and six text boxes corresponding to each label. Rename the labels as follows:
- Label13: Course Name
- Label14: Course ID
- Label15: Enrollment Start Date
- Label16: Enrollment End Date
- Label17: Course duration
- Label18: Department
Designing the Payment Details Frame
Insert a new frame; add a new label and rename it «Do you wish to update the Payment details?» Insert two optionbuttons; rename them Yes and No.
Similarly, add a new frame containing two additional labels and two combo boxes. Rename the labels as follows:
- Label19: Payment Received
- Label20: Mode of Payment
Designing the Navigation Pane
In the final frame, add three buttons from the toolbox, which will contain code for the execution of the forms.
Rename the buttons in the following manner:
- Button1: Save Details
- Button2: Clear Form
- Button3: Exit
Writing the Automated Form Code: Save Details Button
Double-click on the Save Details button. In the ensuing module, insert the following code:
Private Sub CommandButton2_Click()‘declare the variables used throughout the codesDim sht As Worksheet, sht1 As Worksheet, lastrow As Long'Add validations to check if character values are being entered in numeric fields.If VBA.IsNumeric(txtApplicationNo.Value) = False ThenMsgBox "Only numeric values are accepted in the Application Number", vbCriticalExit SubEnd IfIf VBA.IsNumeric(txtStudentID.Value) = False ThenMsgBox "Only numeric values are accepted in the Student ID", vbCriticalExit SubEnd IfIf VBA.IsNumeric(txtAge.Value) = False ThenMsgBox "Only numeric values are accepted in Age", vbCriticalExit SubEnd IfIf VBA.IsNumeric(txtPhone.Value) = False ThenMsgBox "Only numeric values are accepted in Phone Number", vbCriticalExit SubEnd IfIf VBA.IsNumeric(Me.txtCourseID.Value) = False ThenMsgBox "Only numeric values are accepted in Course ID", vbCriticalExit SubEnd If'link the text box fields with the underlying sheets to create a rolling databaseSet sht = ThisWorkbook.Sheets("Student Database")'calculate last populated row in both sheetslastrow = sht.Range("a" & Rows.Count).End(xlUp).Row + 1'paste the values of each textbox into their respective sheet cellsWith sht.Range("a" & lastrow).Value = txtApplicationNo.Value.Range("b" & lastrow).Value = txtStudentID.Value.Range("c" & lastrow).Value = txtName.Value.Range("d" & lastrow).Value = txtAge.Value.Range("e" & lastrow).Value = txtDOB.Value.Range("g" & lastrow).Value = txtAddress.Value.Range("h" & lastrow).Value = txtPhone.Value.Range("i" & lastrow).Value = txtCity.Value.Range("j" & lastrow).Value = txtCountry.Value.Range("k" & lastrow).Value = txtZip.Value.Range("l" & lastrow).Value = txtNationality.Value.Range("m" & lastrow).Value = txtCourse.Value.Range("n" & lastrow).Value = txtCourseID.Value.Range("o" & lastrow).Value = txtenrollmentstart.Value.Range("p" & lastrow).Value = txtenrollmentend.Value.Range("q" & lastrow).Value = txtcourseduration.Value.Range("r" & lastrow).Value = txtDept.ValueEnd Withsht.Activate'determine gender as per user's inputIf optMale.Value = True Then sht.Range("g" & lastrow).Value = "Male"If optFemale.Value = True Then sht.Range("g" & lastrow).Value = "Female"'Display a message box, in case the user selects the Yes radio buttonIf optYes.Value = True ThenMsgBox "Please select the payment details below"Else:Exit SubEnd IfEnd Sub
If you’re not sure what parts or any of the code means, don’t worry. We’ll explain it thoroughly in the next section.
Automated Form Code Explained
The textboxes will contain a mix of text and numeric values, so it’s essential to restrict the user’s input. The Application Number, Student ID, Age, Phone, Course ID, and Course Duration should contain only numbers, while the rest will contain text.
Using an IF statement, the code triggers error pop-ups if the user enters a character or text value in any of the numeric fields.
Since the error validations are in place, you need to link the text boxes with the sheet cells.
The lastrow variables will calculate the last populated row, and store the values in them for dynamic use.
Finally, the values are pasted from the text boxes into the linked Excel sheet.
Clear Form and Exit Button Codes
In the clear button, you need to write the code to clear the existing values from the user form. This can be done in the following manner:
With Me.txtApplicationNo.Value = "".txtStudentID.Value = ""..txtName.Value = "".txtAge.Value = "".txtAddress.Value = "".txtPhone.Value = "".txtCity.Value = "".txtCountry.Value = "".txtDOB.Value = "".txtZip.Value = "".txtNationality.Value = "".txtCourse.Value = "".txtCourseID.Value = "".txtenrollmentstart.Value = "".txtenrollmentend.Value = "".txtcourseduration.Value = "".txtDept.Value = "".cmbPaymentMode.Value = "".cmbPayment.Value = "".optFemale.Value = False.optMale.Value = False.optYes.Value = False.optNo.Value = FalseEnd With
In the exit button, enter the following code to close the user form.
Private Sub CommandButton5_Click()Unload MeEnd Sub
As a last step, you need to input a few final pieces of code to create the drop-down values for the combo boxes (within the payment frames).
Private Sub UserForm_Activate()With cmbPayment.Clear.AddItem "".AddItem "Yes".AddItem "No"End WithWith cmbPaymentMode.Clear.AddItem "".AddItem "Cash".AddItem "Card".AddItem "Check"End WithEnd Sub
VBA Automation Makes Work Easier
VBA is a multi-faceted language that serves many purposes. User forms are only one aspect within VBA—there are many other uses like consolidating workbooks and worksheets, merging multiple Excel sheets, and other handy automation uses.
No matter the automation goal, VBA is up to the task. If you keep learning and getting practice in, there’s no aspect of your workflow you can’t improve.
The Course Booking Form is a simple form illustrating the principles of UserForm design and the associated VBA coding.
It uses a selection of controls including text boxes, combo boxes, option buttons grouped in a frame, check boxes and command buttons.
When the user clicks the OK button their input is entered into the next available row on the worksheet.
Description of excel form:
There are two simple text boxes (Name: and Phone:) into which the user can type free text, and two combo boxes (Department and Course) that let the user to pick an item from the list.
There are three option buttons (Introduction, Intermediate and Advanced) grouped in a frame (Level) so that the user can choose only one of the options.
There are two check boxes (Lunch Required and Vegetarian) that, because they are not grouped in a frame, can both be chosen if required. However, if the person making the booking does not want lunch we do not need to know whether or not they are vegetarian. So, the Vegetarian check box is greyed-out until required.
There are three command buttons (OK, Cancel and Clear Form) each of which performs a pre-defined function when clicked.
The Control Properties Settings:
| Control | Type | Property | Setting |
| UserForm | UserForm | Name | frmCourseBooking |
| Caption | Course Booking Form | ||
| Name | Text Box | Name | txtName |
| Phone | Text Box | Name | txtPhone |
| Department | Combo Box | Name | cboDepartment |
| Course | Combo Box | Name | cboCourse |
| Level | Frame | Name | fraLevel |
| Caption | Level | ||
| Introduction | Option Button | Name | optIntroduction |
| Intermediate | Option Button | Name | optIntermediate |
| Advanced | Option Button | Name | optAdvanced |
| Lunch Required | Check Box | Name | chkLunch |
| Vegetarian | Check Box | Name | chkVegetarian |
| Enabled | False | ||
| OK | Command Button | Name | cmdOk |
| Caption | OK | ||
| Default | True | ||
| Cancel | Command Button | Name | cmdCancel |
| Caption | Cancel | ||
| Cancel | True | ||
| Clear Form | Command Button | Name | cmdClearForm |
Creating Forms In Excel
If you want to build the form yourself, simply copy the layout shown in the illustration above. Follow the steps below:
1. Open the workbook that you want the form to belong in (UserForms like macros have to be attached to a workbook) and switch to the Visual Basic Editor.
2. In the Visual Basic Editor click the Insert UserForm button (or go to Insert > UserForm).
3. If the toolbox does not appear by itself (first click the form to make sure it isn’t hiding) click the Toolbox button (or go to View > Toolbox).
4. To place a control on the form click the appropriate button on the toolbox then click the form. Controls can be moved by dragging them by their edges, or resized by dragging the buttons around their perimeter.
5. To edit the properties of a control, make sure the chosen control is selected then make the appropriate changes in the Properties window. If you can’t see the properties window go to View > Properties Window.
6. To remove a control from the form, select it and click the Delete key on your keyboard.
A UserForm will not actually do anything until the code that drives the form and its various controls is created. The next step is to write the code that drives the form itself.
Adding the Code: 1 Initialising the Form
Initialising the Form:
Most forms need some kind of setting up when they open. This may be setting default values, making sure field are empty, or building the lists of combo boxes. This process is called Initialising the Form and it is taken care of by a macro called UserForm_Initialize (in case you are confused by my varying spelling of the word «initialis(z)e», it’s because I speak English and VBA speaks American — but don’t worry, VBA will spell it for you!). Here’s how to build the code to initialise the Course Booking Form:
1. To view the form’s code window go to View > Code or click F7.
2. When the code window first opens it contains an empty UserForm_Click() procedure. Use the drop-down lists at the top of the code window to choose UserForm and Initialize. This will create the procedure you need. You can now delete the UserForm_Click() procedure.
3. Enter the following code into the procedure:
Private Sub UserForm_Initialize()

txtName.Value = ""

txtPhone.Value = ""

With cboDepartment

.AddItem "Sales"

.AddItem "Marketing"

.AddItem "Administration"

.AddItem "Design"

.AddItem "Advertising"

.AddItem "Dispatch"

.AddItem "Transportation"

End With

cboDepartment.Value = ""

With cboCourse

.AddItem "Access"

.AddItem "Excel"

.AddItem "PowerPoint"

.AddItem "Word"

.AddItem "FrontPage"

End With

cboCourse.Value = ""

optIntroduction = True

chkLunch = False

chkVegetarian = False

txtName.SetFocus

End Sub
How the Initialise Code Works:
The purpose of the UserForm_Initialize() procedure is to prepare the user form in VBA for use, setting the default values for the various controls and creating the lists that the combo boxes will show.
These lines set the contents of the two text boxes to empty:
txtName.Value = ""

txtPhone.Value = ""
Next come the instructions for the combo boxes. First of all the contents of the list are specified, then the initial value of the combo box is set to empty.
With cboDepartment

.AddItem "Sales"

.AddItem "Marketing"

(as many as necessary…)

End With
cboDepartment.Value = «»
If required an initial choice can be made from the option group, in this case:
optIntroduction = True
Both check boxes are set to False (i.e. no tick). Set to True if you want the check box to appear already ticked:
chkLunch = False
chkVegetarian = False
Finally, The focus is taken to the first text box. This places the users cursor in the text box so that they do not need to click the box before they start to type:
txtName.SetFocus
Adding the Code: 2 Making the Buttons Work
There are three command buttons on the form and each must be powered by its own procedure. Starting with the simple ones…
Coding the Cancel Button:
Earlier, we used the Properties Window to set the Cancel property of the Cancel button to True. When you set the Cancel property of a command button to True, this has the effect of «clicking» that button when the user presses the Esc key on their keyboard. But this alone will not cause anything to happen to the form. You need to create the code for the click event of the button that will, in this case, close the form. Here’s how:
1. With the UserForm open for editing in the Visual Basic Editor, double-click the Cancel button. The form’s code window opens with the cmdCancel_Click() procedure ready for editing.
2. The code for closing a form is very simple. Add a line of code to the procedure so it looks like this:
Private Sub cmdCancel_Click()

Unload Me

End Sub
Coding the Clear Form Button:
I added a button to clear the form in case the user wanted to change their mind and reset everything, and to make it easier if they had several bookings to make at one time. All it has to do is run the Initialise procedure again. A macro can be told to run another macro (or series of macros if necessary) by using the Call keyword:
1. Double-click the Clear Form button. The form’s code window opens with the cmdClearForm_Click() procedure ready for editing.
2. Add a line of code to the procedure so it looks like this:
Private Sub cmdClearForm_Click()

Call UserForm_Initialize

End Sub
Coding the OK Button:
This is the piece of code that has to do the job of transferring the user’s choices and text input on to the worksheet. When we set the Cancel button’s Cancel property to True we also set the OK button’s Default property to True. This has of clicking the OK button when the user presses the Enter (or Return) key on their keyboard (providing they have not used their Tab key to tab to another button). Here’s the code to make the button work:
1. Double-click the OK button. The form’s code window opens with the cmdOK_Click() procedure ready for editing.
2. Edit the procedure to add the following code:
Private Sub cmdOK_Click()

ActiveWorkbook.Sheets("Course Bookings").Activate

Range("A1").Select

Do

If IsEmpty(ActiveCell) = FalseThen

ActiveCell.Offset(1, 0).Select

End If

Loop Until IsEmpty(ActiveCell) = True

ActiveCell.Value = txtName.Value

ActiveCell.Offset(0, 1) = txtPhone.Value

ActiveCell.Offset(0, 2) = cboDepartment.Value

ActiveCell.Offset(0, 3) = cboCourse.Value

If optIntroduction = True Then

ActiveCell.Offset(0, 4).Value = "Intro"

ElseIf optIntermediate = True Then

ActiveCell.Offset(0, 4).Value = "Intermed"

Else

ActiveCell.Offset(0, 4).Value = "Adv"

End If

If chkLunch = True Then

ActiveCell.Offset(0, 5).Value = "Yes"

Else

ActiveCell.Offset(0, 5).Value = "No"

End If

If chkVegetarian = True Then

ActiveCell.Offset(0, 6).Value = "Yes"

Else

If chkLunch = False Then

ActiveCell.Offset(0, 6).Value = ""

Else

ActiveCell.Offset(0, 6).Value = "No"

End If

End If

Range("A1").Select

End Sub
How the CmdOK_Click code works:
The first two lines make sure that the correct workbook is active and moves the selection to cell A1:
ActiveWorkbook.Sheets("Course Bookings").Activate

Range("A1").Select

The next few lines moves the selection down the worksheet until it finds an empty cell:

Do

If IsEmpty(ActiveCell) = False Then

ActiveCell.Offset(1, 0).Select

End If

Loop Until IsEmpty(ActiveCell) = True
The next four lines start to write the contents of the form on to the worksheet, using the active cell (which is in column A) as a reference and moving along the row a cell at a time:
ActiveCell.Value = txtName.Value

ActiveCell.Offset(0, 1) = txtPhone.Value

ActiveCell.Offset(0, 2) = cboDepartment.Value

ActiveCell.Offset(0, 3) = cboCourse.Value
Now we come to the option buttons. These have been placed in a frame on the form so the user can choose only one. An IF statement is used to instruct Excel what to for each option:
If optIntroduction = True Then

ActiveCell.Offset(0, 4).Value = "Intro"

ElseIf optIntermediate = True Then

ActiveCell.Offset(0, 4).Value = "Intermed"

Else

ActiveCell.Offset(0, 4).Value = "Adv"

End If
VBA IF statements are much easier to manage than Excel’s IF function. You can have as many options as you want, just insert an additional ElseIf for each one. If there were only two options, you wouldn’t need the ElseIf, just the If and Else would suffice (don’t forget — they all need an End If).
There is another IF statement for each check box. For the Lunch Required check box, a tick in the box means «Yes» the person requires lunch, and no tick means «No» they don’t.
If chkLunch = True Then

ActiveCell.Offset(0, 5).Value = "Yes"

Else

ActiveCell.Offset(0, 5).Value = "No"

End If
We could use a similar IF statement for the Vegetarian check box, but if the person does not require lunch it is irrelevant whether or not they are vegetarian. I any case, it would be wrong to assume that they were not vegetarian simply because they did not require lunch. The IF statement therefore contains a second, nested if statement:
If chkVegetarian = True Then

ActiveCell.Offset(0, 6).Value = "Yes"

Else

If chkLunch = False Then

ActiveCell.Offset(0, 6).Value = ""

Else

ActiveCell.Offset(0, 6).Value = "No"

End If

End If
A tick in the box means «Yes» the person is vegetarian. If there is no tick in the box, the nested IF statement looks at the Lunch Required check box. If the Lunch Required check box has a tick in it then no tick in the Vegetarian check box means that the person is not vegetarian so it inserts «No» into the cell. However, if the Lunch Required check box does not have a tick in it, then we do not know whether or not the person is vegetarian (it doesn’t matter anyway) so the cell is left blank («»).
Finally the selection is taken back to the beginning of the worksheet, ready for the next entry:
Range(«A1»).Select
Adding the Code 3: Manipulating the Form
Finally, an example of how the controls on a form can be manipulated whilst it is in use. When the control properties were set, the Enabled property of the Vegetarian check box was set to False. When a control is not enabled the user cannot enter a value into it, although it can hold a value that was there already, and VBA can add, remove or change the value.
We don’t need to know whether or not the person is vegetarian (even if they are!) if they aren’t ordering lunch. So, the Vegetarian check box remains disabled unless a tick is placed in the Lunch Required check box. Then the user is free to tick the Vegetarian check box if they want to. If they tick it we will know that they have answered «Yes» and if they don’t we know they have answered «No».
We can toggle the Enabled property from False to True by having a procedure that runs automatically whenever the value of the Lunch Required check box changes. Fortunately, more controls have a Change procedure and the one we use here is chkLunch_Change(). We’ll use this to enable the Vegetarian check box when the Lunch Required check box is ticked, and disable it when the Lunch Required check box is not ticked.
There’s just one more thing we need to do. Supposing someone ticked the Lunch Required check box, and also ticked the Vegetarian check box. Then they changed their mind and removed the tick from the Lunch Required check box. The Vegetarian check box would be disabled but the tick that was put in earlier would remain.
An extra line of code can make sure the tick is removed when the box is disabled. Here’s the whole thing:
Private Sub chkLunch_Change()

If chkLunch = True Then

chkVegetarian.Enabled = True

Else

chkVegetarian.Enabled = False

chkVegetarian = False

End If

End Sub
Opening the Form
The form is now ready for use so it needs to be opened with a simple macro. That can be attached to a custom toolbar button, a command button drawn on the worksheet, or any graphic (right click the graphic and choose Assign Macro). If necessary, create a new module for the workbook and add this procedure:
Sub OpenCourseBookingForm()

frmCourseBooking.Show

End Sub
If you liked our blogs, share it with your friends on Facebook. And also you can follow us on Twitter and Facebook.
We would love to hear from you, do let us know how we can improve, complement or innovate our work and make it better for you. Write us at info@exceltip.com
This post provides an in-depth guide to the VBA Userform starting from scratch.
The table of contents below shows the areas of the VBA UserForm that are covered and the section after this provides a quick guide so you can refer back to the UserForm code easily.
“The system should treat all user input as sacred.” – Jef Raskin
A Quick Guide to the VBA UserForm
The following table provides a quick guide to the most common features of the UserForm
| Function | Examples |
|---|---|
| Declare and create | Dim form As New userformCars |
| Declare and create | Dim form As userformCars Set form = New userformCars |
| Show as modal | form.Show OR form.Show vbModal |
| Show as non modal | form.Show vbModeless |
| Unload | Private Sub buttonCancel_Click() Unload Me End Sub |
| Hide | Private Sub buttonCancel_Click() Hide End Sub |
| Getset the title | form.Caption = «Car Details» |
The Webinar
If you are a member of the website, click on the image below to view the webinar for this post.
(Note: Website members have access to the full webinar archive.)

Introduction
The VBA UserForm is a very useful tool. It provides a practical way for your application to get information from the user.
If you are new to UserForms you may be overwhelmed by the amount of information about them. As with most topics in VBA, 90% of the time you will only need 10% of the functionality.
In these two blog posts(part 2 is here) I will show you how to quickly and easily add a UserForm to your application.
This first post covers creating the VBA Userform and using it as modal or modeless. I will also show you how to easily pass the users selection back to the calling procedure.
In the second part of this post I will cover the main controls such as the ListBox, the ComboBox(also called the Dropdown menu), the TextBox and the CheckBox. This post will contain a ton of examples showing how to use each of these controls.
Related Articles
VBA Message Box
VBA UserForm Controls
Download the Code
What is the VBA Userform?
The VBA UserForm is a dialog which allows your application to get input from the user. UserForms are used throughout all Windows applications. Excel itself has a large number of UserForms such as the Format Cells UserForm shown in the screenshot below.

Excel’s “Format cells” UserForm
UserForms contain different types of controls such as Buttons, ListBoxes, ComboBoxes(Dropdown lists), CheckBoxes and TextBoxes.
In the Format Cells screenshot above you can see examples of these controls:
- Font, Font style and Size contain a textbox with a ListBox below it
- Underline and Color use a Combobox
- Effects uses three CheckBoxes
- Ok and Cancel are command Buttons
There are other controls but these are the ones you will use most of the time.
The Built-in VBA Userforms
It is important to note that VBA has some useful built-in UserForms. These can be very useful and may save you having to create a custom one. Let’s start by having a look at the MsgBox.
VBA MsgBox
The VBA message box allows you to display a dialog to the user. You can choose from a collection of buttons such as Yes, No, Ok and Cancel.

You can easily find out which of these buttons the user clicked on and use the results in your code.
The following code shows two simple examples of using a message box
' https://excelmacromastery.com/
Sub BasicMessage()

    ' Basic message
    MsgBox "There is no data on this worksheet "
    ' Basic message with "Error" as title
    MsgBox "There is no data on this worksheet ", , "Error"

End Sub
In the next example, we ask the user to click Yes or No and print a message displaying which button was clicked
' https://excelmacromastery.com/
Sub MessagesYesNoWithResponse()

    ' Display Yes/No buttons and get response
    If MsgBox("Do you wish to continue? ", vbYesNo) = vbYes Then
        Debug.Print "The user clicked Yes"
    Else
        Debug.Print "The user clicked No"
    End If

End Sub
In the final example we ask the user to click Yes, No or Cancel
' https://excelmacromastery.com/
Sub MessagesYesNoCancel()

    ' Display Yes/No buttons and get response
    Dim vbResult As VbMsgBoxResult

    vbResult = MsgBox("Do you wish to continue? ", vbYesNoCancel)

    If vbResult = vbYes Then
        Debug.Print "The user clicked Yes"
    ElseIf vbResult = vbNo Then
        Debug.Print "The user clicked No"
    Else
        Debug.Print "The user clicked Cancel"
    End If

End Sub
You can see all the MsgBox options here.
InputBox
If you want to get a single piece of text or value from the user you can use the InputBox. The following code asks the user for a name and writes it to the Immediate Window(Ctrl + G):
' Description: Gets a value from the InputBox
' The result is written to the Immediate Window(Ctrl + G)
' https://excelmacromastery.com/vba-userform/
Sub GetValue()

    Dim sValue As String
    sValue = Application.InputBox("Please enter your name", "Name Entry")

    ' Print to the Immediate Window
    Debug.Print sValue

End Sub
You can add validation to the InputBox function using the Type parameter:
' https://excelmacromastery.com/
Public Sub InputBoxTypes()

    With Application
        Debug.Print .InputBox("Formula", Type:=0)
        Debug.Print .InputBox("Number", Type:=1)
        Debug.Print .InputBox("Text", Type:=2)
        Debug.Print .InputBox("Boolean", Type:=4)
        Debug.Print .InputBox("Range", Type:=8)
        Debug.Print .InputBox("Error Value", Type:=16)
        Debug.Print .InputBox("Array", Type:=64)
    End With

End Sub
You can download the workbook with all the code examples from the top of this post.
GetOpenFilename
We can use the Windows file dialog to allow the user to select a file or multiple files.
The first example allows the user to select a file
' Print the name of the selected file
sfile = Application.GetOpenFilename("Excel Files (*.xlsx),*.xlsx")
Debug.Print sfile
The following example allows the user to select multiple files
' https://excelmacromastery.com/
Sub GetMultipleFiles()

    Dim arr As Variant
    arr = Application.GetOpenFilename("Text Files(*.txt),*.txt" _
        , MultiSelect:=True)

    ' Print all the selected filenames to the Immediate window
    Dim filename As Variant
    For Each filename In arr
        Debug.Print filename
    Next

End Sub
Note: If you need more flexibility then you can use the File Dialog. This allows you to use the “Save as” file dialog, select folders and so on.
How to Create a VBA UserForm
If the built-in UserForms do not cover your needs then you will need to create your own custom Userform. To use a UserForm in our code we must first create one. We then add the necessary controls to this Userform.
We create a UserForm with the following steps
- Open the Visual Basic Editor(Alt + F11 from Excel)
- Go to the Project Window which is normally on the left(select View->Project Explorer if it’s not visible)
- Right-click on the workbook you wish to use
- Select Insert and then UserForm(see screenshot below)

Creating a Userform
A newly created UserForm will appear. Anytime you want to access this Userform you can double click on the UserForm name in the Project window.
The Toolbox dialog should also be visible. If it’s not visible select View->Toolbox from the menu. We use the toolbox too add controls to our UserForm.

The UserForm Toolbox
Designing the VBA UserForm
To view the design of the UserForm, double click on it in the Project window. There are three important windows we use when creating our UserForms.
- The UserForm
- The properties window – this is where we can change the setting of the Userform and its controls
- The toolbox – we use this to add new controls to our UserForm

UserForm Windows
A Very Simple VBA UserForm Example
Let’s have a look at a very simple UserForm example.
You can download this and all the code examples from the top of this post.
- Create a new UserForm
- Rename it to userformTest in the (Name) property in the properties window
- Create a new module(Right-click on properties window and select Insert->Module)
- Copy the DislayUserForm sub below to the module
- Run the sub using Run->Run UserForm Sub from the menu
- The UserForm will be displayed – you have created your first UserForm application!
- Click on the X in the top right of the UserForm to close
' https://excelmacromastery.com/
Sub DisplayUserForm()

    Dim form As New UserFormTest
    form.Show

End Sub
Setting the Properties of the UserForm
We can change the attributes of the UserForm using the properties window. Select View->Properties Window if the window is not visible.
When we click on the UserForm or a control on a UserForm then the Properties window displays the attributes of that item.

VBA Properties Window
Generally speaking, you only use a few of these properties. The important ones for the UserForm are Name and Caption.
To change the name of the UserForm do the following
- Click on the UserForm in the Project window or click on the UserForm itself
- Click in the name field of the properties window
- Type in the new name
The Controls of the VBA UserForm
We add controls to the UserForms to allow the user to make selections, enter text or click a button. To add a control use the steps below
- Go to the toolbox dialog – if not visible select View->Toolbox
- Click on the control you want to add – the button for this control will appear flat
- Put the cursor over the UserForm
- Hold down the left mouse button and drag until the size you want
The following table shows a list of the common controls
| Control | Description |
|---|---|
| CheckBox | Turn item on/off |
| ComboBox | Allows selection from a list of items |
| CommandButton | Click to perform action |
| Label | Displays text |
| ListBox | Allows selection from a list of items |
| Textbox | Allows text entry |
Adding Code to the VBA UserForm
To view the code of the UserForm
- Right-click on the UserForm in the properties windows(or the UserForm itself) and select “View Code”
- You will see a sub called UserForm_Click. You can delete this when you create your first sub
Note: If you double click on a control it will bring you to the click event of that control. This can be a quicker way to get to the UserForm code.
Adding Events to the VBA UserForm
When we use a UserForm we are dealing with events. What this means is that we want to perform actions when events occur. An event occurs when the users clicks a button, changes text, selects an item in a ComboBox, etc. We add a Sub for a particular event and place our code in it. When the event occurs our code will run.
One common event is the Initialize event which occurs when the UserForm is created at run time. We normally use this event to fill our controls with any necessary data. We will look at this event in the section below.

To add an event we use the ComboBoxes over the code window(see screenshot above). The left one is used to select the control and the right one is used to select the event. When we select the event it will automatically add this sub to our UserForm module.
Note: Clicking on any control on the UserForm will create the click event for that control.
The Initialize Event of the VBA UserForm
The first thing we want to do with a UserForm is to fill the controls with values. For example, if we have a list of countries for the user to select from we could use this.
To do this we use the Initialize event. This is a sub that runs when the UserForm is created(see next section for more info).
To create the Initialize event we do the following
- Right-click on the UserForm and select View Code from the menu.
- In the Dropdown list on the left above the main Window, select UserForm.
- This will create the UserForm_Click event. You can ignore this.
- In the Dropdown list on the right above the main Window, select Initialize.
- Optional: Delete the UserForm_Click sub created in step 2.

Adding the Initialize Event
We can also create the Initialize event by copying or typing the following code
Private Sub UserForm_Initialize()

End Sub
Once we have the Initialize event created we can use it to add the starting values to our controls. We will see more about this in the second part of this post.
Initialize versus Activate
The UserForm also has an Activate event. It is important to understand the difference between this and the Initialize event.
The Initialize event occurs when the actual object is created. This means as soon as you use on of the properties or functions of the UserForm. The code example below demonstrates this
Dim frm As New UserForm1

' Initialize will run as UserForm is created
' the first time we use it
frm.BackColor = rgbBlue

frm.Show
We normally reference the UserForm first by calling Show which makes it seem that displaying the UserForm is triggering the Initialize event. This is why there is often confusion over this event.
In the example below calling Show is the first time we use the UserForm. Therefore it is created at this time and the Initialize event is triggered.
Dim frm As New UserForm1

' Initialize will run here as the Show is the
' first time we use the UserForm
frm.Show
The Activate event occurs when the UserForm is displayed. This can happen using Show. It also occurs any time the UserForm is displayed. For example, if we switch to a different window and then switch back to the UserForm then the Activate event will be triggered.
We create the Activate event the same way we create the Initialize event or we can just copy or type the following code
Private Sub UserForm_Activate()

End Sub
- Initialize occurs when the Userform is created. Activate occurs when the UserForm is displayed.
- For each UserForm you use – Initialize occurs only once, Activate occurs one or more times.
Calling the VBA UserForm
We can use the VBA UserForm in two ways
- Modal
- Modeless
Let’s look at each of these in turn.
Modal Userform
Modal means the user cannot interact with the parent application while this is visible. The excel Format cells dialog we looked at earlier is a modal UserForm. So are the Excel Colors and Name Manager dialogs.
We use modal when we don’t want the user to interact with any other part of the application until they are finished with the UserForm.
Modeless Userform
Modeless means the user can interact with other parts of the application while they are visible. An example of modeless forms in Excel is the Find dialog(Ctrl + F).
You may notice that any Excel dialog that allows the user to select a range has a limited type of Modeless – the user can select a range of cells but cannot do much else.
Modal versus Modeless
The actual code to make a UserForm modal or modeless is very simple. We determine which type we are using when we show the UserForm as the code below demonstrates
Dim frm As New UserFormFruit

' Show as modal - code waits here until UserForm is closed
frm.Show vbModal

' Show as modeless - code does not wait
frm.Show vbModeless

' default is modal
frm.Show
As the comments above indicate, the code behaves differently for Modal and Modeless. For the former, it waits for the UserForm to close and for the latter, it continues on.
Even though we can display any UserForm as modal or modeless we normally use it in one way only. This is because how we use them is different
Typical use of a Modal form
With a Modal UserForm we normally have an Ok and a Cancel button.

The Ok button normally closes the UserForm and performs the main action. This could be saving the user inputs or passing them back to the procedure.
The Cancel button normally closes the UserForm and cancels any action that may have taken place. Any changes the user made on the UserForm are ignored.
Typical use of a Modeless form
With a Modeless UserForm we normally have a close button and an action button e.g. the Find button on the Excel Find Dialog.
When the action button is clicked an action takes place but the dialog remains open.
The Close button is used to close the dialog. It normally doesn’t do anything else.
A VBA UserForm Modal Example
We are going to create a Modal UserForm example. It is very simple so you can see clearly how to use a UserForm.
You can download this and all the code examples from the top of this post.
The following UserForm allows the user to enter the name of a fruit:

We use the following code to show this UserForm and to retrieve the contents of the fruit textbox:
' PROCEDURE CODE
' https://excelmacromastery.com/
Sub UseModal()

    ' Create and show form
    Dim frm As New UserFormFruit

    ' Display Userform - The code in this procedure
    ' will wait here until the form is closed
    frm.Show

    ' Display the returned value
    MsgBox "The user has selected " & frm.Fruit

    ' Close the form
    Unload frm
    Set frm = Nothing

End Sub

' USERFORM CODE
' Returns the textbox value to the calling procedure
Public Property Get Fruit() As String
    Fruit = textboxFruit.Value
End Property

' Hide the UserForm when the user click Ok
Private Sub buttonOk_Click()
    Hide
End Sub
What you will notice is that we hide the UserForm when the user clicks Ok. We don’t set it to Nothing or unload it until after we are finished retrieving the user input. If we Unload the UserForm when the user clicks Ok then it no longers exists so we cannot access the values we want.
Using UserForm_QueryClose to Cancel the UserForm
We always want to give the user the option to cancel the UserForm. Once it is canceled we want to ignore any selections the user made.
Each form comes with an X in the top right-hand corner which allows the user to cancel it:

The X button on the UserForm
This button cancels the UserForm automatically – no code is necessary. When the user clicks X the UserForm is unloaded from memory. That is, it no longer exists so we will get an error if we try to access it. The code below will give an error if the user clicks on the X
' https://excelmacromastery.com/
Sub DisplayFruit()

    Dim frm As New UserFormFruit
    frm.Show

    ' ERROR HERE - If user clicks the X button
    Debug.Print frm.Fruit

End Sub

To avoid this error we want to prevent the UserForm from being Unloaded when the X button is clicked. To do this we use the QueryClose event.
We create a variable first at the top of the UserForm code module. We also add a property so that we can read the variable when we need to retrieve the value:
Private m_Cancelled As Boolean

Public Property Get Cancelled() As Variant
    Cancelled = m_Cancelled
End Property
Then we add the UserForm_QueryClose event to the UserForm module:
' https://excelmacromastery.com/
Private Sub UserForm_QueryClose(Cancel As Integer _
                                       , CloseMode As Integer)

    ' Prevent the form being unloaded
    If CloseMode = vbFormControlMenu Then Cancel = True

    ' Hide the Userform and set cancelled to true
    Hide
    m_Cancelled = True

End Sub
In the first line, we prevent the UserForm from being unloaded. With the next lines, we hide the UserForm and set the m_Cancelled variable to true. We will use this variable later to check if the UserForm was canceled:
We can then update our calling procedure to check if the UserForm was canceled
' PROCEDURE CODE
' https://excelmacromastery.com/
Sub DisplayFruit()

    Dim frm As New UserFormFruit
    frm.Show

    If frm.Cancelled = False Then
        MsgBox "You entered: " & frm.Fruit
    Else
        MsgBox "The UserForm was cancelled."
    End If

End Sub
If we want to add a Cancel button it is simple to do. All we need to do is Hide the form and set the variable m_Cancelled to true. This is the same as we did in the QueryClose Event above:
' https://excelmacromastery.com/vba-userform/
Private Sub buttonCancel_Click()
    ' Hide the Userform and set cancelled to true
    Hide
    m_Cancelled = True
End Sub

Using the Escape key to cancel
If you want to allow the user to cancel using the Esc it is simple(but not obvious) to do. You set the Cancel property of your ‘Cancel’ button to True. When Esc is pressed the click event of your Cancel button will be used.

Putting All the Modal Code Together
The final code for a Modal form looks like this:
' USERFORM CODE
' https://excelmacromastery.com/
Private m_Cancelled As Boolean

' Returns the cancelled value to the calling procedure
Public Property Get Cancelled() As Boolean
    Cancelled = m_Cancelled
End Property

' Returns the textbox value to the calling procedure
Public Property Get Fruit() As String
    Fruit = textboxFruit.Value
End Property

Private Sub buttonCancel_Click()
    ' Hide the Userform and set cancelled to true
    Hide
    m_Cancelled = True
End Sub

' Hide the UserForm when the user click Ok
Private Sub buttonOk_Click()
    Hide
End Sub

' Handle user clicking on the X button
Private Sub UserForm_QueryClose(Cancel As Integer _
                                  , CloseMode As Integer)

    ' Prevent the form being unloaded
    If CloseMode = vbFormControlMenu Then Cancel = True

    ' Hide the Userform and set cancelled to true
    Hide
    m_Cancelled = True

End Sub

' PROCEDURE CODE
' https://excelmacromastery.com/
Sub DisplayFruit()

    ' Create the UserForm
    Dim frm As New UserFormFruit

    ' Display the UserForm
    frm.Show

    ' Check if the user cancelled the UserForm
    If frm.Cancelled = True Then
        MsgBox "The UserForm was cancelled."
    Else
        MsgBox "You entered: " & frm.Fruit
    End If

    ' Clean up
    Unload frm
    Set frm = Nothing

End Sub
&nbps;
You can use this code as a framework for any Modal UserForm that you create.
VBA Minimize UserForm Error
We are now going to use a simple example to show how to use a Modeless VBA UserForm. In this example, we will add a customer name to a worksheet each time the user clicks on the Add Customer button.
You can download this and all the code examples from the top of this post.

The code below displays the UserForm in Modeless mode. The problem with this code is that if you minimize Excel the UserForm may not be visible when you restore it:
' PROCEDURE CODE
' https://excelmacromastery.com/
Sub UseModeless()

    Dim frm As New UserFormCustomer
    ' Unlike the modal state the code will NOT
    ' wait here until the form is closed
    frm.Show vbModeless

End Sub
The code below solves the problem above. When you display a Userform using this code it will remain visible when you minimize and restore Excel:
' https://excelmacromastery.com/
Sub UseModelessCorrect()

    Dim frm As Object
    Set frm = VBA.UserForms.Add("UserFormCustomer")

    frm.Show vbModeless

End Sub
An important thing to keep in mind here is that after the frm.Show line, the code will continue on. This is different to Modal where the code waits at this line for the UserForm to be closed or hidden.
When the Add button is clicked the action occurs immediately. We add the customer name to a new row in our worksheet. We can add as many names as we like. The UserForm will remain visible until we click on the Close button.
The following is the UserForm code for the customer example:
' USERFORM CODE
' https://excelmacromastery.com/
Private Sub buttonAdd_Click()
    InsertRow
End Sub

Private Sub buttonClose_Click()
    Unload Me
End Sub

Private Sub InsertRow()

    With Sheet1

        ' Get the current row
        Dim curRow As Long
        If .Range("A1") = "" Then
            curRow = 1
        Else
            curRow = .Range("A" & .Rows.Count).End(xlUp).Row + 1
        End If

        ' Add item
        .Cells(curRow, 1) = textboxFirstname.Value
        .Cells(curRow, 2) = textboxSurname.Value

    End With

End Sub
Part 2 of this post
You can find the second part of this post here.
What’s Next?
Free VBA Tutorial If you are new to VBA or you want to sharpen your existing VBA skills then why not try out the The Ultimate VBA Tutorial.
Related Training: Get full access to the Excel VBA training webinars and all the tutorials.
(NOTE: Planning to build or manage a VBA Application? Learn how to build 10 Excel VBA applications from scratch.)
Forms and Controls in Excel VBA
Any Windows Application is equipped with set of objects called windows controls. Forms and Controls in Excel VBA topics give you the complete understanding of developing application with Forms and Controls.
In This Section:
- What Are UserForms?
- What Are ActiveX Controls?
- What Are The Different UserForm Controls & Use?
- Practical Learning: Developing A Simple UserForm
- Example File
What Are UserForms?
Any Windows Application is equipped with set of objects called windows controls. The Main control is called a Form, it is the primary window contains different types of controls which allow user to interact with the computer. The following is a simple form to calculate square value of a given number.
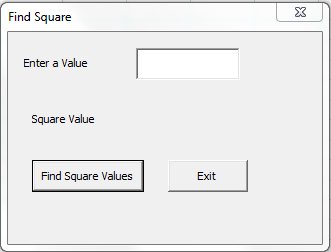
You can enter the any numerical value in TextBox and Push the Command Button to see the result (Example file is attached in this post).

What Are UserForm Controls or ActiveX Controls?
UserForm Controls are objects which you can be placed onto UserForms to interact with your data. There are several ActiveX controls which help users to do different activities with data, each control have different functionality.
We can place form controls on user forms based on our requirement, then add the code for each control to perform required tasks. Following are most commonly used control and their uses.
What Are The Different UserForm Controls & Use?
You can click on the ToolBox to see the various controls available in the VBE (Visual Basic Environment).

| Control | Control Name | Description |
|---|---|---|
| Label | You can use this contol to display the text on the userform | |
| Text box | Enable user to enter some text or data | |
| Command button | Push Button, uses to runs a macro that performs an action when a user clicks it | |
| Combo Box | Drop-down list can be used to provide the interface to select one item from the list of items | |
| List Box | List Box can be used to provide the interface to select one or more item from the list of items | |
| Frame | Layout element which groups common elements | |
| Option Button | Allow user to select an exclusive option from the list of choices | |
| Check Box | Allow user to select one ore more options from the list of choices | |
| Image | You can use this to display a image on the userform |

Forms and Controls in Excel VBA – Practical Learning: Developing A Simple UserForm
Now we will develop a simple userform, follow the below steps to create a userform to Find Square Values of a given number.
Step 1: Open VBE by pressing Alt+F11

Step 2: Goto Menu Bar -> Insert -> Click on UserForm

It should look like this:

Step 3: Click On ToolBox and Add Three Labels, One TextBox and Two Command Buttons as shown below


Step 4: Now Click On the First Label and Change the Caption of the Label as “Enter a Value” – as shown below

Similarly, change the caption of second Label as “Square Value”, Caption of the Third Label as blank(just delete the captions, we need this blank label to show the square value of the given value), Command Button1 as “Find Square Value”, Command Button2 as “Exit”, it should look like this:

Step 5: Now Double Click On the First Command Button (Find Suare Value), It will take you to the form code module, place the following code
Private Sub CommandButton1_Click()
 'Calculate Square Value
 Label3.Caption = TextBox1.Value * TextBox1.Value
End Sub
Similarly add the following code for Exit Button:
Private Sub CommandButton2_Click()
 'Exit Form
 Unload Me
End Sub
Now- your code module should look like this:

Step 6: Click on the Useform (left pane) to view the designed Form and Click on the Run Button to test it


Step 7:You can insert an ActiveX Command Button in the Worksheet and Add the following code to call the userform from your Worksheet
Private Sub CommandButton1_Click()
    'Call userform
    UserForm1.Show
End Sub
Example File
A Powerful & Multi-purpose Templates for project management. Now seamlessly manage your projects, tasks, meetings, presentations, teams, customers, stakeholders and time. This page describes all the amazing new features and options that come with our premium templates.
Save Up to 85% LIMITED TIME OFFER

All-in-One Pack
120+ Project Management Templates
Essential Pack
50+ Project Management Templates
Excel Pack
50+ Excel PM Templates
PowerPoint Pack
50+ Excel PM Templates
MS Word Pack
25+ Word PM Templates
Ultimate Project Management Template
Ultimate Resource Management Template
Project Portfolio Management Templates
Related Posts
-
- What Are UserForms?
- What Are UserForm Controls or ActiveX Controls?
- What Are The Different UserForm Controls & Use?
- Forms and Controls in Excel VBA – Practical Learning: Developing A Simple UserForm
- Example File
VBA Reference
Effortlessly
Manage Your Projects
120+ Project Management Templates
Seamlessly manage your projects with our powerful & multi-purpose templates for project management.
120+ PM Templates Includes:
6 Comments
-
Ali
February 23, 2015 at 10:21 AM — ReplyHi sir, loved your website! The only thing I would like to point out is that you’ve interchanged the icons for Command buttons and Frame in your indroduction. Might get confusing for newbies!
Thanks and keep up the good work!
Ali! -
PNRao
March 2, 2015 at 7:44 PM — ReplyThanks lot Ali- Changed now! PNRao!
-
Tracey-lee
March 5, 2015 at 11:35 PM — ReplyThank you soooo much for all the information that you have shared as well as the time. I am a newbie and really appreciate your site.
-
Naresh
August 31, 2015 at 8:38 PM — ReplyThank u very much sir…i’m new for this website but i noticed that u care of our request or comments…so once again thank u…
-
PNRao
August 31, 2015 at 11:06 PM — ReplyYou are most welcome Naresh! I am glad you found this useful.
Thanks-PNRao! -
Adnan
November 19, 2015 at 9:10 PM — ReplyThank you verrrry much. most of the time I find what am looking for in your site. God bless you.
Effectively Manage Your
Projects and Resources
ANALYSISTABS.COM provides free and premium project management tools, templates and dashboards for effectively managing the projects and analyzing the data.
We’re a crew of professionals expertise in Excel VBA, Business Analysis, Project Management. We’re Sharing our map to Project success with innovative tools, templates, tutorials and tips.
Project Management
Excel VBA
Download Free Excel 2007, 2010, 2013 Add-in for Creating Innovative Dashboards, Tools for Data Mining, Analysis, Visualization. Learn VBA for MS Excel, Word, PowerPoint, Access, Outlook to develop applications for retail, insurance, banking, finance, telecom, healthcare domains.
Page load link
Go to Top