

If you’re creating an article, instructional piece, or essay in Microsoft Word, you may need to include a snippet of code. Whether HTML, JavaScript, or Python, you likely want it to appear different than the document text.
There are a few ways to insert command or code blocks in your Word document. Depending on if you want the reader to simply view the code or have the ability to copy it, let’s walk through the options.
Option 1: Paste Special as HTML
One of the quickest ways to add code to your document is with the Paste Special option for HTML. This inserts the code you’ve copied without the other formatting of your document. And, this option allows your reader to copy the code or command straight from your document.
RELATED: How to Paste Text Without Formatting Almost Anywhere
Select the code or command from your application and copy it using the toolbar, the context menu, or the keyboard shortcut Ctrl+C on Windows or Command+C on Mac.

Place your cursor in your Word document where you want to paste it. Then go to the Home tab, click the Paste drop-down arrow, and choose Paste Special. Select “HTML Format” and click “OK.”
When the code appears in your document, you can format the font or the snippet if you like.
Use the Home tab to color specific pieces of code with the Font section of the ribbon. To add a border or shade, select the Borders drop-down arrow in the Paragraph section and pick “Borders and Shading.”
Option 2: Insert an Object
If you want to insert the code or command in your document only for the reader to see and not copy or edit, you can insert an object containing the snippet.
RELATED: How to Insert a Picture or Other Object in Microsoft Office
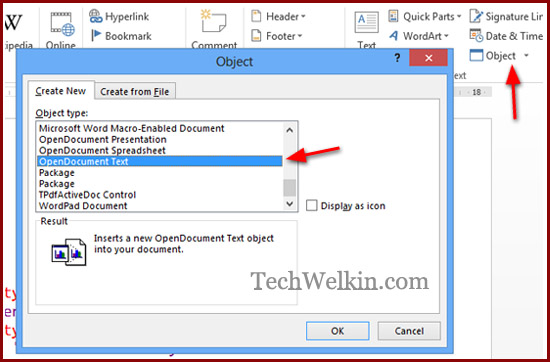
Go to the Insert tab, click the Object drop-down arrow, and pick “Object.”
On the Create New tab, select “OpenDocument Text” as the Object Type. Click “OK.”
A new Word document will open for you to insert your code or command. You can use the Paste Special HTML format described earlier if you like. After you add the snippet, close the document.
Your code then appears in your original Word document as an object. You can then move it, resize it, or add a border if you wish.
Option 3: Attach a Screenshot
Another option for adding your snippet as an item instead of text is using an image. If you have your code or command in an active application window like Notepad++ or Command Prompt, you can easily add it to your document. The drawbacks here are that the reader can’t easily copy your code if they need to and that resizing may negatively affect readability.
Go to the Insert tab and click the Screenshot drop-down arrow. You should see the application window as an option.
Select it and it’ll pop into your document as an image. You can then crop the image to remove the surrounding application window if you like.
Alternatively, you can use the Screen Clipping option in the Screenshot drop-down. When you select this tool, your cursor changes to a crosshair. Use it to drag the area of your screen or other application window you want to capture and release.
That image then appears in your document. You can move, resize, or customize the snippet screenshot like any other image in Word.
Option 4: Use a Syntax Highlighter
One more option is to use a syntax highlighter like Easy Syntax Highlighter. This is a free add-in for Microsoft Word that highlights your code for you including a background and colors for pieces of the code. Plus, you can customize the language and appearance.
RELATED: How to Install and Use Add-ins for Microsoft Office
After you install the add-in, place the code or command in your document. You can type or paste it, whichever you prefer.
Select the code and go to the Easy Syntax Highlighter tab that now displays. To apply the default formatting with the language automatically detected, select “Highlight Selection” in the ribbon.
You’ll see your snippet highlighted and your text formatted.
If you want to select a specific language or formatting, select “Settings” in the ribbon instead. When the sidebar opens, choose a Language and Theme.
With your code selected, click “Highlight Selection” in the sidebar.
You’ll then see your snippet formatted per the settings you picked. This keeps your code or command as text so your reader can copy it, but makes it stand out as its own block.
There’s more than one way to add a code or command block to your Word document. Depending on the purpose for your reader, choose the option that’s best for you!
READ NEXT
- › BLUETTI Slashed Hundreds off Its Best Power Stations for Easter Sale
- › How to Adjust and Change Discord Fonts
- › Google Chrome Is Getting Faster
- › Expand Your Tech Career Skills With Courses From Udemy
- › The New NVIDIA GeForce RTX 4070 Is Like an RTX 3080 for $599
- › Mozilla Wants Your Feature Suggestions for Thunderbird
You can also use SciTE to paste code if you don’t want to install heavy IDEs and then download plugins for all the code you’re making. Simply choose your language from the language menu, type your code, high-light code, select Edit->Copy as RTF, paste into Word with formatting (default paste).
SciTE supports the following languages but probably has support for others: Abaqus*, Ada, ANS.1 MIB definition files*, APDL, Assembler (NASM, MASM), Asymptote*, AutoIt*, Avenue*, Batch files (MS-DOS), Baan*, Bash*, BlitzBasic*, Bullant*, C/C++/C#, Clarion, cmake*, conf (Apache), CSound, CSS*, D, diff files*, E-Script*, Eiffel*, Erlang*, Flagship (Clipper / XBase), Flash (ActionScript), Fortran*, Forth*, GAP*, Gettext, Haskell, HTML*, HTML with embedded JavaScript, VBScript, PHP and ASP*, Gui4Cli*, IDL — both MSIDL and XPIDL*, INI, properties* and similar, InnoSetup*, Java*, JavaScript*, LISP*, LOT*, Lout*, Lua*, Make, Matlab*, Metapost*, MMIXAL, MSSQL, nnCron, NSIS*, Objective Caml*, Opal, Octave*, Pascal/Delphi*, Perl, most of it except for some ambiguous cases*, PL/M*, Progress*, PostScript*, POV-Ray*, PowerBasic*, PowerShell*, PureBasic*, Python*, R*, Rebol*, Ruby*, Scheme*, scriptol*, Specman E*, Spice, Smalltalk, SQL and PLSQL, TADS3*, TeX and LaTeX, Tcl/Tk*, VB and VBScript*, Verilog*, VHDL*, XML*, YAML*.
It can be done without taking snapshots of each segment
What to Know
- To embed a second document into a Word document: Insert > Object > Create New > Word Document > clear Display as icon > OK.
- You can also use Paste Special to insert a variety of data into a document, including code.
This article explains issues with using source code in Word for Microsoft 365, Word 2019, Word 2016, Word 2013, Word 2010, and Word 2007 and instructions for embedding a second document in a Word file. It also provides information on pasting other data into a Word document.
The Problem With Using Source Code in Word
Programmers write software programs using languages such as Java, C++, and HTML. Programming languages use different formatting and symbols from regular languages, so pasting a snippet of code into Word from a programming application causes errors such as text reformatting, indentation shifts, link creation, and misspellings.
Given how Microsoft Word structures documents, inserting and working with source code is more difficult than working in a dedicated code editor. However, document embeds create a container that protects source code from being reformatted.
One way to avoid these formatting issues is to paste the source code into a separate document within the main Word document.
Embed a Second Document Into a Word Document
Here’s how to paste source code into a Word document using a second embedded document.
These instructions only work with a single page of code.
-
Open the target document in Microsoft Word and place the cursor where the source code will appear.
-
Select Insert.
-
In the Text group, select Object.
-
In the Object dialog box, select the Create New tab.
-
In the Object type list, Select Microsoft Word Document.
In Word 2007, select OpenDocument Text.
-
Clear the Display as icon check box.
-
Select OK.
-
A new document opens, titled Document in [target document file name]. Save the document in the same folder as the target document.
-
Copy and paste the source code into the new document. Word automatically ignores the spaces, tabs, and other formatting problems. Spelling errors and grammatical errors are highlighted in the document, but these errors are ignored when the code is inserted in the original document.
-
Save and close the source code document. The source code appears in the main document.
-
Resume work on the main document.
Using Different Paste Types in Word
The most up-to-date versions of Word handle code better than they used to. Word for Microsoft 365 supports several forms of pasting, including with and without source formatting. So pasting a block of code from, for example, Microsoft Visual Studio Code will look different based on the paste type. If you select Paste Special, each of the three options yields a different result:
- Unformatted Text: All code is pasted as unformatted, so you’ll lose indenting, color, typeface, and related contextual clues.
- HTML Format: From VSC, a paste-as-HTML renders what appears to be a photo of the code, complete with the text editor’s background color. This code block is editable, and you can remove the background color in the Paragraph Fill menu option.
- Unformatted Unicode Text: Pastes the text as is but strips the text and background colors. Re-format the code as needed.
FAQ
-
How do I see formatting marks and codes in Word?
To see formatting marks and codes in Word temporarily, go to Home and select the Show/Hide icon to toggle marks on and off. To keep them on permanently, go to File > Options > Display > Show all formatting marks > OK.
-
How do I add links in Word documents?
To add a link in a Word document, highlight the text you want to hyperlink, right-click it, and select Link. Alternatively, select Insert > Links > Link and enter the URL.
-
How do I convert a Word document to HTML?
To convert a Word document to HTML, go to File > Save As. Under Save as Type, choose .html. You can also use an editor like Dreamweaver.
Thanks for letting us know!
Get the Latest Tech News Delivered Every Day
Subscribe
Word для Microsoft 365 Word 2021 Word 2019 Word 2016 Word 2013 Word 2010 Еще…Меньше
Вставка символа с помощью клавиатуры с кодами символов ASCII или Юникода
Символы и специальные знаки вставляются с помощью кодов ASCII или Юникода. Вы можете укассировать код при подытовом коде для знака.
-
Перейдите на вкладку >символ > другие символы.
-
Найдите нужный символ.
Совет: Шрифт Segoe UI Symbol содержит очень большой набор символов Юникода, которые можно выбрать.
-
В правой нижней части вы увидите код знака иот:. Код знака используется для вставки этого символа с клавиатуры. Поле «От»: указывает, является ли это кодом Юникода или символом ASCII.

Юникод

ASCII
Вставка символов Юникод
-
Введите код символа там, куда необходимо вставить знак в кодировке Юникод.
-
Нажмите клавиши ALT + X, чтобы преобразовать код в символ.
Если символ Юникода нужно поместить сразу после другого, выделите код, прежде чем нажимать ALT+X.
Совет: Если вы не получили символ, который вы ожидали, убедитесь в том, что выбран правильный шрифт.
Вставка символов ASCII
На цифровой клавиатуре с помощью клавиши Num Lock введите номера ASCII, а не номера в верхней части клавиатуры.
Все коды символов ASCII имеют четыре цифры. Если код символа меньше четырех цифр, добавьте нули в начале, чтобы получить 4 цифры.
-
На вкладке Главная в группе Шрифт измените шрифт на Wingdings (или другой набор шрифтов).
-
Нажмите клавишу ALT и, удерживая ее, введите код символа с помощью цифровой клавиатуры.
-
После вставки символа измените шрифт на предыдущий.
Полный список символов см. в таблице символов на компьютере, таблице кодов символов ASCII или таблицах символов Юникода, упорядоченных по наборам.
|
Глиф |
Код |
Глиф |
Код |
|---|---|---|---|
|
Денежные единицы |
|||
|
£ |
ALT+0163 |
¥ |
ALT+0165 |
|
¢ |
ALT+0162 |
$ |
0024+ALT+X |
|
€ |
ALT+0128 |
¤ |
ALT+0164 |
|
Юридические символы |
|||
|
© |
ALT+0169 |
® |
ALT+0174 |
|
§ |
ALT+0167 |
™ |
ALT+0153 |
|
Математические символы |
|||
|
° |
ALT+0176 |
º |
ALT+0186 |
|
√ |
221A+ALT+X |
+ |
ALT+43 |
|
# |
ALT+35 |
µ |
ALT+0181 |
|
< |
ALT+60 |
> |
ALT+62 |
|
% |
ALT+37 |
( |
ALT+40 |
|
[ |
ALT+91 |
) |
ALT+41 |
|
] |
ALT+93 |
∆ |
2206+ALT+X |
|
Дроби |
|||
|
¼ |
ALT+0188 |
½ |
ALT+0189 |
|
¾ |
ALT+0190 |
||
|
Знаки пунктуации и диалектные символы |
|||
|
? |
ALT+63 |
¿ |
ALT+0191 |
|
! |
ALT+33 |
‼ |
203+ALT+X |
|
— |
ALT+45 |
‘ |
ALT+39 |
|
« |
ALT+34 |
, |
ALT+44 |
|
. |
ALT+46 |
| |
ALT+124 |
|
/ |
ALT+47 |
ALT+92 |
|
|
` |
ALT+96 |
^ |
ALT+94 |
|
« |
ALT+0171 |
» |
ALT+0187 |
|
« |
ALT+174 |
» |
ALT+175 |
|
~ |
ALT+126 |
& |
ALT+38 |
|
: |
ALT+58 |
{ |
ALT+123 |
|
; |
ALT+59 |
} |
ALT+125 |
|
Символы форм |
|||
|
□ |
25A1+ALT+X |
√ |
221A+ALT+X |
Полный список глифов и соответствующих кодов см. в таблице символов.
|
Глиф |
Код |
Глиф |
Код |
|
|---|---|---|---|---|
|
à |
ALT+0195 |
å |
ALT+0229 |
|
|
Å |
ALT+143 |
å |
ALT+134 |
|
|
Ä |
ALT+142 |
ä |
ALT+132 |
|
|
À |
ALT+0192 |
à |
ALT+133 |
|
|
Á |
ALT+0193 |
á |
ALT+160 |
|
|
 |
ALT+0194 |
â |
ALT+131 |
|
|
Ç |
ALT+128 |
ç |
ALT+135 |
|
|
Č |
010C+ALT+X |
č |
010D+ALT+X |
|
|
É |
ALT+144 |
é |
ALT+130 |
|
|
È |
ALT+0200 |
è |
ALT+138 |
|
|
Ê |
ALT+202 |
ê |
ALT+136 |
|
|
Ë |
ALT+203 |
ë |
ALT+137 |
|
|
Ĕ |
0114+ALT+X |
ĕ |
0115+ALT+X |
|
|
Ğ |
011E+ALT+X |
ğ |
011F+ALT+X |
|
|
Ģ |
0122+ALT+X |
ģ |
0123+ALT+X |
|
|
Ï |
ALT+0207 |
ï |
ALT+139 |
|
|
Î |
ALT+0206 |
î |
ALT+140 |
|
|
Í |
ALT+0205 |
í |
ALT+161 |
|
|
Ì |
ALT+0204 |
ì |
ALT+141 |
|
|
Ñ |
ALT+165 |
ñ |
ALT+164 |
|
|
Ö |
ALT+153 |
ö |
ALT+148 |
|
|
Ô |
ALT+212 |
ô |
ALT+147 |
|
|
Ō |
014C+ALT+X |
ō |
014D+ALT+X |
|
|
Ò |
ALT+0210 |
ò |
ALT+149 |
|
|
Ó |
ALT+0211 |
ó |
ALT+162 |
|
|
Ø |
ALT+0216 |
ø |
00F8+ALT+X |
|
|
Ŝ |
015C+ALT+X |
ŝ |
015D+ALT+X |
|
|
Ş |
015E+ALT+X |
ş |
015F+ALT+X |
|
|
Ü |
ALT+154 |
ü |
ALT+129 |
|
|
Ū |
ALT+016A |
ū |
016B+ALT+X |
|
|
Û |
ALT+0219 |
û |
ALT+150 |
|
|
Ù |
ALT+0217 |
ù |
ALT+151 |
|
|
Ú |
00DA+ALT+X |
ú |
ALT+163 |
|
|
Ÿ |
0159+ALT+X |
ÿ |
ALT+152 |
Дополнительные сведения о лигатурах см. в статье Лигатура (соединение букв). Дополнительные см. в этой теме.
|
Глиф |
Код |
Глиф |
Код |
|
|---|---|---|---|---|
|
Æ |
ALT+0198 |
æ |
ALT+0230 |
|
|
ß |
ALT+0223 |
ß |
ALT+225 |
|
|
Π|
ALT+0140 |
œ |
ALT+0156 |
|
|
ʩ |
02A9+ALT+X |
|||
|
ʣ |
02A3+ALT+X |
ʥ |
02A5+ALT+X |
|
|
ʪ |
02AA+ALT+X |
ʫ |
02AB+ALT+X |
|
|
ʦ |
0246+ALT+X |
ʧ |
02A7+ALT+X |
|
|
Љ |
0409+ALT+X |
Ю |
042E+ALT+X |
|
|
Њ |
040A+ALT+X |
Ѿ |
047E+ALT+x |
|
|
Ы |
042B+ALT+X |
Ѩ |
0468+ALT+X |
|
|
Ѭ |
049C+ALT+X |
ﷲ |
FDF2+ALT+X |
Знаки, используемые для управления некоторыми периферийными устройствами, например принтерами, в таблице ASCII имеют номера 0–31.
|
Десятичное число |
Знак |
Десятичное число |
Знак |
|
|---|---|---|---|---|
|
NULL |
0 |
Освобождение канала данных |
16 |
|
|
Начало заголовка |
1 |
Первый код управления устройством |
17 |
|
|
Начало текста |
2 |
Второй код управления устройством |
18 |
|
|
Конец текста |
3 |
Третий код управления устройством |
19 |
|
|
Конец передачи |
4 |
Четвертый код управления устройством |
20 |
|
|
Запрос |
5 |
Отрицательное подтверждение |
21 |
|
|
Подтверждение |
6 |
Синхронный режим передачи |
22 |
|
|
Звуковой сигнал |
7 |
Конец блока передаваемых данных |
23 |
|
|
BACKSPACE |
8 |
Отмена |
24 |
|
|
Горизонтальная табуляция |
9 |
Конец носителя |
25 |
|
|
Перевод строки/новая строка |
10 |
Символ замены |
26 |
|
|
Вертикальная табуляция |
11 |
ESC |
27 |
|
|
Перевод страницы/новая страница |
12 |
Разделитель файлов |
28 |
|
|
Возврат каретки |
13 |
Разделитель групп |
29 |
|
|
Сдвиг без сохранения разрядов |
14 |
Разделитель записей |
30 |
|
|
Сдвиг с сохранением разрядов |
15 |
Разделитель данных |
31 |
|
|
Пробел |
32 |
DEL |
127 |
Нужна дополнительная помощь?
Microsoft Word is a very versatile software. It has a large number of great features which the common users don’t even know about. Let’s consider a scenario. The other day, Rajesh, a friend of mine sent me an email and told me that he was preparing an MS Word document and needed to embed programming code with syntax highlight. To insert code snippet in his MS Word document, Rajesh did all the syntax highlighting manually. You can imagine that it is a tedious job! So, he asked me if there was an easier way. Well, indeed there is one!
It is easy to embed code snippets with automatic syntax highlight in MS Word. Let’s learn how you can do this magic!
What is a Code Snippet and Syntax Highlighting?
A code snippet is a piece of computer programming code. Such code is usually marked with several colors in order to show various elements of the code distinctively. For example, all the programming language keywords will be highlighted in a particular color and all the errors will be highlighted in a different color. Similarly, there would be per-defined colors for text, tags, properties, attributes, values, symbols etc.

Our tips on MS-Word make your life easier and increase your productivity at work.
Program lines in a code snippets are also usually indented to make the code easily readable.
How to Insert Code Snippets with Syntax Highlight in MS Word
First of all, open the MS Word document in which you want to insert the code snippet. Then place the cursor where you want the snippet to be inserted.
Now, go to Insert tab and then click on the Object option. A new box will appear with a list of objects that you can insert in your MS Word document. Select OpenDocument Text from the list and click OK to insert the object.
You will see a new shaded area is inserted at the cursor position. Also a new Word document will open up. Whatever you will write or paste in this new document, the same will appear in the original document.
To add code snippets with syntax highlight, you can use Insert Object method of MS Word.
So, now, copy the code from your code editor and paste it in the new document. Save the new document and that’s it! Code snippet will appear neatly embedded in your MS Word document.
Syntax Highlighting is not Appearing in MS Word
If you have copied the code from a Microsoft product (like MS Visual Studio), the syntax highlight will automatically carry to the MS Word.
However, if you’re using some other code editors (like Programmer’s Notepad), copied code may appear without syntax highlight in MS Word. But don’t panic!
Most of the code editors will give you the option of copying text with HTML markup or RTF format. You should use these options while copying text.
In Programmer’s Notepad, this option appears as Edit -> Copy as RTF
In Notepad++ the option is available as Plugins -> Copy Text with Syntax Highlighting
If you’re copying syntax highlighted code from a webpage, the HTML markups will automatically get copied and syntax highlight will carry to MS Word.
Advantages of Embedding Code Snippets with Syntax Highlights
Although you can always manually highlight various portions of a code snippet in MS Word, but there are many distinctive advantage of using the embedded object method:
- Code and main document remain separate from each other (programmers love this approach, don’t they?)
- Spelling and grammar mistakes will not be highlighted by MS Word in the embedded code snippet. It is of great help because a lot of programming keywords are not found in dictionary, and as a result such code may result in lots of red and green wavy lines.
- And obviously, it’s easier, quicker method. Code remains in it’s original format and syntax highlights.
- Formatting changes in the main document do not affect the code block.
So, did you find this MS Word tips useful? Whenever you would need to insert a code snippet with syntax highlight in MS Word document, I am sure it will save you a lot of time. Please feel free to ask any questions on this tutorial. I will try my best to assist you. Thank you for using TechWelkin.