
Word for Microsoft 365 Word for Microsoft 365 for Mac Word 2021 Word 2021 for Mac Word 2019 Word 2019 for Mac Word 2016 Word 2016 for Mac Word 2013 Word 2010 Word 2007 Word for Mac 2011 More…Less
Follow the link to the field code you’re interested in, in the alphabetized list below.
Note: For detailed information about inserting and editing field codes, using switches, setting and changing properties, displaying results vs. field codes, locking fields, and other common tasks, see Insert, edit, and view fields in Word.
A
AddressBlock field
Advance field
Ask field
Author field
AutoNum field
AutoNumLgl field
AutoNumOut field
AutoText field
AutoTextList field
B
Bibliography field
C
Citation field
Comments field
Compare field
CreateDate field
D
Database field
Date field
DocProperty field
DocVariable field
E
Embed field
Eq field
F
FileName field
FileSize field
Fill-In field
= (Formula) field
G
GoToButton field
GreetingLine field
H
Hyperlink field
I
If field
IncludePicture field
IncludeText field
Index field
Info field
K
Keywords field
L
LastSavedBy field
Link field
ListNum field
M
MacroButton field
MergeField field
MergeRec field
MergeSeq field
N
Next field
NextIf field
NoteRef field
NumChars field
NumPages field
NumWords field
P
Page field
PageRef field
Print field
PrintDate field
Private field
Q
Quote field
R
RD (Referenced Document) field
Ref field
RevNum field
S
SaveDate field
Section field
SectionPages field
Seq (Sequence) field
Set field
SkipIf field
StyleRef field
Subject field
Symbol field
T
TA (Table of Authorities Entry) field
TC (Table of Contents Entry) field
Template field
Time field
Title field
TOA (Table of Authorities) field
TOC (Table of Contents) field
U
UserAddress field
UserInitials field
UserName field
X
XE (Index Entry) field
Top of Page
Need more help?
Want more options?
Explore subscription benefits, browse training courses, learn how to secure your device, and more.
Communities help you ask and answer questions, give feedback, and hear from experts with rich knowledge.
Alt key in the keyboard helps to type special characters, symbols and emoji. We have written articles providing thousands of keyboard shortcuts using alt codes for Windows and Mac. However, many users send emails to us asking clarification on how to properly use the alt code shortcuts. Therefore, in this article we will explain how to use alt code shortcuts in Windows, Mac and Linus based computers.
What is Alt Code?
This is more technical and difficult to understand for a normal user. In simple words, each character you type on the keyboard is encoded to a printable character with the help of code page used on that machine. Earlier days, IBM computers use the alt key along with the decimal numbers to type special characters using code page 437. For example, Alt + 1 will make the smiley symbol like ☺. Though later, Microsoft developed different code pages for Windows and move to Unicode, they retained the legacy method of using alt key with decimal number due to the popularity.
Currently most operating systems and applications use the standard encoding offered by Unicode Consortium. Unicode assigns a hexadecimal code point for each printable character and aims to standardize the characters usage across devices. For example, Unicode point for the same smiley symbol is U+263A.
Now that some applications like Microsoft Word accepts the Unicode hexadecimal code point while other applications like Outlook only accepts decimal codes with alt key. Therefore, usage of alt code shortcuts depend on the following factors:
- Operating system you use.
- Keyboard layout like international English or language specific.
- Language input method.
- Code page for character encoding.
- Font type on the document.
- Device manufacturer.
Below instructions cover all possibilities of using alt code in different scenarios.
Using Alt Codes in Windows
You can use either decimal alt code or hexadecimal Unicode character in Windows computer to type symbols and special characters.
Alt Code with Number Pad Keyboard
Use this method if you have larger keyboard on your PC or laptop with separate number or numeric pad.
- Turn on the number lock to enable the use of number pad.
- Press and hold one of the alt keys on your keyboard.
- Type decimal numbers using the number pad.
- After typing the numbers, release the alt key.
- You can see the symbol corresponding to the Unicode number.
For example, “Alt + 0163” will produce the pound symbol like £.

Using Alt Code without Separate Number Pad
The above method works well on all Windows devices. Unfortunately, nowadays laptops do not come with long keyboard having separate number pad. However, if you notice the standard laptop keyboard has a number pad within the layout. If your laptop keyboard does not have separate number pad, follow the below instructions:
- First press the “Function” or “Fn” key and press “NumLock” to enable number lock on the keyboard. You should see the NumLock key on the top function keys row. On most of the laptops, it should be either F11 or F12 key.
- Once number lock is enabled, your keyboard behavior will change.
- Now, you can press function key, one of the alt keys and type the decimal numbers using the numeric pad within the keyboard layout.
- Remember, you should use the number keys fro the numeric pad and not the number keys on the top row.
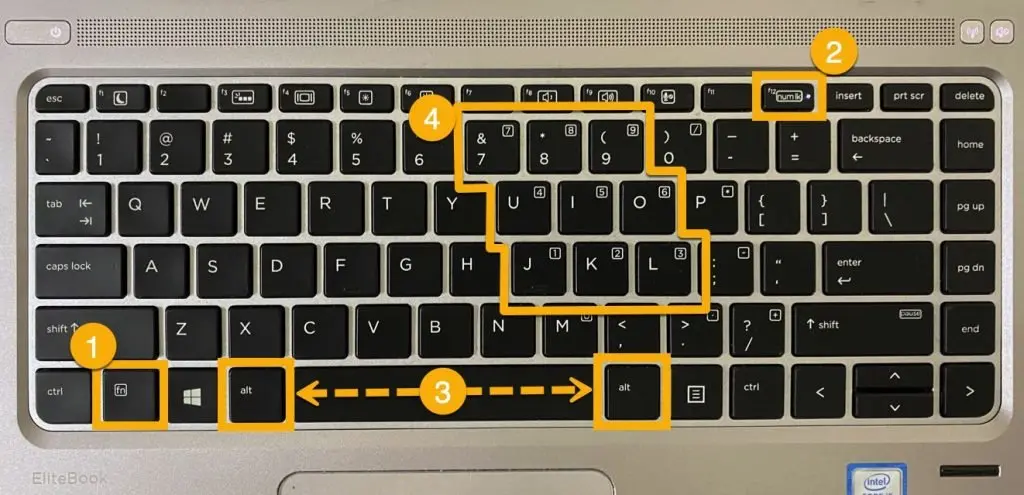
Note that you may or may not need to hold the Fn key depending upon your device.
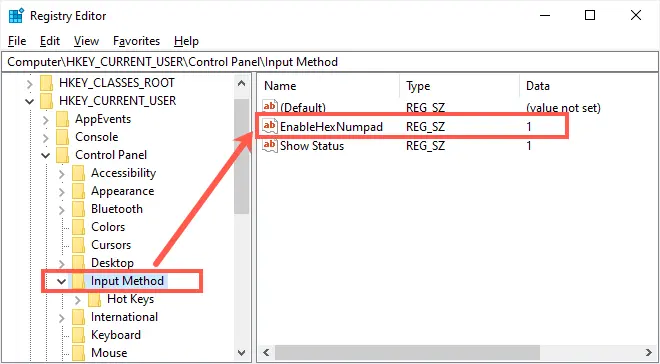
Using Hexadecimal Unicode
The above two methods work based on the decimal code of the symbol or character. Alternatively, you can also try to use the hexadecimal Unicode point by adding entry in Registry.
- Press “Win + R” keys to open Run prompt.
- Type REGEDIT and hit enter to open “Registry Editor”.
- Navigate to “HKEY_CURRENT_USER/Control Panel/Input Method”.
- Right click on the right pane and create a new string value with the name as EnableHexNumpad.
- Modify the string and assign the value as 1.
Now follow the below instructions to use alt codes:
- Press and hold one of the alt keys.
- Press + key and release it.
- Type the hexadecimal code.
- Release the alt key to see the symbol.
For example, “Alt +00F7” will produce the division symbol like ÷.
Alt Codes for Microsoft Word
As mentioned, Microsoft Word accepts alt code with hexadecimal Unicode point.
- First type the Unicode hexadecimal code point.
- Now, press alt and X keys.
- This will convert the hexadecimal code to the corresponding character.
For example, “2642 Alt + X” will produce the male gender symbol like♂.
If alt code shortcut does not work for you, try alternate options like Character Map, emoji keyboard or Symbol utility within Office applications.
Using Alt Codes in macOS
Similar to Windows computers, you can use the option or alt key on Macintosh.
- In order to use alt code shortcuts on Mac, first you need to add Unicode Hex Input to your input method.
- Click on the input method icon on the top bar and activate Unicode Hex Input method for typing.
- Hold one of the option keys and type the hexadecimal Unicode points.
For example, option 221A will produce the square root symbol like √. However, the problem with this method is that Mac will only accept four digits Unicode points. It will not work if the symbol has more than four digit hexadecimal Unicode point. In such a case, you can use the Character Viewer app to type the symbols.
Using Alt Codes in Linux
On Linux based computers, alt codes work differently.
- Press “Control + Shift + U” keys.
- Type the hexadecimal Unicode point.
- This will convert the input into corresponding Unicode symbols.
Points to Remember
- Many non-English keyboard layouts will have AltGr key on the keyboard. AltGr indicates Alt Graph or Alt Right. In most cases, it works similar to alt key and is simply used as a right alt key located right side on the space bar. However, it may also work like “Fn + Alt” combination.
- When using decimal codes, some applications will accept without leading zeros and on some applications you should include leading zeros.
- The decimal codes used with numeric pad are based on the code page and not the conversion of Unicode hexadecimal point.
- On HTML documents, you can use HTML escape entities or decimal or hexadecimal codes in prescribed format.
Unicode and Windows Alt Code
In our earlier articles, we have explained thousands of keyboard shortcuts using alt codes in Windows and Mac. Many users send us emails and complained that the shortcuts are not working on their computer. The alt codes have a long history that may be interpret differently on different devices.
- On older IBM PCs, 0 – 255 characters are stored in Read Only Memory (ROM) to directly interpret it as a shortcut when used with alt code. For example, alt + 003 will produce the heart like ♥.
- Later, Windows used code page 437 to use the four digit decimal codes with alt codes. For example, alt + 0003 will produce ♥.
- In both of the above method, you should use a separate number pad to type the number.
- Nowadays, it is common to use Unicode character encoding on devices. This led to the use of Unicode hexadecimal code in Mac and equivalent decimal point in Windows. For example, you can use alt + 0003 in Mac and alt + 9786 in Windows without separate number pad to type ♥.
Therefore, depending on the device and case, the shortcut may work differently.
Word field codes are a way to add some automation or automatic content into your documents. A simple example is the { DATE } field which will add the current date to a letter.
Chances are good that you’ve already used field codes and not realised it. Date, PrintDate, Page numbering (current and total pages), chapter names in a header are just some Word features that use Field Codes. Word Mail Merge is all about field codes.
Even the humble web link is a field code – any link in Word looks like this when you view field codes: {HYPERLINK “https://office-watch.com/”} . That’s essential knowledge if you want to find/replace web links or just figure out why a link isn’t working.
Insert Field Codes
The quick way to add a Word field code is from Insert | Text, click on the Quick Parts icon and choose ‘Fields …’ in Word for Windows or Mac.
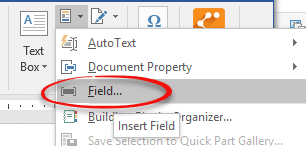
Then choose the field code you want from the list on left.

The options in the center and right sections will change, depending on the field code selected. In the above case, a list of all Quick Parts / Building Blocks.
Here’s the DATE field with formatting and other options:

All the options in the Insert | Field dialog are available from the switches and settings in the field itself.
Choose the options you want and click OK to insert the field.
Show the field code
Normally, Word shows the result of the field code unless you click inside it, then it turns to gray.
Often, you’ll want to see the field code and perhaps change it. Press Alt + F9 to reveal the field codes or Shift + F9 to reveal only the currently selected field code.
You can now alter the field code and details. Alt + F9 again to hide the field codes.
Ctrl + A (Select all) then F9 will update all the fields in a document.
All the Field Code options
For some, but not all, field codes Word shows a more easily understood version of the options. Here’s the Field Properties for PrintDate as shown by Insert Field

Choose from the options shown. To see more choices or tinker with the preset options click Field Codes at bottom left.
Now you can see the exact field code and can change it. We’ve edited the date/time format away from the preset choice to something similar.

At bottom left is ‘Hide Codes’ which takes you back to the main field properties window.
OR choose ‘Options…’ which appears for some field codes.

Now you can see more General Switches or formats.
Field Specific Switches
The Field Specific Switches tab shows the options and their field codes

If you want to learn more about field codes and switches, this dialog is a good way to understand the options and the matching switches.
Typing field code curly brackets
The curly brackets/braces you see aren’t the normal { } you can type from the keyboard.
Make the field code brackets by pressing Ctrl + F9
The Insert | Field command is a more reliable way to start a new field code.
Convert a field to text
Sometimes you want to remove the field code and leave only the result. Do this so the field code isn’t updated any more.
A common use for this is the DATE or PRINTDATE fields which you may want to stay fixed at the current date and not change.
Microsoft calls this ‘Unlinking’ a field. The rest of us would say it’s converting a field code into it’s result or text.
Unlinking/converting is only available via the Ctrl + Shift + F9 shortcut.
Locking a field
The alternative to unlinking or converting a field is to Lock it.
Lock a field: Ctrl + F11
Unlock a field: Ctrl + Shift + F11
Locking a field prevents the field from being updated while retaining the field code. That means the displayed result of the field won’t change until the field is unlocked and updated.
A locked field has the Update Field option greyed out.
Whether you use unlinking or locking is up to you.

Personally, for the final version of a letter or other important document, we use Unlinking. That especially applies to dates. All manner of confusion, embarrassment and accusations can arise if an important past letter appears with the wrong date, because the Word field code has been updated. Unlinking ‘fixes’ the date shown in the document with no risk of accidental updating.
More Word Find / Search tricks
Find and Replace links in Word documents
All the * named format switches for Word field codes
Choices for formatting fields in Word Mail Merge
Show field codes gaffe
Microsoft Office comes with a new Microsoft office 2016 following a variety of new features. This is a stable version. You can download and use it without any concerns — a bug-free ms office product unlike 2015
One thing you need to take into account is that MS office 2016 works only on Windows 10/8.1/XP.You can download Microsoft Office 2016 from the official website.
MS Office 2019 is good but people still use MS Office product key 2016. When you will be using office 2016 for free, here we are with the feature core MS office product 2016. Do not go anywhere and find the following active key.

How To Activate MS Product Key Office 2016?
You don’t have to look anywhere. Here’s the answer. Some product keys may not work on your computer. Check a single person one by one and share which one works for you in the following comment section.
List of Free Microsoft Office 2016 Product Key in 2020
In this list, we have shared the list of the working ms office product office key 2016 for free. All keys are tested and working still in 2020.
| Office 2016 License Key | Microsoft Word 2016 Product key | Microsoft Office 365 2016 Product key free |
| NKGG6-WBPCC-HXWMY-6DQGJ-CPQVG | R69KK-NTPKF-7M3Q4-QYBHW-6MT9B | PTD4T-F6MTH-B7G7Q-2QCX2-6Y829 |
| 9C2PK-NWTVB-JMPW8-BFT28-7FTBF | C2FG9-N6J68-H8BTJ-BW3QX-RM3B3 | NKGG6-WBPCC-HXWMY-6DQGJ-CPQVG |
| PD3PC-RHNGV-FXJ29-8JK7D-RJRJK | J484Y-4NKBF-W2HMG-DBMJC-PGWR7 | YG9NW-3K39V-2T3HJ-93F3Q-G83KT |
| YQMQM-9KV3J-97G7V-8CK38-346GW | YG9NW-3K39V-2T3HJ-93F3Q-G83KT | PD3PC-RHNGV-FXJ29-8JK7D-RJRJK |
| DR92N-9HTF2-97XKM-XW2WJ-XW3J6 | JNRGM-WHDWX-FJJG3-K47QV-DRTFM | J7MQP-HNJ4Y-WJ7YM-PFYGF-BY6C6 |
MS Office 2016 Key:
- ZAQ3W-SE4XT-FV6BY-8HUNI-J9DSM
- 6TFV7-BGY8H-UN9IJ-98NHU-BGKY7
- 8NHUB-GTFV6-DE4SW-4SEX5-DG1CR
MS Office Product Key Free:
- DR92N-9HTF2-97XKM-XW2WJ-XW3J
- J7MQP-HNJ4Y-WJ7YM-PFYGF-BY6C6
- R69KK-NTPKF-7M3Q4-QYBHW-6MT9B
- YG9NW-3K39V-2T3HJ-93F3Q-G83KT
- 869NQ-FJ69K-466HW-QYCP2-DDBV6
- 7WHWN-4T7MP-G96JF-G33KR-W8GF4
Product Key For Microsoft Office 2016:
- AE4SX-5CR6T-FV7BG-8YHUN-KY7GT
- 7B8HU-YGTFV-54WA4-ESXD5-FR6TF
- 6F5RD-E4S4A-ZWSXE-D5CRT-KFVGY
MS Office 2016 Serial Number:
- 7Y8UH-Y6T5S-W3E4X-DCR6T-KFV7B
- XDCRT-FV7BG-8YHUN-YTFVD-BVCSA
- Y8NHU-9HY7G-T6FD5-RS4WS-GJZE4
Office 2016 Product Key Full:
- D5RS4-WA3ZE-4SXTF-6V7BG-Y8MHU
- BGY78-HUNGY-7TFVD-5RSE4-KWA3Z
- N9UGY-7TFVE-S4WA3-ZE4SX-THFV6
Important Features of Microsoft Office Product:
- You can use it online or offline in both versions.
- This version has been made to be preferring with smartphones. That means you may have and revel in all that it has to provide in your telephones and tablets.
- You can get it on Playstore.
- Interestingly, it works with all others in advance features. That is, it can open all different varieties of Excel, PowerPoint, or documents created by an advanced version of it.
- Unlike previous variations, files created through this one are lots secured via the usage of the advanced protection features introduced to it.
Why You Need Microsoft Office Professional 2016 Product Key For Free
The product has a value and only permitted individuals to have access to its features. The product key for MS office 2016 is to do the same. It gives the user the right to access this unique office program functionality.
To make a copy of the licensed software or handle other licensing work, a genuine key is needed. The Microsoft 2016 Office ‘s security key is normally a single 25-digit character code key. Various keys are available with various products. This article mentioned some of the 100% working free activation keys of Microsoft Office 2016 Product Key which can be used for activation.
How To Activate The Latest Version Of The Version Of Microsoft Office 2016?
Microsoft Office is a paid-up program, so the advanced program features can only be accessed by paying people.
You have access rights to a Microsoft Office 2016 product key. To check and activate your Office 2016 copy, you need a genuine key during the installation process.
This page contains a large selection of product keys. Only pick and use one key. Try another one if it doesn’t work. It may have been seen by someone else.
However, you can use other methods to activate the ms office in 2016. Check out these methods and let me know.
Method 1: Internet
You can follow this method if you have a good internet connection. First of all, your product key will be checked by the software to determine whether it is genuine.
- Re-enter the product key.
- Wait for a while, the software will verify your product key.
- You’ll get an installation option.
Method 2: Phone
In this method, you need to call the Microsoft Activation Centre
- Look for the Microsoft product activation number on your product. Call on that number and it will connect you to the nearest Microsoft call center.
- They will provide you a confirmation id.
- Open your Microsoft Office in your PC and open the installation wizard.
- Select the telephonic method.
- Enter the confirmation id.
- Click on the installation option.
Conclusion
In this article, we tried our best to provide you with Microsoft Office 365 Version 2016 Product key for our readers if you need more keys then you can check out our website techdee.com. If any program does not work for you, please remember that you can mention your errors/mistake in the comment sections and we will help you out.

If you’re creating an article, instructional piece, or essay in Microsoft Word, you may need to include a snippet of code. Whether HTML, JavaScript, or Python, you likely want it to appear different than the document text.
There are a few ways to insert command or code blocks in your Word document. Depending on if you want the reader to simply view the code or have the ability to copy it, let’s walk through the options.
Option 1: Paste Special as HTML
One of the quickest ways to add code to your document is with the Paste Special option for HTML. This inserts the code you’ve copied without the other formatting of your document. And, this option allows your reader to copy the code or command straight from your document.
RELATED: How to Paste Text Without Formatting Almost Anywhere
Select the code or command from your application and copy it using the toolbar, the context menu, or the keyboard shortcut Ctrl+C on Windows or Command+C on Mac.

Place your cursor in your Word document where you want to paste it. Then go to the Home tab, click the Paste drop-down arrow, and choose Paste Special. Select “HTML Format” and click “OK.”
When the code appears in your document, you can format the font or the snippet if you like.
Use the Home tab to color specific pieces of code with the Font section of the ribbon. To add a border or shade, select the Borders drop-down arrow in the Paragraph section and pick “Borders and Shading.”
Option 2: Insert an Object
If you want to insert the code or command in your document only for the reader to see and not copy or edit, you can insert an object containing the snippet.
RELATED: How to Insert a Picture or Other Object in Microsoft Office
Go to the Insert tab, click the Object drop-down arrow, and pick “Object.”
On the Create New tab, select “OpenDocument Text” as the Object Type. Click “OK.”
A new Word document will open for you to insert your code or command. You can use the Paste Special HTML format described earlier if you like. After you add the snippet, close the document.
Your code then appears in your original Word document as an object. You can then move it, resize it, or add a border if you wish.
Option 3: Attach a Screenshot
Another option for adding your snippet as an item instead of text is using an image. If you have your code or command in an active application window like Notepad++ or Command Prompt, you can easily add it to your document. The drawbacks here are that the reader can’t easily copy your code if they need to and that resizing may negatively affect readability.
Go to the Insert tab and click the Screenshot drop-down arrow. You should see the application window as an option.
Select it and it’ll pop into your document as an image. You can then crop the image to remove the surrounding application window if you like.
Alternatively, you can use the Screen Clipping option in the Screenshot drop-down. When you select this tool, your cursor changes to a crosshair. Use it to drag the area of your screen or other application window you want to capture and release.
That image then appears in your document. You can move, resize, or customize the snippet screenshot like any other image in Word.
Option 4: Use a Syntax Highlighter
One more option is to use a syntax highlighter like Easy Syntax Highlighter. This is a free add-in for Microsoft Word that highlights your code for you including a background and colors for pieces of the code. Plus, you can customize the language and appearance.
RELATED: How to Install and Use Add-ins for Microsoft Office
After you install the add-in, place the code or command in your document. You can type or paste it, whichever you prefer.
Select the code and go to the Easy Syntax Highlighter tab that now displays. To apply the default formatting with the language automatically detected, select “Highlight Selection” in the ribbon.
You’ll see your snippet highlighted and your text formatted.
If you want to select a specific language or formatting, select “Settings” in the ribbon instead. When the sidebar opens, choose a Language and Theme.
With your code selected, click “Highlight Selection” in the sidebar.
You’ll then see your snippet formatted per the settings you picked. This keeps your code or command as text so your reader can copy it, but makes it stand out as its own block.
There’s more than one way to add a code or command block to your Word document. Depending on the purpose for your reader, choose the option that’s best for you!
READ NEXT
- › BLUETTI Slashed Hundreds off Its Best Power Stations for Easter Sale
- › How to Adjust and Change Discord Fonts
- › Google Chrome Is Getting Faster
- › Expand Your Tech Career Skills With Courses From Udemy
- › The New NVIDIA GeForce RTX 4070 Is Like an RTX 3080 for $599
- › Mozilla Wants Your Feature Suggestions for Thunderbird