
Skip to content
Simple Template
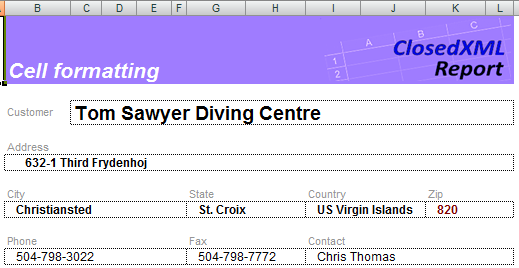
You can apply to cells any formatting including conditional formats.
The template: Simple.xlsx
The result file: Simple.xlsx
Sorting the Collection
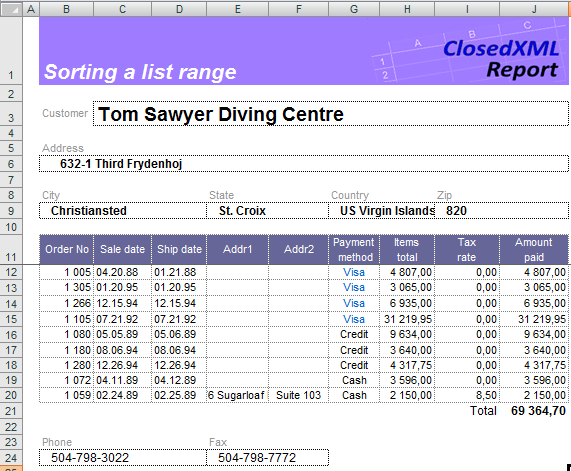
You can sort the collection by columns. Specify the tag <<sort>> in the options row of the corresponding columns. Add option desc to the tag if you wish the list to be sorted in the descending order (<<sort desc>>).
For more details look to the Sorting
The template: tLists1_sort.xlsx
The result file: tLists1_sort.xlsx
Totals
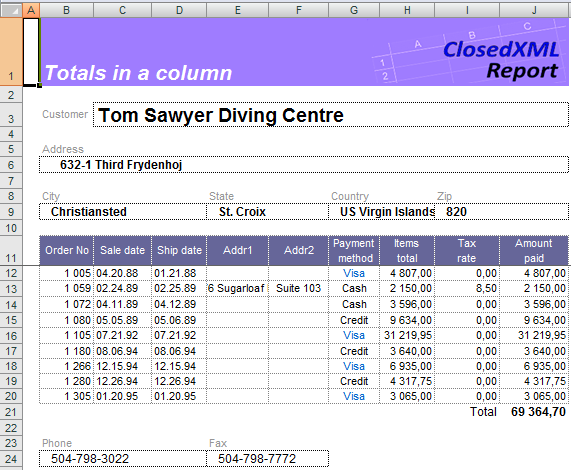
You can get the totals for the column in the ranges by specifying the tag in the options row of the corresponding column. In the example above we used tag <<sum>> in the column Amount paid.
For more details look to the Totals in a Column.
The template: tlists2_sum.xlsx
The result file: tlists2_sum.xlsx
Range and Column Options
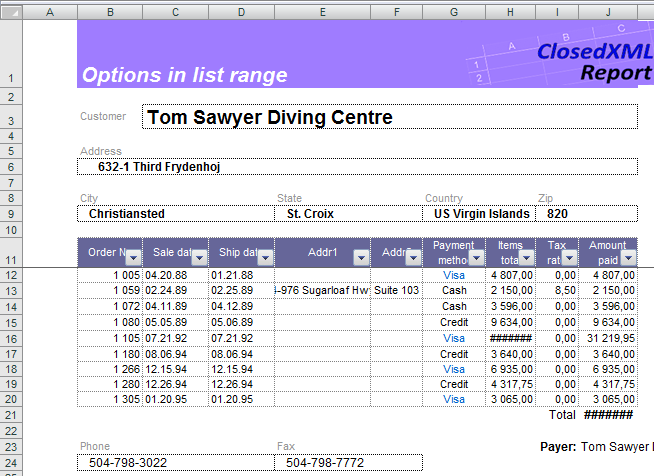
Besides specifying the data for the range ClosedXML.Report allows you to sort the data in the range, calculate totals, group values, etc. ClosedXML.Report performs these actions if it founds the range or column tags in the service row of the range.
For more details look to the Flat Tables
In the example above example we applied auto filters, specified that columns must be resized to fit contents, replaced Excel formulas with the static text and protected the “Amount paid” against the modification. For this, we used tags <<AutoFilter>>, <<ColsFit>>, <<OnlyValues>> and <<Protected>>.
The template: tLists3_options.xlsx
The result file: tLists3_options.xlsx
Complex Range
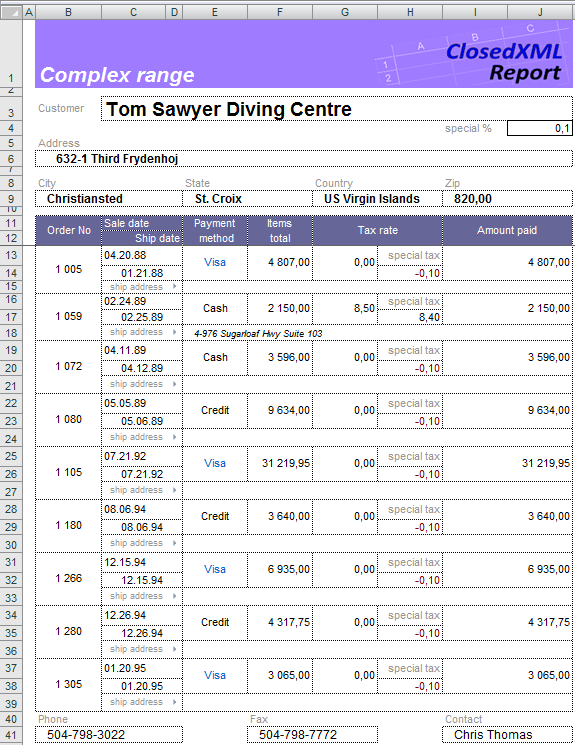
ClosedXML.Report can use multi-row templates for the table rows. You may apply any format you wish to the cells, merge them, use conditional formats, Excel formulas.
For more details look to the Flat Tables
The template: tLists4_complexRange.xlsx
The result file: tLists4_complexRange.xlsx
Grouping
The <<group>> tag may be used along with any of the aggregating tags. Put the tag <<group>> into the service row of those columns which you wish to use for aggregation.
For more details look to the Grouping
The template: GroupTagTests_Simple.xlsx
The result file: GroupTagTests_Simple.xlsx
Collapsed Groups
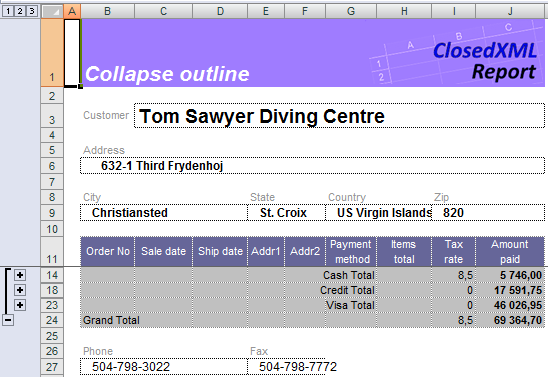
Use the parameter collapse of the group tag (<<group collapse>>) if you want to display only those rows that contain totals or captions of data sections.
For more details look to the Grouping
The template: GroupTagTests_Collapse.xlsx
The result file: GroupTagTests_Collapse.xlsx
Summary Above the Data
ClosedXML.Report implements the tag summaryabove that put the summary row above the grouped rows.
For more details look to the Grouping
The template: GroupTagTests_SummaryAbove.xlsx
The result file: GroupTagTests_SummaryAbove.xlsx
Merged Cells in Groups (option 1)
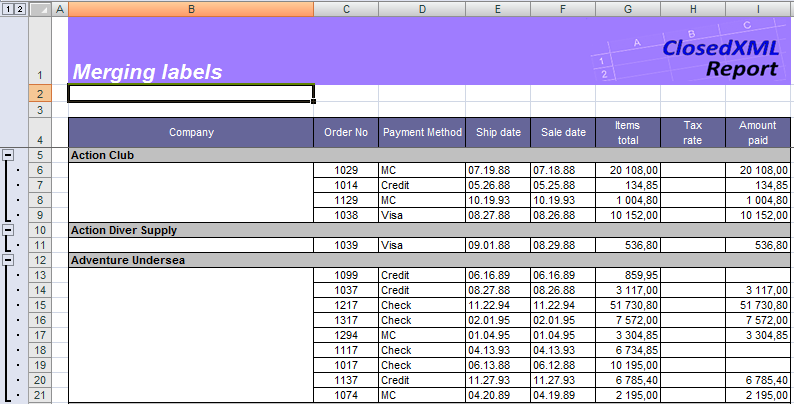
The <<group>> tag has options making it possible merge cells in the grouped column. To achieve this specify the parameter mergelabels in the group tag (<<group mergelabels>>).
For more details look to the Grouping
The template: GroupTagTests_MergeLabels.xlsx
The result file: GroupTagTests_MergeLabels.xlsx
Merged Cells in Groups (option 2)

Tag <<group>> allows to group cells without adding the group title. This function may be enabled by using parameter MergeLabels=Merge2 in the group tag (<<group MergeLabels=Merge2>>). Cells containing the grouped data are merged and filled with the group caption.
For more details look to the Grouping
The template: GroupTagTests_MergeLabels2.xlsx
The result file: GroupTagTests_MergeLabels2.xlsx
Nested Groups
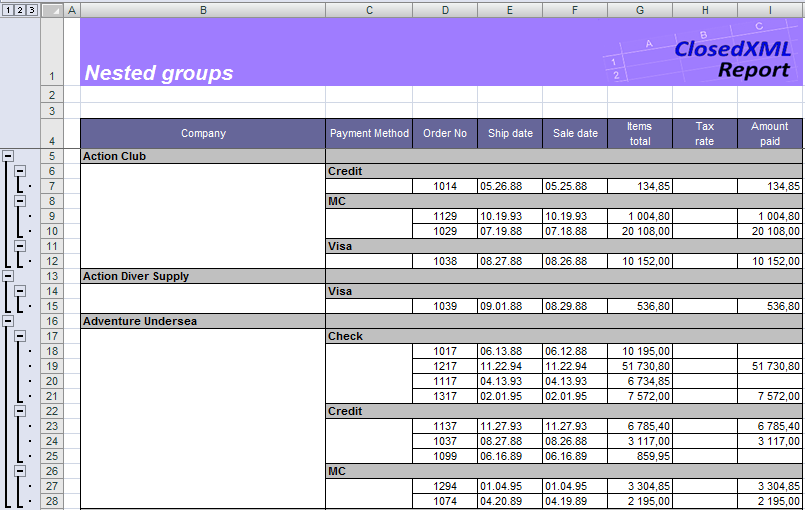
Ranges may be nested with no limitation on the depth of nesting.
For more details look to the Grouping
The template: GroupTagTests_NestedGroups.xlsx
The result file: GroupTagTests_NestedGroups.xlsx
Disable Groups Collapsing
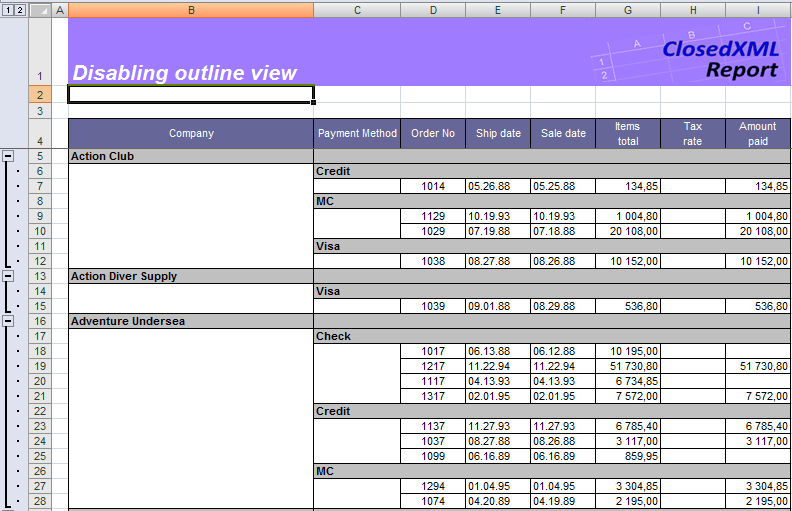
Use the option disableoutline of the group tag (<<group disableoutline>>) to prevent them from collapsing. In the example above the range is grouped by both Company and Payment method columns. Collapsing of groups for the Payment method column is disabled.
For more details look to the Grouping
The template: GroupTagTests_DisableOutline.xlsx
The result file: GroupTagTests_DisableOutline.xlsx
Specifying the Location of Group Captions
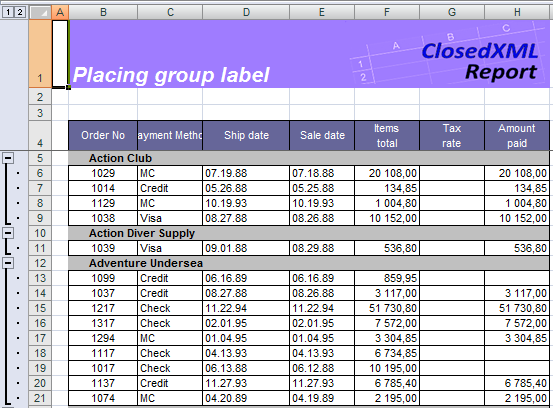
The <<group>> tag has a possibility to put the group caption in any column of the grouped range by using the parameter PLACETOCOLUMN=n where n defines the column number in the range. (starting from 1). Besides, ClosedXML.Report supports the <<delete>> tag that aims to specify columns to delete. In the example above the Company column is grouped with the option mergelabels. The group caption is placed to the second column (PLACETOCOLUMN=2). Finally, the Company column is removed.
For more details look to the Grouping
The template: GroupTagTests_PlaceToColumn.xlsx
The result file: GroupTagTests_PlaceToColumn.xlsx
Formulas in Group Line
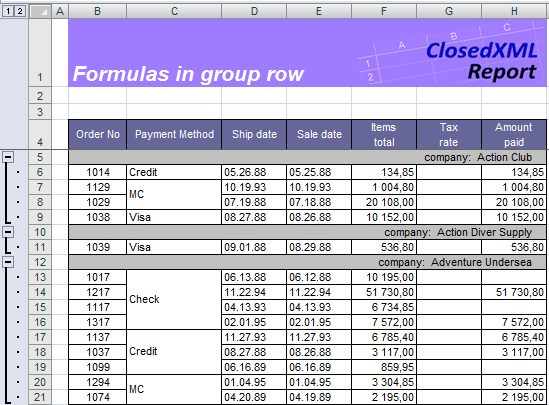
ClosedXML.Report saves the full text of cells in the service row, except tags. You can use this feature to specify Excel formulas in group captions. In the example above there is grouping by columns Company and Payment method. The Amount Paid column contains an Excel formula in the service row.
For more details look to the Grouping
The template: GroupTagTests_FormulasInGroupRow.xlsx
The result file: GroupTagTests_FormulasInGroupRow.xlsx
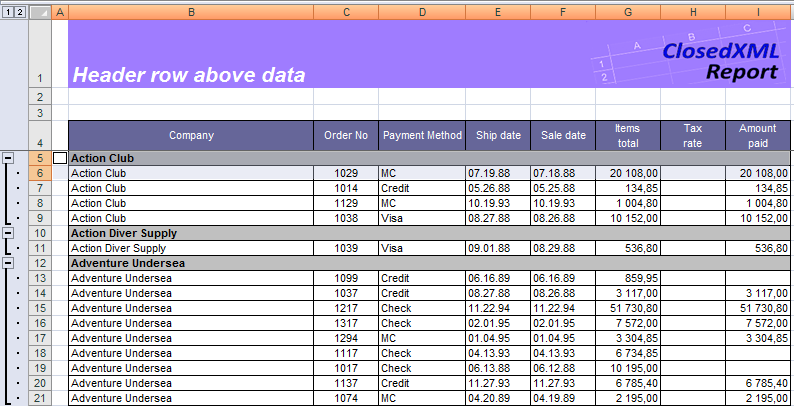
Groups with Captions

You can configure the appearance of the group caption by using the WITHHEADER parameter of the <<group>> tag. With this, the group caption is placed over the grouped rows. The SUMMARYABOVE does not change this behavior.
For more details look to the Grouping
The template: GroupTagTests_WithHeader.xlsx
The result file: GroupTagTests_WithHeader.xlsx
Nested Ranges
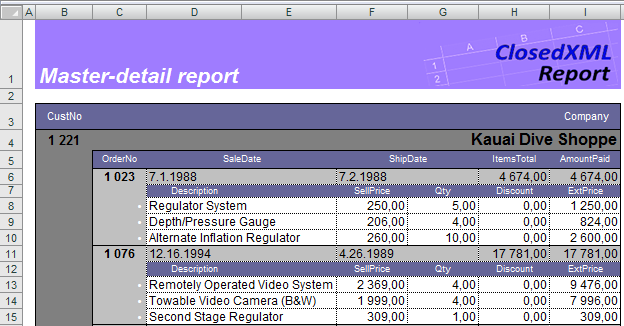
You can place one ranges inside the others in order to reflect the parent-child relation between entities. In the example above the Items range is nested into the Orders range which, in turn, is nested to the Customers range. Each of three ranges has its own header, and all have the same left and right boundary.
For more details look to the Nested ranges: Master-detail reports.
The template: Subranges_Simple_tMD1.xlsx
The result file: Subranges_Simple_tMD1.xlsx
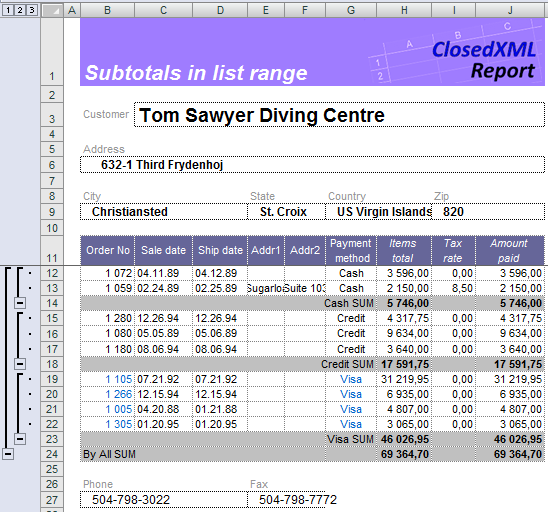
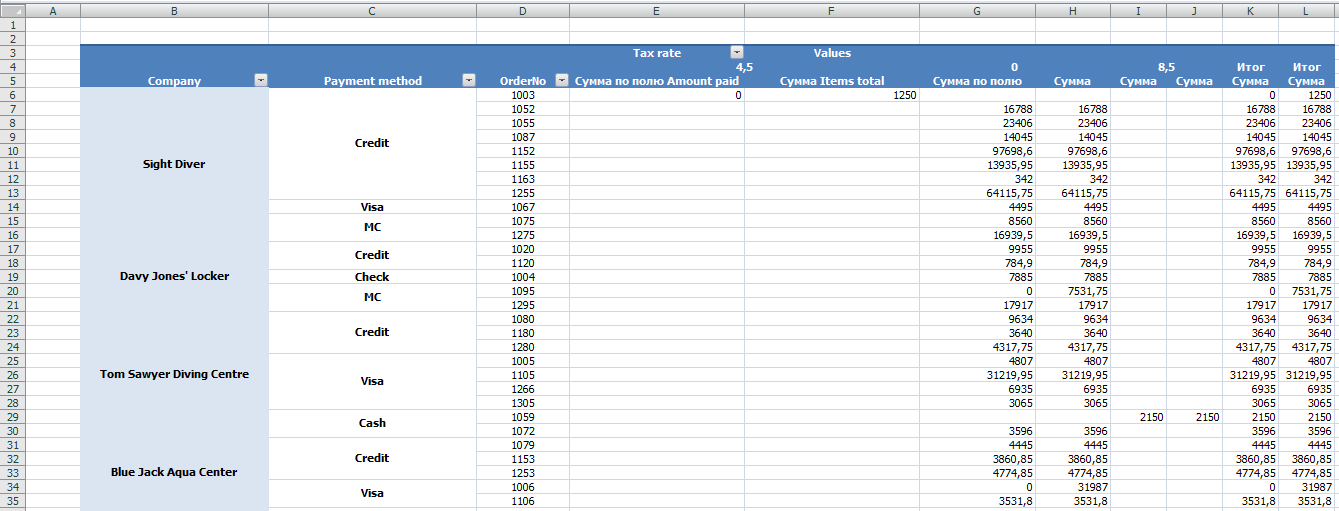
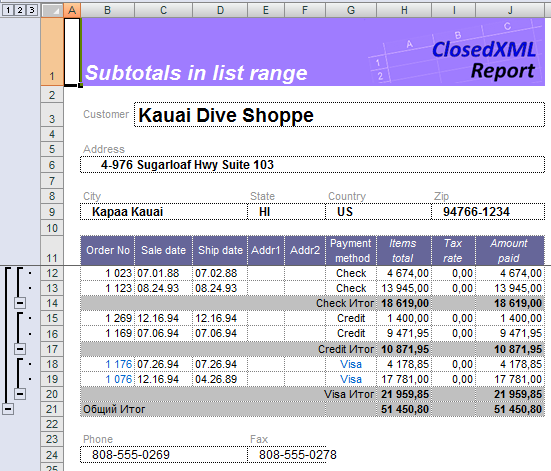
Nested Ranges with Subtotals
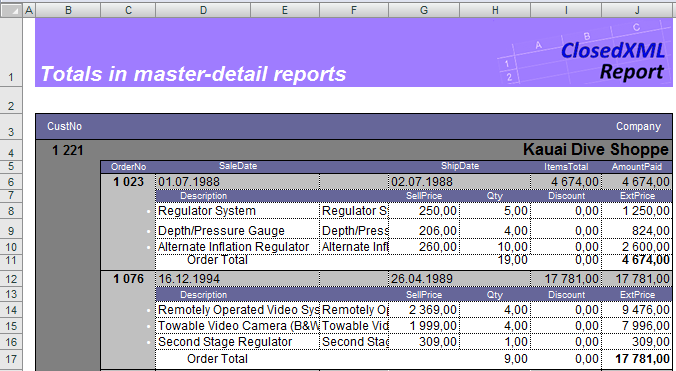
You may use aggregation tags at any level of your master-detail report. In the example above the <<sum>> tag in the I9 cell will summarize columns « in the scope of an order, while the same tag in the I10 cell will summarize all the data for each Customer.
For more details look to the Nested ranges: Master-detail reports.
The template: Subranges_WithSubtotals_tMD2.xlsx
The result file: Subranges_WithSubtotals_tMD2.xlsx
Nested Ranges with Sorting
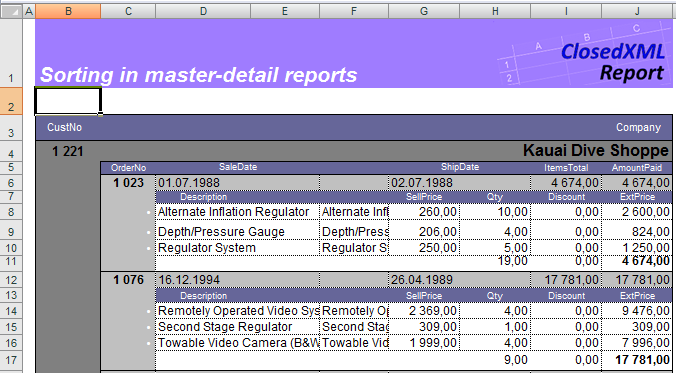
You can use the <<sort>> for the nested ranges as well.
For more details look to the Nested ranges: Master-detail reports.
The template: Subranges_WithSort_tMD3.xlsx
The result file: Subranges_WithSort_tMD3.xlsx
Pivot Tables
ClosedXML.Report support such a powerful tool for data analysis as pivot tables. You can define one or many pivot tables directly in the report template to benefit the power of the Excel pivot table constructor and nearly all the available features for they configuring and designing.
For more details look to the Pivot Tables.
The template: tPivot5_Static.xlsx
The result file: tPivot5_Static.xlsx
In this article I will explain with an example, how to read and import Excel file (Excel sheet) data to GridView using ClosedXml library in ASP.Net using C# and VB.Net.
Download DocumentFormat.OpenXml and ClosedXml Libraries
You can download the libraries using the following download locations.
Note: The DLL files of both OpenXml and ClosedXml are present in the attached sample.
HTML Markup
The following HTML Markup consists of an ASP.Net FileUpload control, a Button and a GridView.
<asp:FileUpload ID=»FileUpload1″ runat=»server» />
<asp:Button ID=»btnImport» runat=»server» Text=»Import» OnClick=»ImportExcel» />
<hr />
<asp:GridView ID=»GridView1″ runat=»server»>
</asp:GridView>
Namespaces
You will need to import the following namespaces.
C#
using System.IO;
using System.Data;
using System.Collections.Generic;
using ClosedXML.Excel;
VB.Net
Imports System.IO
Imports System.Data
Imports System.Collections.Generic
Imports ClosedXML.Excel
Read and Import Excel data to DataTable using ClosedXml
When the Import Button is clicked, the following event handler is executed. First the uploaded Excel file is saved to a folder named Files and then it is opened and read using ClosedXml WorkBook class object.
Then the instance of the first Sheet is determined and all the rows present in the Sheet are fetched.
Finally a loop is executed over the fetched rows and a DataTable is populated which is then bound to the GridView.
C#
protected void ImportExcel(object sender, EventArgs e)
{
//Save the uploaded Excel file.
string filePath = Server.MapPath(«~/Files/») + Path.GetFileName(FileUpload1.PostedFile.FileName);
FileUpload1.SaveAs(filePath);
//Open the Excel file using ClosedXML.
using (XLWorkbook workBook = new XLWorkbook(filePath))
{
//Read the first Sheet from Excel file.
IXLWorksheet workSheet = workBook.Worksheet(1);
//Create a new DataTable.
DataTable dt = new DataTable();
//Loop through the Worksheet rows.
bool firstRow = true;
foreach (IXLRow row in workSheet.Rows())
{
//Use the first row to add columns to DataTable.
if (firstRow)
{
foreach (IXLCell cell in row.Cells())
{
dt.Columns.Add(cell.Value.ToString());
}
firstRow = false;
}
else
{
//Add rows to DataTable.
dt.Rows.Add();
int i = 0;
foreach (IXLCell cell in row.Cells())
{
dt.Rows[dt.Rows.Count — 1][i] = cell.Value.ToString();
i++;
}
}
GridView1.DataSource = dt;
GridView1.DataBind();
}
}
}
VB.Net
Protected Sub ImportExcel(sender As Object, e As EventArgs)
‘Save the uploaded Excel file.
Dim filePath As String = Server.MapPath(«~/Files/») + Path.GetFileName(FileUpload1.PostedFile.FileName)
FileUpload1.SaveAs(filePath)
‘Open the Excel file using ClosedXML.
Using workBook As New XLWorkbook(filePath)
‘Read the first Sheet from Excel file.
Dim workSheet As IXLWorksheet = workBook.Worksheet(1)
‘Create a new DataTable.
Dim dt As New DataTable()
‘Loop through the Worksheet rows.
Dim firstRow As Boolean = True
For Each row As IXLRow In workSheet.Rows()
‘Use the first row to add columns to DataTable.
If firstRow Then
For Each cell As IXLCell In row.Cells()
dt.Columns.Add(cell.Value.ToString())
Next
firstRow = False
Else
‘Add rows to DataTable.
dt.Rows.Add()
Dim i As Integer = 0
For Each cell As IXLCell In row.Cells()
dt.Rows(dt.Rows.Count — 1)(i) = cell.Value.ToString()
i += 1
Next
End If
GridView1.DataSource = dt
GridView1.DataBind()
Next
End Using
End Sub
Screenshots
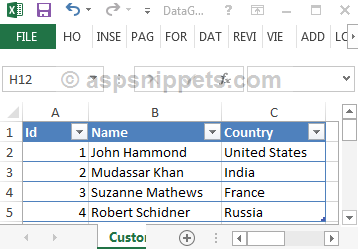
The Excel File
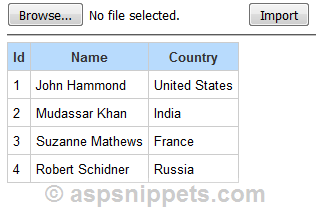
GridView displaying Excel data
Downloads
My Excel file is not in tabular data. I am trying to read from an excel file.
I have sections within my excel file that are tabular.
I need to loop through rows 3 to 20 which are tabular and read the data.
Here is party of my code:
     string fileName = "C:\Folder1\Prev.xlsx";
     var workbook = new XLWorkbook(fileName);
     var ws1 = workbook.Worksheet(1);
How do I loop through rows 3 to 20 and read columns 3,4, 6, 7, 8?
Also if a row is empty, how do I determine that so I can skip over it without reading that each column has a value for a given row.
![]()
Raidri
17.1k9 gold badges63 silver badges65 bronze badges
asked Apr 15, 2015 at 16:15
![]()
Nate PetNate Pet
43.6k122 gold badges267 silver badges407 bronze badges
To access a row:
var row = ws1.Row(3);
To check if the row is empty:
bool empty = row.IsEmpty();
To access a cell (column) in a row:
var cell = row.Cell(3);
To get the value from a cell:
object value = cell.Value;
// or
string value = cell.GetValue<string>();
For more information see the documentation.
answered Apr 16, 2015 at 10:15
![]()
6
Here’s my jam.
var rows = worksheet.RangeUsed().RowsUsed().Skip(1); // Skip header row
foreach (var row in rows)
{
    var rowNumber = row.RowNumber();
    // Process the row
}
If you just use .RowsUsed(), your range will contain a huge number of columns. Way more than are actually filled in!
So use .RangeUsed() first to limit the range. This will help you process the file faster!
You can also use .Skip(1) to skip over the column header row (if you have one).
answered May 4, 2018 at 20:56
![]()
JessJess
23.3k20 gold badges125 silver badges144 bronze badges
I’m not sure if this solution will solve OP’s problem but I prefer using RowsUsed method. It can be used to get the list of only those rows which are non-empty or has been edited by the user. This way I can avoid making emptiness check while processing each row.
Below code snippet can process 3rd to 20th row numbers out of all the non-empty rows. I’ve filtered the empty rows before starting the foreach loop. Please bear in mind that filtering the non-empty rows before starting to process the rows can affect the total count of rows which will get processed. So you need to be careful while applying any logic which is based on the total number of rows processed inside foreach loop.
string fileName = "C:\Folder1\Prev.xlsx";
using (var excelWorkbook = new XLWorkbook(fileName))
{
    var nonEmptyDataRows = excelWorkbook.Worksheet(1).RowsUsed();

    foreach (var dataRow in nonEmptyDataRows)
    {
       //for row number check
       if(dataRow.RowNumber() >=3 && dataRow.RowNumber() <= 20)
       {
           //to get column # 3's data
           var cell = dataRow.Cell(3).Value;
       }
    }
}
RowsUsed method is helpful in commonly faced problems which require processing the rows of an excel sheet.
answered Dec 1, 2017 at 9:17
![]()
RBTRBT
23.4k21 gold badges160 silver badges237 bronze badges
It works easily
 XLWorkbook workbook = new XLWorkbook(FilePath);
 var rowCount = workbook.Worksheet(1).LastRowUsed().RowNumber();
 var columnCount = workbook.Worksheet(1).LastColumnUsed().ColumnNumber();
 int column = 1;
 int row = 1;
 List<string> ll = new List<string>();
 while (row <= rowCount)
 {
      while (column <= columnCount)
      {
         string title = workbook.Worksheets.Worksheet(1).Cell(row, column).GetString();
                ll.Add(title);
                column++;
       }

 row++;
 column = 1;
}
answered Jul 20, 2022 at 18:11
![]()
SaeidSaeid
3463 silver badges8 bronze badges
In software applications, sometimes a user needs to export or import the data in Excel format in order to perform several operations. In this article, we will learn how to export and import an Excel file with ClosedXML package in ASP.NET MVC. ClosedXML is a .NET Library for writing and manipulating the Excel 2007+ files. It’s available free on GitHub to use for the commercial project. For more details, click here to view the license on GitHub.

Import or Read Excel File
Let’s begin!
Create a new empty ASP.NET MVC web project in Visual Studio and install the ClosedXML library from NuGet Package Manager.

After that, add an Empty Controller, i.e., HomeController in the project. Add the below code in the Controller.
- public ActionResult UploadExcel() {
- return View();
- }
- [HttpPost]
- public ActionResult UploadExcel(HttpPostedFileBase file)
- {
- DataTable dt = new DataTable();
- if (file != null && file.ContentLength>0 && System.IO.Path.GetExtension(file.FileName).ToLower()==«.xlsx») {
- string path = Path.Combine(Server.MapPath(«~/UploadFile»), Path.GetFileName(file.FileName));
- file.SaveAs(path);
- using (XLWorkbook workbook=new XLWorkbook(path)) {
- IXLWorksheet worksheet= workbook.Worksheet(1);
- bool FirstRow = true;
- string readRange = «1:1»;
- foreach (IXLRow row in worksheet.RowsUsed()) {
- if (FirstRow)
- {
- readRange = string.Format(«{0}:{1}», 1, row.LastCellUsed().Address.ColumnNumber);
- foreach (IXLCell cell in row.Cells(readRange)) {
- dt.Columns.Add(cell.Value.ToString());
- }
- FirstRow = false;
- }
- else {
- dt.Rows.Add();
- int cellIndex = 0;
- foreach (IXLCell cell in row.Cells(readRange))
- {
- dt.Rows[dt.Rows.Count — 1][cellIndex] = cell.Value.ToString();
- cellIndex++;
- }
- }
- }
- if (FirstRow) {
- ViewBag.Message = «Empty Excel File!»;
- }
- }
- }
- else
- {
- ViewBag.Message = «Please select file with .xlsx extension!»;
- }
- return View(dt);
- }
The GET action of «Upload Excel Action» will return a View as shown in the below image. And, in the POST action method, we are checking the file, its content length, and extension. We will show a message to the user if an incorrect file is uploaded with the help of ViewBag. In UploadExcel.cshtml View, we have added a file control with a Submit button so that we can post that file. For demonstration, we are reading the Excel file and writing its data in the DataTable (You can bind that with a list or model whatever fits with your project or as per your project requirement) and returning the DataTable to the View directly in order to show the content of the Excel document.

UploadExcel.cshtml code
- @using System.Data
- @model DataTable
- @{
- Layout = null;
- }
- <!DOCTYPE html>
- <html>
- <head>
- <meta name=«viewport» content=«width=device-width» />
- <title>ReadExcelFile</title>
- <style>
- table {
- border: 1px solid #000000;
- text-align: left;
- border-collapse: collapse;
- margin-top:20px;
- }
- table td, table th {
- border: 1px solid #000000;
- padding: 5px 4px;
- }
- table th {
- background-color: #5396d2;
- color:white;
- }
- </style>
- </head>
- <body>
- @using (Html.BeginForm(«UploadExcel», «Home», FormMethod.Post, new { enctype = «multipart/form-data» }))
- {
- <div>
- <label>Upload File:</label>
- <input type=«file» id=«file» name=«file» />
- <input type=«submit» value=«Upload File» />
- </div>
- <!—Display Error Message—>
- <div style=«color:red;»>@ViewBag.Message</div>
- <!—Show the Data Table on the View after reading the Excel File—>
- if (Model != null)
- {
- <table>
- <tr>
- @for (int i = 0; i < Model.Columns.Count; i++)
- {
- <th>@Model.Columns[i].ColumnName</th>
- }
- </tr>
- @for (int i = 0; i < Model.Rows.Count; i++)
- {
- <tr>
- @for (int j = 0; j < Model.Columns.Count; j++)
- {
- <td>@Model.Rows[i][j]</td>
- }
- </tr>
- }
- </table>
- }
- <div>
- </div>
- }
- </body>
- </html>
Let’s run the application and upload an Excel file.
Preview
Let’s upload an empty file or file other than Excel. Then, we will get the below messages on View.

Export Data to Excel with ClosedXML
Let’s add another action for demonstration, i.e., WriteDataToExcel() in HomeController. I have created a GetData method which will return some dummy data in the DataTable. I have mentioned the name of the Data Table which will be shown as the Excel worksheet name. In a real project, that might be coming from the Business Layer. Then, we are creating an XLWorkbook object and adding Data Table in the worksheet. After that, we are saving the file as a memory stream and returning the file to the user.
- public DataTable getData() {
- DataTable dt = new DataTable();
- dt.TableName = «EmployeeData»;
- dt.Columns.Add(«ID», typeof(int));
- dt.Columns.Add(«Name», typeof(string));
- dt.Columns.Add(«City», typeof(string));
- dt.Rows.Add(1, «Anoop Kumar Sharma», «Delhi»);
- dt.Rows.Add(2, «Andrew», «U.P.»);
- dt.AcceptChanges();
- return dt;
- }
- public ActionResult WriteDataToExcel()
- {
- DataTable dt = getData();
- string fileName = «Sample.xlsx»;
- using (XLWorkbook wb = new XLWorkbook())
- {
- wb.Worksheets.Add(dt);
- using (MemoryStream stream = new MemoryStream())
- {
- wb.SaveAs(stream);
- return File(stream.ToArray(), «application/vnd.openxmlformats-officedocument.spreadsheetml.sheet», fileName);
- }
- }
- }
Let’s run the application and hit the WriteDataToExcel action method. An Excel file named as Sample will be downloaded.

Hope this will help you.
Thanks.
Содержание
- Примеры шаблонов
- Простой шаблон
- Сортировка списка
- Итоги по столбцам
- Опции списка и колонок
- Сложный диапазон
- Группировка списка
- Схлопнутые группы
- Заголовки над данными
- Объединение заголовков (вариант 1)
- Объединение заголовков (вариант 2)
- Вложенные группы
- Отключенное схлопывание групп
- Размещение заголовка группы
- Формулы в строке группы
- Группировка с заголовками
- Вложенные области
- Вложенные области с итогами
- Вложенные области с внутренней сортировкой
- Быстрый старт
- Установка ClosedXML.Report через NuGet
- Особенности
- Как использовать?
- C# Excel
- Advertisements Excel xlsx
- ClosedXML
- Advertisements C# Excel simple example
- C# Excel cell
- Advertisements C# read Excel file
- C# Excel apply style
- Advertisements C# Excel ranges
- C# Excel merge cells
- Advertisements C# Excel sorting
- Advertisements C# Excel CellsUsed
- Advertisements C# Excel expression evaluation
- Advertisements C# Excel formula
- Report examples
- Simple Template
- Sorting the Collection
- Totals
- Range and Column Options
- Complex Range
- Grouping
- Collapsed Groups
- Summary Above the Data
- Merged Cells in Groups (option 1)
- Merged Cells in Groups (option 2)
- Nested Groups
- Disable Groups Collapsing
- Specifying the Location of Group Captions
- Formulas in Group Line
- Groups with Captions
- Nested Ranges
- Nested Ranges with Subtotals
- Nested Ranges with Sorting
Примеры шаблонов
Простой шаблон
Вы можете применять к ячейкам любое форматирование, включая условные форматы.
Сортировка списка
Вы можете отсортировать список по столбцам. Просто укажите тэг > в ячейках опций соответствующих столбцов. Чтобы отсортировать в порядке убывания, добавьте опцию «Desc» в параметр тэга сортировки ( > ).
Подробнее смотрите раздел Сортировка данных
Итоги по столбцам
Вы можете получить итоговые значения для столбца диапазона, указав соответствующий параметр в ячейке опции столбца. В этом примере мы использовали тэг > в строке опций списка для колонки Amount paid.
Подробнее смотрите раздел Подитоги по столбцам.
Опции списка и колонок
Помимо передачи данных из набора данных в диапазон, ClosedXML.Report может сортировать диапазон, составлять итоговые значения, группировать диапазон и так далее. Эти действия выполняются ClosedXML.Report, если он находит тэги диапазона и тэги столбца в соответствующих ячейках.
Подробнее смотрите раздел Плоские таблицы
В этом примере мы выравняли колонки по содержимому, добавили фильтры в заголовок таблицы, заменили формулы на значения и защитили колонку Amount paid от изменения. Для этого мы использовали тэги: , > , > и .
Сложный диапазон
ClosedXML.Report способен использовать многострочные шаблоны для строки таблицы. Вы можете произвольным образом форматировать ячейки, объединять их, использовать условное форматирование, формулы Excel.
Подробнее смотрите раздел Плоские таблицы
Группировка списка
С тэгом > могут использоваться все тэги суммирования. Укажите опцию > в ячейках опций столбцов, где вы хотите получить промежуточные итоги.
Подробнее смотрите раздел Группировка
Схлопнутые группы
Используйте параметр collapse тэга group ( > ), если вы хотите быстро отображать только строки, которые содержат сводки или заголовки для разделов вашего листа.
Подробнее смотрите раздел Группировка
Заголовки над данными
ClosedXML.Report реализует тэг SUMMARYABOVE. Он помещает строку итогов над сгруппированными данными.
Подробнее смотрите раздел Группировка
Объединение заголовков (вариант 1)
Тэг > позволяет объединять ячейки в сгруппированном столбце. Эта функция доступна с помощью параметра ‘mergelabels’ тэга > .
Подробнее смотрите раздел Группировка
Объединение заголовков (вариант 2)
Тэг > позволяет группировать данные без вставки строки заголовка группы. Эта функция доступна с помощью параметра ‘MergeLabels=Merge2’ тэга > . Ячейки, содержащие сгруппированные данные, объединяются, а ячейка результата содержит сгруппированное значение.
Подробнее смотрите раздел Группировка
Вложенные группы
Списки могут быть сгруппированы с любым уровнем вложенности.
Подробнее смотрите раздел Группировка
Отключенное схлопывание групп
Используйте параметр disableoutline тэга > чтобы отключить схлопывание групп. В этом примере диапазон группируется по колонке Company и Payment method. Схлопывание групп столбца Payment method отключено.
Подробнее смотрите раздел Группировка
Размещение заголовка группы
Тэг > позволяет размещать заголовок группы в любой столбец сгруппированного диапазона с помощью параметра PLACETOCOLUMN=n , где n — номер столбца в диапазоне (начиная с 1). Так же ClosedXML.Report содержит тэг > , позволяющий удалить столбец или строку. В примере группировка выполняется по колонке Company с использованием параметра mergelabels . Заголовок группы столбца Company помещается во второй столбец диапазона (параметр PLACETOCOLUMN=2 ). Затем удаляется столбец Company.
Подробнее смотрите раздел Группировка
Формулы в строке группы
ClosedXML.Report сохраняет весь текст в ячейках строки параметров, если он не распознаёт его тэгом. Используйте эту возможность для размещения формул Excel в строке параметров. В примере выполняется группировка по полю Company и Payment method. В ячейке опций столбца Amount Paid есть формула Excel.
Подробнее смотрите раздел Группировка
Группировка с заголовками
Вы можете настроить отображение заголовка группы с помощью параметра WITHHEADER тэга > . В этом случае заголовок группы помещается над сгруппированными данными и сводной строкой ниже данных. Параметр SUMMARYABOVE не влияет на это размещение.
Подробнее смотрите раздел Группировка
Вложенные области
Вы можете вложить диапазон в другой диапазон, отражающий таким образом подчиненные отношения ваших данных. В примере диапазон Items вложен в Orders, а последний — в Customers. Все три диапазона имеют собственную строку параметров плюс ту же левую границу и ту же ширину.
Вложенные области с итогами
Вы можете использовать тэги суммирования на каждом уровне вложенности в отчете master-detail. В примере тэг > в ячейке I9 будет суммировать ячейки « по заказу, в то время как тот же тэг в ячейке I10 суммирует эти ячейки по поставщику.
Вложенные области с внутренней сортировкой
Вы можете использовать тэг > в самом внутреннем диапазоне.
Источник
Быстрый старт
ClosedXML.Report — это инструмент для создания отчетов и анализа данных в приложениях .NET с использованием Microsoft Excel. Это .NET-библиотека для создания отчетов Microsoft Excel, не требующая установки Excel на машине, на которой выполняется код. С помощью ClosedXML.Report вы можете легко экспортировать любые данные из ваших классов .NET в Excel с помощью XLSX-шаблона.
Установка ClosedXML.Report через NuGet
Если вы хотите включить ClosedXML.Report в свой проект, вы можете установить его непосредственно из NuGet
Чтобы установить ClosedXML.Report, запустите следующую команду в консоли диспетчера пакетов
или если у вас подписанная сборка то:
Особенности
- Копирование форматирования ячеек
- Копирование условного форматирования
- Вертикальные и горизонтальные таблицы
- Возможность применения формул Excel
- Использование динамически рассчитываемых формул с синтаксисом C# и Linq
- Операции с табличными данными: сортировка, группировка, общие функции.
- Сводные таблицы
- Контроль за построением отчёта с помощью управляющих тэгов
- Вложенные области (master-detail)
Как использовать?
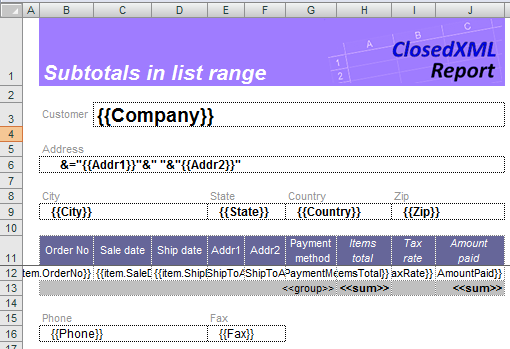
Чтобы создать отчет, вы должны сначала создать шаблон отчета. Вы можете применить любое форматирование к ячейкам рабочей книги, вставить изображения и изменить любой из параметров самой книги. В этом примере мы отключили отображение нулевых значений и спрятали линии сетки. ClosedXML.Report сохранит все изменения в шаблоне.
Template
Code
Result
Для получения дополнительной информации см. Документация и Тесты
Источник
C# Excel
last modified January 4, 2023
C# Excel tutorial shows how to work with Excel files in C# with ClosedXML library.
Advertisements Excel xlsx
In this article we work with xlsx files. The xlsx is a file extension for an open XML spreadsheet file format used by Microsoft Excel. The xlsm files support macros. The xltm are macro-enabled template files. The xls format is a proprietary binary format while xlsx is based on Office Open XML format.
ClosedXML
ClosedXML is a .NET library for reading, manipulating and writing Excel 2007+ (.xlsx, .xlsm) files.
We add the package to the project.
Advertisements C# Excel simple example
In the first example, we create a new xlsx file with ClosedXML.
We create a new Excel file and write a value to a cell.
A new XLWorkbook is created.
We add a new sheet to the workbook.
A value is written to cell with A1 address.
The workbook is saved with the SaveAs method.
C# Excel cell
A cell is an intersection of a row and a column. Each cell has a unique address made up of its column letter and row number. For instance, the first cell located in the upper-left corner of a sheet has address A1.
In the example, we work with cells.
The FirstCell retrieves the reference to the first cell in the sheet. We set its value to 150 using the Value property.
Another way to reference a cell is used an overloaded Cell method, which takes the row and column numbers as parameters.
Here, we get a cell via its address (A6), and use the SetValue method to write a string to the cell. The SetActive method makes the cell active.
We adjust the width of the second column to the contents; the Hello there! value is fully visible.
Advertisements C# read Excel file
In the next example, we read from the previously created Excel file.
The example reads a value from a cell.
We open a workbook.
We navigate to the first sheet.
Using the GetValue method, we read a value from cell A1.
C# Excel apply style
A style can be applied via the Style property.
In the example, apply styles to cells.
We set the widths of A and B columns.
In the A3 cell, we center the text horizontally and vertically and choose a cursive font.
We set a thin border for B2 cell.
In cell B5, the font color is set to red.
Advertisements C# Excel ranges
A range is a group of one or more cells. A range address is specified with a upper-left cell address and a lower-bottom address, separated by a colon.
A single range is created with Range ; multiple ranges are created with Ranges .
In the example, we work with ranges.
We change the background colour for D2:E2 range.
Here, we change the background colour for two ranges.
In each cell of the C10:E15 range, we set a random value. We use the Cells method to get the cells of the range.
We adjust the width of the column C to the written contents so that the whole value is visible.
C# Excel merge cells
To merge cells, we use the Merge method.
We merge four cells into one.
We call the Merge method on a range of four cells; A1 through B2.
Advertisements C# Excel sorting
A column can be sorted with the Sort method.
We add fifteen random values to the A column. Then we sort the column with Sort .
Advertisements C# Excel CellsUsed
The CellsUsed method returns a collection of cells that have a value.
In the example, we write twelve words to two columns of a sheet.
We define a range that is larger than the cells we have written to. With the help of the CellsUsed method, we get all non-empty cells. The Count method counts the number of non-empty cells.
Here we filter all words that have three latin letters.
Advertisements C# Excel expression evaluation
With Evaluate , we can evaluate an expression.
In the example, we have values in the A column. We evaluate SUM and MAX expressions on the values.
Advertisements C# Excel formula
With the FormulaA1 property, we can insert a formula in the cell.
In the example, we insert the SUM formula in the cell below the values.
In this article, we have demonstrated how to work with Excel files with C# using ClosedXMLlibrary.
Источник
Report examples
Simple Template
You can apply to cells any formatting including conditional formats.
Sorting the Collection
You can sort the collection by columns. Specify the tag > in the options row of the corresponding columns. Add option desc to the tag if you wish the list to be sorted in the descending order ( > ).
For more details look to the Sorting
Totals
You can get the totals for the column in the ranges by specifying the tag in the options row of the corresponding column. In the example above we used tag > in the column Amount paid.
For more details look to the Totals in a Column.
Range and Column Options
Besides specifying the data for the range ClosedXML.Report allows you to sort the data in the range, calculate totals, group values, etc. ClosedXML.Report performs these actions if it founds the range or column tags in the service row of the range.
For more details look to the Flat Tables
In the example above example we applied auto filters, specified that columns must be resized to fit contents, replaced Excel formulas with the static text and protected the “Amount paid” against the modification. For this, we used tags , > , > and .
Complex Range
ClosedXML.Report can use multi-row templates for the table rows. You may apply any format you wish to the cells, merge them, use conditional formats, Excel formulas.
For more details look to the Flat Tables
Grouping
The > tag may be used along with any of the aggregating tags. Put the tag > into the service row of those columns which you wish to use for aggregation.
For more details look to the Grouping
Collapsed Groups
Use the parameter collapse of the group tag ( > ) if you want to display only those rows that contain totals or captions of data sections.
For more details look to the Grouping
Summary Above the Data
ClosedXML.Report implements the tag summaryabove that put the summary row above the grouped rows.
For more details look to the Grouping
Merged Cells in Groups (option 1)
The > tag has options making it possible merge cells in the grouped column. To achieve this specify the parameter mergelabels in the group tag ( > ).
For more details look to the Grouping
Merged Cells in Groups (option 2)
Tag > allows to group cells without adding the group title. This function may be enabled by using parameter MergeLabels=Merge2 in the group tag ( > ). Cells containing the grouped data are merged and filled with the group caption.
For more details look to the Grouping
Nested Groups
Ranges may be nested with no limitation on the depth of nesting.
For more details look to the Grouping
Disable Groups Collapsing
Use the option disableoutline of the group tag ( > ) to prevent them from collapsing. In the example above the range is grouped by both Company and Payment method columns. Collapsing of groups for the Payment method column is disabled.
For more details look to the Grouping
Specifying the Location of Group Captions
The > tag has a possibility to put the group caption in any column of the grouped range by using the parameter PLACETOCOLUMN=n where n defines the column number in the range. (starting from 1). Besides, ClosedXML.Report supports the > tag that aims to specify columns to delete. In the example above the Company column is grouped with the option mergelabels . The group caption is placed to the second column ( PLACETOCOLUMN=2 ). Finally, the Company column is removed.
For more details look to the Grouping
Formulas in Group Line
ClosedXML.Report saves the full text of cells in the service row, except tags. You can use this feature to specify Excel formulas in group captions. In the example above there is grouping by columns Company and Payment method. The Amount Paid column contains an Excel formula in the service row.
For more details look to the Grouping
Groups with Captions
You can configure the appearance of the group caption by using the WITHHEADER parameter of the > tag. With this, the group caption is placed over the grouped rows. The SUMMARYABOVE does not change this behavior.
For more details look to the Grouping
Nested Ranges
You can place one ranges inside the others in order to reflect the parent-child relation between entities. In the example above the Items range is nested into the Orders range which, in turn, is nested to the Customers range. Each of three ranges has its own header, and all have the same left and right boundary.
Nested Ranges with Subtotals
You may use aggregation tags at any level of your master-detail report. In the example above the > tag in the I9 cell will summarize columns « in the scope of an order, while the same tag in the I10 cell will summarize all the data for each Customer.
Nested Ranges with Sorting
You can use the > for the nested ranges as well.
Источник
In this article we will discuss how to Read or Import Excel file data into C# DataTable. For this example we will be using the ClosedXML .NET library.
What is ClosedXML?
ClosedXML is .NET library which is used for manipulating and writing the 2007+ Excel files. The ClosedXML library is available for free on GitHub.
Read and Import Excel Data to DataTable using ClosedXML
I will be using a windows forms application for this example. On button click the excel file data will be read, imported to DataTable and will bind the same DataTable to GridView. I have a sample excel file with dummy data at location “D:ClosedXML”


Add ClosedXML NuGet Package
Got to Tools > NuGet Package Manager > Package Manager Console and run the below command
Install-Package ClosedXML -Version 0.96.0
![]()
C# Code
Import below namespace
using ClosedXML.Excel;
        private void btnImport_Click(object sender, EventArgs e)
        {
            using (XLWorkbook workBook = new XLWorkbook(@"D:ClosedXMLSampleData.xlsx"))
            {
                //Read the first Sheet from Excel file.
                //Here SalesOrders is the Work Sheet Name.
                IXLWorksheet workSheet = workBook.Worksheet("SalesOrders");

                //Creating a new datatable
                DataTable dt = new DataTable();

                //Looping through the Worksheet rows.
                bool firstRow = true;

                foreach (IXLRow row in workSheet.Rows())
                {
                    //Using the first row to add columns names to DataTable.
                    if (firstRow)
                    {
                        foreach (IXLCell cell in row.Cells())
                        {
                            dt.Columns.Add(cell.Value.ToString());
                        }
                        firstRow = false;
                    }
                    else
                    {
                        //Adding rows to DataTable.
                        dt.Rows.Add();
                        int i = 0;
                        foreach (IXLCell cell in row.Cells())
                        {
                            dt.Rows[dt.Rows.Count - 1][i] = cell.Value.ToString();
                            i++;
                        }
                    }
                }

                //Bind DataTable to DataGridView

                dgvData.DataSource = dt;
            }
        }
Demo

Wrapping Up
I hope, this blog post has helped you in learning and understanding how to read or import excel file data in C# datatable.
Don’t forget to check out: Generate QR Code in Asp.net Core with 4 Simple Steps
Thank You.
ClosedXML is a .NET library for reading, manipulating and writing Excel files. ClosedXML is a fine library for exporting data to Excel. It is very simple to use and fast enough for smaller sets of data.
Firstly you have to add reference to ClosedXML. Install ClosedXML using NuGet Package Manager.

Using ClosedXML you can set specific cell values, you can insert data from DataTable or from some other collection.
Here, I am going to export a collection of student data to excel.
HomeController.cs
 public class HomeController : Controller
    {
        public ActionResult StudentDetail()
        {
            return View();
        }

        public FileResult ExportToExcel()
        {
            StudentViewModel studentViewModel = new StudentViewModel();
            List<StudentViewModel> studentList= studentViewModel.GetStudentsDetails();
            List<string[]> titles = new List<string[]> { new string[] { "FirstName", "LastName", "RegNumber", "Class" } };
            byte[] fileStream = studentViewModel.ExportToExcel(studentList, "StudentList", titles);
            string mimeType = "application/vnd.openxmlformats-officedocument.spreadsheetml.sheet";
            Response.AppendHeader("Content-Disposition", "inline; filename=" + "StudentList.xlsx");

            return File(fileStream, mimeType);
        }
    }
StudentViewModel.cs
using ClosedXML.Excel;
using System;
using System.Collections.Generic;
using System.IO;
using System.Linq;
using System.Web;

namespace ExportExcelTest.Models
{
    public class StudentViewModel
    {
        #region constructor
        public StudentViewModel()
        {

        }
        #endregion

        #region Properties
        public string FirstName { get; set; }
        public string LastName { get; set; }
        public int RegNumber { get; set; }
        public string Class { get; set; }
        #endregion

        #region PublicMethods
        public List<StudentViewModel> GetStudentsDetails()
        {
            List<StudentViewModel> studentList = new List<StudentViewModel>();
            StudentViewModel student1 = new StudentViewModel
            {
                FirstName = "Kriti",
                LastName = "Mahesh",
                RegNumber = 100156,
                Class = "5th",
            };
            studentList.Add(student1);
            StudentViewModel student2 = new StudentViewModel
            {
                FirstName = "Joyel",
                LastName = "Evelyn",
                RegNumber = 100157,
                Class = "5th",
            };
            studentList.Add(student2);
            StudentViewModel student3 = new StudentViewModel
            {
                FirstName = "Aarushi",
                LastName = "Siva",
                RegNumber = 100158,
                Class = "5th",
            };
            studentList.Add(student3);
            StudentViewModel student4 = new StudentViewModel
            {
                FirstName = "Ira",
                LastName = "Charvi",
                RegNumber = 100159,
                Class = "5th",
            };
            studentList.Add(student4);
            return studentList;
        }
        public byte[] ExportToExcel(List<StudentViewModel> studentList, string worksheetTitle, List<string[]> titles)
        {
            var wb = new XLWorkbook(); //create workbook
            var ws = wb.Worksheets.Add(worksheetTitle); //add worksheet to workbook

            var rangeTitle = ws.Cell(1, 1).InsertData(titles); //insert titles to first row
            rangeTitle.AddToNamed("Titles");
            var titlesStyle = wb.Style;
            titlesStyle.Font.Bold = true; //font must be bold

            // titlesStyle.Alignment.Horizontal = XLAlignmentHorizontalValues.Center; //align text to center


            wb.NamedRanges.NamedRange("Titles").Ranges.Style = titlesStyle; //attach style to the range

            if (studentList != null && studentList.Count() > 0)
            {
                //insert data to from second row on
                ws.Cell(2, 1).InsertData(studentList);
                ws.Columns().AdjustToContents();
            }

            //save file to memory stream and return it as byte array
            using (var ms = new MemoryStream())
            {
                wb.SaveAs(ms);

                return ms.ToArray();
            }

        }
        #endregion
    }
}
When the Import Button is clicked, ExportToExcel Action Method will execute. First it creates object of StudentViewModel and It calls GetStudentsDetails() method. GetStudentsDetails method returns the list of objects (StudentList). Next it calls ExportToExcel method with a set of parameters (StudentList , ExcelWorkSheetTitle and Custom column names). Then the StudentList is added to the Worksheets collection of the ClosedXML’s XLWorkbook object.
Then XLWorkbook object is saved to a MemoryStream object which then is converted to Byte Array and exported and downloaded as Excel file using the File function.
Output

Thanks 🙂