
Home / VBA / VBA Close Workbook (Excel File)
To close an Excel file, you need to use the “Close” method. With this method you can, specify if you want to save the changes or not. And, if you want to save and close a file that is not saved yet you can specify the path where you want to save it before closing.
The following is the syntax for the close method.
Workbook.Close (SaveChanges, FileName, RouteWorkbook)
Steps to Close a Workbook
- Specify the workbook that you want to close.
- Use the close method with that workbook.
- In the code method, specify if you want to save the file or not.
- In the end, mention the location path where you want to save the file before closing.
In this tutorial, we will look at different ways that you can use to close a workbook in Excel using VBA.
Helpful Links: Run a Macro – Macro Recorder – Visual Basic Editor – Personal Macro Workbook
Close a Workbook without Saving
If you want to save the active workbook without saving you need to use code like the following.
ActiveWorkbook.Close SaveChanges:=FalseIn this code, I have specified the “False” for the “SaveChanges” argument. So VBA will ignore if there are any changes in the workbook which are not saved. And if you want to close a specific workbook you can use the name of that workbook. Just like the following code.
Workbooks("book1").Close SaveChanges:=FalseIf you have data in the workbook and you skip the “SaveChanges” argument, then Excel will show a dialog box to confirm if you want to save the workbook or not. The point is: It is better to specify the “SaveChanges” argument even if it’s optional.
Close a Workbook after Saving
As you have seen, there’s an argument in the CLOSE method to specify the path location. Let’s say if you wish to save the “Book6” to the folder on the desktop. Here’s the code that you need to use.
Workbooks("Book6").Close _
SaveChanges:=True, _
Filename:="C:UsersDellDesktopmyFoldermyFile.xlsx"
This code is going to save the workbook “Book6” into the folder that is saved on my desktop with the name “myFIle.xlsx”. But here’s one thing that you need to take care of: IF you already have a workbook with the same name then it will replace that file with the new one.
Don’t worry, there’s a solution that you can use. The following code checks if there’s any file exists with the name that you want to use
Sub vba_close_workbook()
Dim wbCheck As String
wbCheck = Dir("C:UsersDellDesktopmyFoldermyFile.xlsx")
If wbCheck = "" Then
    Workbooks("Book6").Close _
    SaveChanges:=True, _
    Filename:="C:UsersDellDesktopmyFoldermyFile.xlsx"
Else
    MsgBox "Error! Name already used."
End If
End Sub
More on VBA Workbooks
VBA Save Workbook | VBA Delete Workbook | VBA ThisWorkbook | VBA Rename Workbook | VBA Activate Workbook | VBA Combine Workbook | VBA Protect Workbook (Unprotect) | VBA Check IF a Workbook is Open | VBA Open Workbook | VBA Check IF an Excel Workbook Exists in a Folder| VBA Create New Workbook (Excel File)
- VBA Workbook
I have used the following without success. The active workbook closes, indeed, but the excel window remains open.
Application.ActiveWindow.Close SaveChanges:=False
ActiveWorkbook.Close SaveChanges:=False
Which is the command that terminates the application?
EDIT
To say a little more: In the workbook Open event I run a macro. I want to terminate the application when that macro finishes. I also tried this without success.
Private Sub Workbook_Open()
   Macro_MyJob
   Application.Quit
End Sub
Where should I put this Application.Quit command?
asked Sep 2, 2010 at 14:45
![]()
BraniBrani
6,57415 gold badges46 silver badges49 bronze badges
I think your problem is that it’s closing the document that calls the macro before sending the command to quit the application.
Your solution in that case is to not send a command to close the workbook. Instead, you could set the «Saved» state of the workbook to true, which would circumvent any messages about closing an unsaved book. Note: this does not save the workbook; it just makes it look like it’s saved.
ThisWorkbook.Saved = True
and then, right after
Application.Quit
answered Sep 2, 2010 at 16:00
![]()
variantvariant
1,3442 gold badges11 silver badges18 bronze badges
To avoid the Save prompt message, you have to insert those lines
Application.DisplayAlerts = False
ThisWorkbook.Save
Application.DisplayAlerts = True
After saving your work, you need to use this line to quit the Excel application
Application.Quit
Don’t just simply put those line in Private Sub Workbook_Open() unless you got do a correct condition checking, else you may spoil your excel file.
For safety purpose, please create a module to run it. The following are the codes that i put:
Sub testSave()
Application.DisplayAlerts = False
ThisWorkbook.Save
Application.DisplayAlerts = True
Application.Quit
End Sub
Hope it help you solve the problem.
answered Apr 29, 2013 at 8:14
![]()
Leng KeongLeng Keong
1431 silver badge3 bronze badges
1
Sub TestSave()
Application.Quit
ThisWorkBook.Close SaveChanges = False
End Sub
This seems to work for me, Even though looks like am quitting app before saving, but it saves…
answered Jan 6, 2015 at 8:33
![]()
kc kalamakc kalama
711 silver badge1 bronze badge
2
Application.Quit
Should do the trick.
answered Sep 2, 2010 at 14:47
![]()
MichaelMichael
1,6362 gold badges16 silver badges21 bronze badges
0
I tried a certain sequence that seems to work as you can see below:
ThisWorkbook.Saved = True
Application.Quit
Application.ActiveWindow.Close SaveChanges:=False
ActiveWorkbook.Close SaveChanges:=False
![]()
ForceMagic
6,15212 gold badges68 silver badges88 bronze badges
answered Jul 17, 2013 at 19:55
![]()
You can try out
ThisWorkbook.Save
ThisWorkbook.Saved = True
Application.Quit
answered Mar 27, 2019 at 5:19
![]()
In my case, I needed to close just one excel window and not the entire application, so, I needed to tell which exact window to close, without saving it.
The following lines work just fine:
Sub test_t()
  Windows("yourfilename.xlsx").Activate
  ActiveWorkbook.Close SaveChanges:=False
End Sub
answered Jun 7, 2018 at 13:55
![]()
Sub button2_click()
'
' Button2_Click Macro
'
' Keyboard Shortcut: Ctrl+Shift+Q
'
    ActiveSheet.Shapes("Button 2").Select
    Selection.Characters.Text = "Logout"
    ActiveSheet.Shapes("Button 2").Select
    Selection.OnAction = "Button2_Click"
    ActiveWorkbook.Saved = True
    ActiveWorkbook.Save
    Application.Quit
End Sub
![]()
answered Jul 26, 2013 at 7:07
![]()
When working with an Excel workbook, there are a few basic operations that any user needs to know how to carry out. The following are 2 of the most important ones:
- Opening a workbook.
- Closing a workbook.
 These 2 actions are just as important if you’re working with Visual Basic for Applications.
In this tutorial, I focus on topic #2: How you can easily close an Excel workbook with VBA.
For these purposes, in the first few sections of this tutorial, I introduce some VBA constructs that help you create macros that close workbooks. My focus is, mainly, in the Workbook.Close method. However, I also introduce the Workbooks.Close method, which allows you to quickly close all open workbooks. At the end of that first section, I discuss the topic of closing Excel workbooks without prompts and introduce some of the most common ways of achieving this.
In the second section of this post, I go through 8 macro code examples. These VBA code samples use the constructs introduced in the first section for purposes of closing Excel workbooks in different situations. All of the macros are accompanied by an explanation. You can easily adjust the code samples in order to fit your own needs.
This Excel VBA Close Workbook Tutorial is accompanied by an Excel workbook containing the macros I use in the examples below. You can get immediate free access to this example workbook by subscribing to the Power Spreadsheets Newsletter.
Please use the following table of contents to quickly navigate to the section that interests you the most. For best results, you may want to read the whole blog post.
Let’s start by taking a look at the…
Workbook.Close Method
You can use the Workbook.Close method for purposes of closing the applicable workbook object.
The basic syntax of Workbook.Close is as follows:
expression.Close(SaveChanges, Filename, RouteWorkbook)
The following are the applicable definitions for purposes of the statement above:
- expression: Workbook object.
- SaveChanges: Optional argument. You use SaveChanges for purposes of specifying whether to save changes (True) or not (False).
- Filename: Optional argument. Filename allows you to specify the filename used by Excel when saving.
- RouteWorkbook: Optional argument. Makes reference to workbook routing. In that context, it allows you to determine whether the workbook is sent to the next recipient (True) or not (False).
Since expression represents a Workbook object, I simplify the syntax above to the following:
Workbook.Close(SaveChanges, Filename, RouteWorkbook)
Let’s start by taking a closer look at the 3 parameters (SaveChanges, Filename and RouteWorkbook) above. After covering these arguments, I provide a few additional comments about the Workbook.Close method.
SaveChanges Parameter
You use the SaveChanges parameter to specify whether Visual Basic for Applications saves changes to the workbook (or not) when the workbook:
- Has unsaved changes.
- Doesn’t appear in any other open windows.
Both of these conditions must be met in order for VBA to consider SaveChanges. In other words, VBA ignores SaveChanges in the following situations:
- When there aren’t any unsaved changes to the workbook.
- Where there are changes to the workbook, but the workbook appears within other open windows.
SaveChanges is an optional argument. You generally use the following values when working with it:
- True: Close workbook and save changes.
- False: Close workbook without saving changes.
If you omit the SaveChanges parameter and the relevant workbook contains unsaved changes, Excel displays a dialog box. This dialog asks the user whether the changes should be saved or not.

Filename Parameter
Filename allows you to specify the filename under which Excel saves the changes to the closed workbook.
Filename is an optional parameter. Additionally, Filename is only relevant if you set SaveChanges to True. Whenever you set the SaveChanges parameter to False, the changes aren’t saved at all.
If you omit Filename and the workbook has no previous filename, Excel displays the Save As dialog box and asks the user to provide the filename.

Despite the above, if you want to ensure that a particular workbook is saved under a certain name and close it, you can generally proceed as follows:
- Use the Workbook.SaveAs method to save the workbook; and
- Close the workbook by using the Workbook.Close method.
This way of proceeding is suggested by authorities such as author Richard Mansfield (in Mastering VBA for Microsoft Office 2016). Some of the advantages of using the SaveAs method (vs. the Filename parameter) for these purposes are the following:
- Ensures that the workbook is always saved under the filename you specify.
- Allows you to take advantage of the 10 parameters of the SaveAs method. By using these parameters, you can specify items such as (i) file format, and (ii) protection password.
RouteWorkbook Parameter
The RouteWorkbook parameter is associated to workbook routing. You can use RouteWorkbook to specify whether the workbook is routed to the next recipient or not.
RouteWorkbook is optional.
The main rules that Visual Basic for Applications uses to determine how to deal with RouteWorkbook are as follows:
- If there’s no need to send the workbook to the next recipient, VBA ignores RouteWorkbook.
For example, the workbook doesn’t need to be routed if (i) there’s no routing slip attached, or (ii) the routing has already occurred.
- If the workbook needs to be routed, VBA applies the value you specify for RouteWorkbook. You can use the following 2 values:
- True: VBA routes the workbook to the next recipient.
- False: The workbook isn’t sent.
- If you omit RouteWorkbook and the workbook need to be send, Excel asks the user whether the workbook is routed or not.
Workbook.Close Method And Auto_Close Macros
Auto_Close macros aren’t executed when you close the workbook from VBA. This is relevant if your workbook uses Auto_Close macros (vs. the BeforeClose event) for purposes of automatically running a macro before a workbook closes. The Workbook.Close method does trigger the BeforeClose event.
If you need to deal with Auto_Close macros and want the macro to be executed when you use the Workbook.Close method, use the Workbook.RunAutoMacros method.
Workbook.Close Method And Add-Ins
Usually, you install and uninstall add-ins through the Add-Ins dialog.
You can also open and close add-ins. In other words, you can theoretically apply the Workbook.Close method to an add-in.
As a consequence of the above, if you’ve accessed an add-in as a workbook (vs. using the Add-Ins dialog box), you can close it with the Close method. However, as a general rule, this isn’t the most appropriate way to deal with add-ins.
The reason for this is explained by Excel authorities Dick Kusleika and Mike Alexander in Excel 2016 Power Programming with VBA, as follows:
Using the Close method on an installed add-in removes the add-in from memory but does not set its Installed property to False. Therefore, the Add-Ins dialog box still lists the add-in as installed, which can be confusing.
Therefore, as a general rule, use the AddIn.Installed property for purposes of installing and removing add-ins.
Workbooks.Close Method
You can also apply the Close method to the collection of all open Excel workbooks. In other words, you can use the Workbooks.Close method to close all Excel workbooks at once.
The basic syntax of Workbooks.Close is as follows:
expression.Close
“expression” represents the Workbooks collection. Therefore, I simplify the above as follows:
Workbooks.Close
The Workbooks.Close method is, to a certain extent, similar to the Workbook.Close method I explain above. For example, Auto_Close macros aren’t executed when you close a workbook with either of these methods. Therefore, my comments above regarding Auto_Close macros and Workbook.Close are also generally applicable to Workbooks.Close.
There’s, however, a very important difference between Workbook.Close and Workbooks.Close:
Workbooks.Close takes no parameters. As I explain above, Workbook.Close has 3 parameters (SaveChanges, Filename and RouteWorkbook).
As a consequence of the above, if you want to use any (or all) of the parameters I describe above while closing all open workbooks, you generally have to rely on loops.
Further below, I provide macro code examples that you can use to close all open workbooks using either of these 2 methods:
- Workbooks.Close.
- Workbook.Close (+ loops).
Excel VBA To Close Workbook Without Prompts
In certain cases, you want to ensure that Excel closes a particular workbook without showing any prompts.
When working with the Close VBA method, the prompts that you usually have to deal with ask one of the following questions:
- Should Excel save the changes?

- What filename should Excel use?


There are a few different ways in which you can handle this using Visual Basic for Applications. The most common ways of tackling this issue are the following 4:
- Saving the workbook prior to using the Close method.
- Appropriately using the SaveChanges and Filename parameters of the Workbook.Close method.
- Using the Application.DisplayAlerts property.
- Setting the Workbook.Saved property to True.
I cover the topic of how to save a workbook using VBA (#1 above) in a separate blog post that you can find in the Archives. I cover both the SaveChanges and Filename arguments (#2 above) in this tutorial.
Therefore, in the following sections, I introduce the remaining VBA constructs #3 (Application.DisplayAlerts) and #4 (Workbook.Saved). Using either of these 2 properties results in Excel closing the workbook without prompts. In both cases, Excel closes the file without saving the changes.
Application.DisplayAlerts Property
The Application.DisplayAlerts property allows you to specify whether or not Excel displays certain prompts and alerts. For these purposes, you can set Application.DisplayAlerts to either of the following values:
- True: The default value. Excel displays alerts and messages.
- False: The alerts and messages aren’t displayed. If a particular alert or message requires a user response, Excel uses the default.
The basic syntax of Application.DisplayAlerts is as follows:
expression.DisplayAlerts
“expression” is the Excel Application object. Therefore, I simplify the above as follows:
Application.DisplayAlerts
Macro example #7 below uses the Application.DisplayAlerts property for purposes of closing a workbook without prompts. There are, however, other (better) ways of using VBA to close an Excel workbook without displaying prompts. I provide further explanation of this matter in the relevant section (for macro sample #7) further below.
Workbook.Saved Property
From a general perspective, the Workbook.Saved property indicates whether changes have been made to a particular Excel workbook since the last time it was saved. In other words, Workbook.Saved indicates whether the workbook has unsaved changes.
The basic syntax of Workbook.Saved is as follows:
expression.Saved
“expression” is a Workbook object. Therefore, I simplify the above as follows:
Workbook.Saved
The Saved property is, however, read/write. Therefore, you can set Workbook.Saved to either of the following values:
- True: No changes have been made since the last time the workbook was saved.
- False: Changes have been made.
By setting Saved to True prior to closing a workbook, you can close a workbook without Excel displaying a prompt. In such case, the changes to the workbook aren’t saved.
I provide a practical code example showing how you can easily do this further below (macro example #8).
In the following sections, I provide 8 macro code examples that allow you to close an Excel workbook using VBA. These 8 macro samples cover several of the most common situations you’re likely to encounter.
The Sub procedure examples I provide work with the active workbook. For these purposes, I use the Application.ActiveWorkbook property (ActiveWorkbook). By replacing the object reference, you can easily adjust these macros in order to work with other workbooks.
Macro Code Example #1: Excel VBA Close Workbook
At the most basic level, you can use a statement with the following structure to close an Excel workbook:
Workbook.Close
The following sample macro (Close_Workbook) closes the active workbook:

The macro example has a single statement that follows the structure I describe above:
ActiveWorkbook.Close
This statement is built by using the following items:
- ActiveWorkbook: The Application.ActiveWorkbook property returns the active workbook.
- Close: The Close method closes the active workbook returned by item #1.
Macro Code Example #2: Excel VBA Close Workbook Without Saving Changes
If you want to close a workbook without saving changes, you can use a statement that uses the following syntax:
Workbook.Close SaveChanges:=False
The following macro example (Close_Workbook_Without_Saving_Changes) closes the active workbook without saving changes:

The following are the items within the macro’s single statement:
- ActiveWorkbook: The active workbook.
- Close: The Close method.
- SaveChanges:=False: The SaveChanges parameter of the Workbook.Close method is set to False. Therefore, Excel doesn’t save changes prior to closing the workbook.
This macro is substantially the same as the previous example #1. The only new item is the SaveChanges argument (#3).
Macro Code Example #3: Excel VBA Close Workbook And Save Changes
You can use the following statement structure to close a workbook and save the changes:
Workbook.Close SaveChanges:=True
The following sample Sub procedure (Close_Workbook_Save_Changes) closes the active workbook and saves changes:

The only statement within the macro has the following 3 components:
- ActiveWorkbook: Reference to the active workbook.
- Close: The Close method.
- SaveChanges:=True: Sets the SaveChanges parameter of Workbook.Close to True. As a consequence of this, Excel saves the changes when closing the workbook.
This procedure is almost identical to macro sample #2 above. The only difference is the value to which the SaveChanges parameter (#3 above) is set (True vs. False).
Macro Code Example #4: Excel VBA Close Workbook And Save Changes With Filename
The VBA statement structure that I show below allows you to do the following:
- Save the workbook before closing.
- Set the filename that Excel uses if the workbook has no previously associated filename.
The following VBA statement structure allows you to do the above:
Workbook.Close SaveChanges:=True, Filename:=”fileNameString”
For these purposes, “fileNameString” is the file name you want Excel to use.
As I mention further above (section about the Filename parameter), using the statement I provide in this section doesn’t always result in the workbook being saved with the filename you want. In order to ensure that the workbook is saved always under the desired filename, you can generally use the Workbook.SaveAs method prior to calling the Workbook.Close method.
The following macro example (Close_Workbook_Save_Changes_Filename) closes the active workbook and saves changes under the specified filename. The filename under which the workbook is saved (if applicable) is “Excel VBA Close Workbook”.

The statement within the macro above has the following components:
- ActiveWorkbook: Application.ActiveWorkbook property.
- Close: Workbook.Close method.
- SaveChanges:=True: Sets the SaveChanges parameter of Workbook.Close to True.
- Filename:=”Excel VBA Close Workbook”: The Filename argument of the Close method. Specifies that the filename that Excel uses is “Excel VBA Close Workbook”.
This sample macro is very similar to the previous example #3. The only new item is the Filename parameter (#4).
Macro Code Examples #5 And #6: Excel VBA Close All Workbooks
In this section, I provide 2 macro examples that you can use to close all Excel workbooks at once.
As I mention above, you can use the Workbooks.Close method in order to close all the members of the Workbooks collection (i.e. all open workbooks). Therefore, you can use the following statement for purposes of closing all open Excel workbooks:
Workbooks.Close
The following macro code sample (Close_All_Workbooks) closes all workbooks with the Workbooks.Close method. The single statement within this macro is the one I explain above.

However, as I explain above, Workbooks.Close takes no parameters.
The Workbook.Close method does take parameters. The Workbook.Close method works with only one workbook at a time. In order to close all open workbooks at once, you can use a For Each… Next loop. The resulting structure of the relevant VBA loop is as follows:
For Each Workbook In Workbooks
Workbook.Close
Next Workbook
The following procedure example (Close_All_Workbooks_Loop) uses the Workbook.Close method and a For Each… Next loop to close all workbooks:

The process followed by this macro to close all open workbooks is as follows:
- Close the first open workbook.
- Check whether there are elements left within the collection of open workbooks.
- If there are open workbooks left:
- Close the next workbook.
- Repeat step #2 above.
- If there are no open workbooks left (step #2), exit the For Each… Next loop and end the macro.
The following diagram illustrates this procedure:

Let’s take a closer look at each of the lines of code within this sample macro:
Line #1: Dim myWorkbook As Workbook
The Dim statement declares the myWorkbook object variable.
Line #2: For Each myWorkbook In Workbooks
Opening statement of a For Each… Next loop. This repeats the execution of the statement within the loop (line #3 below) for each workbook within the Workbooks collection.
The 2 relevant items within this line of code are the following:
- myWorkbook: myWorkbook variable. Used to iterate through all the elements within the Workbooks collection (item #2).
- Workbooks: The Application.Workbooks property returns the collection of all open workbooks.
Line #3: myWorkbook.Close
This statement is exactly the same as that in macro sample #1 above. You can easily modify this statement to use the SaveChanges and/or Filename properties. Examples #2 through #4 are examples of how you can do this.
When within the For Each… Next loop, this line #3 results in Excel closing the applicable workbook. The closed workbook, therefore, is dependent on the current iteration of the loop.
Line #4: Next myWorkbook
Closing statement of the For Each… Next loop.
Macro Code Examples #7 And #8: Excel VBA Close Workbook Without Prompt
This section provides 2 macro code examples that allow you to close a workbook without prompts.
The first macro sample (#7) uses the following basic structure:
Application.DisplayAlerts = False
Workbook.Close
This results in Excel closing the workbook without prompts. Additionally, the workbook isn’t saved.
As I mention above when introducing the Application.DisplayAlerts property, you’re generally better off avoiding this particular VBA code structure. The other options I discuss in this tutorial (saving the workbook prior to calling Close, or using the SaveChanges and Filename parameters of Close) are more appropriate in most situations.
The following macro example (Close_Workbook_Without_Prompt_1) turns off Excel’s prompts and alerts prior to closing the workbook. Therefore, Excel closes the active workbook without prompts.

This sample macro is composed of the following 2 statements:
- Application.DisplayAlerts = False: Sets the Application.DisplayAlerts property to False. As a consequence, Excel turns off prompts.
- ActiveWorkbook.Close: The Application.ActiveWorkbook property and the Workbook.Close method are used to close the active workbook.
The second macro within this section uses the following syntax:
With Workbook
.Saved = True
.Close
End With
By setting the Workbook.Saved property to True, you indicate that no changes have been made since the last time the workbook was saved. In other words, you’re telling Excel that the workbook you’re closing doesn’t need to be saved.
The following macro code sample (Close_Workbook_Without_Prompt_2) sets the Saved property to True prior to calling the Workbook.Close method. As a consequence of this, the active workbook is closed without displaying prompts.

Let’s take a closer look at each of the lines of code within this sample Sub procedure:
Line #1: With ActiveWorkbook
Opening line for a With… End With block. As a consequence of this, the statements within the block (lines #2 and #3) work with the object specified in this line #1. That object is the active workbook (ActiveWorkbook).
Line #2: .Saved = True
Sets the Workbook.Saved property to True. Indicates that no changes have been made to the active workbook (in line #1 above) since last time the workbook was saved.
Line #3: .Close
Calls the Workbook.Close method. Closes the active workbook (in line #1 above).
Line #4: End With
Closing line of the End… End With statement.
Conclusion
After reading this Excel VBA tutorial, you have the knowledge you need to start crafting macros that quickly close Excel workbooks in several different scenarios.
In the first section of this tutorial, you read about the 2 VBA methods you can use to close Excel workbooks:
- Workbook.Close.
- Workbooks.Close.
In addition to reading about how you can easily use each of these methods, you’ve seen why most VBA Sub procedures rely on the Workbook.Close method. You’ve also read about how, by appropriately using the parameters of Workbook.Close or combining this method with other VBA constructs, you can specify how Excel acts when closing a workbook.
Finally, you’ve seen 8 examples of macro code that put the above VBA constructs and information in practice.
Overall, the information and examples within this tutorial allow you to easily and quickly create Excel macros that achieve a variety of objects. The following are some examples of what you can now do with Visual Basic for Applications:
- Close a particular Excel workbook.
- Close a workbook without saving changes.
- Close a workbook and save the changes. This includes the possibility of setting the filename Excel uses when saving.
- Close all open workbooks at once.
- Close an Excel workbook without any prompts.
This Excel VBA Close Workbook Tutorial is accompanied by an Excel workbook containing the macros I use in the examples above. You can get immediate free access to this example workbook by subscribing to the Power Spreadsheets Newsletter.
Books Referenced In This Excel Tutorial
- Alexander, Michael and Kusleika, Dick (2016). Excel 2016 Power Programming with VBA. Indianapolis, IN: John Wiley & Sons Inc.
- Mansfield, Richard (2016). Mastering VBA for Microsoft Office 2016. Indianapolis, IN: John Wiley & Sons Inc.
In this Article
- Open a Workbook in VBA
- Open Workbook From Path
- Open Workbook – ActiveWorkbook
- Open Workbook and Assign to a Variable
- Workbook Open File Dialog
- Open New Workbook
- Open New Workbook To Variable
- Open Workbook Syntax
- Open Workbook Read-Only
- Open Password Protected Workbook
- Open Workbook Syntax Notes
- Close a Workbook in VBA
- Close Specific Workbook
- Close Active Workbook
- Close All Open Workbooks
- Close First Opened Workbook
- Close Without Saving
- Save and Close Without Prompt
- Other Workbook Open Examples
- Open Multiple New Workbooks
- Open All Excel Workbooks in a Folder
- Check if a Workbook is Open
- Workbook_Open Event
- Open Other Types of Files in VBA
- Open a Text file and Read its Contents
- Open a Text File and Append to it
- Opening a Word File and Writing to it
In this tutorial, you will learn how to use VBA to open and close Excel Workbooks and other types of Files in several ways.
VBA allows you to open or close files using the standard methods .Open and .Close.
If you want to learn how to check if a file exists before attempting to open the file, you can click on this link: VBA File Exists
Open a Workbook in VBA
Open Workbook From Path
If you know which file you want to open, you can specify its full path name in the function. Here is the code:
Workbooks.Open "C:VBA FolderSample file 1.xlsx"This line of the code opens “Sample file 1” file from the “VBA Folder”.
Open Workbook – ActiveWorkbook
When you open a workbook, it automatically becomes the ActiveWorkbook. You can reference the newly opened workbook like so:
ActiveWorkbook.SaveWhen you reference a sheet or range and omit the workbook name, VBA will assume you are referring to the ActiveWorkbook:
Sheets("Sheet1").Name = "Input"Open Workbook and Assign to a Variable
You can also open a workbook and assign it directly to an object variable. This procedure will open a workbook to the wb variable and then save the workbook.
Sub OpenWorkbookToVariable()
    Dim wb As Workbook
    Set wb = Workbooks.Open("C:VBA FolderSample file 1.xlsx")

    wb.Save
End Sub
Assigning workbooks to variables when they open is the best way to keep track of your workbooks
Workbook Open File Dialog
You can also trigger the workbook Open File Dialog box. This allows the user to navigate to a file and open it:
Sub OpenWorkbook ()

    Dim strFile As String

    strFile = Application.GetOpenFilename()
    Workbooks.Open (strFile)

End Sub
As you can see in Image 1, with this approach users can choose which file to open. The Open File Dialog Box can be heavily customized. You can default to a certain folder, choose which types of files are visible (ex. .xlsx only), and more. Read our tutorial on the Open File Dialog Box for detailed examples.
Open New Workbook
This line of code will open a new workbook:
Workbooks.AddVBA Coding Made Easy
Stop searching for VBA code online. Learn more about AutoMacro — A VBA Code Builder that allows beginners to code procedures from scratch with minimal coding knowledge and with many time-saving features for all users!

Learn More
Open New Workbook To Variable
This procedure will open a new workbook, assigning it to variable wb:
Sub OpenNewWorkbook()
    Dim wb As Workbook
    Set wb = Workbooks.Add
End Sub
Open Workbook Syntax
When you use Workbooks.Open you might notice that there are many options available when opening the workbook:

The Filename is required. All other arguments are optional – and you probably won’t need to know most of the other arguments. Here are the two most common:
Open Workbook Read-Only
When workbook is opened read-only, you can’t save over the original file. This prevents the file from being edited by the user.
Workbooks.Open "C:VBA FolderSample file 1.xlsx", , TrueVBA Programming | Code Generator does work for you!
Open Password Protected Workbook
A workbook might be password-protected. Use this code to open the password-protected workbook:
Workbooks.Open "C:VBA FolderSample file 1.xlsx", , , "password"Open Workbook Syntax Notes
Notice that in the image above, we included a parenthesis “(” to show the syntax. If you use parenthesis when working with Workbooks.Open, you must assign the workbook to a variable:
Sub OpenWB()
    Dim wb As Workbook
    Set wb = Workbooks.Open("C:VBA FolderSample file 1.xlsx", True, True)
End Sub
Close a Workbook in VBA
Close Specific Workbook
Similarly to opening a workbook, there are several ways to close a file. If you know which file you want to close, you can use the following code:
Workbooks.Close ("C:VBA FolderSample file 1.xlsx")This line of code closes the file “Sample file 1” if it’s opened. If not, it will return an error, so you should take care of error handling.
Close Active Workbook
If you want to close the Workbook which is currently active, this line of code will enable you to do that:
ActiveWorkbook.CloseAutoMacro | Ultimate VBA Add-in | Click for Free Trial!
Close All Open Workbooks
To close all open Workbooks, you can simply use this code:
Workbooks.CloseClose First Opened Workbook
This will close the first opened/created workbook:
Workbooks(1).CloseReplace 1 with 2 to close the second opened / created workbook and so on.
Close Without Saving
This will close a Workbook without saving and without showing the save prompt:
ActiveWorkbook.Close savechanges:=FalseSave and Close Without Prompt
Similarly this will save and close a Workbook without showing the save prompt:
ActiveWorkbook.Close savechanges:=TrueNote: There are several other ways to indicate whether to save or not save a Workbook and also whether to show prompts or not. This is discussed in more detail here.
AutoMacro | Ultimate VBA Add-in | Click for Free Trial!
Other Workbook Open Examples
Open Multiple New Workbooks
This procedure will open multiple new workbooks, assigning the new workbooks to an array:
Sub OpenMultipleNewWorkbooks()
    Dim arrWb(3) As Workbook
    Dim i As Integer

    For i = 1 To 3
        Set arrWb(i) = Workbooks.Add
    Next i
End Sub
Open All Excel Workbooks in a Folder
This procedure will open all Excel Workbooks in a folder, using the Open File Dialog picker.
Sub OpenMultipleWorkbooksInFolder()
    Dim wb As Workbook
    Dim dlgFD As FileDialog
    Dim strFolder As String
    Dim strFileName As String
    Set dlgFD = Application.FileDialog(msoFileDialogFolderPicker)
    If dlgFD.Show = -1 Then
        strFolder = dlgFD.SelectedItems(1) & Application.PathSeparator
        strFileName = Dir(strFolder & "*.xls*")
        Do While strFileName <> ""
            Set wb = Workbooks.Open(strFolder & strFileName)

            strFileName = Dir
        Loop
    End If
End Sub
Check if a Workbook is Open
This procedure will test if a workbook is open:
Sub TestByWorkbookName()
Dim wb As Workbook

    For Each wb In Workbooks
        If wb.Name = "New Microsoft Excel Worksheet.xls" Then
            MsgBox "Found it"
            Exit Sub 'call code here, we'll just exit for now
        End If
    Next

End Sub
AutoMacro | Ultimate VBA Add-in | Click for Free Trial!
Workbook_Open Event
VBA Events are “triggers” that tell VBA to run certain code. You can set up workbook events for open, close, before save, after save and more.
Read our Workbook_Open Event tutorial to learn more about automatically running macros when a workbook is opened.
Open Other Types of Files in VBA
You can use the VBA to open other types of files with VBA – such as txt or Word files.
Open a Text file and Read its Contents
The VBA open method allows you to read or write to the file once you have opened it. To read the contents of a file, we can open the file for INPUT.
Sub OpenTextFile()
   Dim strFile As String
   Dim strBody As String
   Dim intFile As Integer

   strFile = "C:datatest.txt"
   intFile = FreeFile
   Open strFile For Input As intFile
   strBody = Input(LOF(intFile), intFile)
   'loop here through your text body and extract what you need
   ''some vba code here
   Debug.Print strBody
   Close intFile
End Sub
The code above will open the text file “test.txt” and then it will read the entire contents of the file to the strBody variable. Once you have extracted the file data into the strBody variable, you can use it for what you require. Using the Debug.Print command above enables us to see the contents of the strBody variable in the Immediate window in the VBE.
Open a Text File and Append to it
We can also open a text file in VBA, and then append to the bottom of the file using the Append method.
Sub AppendToTextFile()
Dim strFile As String
Dim strBody As String
Dim intFile As Integer

   strFile = "C:datatest.txt"
   intFile = FreeFile
   Open strFile For Append As intFile
'add two lines to the bottom
   Print #intFile, "This is an extra line of text at the bottom"
   Print #intFile, "and this is another one"
'close the file
   Close intFile
End Sub
The above code will open the text file and then append 2 lines of text to the bottom of the file using the #intFile variable (the # sign is the key!). The code then closes the file.
Opening a Word File and Writing to it
We can also use VBA in Excel to open a Word file.
Sub OpenWordFile()
   Dim wApp As Object
   Dim wDoc As Object
   Set wApp = CreateObject("Word.Application")
   Set wd = wApp.documents.Open("c:datatest.docx")
   wApp.Visible = True
End Sub
This code will open a copy of Word, and then open the document test.docx.
VBA Close Excel File – Workbook Example Code
VBA code to close the excel file example will help us to close the excel file. We can use Close method of Workbook to close the file. In this example we will see how to close the Active Excel Workbook using VBA. VBA code for closing Active Workbook macro should work for all the version of Microsoft Excel 2003, Excel 2007, Excel 2010, and Excel 2013.

VBA code to close the excel file
Here is the Example VBA syntax and Example VBA Macro code to close the Excel File. This will help you to how to close active Excel workbook using VBA.
VBA Close Excel File: Syntax
Following is the VBA Syntax and sample VBA code to close the Excel File using VBA. We are using the Close method of the Excel Workbook object.
Workbook.Close
Here workbook can be ActiveWorkbook, ThisWorkbook or a workbook assigned to an object.
ActiveWorkbook.Close will Close the currently active Excel Workbook. And ThisWorkbook.Close will close the workbook which we have written our VBA code. And we can set the workbook to any object and we can close it using WorkbookObject.Close method as shown below:
Dim wb as Workbook
Set wb=Thisworkbook
Wb.Close
Here is explained VBA code:
‘Declaring the wb object as Workbook, in the next statement we will assign the workbook to this object.
Dim wb As Workbook
‘Assigning Thisworkbook to workbook object i.e.; wb.
Set wb = ThisWorkbook
‘And closing the workbook using workbook object which we have created above and Close method of the workbook.
wb.Close
Like this we can assign any workbook to an object. And then we can close the Excel Workbook using Object in VBA.
Close Excel File using VBA : Examples
The following VBA code is to Close the Excel File. This code will close the Workbook which we have this VBA procedure.
Sub sbVBS_To_CloseExcelFile()
    ThisWorkbook.Close
End Sub
Instructions to run the VBA code to close the excel file
Please follow the below steps to execute the VBA code to close the excel file.
Step 1: Open any existing Excel workbook
Step 2: Press Alt+F11 – This will open the VBA Editor
Step 3: Insert a code module from then insert menu
Step 4: Copy the above code and paste in the code module which have inserted in the above step
Step 5: Do some changes and save the file
Step 6: Now press F5 to execute the code
Now you can observe that your Excel workbook is closed with the changes.
Explained VBA Code to Close the Excel File :
Starting procedure to write VBA code to Close Excel File using VBA.
Sub sbVBS_To_CloseExcelFile_C()
‘To close ThisWorkbook, i.e the workbook with the code module and this procedure. We are using Close method of the workbook to close the excel file.
ThisWorkbook.Close
‘Ending sub procedure to close the Excel workbook
End Sub
Here ThisWorkbook object represent the workbook with this code module. And Close is the Workbook method to Close the Excel File. We will see the other examples to close the Workbook in different situations in the following examples.
VBA to Close Active Excel Workbook: Examples
The following VBA code is to Close the Active Excel Workbook. This code will close the Workbook which is currently active.
Sub sbVBS_To_CloseActiveExcelWorkbook()
    ActiveWorkbook.Close
End Sub
VBA to Close any Workbook: Examples
The following VBA code is to Close any Excel Workbook. This code will close the Workbook usin object..
Sub sbVBS_To_CloseExcelWorkbook()
 Dim wb as Workbook
Set wb=ThisWorkbook ‘here you can set any workbook
    wb.Close
End Sub
VBA to Save and Close Excel Workbook: Examples
The following VBA code is to Save and Close any Excel Workbook. This code will close the Workbook usin object.
Sub sbVBS_To_SaveCloseExcelWorkbook()
 Dim wb as nWorkbook
Set wb=ThisWorkbook ‘here you can set any workbook
    Wb.Save
    wb.Close
End Sub
A Powerful & Multi-purpose Templates for project management. Now seamlessly manage your projects, tasks, meetings, presentations, teams, customers, stakeholders and time. This page describes all the amazing new features and options that come with our premium templates.
Save Up to 85% LIMITED TIME OFFER

All-in-One Pack
120+ Project Management Templates
Essential Pack
50+ Project Management Templates
Excel Pack
50+ Excel PM Templates
PowerPoint Pack
50+ Excel PM Templates
MS Word Pack
25+ Word PM Templates
Ultimate Project Management Template
Ultimate Resource Management Template
Project Portfolio Management Templates
Related Posts
- VBA code to close the excel file
- VBA Close Excel File: Syntax
- Close Excel File using VBA : Examples
- Instructions to run the VBA code to close the excel file
- Explained VBA Code to Close the Excel File :
- VBA to Close Active Excel Workbook: Examples
- VBA to Close any Workbook: Examples
- VBA to Save and Close Excel Workbook: Examples
VBA Reference
Effortlessly
Manage Your Projects
120+ Project Management Templates
Seamlessly manage your projects with our powerful & multi-purpose templates for project management.
120+ PM Templates Includes:
2 Comments
-
Vignesh
September 17, 2015 at 3:32 PM — ReplyHi All,
I need to protect the VBA Coding except using the Excel VBA Protection method, because there are many tools in online to unlock the VBA Project.
Please help.
Thanks in Advance,
Vignesh Raja -
PNRao
September 19, 2015 at 1:16 AM — ReplyHi Vignesh,
Yes! as you said, there are many tools to unprotect the VBA Project. As per my understanding, no tools can protect the VBA code. We recommend you to go for COM based Add-ins.Thanks-PNRao!
Effectively Manage Your
Projects and Resources
ANALYSISTABS.COM provides free and premium project management tools, templates and dashboards for effectively managing the projects and analyzing the data.
We’re a crew of professionals expertise in Excel VBA, Business Analysis, Project Management. We’re Sharing our map to Project success with innovative tools, templates, tutorials and tips.
Project Management
Excel VBA
Download Free Excel 2007, 2010, 2013 Add-in for Creating Innovative Dashboards, Tools for Data Mining, Analysis, Visualization. Learn VBA for MS Excel, Word, PowerPoint, Access, Outlook to develop applications for retail, insurance, banking, finance, telecom, healthcare domains.
Page load link
Go to Top
The need to close Excel after running a macro arises all the time especially in large-scale Excel reporting automations where you may be collating data from multiple Excel files. To learn how to close Excel from within VBA then read on…
Excel has various options within VBA that can be used to close Excel down. It is important to know exactly what you want to achieve as they all have slightly different results.
For example closing a workbook generally means that the workbook is closed but the Excel application remains open, closing Excel the application will close Excel down and by default that means the workbook will be closed with it.
Sometimes you may need to close down a certain workbook so again that is something to consider in your code. For example maybe you have a data file that you copy data from and then you just want to close this down and leave the main report open.
Below are the most common scripts for achieving all of these options:
Close everything down, all workbooks and Excel
Application.Quit
This shuts the lot down, all open workbooks and all open Excel programs. You will need to have saved any changes that you want before this code is completed, Excel will prompt you to save or not unless you have switched alerts off.
Close a certain workbook down
Workbooks(“Name of Workbook”).Close
This will close down a particular workbook. You do not need to specify the file path as this will generate an error known as run-time error ‘9’, subscript out of range. Excel will know which of the open workbooks you mean just by the workbook name.
If you have alerts turned off then Excel will just close the file without saving changes but if you want to be more professional with your VBA then add the save settings to the end of the code like so:
Workbooks(“Name of Workbook”).Close SaveChanges:=True
Or
Workbooks(“Name of Workbook”).Close SaveChanges:=False
Close all workbooks but leave Excel open
Workbooks.Close
This will close all the workbooks you have open. As with the above you will be prompted to save changes, if any have occurred, unless you either have alerts switched off or you have previously saved the file.
Summary
To recap the first thing to do is decide on what you are trying to achieve with closing Excel, do you want everything closed down, just the workbook closed down or just a specific workbook closed down and Excel to remain open.
Always consider your saving options.
Sometimes you may not want to save so you can get around the Excel prompt message asking you to save the workbook by switching alerts off, a more professional approach will set the save criteria in the VBA script and this also helps prevent unwanted results that can occur when you do switch alerts off.
Keep Excelling,

How to close an Excel workbook using VBA and macros, including how to save the file before you close it or discard any changes.
Sections:
Selecting Which Workbook to Close
Close Workbook While Saving Changes
Close Workbook Without Saving Changes
Let the User Decide to Save Changes or Not
Notes
Selecting Which Workbook to Close
First, we need to tell the macro to choose the current workbook to close or another workbook to close.
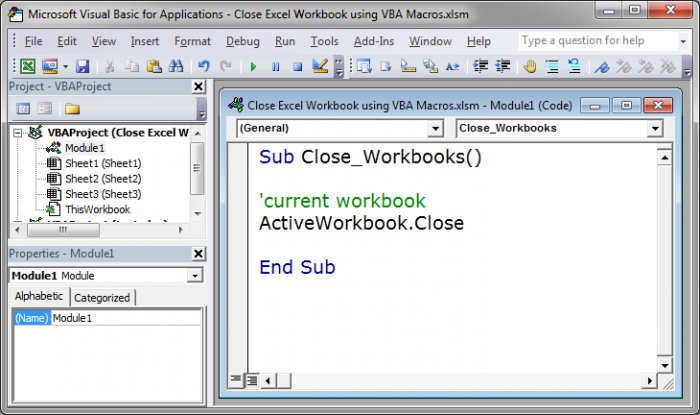
Current Workbook
We use this piece of code to close the current or currently active workbook and close that.
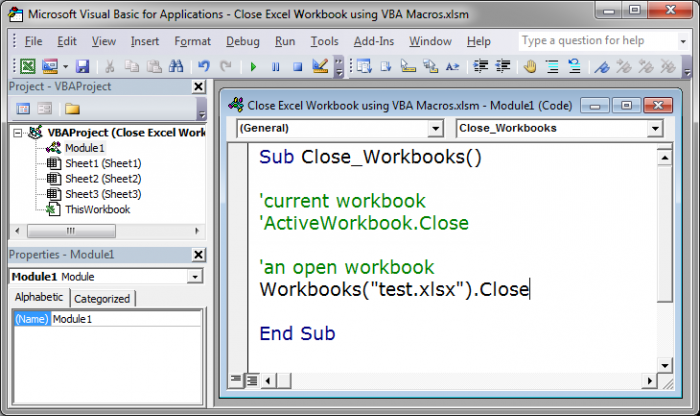
Other Workbook
We use this piece of code to close any specific open workbook.
Workbooks("test.xlsx").Close
Replace test.xlsx with the name of the file that you want to close.
Close Workbook While Saving Changes
To have Excel automatically save any changes for the workbook that you want to close, just put True behind the close workbook code from above like this:
ActiveWorkbook.Close True
or, to close a specific file like this:
Workbooks("test.xlsx").Close True
Close Workbook Without Saving Changes
To have an Excel window close WITHOUT saving any changes, just put False behind the close workbook code from above like this:
ActiveWorkbook.Close False
or, to close a specific file like this:
Workbooks("test.xlsx").Close False
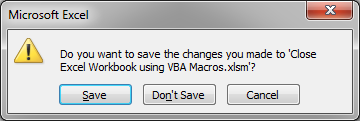
Let the User Decide to Save Changes or Not
You use the basic code from the first section and don’t include a True or False after it and a dialog box will open asking if you want to save the file or not; it looks like this:
Close the currently active or visible workbook:
Close a specific workbook:
Workbooks("test.xlsx").Close
Notes
You may run into issues with messages popping up depending on your implementation of this code and your setup and it can help to turn off ScreenUpdating for Excel. Make sure to turn it back on when you are finished though.
If Application.DisplayAlerts is set to False before you close the workbook, you won’t see a popup asking if you want to save it or not before closing it. If this is the case, you may lose data if you wanted to save the file before closing it, so test your code on a sample workbook first.
Download the sample files for this tutorial to test everything out.
Similar Content on TeachExcel
Open Excel Workbook Using VBA Macros
Tutorial:
Simple way to open an Excel workbook using VBA and macros.
Syntax
Workbooks.Open («File…
Macro to get Data from Another Workbook in Excel
Tutorial:
Macro to get data from a workbook, closed or open, over a network or locally on your comp…
Get User Submitted Data from a Prompt in Excel using VBA Macros
Tutorial: How to prompt a user for their input in Excel.
There is a simple way to do this using VBA …
Interactive Clickable Buttons and Interface Without Using VBA/Macros in Excel
Tutorial:
How to make your Excel dashboards and worksheets more interactive and easier to view and …
Loop through a Range of Cells in Excel VBA/Macros
Tutorial: How to use VBA/Macros to iterate through each cell in a range, either a row, a column, or …
Kill Command in Excel (Delete Files Using VBA)
Tutorial:
How to safely remove, delete, kill any Excel file, or other file, using VBA Macros in Exc…
Subscribe for Weekly Tutorials
BONUS: subscribe now to download our Top Tutorials Ebook!
| title | keywords | f1_keywords | ms.prod | api_name | ms.assetid | ms.date | ms.localizationpriority |
|---|---|---|---|---|---|---|---|
|
Workbook.Close method (Excel) |
vbaxl10.chm199085 |
vbaxl10.chm199085 |
excel |
Excel.Workbook.Close |
c0376cab-a2db-c606-67bf-0a4921b81e03 |
05/29/2019 |
medium |
Workbook.Close method (Excel)
Closes the object.
Syntax
expression.Close (SaveChanges, FileName, RouteWorkbook)
expression A variable that represents a Workbook object.
Parameters
| Name | Required/Optional | Data type | Description |
|---|---|---|---|
| SaveChanges | Optional | Variant | If there are no changes to the workbook, this argument is ignored. If there are changes to the workbook and the workbook appears in other open windows, this argument is ignored. If there are changes to the workbook but the workbook doesn’t appear in any other open windows, this argument specifies whether changes should be saved. If set to True, changes are saved to the workbook.
If there is not yet a file name associated with the workbook, FileName is used. If FileName is omitted, the user is asked to supply a file name. |
| FileName | Optional | Variant | Saves changes under this file name. |
| RouteWorkbook | Optional | Variant | If the workbook doesn’t need to be routed to the next recipient (if it has no routing slip or has already been routed), this argument is ignored. Otherwise, Microsoft Excel routes the workbook according to the value of this parameter.
If set to True, the workbook is sent to the next recipient. If set to False, the workbook is not sent. If omitted, the user is asked whether the workbook should be sent. |
Remarks
Closing a workbook from Visual Basic doesn’t run any Auto_Close macros in the workbook. Use the RunAutoMacros method to run the Auto_Close macros.
Example
This example closes Book1.xls and discards any changes that have been made to it.
Workbooks("BOOK1.XLS").Close SaveChanges:=False
[!includeSupport and feedback]