
Add clip art to your file
Word for Microsoft 365 Outlook for Microsoft 365 PowerPoint for Microsoft 365 OneNote for Microsoft 365 Publisher for Microsoft 365 Excel for Microsoft 365 for Mac Word for Microsoft 365 for Mac PowerPoint for Microsoft 365 for Mac Word for the web OneNote for the web PowerPoint for the web Word 2021 PowerPoint 2021 Publisher 2021 OneNote 2021 Excel 2021 for Mac Word 2021 for Mac PowerPoint 2021 for Mac Word 2019 PowerPoint 2019 Publisher 2019 Excel 2019 for Mac Word 2019 for Mac PowerPoint 2019 for Mac Excel 2016 Word 2016 Outlook 2016 PowerPoint 2016 OneNote 2016 Publisher 2016 Excel 2013 Word 2013 Outlook 2013 PowerPoint 2013 OneNote 2013 Publisher 2013 Excel 2010 Word 2010 Outlook 2010 PowerPoint 2010 OneNote 2010 Publisher 2010 More…Less
Depending on which version of Office you have, you may be able to use an Office library of clip art, or get clip art from the web.
Insert clip art
In the newer versions of Office, there’s no longer a clip art library, but Office still helps you insert clip art.
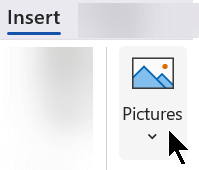
STEP 1:
Select Insert > Pictures > Online Pictures
(In Outlook, when you’re using the Reading pane, there isn’t an Insert menu. Click Pop Out  and then you’ll see the Insert menu.)
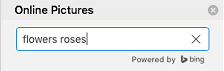
STEP 2:
Type a word or phrase to describe what you’re looking for, then press Enter.
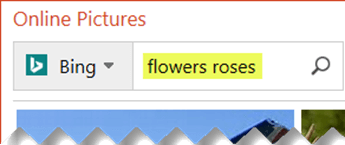
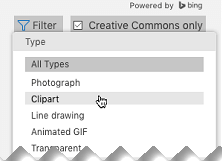
STEP 3:
Filter the results by Type for Clipart.

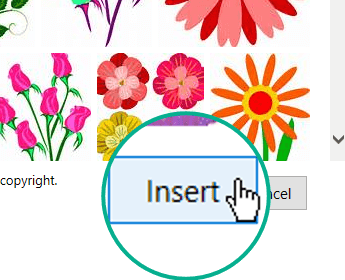
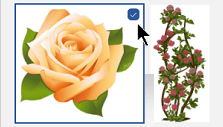
STEP 4:
Select a picture.

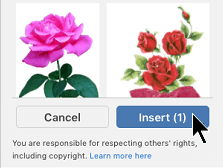
STEP 5:
Select Insert.
That’s it!
The image is inserted in your Office document.

Clip art and copyright
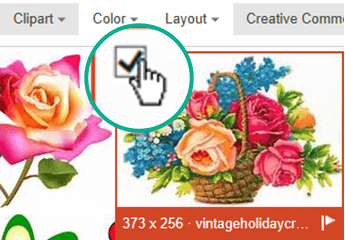
The licensing filter (Creative Commons only or All) can help you choose images that are appropriate for the use you have in mind. (Read about Creative Commons licenses here.)
When using pictures or clip art from Bing, you’re responsible for respecting copyright, and the license filter in Bing can help you choose which images to use.
New kinds of clip art for Microsoft 365
Microsoft 365 doesn’t have traditional clip art anymore, but as a subscriber you get several new kinds of high quality art in its place for free: high-resolution photographs, icons, cutout people, stickers, illustrations, and cartoon people. Select Insert > Pictures > Stock Images to see your options. For more details, see Insert images, icons, and more.
|
Icons are ready-made images that you can insert, pivot, rotate, color, and resize (with no loss of quality). |
|

|
Stickers are whimsical illustrations that can enliven any document. |

|
Cartoon people are cartoon-style drawings. You can mix and match different head/hair, face, and body parts to get just the look you want. |
Voice clips instead of clip art
Looking for information about adding an audio clip to a slide? See Add or delete audio in your PowerPoint presentation.
Insert clip art
In Office 2013 and Office 2016, there’s no longer a clip art library, but Office still helps you insert clip art.
STEP 1:
Select Insert > Online Pictures
(In Outlook, when you’re using the Reading pane, there isn’t an Insert menu. Click Pop Out and then you’ll see the Insert menu.)

STEP 2:
Type a word or phrase to describe what you’re looking for, then press Enter.
STEP 3:
Filter the results by Type for Clipart.

STEP 4:
Select a picture.
STEP 5:
Select Insert.
That’s it!
The image is inserted in your Office document.
Clip art and copyright
The licensing filter (Creative Commons only or All) can help you choose images that are appropriate for the use you have in mind. (Read about Creative Commons licenses here.)
When using pictures or clip art from Bing, you’re responsible for respecting copyright, and the license filter in Bing can help you choose which images to use.
Free image library: the Pickit add-in
Another option is to install an Office add-in named Pickit that puts free, licensed clip art in Office.
Click a section title below to open it and read detailed instructions.
-
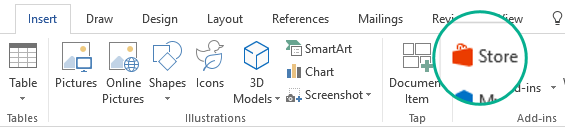
Open the Office app you want to add Pickit it to (Word, PowerPoint, or Excel).
-
On the Insert tab, in the Add-ins group, select Store.

The Office Add-ins dialog box opens.
-
In the dialog box, use the Search box to look for Pickit Free Images.
-
Click the Add button for Pickit Free Images.
-
Close the Office Add-ins dialog box.
Pickit may take a few moments to be «loaded» into the Office app. When it’s done, a message appears at the bottom of your app window telling you so.
At the far right end of the ribbon, on the Home tab, you’ll see the circular pink Pickit icon:
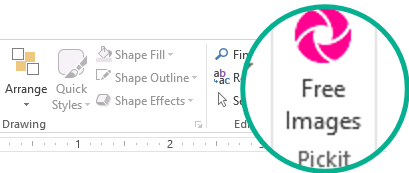
Once Pickit is on your computer, you can find pictures with it as described here:
-
On the Home tab of the Ribbon, in the Pickit section at the far right, select the Free Images button.
The Pickit Free Images task panel opens on the right side of the application window.
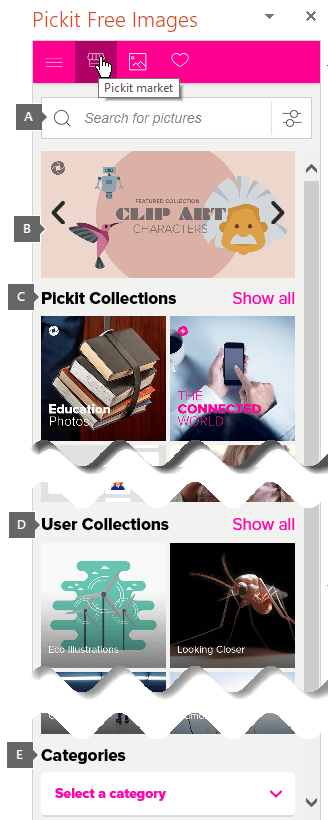
-
On the pink toolbar near the top, use the second tab, the Pickit market, to browse for images.
Pickit lets you browse images in several ways:
-
There’s a search box (callout A in the picture) where you can type keywords such as flower, clipart, and business.
-
A set of featured collections (B) just below the Search box. The set includes a Clip Art Characters collection.
-
There are 25 collections (C) organized by Pickit.
-
There are numerous user collections (D) to browse.
-
There are 35 categories (E) of images (such animals and pets, cities and places, music and instruments, and transportation) you can choose from at the bottom of the task panel.
Voice clips instead of clip art
Looking for information about adding an audio clip to a slide? See Add or delete audio in your PowerPoint presentation.
-
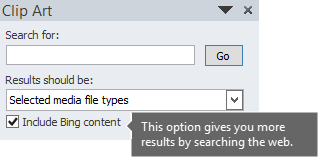
On the Insert tab of the toolbar ribbon, in the Images section, select Clip Art.
(In Outlook, when you’re using the Reading pane, there isn’t an Insert menu. Click Pop Out
and then you’ll see the Insert menu and the Clip Art icon.)The Clip Art task panel appears on the right side of the application window.
-
In the Search for box, type keywords that describe the art you’re looking for.
-
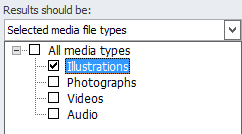
Under Results should be, select the types of media you want included in the search results:
-
Ensure that Include Bing content is selected if you’re connected to the internet and want images from the web included in your search results. *
Turning on this option gives you more search results to choose from. (Otherwise, leave that box cleared, and you’ll only receive search results from the pictures installed on your computer by Office 2010.)
-
Select Go to start the search.
The search results are shown in the task panel.
-
You can scroll vertically if the results don’t all fit in the task pane.
-
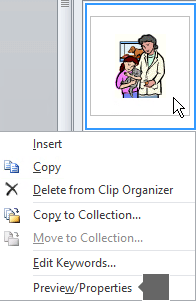
To see a larger version of a thumbnail image in the result list, or to simply see the image if all that is shown is a small red x placeholder, right-click the thumbnail and select Preview/Properties.
While you’re in the Preview/Properties window, you can browse through the images by selecting Previous and Next.
-
-
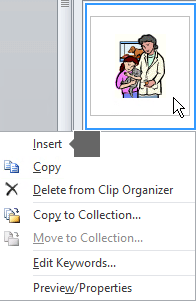
To insert a picture in your document, right-click the thumbnail image in the task panel, and select Insert.
Once the image is inserted, you can adjust its placement by selecting it and dragging with the mouse.

When you search for clip art and pictures online, you’ll be directed to Bing. You’re responsible for respecting copyright, and the license filter in Bing can help you choose which images to use.
* Bing Image Search filters are based on the highly respected Creative Commons license system. To better understand the licensing options, see Filter images by license type. You’re responsible for respecting the rights of others’ property, including copyright.
In Microsoft 365 for Mac, Office 2021 for Mac, and Office 2019 for Mac, beginning with version 16.19, you can go on the web to find clip art and other pictures.
STEP 1:
Select Insert > Pictures > Online Pictures
STEP 2:
Type a word or phrase to describe what you’re looking for, then press Enter.
STEP 3:
Filter the results by Type for Clipart.
STEP 4:
Select a picture.
STEP 5:
Select Insert.
That’s it!
The image is inserted in your Office document.
The licensing filter (Creative Commons only or All) can help you choose images that are appropriate for the use you have in mind. (Read about Creative Commons licenses here.)
Sorry, clip art isn’t supported in Office 2016 for Mac.
You can use Insert > Pictures to add pictures from your computer or from the Photo Browser.

Microsoft 365 supports Online Pictures, Icons, and 3D objects, and it gets feature updates monthly:
Buy or try Microsoft 365
You can insert clip art from the web in Word, PowerPoint, and Excel, or in OneNote.
Insert clip art in Word, PowerPoint, or Excel
-
Select Insert > Pictures > Stock Images.
Tabs across the top show you the types of pictures you can select from:
-
Images: A large set of high-resolution photographs featuring many different subjects.
-
Cutout People: Photos of people in various poses. The pictures have transparent backgrounds to help them fit easily into your document or to combine multiple pictures.
-
Stickers: Fun, animation-style drawings.
-
Icons (PowerPoint only): Small symbols covering numerous subjects. You can easily change color and resize them with no loss of image quality.
-
Illustrations (PowerPoint only): Many drawings, all in a similar style, covering numerous subjects.
-
Cartoon People (PowerPoint only): A large set of cartoon-style drawings. You can mix and match different parts, such as head/hair and facial expressions.
-
-
Select a tab, then browse the images by scrolling, or enter a term in the search box to filter the set of images.
-
Select an image or images, then choose Insert.
Insert clip art in OneNote
-
Select Insert > Picture > From Online.
-
In the Online Pictures dialog box, type words describing the kind of picture you want (such as roses), and then press Enter.
-
Select the Filter button
and then select Clipart under the Type category. -
Select the image you want to insert, then click the Insert button.
(You can only insert one picture at a time.)
 and then select Clipart under the Type category.
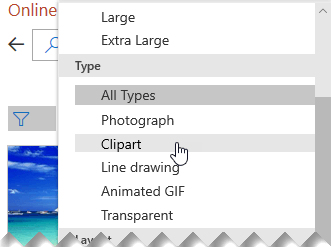
The licensing filter (Creative Commons only or All) can help you choose images that are appropriate for the use you have in mind. (Read about Creative Commons licenses here.)
See Also
Insert images, icons, and more in Microsoft 365
Make or find pictures in Office
Add a drawing to a Word document
Icons: A new kind of clip art
Need more help?
![]()
Загрузить PDF
![]()
Загрузить PDF
Из данной статьи вы узнаете, как вставить клипарт в Microsoft Word на компьютерах под управлением Windows и Mac OS X. В новых версиях MS Office клипарты были заменены изображениями Bing, но в Microsoft Word все равно можно найти и вставить клипарты.
-
1
Откройте документ Microsoft Word. Для этого дважды щелкните по документу Microsoft Word, в который нужно вставить клипарт.
- Также можно создать новый документ; для этого дважды щелкните по значку программы Microsoft Word, а затем нажмите «Новый документ».
-
2
Перейдите на вкладку Вставка. Она находится слева на синей ленте инструментов Word, которая расположена в верхней части окна Word. Откроется панель инструментов «Вставка».
-
3
Нажмите Изображения из интернета. Вы найдете эту опцию в разделе «Иллюстрации» на панели инструментов. Откроется всплывающее окно со строкой поиска Bing.
-
4
Введите поисковый запрос со словом клипарт. Введите ключевое слово, которое описывает нужный клипарт, затем введите слово клипарт, после этого нажмите ↵ Enter. Bing приступит к поиску клипартов, которые соответствуют поисковому запросу.
- Например: чтобы найти клипарт со слонами, введите слоны клипарт и нажмите ↵ Enter.
- У вас должен быть доступ в интернет, чтобы искать клипарты с помощью Bing.
-
5
Выберите клипарт. Щелкните по клипарту, который вы хотите вставить в документ Word. В верхнем левом углу изображения появится галочка, что свидетельствует о том, что клипарт выбран.
- Можно выбрать сразу несколько клипартов.
-
6
Нажмите Вставить. Эта кнопка находится в нижней части окна. Выбранный клипарт будет вставлен в документ Word.
Реклама


-
1
Откройте страницу поиска изображений Bing. Перейдите на страницу https://www.bing.com/images/. Описываемый процесс можно применить в Safari, Google Chrome и Firefox, но не факт, что и в других браузерах.[1]
-
2
Введите поисковый запрос. Введите ключевое слово, которое описывает нужный клипарт, а затем нажмите ⏎ Return. Запустится поиск изображений с помощью Bing.
-
3
Щелкните по Фильтр. Этот значок в виде воронки находится на правой стороне страницы Bing, чуть выше результатов поиска. Под строкой поиска и над результатами поиска отобразится ряд вкладок.
-
4
Щелкните по Тип ▼. Эта вкладка находится под панелью поиска. Откроется выпадающее меню.
-
5
Щелкните по Клипарт. Эта опция находится посередине выпадающего меню и позволит оставить в результатах поиска только клипарты.
-
6
Выберите клипарт. Щелкните по клипарту, который вы хотите вставить в документ Word.
-
7
Сохраните клипарт. Зажмите Ctrl, щелкните по клипарту, а затем нажмите «Сохранить изображение». Клипарт будет сохранен на компьютере.
-
8
Откройте документ Word. Для этого дважды щелкните по документу Word, в который нужно вставить клипарт.
- Также можно создать новый документ; для этого дважды щелкните по значку программы Microsoft Word, а затем нажмите «Новый документ».
-
9
Перейдите на вкладку Вставка. Она находится слева на синей ленте инструментов Word, которая расположена в верхней части окна Word. Откроется панель инструментов «Вставка».
- Не щелкайте по меню «Вставка» в верхней части экрана.
-
10
Нажмите Рисунки. Вы найдете эту опцию слева на панели инструментов. Откроется выпадающее меню.
-
11
Нажмите Рисунок из файла. Эта опция находится в нижней части выпадающего меню.
-
12
Выберите изображение. Для этого щелкните по сохраненному клипарту.
- Возможно, вам придется перейти в папку (на левой панели окна Finder), в которую скачался выбранный клипарт, например, в папку «Загрузки».
-
13
Нажмите Вставить. Эта кнопка находится в нижней части окна. Выбранный клипарт будет вставлен в документ Word.
Реклама


Советы
- Также можно вставить фотографии из фототеки компьютера; для этого нажмите «Вставка» > «Рисунки».
Реклама
Предупреждения
- Многие изображения (клипарты), которые найдет Bing, защищены авторским правом. Их можно использовать бесплатно в личных целях (например, в презентации), но если вы получаете от этого прибыль, ваши действия являются незаконными.
Реклама
Об этой статье
Эту страницу просматривали 40 736 раз.
Была ли эта статья полезной?
Plain text documents look plain and boring. The world is visual, and an easy way to spice up your document is with clip art.


The term “clip art” refers to simple drawings made for computer users for both digital and printed materials. They’re usually fun and whimsical.
Microsoft Word has a feature that makes adding Office clip art to your project easier than ever. As you’ll see in this article, you don’t have to leave Word to find and insert clip art into your Word document. That’s because Word has a built-in online browser you can use to find clip art for your material.
But your best bet is to use premium clipart in Word from Envato Elements. Elements offers thousands of stylish clipart packs for download now. Use them to learn how to insert clipart in Word and wow every reader!
Find Clip Art on Microsoft Word Now (Quickstart Video)
Do you want to quickly find out how to add clip art to your Microsoft Word document? Our quickstart video can help.
To learn even more about using clip art with Microsoft Word, study the written tutorial below.
How to Find Clip Art on Microsoft Word
Now, let’s learn how to insert clipart in Word. The first option here is to use Word’s built-in library of clipart. You can do this right inside the app!
The tips in this section were written using Windows and Office365. If you’ve got a different operating system or a different version of PowerPoint, your steps may be slightly different.
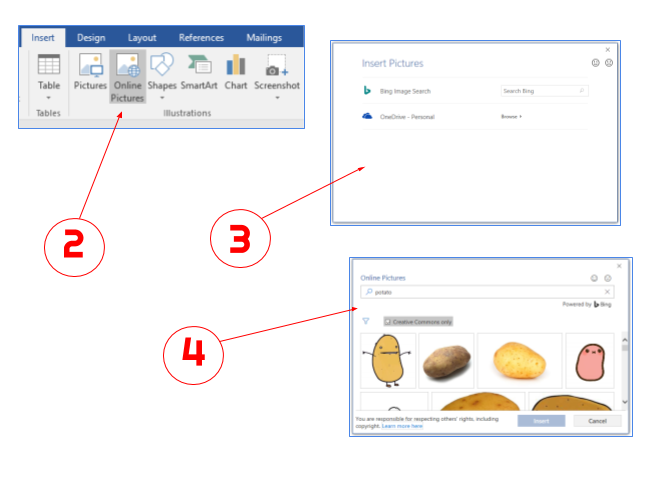
To get started finding clip art, first click on the Insert tab. Then, in the Illustrations group, click on the Pictures drop-down arrow. From the list of options, choose Online Pictures.


In the center of your Word screen, you’ll see the Online Pictures menu launch. In the search bar, type a keyword or phrase related to the image you want to use. Press Enter.
When you hit Enter, you’ll see images for your search term appear. Now, you’ll have a few options.


By default, the Creative Commons only filter is checked. This means the images’ creator has given permission for others to use, share, and build on their work. It’s always best to leave this option checked. Otherwise, you may find yourself using clipart and images that you’re not allowed to use in your work.
You can click on the filter icon to filter the results based on other dimensions:
- Size. Small, medium, large, or extra large
- Type. Photograph, clipart, line drawing, or transparent
- Layout. Square, wide, or tall
- Colors. Color only, black and white.


Click on Clipart and whatever other filters you want to use. This displays only clip art in the results, leaving out other types of images.


The image results will be filtered according to these settings. Scroll down the results to find a clip art for your document. If you’re not happy with the results, try using different keywords and filters.
How to Insert Clip Art
When you find the clip art you want to add to your document, click on it to select it.
To find out more about the image, click on the ellipsis on the lower-right corner of the image. This displays the image size and link to its source.


If you want to add the clipart to your Word document, click on its thumbnail. This will select the clipart in Word design. Then, find the Insert button in the lower right corner of the Online Pictures menu. Click it, and you’ll see the clipart appear in your Word doc.


You could also insert several clip art images all at the same time. To do so, scroll throughout the image results and click on all the images you wish to insert. Then, press Insert. Watch as every clipart image you selected appears on your page.
That’s it! You’ve learned how to insert clipart in Word easily. But you’re not done! Now, it’s time to learn how to use clip art with Word’s editing designs. This lets you make each piece of clipart your own, seamlessly merging it with your documents.
How to Edit Clip Art
With the clip art added to your Word document, you can now manipulate and edit it as you would any other image in Word.
For example, you can resize and rearrange clip art in Word. To begin, select the clip art, then click and drag one corner to resize the image. Then, you can click and drag on the center of the image to move it around the page.
Additionally, you can make many other changes and customizations to your favorite clipart in Word designs. Be sure your clipart is selected, then come up to the Picture Format tab, found on Word’s ribbon. Click on it.
Here, you have many choices. In the Adjust group, you can apply corrections and new colors to change up the look and feel of your clipart. In the Picture Styles group, you can add frames, borders, and more. For example, you can make your clip art black and white by opening the Color drop-down and choosing Grayscale from the Recolor group.


Use the other buttons on the Picture Format tab to achieve the look and effect you desire.
For example, click Wrap Text > Square to have the text run around the clip art. Or select other text wrap options to achieve the layout you’ve got in mind.


This controls how text interacts with your clipart, and how they fit together. It’s a key part of the design process, helping you ensure your documents always look their very best.
How to Insert Icons, the Modern Clip Art
There’s another kind of drawing you can add to your Word document. What are these? Icons! They’re super simple and have become popular both online and in printed form.
Icons are all over the screens of computers and mobile devices. In fact, many people have developed a kind of icon vocabulary. Most people know, for example, that the floppy disk icon means “save.” This includes folks who’ve never seen a floppy disk in their lives!
To insert an icon, place the cursor where you want the icon to be. Click the Insert tab, then click Icons.
![]()
![]()
![]()
The Stock Images menu opens, on the Icons tab. Use the search field to look for a specific icon. When you find the one you want to use, click on it to select it. Then, click Insert. The selected icon is added to the document.
![]()
![]()
![]()
From here you can treat the icon like any image in Word and change its size, orientation, position, text wrapping, and other settings.
For example, to change the color of the icon, select it, then click the Graphics Format tab. Click Graphics Fill, then select the color you wish to use from the drop-down.


Click on the thumbnail of the new color, and you’ll see Word apply it to the icon that you have selected.
How to Find More Clip Art Online
Want a wider selection of clip art images and icons to add to your Word project? You can look at external sources. And the best option here is Envato Elements.


Elements is the top source for professionally made Microsoft clip art, graphics, and icons. Plus, you’ll enjoy countless Microsoft Word templates! The offer is powerful.
For a flat monthly rate, you can download and use as many of these templates and assets as you want. It’s a tremendous creative value, and one that you can’t afford to miss in 2023 and beyond.


Elements also provides fonts, photos, stock video, video footage, music, and more. All these categories are included in the unlimited downloads offer. Join Elements today and start downloading!
How to Find Premium Graphics from Elements for More Professional Results
To find and use clip art from Elements, first log into your account. At the top of the homepage, you’ll see the search box. You can use this to find clip art of your own.


Begin by clicking on the drop-down arrow beside All Items. From the list of displayed options, choose Graphics. Next, type a keyword or phrase in the search bar. Click the search icon.
You’ll see an array of clipart designs appear. We’ll use the Truck Driver Sitting In Construction Truck clipart design to demonstrate. Click on the thumbnail of the file that you wish you use.
This opens the page for that graphic or graphic pack. This page gives you a preview of the images, as well as more information about the file, such as what formats and image sizes are included. Click the Download button to download the file.


The Add this file to a project dialog box opens. Check the appropriate box to add the file to an existing project. Then click Add & Download.
The file is downloaded into your computer. If it’s a zip file, double-click on the file name to unzip it.
Then, go back to your Word document, and place the cursor where you want to insert the clip art. Click on the Insert tab. Next, click Pictures > This Device. Find your clipart page, select it by clicking, and then choose Insert.


Word will add clipart that you’ve selected. From here, you can move and style it like any other image — just like we did above!


As you can see, it’s a great idea to use clipart in Word from Envato Elements. With thousands of expertly crafted designs to choose from, you’re sure to find the perfect design for your next project. Get started today!
6 Bestselling Clip Art Images From Envato Elements
Clip art images have come a long way since they were first used in desktop publishing in the 1980s.


The following bestselling clip art graphics in Elements show you the wide range of options you’ve got at your fingertips. They’re proof that clip art can look anywhere from whimsical to technical to cartoonish, and everything between.
1. Maternity Clip Art


As the name suggests, this pack includes clip art of images related to pregnancy, maternity, nursery, and mom and baby. All clip art images are in PNG format, which means they’ve got a transparent background. This makes it easy for you to add them to a collage, design, or layout.
2. Christmas Clip Arts


Whoever thinks clip art can’t be elegant should check out this collection. Although they maintain the hand-drawn charm that clip art images are known for, these Christmas-themed clip art graphics are tasteful and graceful at the same time. The collection includes 14 clip art images in both EPS and PNG formats.
3. Flower Set Clip Art


This clip art set is perfect for any flower-related project. It delivers plenty of value: a total of 47 flower clip art images, available in both EPS and PNG file formats. The clip art images are 6 inches x 6 inches, so you can use them even in large, printed projects.
4. Warehouse Clip Art


The boxy, technical look of these images are perfect for warehouse, manufacturing, and industry-related projects. The clip art graphics come in EPS and AI formats. This means you can edit them if you’re so inclined.
5. Outer Space Vector Clip Art


It’s no wonder this pack of outer space-themed clip art images is a bestseller. The graphics are just plain fun! The set has 25 cute clip art images, including a green alien and a monkey in a space suit. The graphics come in a variety of formats, including EPS, PNG, and SVG.
6. Watercolor Clip Art Abstract


These could be one of the most unusual clip art images you’ve ever seen. While most clip art is hand-drawn, this set of flower clip art is hand painted in watercolor, making for a very pretty effect. A total of 18 individual images are included in PNG format. Each flower is 5 inches x 5 inches in size.
Learn More About Microsoft Word
A clip art or icon you add to your Word document behaves like any image. That’s why it pays to learn more about how to work with images and pictures in Word. The following posts can help:
Tips for Using Clip Art in Word
Now that you know how to find, insert, and format clip art images in Word, you might be tempted to go crazy with them. As with other creative elements in a material, clip art can be misused or abused, making your document look amateurish and unprofessional. Careless use of other people’s clip art can even get you into trouble.
To avoid these issues, consider the following tips for using clip art in Word:
1. Check on Permission to Use the Image
As mentioned above, clip art that are publicly available come with different licenses. Even among clip art with the Creative Commons license, different rights and obligations may be assigned.
And so, look at the license of the clip art you want to use and ensure that you comply with it. For example, some clip art with Creative Commons license may not be free for commercial use.
Clip art, icons, and other graphics you download on Envato Elements come with broad commercial rights. This means you can use them for both personal and commercial projects. With that said, there are certain things you’re not allowed to do. This page has more details.
2. Choose Clip Art That Matches the Tone and Visual Style of Your Brand
In general, clip art tends to be casual. Some may even consider them childish. So, clip art tends to go better on projects that are informal in tone and visual style. Icons, on the other hand, tend to be acceptable even in more formal, academic, and corporate materials.
![]()
![]()
![]()
You can only decide on a case-by-case basis, because there are many different kinds of clip art. You may find some that work for more formal projects, especially if you get premium clip art from Elements.
3. Use Clip Art Only When It Adds Meaning to Your Document
To avoid the misuse of clip art, use it only when it makes your document more meaningful. It’s probably a good idea to add clip art to your project if they:
- act like visual shortcuts or metaphors, either replacing or enriching the text
- make the text easier to understand or navigate
- reinforce the personality or style of your brand
A common mistake is to add clip art for its own sake. In this case, clip art only clutters up your project. It doesn’t add value and it can even annoy or turn off your reader.
Download Some Fun Clip Art for Your Microsoft Word Document Today
Clip art continues to be a fun way to make your projects more lively, interesting, and effective. These simple graphics are easy for most users to understand. A type of clip art, the icon, has in fact become ubiquitous in digital materials and screens.
You can also find top-quality clip art, icons, and other graphics at Elements. Elements is the perfect choice for you, if you create many Word documents. You’ll enjoy unlimited downloads of icons, graphics, and Word templates for a flat rate.
Now, it’s time to embrace the idea of clipart! Find your favorite designs and start adding them today. You’ll be crafting stunning and unique Word documents in moments.
Editorial Note: This tutorial was originally published July of 2020. It’s been completely reviewed for accuracy and relevancy and a video has been added by Andrew Childress.
Clip Art is the term given to pre-made images that are ready for use in your Microsoft Word documents. There are many Clip Art categories, such as Christmas, Special Occasions, People, Business, Decorative Elements, Animals, Cartoons and many more.
Contents
- 1 Where is clipart in Word?
- 2 What is clipart and how do you use it?
- 3 Why do we use clipart?
- 4 What is clip art called now?
- 5 How do you create clipart?
- 6 How do you insert clipart on a Word document?
- 7 What is difference between WordArt and clipart?
- 8 What is the difference between picture and clipart?
- 9 What is PowerPoint clip art?
- 10 Is clip art a thing?
- 11 What is clipart gallery?
- 12 Is clip art copyrighted?
- 13 How can I get clip art for free?
- 14 How do I make clipart online?
- 15 How do I turn a picture into clipart?
- 16 Is Microsoft clipart free to use?
- 17 What is the difference between ClipArt and clipboard?
- 18 How can you draw shapes in Microsoft Word?
- 19 What is the difference between WordArt and SmartArt?
- 20 Can you edit pictures on word?
On the Insert tab of the toolbar ribbon, in the Images section, select Clip Art. and then you’ll see the Insert menu and the Clip Art icon.) The Clip Art task panel appears on the right side of the application window. In the Search for box, type keywords that describe the art you’re looking for.
What is clipart and how do you use it?
Clip art is the term from graphic arts which defines pre-made images that can be used as visuals for different media. In other words, it is a collection of pictures which may be integrated into a document, presentation, banner and other stuff that requires visuals.
Why do we use clipart?
Using clip art images you can create desktop wallpapers, collages, websites. They are also used in designing advertising posters, booklets, calendars, etc. So, the clip art collection is a necessary tool that every webmaster has.
What is clip art called now?
Microsoft killed clip art and replaced it with Bing Image Search, which in Office filters for Creative Commons images. It’s one of many resources and you can still find clip art elsewhere. Remember Microsoft’s clip art?
How do you create clipart?
Step-by-step Instructions
- Start with a representative picture as your base.
- Create a semi transparent shape and remove the lines.
- Insert shapes to roughly trace the images.
- Rotate and size/scale shapes to roughly match picture.
- Modify the shapes for a closer fit.
- After everything traced, turn off the semi transparency.
How do you insert clipart on a Word document?
Go to the search bar and type a word or phrase. Or, select a category. Select Filter, go to the Type section, then choose Clipart. Choose a picture, then select Insert to place the clipart image in your document.
What is difference between WordArt and clipart?
Answer: Clip art is set of images provided by Microsoft office , which can be used in the document . Word art is stylish text styles provided by Microsoft office. Answer: ClipArt is animated pictures and WordArt is like animated words.
What is the difference between picture and clipart?
Clipart is a graphic art whereas Picture is an artifact. 2. Clipart is generally found in electronic form whereas Picture can be in electronic as well as in printed form.Clipart is composed by hand or by some kind of computer software whereas Picture is captured by optical devices such as cameras, mirrors etc.
What is PowerPoint clip art?
Clip Art is a collection of media files (images, videos, audio, and animation files) that Microsoft includes with the PowerPoint application.This feature works the same in all modern versions of Microsoft PowerPoint: 2010, 2013, and 2016. Click in the slide where you want to insert a clip art file.
Is clip art a thing?
Clip art search is still inside Office – for now
When you want to add an image to your file, head to the ribbon and click Insert, then Online Pictures.Office.com clip art still works for now, so charge ahead if that’s what you want to use. Type in your search term and then select your favorite zany image.
What is clipart gallery?
Clip art is a collection of pictures or images that can be imported into a document or another program.Clip art galleries many contain anywhere from a few images to hundreds of thousands of images.
Is clip art copyrighted?
Public Domain clip art is not copyright protected and can generally be used for any purpose. Regardless, you should always read the Terms and Conditions of Use to determine what you can and can’t do with clip art.
How can I get clip art for free?
15 Best Free Clipart Sites to Level up Your Designs
- Fotor.com – Best Friendly Clipart Website.
- Freepik.com – Best Overall Clipart Website.
- Etc.usf.edu – Best Educational Clipart Website.
- 4.Vecteezy.com – Best Vector Graphics Website.
- All-free-download.com – Best Commercial Use Clipart Website.
How do I make clipart online?
Make Photo Designs with Clipart Images in 3 Steps
- Choose a Template. Choose from hundreds of templates to start.
- Edit. Add photos and edit your design with clipart images.
- Save/Share. Save your photo design as image or share it online via social media.
How do I turn a picture into clipart?
How to Make Clipart from a Photo
- To begin, open the photo that you want to work with.
- Select the photo with the Pick tool and go to Bitmaps > Outline Trace > Clipart.
Is Microsoft clipart free to use?
Yes. Generally, Microsoft clip art is only licensed for personal, educational, and non-commercial uses.
What is the difference between ClipArt and clipboard?
The clipboard is a buffer that certain operating systems have inside and between software programs for quick-term storage whereas the clip art Clip art is a series of images or photos that can be inserted into a file.
How can you draw shapes in Microsoft Word?
Click in your document where you want to create the drawing. On the Insert tab, in the Illustrations group, click Shapes. When you find the shape you want to insert, double-click to insert it automatically, or click and drag to draw it in your document.
What is the difference between WordArt and SmartArt?
WordArt lets you add fancy text to your Excel 2013 document. SmartArt lets you add small graphical lists and diagrams into your worksheet. You can also capture screenshots of Windows or other objects to be inserted into your Excel document.
Can you edit pictures on word?
Microsoft Office Picture Manager isn’t included in the new Office but you can use Word to edit photos. Word has many built-in photo editing features, so you might not need a separate program.In Word, you can choose color variations, crop, compress at different levels, and apply some special effects.
How to Find Clip Art in Word
Each version of Microsoft Word below has slightly different steps for finding and inserting clip art. Follow the instructions for the Microsoft Word version you currently use.
For Word 2016 and 2013:
- Open the Word where you would like to insert the clip art.
- Click the [Insert] tab > From the «Illustrations» group, click [Online Pictures]. A pop-up will appear allowing you to search Office.com or Bing.
- In one of the search boxes, type a keyword for the clip art you would like to find (e.g., potato) > press [Enter].
- From the resulting list of pictures, choose the one you would like to add > Click [Insert].
For Word 2010:
- Open the Word document where you would like to insert the clip art.
- Click the [Insert] tab > From the «Illustrations» group, click [Clip Art]. A clip art pane will open to the right of the document.
- In the «Search for» box, type a term or keyword for the clip art you would like to find (e.g., «potato») > Click [Go]. The clip art will appear in the pane below.
- To insert the clip art, place your cursor where you would like to insert the clipart in your document and click the image from the clip art pane.
For Word 2007:
- Open the Word document where you would like to insert the clip art.
- Click the [Insert] tab > From the «Illustrations» group, click [Clip Art]. A clip art pane will open to the right of the document.
- Select «Organize Clips» on the bottom of the pane.
- In the left menu, double-click «Office Collections.»
- Double-click any category that interests you.
- To insert the clip art, place your cursor where you would like to insert the clipart in your document and click the image from the clip art pane.
Keywords: clipart, use clipart, find clipart, where’s clipart in word, where’s clip art in word. using clipart, using clip art, office 2010
Share This Post
-
Facebook
-
Twitter
-
LinkedIn