
“Classes struggle, some classes triumph, others are eliminated. Such is history” – Chairman Mao
A Quick Guide to the VBA Class Module
| Item | Explanation |
|---|---|
| Class Module | Allows the user to create their own objects. |
| Method | A public function or sub in the class module. |
| Member variable | A variable declared in the class module. |
| Property | Special function/subs that behave like variables when used |
| Property types | Get, Set and Let. |
| Event — Initialize | Sub that automatically runs when the class module object is created. |
| Event — Terminate | Sub that automatically runs when the class module object is deleted. |
| Declaring and Creating — Static |
Dim o As New Class1 |
| Declaring and Creating — Dynamic | Dim o As Class1 Set o = New Class1 |
| Calling a class module sub | o.WriteValues Total |
| Calling a class module function | Amount = o.Calculate() |
| Using a class module property | o.Amount = 1 Total = o.Amount |
The Webinar
Members of the Webinar Archives can access the webinar for this article by clicking on the image below.
(Note: Archive members have access to the webinar archive.)

Introduction
VBA Class Modules allow the user to create their own objects. If you are not familiar with objects then I would highly recommend that you first check out my previous post VBA Objects – The Ultimate Guide.
In languages such as C# and Java, classes are used to create objects. Class Modules are the VBA equivalent of these classes. The major difference is that VBA Class Modules have a very limited type of Inheritance* compared to classes in the other languages. In VBA, Inheritance works in a similar way to Interfaces** in C#Java.
In VBA we have built-in objects such as the Collection, Workbook, Worksheet and so on. The purpose of VBA Class Modules is to allow us to custom build our own objects.
Let’s start this post by looking at why we use objects in the first place.
*Inheritance is using an existing class to build a new class.
**Interfaces are a form of Inheritance that forces a class to implement specifics procedures or properties.
Download the Source Code
Why Do We Use Objects
Using objects allows us to build our applications like we are using building blocks.
The idea is that the code of each object is self-contained. It is completely independent of any other code in our application.
This is similar to how things are built using Lego® bricks. There are many different types of Lego® components used. For example, a block, steering wheel, and laser are different items. They behave completely independently of each other. The wheel spins, the laser rotates etc. Yet we can connect them together to create a building, vehicle, space station and so on.
If you are still not clear about this then don’t worry. We’ll be breaking it all down into simple terms in the rest of this post.
Advantages of Using Objects
Treating parts of our code as blocks provide us with a lot of great advantages
- It allows us to build an application one block at a time.
- It is much easier to test individual parts of an application.
- Updating code won’t cause problems in other parts of the application.
- It is easy to add objects between applications.

Not a good look for your code © BigStockPhoto.com
Disadvantages of Using Objects
With most things in life there are pros and cons. Using VBA class modules is no different. The following are the disadvantages of using class module to create objects
- It takes more time initially to build applications*.
- It is not always easy to clearly define what an object is.
- People new to classes and objects can find them difficult to understand at first.
*If you create an application using objects it will take longer to create it initially as you have to spend more time planning and designing it. However, in the long run it will save you a huge amount of time. Your code will be easier to manage, update and reuse.
Creating a Simple Class Module
If you would like to see working examples of this code you can download the source code from the top of this post.
Let’s look at a very simple example of creating a class module and using it in our code.
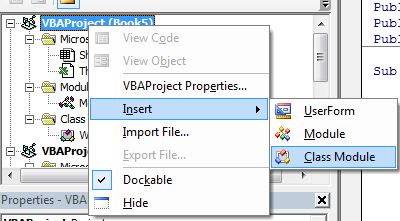
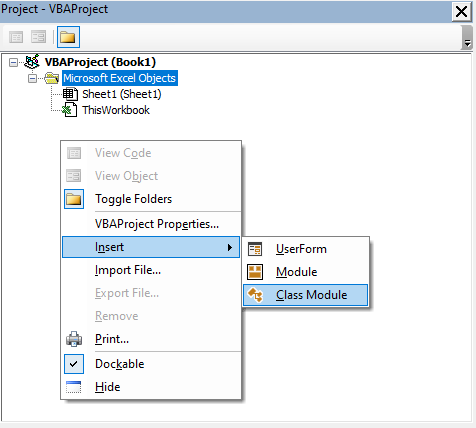
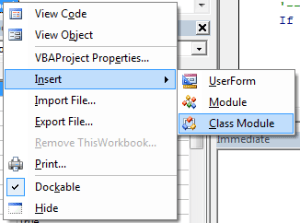
To create a class module we right-click in the Project window and then select Insert and Class Module

Adding a Class Module
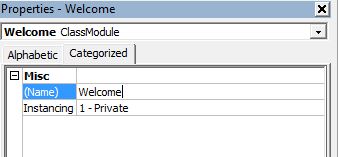
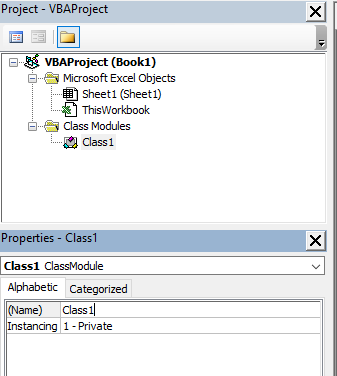
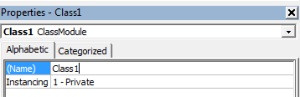
Our new class is called Class1. We can change the name in the Properties window as the following screenshot shows:

Let’s change the name of the class module to clsCustomer. Then we will add a variable to the class module like this:
Public Name As String

We can now use this class module in any module(standard or class) in our workbook. For example
' Create the object from the class module
Dim oCustomer As New clsCustomer

' Set the customer name
oCustomer.Name = "John"

' Print the name to the Immediate Window(Ctrl + G)
Debug.Print oCustomer.Name
Class Module versus Objects
People who are new to using classes and VBA class modules, often get confused between what is a class and what is an object.
Let’s look at a real world example. Think of a mass produced item like a coffee mug. A design of the mug is created first. Then, thousands of coffee mugs are created from this design.
This is similar to how class modules and objects work.
The class module can be thought of as the design.
The object can be thought of as the item that is created from the design.
The New keyword in VBA is what we use to create an object from a class module. For example:
' Creating objects using new
Dim oItem As New Class1
Dim oCustomer1 As New clsCustomer
Dim coll As New Collection
Note: We don’t use New with items such as Workbooks and Worksheets. See When New is not required for more information.
VBA Class Modules Versus VBA Normal Modules
Writing code in a class module is almost the same as writing code in a normal module. We can use the same code we use in normal modules. It’s how this code is used which is very different.
Let’s look at the two main differences between the class and the normal module. These often cause confusion among new users.
Difference 1 – How the modules are used
If you want to use a sub/function etc. from a class module you must create the object first.
For example, imagine we have two identical PrintCustomer subs. One is in a class module and one is in a normal module…
' CLASS MODULE CODE - clsCustomer
Public Sub PrintCustomer()
    Debug.Print "Sample Output"
End Sub
' NORMAL MODULE CODE
Public Sub PrintCustomer()
    Debug.Print "Sample Output"
End Sub
You will notice the code for both is exactly the same.
To use the PrintCustomer sub from the class module, you must first create an object of that type
' Other Module
' https://excelmacromastery.com/
Sub UseCustomer()

    Dim oCust As New clsCustomer
    oCust.PrintCustomer

End Sub
To use PrintCustomer from the normal module you can call it directly
' Other Module
' https://excelmacromastery.com/
Sub UseCustomer()

    PrintCustomer

End Sub
Difference 2 – Number of copies
When you create a variable in a normal module there is only one copy of it. For a class module, there is one copy of the variable for each object you create.
For example, imagine we create a variable StudentName in both a class and normal module:
' NORMAL MODULE
Public StudentName As String
' CLASS MODULE called clsStudent
Public StudentName As String
For the normal module variable there will only be one copy of this variable in our application.
StudentName = "John"
For the class module, a new copy of the variable StudentName is created each time a new object is created.
Dim student1 As New clsStudent
Dim student2 As New clsStudent

student1.StudentName = "Bill"
student2.StudentName = "Ted"
When you fully understand VBA class modules, these differences will seem obvious.
The Parts of a Class Module
There are four different items in a class module. These are
- Methods – functions/subs.
- Member variables – variables.
- Properties– types of functions/subs that behave like variables.
- Events – subs that are triggered by an event.
You can see they are all either functions, subs or variables.
Let’s have a quick look at class that has examples of each of these:
' CLASS MODULE CODE from clsAccount
' https://excelmacromastery.com/vba-class-modules/

' Member variable
Private m_balance As Double

' Properties
Property Get Balance() As Double
    Balance = m_balance
End Property

Property Let Balance(value As Double)
    m_balance = value
End Property

' Event - triggered when class created
Private Sub Class_Initialize()
    m_balance = 100
End Sub

' Methods
Public Sub Withdraw(amount As Double)
    m_balance = m_balance - amount
End Sub

Public Sub Deposit(amount As Double)
    m_balance = m_balance + amount
End Sub
The following code demonstrates how this class could be used:
' This sub uses the clsAccount class
' The results are printed to the Immediate Window(Ctrl + G)
' https://excelmacromastery.com/vba-class-modules/
Sub Demo_clsAccount()

    Dim oAccount As New clsAccount

    ' Print the balance
    Debug.Print "Starting balance is: " & oAccount.Balance

    ' Deposit money
    oAccount.Deposit 25

    ' Print the balance
    Debug.Print "Balance after deposit is: " & oAccount.Balance

    ' Withdraw Money
    oAccount.Withdraw 100

    ' Print the balance
    Debug.Print "Balance after withdrawl is: " & oAccount.Balance

End Sub
If we run the code we will get the following:
Starting balance is: 100
Balance after deposit is: 125
Balance after withdrawl is: 25
Now that we have seen examples, let’s take a look at each of these in turn.
Class Module Methods
Methods refer to the procedures of the class. In VBA procedures are subs and functions. Like member variables they can be Public or Private.
Let’s look at an example:
' CLASS MODULE CODE for clsExample
' https://excelmacromastery.com/vba-class-modules/

' Public procedures can be called from outside the object
Public Sub PrintText(text As String)
    Debug.Print text
End Sub

Public Function Calculate(amount As Double) As Double
    Calculate = amount - GetDeduction
End Function

' private procedures can only be called from within the Class Module
Private Function GetDeduction() As Double
    GetDeduction = 2.78
End Function
We can use the clsExample class module like this:
' Sub used to demonstrate Class clsExample
' https://excelmacromastery.com/vba-class-modules/
Public Sub ClassMembers()

    Dim oSimple As New clsExample

    oSimple.PrintText "Hello"

    Dim total As Double
    total = oSimple.Calculate(22.44)

    Debug.Print total

End Sub
Class Module Member Variables
The member variable is very similar to the normal variable we use in VBA. The difference is we use Public or Private instead of Dim.
' CLASS MODULE CODE

Private Balance As Double
Public AccountID As String
Note: Dim and Private do exactly the same thing but the convention is to use Dim in sub/functions and to use Private outside sub/functions.
The Public keyword means the variable can be accessed from outside the class module. For example:
' This code will give an ERROR!!
Sub Demo_BankAccount()

    Dim oAccount As New clsBankAccount

    ' Valid - AccountID is public
    oAccount.AccountID = "499789"

    ' ERROR - Balance is private
    oAccount.Balance = 678.9

End Sub
In the above example, we cannot access Balance because it is declared as Private. We can only use a Private variable within the class module. We can use in a function/sub in the class module e.g.
' CLASS MODULE CODE
' https://excelmacromastery.com/
Private Balance As Double

Public Sub SetBalance()
    Balance = 100
    Debug.Print Balance
End Sub
It is considered poor practice to have public member variables. This is because you are allowing code outside the object to interfere with how the class works. The purpose of the using classes is so that we hide what is happening from the caller.
To avoid the user directly talking to our member variables we use Properties.
Class Module Properties
- Get – returns an object or value from the class
- Let – sets a value in the class
- Set – sets an object in the class
Format of VBA Property
The normal format for the properties are as follows:
Public Property Get () As Type
End Property

Public Property Let (varname As Type )
End Property

Public Property Set (varname As Type )
End Property
We have seen already that the Property is simply a type of sub. The purpose of the Property is to allow the caller to get and set values.
Why we use Properties
Why can’t we just make the variables Public and use them directly?
Let’s explain with some examples. Imagine we have a class that maintains a list of Countries. We could store the list as an array
' Use array to store countries
' https://excelmacromastery.com/
Public arrCountries As Variant

' Set size of array when class is initialized
' https://excelmacromastery.com/
Private Sub Class_Initialize()
    ReDim arrCountries(1 To 1000)
End Sub
When the user wants to get the number of countries in the list they could do this:
' NORMAL MODULE CODE
Dim oCountry As New clsCountry

' Get the number of items
NumCountries = UBound(oCountry.arrCountries) - LBound(oCountry.arrCountries) + 1
There are two major problems with the above code:
- To get the number of countries you need to know how the list is stored e.g. Array.
- If we change the Array to a Collection, we need to change all code that reference the array directly.
To solve these problems we can create a function to return the number of countries
' CLASS MODULE CODE - clsCountryList
' Array
Private arrCountries() As String

Public Function Count() As Long
    Count = UBound(arrCountries) + 1
End Function
We then use it like this:
' MODULE CODE
Dim oCountries As New clsCountries

Debug.Print "Number of countries is " & oCountries.Count
This code solves the two problems we listed above. We can change our Array to a Collection and the caller code will still work e.g.
' CLASS MODULE CODE
' Collection
' https://excelmacromastery.com/
Private collCountries() As Collection

Public Function Count() As Long
    Count = collCountries.Count
End Function
The caller is oblivious to how the countries are stored. All the caller needs to know is that the Count function will return the number of countries.
As we have just seen, a sub or function provides a solution to the above problems. However, using a Property can provide a more elegant solution.
Using a Property instead of a Function/Sub
Instead of the creating a Count Function we can create a Count Property. As you can see below they are very similar:
' Replace this
Public Function Count() As Long
    Count = UBound(m_countries) - LBound(m_countries) + 1
End Function

' With this
Property Get Count() As Long
    Count = UBound(m_countries) - LBound(m_countries) + 1
End Property
In this scenario, there is not a lot of difference between using the Property and using a function. However, there are differences. We normally create a Get and Let property like this:
' https://excelmacromastery.com/vba-class-modules/

Private m_totalCost As Double

Property Get totalCost() As Long
     totalCost = m_totalCost
End Property

Property Let totalCost(value As Long)
     m_totalCost = value
End Property
Using Let allows us to treat the property like a variable. So we can do this
oAccount.TotalCost = 6
The second difference is that using Let and Get allows us to use the same name when referencing the Get or Let property. So we can use the property like a variable. This is the purpose of using Properties over a sub and function.
oAccount.TotalCost = 6
value = oAccount.TotalCost
If we used a function and a sub then we cannot get the behaviour of a variable. Instead we have to call two different procedures e.g.
oAccount.SetTotalCost 6
value = oAccount.GetTotalCost
You can also see that when we used Let we can assign the value like a variable. When we use SetTotalCost , we had to pass it as a parameter.
The Property in a Nutshell
- The Property hides the details of the implementation from the caller.
- The Property allows us to provide the same behaviour as a variable.
Types of VBA Property
There are three types of Properties. We have seen Get and Let already. The one we haven’t looked at is Set.
Set is similar to Let but it is used for an object(see Assigning VBA Objects for more detail about this).
Originally in Visual Basic, the Let keyword was used to assign a variable. In fact, we can still use it if we like.
' These line are equivalent
Let a = 7
a = 7
So we use Let to assign a value to a variable and we use Set to assign an object to an object variable.
' Using Let
Dim a As Long
Let a = 7

' Using Set
Dim coll1 As Collection, coll2 As Collection
Set coll1 = New Collection
Set coll2 = coll1
- Let is used to assign a value to a basic variable type.
- Set is used to assign an object to an object variable.
In the following example, we use Get and Let properties for a string variable:
' CLASS MODULE CODE for clsPerson
' https://excelmacromastery.com/vba-class-modules/

' SET/LET PROPERTIES for a variable
Private m_name As String

' Get/Let Properties
Property Get name() As String
    name = m_name
End Property

Property Let name(name As String)
    m_name = name
End Property
We can then use the name properties like this:
' Testing Let and Set for the clsPerson Class
' https://excelmacromastery.com/vba-class-modules/
Sub TestLetSet()

    Dim name As String
    Dim oPerson As New clsPerson

    ' Let Property
    oPerson.name = "Bill"

    ' Get Property
    name = oPerson.name

End Sub
In the next example, we use Get and Set properties for an object variable:
' CLASS MODULE CODE for clsCurrency
' https://excelmacromastery.com/vba-class-modules/

Private m_Prices As Collection

' Get/Set Properties
Property Get Prices() As Collection
    Set Prices = m_Prices
End Property

Property Set Prices(newPrices As Collection)
    Set m_Prices = newPrices
End Property
We can then use the properties like this:
' The code below demonstrates how to use the LetSet properties with a class.
'
' 1. The sub creates a collection and adds value.
' 2. We then add it to the clsCurrency class object using the Set Property.
' 3. We then read it from the class object usiing the Get property.
'
' https://excelmacromastery.com/vba-class-modules/
Sub TestLetSet()

    ' Create a collection and add prices
    Dim Prices As New Collection
    Prices.Add 21.23
    Prices.Add 22.12
    Prices.Add 20.12

    Dim oCurrency As New clsCurrency

    ' Uses the Set property of clsCurrency to
    ' add the collection to the class
    Set oCurrency.Prices = Prices

    Dim PricesCopy As Collection
    ' Uses the Get property of clsCurrency
    ' to read the collection from the class
    Set PricesCopy = oCurrency.Prices

    ' Print the results to the Immediate Window(Ctrl + G)
    PrintCollection Prices, "Prices"
    PrintCollection PricesCopy, "Copy"

End Sub

' Print the contents of a Collection to the Immediate Window(Ctrl + G)
Sub PrintCollection(c As Collection, name As String)

    Debug.Print vbNewLine & "Printing " & name & ":"

    Dim item As Variant
    For Each item In c
        Debug.Print item
    Next item

End Sub
We use the Get property to return the values for both items. Notice that even though we use the Get Property to return the Collection, we still need to use the Set keyword to assign it.
One very important thing to understand is that when we use Set we are still referencing the same collection. Set is not creating a copy of the collection. You can read more about this here
Class Module Events
If you to see working examples of this code you can download the source code from the top of this post.
A class module has two events
- Initialize – occurs when a new object of the class is created.
- Terminate – occurrs when the class object is deleted.
In Object-Oriented languages like C++, these events are referred to as the Constructor and the Destructor. In most languages, you can pass parameters to a constructor but in VBA you cannot. We can use a Class Factory to get around this issue as we will see below.
Initialize
Let’s create a very simple class module called clsSimple with Initialize and Terminate events:
' CLASS MODULE CODE
' https://excelmacromastery.com/
Private Sub Class_Initialize()
    MsgBox "Class is being initialized"
End Sub

Private Sub Class_Terminate()
    MsgBox "Class is being terminated"
End Sub

Public Sub PrintHello()
    Debug.Print "Hello"
End Sub
In the following example, we use Dim and New to create the object.
In this case, oSimple is not created until we reference it for the first time e.g.
' https://excelmacromastery.com/
Sub ClassEventsInit2()

    Dim oSimple As New clsSimple

    ' Initialize occurs here
    oSimple.PrintHello

End Sub
When we use Set and New together the behaviour is different. In this case the object is created when Set is used e.g.
' https://excelmacromastery.com/
Sub ClassEventsInit()

    Dim oSimple As clsSimple

    ' Initialize occurs here
    Set oSimple = New clsSimple

    oSimple.PrintHello

End Sub
Note: For more information about the different between using New with Dim and using New with Set see Subtle Differences of Dim Versus Set
As I said earlier, you cannot pass a parameter to Initialize. If you need to do this you need a function to create the object first
' CLASS MODULE - clsSimple
' https://excelmacromastery.com/
Public Sub Init(Price As Double)

End Sub

' NORMAL MODULE
Public Sub Test()

    ' Use CreateSimpleObject function
    Dim oSimple As clsSimple
    Set oSimple = CreateSimpleObject(199.99)

End Sub

Public Function CreateSimpleObject(Price As Double) As clsSimple

    Dim oSimple As New clsSimple
    oSimple.Init Price

    Set CreateSimpleObject = oSimple

End Function
We will expand on this CreateSimpleObject in Example 2 to create a Class Factory.
Terminate
The Terminate event occurs when the class is deleted. This happens when we set it to Nothing
' https://excelmacromastery.com/
Sub ClassEventsTerm()

    Dim oSimple As clsSimple
    Set oSimple = New clsSimple

    ' Terminate occurs here
    Set oSimple = Nothing

End Sub
If we don’t set the object to Nothing then VBA will automatically delete it when it goes out of scope.
What this means is that if we create an object in a procedure, when that procedure ends VBA will delete any objects that were created.
' https://excelmacromastery.com/
Sub ClassEventsTerm2()

    Dim oSimple As New clsSimple

    ' Initialize occurs here
    oSimple.PrintHello

   ' oSimple is deleted when we exit this Sub calling Terminate
End Sub
Class Module Example 1
In this example, we are going to look at a very common use of a Class module.
Imagine we have the following data

We want to read the Albums based on a range of years and then create various reports.
We could use a 2D Array for this or a Collection of collections e.g.
' https://excelmacromastery.com/
For i = 2 To rg.Rows.Count

    Year = rg.Cells(i, 3)
    If startYear <= Year And endYear >= Year Then

        ' Create a new collection for each row
        Set rowColl = New Collect

        ' Add artist
        rowColl.Add rg.Cells(i, 1).Value
        ' Add Title
        rowColl.Add rg.Cells(i, 2).Value

        ' and so on

        ' Add row collection to main collection
        coll.Add rowColl

    End If

Next i
As you can imagine this code would get messy very quickly.

© BigStockPhoto.com
Lucky for us we have VBA class modules to make our life easier. We can create a class module to store the items.
' clsAlbum class module
Private m_sArtist As String
Private m_sTitle As String
Private m_sYear As String
Private m_sGenre As String
Private m_sSales As String

' Properties
' https://excelmacromastery.com/
Public Property Get Artist() As String
    Artist = m_sArtist
End Property
Public Property Let Artist(ByVal sArtist As String)
    m_sArtist = sArtist
End Property

' etc
Each time we want to add a record we can do it as follows:
' Declare the Variable
Dim oAlbum As clsAlbum

' Create new album
Set oAlbum = New clsAlbum

' Add the details
oAlbum.Artist = rg.Cells(i, 1)
oAlbum.Title = rg.Cells(i, 2)
oAlbum.Year = rg.Cells(i, 3)
oAlbum.Genre = rg.Cells(i, 4)
oAlbum.Sales = rg.Cells(i, 5)

' Add the album object to the collection
coll.Add oAlbum
You can see that this makes our code much more readable. It is clear what Artist, Title etc. are being used for.
We can then easily use this data to create reports, write to files etc.
' https://excelmacromastery.com/
Sub PrintAlbum(coll As Collection)

    Dim oAlbum As clsAlbum

    For Each oAlbum In coll
        ' Print out the title and artist for each album
        Debug.Print oAlbum.Title, oAlbum.Artist
    Next

End Sub
Below is the full code for this example:
' https://excelmacromastery.com/
Sub CreateReport()

    Dim coll As Collection
    ' read the data
    Set coll = ReadAlbums(1990, 2001)

    ' Print the album details
    PrintAlbum coll

    ' Print the total sales
    PrintTotalSales coll

End Sub

Function ReadAlbums(startYear As Long, endYear As Long) _
              As Collection

    Dim rg As Range
    Set rg = Sheet1.Range("A1").CurrentRegion

    ' Create a collection to store the albums
    Dim coll As New Collection
    Dim oAlbum As clsAlbum

    Dim i As Long, Year As Long
    For i = 2 To rg.Rows.Count

        Year = rg.Cells(i, 3)
        If startYear <= Year And endYear >= Year Then
            ' Create new album
            Set oAlbum = New clsAlbum
            ' Add the details
            oAlbum.Artist = rg.Cells(i, 1)
            oAlbum.Title = rg.Cells(i, 2)
            oAlbum.Year = Year
            oAlbum.Genre = rg.Cells(i, 4)
            oAlbum.sales = rg.Cells(i, 5)
            ' Add the album objecdt to the collection
            coll.Add oAlbum
        End If

    Next i

    Set ReadAlbums = coll

End Function

Sub PrintAlbum(coll As Collection)

    Dim oAlbum As clsAlbum
    For Each oAlbum In coll
        Debug.Print oAlbum.Title, oAlbum.Artist
    Next

End Sub

Sub PrintTotalSales(coll As Collection)

    Dim oAlbum As clsAlbum, sales As Double
    For Each oAlbum In coll
        sales = sales + oAlbum.sales
    Next

    Debug.Print "Total number sales is " & sales

End Sub
Class Module Example 2
In this example, we’re going to take things a bit further. We’re going to look at some neat tricks when using objects.
Imagine you have a list of products like in the image below.

The products have different fields so we need to use a different class module for each product type. One type for a Book row, one type for a Film row.
We’ll create our class modules first. As you can imagine the are very similar for both product types
' CLASS MODULE - clsBook
' https://excelmacromastery.com/
' Member variables
Private m_Title As String
Private m_Year As Long

' Properties
Property Get ItemType() As String
    ItemType = "Book"
End Property
Property Get Title() As String
    Title = m_Title
End Property
Property Get Year() As Long
    Year = m_Year
End Property

' Methods
Public Sub Init(rg As Range)
    m_Title = rg.Cells(1, 2)
    m_Year = CLng(rg.Cells(1, 4))
End Sub

Public Sub PrintToImmediate()
    Debug.Print ItemType, m_Title, m_Year
End Sub
' CLASS MODULE - clsFilm
' https://excelmacromastery.com/
' Member variables
Private m_Title As String
Private m_Year As Long

' Properties
Property Get ItemType() As String
    ItemType = "Film"
End Property
Property Get Title() As String
    Title = m_Title
End Property
Property Get Year() As Long
    Year = m_Year
End Property

' Methods
Sub Init(rg As Range)
    m_Title = rg.Cells(1, 2)
    m_Year = CLng(rg.Cells(1, 5))
End Sub

Public Sub PrintToImmediate()
    Debug.Print ItemType, m_Title, m_Year
End Sub
As you can see, the only real difference is the Init sub.
When we read each record we need to determine if it is a Book or Film. Then we create the appropriate object. You would imagine we would have to create a variable for each type e.g.
' One variable required for each type
Dim oBook As clsBook
Dim oFilm As clsFilm

' If book do this
Set oBook = New clsBook

' Else If film do this
Set oFilm = New clsFilm
If we had lots of different types this would get very messy indeed. The good news is we only need to use one variable!
In VBA we can declare a variable as a Variant. When we use a Variant we are essentially saying “We will decide the type of variable when the code is running”.
This is very useful when dealing with objects and allows us to get away with using one variable e.g.
' Only one variable required
Dim oItem As Variant

' If book set type to clsBook
Set oItem = New clsBook

' Else If film set type to clsFilm
Set oItem = New clsFilm
This is really useful as we only need one variable no matter how many objects we have.
A second advantage of using a Variant is this. If each Class Module has a sub/function with the same name and parameters, we can use the same variable to call it
So imagine clsBook has a function called InitBook and clsFilm has a function called InitFilm. We would need to do this:
' If clsBook
If Type = "Book" Then
    oItem.InitBook
ElseIf Type = "Film" Then
    oItem.InitFilm
However, if they have the same name, e.g. Init, we can replace the IfElseIf lines of code with one line:
    ' this will call the Init sub of whatever type oItem is set to
    oItem.Init
We can now create a function to create the appropriate object. In Object Oriented Programming, we have what is called a Class Factory. This is simply a function that creates an object based on a given type.
We saw earlier that the Initialize event does not take parameters. We can call Init in the Class Factory to get around this issue.
The full code for the ClassFactory function is here:
' https://excelmacromastery.com/
Function ClassFactory(rg As Range) As Variant

    ' Get product type
    Dim sType As String
    sType = rg.Cells(1, 1)

    ' Create an object based on the type
    Dim oItem As Variant
    Select Case sType

        Case "Book":
            Set oItem = New clsBook
        Case "Film":
            Set oItem = New clsFilm
        Case Else
            MsgBox "Invalid type"

    End Select

    ' Parse the fields to the correct class variables
    oItem.Init rg

    ' Return the product object
    Set ClassFactory = oItem

End Function
This following is our starting sub. In this sub, we read through the worksheet and pass the range to ClassFactory.
It creates the object, passes the range to the object Parse method. Then it returns the object which we add to our Collection.
' https://excelmacromastery.com/
Sub ReadProducts()

    ' Create the collection
    Dim coll As New Collection
    Dim product As Variant

    Dim rg As Range


    ' Read products from the worksheet
    Dim i As Long
    For i = 1 To 2
        Set rg = Sheet1.Range("A" & i & ":E" & i)
        Set product = ClassFactory(rg)
        coll.Add product
    Next

    ' Print the product details to the Immediate Window(Ctrl + G)
    PrintCollection coll

End Sub
We can also use the variant object to print the items. As long as both objects have a sub with the same name and parameters(e.g PrintToImmediate) we can call it using a Variant type.
' https://excelmacromastery.com/
Public Sub PrintCollection(ByRef coll As Collection)

    Dim v As Variant
    For Each v In coll
        ' Print items
        v.PrintToImmediate
    Next

End Sub
The source code for this post also includes this example using Inheritance(i.e. class interfaces). You can download the code here:
Conclusion
That concludes my post on the VBA Class Modules. In this post, we have looked at the parts of the VBA Class Module and two example cases where you would use them.
It’s important to understand that Classes and Objects is a vast topic. There are countless types of objects you can create and ways you can use them.
If you plan to use Class Modules then my advice is to start simple and get familiar with how to create a simple one. Once you have mastered the basics it will be much easier to move onto more challenging scenarios.
What’s Next?
Free VBA Tutorial If you are new to VBA or you want to sharpen your existing VBA skills then why not try out the The Ultimate VBA Tutorial.
Related Training: Get full access to the Excel VBA training webinars and all the tutorials.
(NOTE: Planning to build or manage a VBA Application? Learn how to build 10 Excel VBA applications from scratch.)
Хитрости »
1 Август 2013 63734 просмотров
Работа с модулями классов
Многие наверняка слышали про модули классов, но не все их используют. На самом деле довольно многие программирующие на VBA за все время программирования прекрасно обходятся без применения модулей классов. Т.к. VBA не является языком объектно-ориентированного программирования(ООП) в строгом смысле слова, то пользовательские классы здесь не обязательны и как следствие не так уж и часто используются при разработке. Это не значит, что VBA не содержит модулей классов: модули книги, листов, пользовательские формы — все это модули классов. Многие, кстати, используют их даже не зная того, что используют именно модули классов. Т.к. модуль листа, книги и формы — это модуль класса, то почти каждый, кто работал с формой работал с модулем класса. В чем их большая польза — с их помощью можно отслеживать различные события объектов. Для форм это события самой формы или любого её элемента — например CommandButton_Click или TextBox_Change. Но мы сейчас рассмотрим лишь тот тип модулей, который в VBA обычно называют модулем класса — Class Module.
Модуль класса(Class Module) – это модуль, содержащий программные коды, которые реализуют работу пользовательских классов. В подавляющем большинстве случаев создается специально для отслеживания событий различных объектов. Создается так же, как и любой другой объект проекта: в окне проводника объектов щелкаем правой кнопкой мыши на нужном проекте-Insert—Class Module

Но прежде чем создать модуль, необходимо понять, что мы будем в нем хранить и для чего он нам. Возьмем для примера самую распространенную проблему: на форме создано несколько ТекстБоксов и необходимо отследить событие ввода данных в эти ТекстБоксы. Обычно делается все просто — для каждого ТекстБокса прописывается отслеживание события:
Private Sub TextBox1_Change()
    MsgBox "Изменено значение TextBox1"
End Sub
Private Sub TextBox2_Change()
    MsgBox "Изменено значение TextBox2"
End Sub
Private Sub TextBox3_Change()
    MsgBox "Изменено значение TextBox3"
End Sub
'и т.д.
С одной стороны — все верно. А с другой: что если таких текстбоксов у нас не 3, а 43? Не очень удобно для каждого событие прописывать. Да и читабельность такой «портянки» кода тоже значительно падает.
Или другая ситуация — необходимо «на ходу» создать ТекстБоксы на форме и в дальнейшем отслеживать их события. Как тут быть? Ведь раз ТексБоксов еще нет — то и события в форме для них не создать. Создание для них кодов обработки событий заранее ничего не даст — они не будут связаны с самими объектами, поэтому и пытаться даже не стоит. Почему так — при создании элемента вручную VBE делает за нас всю грязную работу — он сам ассоциирует созданный объект с событиями, предназначенные для него заранее. Если же создать объект программно — то часть грязной работы придется делать самим. И создание модуля класса, с описанием в нем объекта ТекстБокс и его событий, как раз очень даже подойдет.
Рассмотрим сразу оба случая. Что нам для этого потребуется:
- для начала создать модуль класса с именем clsmTxtBxes(Insert—Class Module)
- создать стандартный модуль с именем mMain(Insert—Module)
- ну и сама форма тоже не лишняя(Insert—UserForm). У меня форма называется frmTest.
- очень желательно наличие у вас опыта написания хотя бы простейших процедур. Иначе может показаться все очень сложным и непонятным.
Чтобы было проще вникать советую скачать файл с готовыми кодами:
 Tips_Macro_UseClassModules.xls (63,5 KiB, 5 957 скачиваний)
Для начала создадим на нашей форме frmTest 4 ТекстБокса, не меняя их имена(по умолчанию они будут TextBox1, TextBox2, TextBox3, TextBox4). Это для того, чтобы понять как применить модули класса к уже созданным ранее на форме элементам.
Далее в стандартный модуль mMain поместим следующий код:
Option Explicit
Public aoTxtBxes(1 To 8) As New clsmTxtBxes
Sub Show_Form()
    frmTest.Show
End Sub
aoTxtBxes — массив, который будет содержать до 8 ТекстБоксов. Объявляется как Public (чтобы был доступен из любого модуля проекта. Подробнее в статье: Что такое переменная и как правильно её объявить?). Обращаю внимание, что данный массив объявлен как созданный нами модуль класса — As clsmTxtBxes. Это обязательное условие. Если у вас модуль класса называется ClassModule1, то и объявлять aoTxtBxes следует соответственно:
Public aoTxtBxes(1 To 8) As New ClassModule1
но я не приветствую подобный подход, т.к. имя ClassModule1 ни о чем нам не говорит, в то время как clsmTxtBxes сразу дает понять, что там мы обрабатываем ТекстБоксы. Хотя это дело вкуса. Если в одном модуле класса собраны различные событийные процедуры для разных типов(TextBox, ComboBox, ListBox и т.д.) — то конечно, имя лучше дать более общее.
Теперь в созданный модуль класса clsmTxtBxes запишем создание объекта и код, который хотим применить для всех наших ТекстБоксов:
Option Explicit
Public WithEvents oTxtBx As MSForms.TextBox
'событие изменения текста в TextBox-ах
Private Sub oTxtBx_Change()
    MsgBox "Вы изменили значение " & oTxtBx.Name, vbInformation, "Информационное окно"
End Sub
Public WithEvents oTxtBx As MSForms.TextBox — создаем объект типа ТекстБокс с отслеживанием его событий. Идентификатором объекта с отслеживанием событий служит оператор WithEvents (может применяться только в модулях классов).
Если необходимо отследить изменения не TextBox, а ComboBox, то соответственно объявляем объект нужного типа:
Public WithEvents oCmbBx As MSForms.ComboBox
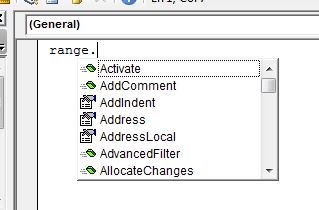
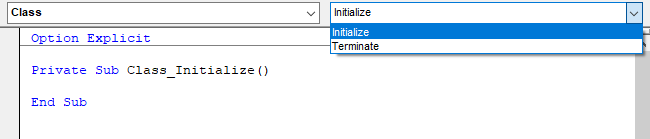
Сами события для контролов не берутся из головы и не пишутся вручную — они уже есть и следует использовать именно те, которые доступны. Чтобы для конкретного элемента создать событие, необходимо перейти в модуль класса, вверху в левой части выбрать из списка нужный объект(в нашем случае это oTxtBx) и после этого в правом списке выбрать событие(в этом списке перечисляются все процедуры, доступные для выбранного объекта):

Для выбранного события в модуле будет автоматически создана новая процедура.
Процедуры, события для которых уже созданы, выделяются в списке жирным шрифтом и при выборе их из списка происходит переход в процедуру выбранного события.
Завершающий этап — создаем код в модуле формы frmTest, который создаст недостающие ТекстБоксы и свяжет их и ранее созданные с модулем класса:
Option Explicit

Private Sub UserForm_Initialize()
    Dim i As Integer
    'Присваиваем последовательно значениям массива aoTxtBxes значения объектов, существующих на форме
    For i = 1 To 4
        Set aoTxtBxes(i).oTxtBx = Me.Controls("TextBox" & i)
    Next i
    'создаем 4 своих TrxtBox-а помимо имеющихся на форме и так же заносим в массив aoTxtBxes
    For i = 5 To 8
        Set aoTxtBxes(i).oTxtBx = Me.Controls.Add("Forms.TextBox.1", "TextBox" & i)
        'задаем позицию нового TextBox
        aoTxtBxes(i).oTxtBx.Left = 100
        aoTxtBxes(i).oTxtBx.Top = Me.Controls("TextBox" & i - 4).Top
    Next i
End Sub
Кратко описать, что делает эта процедура, можно так:
- при запуске формы в массив aoTxtBxes запоминаются сначала те ТекстБоксы, которые мы предусмотрительно заранее создали на форме
- затем создаются еще 4 новых ТекстБокса, которые также записываются в массив aoTxtBxes
- Т.к. массив aoTxtBxes у нас является новым экземпляром класса, то обращаться к его содержимому мы можем только по законам работы с классами, т.е. только к тем объектам и методам, которые в классе прописаны. А у нас там пока только один объект прописан — oTxtBx(Public WithEvents oTxtBx As MSForms.TextBox). Его и используем. Ничего другого использовать VBE нам и не позволит
- т.к. класс мы создали, событие объекта прописали, объектам значения ТекстБоксов присвоили — остается только наслаждаться. Теперь любое изменение в любом из ТекстБоксов будет обработано и появится сообщение — «Вы изменили значение » + имя ТекстБокса
Если необходимо больше ТекстБоксов обработать — увеличиваем верхнюю границу массива aoTxtBxes(если хотим вместить 20 текстбоксов — Public aoTxtBxes(1 To 20) As New clsmTxtBxes). Если заранее неизвестно количество — либо задаем с запасом, либо объявляем aoTxtBxes как динамический массив(Public aoTxtBxes() As New clsmTxtBxes), а границы определяем в процессе(посредством ReDim Preserve). Но это уже совершенно другая тема.
Конечно, здесь я привел лишь маленький пример показа сообщения при изменении ТекстБокса. Но ведь можно таким образом отследить практически любое доступное событие. И не просто сообщение показывать, а запретить ввод букв, делать проверку введенного значения на соответствие шаблону и пр. Все зависит от конкретной задачи.
Так же дополню, что подобным образом можно создавать и отслеживать и иные элементы форм. Для этого необходимо лишь изменить тип элемента здесь:
Me.Controls.Add("Forms.TextBox.1", "TextBox" & i)
и соответственно изменить/добавить тип переменной в модуле класса:
Public WithEvents oCmbBx As MSForms.ComboBox
Всего для создания доступно 11 встроенных типов контролов:
ComboBox — MSForms.ComboBox
CheckBox — MSForms.CheckBox
CommandButton — MSForms.CommandButton
Frame — MSForms.Frame
Image — MSForms.Image
Label — MSForms.Label
ListBox — MSForms.ListBox
MultiPage — MSForms.MultiPage
SpinButton — MSForms.SpinButton
TabStrip — MSForms.TabStrip
ToggleButton — MSForms.ToggleButton
И небольшая ложка дегтя: из модулей классов доступны не все события. Например, для TextBox-ов нет события Exit. Это порой расстраивает. И никак это не исправить — нет его и все…
Скачать пример:
Tips_Macro_UseClassModules.xls (63,5 KiB, 5 957 скачиваний)
Также см.:
Что такое модуль? Какие бывают модули?
Что такое переменная и как правильно её объявить?
Variable not defined или что такое Option Explicit и зачем оно нужно?
Статья помогла? Поделись ссылкой с друзьями!
![]() Видеоуроки
Видеоуроки
Поиск по меткам
Access
apple watch
Multex
Power Query и Power BI
VBA управление кодами
Бесплатные надстройки
Дата и время
Записки
ИП
Надстройки
Печать
Политика Конфиденциальности
Почта
Программы
Работа с приложениями
Разработка приложений
Росстат
Тренинги и вебинары
Финансовые
Форматирование
Функции Excel
акции MulTEx
ссылки
статистика
What is a Class in VBA?
A class is a blueprint for an object to be created. A class itself does nothing but using classes you can create multiple identical objects that can perform operations or can be used as a data resource.
In real life, the model (design and functionalities) of a car is a class and the car itself is an object of that class. In the class, we define what the car has in it and what it can do. For example, a car has 4 wheels, 5 gears, steering wheel, etc. These are attributes/properties. We also define what a car can do, like moving forward, backward, turn, etc. These are functions of the car class. A car object created using car class, will have all these properties. If you define a car that has 5 wheels than a car created using this class will have 5 wheels. You get the point.
Enough of theory, now let’s see how you can use a class module in VBA.
Using Excel VBA class module
While working in VBA, you must have used Range(«A1»).select. The Range is pre-defined class in VBA. The select is one of the functions of Range class that select the specified range. Similarly, Debug is class in VBA and print and assert are it’s methods. Worksheets, Workbooks, Range, etc. all are VBA classes that we use in our subs.
Create your own class
First, we need to add a class module in VBA
Press ALT+F11 key combination to open excel VBA editor.
-
- Right-click on project explorer. Move the cursor to Insert—> Class module. Click on it. The same thing can be done from the Insert menu.
-
- The class will be added to the folder «Class module». The default name is like class1, class2, and so on. You can change the class name from the property window. Let’s name our class «Welcome».
- Now let’s create add some attributes to our class. Since I want these attributes to be available to the public, I have use accessibility operator public.
Public name As String
Public var1 As Integer
Public var2 As Integer
- Now let’s add a function to this class. I want a function that says Hi! to the user. To do so add a sub and name it sayHiTo.
Sub sayHiTo(user As String) name = user MsgBox ("Hi! " & name) End Sub - Now let’s use class in a module. Insert a new module if you don’t have any. Write a sub. I have named my sub Test.
Sub test()
 Dim wc As New Welcome 'Declared and initialized Welcome object
 wc.sayHiTo ("Jack") 'used sayHiTo method of Welcome Object.
End Sub
- Run this sub Test using F5 key. It will prompt «Hi! Jack» on excel workbook.

How does it work?
In sub Test, we have created is an object «wc» of Welcome class. An object is created in VBA in two methods. we run the code, Test sub creates an object wc of the Welcome class. This object has all the properties of the Welcome class. We use the sayHiTo method of the Welcome class to say hi to the user.
Object Creation in Excel VBA
-
- Instant creation
In Instant creation, we create an object while declaring the object with the «new» key. In our example above, we have used instant creation.
Dim wc As New Welcome
2. Delayed creation
In delayed creation, we first declare the object only. We don’t use the «new» keyword. In order to use the object, we need to initialize it with the «new» keyword.
Sub test()
 Dim wc As Welcome
 'wc.sayHiTo ("Jack") 'generates error since wc is not initialised yet
'initialising object
Set wc = New Welcome
wc.sayHiTo ("Cory") 'this will work.
End Sub
Accessing Variables of a Class
In the above examples, we have used public variables for class but it is wrong to practice. We should avoid using public variables in a class. Now the question is how would we access variables of the class. Earlier, we used subroutine to access name but VBA classes provide properties that are used to systematically update and retrieve private variable values of the class. The properties are more elegant than sub or function for updating and accessing private variables. Let’s see how.
Syntax of class property
Private name As String
Private var1 As Integer
Private var2 As Integer
Property Let MyName(nm As String)
name = nm
End Property

Property Get MyName() As String
MyName = name
End Property
Let’s use them in a module.
Sub test()
 'creating class object
 Dim wc As New Welcome
 Dim wc1 As New Welcome

 'using properties
 wc.MyName = "Exceltip.com"
 wc1.MyName = "ExcelForum.com"

 Debug.Print wc.MyName
 Debug.Print wc1.MyName

 End Sub
When you will run this test sub, you will get two names printed for two objects of the «Welcome» class.
How properties are different from sub and functions
In the above example, notice that we have used MyName property as a variable. We initialized the value of «Name» variable just by writing wc.MyName=»assdf». This line of command called the property called Property Get MyName() As String. We didn’t pass any value in parenthesis as we did in the beginning.
Similarly, to print the values of «Name» variable we used command Debug.Print wc.MyName. Isn’t it as simple as normal variable initialization? The only difference is that you can do a whole lot in the property segment. You put data validation, calculation, communication, etc. and user will only see the result.
Another difference is that we can use same name of the property to let and get part. This makes it easier and less confusing.
So yeah guys, this was a simple example of a class module in Excel VBA. This is just the tip of the iceberg, there’s a lot of juice in this topic that we will explore in later articles. We will explore each of them one by one in the easiest way possible. I hope I was explanatory enough to make you understand this. If you have any doubts regarding this topic or any other excel VBA topic, mention it in the comments section below.
Related Articles:
Import a module from a file using VBA in Microsoft Excel | Learn how to import entire module from another file using VBA.
Create a new module using VBA in Microsoft Excel | You can use a module to create another model in VBA. This can help you minimize the additional overhead work.
Add a procedure to a module using VBA in Microsoft Excel | To add procedures to modules automatically use this VBA code.
Popular Articles:
50 Excel Shortcuts to Increase Your Productivity | Get faster at your task. These 50 shortcuts will make you work even faster on Excel.
The VLOOKUP Function in Excel | This is one of the most used and popular functions of excel that is used to lookup value from different ranges and sheets.
COUNTIF in Excel 2016 | Count values with conditions using this amazing function. You don’t need filter your data to count specific value. Countif function is essential to prepare your dashboard.
How to Use SUMIF Function in Excel | This is another dashboard essential function. This helps you sum up values on specific conditions.
A Class is essentially a blueprint for an object. Object instances are created from a Class the way a house is built using a blueprint. Classes are used to achieve abstraction and encapsulation by storing related state and behavior together and restricting access to certain details within the class while providing a public API for client programs to interact with. Classes can have associated events which trigger code to run when something happens. Classes have a built-in initialize event which is triggered when an object is instantiated and a built-in terminate event which is triggered when the instance is released. In VBA, classes are created using Class Modules. The code modules associated with UserForms and application-specific objects such as Excel Workbooks and Worksheets are class modules with an associated object.
Class Modules
Classes in VBA are written inside class modules. The name of the class module itself is the name of the class and all code inside the class module is part of the class.
Add a Class Module
To insert a Class module into a VBA project right-click in the project explorer and select insert class module or import the class from a file.
Class Module Properties
To change the name of a class change the Name property of the class module.
The Class module’s Instancing property can be set to Private or PublicNotCreatable. When the Instancing property is set to Private, which is the default, the class can only be used inside the project in which the class module is located. When the Instancing property is set to PublicNotCreatable the class can be used in outside projects but cannot be instantiated outside the project. PublicNotCreatable classes must be instantiated within the project and passed to an outside project from a public function.
Member Accessibility
Procedures and variables declared in a class module can be declared Public or Private. Public members are accessible from anywhere outside the class including from other VBA projects. Private members can only be accessed inside the class. Private variables or constants in a class can be exposed outside the class using Public Property procedures.
Procedures in a class module can also be declared Friend. Variables cannot be declared using Friend. Friend procedures are accessible from anywhere outside the class and within the VBA project where the class module is located.
Constants, Enums, User-Defined Types, Arrays, and Declare Statements can only be declared Private inside class modules. Fixed-Length Strings cannot be declared inside a class module.
Property Procedures
Property procedures are used to assign or retrieve properties of a class. There are three types of property procedures: Get, Let, and Set. Get is used to retrieve the value of a property. Let is used to assign the value of a property which is a value type variable. Set is used to assign a property which is an object variable. Exit Property can be used to exit a property procedure early.
'Standard Module: Module1

Option Explicit

Public Sub Example()

    Dim E As clsExample
    Set E = New clsExample

    E.Message = "Hello, World!"
    Debug.Print E.Message

    Set E.Coll = New Collection
    Debug.Print E.Coll.Count

End Sub
'Class Module: clsExample
Option Explicit
Private pMessage As String
Private pColl As Collection
'''Assign and retrieve value type variable
Public Property Let Message(RHS As String)
pMessage = RHS
End Property
Public Property Get Message() As String
Message = pMessage
End Property
'''Assign and retrieve object variable
Public Property Set Coll(RHS As Collection)
Set pColl = RHS
End Property
Public Property Get Coll() As Collection
Set Coll = pColl
End PropertyInitialize and Terminate Event Procedures
When an Initialize procedure is declared inside a class module, it will be executed when an instance of the class is created. When a Terminate procedure is declared inside a class module, it will be executed when the instance is released.
'Standard Module: Module1

Option Explicit

Public Sub Example()

    Dim C1 As Class1

    'Class1 instance created. Initialize event triggered.
    Set C1 = New Class1

    'Class1 instance terminated. Terminate event triggered.
    Set C1 = Nothing

End Sub
'Class Module: Class1
Option Explicit
Private Sub Class_Initialize()
Debug.Print "Class Initialized"
End Sub
Private Sub Class_Terminate()
Debug.Print "Class Terminated"
End SubTo add an Initialize or Terminate event procedure to a class module use the object box and procedure box drop-downs in the class module’s code window to select the class and then select the event procedure to add.

Me Keyword
The Me keyword is used inside a class module to refer to the specific instance of the class which is executing the code. The Me keyword can be used to access the Public Properties of the current class instance from within the class. The Me keyword can be used to pass the current instance of the class as an argument to another procedure.
'Standard Module: Module1

Option Explicit

Public Sub Example()

    Dim C1 As Class1
    Set C1 = New Class1

    C1.Variable = "Test"
    C1.PrintVariable

End Sub
'Class Module: Class1
Option Explicit
Private pVariable As Variant
Public Property Let Variable(Value As Variant)
pVariable = Value
End Property
Public Property Get Variable() As Variant
Variable = pVariable
End Property
Public Sub PrintVariable()
Debug.Print Me.Variable
End SubThe VBA Class allows you to define your own objects with unique properties and methods in VBA. Classes in at the core of all Object Oriented Programming languages. Although we can argue how much is VBA actually an Object Oriented Programming language, there is no doubt that VBA allows you to create Classes similarly as in Java or C#. But what is a Class? A Class allows you to encapsulate any level of abstraction and complexity into a single object and facilitate only an interface (certain procedures or methods if you prefer) to this object.

Personally I am a fan of (VBA) Classes as they require abstract thinking and a modular approach to writing code (in this case VBA). If you have seen a lot of VBA code, not once were you probably horrified to see a junkyard of random Subs and Functions with no obvious relationship between them. Classes whereas “require” that you encapsulate a certain “amount of functionality” into a single object which maps similarly to the world around us which is represented by single objects which can help us yield certain results. In my opinion this is an easy concept to grasp as everyday we are dealing with individual tools and objects that allow us to achieve certain goals. Sometime we are not necessary sure how these objects work (a PC) but we know how to use their interface to achieve an objective (send an email). Let’s use a simple analogy as we move forward through this tutorial…
VBA Class example
Before I explain more let us see a very simple Class example. To create a class insert a “Class” module to the “Class Modules” folder:

Next I inserted some example code to my class below and renamed my class (in the Properties panel) to MyClass.
Public name As String

Public Sub Hello()
    Debug.Print "Hello my name is " & name
End Sub
If you want to use your class you can create a simple VBA Sub in any module:
Sub Main()
  Dim class as New MyClass
  class.name = "John"
  class.Hello
End Sub
Output:
Hello my name is John
The Car – Class Analogy
One of my personal favorite analogies of a Class is the Car Class. Let us say we want to create a Class for a Car object. Now an object of this class (a Car) will have certain properties like the brand of the Car, the color, the license plate numbers, as well as will have certain behaviors (called methods in Computer Programming) like driving forward, turning left, breaking etc. See below a simple example of how this translates to a VBA Class.
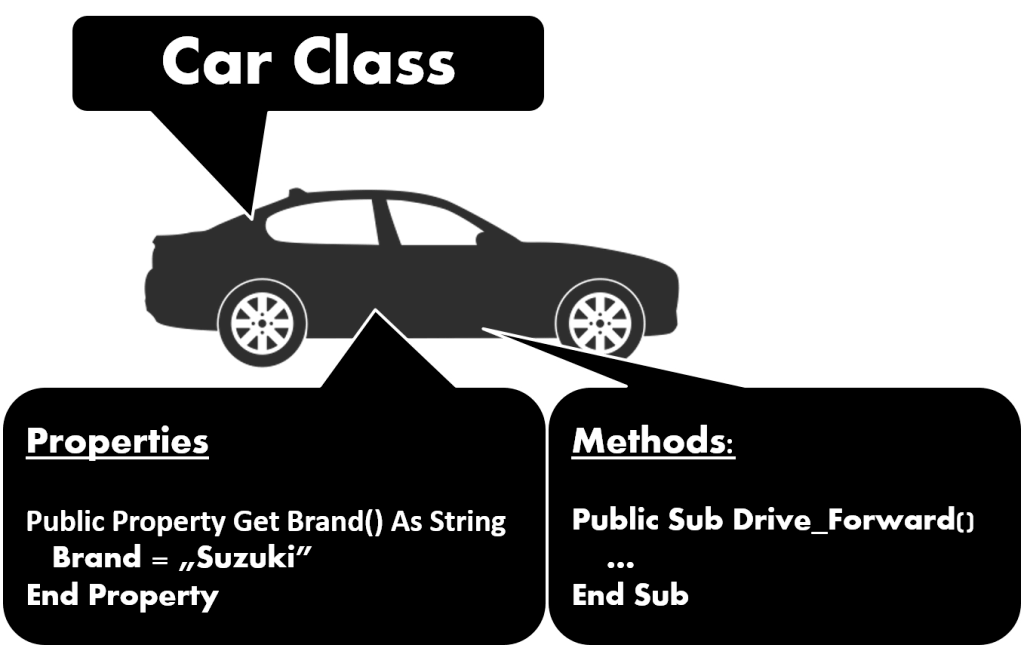
This approach makes it easier for someone who does not understand/know the underlying implementation to easily start using the Car Class object, as the Car object encapsulates everything that has to do with a single Car object the user can seamlessly reuse this object.
Creating a new VBA Class
Let’s start our journey by creating a new empty VBA Class. To add a new VBA Class go to the menu and select Insert then select Class Module.
Alternatively, right-click on any item in your VBA Project and select Class Module like shown below:
Classes in VBA are similar to regular VBA modules. They have their own namespace and can consist of procedures, functions, variables etc. There are other things you will find in a VBA Class, but we will get to that.
Next let’s make sure to name our Class appropriately:
Make sure that the Class name is not identical to a module or procedure within your VBA project or this will make it complicated to use this Class.
Now you have a new empty Class. It doesn’t do much except exist. But before we put some life into it let’s test that indeed it works. I have created a simple VBA Class which I named CarClass. The example below will create the new class.
Sub TestCarClass()
Hello
Notice that when defining the Car variable I used the Set clause. This is because each Class is an object and the Car variable contains only a reference to this object. If you are not familiar with handling VBA Objects read here. Now let’s animate our class by adding some procedures (behaviors/methods) and some properties.
Variables, Procedures and Functions
A VBA Class can contain variables, procedures and functions just like regular VBA modules.
Let’s extend our VBA Class CarClass with some additional procedures and variables common to our abstract model of a car.
Public Speed As Integer
Public LicensePlate as String

Sub DriveForward()
    Speed = IIf(Speed < 0, -Speed, Speed)
End Sub

Sub DriveBack()
    Speed = IIf(Speed < 0, Speed, -Speed)
End Sub
We can now create a new object of Class CarClass and start working with it:
Sub TestCarClass()
    Dim Car As CarClass
    Set Car = New CarClass
    Car.LicensePlate = "34344W"
    Car.Speed = 100 'set speed to 100 mph

    Car.DriveBack 'set speed to -100 mph

    Car.DriveForward 'set speed to 100 mph
End Sub
Properties – Get, Let and Set
A Class should encapsulate abstraction and complexity. With our current CarClass we don’t have much control over the values users provide for the Speed and LicensePlate variables. What if the user sets the speed to some non-sense value like 1000mph? What if we want to validate the LicensePlate before setting it? Fortunately, the VBA Class introduces Get, Let and Set procedures that address that.
- Get – return value of the property
- Let – set the value of the property
- Set – set the object value of the property (if applies)
The Get and Let procedures manage the process of retrieving and defining the value of a specific Class property. The Set procedure is basically a Setter aimed at properties which are objects not native VBA data structures. Let look at another simple example with our CarClass:
Let’s replace this:
Public Speed As Integer
Public LicensePlate as String
With this:
Dim vSpeed As Integer
Dim vLicensePlate As String

Public Property Get Speed() As Integer
    Speed = vSpeed
End Property

Public Property Let Speed(sp As Integer)
    vSpeed = Application.WorksheetFunction.Min(sp, 100)
    vSpeed = Application.WorksheetFunction.Max(vSpeed, -100)
End Property

Public Property Get LicensePlate() As String
    LicensePlate = vLicensePlate
End Property

Public Property Let LicensePlate(lp As String)
    If Len(lp) <> 6 Then Err.Raise (xlErrValue) 'Raise error
    vLicensePlate = lp
End Property
Notice the highlighted rows above where I introduced the new Get and Let property procedures. As you can see now I am getting and setting the Speed and LicensePlate value via the property procedures. This is more convenient than making a variable Public within the class, as it gives you more control on the value of the variable. Remember that a Class should encapsulate abstraction and complexity. A perfect Class object prevents the user from any restricted behaviors with this object.
Notice that you use properties similarly as you would use Public variables:
Dim car As CarClass
Set car = New CarClass
car.Speed = 10
Debug.Print car.Speed '10

car.Speed = 12345
Debug.Print car.Speed '100

car.LicensePlate = "123456"
Debug.Print car.LicensePlate '123456

car.LicensePlate = "1234567" 'Error!
Events – Initialize and Terminate
The Class module provides 2 default event procedures Class_Initialize() and Class_Terminate():
- Private Sub Class_Initialize() – fired when the Class object is initialized e.g.
Set car = New CarClass
- Private Sub Class_Terminate() – fired when the Class object is destroyed e.g.
Set car = Nothing
These 2 procedures are meant to facilitate the following objectives:
- Initializing the Class object to prepare it for use i.e. initializing objects associated with the Class like Collections, setting default value of Class variables
- Terminate the Class object and any objects associated with the Class i.e. free allocated memory
Let’s now extend our CarClass with a the following event procedures:
Dim SpeedRegister As Collection

Private Sub Class_Initialize()
    Set SpeedRegister = New Collection
    vSpeed = 0 'Set speed to 0
    vLicensePlate = "XXXXXX" 'Set unknown License Plate
End Sub

Private Sub Class_Terminate()
    Set SpeedRegister = Nothing
End Sub
We will use the SpeedRegister to record any changes in the speed of our Car. See full code of our CarClass :
Dim vSpeed As Integer
Dim vLicensePlate As String
Dim SpeedRegister As Collection

Public Property Get Speed() As Integer
    Speed = vSpeed
End Property

Public Property Let Speed(sp As Integer)
    vSpeed = Application.WorksheetFunction.Min(sp, 100)
    vSpeed = Application.WorksheetFunction.Max(vSpeed, -100)
    SpeedRegister.Add sp
End Property

Public Property Get LicensePlate() As String
    LicensePlate = vLicensePlate
End Property

Public Property Let LicensePlate(lp As String)
    If Len(lp) <> 6 Then Err.Raise (xlErrValue) 'Raise error
    vLicensePlate = lp
End Property

Sub DriveForward()
    Speed = IIf(Speed < 0, -Speed, Speed)
End Sub

Sub DriveBack()
    Speed = IIf(Speed < 0, Speed, -Speed)
End Sub

Private Sub Class_Initialize()
    Set SpeedRegister = New Collection
End Sub

Private Sub Class_Terminate()
    Set SpeedRegister = Nothing
End Sub
Instancing – Private vs. PublicNonCreatable
VBA In the properties section of the VBA Class you will find a property call Instancing. You are probably wondering what this property does. There are two available options – Private and PublicNonCreatable:
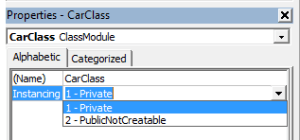
- Private – the Class cannot be created and referenced outside the VBA Project. It is “Private” to the VBA Project
- PublicNonCreatable – the Class is Public and can be referenced out the VBA Project. It cannot be however created outside the project using the New clause
But why would you want to set your Class to PublicNonCreatable? Whenever you want to use it outside your VBA Project e.g. from a separate Excel, Access, MS Office VBA Project file currently open. This is especially useful if you have a Class you want to use within multiple VBA Projects and not having to copy the Class code to every project. You can consider creating a simple Excel AddIn and include the Class code in the VBA Project. If the AddIn is placed in your C:usernameAppDataRoamingMicrosoftAddIns directory it will open automatically with your MS Office applications.
But how are we supposed to use this Class if we can create this object? We need to create a dedicated function that will return the object. Let’s make an effort now to reuse our CarClass Class within a separate VBA Project:
Add a new Module and add a function
First we need to use an existing or create a new Module in which we will place our function which initializes the CarClass :
Public Function New_CarClass()
  Set New_CarClass = New CarClass
End Function
Notice that the Class needs to be Public so it can be referenced from the other VBA Project.
Set the Class to PublicNonCreatable
Click on the Class (CarClass) and change Instancing from Private to PublicNonCreatable.
Create the Class using the defined function
You are ready to reuse the CarClass in a different VBA Project:
Dim car as Object
Set car = New_CarClass
'Use the Class normally...
That’s it!
VBA Class Module vs. Standard Module
What is the difference between a standard Module and a Class Module? A Class instance is basically and Object and has all the properties of Objects in VBA. Here are some key differences worth highlighting:
- There is only one copy of standard module data. A Class module, however, is created separately for each instance of the class. Hence each Class instance has it’s own set of Class variables individual to the object
- Data in a standard module exists as long as your program scope – the life of you VBA Project. Only when you close your Excel/Access/Word/PowerPoint file will the data be lost for all global variables. In a Class module, however, data for each instance exists only for the lifetime of the object. It ceases to exist the moment the Class Object is destroyed e.g. when the Class object is set to Nothing
- Variables declared Public in a standard module are visible anywhere in your project. However, Public variables in a Class module are only accessed if you have an object variable containing a reference to a particular instance of a class
Conclusions
Hopefully this tutorial has familiarized you with the VBA Class enough to start using it. As mentioned I think it is really worth making the effort to learn the VBA Class as using classes makes your code more readable and manageable. Classes encapsulate abstraction and complexity – it makes life easier when you or others need to reuse your code without necessarily needing to review the code and implementation.
If you feel you mastered Classes in Excel macros do check out my VBA Implements Tutorial as well!
Let me know what you think! Be sure to follow me on Twitter and Facebook for upcoming posts and tutorials!

Introduction To Classes
This page is an introduction to Classes.

Classes are a very powerful tool in intermediate to advanced level VBA programming.
This page is an introduction to what a class and an object are and will
hopefully get you started working with classes. This is by no means a
comprehensive guide. Entire books have been written about Object Oriented Programming, of which classes are an essential component.
In VBA, a class is defined in class module and serves as a
template for an object. The term object is deliberately vague.
An object can be defined to represent whatever you want. Anything that you can describe
conceptually can be represented by a class. The difference between
a class and an object is that a class does nothing and consumes no memory. It is like a blueprint. When
you have a variable of that class type and create instance of that class with the New keyword,
a process called instantiating, it becomes an object and consumes memory and can carry out actions. A
class is defined by its properties, which describe attributes of the class, and
its methods (sub and function procedures), which carry out actions in the object. If a class
is analogous to a noun, a property is like an adjective — it describes the
object. A method is like a verb — it carries out an action.
You must instantiate a class into an object in order to do anything with it. There
is nothing you can do with a class module beyond creating an object from it. An
example of instantiation is shown below:
Dim C As Class1
Set C = New Class1
where Class1 is the name of the class module. Unlike other languages, VB/VBA allows for
only one class in a class module, and the name of the class is the name of the module.
You can now work with the properties and methods defined in Class1 in the C object
variable.
NOTE: It is also possible to combine the two statements above into a single statement:
Dim C As New Class1
This is called an auto-instancing variable. When the variable C is
first encountered in code, a new instance is created. In general, you should avoid auto-instancing variables
for two reasons:
- First, it adds overhead to the code because the variable must be tested for Nothing every time it is encountered in code.
- Second, you have no way to test whether a auto-instancing variable is Nothing because the very act of using the variable
name in an If Obj Is Nothing Then statement will automatically create an instance of the variable.

Before getting in to classes and objects, it will prove useful to examine
briefly a class’s logical ancestor, the Type declaration. A Type is made up of
other basic variable types. You may be familiar with Types from other programming languages,
in which they are called a struct, structure,
or record. For example, we could declare a Type that describes an
employee:
Type Employee
    Name As String
    Address As String
    Salary As Double
End Type
This defines a single type named Employee which has
three elements: Name, Address,
and Salary. You can then create variables of the
Employee type and give values to the elements. For example,
Dim Manager As Employee
Manager.Name = «Joe Smith»
Manager.Address = «123 Main Street»
Manager.Salary = 40000
Types are quite useful, but have three shortcomings. First, you can’t declare
new instances of a Type. You must declare all the
variables you’ll need at design time or you need a dynamic array that is resized
with Redim Preserve, an awkward and expensive
operation. The second shortcoming of a Type is that
you have no control over what values are assigned to the elements of a
Type. For example, there is nothing to prevent the
assignment of a negative value to the Salary element.
Finally, a Type can’t do anything. It cannot carry out
actions; it is simply a static data structure.
While Types have their place (they are used extensively in Windows API functions),
a class module is often a better solution. New instances of a class may be created
with the New keyword and stored in a Collection or Dictionary object. Next, the properties of a class can be set or retrieved with Property Let
and Property Get procedures, which can contain executable code. Thus, code could
be written to raise an error or take other appropriate action if an invalid value
is used to set a property value, such as a negative value for a Salary. Finally, classes have methods (sub and function procedures) which can
carry out actions. In the example of an employee, there might be a method to print
a paycheck for the employee.
For illustration, let’s adapt the Employee Type described above into a class. First,
insert a class module into your VBProject (from the Insert menu in the
VBA editor). Name the class CEmployee (it is common practice to use a ‘C’ as the
first letter of a class). There are three properties to create: Name, Address, and
Salary. These values will be stored in private variables within the class. Since
they are declared Private, they cannot be accessed outside the class module.
Private pName As String
Private pAddress As String
Private pSalary As Double
Next, we need to declare Property procedures to allow these variables to be read from
and written to. This is done with Property Get and Property Let functions (or Property
Set
for object type variables).
Public Property Get Name() As String
Name = pName
End Property
Public Property Let Name(Value As String)
pName = Value
End Property
Public Property Get Address() As String
Address = pAddress
End Property
Public Property Let Address(Value As String)
pAddress = Value
End Property
Public Property Get Salary() As Double
Salary = pSalary
End Property
Public Property Let Salary(Value As Double)
pSalary = Value
End Property
The Get procedure is used to return a value out of the class, and the Let procedure
is to put a value into the class.
Note that the return data type of the Get property procedure must be the same data type as the (last) parameter to the
Let property procedure. Otherwise, you’ll get a compiler error.
Because Property procedures can contain any code you like, the Let Salary procedure
can be written to exclude non-positive values.
Public Property Let Salary(Value As Double)
If Value > 0 Then
pSalary = Value
Else
End If
End Property
A property can be made read-only simply by omitting the Let procedure. For example,
a read-only property might be withholding tax, which is calculated when it is called.
E.g.,
Property Get WithholdingTax() As Double
WithholdingTax = calculated value
End Property
Finally, the class can contain methods, such as a PrintPaycheck procedure.
Public Sub PrintPaycheck()
End Sub
Now that we have defined the class, we can create objects based on the class. In
a standard code module, declare a variable of type CEmployee.
Dim Emp As CEmployee
Then, Set that variable to a new instance of the class and assign some property values.
Set Emp = New CEmployee
Emp.Name = «Joe Smith»
Emp.Address = «123 Main Street»
Emp.Salary = 40000
If you need to store multiple instances of a class, such as for a group of employees, you can create mutliple objects from the
class and store them in a Collection or Dictionary object, as shown below.
Dim Employees As Collection
Dim Emp As CEmployee
Set Employees = New Collection
For Each Item In SomeList
Set Emp = New CEmployee
Employees.Add Emp
Next Item
Now, you can use a simple For Each loop to loop through the collection and iterate
through the collection and access each instance of CEmployee sequentailly:
Dim Emp As CEmployee
For Each Emp In Employees
Debug.Print Emp.Name
Next Emp
The Instancing property of a class controls where that class
may be used. The default value is Private, which means that the class can be used
only in the project in which the class is defined. You
can set the instancing property to PublicNotCreatable, which allows a variable to
be declared as that class type in projects that have a reference to the project
containing the class. The second class may declare a variable of the class type,
but cannot create an instance of the class with the New keyword. See the next section
for more details.
If the Instancing property of the class is PublicNotCreatable a variable
of that class type may be declared in other projects, but cannot be created in that project. You can use a function in the project
containing the class to return a new instance to the caller. First, change the name of the project containing the class from the default value
of VBProject to something meaningful like projSourceProject. Then, in the class that
will use the class, set a reference to projSourceProject. Back in the project containing the class, create a
procedure that will create and return a new instance of the class:
Public Function GetClass() As CEmployee
Set GetClass = New CEmployee
End Function
Then call this function in the project that will use the class:
Dim NewEmp As projSourceProject.CEmployee
Set NewEmp = projSourceProject.GetClass()
Code within a Property or method of a class can refer to its own instance by using the Me reference. For
example,
    Private pName As String
    Property Let Name(S As String)
        pName = S
    End Property

    Public Sub SomeMethod()

        Me.Name = "ABCD"
    End Sub
This refers to the Name property of the instance of the class from which it is executed.
Other programming languages, such as C++, C# and Java, use the keyword this to refer to the instance of a class.
You can specify a property to be the default property of a class. When you do this,
you can omit that property name and the compiler will use the default property. For
example if you made Name the default property, the following lines of code are functionally
equivalent:
Emp.Name = «Joe Smith»
Emp = «Joe Smith»
See Default Property Of A Class for information and examples of creating a default property.
This page just scratches the surface of what you can do with classes. Consult a good
book on VBA or VB6 programming for a more in depth treatment of classes.
This page last updated: 26-Jan-2012