
Word for Microsoft 365 Word 2021 Word 2019 Word 2016 More…Less
In Word, you can easily add citations when writing a document where you need to cite your sources, such as a research paper. Citations can be added in various formats, including APA, Chicago-style, GOST, IEEE, ISO 690, and MLA. Afterwards, you can create a bibliography of the sources you used to write your paper.
To add a citation to your document, you first add the source that you used.
Add a new citation and source to a document
-
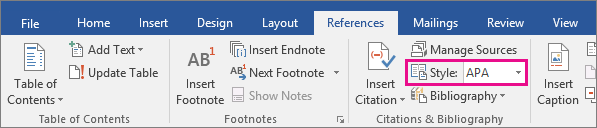
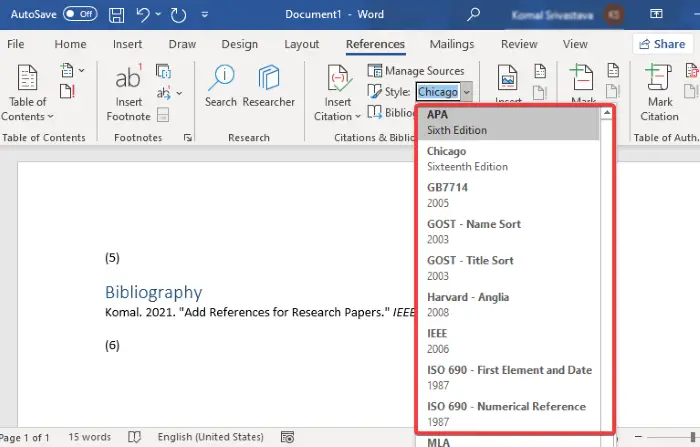
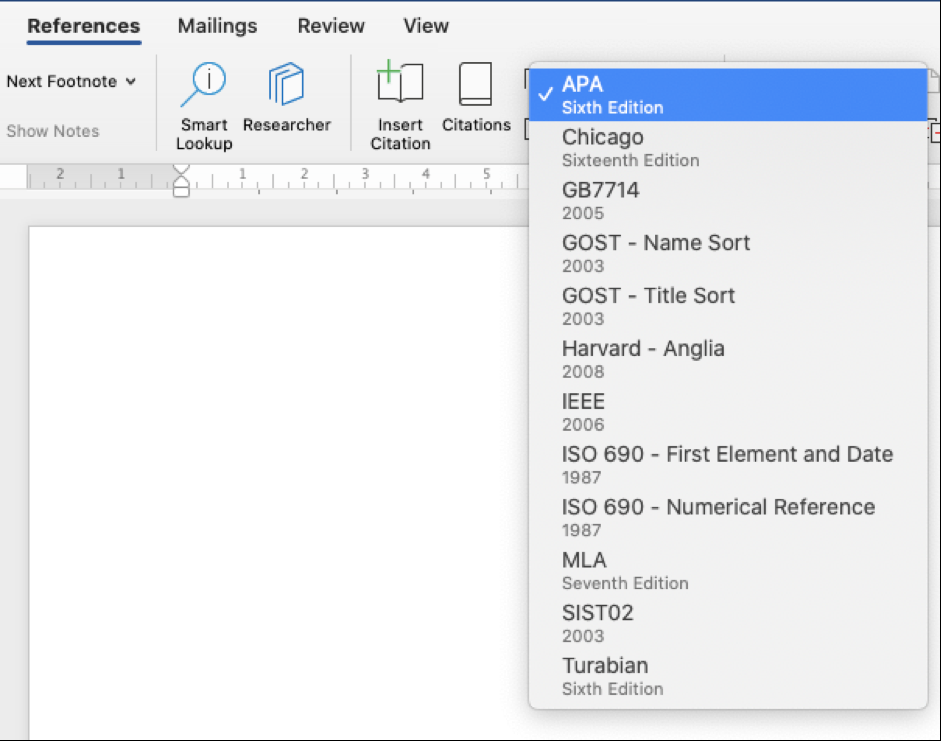
On the References tab, in the Citations & Bibliography group, click the arrow next to Style and click the style that you want to use for the citation and source. For example, social sciences documents usually use the MLA or APA styles for citations and sources.

-
Click at the end of the sentence or phrase that you want to cite.
-
On the Reference tab, click Insert Citation and then do one of the following:
-
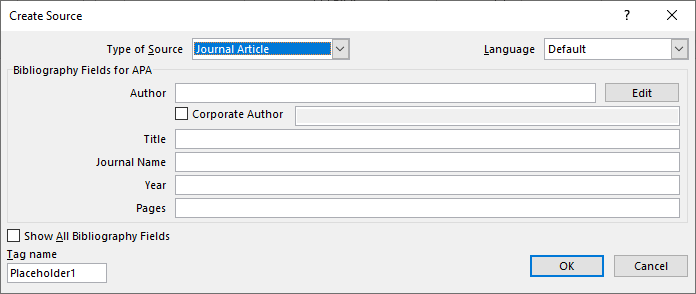
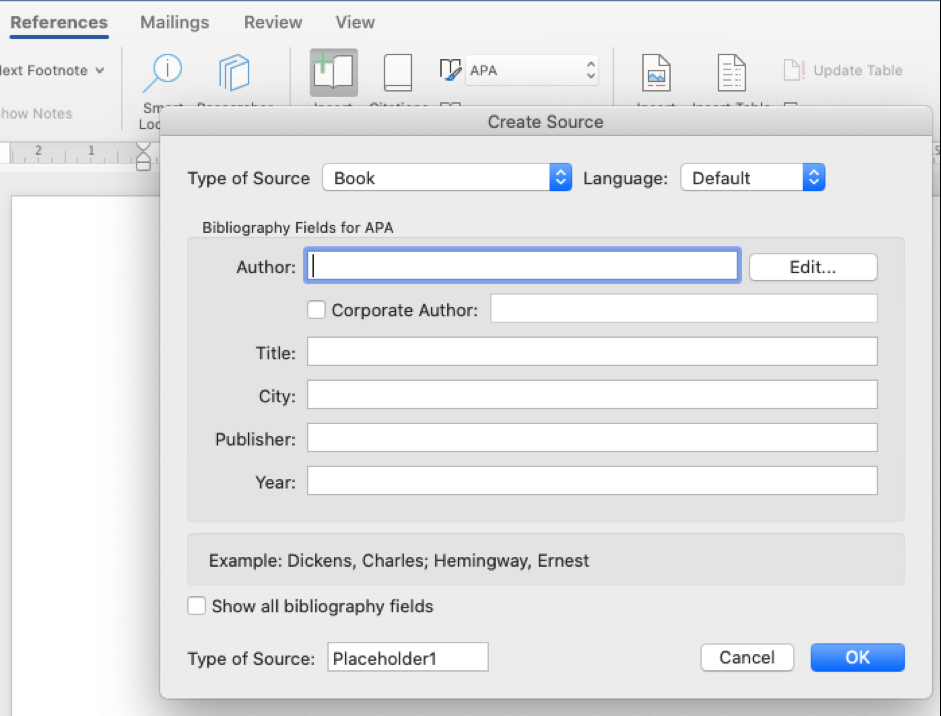
To add the source information, click Add New Source, and then, in the Create Source dialog box, click the arrow next to Type of Source, and select the type of source you want to use (for example, a book section or a website).
-
To add a placeholder, so that you can create a citation and fill in the source information later, click Add New Placeholder. A question mark appears next to placeholder sources in Source Manager.
-
-
If you chose to add a source, enter the details for the source. To add more information about a source, click the Show All Bibliography Fields check box.
-
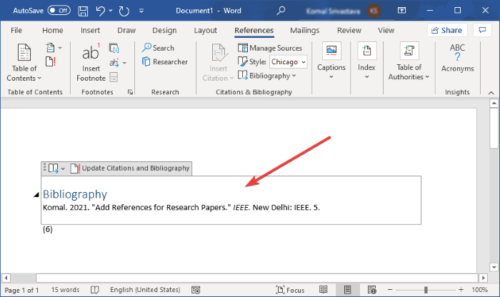
Click OK when finished. The source is added as a citation at the place you selected in your document.
When you’ve completed these steps, the citation is added to the list of available citations. The next time you quote this reference, you don’t have to type it all out again. You just add the citation to your document. After you’ve added a source, you may find you need to make changes to it at a later time. To do this, see Edit a source.
Notes:
-
If you’ve added a placeholder and want to replace it with citation information, see Edit a source.
-
If you choose a GOST or ISO 690 style for your sources and a citation is not unique, append an alphabetic character to the year. For example, a citation would appear as [Pasteur, 1848a].
-
If you choose ISO 690-Numerical Reference and your citations still don’t appear consecutively, you must click the ISO 690 style again, and then press ENTER to correctly order the citations.
Add citations to your document
-
Click at the end of the sentence or phrase that you want to cite, and then on the References tab, in the Citations & Bibliography group, click Insert Citations.
-
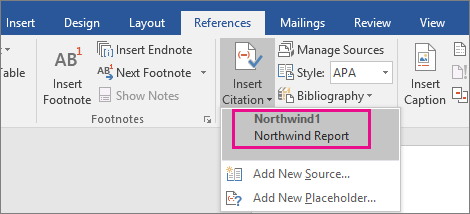
From the list of citations under Insert Citation, select the citation you want to use.
Find a source
The list of sources that you use can become quite long. At times, you might need to search for a source that you cited in another document.
-
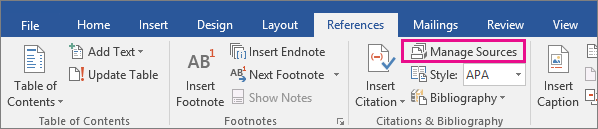
On the References tab, in the Citations & Bibliography group, click Manage Sources.
If you open a new document that does not yet contain citations, all of the sources that you used in previous documents appear under Master List.
If you open a document that includes citations, the sources for those citations appear under Current List. All the sources that you have cited, either in previous documents or in the current document, appear under Master List.
-
To find a specific source, do one of the following:
-
In the sorting box, sort by author, title, citation tag name, or year, and then look for the source that you want in the resulting list.
-
In the Search box, type the title or author for the source that you want to find. The list dynamically narrows to match your search term.
-
Note: You can click the Browse button in Source Manager to select another master list from which you can import new sources into your document. For example, you might connect to a file on a shared server, on a research colleague’s computer or server, or on a Web site that is hosted by a university or research institution.
Edit a source
-
On the References tab, in the Citations & Bibliography group, click Manage Sources.
-
In the Source Manager dialog box, under Master List or Current List, select the source you want to edit, and then click Edit.
Note: To edit a placeholder to add citation information, select the placeholder from Current List and click Edit.
-
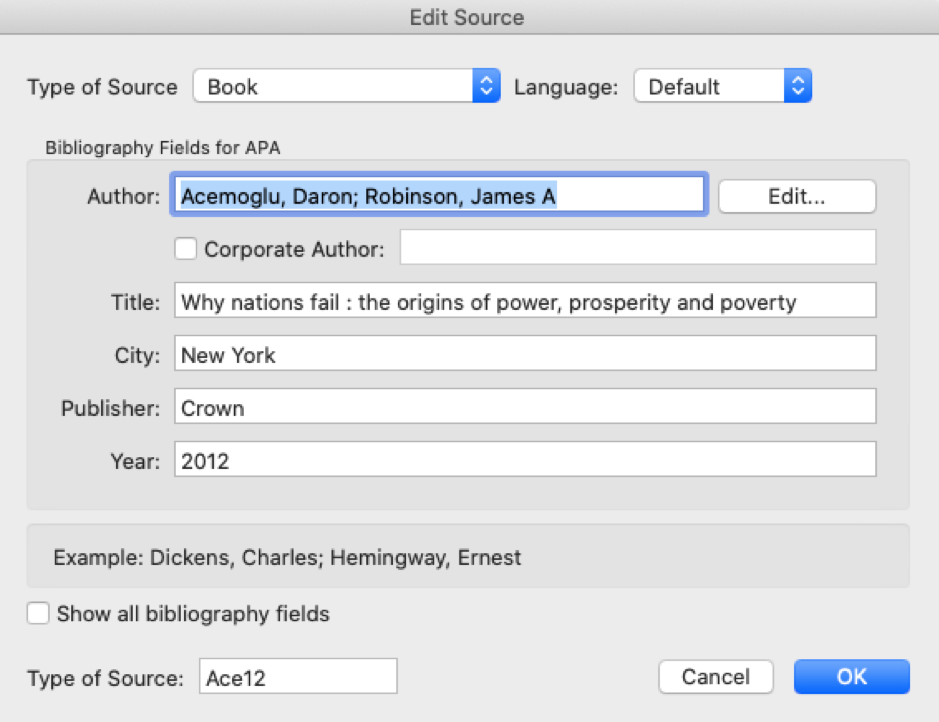
In the Edit Source dialog box, make the changes you want and click OK.

Need more help?
Want more options?
Explore subscription benefits, browse training courses, learn how to secure your device, and more.
Communities help you ask and answer questions, give feedback, and hear from experts with rich knowledge.
![]()
Download Article
![]()
Download Article
Microsoft Word has many automatic features that can help you write a report or academic paper. Among these, you can keep a list of sources and citations to automatically generate a bibliography (also called a «Reference List» or «Works Cited») at the end of your paper. If you need footnotes or endnotes, Word has features that can help you format those as well.
-
1
Choose a citation style on the «References» tab. When you click on the «References» tab, you’ll see the word «Style» next to a drop-down menu. If you click on the drop-down menu, you can select the citation style you want to use for your references.
- Make sure the edition is the same as the one you need to use. Word typically offers the most recent edition of each style, but if you have an older version of Word you may need to upgrade. If you have a subscription version, simply download the latest update.[1]
- Make sure the edition is the same as the one you need to use. Word typically offers the most recent edition of each style, but if you have an older version of Word you may need to upgrade. If you have a subscription version, simply download the latest update.[1]
-
2
Click «Add New Source» to enter information about a source. On the «References» tab, click the «Insert Citation» button in the «Citations and Bibliography» group. Any sources you’ve already entered will appear in a drop-down. Select «Add New Source» if the source you want to cite isn’t already listed.
- A dialogue box will appear with the necessary fields for the citation, including spaces for the author, title, year of publication, city, and publisher. Enter all the information you have for your source, then click «OK.»
- If you have additional information about the source that doesn’t fit into any of these basic fields, check the box next to «Show All Bibliography Fields.»
Tip: If you don’t have all the information for the source, or if you don’t want to interrupt your train of thought to add a new source, you can click «Add New Placeholder» instead. This alerts you that you need to add a citation there.
Advertisement
-
3
Continue to insert citations as you write your paper. Set the cursor at the end of a sentence where you need a citation. Go back up to the «References» tab and click on «Insert Citation» to bring up the list of sources. Click on the source you want to cite, and Word will automatically generate an in-text citation in the style you’ve chosen.
- To edit an individual citation, such as if you wanted to add a page number for a direct quote, right-click the citation for citation options and click «Edit Citation.»[2]
- To edit an individual citation, such as if you wanted to add a page number for a direct quote, right-click the citation for citation options and click «Edit Citation.»[2]
-
4
Use the «Manage Sources» button to edit or delete sources. Particularly if you have a long paper with a lot of sources, you may find as you go that you have some duplicated sources or some that you no longer need to use. You can add, delete, or edit sources using the «Manage Sources» button in the «Citations & Bibliography» group under the «References» tab.
- Choose the source you want to edit from your master list. As you edit, you’ll see a preview of the final citation in the lower box.
- If you inserted placeholders while you were writing, you can also use this menu to add information for those sources.


Advertisement
-
1
Select the footnote or endnote option on the «References» tab. Set your cursor where you want the footnote or endnote number in your text. Typically this will be at the end of a sentence, but it may be after a signal phrase or author’s name. Go up to the «References» tab and click «Insert Footnote» or «Insert Endnote.»[3]
- Word will automatically create a superscripted number in your text and move the cursor to the footnote or endnote field.
Keyboard shortcuts:
Insert Footnote: Alt+Ctrl+F (PC); Command+Option+F (Mac)
Insert Endnote: Alt+Ctrl+D (PC); Command+Option+E (Mac) -
2
Use the «Expand» icon to adjust footnote or endnote settings. You can use sequential numbers, letters, or other symbols to mark your footnotes or endnotes. You can also specify what number or letter you want them to start from.[4]
- By default, footnotes or endnotes will continue sequential numbering throughout your document. If you want the numbers to restart at the beginning of each new section or chapter, you can specify this in the settings.
If you need to convert footnotes to endnotes, click on the «Insert» menu, then «Footnote,» then «Options.» Select «Convert» from the menu, then click on «Endnotes.»
-
3
Type your footnote or endnote into your document. You can enter your citation by hand, or you can use the «Insert Citation» tool to add a citation in your footnote or endnote. Choose your source from the drop-down or add a new source if you want to cite a source that you haven’t entered yet.[5]
- You can also use the «Placeholder» tool if you don’t yet have all the information for the source and need to add it in later.
- Check the formatting against your style guide to make sure it’s correct before you continue.
-
4
Double-click the footnote number to go back to the document. When you’re ready to go back up to where you left off and start writing again, double-click the number or other symbol at the beginning of the footnote. It will send the cursor back to the end of the text.[6]
- Similarly, you can double-click a superscripted footnote number in the text to check that footnote, edit, or add to it. While you can also simply scroll down the page, this is a quicker way to get there.
To delete a footnote or endnote, highlight the footnote or endnote number in your text and press the delete key. Word will automatically renumber your other footnotes or endnotes to accommodate for the deletion.


Advertisement
-
1
Choose the format for your bibliography. Word automatically builds your bibliography for you as you enter your sources. Select «Bibliography» fro the «References» tab, then choose the type of bibliography you want from the drop-down.[7]
- For example, if you’re writing your paper in MLA style, you would want a «Works Cited» bibliography. Assuming you chose MLA as the style for your source citations, the «Works Cited» format would be the first format option in the «Bibliography» drop-down menu.
-
2
Generate your bibliography with a click. When you find the format you want, simply select it from the drop-down menu and click. Word will automatically create your bibliography at the end of your document.[8]
- The bibliography is considered a separate object from the paper you’re writing, and will automatically start on a new page.
Tip: You don’t have to wait until you’ve finished writing your paper to create your bibliography. Word will auto-populate your bibliography with any new sources you add after the bibliography has been generated.
-
3
Proofread your bibliography carefully. Even though Word has done the hard work of formatting for you, you still need to double-check each entry. Make sure the source is correct and the entry is formatted correctly for the style you’ve chosen.[9]
- For example, if you made a typographical error when entering the information about the source, that error would carry over into your bibliography.


Advertisement
Ask a Question
200 characters left
Include your email address to get a message when this question is answered.
Submit
Advertisement
Thanks for submitting a tip for review!
-
The steps and information in this article are accurate for Word for Office 365, Word 2019, Word 2016, Word 2013, Word 2010, and Word 2007. If you have a different edition of Word, your menu options may differ slightly.[10]
Advertisement
About This Article
Thanks to all authors for creating a page that has been read 91,028 times.
Is this article up to date?

Managing citations for research papers, theses, dissertations, and other nonfiction works can be overwhelming. However, you can ease the process by learning how to insert citations in Microsoft Word using the software’s citation and bibliography tools.
This tutorial covers six topics:
- How to select a citation style
- How to insert citations for new sources
- How to insert citations for existing sources
- How to edit sources
- How to use citation placeholders
- How to insert bibliographies, reference lists, or works cited lists
Important Note: At the time this tutorial was published, Microsoft Word did not offer the most up-to-date formatting for several of our primary style guides, including APA, Chicago, MLA, and Turabian. Therefore, I encourage you to review the available styles before using the citation and bibliography tools. We will cover the steps to customize citation and bibliography styles in a separate tutorial.
This tutorial is also available as a YouTube video showing all the steps in real time.
Watch more than 150 other writing-related software tutorials on my YouTube channel.
The images below are from Word in Microsoft 365. The steps are the same in Word 2021, Word 2019, and Word 2016. However, your interface may look slightly different in those older versions of the software.
How to Select a Citation Style in Microsoft Word
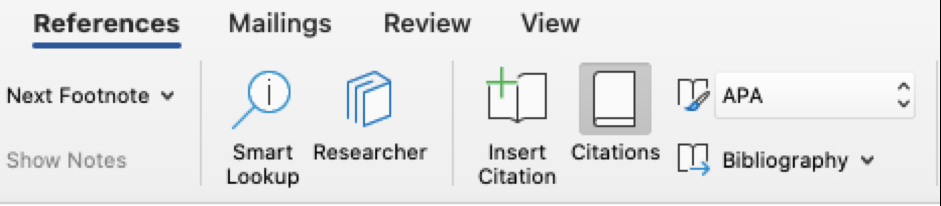
- Select the References tab in the ribbon.

- Select your citation style from the Style menu in the Citations & Bibliography group.

How to Insert Citations for New Sources in Microsoft Word
- Place your cursor where you want to insert the citation.

- Select the References tab in the ribbon (see figure 1).
- Select the Insert Citation button in the Citations & Bibliography group.

- Select Add New Source from the drop-down menu.

- Select the source type from the Type of Source menu in the Create Source dialog box.

- Enter the source information into the bibliography fields.

- (Optional Step) Select Show All Bibliography Fields if you need to add additional information.

- (Optional Step) Enter the source information into the additional fields.

- Select the OK button.

Your citation should appear in your text.

How to Insert Citations for Existing Sources in Microsoft Word
Once you enter a source, as shown in the section above, you can create additional citations for that source without reentering the information.
- Place your cursor where you want to insert the citation (see figure 3).
- Select the References tab in the ribbon (see figure 1).
- Select the Insert Citation button in the Citations & Bibliography group (see figure 4).
- Select the source from the drop-down menu.

Your citation should appear in your text (see figure 11).
How to Edit Sources in Microsoft Word
When you edit an existing source, you will also edit any existing citations for that source in your current document.
- Select the References tab in the ribbon (see figure 1).
- Select the Manage Sources button in the Citations & Bibliography group.

- Select the source you want to edit in the Master List or the Current List in the Source Manager dialog box.

Pro Tip: The Master List is stored in your computer and is accessible in all your documents. The Current List is part of your current file and is only accessible in that file. By default, Word stores new sources in the Master List and the Current List.
- Select the Edit button.

- Enter your edits in the Edit Source dialog box. (Select Show All Bibliography Fields, if necessary.)

- Select the OK button.

- Select Yes or No in the alert box stating that you will be updating the source in both the Master List and the Current List. (Strongly consider selecting Yes to update both lists if you plan to cite this source in future documents.)

- Select the Close button in the Source Manager dialog box.

How to Use Citation Placeholders in Microsoft Word
You can use placeholders if your source information is not available.
- Place your cursor where you want to insert the citation placeholder.
- Select the References tab in the ribbon (see figure 1).
- Select the Insert Citation button in the Citations & Bibliography group (see figure 4).
- Select Add New Placeholder from the drop-down menu.

- (Optional Step) Change the name of the placeholder in the Placeholder Name dialog box.

- Select the OK button.

Pro Tip: You can use the same placeholder in the future by selecting it from the Insert Citation drop-down menu (see figure 12).
- When you are ready to replace the placeholder with a source, complete the steps in How to Edit Sources above.
How to Insert Bibliographies, Reference Lists, or Works Cited Lists in Microsoft Word
These steps will only work if you inserted your sources using Word’s citation and bibliography tools.
- Place your cursor where you want to insert the bibliography, reference list, or works cited list.
- Select the References tab in the ribbon (see figure 1).
- Select the Bibliography button in the Citations & Bibliography group.

- Select Bibliography, References, or Works Cited from the drop-down menu.

Your bibliography, reference list, or works cited list should appear in your document.
Related Resources
How to Create Hanging Indents in Microsoft Word
How to Insert Footnotes and Endnotes in Microsoft Word
How to Convert Individual Footnotes to Endnotes in Microsoft Word (and Individual Endnotes to Footnotes)
How to Create a Cover Page in Microsoft Word (Built-In and Custom)
Updated August 22, 2022
You know how our parents or professors moan about the days when they had to type their papers on a typewriter and that we, the young generation, do not know how easy we have it? Well we really don’t! Especially with this new/old feature you can find on Microsoft Office (MS) 2007.
I call it new/old because it’s not that new (about 5 years old now) but it’s still news to some people. At the top of your word document are seven tabs: Home—Insert—Page layout—References—Mailings—Review—View. The secret to great and awesome citation is the ‘references’ tab.

When I was a student I majored in the humanities, which translates to lots of writing and research. Our professors made us go through a rigorous process and methodology of writing papers, in the end we came out knowing how to write decent papers.
So here’s a recap of the process I went through: Most of my professors asked us to write papers in steps so there’s a bunch of stuff to do before the actual writing.
1) Step one: Write a thesis-statement and/or paragraph about your overall paper.
Here’s an example of mine: My paper will be on family structures in the US and how the presidential families have a role to play in fitting the image or setting the expectations.
2) Step two: Gather your sources (minimum 8 sources, half books and half journals).
I thought this was a pain, but I learned a lot from this stupid not-so-stupid-after-all process. I used to think “hell, I haven’t even written the paper, why should I get the sources first?” It’s because you don’t want to spend an all-nighter writing a paper of 3000 words without having your sources at the ready, instead of trying in vain to Google for sources (ahem Wikipedia) the night before the deadline that will most likely get shot down by your professors later anyways.
So how useful is this? I can’t even tell you how crazy useful this is. This gives you and your professor a chance to see how far you can manipulate your source. You’re writing a paper on dictators: Your sources can be taken from journals, books and articles. What you DON’T want your source to be is that Hitler parody on youtube (just type that in Google, you’ll know what I’m talking about).
I’ve known people to use such websites or blogs without realizing that their sources are actually, crap. One classmate used a website that she thought was a scholarly one, but it turned out to be a well-maintained racist website that called for segregation. The paper was on animal breeding, involving cross-breeds and pure-breeds. My classmate only found out after getting an ‘F’ for that paper.
There’s another reason why getting your sources early is a good thing. You can insert them into this crazy-awesome function on Word as in-text citations and a bibliography.
Let’s say you have a book and you want to use it as a source in your paper. In Word go to ‘references’ and click on ‘insert citation’ and a drop-down list will give you the option of ‘add source.’ Click on that.

A pop-up with different fields will appear. If you chose the APA setting, then it should look comme Ça!

Then choose your ‘type of source.’ We already established that it’s a book, so choose ‘book’ (among other choices are website, film, presentation, and miscellaneous).

So now I fill out all the fields…

…and then hit ‘OK’. The citation should look like this: (Collins, 2010).
Your sources are stored, so throughout your paper if you want to cite a line from one of these books, all you have to do is go to the drop-down list and click on one of them:

Pretty nifty huh?
Now for the grand finale of this featured citation to save nations of students from paper abominations, I give you, the bibliography!

You go to the ‘references’ tab as usual, but instead of “Insert citation” you click on “Bibliography” where you’re given two choices: Bibliography or works cited. Usually the bibliography is the one professors want to see, so you give a gentle click and…
Bibliography
Collins, S. (2010). The Hunger Games Mockingjay. London: Scholastic Ltd.
Levitt, S. D., & Dubner, S. J. (2009). Superfreakonomics. New York: HarperCollins.
Pratchett, T. (2010). I Shall Wear Midnight. London: Random House.
Pullman, P. (1995). The Golden Compass. New York: Random House.
Stockett, K. (2009). The Help. New York: Penguin Group.
Voila!
WHAT IS THIS SOURCERY?!

Get it? “Source” cery? Hur hur hur.
Disclaimers: While this amazing-awesome-super-licious feature is very useful, it is no substitute to really knowing how to cite. Before you go crazy on your word documents, do check grammar manuals on the accurate way of citing just so that you know you’re on the right track. It’s like using a calculator, you (ideally) should have a rough estimate in your head before you punch in a formula, or else your accidental inclusion of several zeroes will go unnoticed and you just gave an obviously ridiculous answer. So check the actual citation process before using this reference feature.
Also! It doesn’t hurt to double-check with your professor or thesis adviser on whether they approve and appreciate the accuracy of this feature. Maybe they’ll ask you to use a citation style that isn’t offered by Word Doc (in which case, you’re on your own buddy). The last thing we want to happen is you writing a paper with this, and your professor getting upset and trying to hunt down the writer who advised you to use this feature in the first place (i.e. me).
So I bid you all good luck with your papers! And…

[divider]
Undergrad Success would like to thank Gradberry for this article — Be sure to check out The Fruit Bowl!

If you need to cite sources and create a bibliography in Word for your research paper, essay, or article, the process is easy and flexible with our how-to.
It’s much easier these days to create a bibliography for your research, term paper, article, or thesis than it used to be. And if you use Microsoft Word to write your papers, it offers a built-in tool for creating and automatically updating sources and a bibliography in the most common styles.
You can save a list of sources to reuse within the same document or new documents, fill in all the details you need with a helpful tool, and insert a bibliography at any time and in any spot. Here’s how it’s done!
The Word References Tab
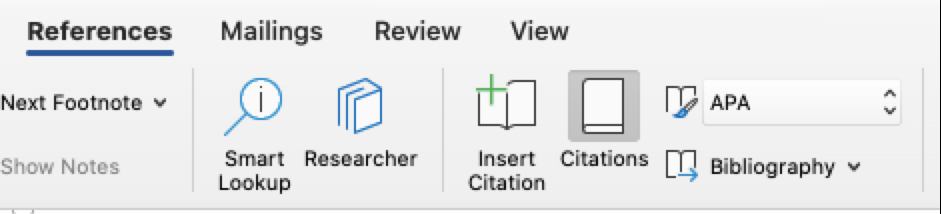
For this task, you’ll be working with the References tab in Word which is the same area you’d use to create a table of contents. And there is a nice section in the ribbon on this tab called, you guessed it, Citations & Bibliography.
You also have two convenient ways to add a list of sources. You can add them as you work through your document or add them all upfront and then insert them as needed.
So, open up your Word document or create a new one and let’s begin!
Select Your Style
A good first step for citing sources and creating a bibliography in Word correctly is to select the Style in the Citations & Bibliography of the ribbon. As with college papers, professors usually require a specific style. By selecting this right from the start, sources will be formatted as they should be throughout your document writing process.
Click the Style drop-down and select the one you want from the list. You’ll see the most common citation styles like APA, MLA, Chicago, and several others.

Cite New Sources as You Write
When you land on a spot in your document where you need to cite a source, the fun begins. Click the Insert Citation button and select Add New Source.
You’ll notice that you can also choose to Add (a) New Placeholder. This is convenient if you haven’t gotten the details for your source yet but want to make sure you hold a spot for it.

When the Create Source box opens, you’ll have everything you need to cite your source.
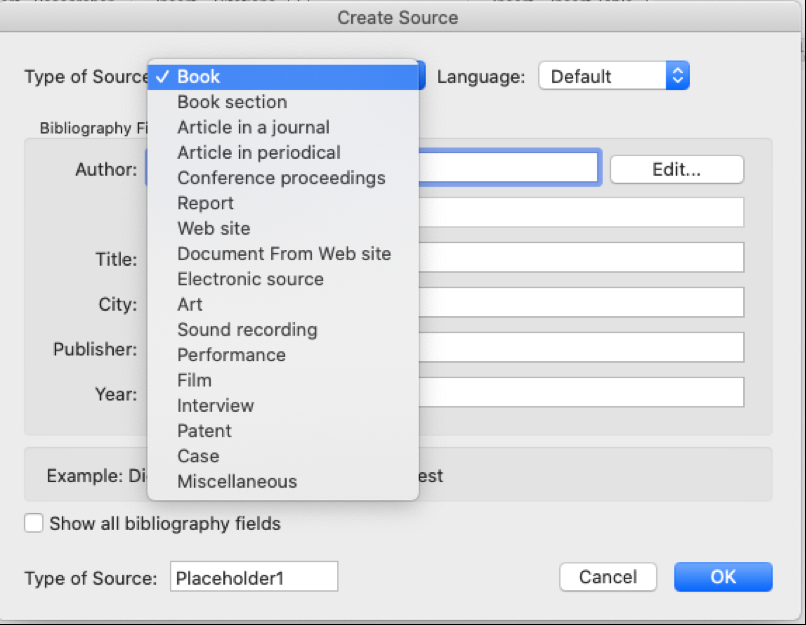
Type of Source: Click the drop-down box and choose the source type from the list. You can pick from plenty of options like a book, website, article, patent, sound recording, and others.
Bibliography Fields per style: Obviously the details for your source will vary depending on the type beyond the basic fields you need like title and author. You’ll have options for things like the URL of the website, the patent number for a patent, and the director for a film.
All Bibliography Fields: Although you’ll be presented with the fields you need for the style you select you can also view All Bibliography Fields by marking that checkbox. Then, you’ll see red asterisks next to the recommended fields.

Adding More Details: You’ll notice that some fields have an Edit button next to them. This is helpful if you want to add more than one name to a field. Complete the Add Name fields for the first person, click the Add button, then complete the name fields for the next person. You can use the Up and Down buttons to place the names in the order you want them to display. Click OK when you finish.

Manage Your Sources
Once you begin adding sources to your document or if you prefer to add them all upfront, you can use the Source Manager. Click Manage Sources in the Citations & Bibliography section of the ribbon.
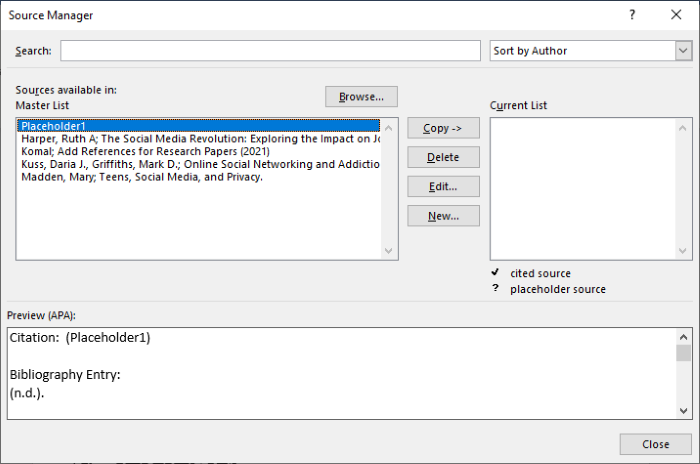
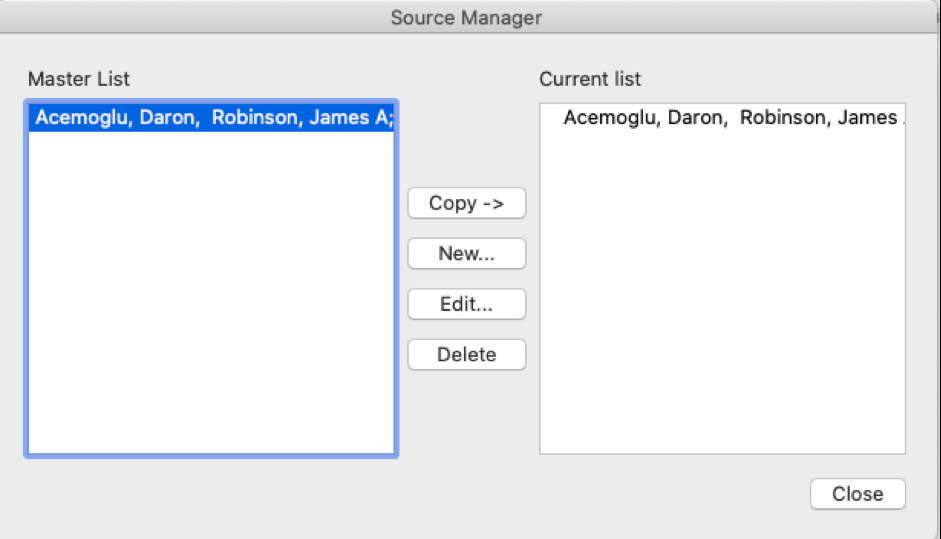
When the tool displays, you’ll see the Master List on the left and your Current List on the right. Here’s how to work with the Source Manager.
- The Master List contains all sources you have already added or that are built into Microsoft Word.
- The Current List contains all sources you have added to your current document.
- Select a source from the Master List and click Copy to move it to your Current List and vice versa.
- Choose any source and click Edit to make changes.
- Choose any source and click Delete to remove it.
- Select New to add a new source.

You can use the Search box at the top to find a certain source or the Sort drop-down list to sort sources by author, tag, title, or year.
When you finish working with the Source Manager, click Close.
Cite Saved Sources as You Write
Any source that you see in your Current List in the Source Manager can be inserted into your document easily. So, once you add a source, you can reuse it with a couple of clicks.
When you hit a spot in your document where you want to cite a source, click Insert Citation from the ribbon. You’ll see your Current List above the Add New Source option. Select one and it will pop right into your document.

Create an Updating Bibliography
You can add an updating, built-in bibliography to your Word document before or after you cite your sources. This is handy because you can update the bibliography at any time with a click.
Place your cursor where you want the bibliography and click the Bibliography button in the ribbon. Choose one of the Built-In options from the top: Bibliography, References, or Works Cited. You’ll see your bibliography pop into your document, formatting nicely, and exactly as it should be for the style you selected.

Here are the actions you can take:
On the top left of the bibliography heading is an arrow you can click to collapse and expand it. Above the heading, you’ll see a toolbar that lets you do the following.
- Three dots: If you click the three dots on the left of the toolbar, this selects the bibliography. You can use this if you want to delete it from your document or drag to move it.
- Bibliographies: Click this button to change the bibliography type or convert it to static text.
- Update Citations and Bibliography: Click this button to update the bibliography at any time. This allows you to continue citing sources in your document and add them to the bibliography automatically.

Use a Static Bibliography in Word
You’ll also see the option for Insert Bibliography at the bottom of the Bibliography drop-down list in the ribbon. In addition, you’ll see a Convert bibliography to static text option in the Bibliography toolbar.

Both options give you the same results:
- The bibliography will not contain a header automatically.
- The bibliography will stop updating your Current List in the Source Manager.
- You can make manual changes to the bibliography if you want to deviate from Word’s built-in styling.
Never Forget to Cite a Source in Word
With the tools that Microsoft Word offers, creating a bibliography for your document is no longer a tedious task. Plus, you can cite and reuse saved sources quickly and easily!
Looking for more help? Check out how to add and use custom dictionaries in Microsoft Word or how to add annotations in your next Word document.
![]()
Adding citations and references is essential for students for their academic projects. Failing to add relevant references can not only lead to a deduction of marks but might even result in the project being rejected by the teacher. Furthermore, it can be difficult to keep up with different types of referencing styles to meet the criteria set by your teachers. Fortunately, Microsoft Word makes it quite easy to add citations and references to your Word documents.
How to Create References in Microsoft Word
The References tab in MS Word provides a comprehensive set of features for adding citations and references. The below guide will help you to add references in your Word documents, using Microsoft Word and older versions.
Step 1: To create a reference, head over to the References tab in MS Word and select a referencing style. By default Microsoft Word provides a variety of referencing styles, including the most commonly used styles like the Chicago and Harvard style of referencing.
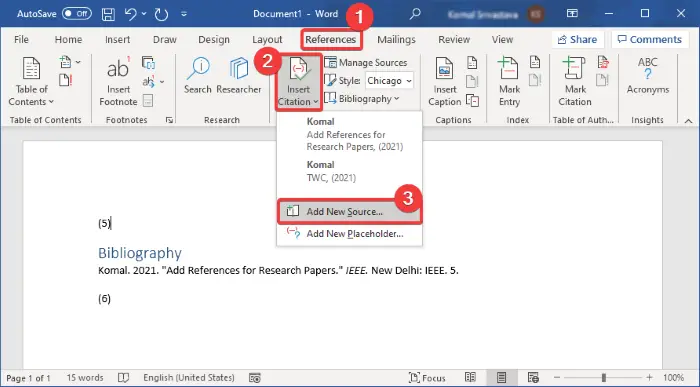
Step 2: To add a citation click Insert Citation and select Add New Source.
Step 3: This will open a dialog box where you can select a source type and add relevant details. The available source types include Book, Book Section, Journal Article, Article in a Periodical, Conference Proceedings, Report.
Step 4: Once your reference has been created, go to Insert Citation and select it to add it as an inline reference.
Editing Your Citations and References in Microsoft Word
You can edit your citation anytime by clicking on the inline citation. The available options in the drop down menu will allow you to edit the citation and source, convert the citation to static format, as well as to update citation and bibliography.
You can also manage your added references by going to Manage Sources in the References tab. This section can be used to edit and remove added sources, as well as to copy and add new sources.
Adding Bibliographies to MS Word
In the References section you can use the Bibliography menu to add a Bibliography to your Microsoft Word document.
Adding End Notes to Your Microsoft Word Document
You can add end notes to your MS Word documents via References –> Insert Endnote.
As we could see, adding citations in Microsoft Word is possible with these simple steps. These tips can be helpful for Academic research or when preparing business documents. If you need more help you can learn Microsoft Word and how to accomplish simple tasks to be more productive at work.
Download PC Repair Tool to quickly find & fix Windows errors automatically
Referencing is a prominent thing in academic writing. It is used to provide sources to other authors’ work you have referred to in your studies. In this article, I am going to share a tutorial on how you can add references for research papers in Microsoft Word.
Thankfully, Microsoft Word comes with a dedicated feature to add references to your documents. So, you don’t need any external app or add-on to do that. You can add citations to your sources and research papers in different styles. Plus, it also lets you search for references to research papers online and then directly cite them in your documents.
We have seen how to put References or cite Sources in PowerPoint. now let us see how to use the Referencing feature of Word.
Launch Microsoft Word and open your document or create a new one.
Then, go to the References tab present on main toolbar. In this tab, you will find a Citations & Bibliography section.
From here, click on the Insert Citation > Add New Source option.
You can also select a Style to add citations in the required format, such as APA, Chicago, IEEE, Harvard, MLA, etc.
Now, add details of the research paper to add its reference. You can enter type of source (journal article, book, conference proceedings, website, electronic source, etc.), title, author, year, pages, and more. Press OK button after specifying the details of your reference.
A reference for the research paper will be added to your document. To list all your references and sources in a dedicated bibliography or works cited section, click on the Bibliography option.
If you want to generate citation for a research paper automatically, you can use its Search feature. This feature basically lets you search for your sources online and then directly add their references into your document.
From the References tab, click on the Search button which will open a Search panel at the right. Type the full title of your research paper and press Enter button. It will fetch and display your research paper and similar results. Select the one you want to cite, click on the three-dot menu, and then tap on the Cite button. This will add a citation to your referred research paper in the Word document.

You can manage all your references and sources that you have added to a document using its Manage Sources option. It lets you copy, edit, delete, and search for required sources from one place.
Hope this guide helps you add references and citations of research paper and other sources to your Microsoft Word document.
Now read: How to create a Drop-down List in Word.

Komal has done M.Tech in Computer Science & Engineering. She is a keen follower of the Windows ecosystem & a technical writer since the last six years. She loves finding solutions for day-to-day tech problems.
How to Automatically Add Citations and Bibliographies to Your Document
Properly formatting citations and references have always driven researchers crazy. With Microsoft Office Word, though, the process is streamlined to the point of almost being automatic. Microsoft Word automatically generates a bibliography from the sources you used to write your manuscript. Each time you add a new citation to your document, Word adds that source so that it appears in the bibliography in the proper format, such as APA, Chicago/Turabian, and MLA style. This handout is going to show you how to add citations and bibliographies to your Word documents and how to format references automatically using the Microsoft Word References tool.
The techniques this guide is going to discuss here should work for all Microsoft Word newer versions. The screenshots are all taken in the latest version of Microsoft Word 2020 for Mac, so your Word version might look slightly different, but it works the same way.
Before you can add a citation, a works cited list, or a bibliography; you should add a source to your word document. A works cited list is a list of references, usually placed at the end of the main text, that you referred to in your document. A works cited list is different from a bibliography, which is a list of sources that you consulted when you created the document.
When you add a new source, the source information is saved on your computer automatically
When you complete adding your sources, you can automatically generate a works cited list or a bibliography based on your source information that you completed already. When you add a new source, the source information is saved on your computer automatically. If you want to find and reuse any source that you have previously created, even sources in your other documents, you can use the Citations tool.
A citation is a parenthetical reference that is placed in line with the text. A citation is different from a footnote or an endnote, which is placed at the bottom of the page or end of the document. You can use the source information stored in your citation tool to create citations, a reference list, or a bibliography. However, there is no way to create footnotes or endnotes by using the information in Citations tool or the Source Manager.
For more information about citation styles for various manuals, such as APA, MLA, or Chicago Style, read the following articles: Citation Styles | Which Citation Style Should I Use?, APA Formatting Guide for Academic Manuscripts.
Steps to Automatically Add Citations and References
Step 1:
-
Open a new or existing Microsoft Word document.
Step 2:
-
Place your cursor where you would like your in-text reference to be.
-
When you are working on any Word document, place your cursor where you want the citation to be placed.
Step 3:
-
Choose a documentation style (APA, Chicago, MLA, or IEEE) from the dropdown menu.
Step 4:
-
Click at the end of the sentence or phrase that you want to cite.
-
Choose the References tab at the top and click the Insert Citation button.
-
In the Create Source dialog box, next to Type of Source, select the type of source you want to us.
-
In this dialog box, you can enter all of the relevant information for your source. The default setting for the Type of Source dropdown is Book.
-
If you want to enter other types of sources such as a book section, an article in a journal or periodical, or a website, open the dropdown menu to choose the type of source you want.
-
Then click OK to complete the source.
-
Enter the details for your source (for example, author name, title of the source, and year of the publication), and click OK. The source is added as a citation at the place you selected in your document. If you want to add more details for your source, check the Show all bibliography fields box.
When you have completed the steps mentioned above, the citation is added to the available citations. The next time you quote this reference, you do not have to type it all out again. Just select your source from the list of available citations.
Here is an example:
You can repeat those steps to add any other sources you need, and to place citations where you want.
How to Edit an Existing Source Using Microsoft Word
Step 1:
-
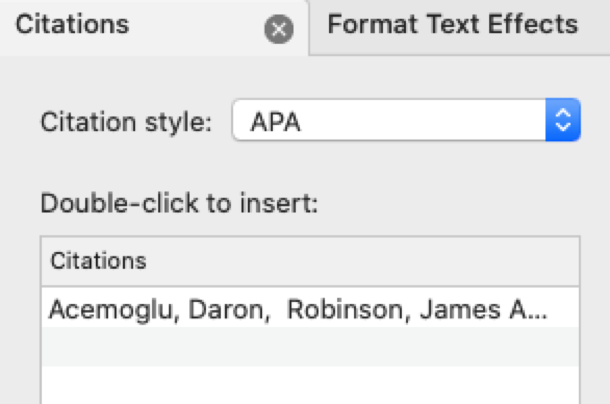
If you want to edit a source, go to the References tab, click Citations, and then click the settings button in the bottom right corner of the Citations pane.
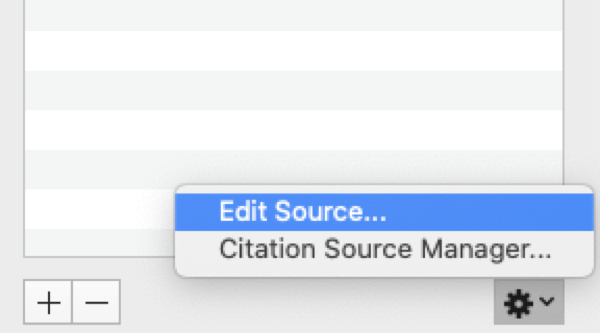
Step 2
-
Click Edit Source, make the necessary changes to the source and then click OK.
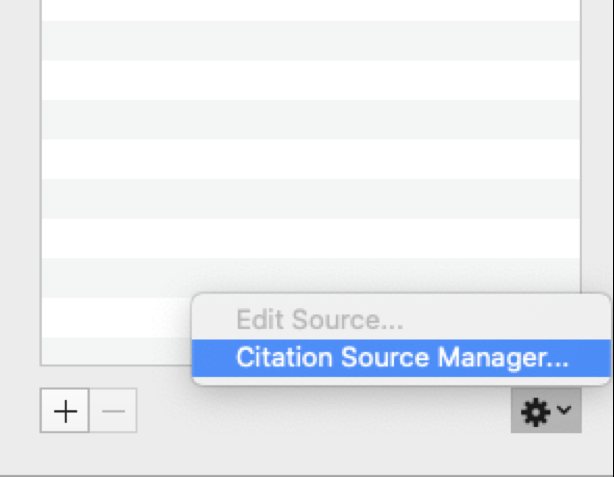
Step 3
-
If you want to manage your list of sources, click Citation Source Manager and then add, edit, or delete sources in your list. You can also copy the available sources or add a new one.
How to Add Citations to Your Word Document
Follow the steps below to add a citation to your document.
Step 1
-
Place your cursor where you would like your in-text reference to be and then on the References tab, click Citations
-
Go to the Citations pane on the right and double-click the citation you want to add to your document.
How to Create A Bibliography or A Reference List
A reference list or bibliography is a list of all works you cited or referred to in your document. When your document is completed, you will want to add a bibliography or works cited list that lists all your sources.
Step 1:
-
Click where you want the Works Cited or Bibliography to appear (mostly at the very end of the main text).
Step 2:
-
On the References tab, click the arrow next to Bibliography, and then click Bibliography or Works Cited.
-
A works cited list is typically used when you cite sources using the Modern Language Association (MLA) style, and it differs from a bibliography, which is a list of all works that you consulted when your researched and wrote your document.

When you click Bibliography, you will have the following list (for APA style):

When you click Works Cited, you will have the following one (for MLA style:

How to Change A Bibliography or Works Cited List Style
You can change the style of all the citations contained in your document’s works cited list or bibliography without manually editing the style of each citation. You can change the citations from the APA style to the MLA style based on your manual.
-
Go to the View menu, click Draft or Print Layout.

-
On the References tab, click Citations.
-
In the Citations pane, on the Citation style list, select a style.

All references in your document’s bibliography or works cited list change to the new style.
If you need help, then contact us!
Best Edit & Proof expert editors aim to provide your manuscripts with proper scholarly and academic tone and style. They will significantly improve the chances of having your research manuscript accepted for publishing. They provide subject-area proofreading and editing services in several fields categorized under various disciplines. With our extensive knowledge and expertise, we will help you find the right tone and style for your manuscript.
If you need our subject-area editors to format your manuscripts, giving you the fundamental rules for formatting your manuscripts as described in your guidelines, such as APA, MLA, or Chicago/Turabian styles, then contact us. At Best Edit & Proof, our proofreaders and editors edit every type of academic paper. We have a user-friendly website, and a simplified ordering process.
If you would like our subject-area editors and language experts to work on your project for the improvement of its academic tone and style, then please visit the order page. It is easy! It takes only a few minutes to submit your paper and complete the process. Click here to see how it works.
We have flat-rate pricing based on our type of service (editing or proofreading), word count, and turnaround time. Enter your word count or copy and paste your document into our pricing calculator to get an instant quote.
24/7 customer support | Live support
If you need support for editing and proofreading services, contact us. You can also e-mail us or use the 24/7 live chat module to get direct support. We have a 24/7 active live chat mode to offer you direct support along with qualified editors to refine and furbish your manuscript. Alternatively, you can text us through our WhatsApp business line.
Stay tuned for updated information about editing and proofreading services!
Follow us on Twitter, LinkedIn, Facebook, Instagram, and Medium.
For more posts, click here.
For more information about the citation styles and APA style, read the following articles:
-
The 9 Most Important Changes in the 7th Edition of the APA Manual
-
APA Manual 7th Edition: In-Text Citation
-
How to Present Tables and Figures in APA Style (7th edition)
-
How to Use et al. in APA Style (7th Edition)?
-
APA Style: In-Text Citation | Reference List Entry
-
How to Cite Sources in APA Referencing Style? | With APA 7th Edition Update
-
How and When to Use ”et al.” in APA In-Text Citations?
-
Citation Styles | Which Citation Style Should I Use?
-
APA Formatting Guide for Academic Manuscripts
This handout discusses how to add citations and bibliography automatically to your manuscript. To give you an opportunity to practice your proofreading, we have left a few spelling, punctuation, and grammatical errors in the text. See if you can spot them! If you spot the errors correctly, you will be entitled to a 10% discount.