
Your finger or a digital pen gives you freedom from a keypad when you’re working on a touch device. In addition to drawing, writing and highlighting, Ink Editor lets you use natural gestures like circling to select and crossing out to delete.

Note: Pictures in this article are from Word for Microsoft 365, but Ink Editor is also available in Word Mobile. Use it on Windows touch devices and devices that work with digital pens such as Microsoft Surface running Windows 10 TH2 or higher operating system.
Edit with natural gestures
If your device is touch-enabled, the Draw tab is turned on automatically. Otherwise, turn it on by selecting File > Options > Customize Ribbon > Draw.
-
Choose Draw and select the Ink Editor pen.

(If you don’t have a digital pen enabled device and have a touch device instead, choose Draw with Touch > Ink Editor pen.)
-
Do any of the following to edit your document using natural gestures:
Circle to select text
Draw a circle around the text you want to select. You can select words, sentences or paragraphs. Now you can apply formatting like font color, bold, or italic.
Cross out to delete text
Draw a line thorough the text to delete it. Delete large chunks of text by drawing a diagonal line or up-and-down squiggles.
Apply highlighting
Choose a highlighter pen from the Pens group and draw across text to highlight the text. To remove the highlight draw across the text again. You can either highlight freeform or select the highlighter and choose Snap to Text.
Join words
Draw a curve to join two words. Be sure both ends of the curve touch the words you want to join.
Split words
Draw a vertical line within a word to split it in two.
Insert a word
Draw a caret between two words to insert text. After you draw the caret, write the words you want to add. When you’re done writing, the text is inserted where you drew the caret.
Make a new line
Draw a backwards L shape. Text after the shape moves to a new line.

Notes:
-
If you wish to keep a record of your ink edits, select the Ink Editor pen > Track Changes before you start reviewing your document.
-

Select Ink using the Lasso tool
In Word, you can use the Lasso tool to select one or more drawn objects. Most of your tools are in the Pens gallery.
-
Go to Draw > Lasso.
-
Click and drag the lasso around the drawing you want to select.
-
Do any of the following
-
Press Delete to remove the selected drawing.
-
Use your mouse or arrow keys to move the drawing.
-
Right-click the selected drawing and select Format Ink. Change color, transparency, and line width options from the Format Ink pane.
-
Right-click the selected drawing and select caption, text wrap, or Alt text options.
-
Click and drag a sizing handle to stretch, shrink, or resize the drawing.
-


See Also
Draw and write with ink in Office
Languages supported for ink-to-text conversion
Tell us what you think about Ink Editor and suggest improvements
If you have suggestions for new actions or gestures you’d like to see in Ink Editor, let us know by providing us feedback. See How do I give feedback on Microsoft Office? for more information.
Need more help?
Sometimes you may need to insert numbers or letters with circles in Word document, but you can’t type them directly or copy them from Internet every time. So how to insert circled numbers and letters in Word exactly?
To answer this question, I’ll share the detailed steps in the post. You can have a try following this guide.
Insert Circled Numbers from Symbol
1. One of the most commonly used way to insert circled numbers or letters is using Symbol.
2. Go to Insert tab, click Symbol and choose More Symbols… in the drop-down list.

3. Choose Windings, Windings 2 or Wingdings 3 as the font in Symbols tab, then scroll down to find the circled numbers. Click Insert to add the specified number to your document.

4. Note: you can only insert numbers from 1-10 with circles in this way. So if you want to insert larger numbers or letters with circles, please try the second method.
Insert Circled Number or Letter Using Enclose Characters
There’s a feature called Enclose Characters in Word, you can make use of it to insert circled numbers as well as letters.
1. Switch to Home tab, click the icon of Enclose Characters in Font section.

2. Enter the number or text you want to add circle in the textbox, then make the choice of Style and Enclosure. Click OK to implement it.

3. You can also select the existing letter in advance and click Enclose Characters to circle it. But don’t forget the maximum number of characters you can circle is 2.
4. As for circling 2 characters, like 2 letters or numbers larger than 9, you’ll find the result isn’t very well even if you choose Enlarge symbol in Style.

5. To make it looks better, you can press [Alt+F9] to switch to field mode. The circled number I just entered will be displayed as below:

6. The circle and the number are both in the parentheses, you can select the number to shrink its size.

7. It’s not enough cause the number will still be on the lower part of the circle. To raise its position, you can select the number and click the small arrow at the lower right corner of Font section in Home tab.

8. Switch to Advanced in the popping out Font window, choose Raised in the drop-down list of Position and click OK.

9. Then you can press [Alt+F9] to check the result. If it can still not satisfy you, just keep switching the mode to make adjustments till it finally looks good.

Insert a Circle Shape and Add Text to It
This method is not that frequently used, but it still works under certain circumstance. For example, if you want to circle more than 2 characters, the normal means may not help at all while this one does.
1. Switch to Insert tab, click Shapes and choose the oval shape in the list.

2. Hold your [Shift] key while dragging mouse to draw the shape. It will help you to draw a perfect circle instead of oval.

3. You can drag the vertices of it to move or resize it, but don’t forget holding [Shift] while resizing it, otherwise it will become oval again.
4. And if the color isn’t right, just double click the circle to enable Drawing Tools, you can change the setting in Shape Fill and Shape Outline.

5. Then right click the circle and choose Add Text in the menu.

6. A textbox will be created inside the circle, you can type any text in it and adjust its font and size.

But you can do very little to adjust the text added in this way – you can’t even move it freely.
Instead, you can try changing the text into WordArt in advance.
7. Click WordArt in Insert tab to choose a style and type the text in the textbox.

8. Then you can freely resize and move the new created WordArt to adapt the circle.

9. Circled numbers and letters created in this way allow you to adjust them freely, but you must make corresponding changes to both the circle and the WordArt inside it, since they won’t match with each other automatically.

Copyright Statement: Regarding all of the posts by this website, any copy or use shall get the written permission or authorization from Myofficetricks.
Nov 17, 2020
· 1 minute read
If you have a circular object and you want to write a text around it you can follow these steps;
How to Curve Text Around a Circular Object in Word
1- Write your desired text.
2- Select the text.
3- Click on Insert tab.
4- In the Text part, click on the Insert Workart key.

5- Choose a equal size for height and width of the workart box.

6- Click on the Workout Effect
- In the Transform part, choose a circle path in the Follow Path part.

7- Select the text.
8- click on the home tab, in the font part choose your desired colour and font for your text.


word
wordart
Microsoft 365, Microsoft Office, Microsoft Office for Mac, Microsoft Word, Office 2013, Office 2016, Office 2019, Office 2021 / Office LTSC, Office 365 /
30 April 2022
In Microsoft Word, circling around text can place emphasis or enhance the text appearance. There are a few methods you can choose in Word documents and you’re not limited to circles.
We’ll show how to add a simple circle like this, plus a lot more.
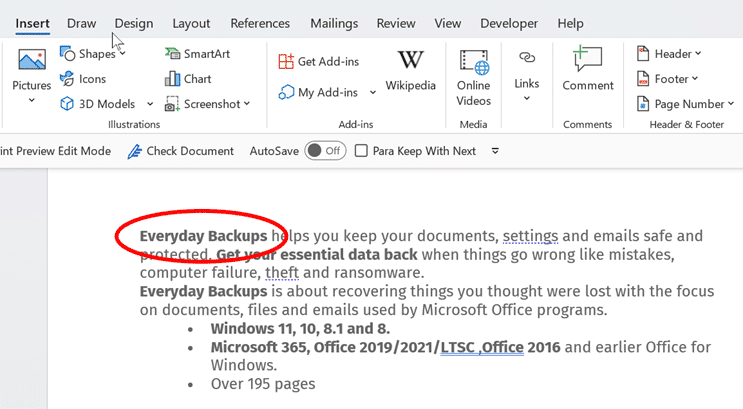
Add shape to document
Go to Insert | Illustrations | Shapes
For our example we’ve chosen the Oval shape under Basic Shapes.

Now, hold down your cursor and drag the circle over the text.

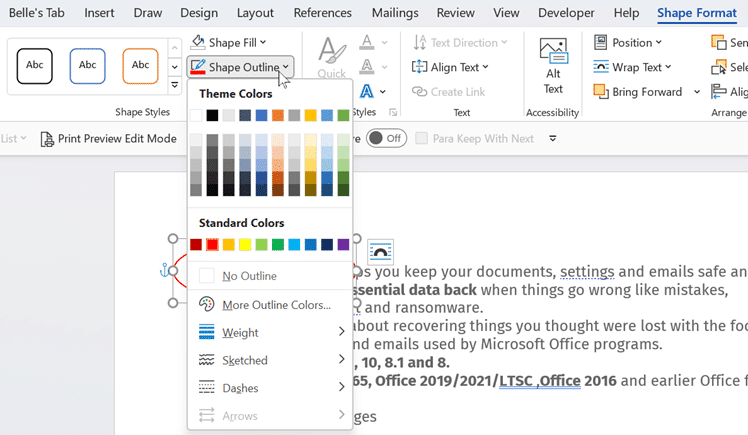
Now, make sure the shape has been selected. We change the formatting under Shape Format | Shape Styles to make it into a transparent circle.
- Shape Fill – choose No Fill, so that it doesn’t cover your text.
- Shape Outline – choose a color of your choice that will really stick out on the page.
- Weight – choose the thickness of the line.
- Sketched – add more of a sketched look to your line.
- Dashes – choose between different dashed lines.

Sketchy or hand-drawn effect
For a rough, hand-drawn line effect go to Shape Outline | Sketchy .

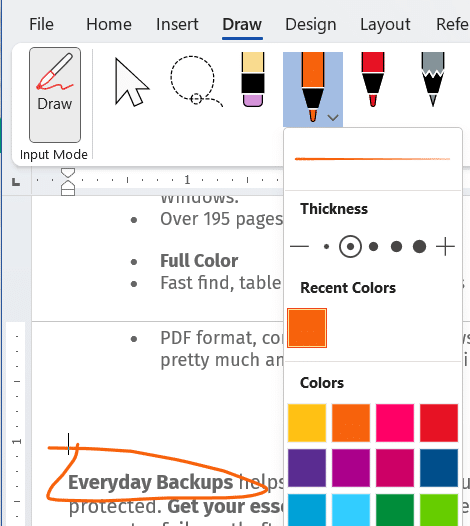
Really hand drawn shape
Yet another option is to really draw a line or shape around the words using the Draw tab. You don’t need a digital pen, just a mouse is enough. Go to the Draw tab, choose a pen, pencil etc and a color.
Add text within a shape
Another way around it is adding text within a shape. This means the text will move with the shape.
Go to Insert | Illustrations | Shapes.
Select your preferred shape.
Right click on the shape and select ‘Add Text’.
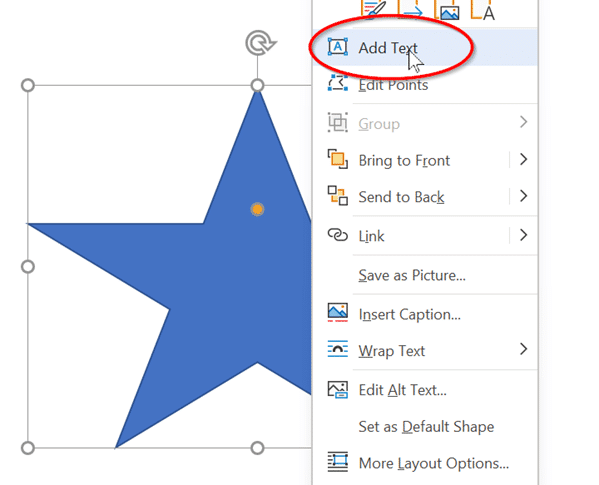
Type your text within the shape. If you need more room for text, drag the yellow dot up to ‘fatten’ the star shape

Double-click inside the shape to bring up options to change the Font style from the mini-toolbar. Of course all the formatting options are also on the Home tab.

Starting Word Page numbers from a specific page number
Make lines and arrows straight – a Word bug fix
Solved! How to connect shapes in Word
Simple shapes can have a lot of uses in a Word document, so it’s entirely possible that you might need to use one.
Whether you want to use the circle on its own, or as part of another document option, knowing how to draw a circle in Word can be beneficial for a number of reasons.
- Open your document.
- Click where you want the circle.
- Select the Insert tab.
- Click the Shapes button, then select the Oval shape.
- Click in the document then drag your mouse to draw the circle.
Our article continues below with additional information on how to draw a circle in Word 2010, including pictures of these steps.
If you would like to know how to insert a circle or another shape in a Google Slide presentation, then click here to find out how.
While Microsoft Word is primarily thought of as a document editor for text, it has a variety of different drawing tools that allow you to insert custom shapes into the document.
You can even use shape fill options and format shape settings to further customize an object that you draw. Our steps below will walk you through how to draw a circle in Microsoft Word 2010 using these tools and settings.
There are a lot of different types of files and objects that you can insert into Microsoft Word 2010 documents, and some of them are simpler and more useful than you might expect.
We have previously described how to take a screenshot in Microsoft Word 2010, but not everything that you add to a Word document needs to be an image or an external type of media.
For example, you can also create objects and shapes entirely from scratch. Therefore, if you need to create a circle and insert it into your document, you can use the Shapes option on the Insert menu to do so.
Fortunately, the Shapes tool in Microsoft Word is quite versatile, and you can use it and the other various drawing tools to create some useful shapes and designs.
Our article below will show you how to draw a circle (or draw an oval) in Microsoft Word if your document would be improved with the addition of that shape.
Our 1 inch margins in CM Word guide can show you how to change the unit of measurement when you are using Microsoft Word.
Inserting a Circle into Word 2010 (Guide with Pictures)
While the tool that you are going to be using is technically for inserting ovals, you can manually adjust the size of the oval so that it is perfectly proportioned and, therefore, a circle. Continue reading below to learn about the steps that you need to take to draw your circle in a Word document.
Are you currently in the market for a new laptop that will easily run Word, along with all of the other programs you use on a regular basis? Check out best selling laptops on Amazon and find a fast and affordable option.
Step 1: Launch Microsoft Word 2010, or double-click the Word file in which you want to draw a circle.
Step 2: Browse to the location in which you want to insert the circle.
Step 3: Click the Insert tab at the top of the window.
Step 4: Click the Shapes drop-down menu in the Illustrations section of the ribbon at the top of the window, then click the Oval icon in the Basic Shapes section of the menu.

Step 5: Click your mouse at the desired location in your document, then drag your mouse until the oval is at the desired shape.
Now that you know how to draw a circle in Word you might have all of the steps that you need. But if you need a perfect circle, then you will need to take a couple more steps.
**The following steps are only necessary if you need a perfect circle**
How to Draw a Perfect Circle in Word 2010
This section continues from the steps in the previous section.
Step 6: If it is not currently selected, click the Drawing Tools – Format tab at the top of the window.
Note that the circle will need to be selected for this menu to be visible.

Step 7: Click inside the Shape Height field in the Size section of the ribbon at the top of the window, then enter your desired circle height.

Step 8: Click inside the Shape Width field under the Shape Height field, then enter the same value that you entered in Step 7. Your shape should now be a perfect circle.
If you want to change the appearance of the circle, you can modify the settings for the shape using the assorted menus in the Drawing Tools-Format tab of the ribbon.
Additional Information on How to Use the Circle Shape Tool in Microsoft Word
If you want to use any of the additional drawing tools, such as the “Shape Fill” option, which allows you to color in your circle, then you will need to select the circle first.
The Insert tab in Word is also where you will need to go if you want to add an image to your document, or other custom objects like a table or a text box.
If you are adding a circle to your document because you want to use it in conjunction with another object, such as a text box that will display text on top of the circle, then you will probably need to adjust the “layers” of those objects. You can find these on the Layout tab in the Arrange section.
Another way that you can add a perfect circle to your document is by holding the Shift key after you have chosen to draw an oval. To accomplish this you would click the Insert tab, click Shapes, choose the Oval from the drop down menu, then hold down the Shift key as you draw a circle in your document.
Additional Sources
- How to insert a check mark in Microsoft Word
- How to do small caps in Microsoft Word
- How to center text in Microsoft Word
- How to merge cells in Microsoft Word tables
- How to insert a square root symbol in Microsoft Word

Matthew Burleigh has been writing tech tutorials since 2008. His writing has appeared on dozens of different websites and been read over 50 million times.
After receiving his Bachelor’s and Master’s degrees in Computer Science he spent several years working in IT management for small businesses. However, he now works full time writing content online and creating websites.
His main writing topics include iPhones, Microsoft Office, Google Apps, Android, and Photoshop, but he has also written about many other tech topics as well.
Read his full bio here.
![]()
Written by Allen Wyatt (last updated February 5, 2021)
This tip applies to Word 2007, 2010, 2013, and 2016
When Des writes paper notes, she often puts squares around certain letters or numbers and circles around others. This is her own «code» that allows her to key in on information she needs to pay attention to. Des can relatively easily put squares around letters or numbers in a Word document (using borders), but she hasn’t found a way to add circles.
There are actually a few ways you can go about this. One way, of course, is to use the graphics capabilities built into Word to create a shape (a circle) that can be placed around any letters or numbers you desire. A quick way to do this is to customize the Quick Access Toolbar so it includes the Oval tool. (How you customize the QAT has been covered in other WordTips. The Oval tool is found by listing All Commands during the configuration process.)
Once the Oval tool is in place, click on it and you can then use the mouse pointer to draw the circle. Just hold down the Shift key as you click and drag, and you are guaranteed of a perfect circle. Of course, the circle is filled in with a color, but all you need to do is use the Fill tool (on the Format tab, visible immediately after drawing the circle) to choose No Fill. You can even right-click the circle and choose Set As Default. This assures that the next use of the Oval tool results in a no-fill shape. (You’ll still need to hold down Shift, however, to ensure you create a circle.)
The benefit to this approach is that you can make the circle any size you want and any color you want. The drawback is that it adds graphic shapes to your document—they can sometimes be difficult to position and they increase the size of your document file.
Another approach is to «enclose» your characters. This is achieved through a different command you can add to the Quick Access Toolbar. When configuring, again display All Commands and look for one named Enclose Character. When you’ve added it to the QAT, use it by selecting some text (either one or two characters, no more) and then clicking the tool. You then see the Enclose Character dialog box displayed. (See Figure 1.)
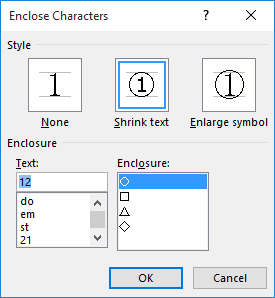
Figure 1. The Enclose Character dialog box.
Here you can select how you want the text affected (shrunk or enlarged) and what type of shape you want to use to enclose the text (circle, square, triangle, etc.). When you click on OK, the text is adjusted through the use of an EQ field. You’ll need to play with this approach a bit to determine if it works just the way you want.
A third way you can tackle this problem is to use a font that already has characters enclosed within circles. This is actually built into Word 2007, Word 2010, and Word 2013. Follow these steps:
- Position the insertion point where you want the circled text.
- Display the Insert tab of the ribbon.
- In the Symbols group, click the Symbol tool and then choose More Symbols. Word displays the Symbol dialog box.
- Using the Font drop-down list, choose Arial Unicode MS.
- Make sure that the From drop-down list is set to Unicode (Hex).
- Using the Subset drop-down list, choose Enclosed Alphanumerics. (You will need to scroll through the drop-down options a ways to find this.) (See Figure 2.)
- Select the symbol you want to use. (If you scroll down a bit you’ll also find circled uppercase letters and circled lowercase letters.)
- Click Insert.
- Close the Symbol dialog box.
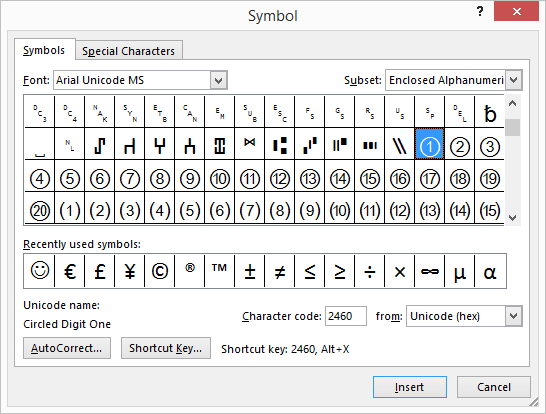
Figure 2. The Symbol dialog box.
The drawback to this approach is that it works only for the numbers 1 through 20 and for single letters (uppercase or lowercase). These steps also won’t work in Word 2016 because—for some inexplicable reason—Microsoft removed the Arial Unicode MS font, and it seems that none of the installed fonts has the Enclosed Alphanumerics subset included. You could, of course, search the Web for a downloadable font that would include circled characters.
WordTips is your source for cost-effective Microsoft Word training.
(Microsoft Word is the most popular word processing software in the world.)
This tip (13436) applies to Microsoft Word 2007, 2010, 2013, and 2016.
Author Bio
With more than 50 non-fiction books and numerous magazine articles to his credit, Allen Wyatt is an internationally recognized author. He is president of Sharon Parq Associates, a computer and publishing services company. Learn more about Allen…
MORE FROM ALLEN
Changing Sort Order
When sorting information, Word follows some pretty strict rules. If you want to modify how those rules are applied, you …
Discover More
Adding Items to a Context Menu
Context menus can be very helpful for presenting common operations you can perform, based on the context in which the …
Discover More
Using the EOMONTH Function
If you need to determine the date of the last day in a month, it’s hard to beat the flexibility of the EOMONTH function. …
Discover More

There are many ways to make text stand out in your document. You can format the font in bold or italic or highlight the text using color. For another option, we’ll show you how to circle text in Microsoft Word.
You may want to place a circle around text to emphasize it. But you might also want to use that circled text to enhance the appearance. Whatever your reason, circling text in Word takes only a couple of steps.
Add a Shape to the Document
Open your Word document and go to the Insert tab. Click “Shapes” to view the available options.

The closest shape to a circle is the oval, which works well for circling text. Choose that option in the Basic Shapes section.
Your cursor changes to a plus sign. Click and then drag to draw the oval on your document. You can make it as large or small as you like to accommodate the text you want to circle. But remember, you can resize the shape later as well.
Now that you have your shape, you may need to adjust it so that you can see the text you circle. You can also make optional changes to the line size or color.
Format the Circle Around the Text
You can use the Shape Format tab to customize your shape.
RELATED: How to Add and Format Text in a Shape in Microsoft Word
If your shape has a fill color that you need to remove, select the shape and pick “No Fill” in the Shape Fill drop-down box on the Shape Format tab.
This allows you to place the circle over the text and see only the outline of the shape.
To adjust the line of the circle, select the Shape Outline drop-down arrow. You can then change the line color, weight, and style.
As you make your changes, you’ll see your circle update immediately. So, you can get just the right look.
Move and Resize the Circle
You can move the shape so it’s on top of the text you want to circle by simply dragging it.
If you need to make the circle larger or smaller, drag a corner or edge in or out.
You can make these adjustments to your shape until you see the ideal circle.
If your preferred method of making text pop in your document is by circling it, you can do this in just minutes. And by using the Shapes feature in Microsoft Word, you’ll have a nicely drawn circle.
READ NEXT
- › How to Use the Ink Features in Microsoft Office
- › Expand Your Tech Career Skills With Courses From Udemy
- › BLUETTI Slashed Hundreds off Its Best Power Stations for Easter Sale
- › This New Google TV Streaming Device Costs Just $20
- › Google Chrome Is Getting Faster
- › The New NVIDIA GeForce RTX 4070 Is Like an RTX 3080 for $599
- › How to Adjust and Change Discord Fonts
How-To Geek is where you turn when you want experts to explain technology. Since we launched in 2006, our articles have been read billions of times. Want to know more?
![]()
Download Article
![]()
Download Article
While you can’t outright draw free-form in Word, you can use the shapes menu to make shapes like circles. This wikiHow will teach you how to draw a circle in the computer desktop and mobile versions of Word.
-
1
Open a blank project in Word. When you tap to open Word, the program will launch and ask if you want to open a previous document or start a new one. You’ll want to open a new document to practice creating circles before you use them in any other documents.
- This app icon looks like two white pieces of paper on a blue background that you can find on your home screens, in the app drawer, or by searching.
-
2
Tap ••• (iOS) or
(Android) at the top of your keyboard. If you don’t see this menu, you’ll need to tap anywhere in the document to pull this menu up.
- The menu options will change and your keyboard should disappear.
- If you’re opening up a previous document, enable editing mode by tapping the pencil icon.
Advertisement
-
3
Tap the arrows next to Home. You’ll see this on the left side of your screen.
-
4
Tap Insert. The menu options in the right panel of the window will change.
-
5
Tap Shapes. Tapping this will bring you to a menu of shapes you can insert into the document.
-
6
Tap a circle you want to add. You can scroll through to find the «Basic Shapes» header; you’ll find a circle in that section if there isn’t one under «Recent Shapes.»
-
7
Edit the circle in your document. When you tap a circle shape from the menu at the bottom of the screen, it is copied into your document. You can pull, pinch, and drag the dots around the shape to edit its appearance.
- When you’re satisfied with the circle, tap the document around the circle and that editing menu will close. If you need to edit that shape again, you can tap on it.


Advertisement
-
1
Open Word. You’ll find this program in your Start Menu or Applications folder.
- You can either start a new document or resume a previously created document.
-
2
Click the Insert tab. You’ll see this in the editing ribbon above the document with «Home.»
-
3
Click Shapes. A menu of shapes you can add to the document will drop-down.
-
4
Click a circle you want to add. You’ll find circle shapes in «Basic Shapes.»
-
5
Click and drag while pressing ⇧ Shift on your keyboard to draw the circle on your document. After you select a circle theme and click and drag your mouse over the document to draw your circle, you can edit it.
- If you don’t hold down the Shift key, your shape may not result in a circle.
- You can change the overall look of your circle by changing the settings in Format > Shape Fill.[1]


Advertisement
Ask a Question
200 characters left
Include your email address to get a message when this question is answered.
Submit
Advertisement
Thanks for submitting a tip for review!
References
About This Article
Article SummaryX
1. Open a blank project in Word.
2. Tap the three-dots menu icon (iOS) or the up-pointing arrow icon (Android) .
3. Tap the arrows next to Home.
4. Tap Insert.
5. Tap Shapes.
6. Tap the circle icon.
7. Edit the circle in your document.
Did this summary help you?
Thanks to all authors for creating a page that has been read 14,265 times.
Is this article up to date?
Even if you’ve been a Microsoft Word user for a long time, there are certain formatting options or objects that you need, but might not know where to find. For example, you might need to know how to curve text in Word if you’re designing a document that would benefit from having that effect.
A traditional Microsoft Word document, such as one that you might create for school or your job, is rarely more than plain text and maybe a picture or graph. But there are a lot of other elements that can be included in a Word document, including curved words.
You can curve text in Microsoft Word selecting the text, clicking the Insert tab, clicking the WordArt button and choosing an option from the drop down menu. You can then select the Format tab > Text Effects > Transform > then choose a curved path.
Whether you’re designing a flyer or a newsletter, or anything else that needs to be visually appealing, there are many cases where you might find yourself needing to curve a Word in your document. Our guide below will show you how to use the tools in Microsoft Word to achieve your curved text.
How to Arch Microsoft Word Text
The steps in this article were performed in Microsoft Word for Office 365, but will also work in most other versions of Word.
This first part of this section provides a brief overview of how to curve text.
If you would like to see the full tutorial with pictures, simply keep scrolling, or click this link to jump to that section. We also discuss how to curve text without WordArt further down in this article.
- Open the Word document.
- Choose where to add the curved text, then type it.
- Select the text.
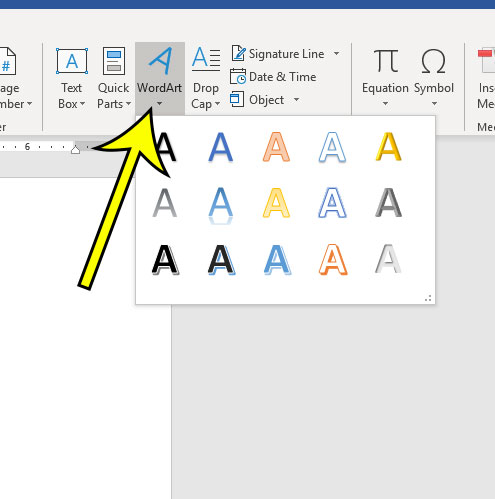
- Click the Insert tab.
- Choose the WordArt button, then select a style.
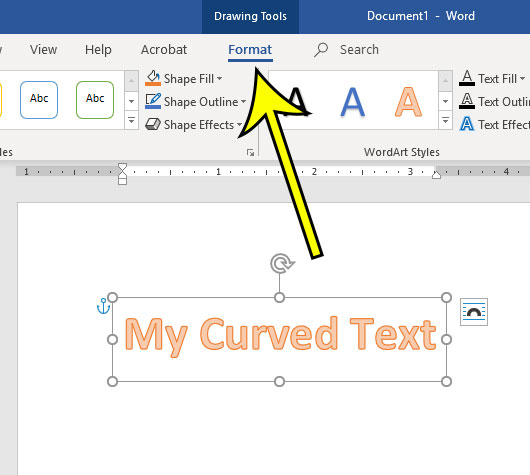
- Click the Drawing Tools – Format tab.
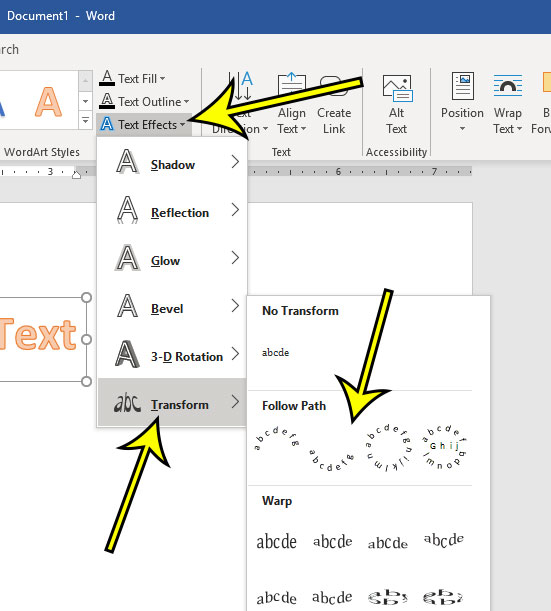
- Select Text Effects, then Transform, then a curved text style.
- Adjust the WordArt text box as needed.
Our guide continues below with additional information on how to curve text in Word, including pictures of these steps.
Would you like to include the number of pages next to your page numbers? Our page 1 of 2 in Word tutorial can show you how to set that up.
Full Tutorial – How to Curve Text in Microsoft Word
As mentioned above, this section provides additional information on curving text in Microsoft Word, including pictures.
Note that this method uses WordArt. However, you can also curve text without WordArt. That method is discussed in the section below this one.
Step 1: Open your document in Word.
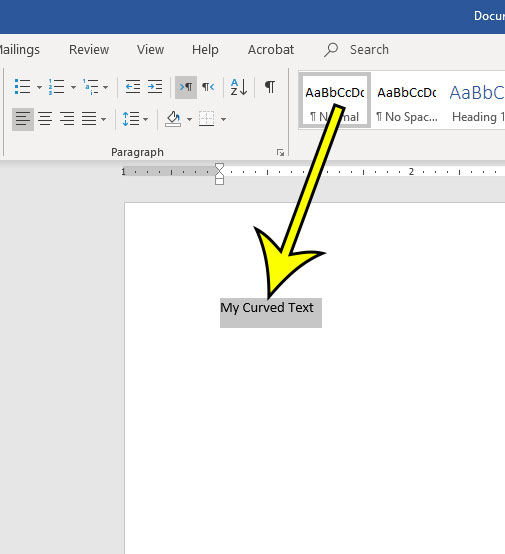
Step 2: Click at the point where you want to place the curved text, then type it.
Step 3: Use your mouse to select the text that you wish to curve.
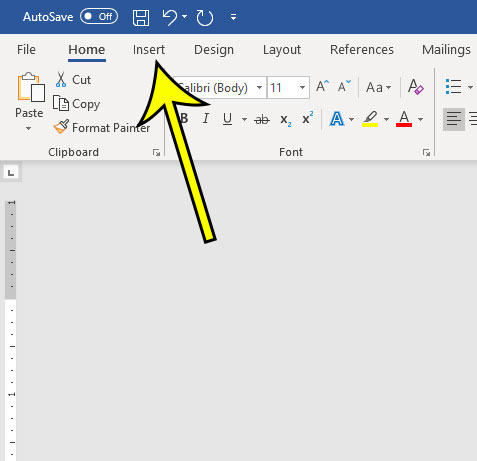
Step 4: Select the Insert tab at the top of the window.
Step 5: Click the Word Art button, then choose the desired style for your curved text.
Step 6: Select the Drawing Tools Format tab at the top of the window.
Step 7: Choose the Text Effects option, select Transform, then click the desired curve type under Follow Path.
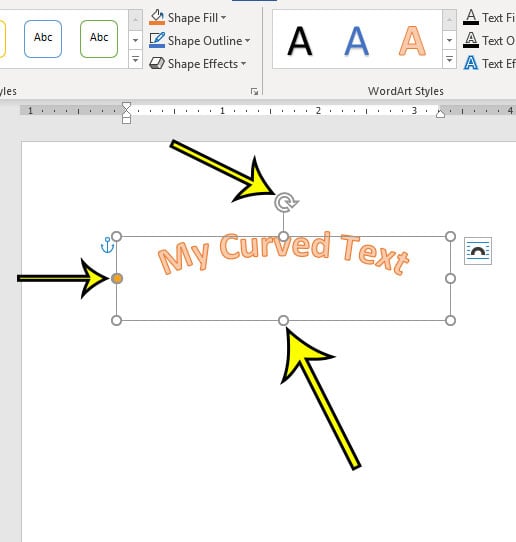
Step 8: Adjust the layout options for your curved text by clicking the white anchors to change the size of the text box, clicking and dragging the orange anchor to adjust the curvature, or clicking on the arrow to rotate the text.
The next section provides an alternate method for curving text.
If you’re adding math equations or other similar text to your document, then this how to do fraction on Word guide can show you a useful tool in the application.
How to Curve Text in Microsoft Word Without WordArt
Sometimes you will want to avoid using certain types of objects in Microsoft Word, including WordArt. Therefore you might want to try this method of curving text instead.
Step 1: Click the Insert tab.
Step 2: Click the Text Box button and choose your text box type.

Step 3: Enter the text into the text box.
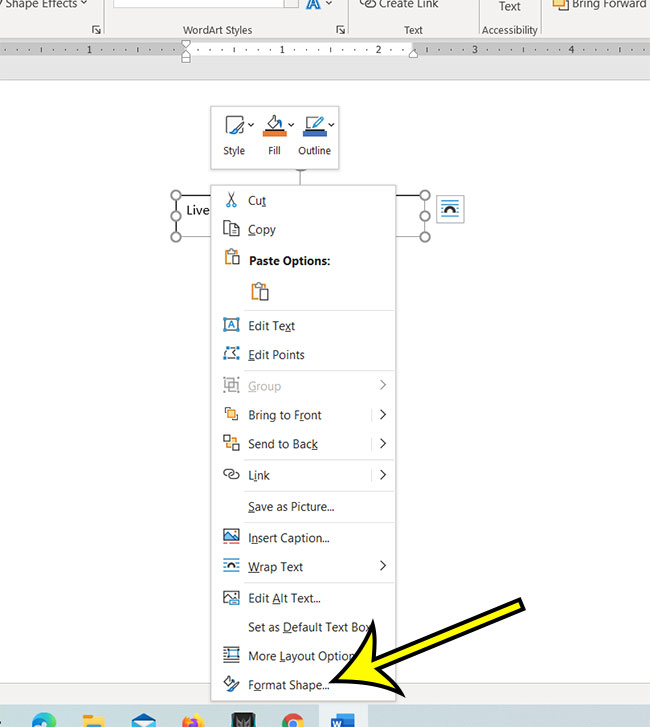
Step 4: Right-click the text box and choose Format Shape.
Note that you need to right-click on the text box border, not inside the text box.
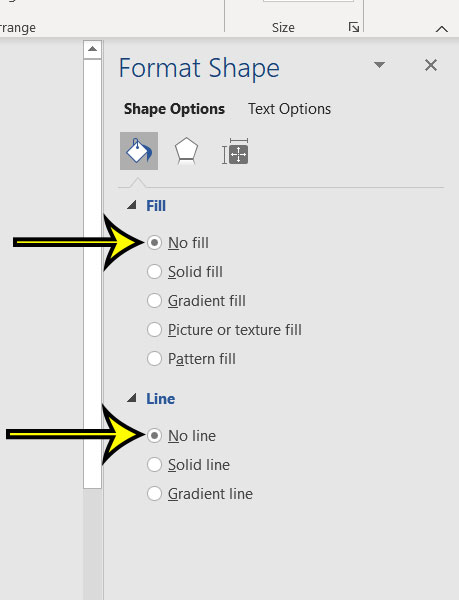
Step 5: Select No Fill and No Line from the column at the right side of the window.
Step 6: Click the Text Effects button, select Transform, then click one of the curved text options under Follow Path.

Depending on the version of Word that you are using you may or may not see a preview of the curved text after you select the shape transformation. Otherwise, you will need to click outside of the text box.
You can edit the text in the text box and adjust its formatting until it looks the way that you want it to look. You can also adjust the size of the text box or rotate it using the controls that surround the text box when it’s selected.
Our tutorial continues below with additional discussion about ways of adding curves to text in Word.
If you see a lot of weird symbols in your document that you can’t remove, then read this how to remove paragraph symbols in Word 2013 article to stop showing all of those different marks.
Frequently Asked Questions About How to Bend Words in Word
Where do I find the different Word Art styles in Microsoft Word?
When you select the Insert tab at the top of the window, you will see a WordArt button in the Text group of the ribbon.
If you click that button it will display the WordArt drop down menu where you can choose from one of the different options that is shown there.
Whichever WordArt icon you select will be applied to the existing text that you used your mouse cursor to select.
How do I add a curved line in Microsoft Word?
If you want to place a curved line in your document instead of choosing to curve or bend text, then you will need to utilize the Shapes tool instead.
You can select the Insert tab at the top of the window, then click the Shapes button in the Illustrations group in the ribbon.
You can then select the Curved line option in the Lines section of the dropdown menu, then draw the line in the document.
Note that the curved line can take some getting used to, as it won’t start curving until you single click your mouse. You can double click your mouse when you are done drawing the curved line, which will create the shape box.
Drawing a line like this in Word takes a little practice, so you might need to try it a couple of times first.
More Information on Curving Text to a Custom Shape in Word
There are a lot of WordArt styles that you can pick from when you are using the Word Art option to create the curved text effect. Plus, you can always go back and choose a different WordArt option or WordArt style after you use the transform option if you don’t like the result.
The placeholder text in a text box can be selected and deleted.
One of the benefits of using a text box to create curved text is that you can move a text box almost anywhere in the Word window, which gives you far more placement options than you have when you use WordArt text.
If you format your curved text and find that you made a mistake, you can undo curved text by pressing the Ctrl + Z keyboard shortcut.
Do you need your curved text to be a specific size? Find out how to show the ruler in Microsoft Word so that you can tell how large part of your document will be when you print it.
Active Time
5 minutes
Additional Time
2 minutes
Total Time
7 minutes
Difficulty
Medium
Materials
- Microsoft Word document
Instructions
- Open the document with the text you want to curve.
- Find the text to curve, or type it.
- Select the text to curve with your mouse.
- Click the Insert tab.
- Choose the Word Art option, then click the text icon that looks the way you want your curved text to look.
- Click the Drawing Tools Format tab at the top of the window.
- Choose the Text Effects option, click Transform, then click a curve type from the options on the menu.
- Adjust the layout options for your curved text.
Notes
After applying the transformation to your text, there will be a text box around it.
— Click the circular arrow to rotate the text box.
— Click one of the white circular anchors to change the size of the text box.
— Click and drag on the orange circular anchor to adjust the curvature of the text.

Kermit Matthews is a freelance writer based in Philadelphia, Pennsylvania with more than a decade of experience writing technology guides. He has a Bachelor’s and Master’s degree in Computer Science and has spent much of his professional career in IT management.
He specializes in writing content about iPhones, Android devices, Microsoft Office, and many other popular applications and devices.
Read his full bio here.