
Excel for Microsoft 365 Word for Microsoft 365 Outlook for Microsoft 365 PowerPoint for Microsoft 365 Project Online Desktop Client Excel 2021 Word 2021 Outlook 2021 PowerPoint 2021 Project Professional 2021 Project Standard 2021 Excel 2019 Word 2019 Outlook 2019 PowerPoint 2019 Project Professional 2019 Project Standard 2019 Excel 2016 Word 2016 Outlook 2016 PowerPoint 2016 Project Professional 2016 Project Standard 2016 Excel 2013 Word 2013 Outlook 2013 PowerPoint 2013 Project Professional 2013 Project Standard 2013 Excel 2010 Word 2010 Outlook 2010 PowerPoint 2010 More…Less
This article discusses drawing curves, circles, and ovals. For information about drawing lines, see Draw or delete a line or connector. For information about freeform shapes and editing points in shapes, see Draw or edit a freeform shape.
Draw a curve
-
On the Insert tab, click Shapes.
-
Under Lines, click Curve.
-
Click where you want the curve to start, drag to draw, and then click wherever you want to add a curve.
-
To end a shape, do one of the following:
-
To leave the shape open, double-click at any time.
-
To close the shape, click near its starting point.
-
Draw an oval or circle
-
On the Insert tab, click Shapes.
-
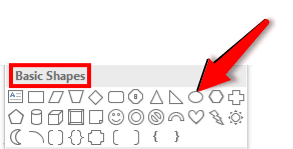
Under Basic Shapes, click Oval.
-
Click where you want the oval to start, and drag to draw the shape.
-
To draw a circle, press Shift while you drag.
Notes:
-
You can change the look of your circle or curve by adding a shape fill or effect or changing the border.
-
If you want to create a more advanced diagram like overlapping circles, an organizational chart, or a flowchart, you can create a SmartArt graphic instead of drawing each shape manually.
-
Circles and ovals are filled automatically. If you don’t want the shape to obscure anything underneath it, such as text or cells, select the shape, and on the Format tab, click Shape Fill, and then click No Fill.
-
Draw a curve
-
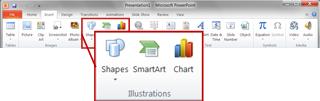
On the Insert tab, in the Illustrations group, click Shapes.

-
Under Lines, click Curve
. -
Click where you want the curve to start, drag to draw, and then click wherever you want to add a curve.
-
To end a shape, do one of the following:
-
To leave the shape open, double-click at any time.
-
To close the shape, click near its starting point.
Note: By default, a closed shape is filled. To make sure that the shape doesn’t obscure the cells underneath, select the shape, and then under Drawing Tools, on the Format tab, in the Shape Styles group, click Shape Fill, and then click No Fill
-
 .
.Top of Page
Draw an oval or circle
-
On the Insert tab, in the Illustrations group, click Shapes.
-
Under Basic Shapes, click Oval
. -
Click where you want the circle to start. To make the shape a circle, press and hold SHIFT while you drag to draw.
Notes:
-
You can change the look of your circle or curve by adding a shape fill or shape effect or changing the shape border.
-
If you want to create a more advanced diagram like overlapping circles, an organizational chart, or a flowchart, you can create a SmartArt graphic instead of drawing each shape manually.
-
By default, a circle or oval is filled. To make sure that the shape doesn’t obscure the cells underneath, select the shape, and then under Drawing Tools, on the Format tab, in the Shape Styles group, click Shape Fill, and then click No Fill.
-
 .
.Top of Page
Need more help?
Want more options?
Explore subscription benefits, browse training courses, learn how to secure your device, and more.
Communities help you ask and answer questions, give feedback, and hear from experts with rich knowledge.
![]()
Download Article
![]()
Download Article
While you can’t outright draw free-form in Word, you can use the shapes menu to make shapes like circles. This wikiHow will teach you how to draw a circle in the computer desktop and mobile versions of Word.
-
1
Open a blank project in Word. When you tap to open Word, the program will launch and ask if you want to open a previous document or start a new one. You’ll want to open a new document to practice creating circles before you use them in any other documents.
- This app icon looks like two white pieces of paper on a blue background that you can find on your home screens, in the app drawer, or by searching.
-
2
Tap ••• (iOS) or
(Android) at the top of your keyboard. If you don’t see this menu, you’ll need to tap anywhere in the document to pull this menu up.
- The menu options will change and your keyboard should disappear.
- If you’re opening up a previous document, enable editing mode by tapping the pencil icon.
Advertisement
-
3
Tap the arrows next to Home. You’ll see this on the left side of your screen.
-
4
Tap Insert. The menu options in the right panel of the window will change.
-
5
Tap Shapes. Tapping this will bring you to a menu of shapes you can insert into the document.
-
6
Tap a circle you want to add. You can scroll through to find the «Basic Shapes» header; you’ll find a circle in that section if there isn’t one under «Recent Shapes.»
-
7
Edit the circle in your document. When you tap a circle shape from the menu at the bottom of the screen, it is copied into your document. You can pull, pinch, and drag the dots around the shape to edit its appearance.
- When you’re satisfied with the circle, tap the document around the circle and that editing menu will close. If you need to edit that shape again, you can tap on it.


Advertisement
-
1
Open Word. You’ll find this program in your Start Menu or Applications folder.
- You can either start a new document or resume a previously created document.
-
2
Click the Insert tab. You’ll see this in the editing ribbon above the document with «Home.»
-
3
Click Shapes. A menu of shapes you can add to the document will drop-down.
-
4
Click a circle you want to add. You’ll find circle shapes in «Basic Shapes.»
-
5
Click and drag while pressing ⇧ Shift on your keyboard to draw the circle on your document. After you select a circle theme and click and drag your mouse over the document to draw your circle, you can edit it.
- If you don’t hold down the Shift key, your shape may not result in a circle.
- You can change the overall look of your circle by changing the settings in Format > Shape Fill.[1]


Advertisement
Ask a Question
200 characters left
Include your email address to get a message when this question is answered.
Submit
Advertisement
Thanks for submitting a tip for review!
References
About This Article
Article SummaryX
1. Open a blank project in Word.
2. Tap the three-dots menu icon (iOS) or the up-pointing arrow icon (Android) .
3. Tap the arrows next to Home.
4. Tap Insert.
5. Tap Shapes.
6. Tap the circle icon.
7. Edit the circle in your document.
Did this summary help you?
Thanks to all authors for creating a page that has been read 14,265 times.
Is this article up to date?

В Microsoft Word есть большой набор инструментов для рисования. Да, они не удовлетворят потребности профессионалов, для них существует специализированный софт. А вот для нужд рядового пользователя текстового редактора этого будет достаточно.
В первую очередь, все эти инструменты рассчитаны на рисование различных фигур и изменение их внешнего вида. Непосредственно в данной статье мы поговорим о том, как нарисовать в Ворде круг.
Урок: Как нарисовать линию в Word
Развернув меню кнопки «Фигуры», с помощью которой и можно добавить тот или иной объект в документ Ворд, вы не увидите там круга, по крайней мере, обычного. Однако, не отчаивайтесь, как бы странно это не звучало, он нам и не понадобится.
Урок: Как нарисовать стрелку в Word
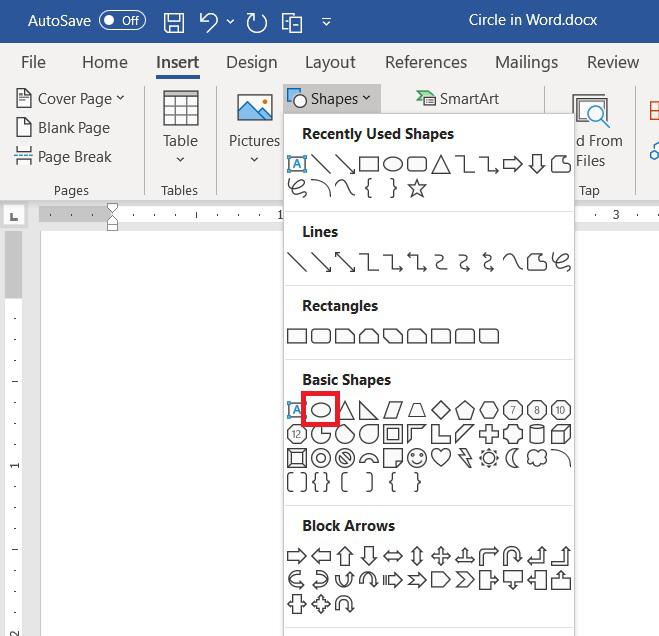
1. Нажмите кнопку «Фигуры» (вкладка «Вставка», группа инструментов «Иллюстрации»), выберите в разделе «Основные фигуры» овал.
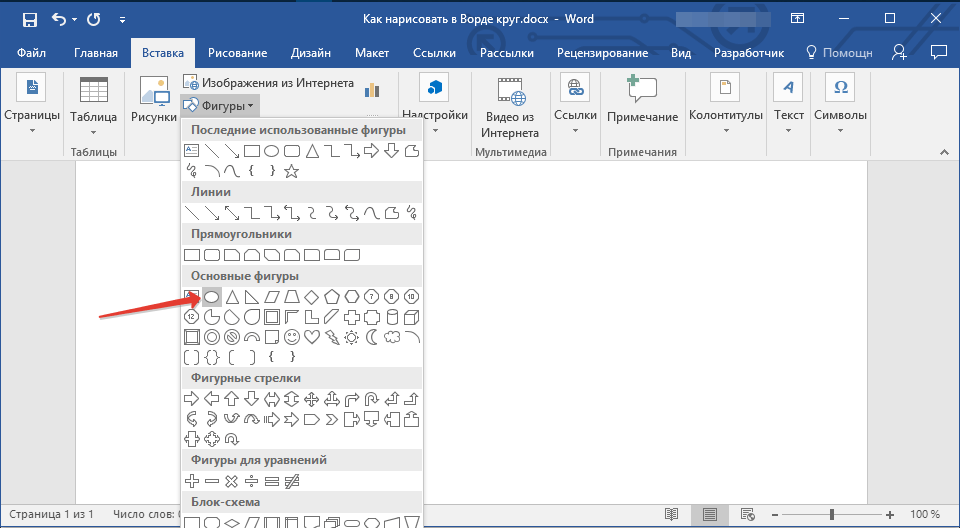
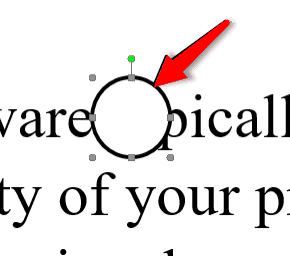
2. Зажмите клавишу «SHIFT» на клавиатуре и нарисуйте круг необходимых размеров используя левую кнопку мышки. Отпустите сначала кнопку мышки, а затем клавишу на клавиатуре.
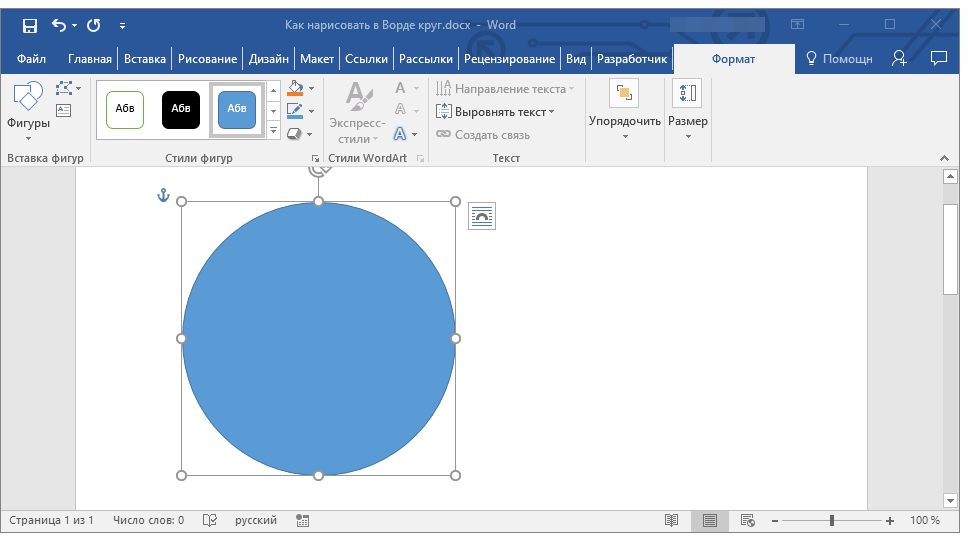
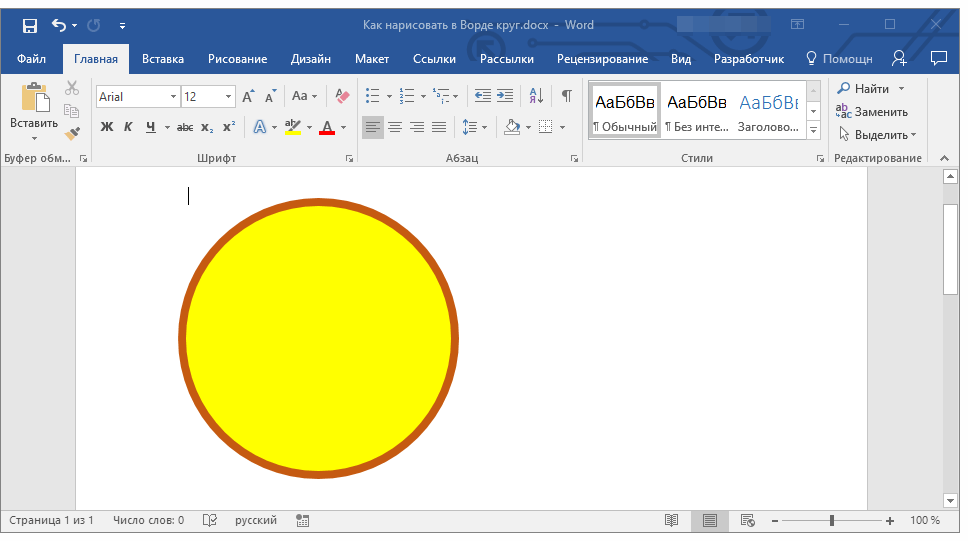
3. Измените внешний вид нарисованного круга, при необходимости обратившись к нашей инструкции.
Урок: Как рисовать в Ворде
Как видите, несмотря на то, что в стандартном наборе фигур программы MS Word нет круга, нарисовать его совсем несложно. Кроме того, возможности этой программы позволяют изменять уже готовые рисунки и фотографии.
Урок: Как изменить изображение в Ворде

Еще статьи по данной теме:
Помогла ли Вам статья?
Draw an oval or circle On the Insert tab, click Shapes. Under Basic Shapes, click Oval. Click where you want the oval to start, and drag to draw the shape. To draw a circle, press Shift while you drag.
Contents
- 1 How do I draw a circle in Word 2010?
- 2 Is there a way to draw on Microsoft Word?
- 3 How do you circle text in Microsoft Word?
- 4 How do you draw something on word?
- 5 How do I circle something in a PDF?
- 6 How do I draw a shape in Word?
- 7 How do I draw a pen in Word?
- 8 How do I insert a pen in Word?
- 9 How do you draw a perfect circle by Terrance Hayes?
- 10 How do I make a transparent circle in Word?
- 11 How do you insert a circle in Word Online?
- 12 How do you highlight something in Word?
- 13 How do you circle something in Powerpoint?
- 14 How do I draw on a PDF in Windows?
- 15 How do you write inside a shape in Word?
- 16 How do you outline a shape in Word?
- 17 Where is the Drawing toolbar in Word 2016?
- 18 How do I use Apple pencil in Word?
How do I draw a circle in Word 2010?
How to Draw a Circle in Word 2010
- Open your document.
- Click where you want the circle.
- Select the Insert tab.
- Click the Shapes button, then select the Oval shape.
- Click in the document then drag your mouse to draw the circle.
Is there a way to draw on Microsoft Word?
You can draw freely in Microsoft Word using the “Draw” feature whether you have Word for Mac or Windows. You can also insert customizable shapes into your document, or draw using the “Scribble” feature.
How do you circle text in Microsoft Word?
Create curved or circular WordArt
- Go to Insert > WordArt.
- Pick the WordArt style you want.
- Type your text.
- Select the WordArt.
- Go to Shape Format > Text Effects > Transform and pick the effect you want.
How do you draw something on word?
How to draw in Word
- Click the ‘Shapes’ button and select ‘Scribble’ Open up your Microsoft Word document.
- Hold down your mouse to draw. Click and hold down your mouse to draw.
- Release the mouse. As soon as you release your mouse, the drawing will be finished.
- Edit your drawing. Double-click your drawing.
How do I circle something in a PDF?
Choose Insert Menu > Drawing > Select Rectangle , Circle or Basic Shape.
How do I draw a shape in Word?
Click in your document where you want to create the drawing. On the Insert tab, in the Illustrations group, click Shapes. When you find the shape you want to insert, double-click to insert it automatically, or click and drag to draw it in your document.
How do I draw a pen in Word?
On the Draw tab of the Ribbon, tap a pen to select it. In Word, you must be in Print layout to draw with ink. If the Draw tab is grayed out so that you can’t select a pen, go the View tab and select Print Layout. ; then you can select a pen to draw with.
How do I insert a pen in Word?
Click on File tab and select Options from the menu Page 2 3. Select All Tabs under Choose Commands from: 4. Select Pens under the Ink Tools and click the Add button to add the Pens tab as a main tab on the ribbon.
How do you draw a perfect circle by Terrance Hayes?
A man circling a railway underpass before attacking a policeman. To draw the model’s nipples I have to let myself be carried away. In the mouth of the future: the mute pearls a bride wears to her wedding, The sleeping ovaries like the heads of riders bunched in a tunnel.
How do I make a transparent circle in Word?
Select the shape or shapes that you want to make transparent. Right-click, and on the context menu, select Format > Fill. Set the Transparency slider to the percentage of transparency that you want.
How do you insert a circle in Word Online?
Add a shape in Excel, Outlook, Word, or PowerPoint
- On the Insert tab, click Shapes.
- Click the shape you want, click anywhere in the workspace, and then drag to place the shape. To create a perfect square or circle (or constrain the dimensions of other shapes), press and hold Shift while you drag.
How do you highlight something in Word?
Highlight multiple parts of a document
- Go to Home and select the arrow next to Text Highlight Color.
- Select the color that you want.
- Select the text or graphic that you want to highlight.
- To stop highlighting, select the arrow next to Text Highlight Color.
How do you circle something in Powerpoint?
Draw an oval or circle
- On the Insert tab, click Shapes.
- Under Basic Shapes, click Oval.
- Click where you want the oval to start, and drag to draw the shape.
- To draw a circle, press Shift while you drag. Notes: You can change the look of your circle or curve by adding a shape fill or effect or changing the border.
How do I draw on a PDF in Windows?
Add a line, arrow, or shape
- Choose Tools > Comment.
- Draw in the PDF:
- To edit or resize the markup, select it and drag one of the handles to make your adjustments.
- To add a pop-up note to the markup, select the Hand tool, and double-click the markup.
- (Optional) Click the close button in the pop-up note.
How do you write inside a shape in Word?
Add text to an AutoShape
- On the Insert tab, in the Illustrations group, click Shapes, and then click the shape that you want.
- Drag to create the shape.
- The shape is automatically selected.
- On the Drawing Tools tab, in the Insert Shapes group, click Edit Text.
- Type the text that you want.
How do you outline a shape in Word?
Add or remove a border for a shape or text box
Select the shape or text box to which you want to add, change, or remove a border. Click Shape Format, and then click the arrow next to Shape Outline. Either click the color that you want, or mix your own color by clicking More Outline Colors.
Where is the Drawing toolbar in Word 2016?
Click View > Toolbars > Drawing. The Drawing toolbar is displayed or hidden. The Drawing toolbar contains a collection of icon buttons that allows the user to draw shapes and images in the document.
How do I use Apple pencil in Word?
In a document, tap Apple Pencil in the body of a word-processing document where you want to write. Or tap in a text box, shape, or in a table cell in a word-processing or page layout document. Tap the Scribble tool in the toolbar at the bottom of the screen, then start writing.
Circle is one of the basic shapes that you may need. However, drawing a circle in Word and PowerPoint is not straightforward. But with the simple trick, you can quickly draw a perfect circle of any size in Word or PowerPoint.
Steps to draw a Circle in Word and Power Point
- In the Insert Tab, click on Shapes
- From the drop-down list, click on Oval under Basic Shapes
- Left click at the location where you want to start Circle
- Drag the mouse holding shift key to draw the perfect circle of desire size
- Release shift key and mouse when done
Resizing Circle Afterwords
You can also resize the circle after drawing it.
- Click anywhere on the circle to resize
- Drag the corner handle around the circle while holding shift key to resize it to desired size
- Once done release mouse button
Summary
To draw circle in Ms Word and PowerPoint, navigate to Insert > Shape and click Oval from Basic Shapes. Left click anywhere to start circle and drag with left mouse button holding shift key to get perfect circle.
Simple shapes can have a lot of uses in a Word document, so it’s entirely possible that you might need to use one.
Whether you want to use the circle on its own, or as part of another document option, knowing how to draw a circle in Word can be beneficial for a number of reasons.
- Open your document.
- Click where you want the circle.
- Select the Insert tab.
- Click the Shapes button, then select the Oval shape.
- Click in the document then drag your mouse to draw the circle.
Our article continues below with additional information on how to draw a circle in Word 2010, including pictures of these steps.
If you would like to know how to insert a circle or another shape in a Google Slide presentation, then click here to find out how.
While Microsoft Word is primarily thought of as a document editor for text, it has a variety of different drawing tools that allow you to insert custom shapes into the document.
You can even use shape fill options and format shape settings to further customize an object that you draw. Our steps below will walk you through how to draw a circle in Microsoft Word 2010 using these tools and settings.
There are a lot of different types of files and objects that you can insert into Microsoft Word 2010 documents, and some of them are simpler and more useful than you might expect.
We have previously described how to take a screenshot in Microsoft Word 2010, but not everything that you add to a Word document needs to be an image or an external type of media.
For example, you can also create objects and shapes entirely from scratch. Therefore, if you need to create a circle and insert it into your document, you can use the Shapes option on the Insert menu to do so.
Fortunately, the Shapes tool in Microsoft Word is quite versatile, and you can use it and the other various drawing tools to create some useful shapes and designs.
Our article below will show you how to draw a circle (or draw an oval) in Microsoft Word if your document would be improved with the addition of that shape.
Our 1 inch margins in CM Word guide can show you how to change the unit of measurement when you are using Microsoft Word.
Inserting a Circle into Word 2010 (Guide with Pictures)
While the tool that you are going to be using is technically for inserting ovals, you can manually adjust the size of the oval so that it is perfectly proportioned and, therefore, a circle. Continue reading below to learn about the steps that you need to take to draw your circle in a Word document.
Are you currently in the market for a new laptop that will easily run Word, along with all of the other programs you use on a regular basis? Check out best selling laptops on Amazon and find a fast and affordable option.
Step 1: Launch Microsoft Word 2010, or double-click the Word file in which you want to draw a circle.
Step 2: Browse to the location in which you want to insert the circle.
Step 3: Click the Insert tab at the top of the window.
Step 4: Click the Shapes drop-down menu in the Illustrations section of the ribbon at the top of the window, then click the Oval icon in the Basic Shapes section of the menu.

Step 5: Click your mouse at the desired location in your document, then drag your mouse until the oval is at the desired shape.
Now that you know how to draw a circle in Word you might have all of the steps that you need. But if you need a perfect circle, then you will need to take a couple more steps.
**The following steps are only necessary if you need a perfect circle**
How to Draw a Perfect Circle in Word 2010
This section continues from the steps in the previous section.
Step 6: If it is not currently selected, click the Drawing Tools – Format tab at the top of the window.
Note that the circle will need to be selected for this menu to be visible.

Step 7: Click inside the Shape Height field in the Size section of the ribbon at the top of the window, then enter your desired circle height.

Step 8: Click inside the Shape Width field under the Shape Height field, then enter the same value that you entered in Step 7. Your shape should now be a perfect circle.
If you want to change the appearance of the circle, you can modify the settings for the shape using the assorted menus in the Drawing Tools-Format tab of the ribbon.
Additional Information on How to Use the Circle Shape Tool in Microsoft Word
If you want to use any of the additional drawing tools, such as the “Shape Fill” option, which allows you to color in your circle, then you will need to select the circle first.
The Insert tab in Word is also where you will need to go if you want to add an image to your document, or other custom objects like a table or a text box.
If you are adding a circle to your document because you want to use it in conjunction with another object, such as a text box that will display text on top of the circle, then you will probably need to adjust the “layers” of those objects. You can find these on the Layout tab in the Arrange section.
Another way that you can add a perfect circle to your document is by holding the Shift key after you have chosen to draw an oval. To accomplish this you would click the Insert tab, click Shapes, choose the Oval from the drop down menu, then hold down the Shift key as you draw a circle in your document.
Additional Sources
- How to insert a check mark in Microsoft Word
- How to do small caps in Microsoft Word
- How to center text in Microsoft Word
- How to merge cells in Microsoft Word tables
- How to insert a square root symbol in Microsoft Word

Matthew Burleigh has been writing tech tutorials since 2008. His writing has appeared on dozens of different websites and been read over 50 million times.
After receiving his Bachelor’s and Master’s degrees in Computer Science he spent several years working in IT management for small businesses. However, he now works full time writing content online and creating websites.
His main writing topics include iPhones, Microsoft Office, Google Apps, Android, and Photoshop, but he has also written about many other tech topics as well.
Read his full bio here.
Draw an oval or circle On the Insert tab, click Shapes. Under Basic Shapes, click Oval. Click where you want the oval to start, and drag to draw the shape. To draw a circle, press Shift while you drag. Notes: You can change the look of your circle or curve by adding a shape fill or effect or changing the border.
How do you draw a circle in text?
You can create a circle in your document by going to the INSERT/Shapes… menu option and select the oval shape from that palette. You can then draw the oval with your mouse while holding down the Shift key as you draw the shape, which will “force” the oval to have a uniform diameter, otherwise known as a “circle”.
Is there a way to circle text in Word?
Create curved or circular WordArt Go to Insert > WordArt. Pick the WordArt style you want. Type your text. Select the WordArt. Go to Shape Format > Text Effects > Transform and pick the effect you want.
Is there a drawing function in Word?
You can draw freely in Microsoft Word using the “Draw” feature whether you have Word for Mac or Windows. You can also insert customizable shapes into your document, or draw using the “Scribble” feature. The process of drawing in Word varies based on which version of Word and device you’re using.
How do I circle something in a picture?
After you’ve taken a photo, tap on Edit, then Draw. Then select the shape you want to use. If you’re going to circle something on a picture, select either the square or the circle shape and drag it around your focus area.
How do I make a transparent circle in Word?
Apply transparency to a shape Select the shape or shapes that you want to make transparent. Right-click, and on the context menu, select Format Shape. In the Format Shape pane, set the Transparency slider to the percentage of transparency that you want.
How do you draw something on word?
How to draw in Word Click the ‘Shapes’ button and select ‘Scribble’ Open up your Microsoft Word document. Hold down your mouse to draw. Click and hold down your mouse to draw. Release the mouse. As soon as you release your mouse, the drawing will be finished. Edit your drawing. Double-click your drawing.
How do you add an outside border in Word?
How to highlight or select text. Once the text is highlighted, click the Home tab. On the Home tab, click the down arrow on the border to get border options, like those shown in the picture. Select the type of border you want to use. If you want a single border around the text, click Outside Borders.
How do you turn on draw in Word?
If your device is touch-enabled, the Draw tab is turned on automatically. Otherwise, turn it on by selecting File > Options > Customize Ribbon > Draw.
How do you highlight something in Word?
Highlight multiple parts of a document Go to Home and select the arrow next to Text Highlight Color. Select the color that you want. Select the text or graphic that you want to highlight. To stop highlighting, select the arrow next to Text Highlight Color.
How do you use pen in Word?
How to Use a Pen With MS Word Connect your writing tablet to your computer. Open the document you wish to write pen marks on. Click on the “Review” tab. Click “Start Inking” on the far right of the screen to begin using the tablet with Microsoft Word. Touch on the tablet to write using the pen tool.
Which tool will you use to draw a circle?
compass is traditional tool for drawing circles A compass is the traditional tool for drawing precise circles, and its sharp point acts as a pivot.
Is it possible to draw a perfect circle?
Drawing a perfect circle by hand is impossible. The human brain doesn’t have the precision or resources to draw an ever curving circle by hand. Until someone discovers the exact value of π, perfect circles will remain a mathematical concept only possible as an idea.
What app allows you to draw on pictures?
Recap. Skitch. Scribble Lite. Annotate. You Doodle. Draw on Pictures. Inkboard. Atom Draw.
Where do I find drawing tools in Word?
It looks like this, and usually appears at the bottom of your window. If your Draw Tools are not showing, you can make them appear by pulling down the View menu, clicking on Toolbars and clicking on Drawing. Take a moment to look at the functions of the Draw Tools.
Does scribble work in Word?
Turn handwriting into text with Scribble In a document, tap Apple Pencil in the body of a word-processing document where you want to write. Or tap in a text box, shape, or in a table cell in a word-processing or page layout document. Tap the Scribble tool in the toolbar at the bottom of the screen, then start writing.
How do you draw free in Word?
Draw a freeform shape Click anywhere in the document, and then drag to draw. To draw a straight segment with the Freeform tool, click one location, move your pointer to a different location, and then click again; to draw a curved segment, keep your mouse button pressed as you drag to draw.
How do I put a border around text in Word?
Add a border to selected text Select a word, line, or paragraph. On the Home tab, click the arrow next to the Borders button. In the Borders gallery, click the border style that you want to apply.
How do you put an outside border on?
Click the “Home” tab, select the “Borders” drop-down menu from the Font group and select “More Borders.” Alternatively, to apply a simple outside border, click “Outside Borders” or “Thick Box Borders.”.
How do I put a border around a paragraph in Word?
How to Put Borders Around a Paragraph in Word 2016 Place the insertion pointer in a paragraph. Click the Home tab. In the Paragraphs group, click the triangle next to the Borders command button. The Borders menu appears. Choose a border style from the menu.
How do I turn off drawing tools in Word?
To turn off the drawing canvas, do the following: From the Tools menu, choose Options. Click the General tab. Uncheck Automatically Create Drawing Canvas When Inserting AutoShapes in the General Options section. Click OK.
What is the drawing toolbar in Word?
The Drawing toolbar contains a collection of icon buttons that allows the user to draw shapes and images in the document. Provides a number of features for drawing. Enables you to select objects in the document. Inserts various shapes into the document.
You may want to place a circle around a certain letter or number in your MS Word document. This may be to emphasize an important point in the document. It may also be to simply decorate the text.
- Use the Oval Tool
- Use the Enclose Characters Tool
- Insert a Circle Shape
- Insert Enclosed Alphanumeric Symbols
We will show you step-by-step instructions for all the tools above.
Let us begin.
Method #1: Use the Oval Tool
Note: Word does not enable the Oval Tool by default. The best place to enable and place the Oval Tool is in the Quick Access Toolbar.
Step #1: Open the Word Document
Open the Word document where you want to place circles.

Step #2: Open the Word Options menu.
Click on the File tab in the top menu toolbar.

This opens the Files menu.
Click Options at the bottom of the Files menu.
Word Options menu will open.
Click on Quick Access Toolbar.
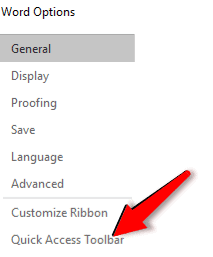
A dialog box for Customize the Quick Access Toolbar will open on the right-hand side.
Step #3: Customize the Quick Action Toolbar
Click on the down arrow below Choose commands from:
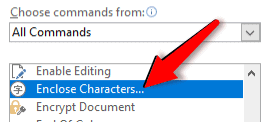
From the drop-down menu, select All Commands to change the command list below.

Search in the command list below All Commads and click on Oval.

Click on the Add button on the right-hand side of the command list.
Word will add the Oval tool in the Quick Action Toolbar list on the right.

Click on OK at the bottom of the dialog box to exit.
The Oval tool appears in the Quick Action Toolbar above the main toolbar.
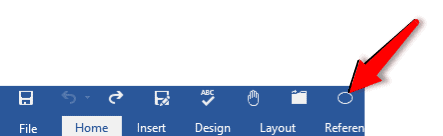
Step #4: Use the Oval Tool
Position the cursor where you want the circle to appear.
Click on the Oval Tool in the Quick Action Toolbar.
The cursor will change to a cross.
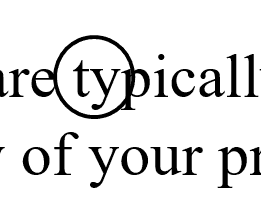
Click on one corner and drag the cross cursor to the opposite corner to form a non-transparent circle.
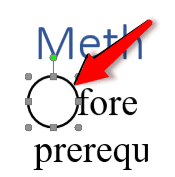
Right-Click on the circle to open a menu.
Click on Format AutoShape/Picture.
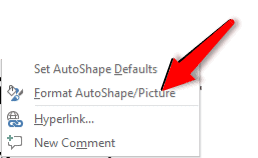
This opens the Format AutoShape dialog box.
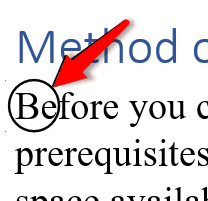
Click on the tab Colors and Lines.
Under Fill, drag the Transparency bar to the extreme right to 100%.

Click on OK at the bottom of the dialog box to exit.
Word makes the circle transparent.
Open the Format AutoShape/Picture dialog box again. Use it to change the weight, color, and style of the circle.
Method #2: Use the Enclose Characters Tool
Note: Word does not enable the Enclose Characters Tool by default. The best place to enable and place the Enclose Characters Tool is in the Quick Access Toolbar.
Step #1: Open the Word Document
Open the Word document where you want to place circles.

Step #2: Open the Word Options menu.
Click on the File tab in the top menu bar.

This opens the Files menu.
Click Options at the bottom of the Files menu.

Word Options menu will open.
Click on Quick Access Toolbar.

A dialog box to Customize the Quick Access Toolbar will open on the right-hand side.
Step #3: Customize the Quick Action Toolbar
Click on the down arrow below Choose commands from:
From the drop-down menu, select All Commands to change the command list below.

Search in the command list and click on Enclose Characters.
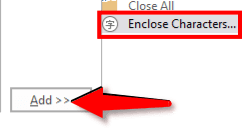
Click on the Add button on the right-hand side of the command list.
Word will add the Enclose Characters tool in the Quick Action Toolbar list on the right.
Click on OK at the bottom of the dialog box to exit.
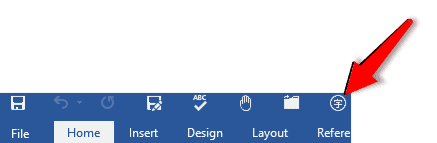
The Enclose Characters tool appears in the Quick Action Toolbar above the main toolbar.
Step #4: Use the Enclose Characters tool
Select the letter or number around which you want the circle to appear.
Click on the Enclose Characters tool in the Quick Action Toolbar.
The Enclose Characters dialog box will open.
Under Style, click on the Enlarge symbol icon in the dialog box.
Under Enclosure, select the shape of the enclosure you want.
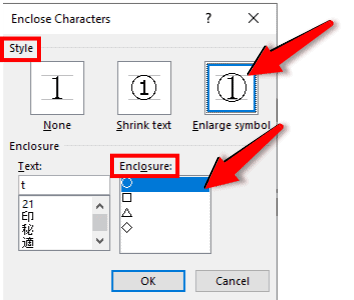
Click on OK to exit.
Word places the selected shape to enclose the letter/number.

Method #3: Insert a Circle Shape
Step #1: Open the Word Document
Open the Word document where you want to place circles.

Step #2: Insert a Circle Shape
Click on the Insert tab on the top menu toolbar to change the ribbon.

In the section Illustrations, click on the Shapes icon.

This opens a drop-down dialog box for various shapes.
Click on the Oval icon in Basic Shapes.
The cursor will change to a cross.
Position the cross cursor at the top left-hand corner. Drag it to the bottom right-hand corner to form a non-transparent circle.
Under Shape Styles, click on Shape Fill.

This opens the Shape Styles dialog.
Click on No Fill.

The circle changes to a transparent one.
You can select the circle and use the handles to move it. You can also change its shape and size.
Method #4: Insert Enclosed Alphanumeric Symbols
Step #1: Open the Word Document
Open the Word document where you want to place circles.
Place the cursor where you want the circle to appear.
Step #2: Insert Enclosed Alphanumeric Symbols.
Click on the Insert tab in the top menu toolbar to change the ribbon.

In the section Symbols, click on the Symbol icon.

In the drop-down menu, click on the More Symbols icon.

This will open the Symbol dialog.
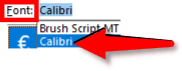
Under the Symbols tab, click on the downward arrow on the right of Font.
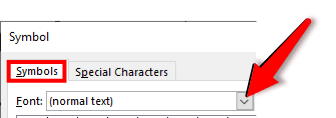
Under Font, select the Calibri font.
Under Subset, select Mathematical Operators.
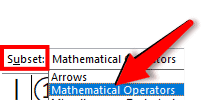
A number of encircled symbols will appear.
Select the symbol you want.
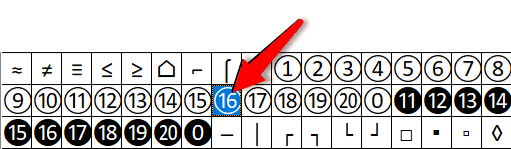
Click on Insert and then on Close at the bottom of the dialog to exit.
Word places the selected symbol in the document.

Note: Word offers only numbers as enclosed alphanumeric symbols.
Conclusion
Follow our simple instructions to place a circle around a number or letter in your document. We have shown you four methods. Select the one that suits you best.