
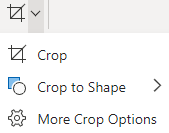
If you want to change the outline of a photo to make it a shape (like a circle or rounded rectangle), use the cropping tool on the ribbon  with the Crop to Shape option.
You can crop to a shape in Word, PowerPoint, Outlook, or Excel.
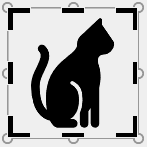
Crop an image to a shape, such as a circle
You can quickly change the shape of a picture by cropping it to a specific shape. The picture is automatically trimmed to fill the geometry of the selected shape while maintaining its proportions.
(If you want to crop the same picture to more than one shape, make copies of the picture and crop each to the desired shape individually.)

-
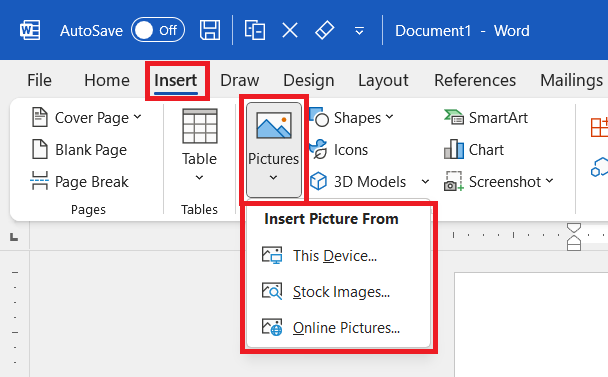
Use Insert > Picture to add the image to a Microsoft 365 file (such as a Word document, PowerPoint presentation, or an Outlook email message).
-
Click the picture.
You may crop multiple pictures at once, but you must crop them to the same shape. (But in Word, this is difficult, because you can’t multi-select pictures that have the default In Line with Text layout option.)
-
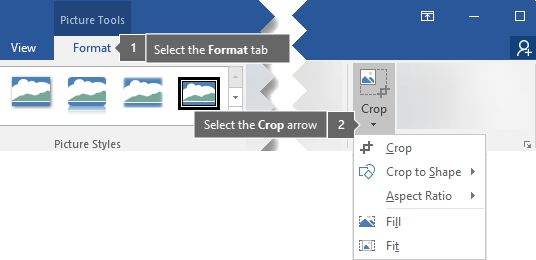
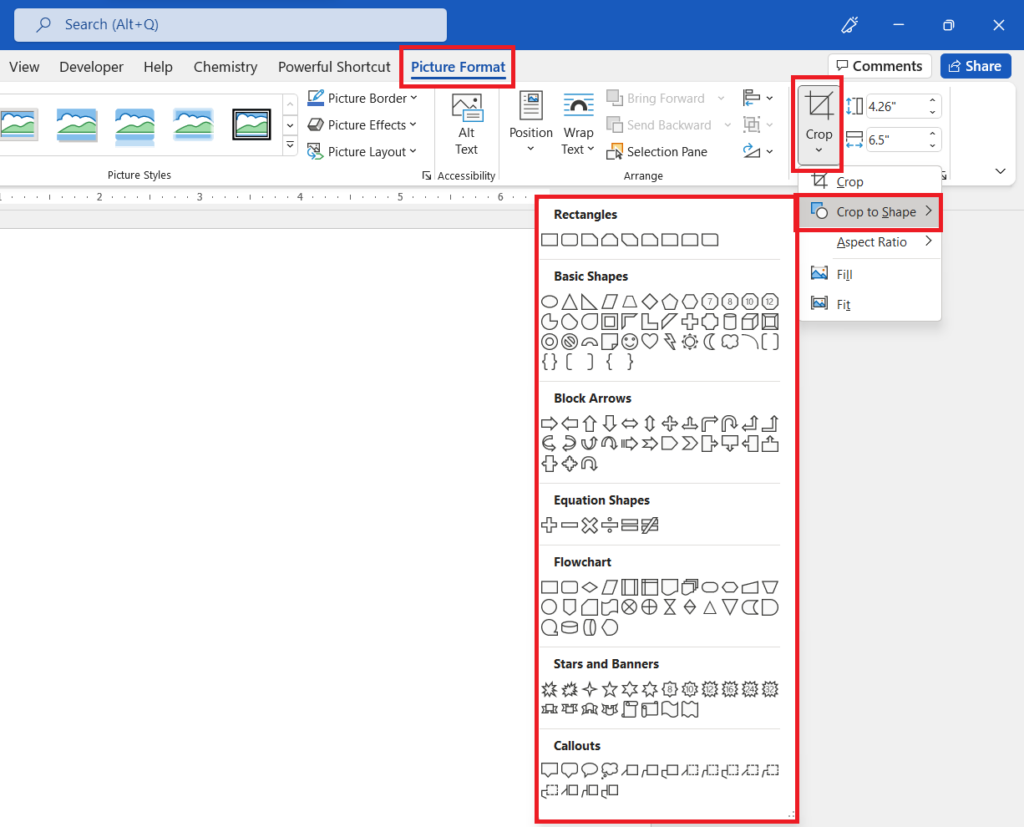
Click Picture Tools > Format, and in the Size group, click the arrow under Crop.

-
From the menu that appears, select Crop to Shape, and then click the shape you want to crop to.
The shape is immediately applied to the image.
-
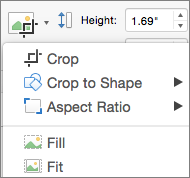
Next, use Crop > Fit or Crop > Fill to change how much of the picture fits within the shape you’ve applied:
-
Fill Fills the entire shape with the picture. Some outer edges of the picture may be cropped away. There won’t be any empty space at the margins of the shape.
-
Fit Makes the entire picture fit within the shape while maintaining the picture’s original aspect ratio. There may be empty space at the margins of the shape.
(Black crop handles appear on the edges and corners of the picture when you select the Fit or Fill option.)
-
-
You can adjust the position of the picture within the frame by selecting the picture and dragging it where you want. For example, this can help you center the most important part of the picture within the shape you’ve applied to the picture.
-
Crop the margins of the image by dragging a black crop handle as follows:
Description
Action
Crop one side
Drag inward on the side cropping handle
Crop two adjacent sides at the same time
Drag inward on the corner cropping handle
Crop equally on two parallel sides at once
Press and hold Ctrl while dragging inward on the side cropping handle
-
Click the Crop button again when you are done.
Start with a shape and add an image to it
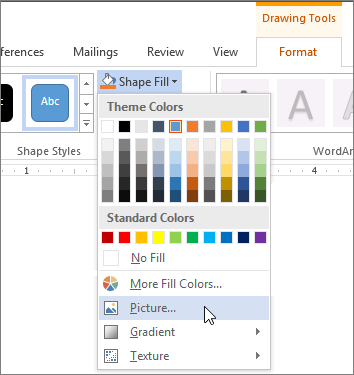
You can add a picture as fill for a shape and then edit or crop the shape.
Add a picture to a shape
-
Add a shape to your document (see Add shapes for instructions) and click the shape to select it.
-
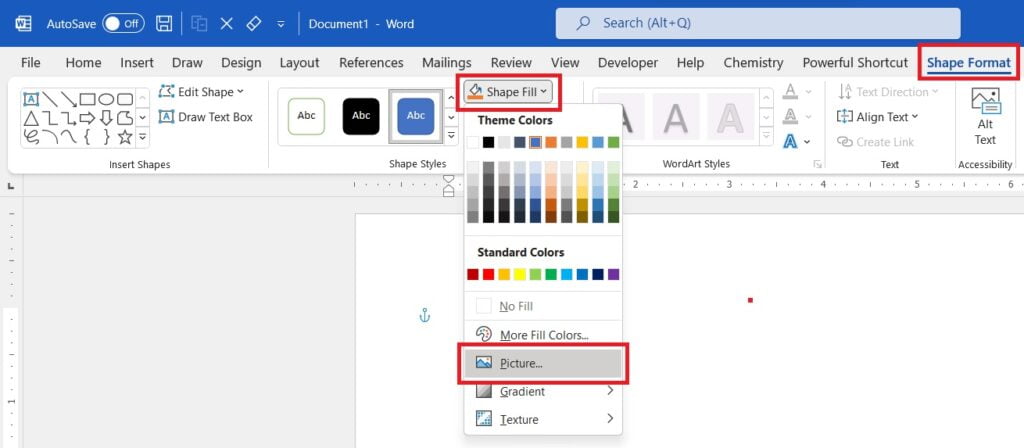
Click Drawing Tools > Format, and in the Shape Styles group, click Shape Fill > Picture.
-
Select the type of picture you want (such as From a File or Online Pictures) and then navigate to the picture you want and insert it.
Resize the shape
To change the filled shape’s dimensions while maintaining its basic format, select it and drag any of the sizing handles.
Choose how the picture fits in the shape
If your picture is skewed, cut off, or doesn’t fill the shape the way you want, use the Fit and Fill tools on the Crop menu for fine tuning:
-
Click a shape created using Shape Fill > Picture.
-
Click Picture Tools > Format, and in the Size group, click the arrow under Crop. A menu appears showing cropping options.
-
Choose Fit if you want as much of the picture as possible to fit within the shape; the original picture aspect ratio will be maintained, but you may have empty space inside your shape.
-
Choose Fill to have the shape fit within the bounds of the picture, cropping away everything outside the shape. You can drag the picture to change what part of it shows within the shape.
-
-
If you want, you can adjust the crop area by using the cropping handles, as described under Crop a picture.
-
When you’re finished, press Esc or click anywhere outside the picture within the document.
Use edit points to edit or crop the shape
Although cropping tools are not available for shapes, you can use the Edit Points tool to customize a shape.
-
Select the shape that you want to edit.
-
Click Shape Format, and in the Insert Shapes group, select Edit Shape
> Edit Points. -
Drag the shape’s vertex points (which appear as black dots around the shape’s perimeter) until the shape looks the way you want.
-
To delete a vertex point, hold Ctrl and click it. To add a vertex point, hold Ctrl while clicking anywhere on the perimeter of the shape that does not already have a vertex point.
 > Edit Points.
See Also
Crop a picture in Microsoft 365
Cut out or cover part of a picture
If you want to change the outline of a photo to make it a shape (like a circle or rounded rectangle), use the cropping tool on the ribbon .
You can crop to a shape in Word, PowerPoint, or Excel.
Crop to a specific shape
Quickly change the shape of a picture by cropping it to a specific shape. The picture is automatically trimmed to fill the geometry of the selected shape while maintaining its proportions.
If you want to crop the same picture to more than one shape, make copies of the picture and crop each to the desired shape individually.
-
Use Insert > Picture to add the image to an Office file (such as a Word document, PowerPoint presentation, or an Excel workbook).
-
In your file, select the picture that you want to crop.
-
On the Picture Format tab, click the arrow next to Crop.
(If you don’t see the Picture Format tab, make sure that you’ve selected a picture (not a shape).)
-
Point to Crop to Shape and then click the shape you want to crop to.
The shape is immediately applied to the image.
-
If you want to adjust the shape, click the Crop button again on the ribbon.
Black crop handles appear on the edges and corners of the picture.
-
Crop the image by dragging any crop handle inward. If you drag one of the corner handles, it crops two adjacent sides at the same time.

Crop to fit or fill a shape
After you have added a picture to a shape, you can choose how the picture fits in the shape by using the Fit and Fill tools for fine tuning.
-
In your file, select the picture that you want within the shape.
-
On the Picture Format tab, click the arrow next to Crop.
If you don’t see the Picture Format tab, make sure that you’ve selected a picture (and not a shape).
-
Click Fill or Fit, and then click outside the picture.
Option
Description
Fill
Removes (or «crops») part of the picture, but still fills the entire shape.
Fit
Makes the entire picture fit within the shape. The original picture aspect ratio is maintained, but you may have empty space inside your shape.
Which app are you using?
Word | PowerPoint
Word: Fit a picture inside a shape
Word for the web doesn’t have the «crop-to-shape» feature that the desktop app has, but you can still use quick picture-styles to apply some basic shapes to a picture, as described here:
-
Insert the image in your document. (Select Insert > Picture and then navigate to the picture you want to use.)
-
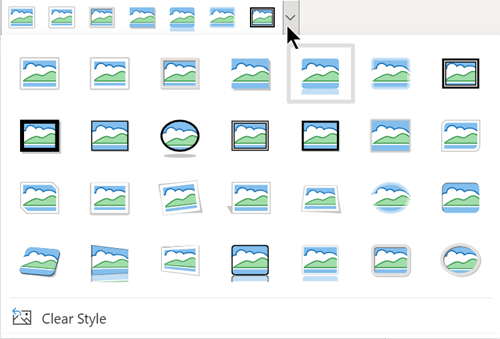
With the image selected on the canvas, select the Picture tab on the ribbon, and then open the Picture Styles gallery:
-
Select a shape to apply it to your picture.
-
Once the shape is applied, you can resize it as needed.
PowerPoint: Crop a picture to a shape
-
Select a picture on a slide to crop to a shape.
-
On the Picture tab, on the right end, select the arrow next to Crop.
Tip: If you don’t see the Picture tab, be sure to select a picture.
-
Select Crop to Shape, then choose a shape to apply to the border of the picture.
-
If you want to trim the margins of the picture, select Crop again, then drag a handle
inward as needed. Drag other handles as needed. -
To save your changes, select the Crop button again, or press Esc.
 inward as needed. Drag other handles as needed.
Draw a curve
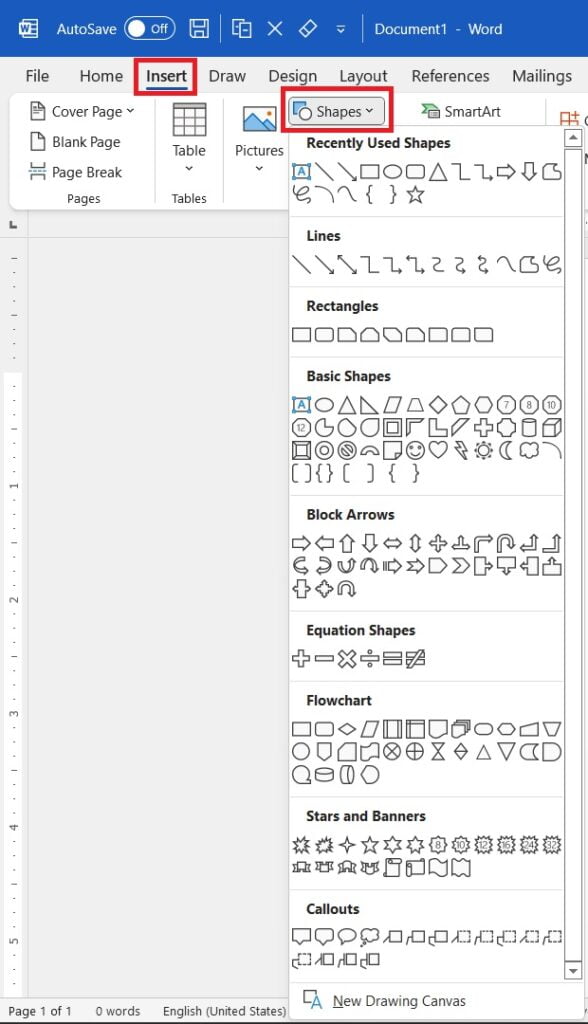
- On the Insert tab, in the Illustrations group, click Shapes.
- Under Lines, click Curve .
- Click where you want the curve to start, drag to draw, and then click wherever you want to add a curve.
- To end a shape, do one of the following: To leave the shape open, double-click at any time.
Contents
- 1 How do you bend text around a picture in Word?
- 2 How do you round the edges of a picture in Word?
- 3 Where can I curve an image?
- 4 How do you manipulate a picture in Word?
- 5 How do you circle a word in Microsoft Word?
- 6 Why wont word let me wrap a picture?
- 7 How do you round the edges of a picture?
- 8 Can you warp a picture in Word?
- 9 How do you make a picture curve?
- 10 What are the different ways to manipulate image?
- 11 What are the text wrapping options?
- 12 Why is my wrap text not working in Word?
- 13 How do I put an image on the right side in Word?
- 14 How do you round an image in CSS?
- 15 How do you freehand crop an image in Word?
- 16 How do I curve an image in Canva?
- 17 Where is the position command in Word?
- 18 How do you curve an image in Powerpoint?
How do you bend text around a picture in Word?
Create curved or circular WordArt
- Go to Insert > WordArt.
- Pick the WordArt style you want.
- Type your text.
- Select the WordArt.
- Go to Shape Format > Text Effects > Transform and pick the effect you want.
How do you round the edges of a picture in Word?
E.g. to round the corners of an image… “Insert > Shapes > Rounded Rectangle“. Then with the shape selected do “Drawing Tools > Shape Fill > Picture” and select the required image. To adjust the corner radius, just pull on the yellow dot.
Where can I curve an image?
How to Curve A Photo In Photoshop. The easiest way to curve a photo in Photoshop is to select the image layer and go to Edit > Transform > Warp. In the warp presets found in the upper settings bar, select the “Arc” preset and adjust the bend percentage to suit your image.
How do you manipulate a picture in Word?
Start by inserting the image into your Word document (Insert > Pictures) and selecting the image. To begin formatting your selected image, click Format > Crop (or Format > Crop > Crop). You can also enter the image cropping mode by right-clicking the image and selecting Crop.
How do you circle a word in Microsoft Word?
How do I electronically circle a word in a document?
- Select View > Page Layout (or click on the 4th icon at the bottom edge of your document)
- In the Ribbon, click on the first tab (Home)
- All the way to the right, click on the icon with a blue circle/triangle/square.
- Select the circle/oval under Basic Shapes.
Why wont word let me wrap a picture?
In the list to the left, select Layout. Click on the Advanced button. Make sure the Position tab at the top is selected. Place a checkmark in “Wrap text within text boxes for overlay objects.”
How do you round the edges of a picture?
Curving the edges of shapes or photographs
- Step one – Draw the Curve. Selected the Rounded Rectangle as we did in the first example. Then draw a rectangle over your shape.
- Step two – Select the Curved Rectangle. In order to create a mask you need to select the curved rectangle you have just drawn.
Can you warp a picture in Word?
Configure text wrapping around a picture or drawing object
Select the picture or object. Go to Picture Format or Shape Format and select Arrange > Wrap Text. If the window is wide enough, Word displays Wrap Text directly on the Picture Format tab. Choose the wrapping options that you want to apply.
How do you make a picture curve?
Click “Edit” at the top of the window, click “Transform,” and then click “Warp.” This will place a box with circles on it around your image. The circles are the handles that will control the warp effect.
What are the different ways to manipulate image?
Other examples of photo manipulation include retouching photographs using ink or paint, airbrushing, double exposure, piecing photos or negatives together in the darkroom, scratching instant films, or through the use of software-based manipulation tools applied to digital images.
What are the text wrapping options?
What are the Text Wrapping Options?
- Square, Tight, and Through: These three options are all variations on the same thing.
- Top and Bottom: This option keeps the text above and below the object, but not to its sides.
- Behind Text and In Front Of Text: These two options don’t affect the text at all.
Why is my wrap text not working in Word?
The advanced options in the Word Options dialog box. Make sure the Show Text Wrapped Within the Document Window check box is cleared.
How do I put an image on the right side in Word?
Click and drag the first image to where you want it on the page. Release the mouse button. Click and drag the second image next to the first, where you want it to align. As the sides come close to each other, Word will automatically snap the second image into place next to the first.
How do you round an image in CSS?
The CSS property border-radius adds rounded corners on images. You can round all of the image’s corners or just select corners, vary the radius on different corners or display an image in the shape of an oval or a circle.
Rounded Corners on Images
- Add the image to your page.
- Add a class to your image.
- Style your corners.
How do you freehand crop an image in Word?
This is one way to do it:
- Draw the shape.
- Right-click (or Control-click) on it and select Format Shape.
- Choose Fill > Picture or Text and click on Picture.
- Insert a picture, then select Format Picture in the Ribbon.
- Choose Crop > Crop to Fit.
How do I curve an image in Canva?
After the upload, click “Edit image”. Click on the photo and find the “…” button above it. Select the button and click on “Crop”. Click the dot on one of the image corners and drag the frame until you are satisfied with the size and position.
Where is the position command in Word?
In your document, select the object with which you want to work, switch to the “Layout” menu, and then click the “Position” button. That button also appears on the “Format” menu of the Ribbon and works the same way. The Position drop-down menu is divided into two sections: “In Line With Text” and “With Text Wrapping.”
How do you curve an image in Powerpoint?
If you want to change the outline of a picture and make it a shape (like a circle or a star), use the cropping tools on the PICTURE TOOLS FORMAT tab. Select the picture (or pictures) that you want to crop. On the PICTURE TOOLS FORMAT tab, click Crop > Crop to Shape, and then pick the shape you want.
Break images out of their square boxes.You can create an image embedded in nearly any kind of shape in Microsoft Word. To see this feature at work, choose Insert, Shapes and select a shape–say, the ellipse. Hold the Shift key as you do this, to draw a perfect circle. Once you’ve selected the shape, theDrawing Tools tab appears. From the Format tab, select Shape Fill, Picture; select a picture to use; and click Insert. You can do this with any built-in shape. You can also create your own custom shapes by using the Curve or Freeform tools and then fill them with images, too.
If your image looks out of proportion inside the shape, select the shape, right-click it, and choose Format Shape. Click the Crop option and, if your image is stretched so that everything is taller than it should be, increase the Picture Position: Width setting. Likewise, if the image is stretched so that it is wider than it should be, increase the Picture Position: Height setting. If you increase both the Width setting and the Height setting, you can adjust the position of the image in the shape by using the Offset options. DeselectRotate with Shape if you want the image to remain horizontal even if you rotate the shape.
Click one of the Fill options in the ‘Picture or texture fill area’ to alter the image transparency inside the shape.
Ms Word and PowerPoint has lot of feature to work on image. One such feature is cropping an image to circle or any custom shape. This blog covers 2 ways by which you can crop picture to circle or any other shape in Ms Word and PowerPoint. The video demonstration is also available here.
1st Method: Draw shape and fill it with picture (Works in all versions of Word & PowerPoint)
- Go to Insert > Shapes and draw shape into which you want to crop image
- Click shape and go to Shape Format tab > Shape Fill and select Picture….
- Browse picture/image and then click insert.
For instructions to Zoom in/out or move the image in shape, scroll down or click here to quickly go to the relevant section.
2nd Method: Crop image to shape in 1 click (Works only on newer version of Ms Word & PowerPoint)
This method allows you to crop image to shape in just 1 click. However, it works only in newer version of Ms Word and PowerPoint. Follow these steps
- Go to Insert > Picture and browse the image to insert
- Select image and go to Picture Format > Crop > Crop to Shape and click the desired shape
Following section describes instruction to zoom in/out or position picture inside shape
Zoom in/out or position the image after cropping
To zoom in/out or position the image after cropping, follow these steps
- Select cropped image and go to Picture Format and Click Crop
- Zoom in/out: Use the picture handles at the side or corners to resize.
- Position/Pan: Move image by holding the left button of your mouse to position the desired part of an image in shape
Video on how to crop image to any shape in Ms Word and PowerPoint
Related Posts
We are all familiar with various shapes and have used those shapes for different purposes as well. Many of us might know how to draw shapes like circles, ovals, squares, rectangles, etc., but we might lack the proper skill of doing that when it comes to how to crop a picture into a circle.
Cropping photos into different shapes may be entertaining and interesting. And it’s not at all challenging. You can easily change the image’s outline to a circle with the help of Microsoft Word, Adobe Photoshop, or any other online tool in no time. There are many useful tricks from which you can crop a picture into a circle without any problem.
Choosing a photo is perhaps the most challenging aspect. Cropping images into other forms, such as squares, circles, and triangles, is feasible. So, in this article, we will provide you with a straightforward process on how to crop a picture into a circle for various purposes. We will learn to crop a picture into a circle with the help of Microsoft Word, Photoshop, and Online Tools.
READ: Best Free Android Apps For Editing Photo
The majority of our photographs are square in form. Squares are nice, but circles are far more fascinating. Curved forms are more appealing to people than straight shapes, and nearly everything appears better when it is shaped like a circle. So, if you want to make your presentation, design, documents, or social media posts appealing, cropping photos into circle shapes could be a good idea.
Cropping a picture into a circle in Microsoft Word isn’t as hard as it sounds. If you are using Microsoft Office 2013 and above, you will be able to make a picture a circle in word using the tools available.
To crop a Picture into a circle in Word, do the following:
READ: Top 5 Must Have Photo Editing Apps For iPhone Users
2. How To Crop Picture Into Circle Online
If you don’t like using the first method, you can also take the help of the online tool for cropping the image into a circle. Image Online is a great tool that can easily crop a picture into a circle. With cropping, there are many features like adjusting the lights, rotating, blurring images, etc.
READ: How To Access Posts Your Deleted Recently From Instagram
So, let’s see the steps on how to crop a picture into a circle online using the image online tool.
3. How To Circle Crop An Image In Photoshop
If you feel that the above two methods are not that useful, you have to try Photoshop to crop a picture into a circle. With the help of Photoshop, you have complete control over the picture and the design that you want to include in any particular shape. Following are the steps for cropping a picture into a circle using photoshop.
READ: Fix Backwards Typing In Adobe Photoshop Type Tool
Conclusion
I hope this article helped solve your problem on how to crop a picture into a circle. All three methods mentioned above are easy to use for cropping a picture into a circle. However, if you want the best result, I suggest you go with photoshop even though this method is slightly more complex than the other two. If you have any questions regarding this article, then let us know in the comment section.