
Пример создания пользовательской формы в редакторе VBA Excel для начинающих программировать с нуля. Добавление на форму текстового поля и кнопки.
Начинаем программировать с нуля
Часть 4. Первая форма
[Часть 1] [Часть 2] [Часть 3] [Часть 4]
Создание пользовательской формы
Создайте или откройте файл Excel с расширением .xlsm (Книга Excel с поддержкой макросов) или с расширением .xls в старых версиях приложения.
Перейдите в редактор VBA, нажав сочетание клавиш «Левая_клавиша_Alt+F11».
В открывшемся окне редактора VBA выберите вкладку «Insert» главного меню и нажмите кнопку «UserForm». То же подменю откроется при нажатии на вторую кнопку (после значка Excel) на панели инструментов.

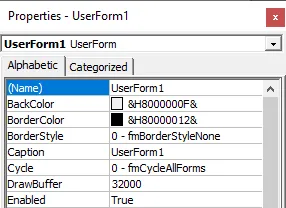
На экране редактора VBA появится новая пользовательская форма с именем «UserForm1»:

Добавление элементов управления
Обычно вместе с пользовательской формой открывается панель инструментов «Toolbox», как на изображении выше, с набором элементов управления формы. Если панель инструментов «Toolbox» не отобразилась, ее можно вызвать, нажав кнопку «Toolbox» во вкладке «View»:

При наведении курсора на элементы управления появляются подсказки.
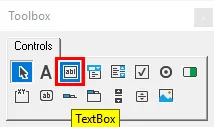
Найдите на панели инструментов «Toolbox» элемент управления с подсказкой «TextBox», кликните по нему и, затем, кликните в любом месте рабочего поля формы. Элемент управления «TextBox» (текстовое поле) будет добавлен на форму.
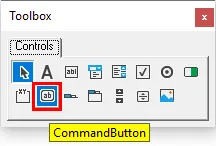
Найдите на панели инструментов «Toolbox» элемент управления с подсказкой «CommandButton», кликните по нему и, затем, кликните в любом месте рабочего поля формы. Элемент управления «CommandButton» (кнопка) будет добавлен на форму.
Кликнув по элементу управления на форме, вы можете изменять его размер, перетягивая границы за белые квадратики, и перетаскивать по форме, ухватив за одну из границ. Кликнув по заголовку формы или по ее рабочему полю, вы можете также изменять ее размер, перетягивая границы за белые квадратики.

Нажатием клавиши «F4» вызывается окно свойств, с помощью которого можно вручную задавать значения свойств пользовательской формы и элементов управления. В окне свойств отображаются свойства выбранного элемента управления или формы, если выбрана она. Также окно свойств можно вызвать, нажав кнопку «Properties Window» во вкладке «View».
Отображение формы на экране
Чтобы запустить пользовательскую форму для просмотра из редактора VBA, необходимо выбрать ее, кликнув по заголовку или свободному от элементов управления полю, и совершить одно из трех действий:
- нажать клавишу «F5»;
- нажать на треугольник на панели инструментов (на изображении выше треугольник находится под вкладкой «Debug»);
- нажать кнопку «Run Sub/UserForm» во вкладке «Run».
Для запуска пользовательской формы с рабочего листа Excel, можно использовать кнопки, описанные в этой статье. Например, чтобы отобразить форму с помощью «кнопки – элемента ActiveX», используйте в модуле рабочего листа следующий код:
|
Private Sub CommandButton1_Click() UserForm1.Show End Sub |

Для «кнопки – элемента управления формы» можно использовать следующий код, размещенный в стандартном программном модуле:
|
Sub ShowUserForm() UserForm1.Show End Sub |

В результате вышеперечисленных действий мы получаем на рабочем листе Excel пользовательскую форму с мигающим курсором в текстовом поле:

Добавление программного кода
Программный код для пользовательской формы и элементов управления формы записывается в модуль формы. Перейти в модуль формы можно через контекстное меню, кликнув правой кнопкой мыши на поле формы или на ссылке «UserForm1» в проводнике слева и нажав кнопку «View Code».
Переходить между открытыми окнами в редакторе VBA можно через вкладку «Window» главного меню.
Изменить название пользовательской формы и элементов управления, их размеры и другие свойства можно через окно свойств (Properties Window), которое можно отобразить клавишей «F4». Мы же это сделаем с помощью кода VBA Excel, записанного в модуль формы.
Откройте модуль формы, кликнув правой кнопкой мыши по форме и нажав кнопку «View Code» контекстного меню. Скопируйте следующий код VBA, который будет задавать значения свойств формы и элементов управления перед ее отображением на экране:
|
1 2 3 4 5 6 7 8 9 10 11 12 13 14 15 16 17 18 19 20 21 22 23 24 25 26 27 28 29 30 31 32 33 34 35 36 37 38 39 40 41 42 43 44 45 |
Private Sub UserForm_Initialize() ‘Me — это обращение к форме в ее модуле With Me ‘Присваиваем форме заголовок .Caption = «Новая форма» ‘Задаем ширину формы .Width = 300 ‘Задаем высоту формы .Height = 150 End With With TextBox1 ‘Задаем ширину текстового поля .Width = 200 ‘Задаем высоту текстового поля .Height = 20 ‘Задаем расстояние от внутреннего края ‘формы сверху до текстового поля .Top = 30 ‘Задаем расстояние от внутреннего края ‘формы слева до текстового поля, чтобы ‘текстовое поле оказалось по центру .Left = Me.Width / 2 — .Width / 2 — 6 ‘Задаем размер шрифта .Font.Size = 12 ‘Присваиваем текст по умолчанию .Text = «Напишите что-нибудь своё!» End With With CommandButton1 ‘Задаем ширину кнопки .Width = 70 ‘Задаем высоту кнопки .Height = 25 ‘Задаем расстояние от внутреннего края ‘формы сверху до кнопки .Top = 70 ‘Задаем расстояние от внутреннего края ‘формы слева до кнопки, чтобы ‘кнопка оказалось по центру .Left = Me.Width / 2 — .Width / 2 — 6 ‘Задаем размер шрифта .Font.Size = 12 ‘Присваиваем кнопке название .Caption = «OK» End With End Sub |
Вставьте скопированный код в модуль формы:

Познакомьтесь еще с одним способом отображения на экране пользовательской формы в процессе тестирования: установите курсор внутри процедуры UserForm_Initialize() и нажмите клавишу «F5» или треугольник на панели инструментов. Все предыдущие способы (с выбором формы в редакторе и кнопками на рабочем листе) тоже работают.
В результате мы получаем следующую форму:

Теперь перейдите в редактор VBA, откройте проект формы «UserForm1» и дважды кликните по кнопке «CommandButton1». В результате откроется модуль формы и будет создан шаблон процедуры CommandButton1_Click(), которая будет запускаться при нажатии кнопки:
|
Private Sub CommandButton1_Click() End Sub |
Вставьте внутрь шаблона процедуры CommandButton1_Click() следующую строку кода, которая будет копировать текст из текстового поля в ячейку «A1» активного рабочего листа:
|
Range(«A1») = TextBox1.Text |

Отобразите пользовательскую форму на экране и проверьте работоспособность кнопки «OK».
A UserFrom refers to a form or a dialog box on the screen that enables a user to input data into Excel’s user interface. it can be created using the Visual Basic Editor and is used to control data entry and avoid errors.
1. Creating a UserForm:
To create a userform head on to the Developer tab-> Visual Basic->Insert->UserForm.
You can also go to the Project window on the left side and right-click the workbook you want to use and select Insert->UserForm. This opens up a blank userform (UserForm1) and a toolbox(if the toolbox doesn’t pop up head on to View>toolbox).

2. Naming the UserForm:
By default, excel opens up an userform with the name UserForm1 in order to change that name:
- Head to the Properties window(view>Properties window), This opens a pane on the left.
- Click on the ‘Name’ section and type a name of your choice. (don’t add spaces)
- The name won’t be reflected on the userform when you do so because that’s a different property of the form.
- Head to the ‘Caption’ property and type in a name, and it will be reflected on your UserForm.

Now let’s play with some controls and learn how to add them to our UserForm.
3. Adding a Textbox to the UserForm:
A Textbox is used to enable users to input information into the form.
- To add a TextBox head onto the ToolBox. Click on( View->Toolbox) if it isn’t visible by default.
- Select the TextBox button
- Click on the userform to place it or drag it to a position of your choice.
- You can resize the Textbox to the dimensions of your liking
To rename the Textbox With the new textbox selected, double-click on the ‘Name’ property in the Properties window and rename it(its been renamed to ‘TextBox’ here).


4. Adding a Label to the UserForm:
A Label can be used to describe what type of data is being entered into the textboxes, a message, or instructions.
- To add a Label head onto the ToolBox.
- Select the ‘Label ‘button
- Click on the userform to place it or drag it to a position of your choice.
- You can resize it to the dimensions of your liking or leave it in standard size.
To rename the Label With the new Label selected, double-click on the ‘Name‘ property in the Properties window and rename it. Also, change the ‘Caption’ property accordingly. its been renamed to ‘LblSelectSheet’ and captioned to ‘Please select a worksheet’.


5. Adding Buttons to the Userform:
To make the form interactive you can place buttons to perform certain actions.
- To add a Button head onto the ToolBox.
- Select the ‘CommandButton’ button
- Click on the userform to place it or drag it to a position of your choice.
- You can resize it to the dimensions of your liking or reposition the buttons by dragging them to a new location on the form.
To rename the button With the new button selected, double-click on the ‘Name’ property in the Properties window and rename it. Then change the ‘Caption’ property to name the button relevantly close to the action it will be performing. For example the AddSheet and CloseFom button in the image below. In the below images 2 buttons have been added and renamed to ‘CmdAddSheet’ and ‘CmdCloseFrm’ and captioned to ‘Add Sheet’ and ‘Close Form’.


6. Adding code to the buttons:
To ensure the buttons are performing the actions we need to code inside VBA and to add code for specific controls double-click on the controls in the form, and it directs you to the specific code segment. After adding the necessary code for each of the controls click on the run button to display the userform.
- Select the button for example Add sheet button in this example
- On the Menu bar, choose View >Code.
- This creates a procedure, where you can add your code.
- Enter the following code to add another sheet to your workbook and name it according to your choice.
Private Sub CmdAddSheet_Click()
Worksheets.Add before:=Worksheets(1)
ActiveSheet.Name = InputBox("please enter the name for the worksheet")
End Sub
7. Adding code to the close button :
Add the following code to close the form by clicking on the ‘close from’ button and redirect to the VBE.
Private Sub CmdCloseFrm_Click()
  Unload Me
End Sub
8. Testing the userform :
To test the UserForm simply go to the menu bar and hit the Run button. It runs userform and displays it on the screen. For example, a userform that selects a sheet from the combobox and directs you to it, with 2 buttons Add Sheet and Close form button to add an extra sheet in the workbook and the close the userform is displayed.


Complete code to run the above userform inclusive of a combobox with the list of worksheets currently present in the workbook and functionality of buttons is:
Private Sub CmdAddSheet_Click()
Worksheets.Add before:=Worksheets(1)
ActiveSheet.Name = InputBox("please enter the name for the worksheet")
End Sub

Private Sub CmdCloseFrm_Click()
Unload Me
End Sub

Private Sub combobox_Change()
Worksheets(Me.combobox.Value).Select


End Sub

Private Sub UserForm_Initialize()

    Dim i As Integer
    i = 1
    Do While i <= Worksheets.Count
    Me.combobox.AddItem Worksheets(i).Name
    i = i + 1
    Loop


End Sub
To automate the userform experience or to display it as soon as you open the workbook the following needs to be done:
Making use of the workbook event
- Head on to the Developer tab>Visual Basic.
- Double click “This workbook” from the project window.
- Change the drop-down on the top left from General to workbook.
- Add this line of code to the procedure “formname.show”(in the below example frmFinalReport.show).
- Save and run.

- Excel VBA UserForm
Excel VBA UserForm
В Excel VBA у нас есть очень полезный инструмент, который называется UserForm. Это практичный способ получения информации от пользователя. Что такое пользовательская форма в VBA? UserForm похож на окно мастера или диалоговое окно, в которое мы просим пользователей вводить данные, и в нем есть некоторые инструкции.
VBA UserForm также встроен в Excel и может быть создан разработчиками. Чтобы использовать пользовательскую форму VBA, сначала нам нужно активировать вкладку разработчика на вкладке «Параметры». Как только вкладка разработчика активирована, мы можем перейти в Excel VBA и создать пользовательские формы. Пользовательские формы используются для хранения данных в Excel. Это можно сравнить с формами Google, где у нас есть определенный набор инструкций и мы просим пользователя ввести данные в соответствии с инструкциями.
UserForm широко используется повсеместно. В UserForm введенные пользователем данные сохраняются в соответствующем столбце. Это самый практичный способ в Excel получить информацию от пользователя и сохранить данные в Excel относительно в правильном месте.
Как создать пользовательскую форму в Excel VBA?
Ниже приведены различные примеры создания пользовательской формы в Excel с использованием кода VBA.
Вы можете скачать этот шаблон VBA UserForm Excel здесь — шаблон VBA UserForm Excel
Excel VBA UserForm — Пример № 1
Во-первых, давайте перейдем к основам пользовательской формы. Как просмотреть пользовательскую форму и что такое пользовательская форма.
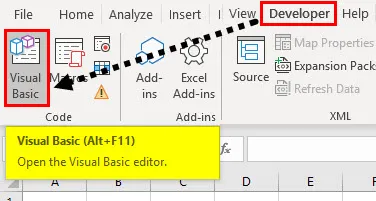
- В рабочем листе Excel перейдите на вкладку Разработчик и щелкните редактор Visual Basic.
- Теперь, как нам добавить пользовательскую форму на этот пустой экран? В инструменте вставки щелкните UserForms.
- Откроется новое окно мастера, и оно пустое, что является нашей пустой формой пользователя.
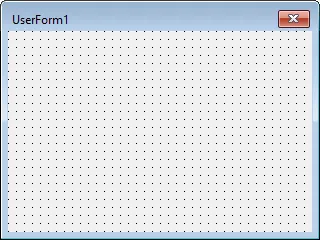
- В настоящее время он называется userform1, поскольку мы не дали ему никакого имени. Мы можем сделать это, изменив его имя в опции свойств в левой части экрана.
- Давайте изменим имя на образец формы и посмотрим результат.
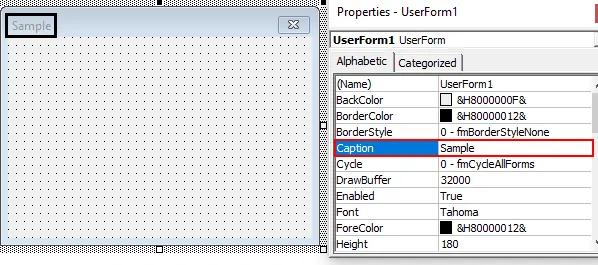
Наша пользовательская форма теперь называется образцом.
- Теперь давайте попробуем изменить цвет пользовательской формы. В панели инструментов свойств у нас есть выпадающий список, названный как цвет спины, мы можем выбрать любой набор цветов, который мы хотим.

- После того, как я выбрал опцию для черного цвета, мой образец пользовательской формы был изменен следующим образом:

- Как мы запускаем эту форму пользователя? Убедитесь, что мы нажали на саму пользовательскую форму и нажмите кнопку запуска, показанную на скриншоте ниже. Когда мы нажимаем кнопку запуска, мы видим, что на экране Excel появляется пустая форма.
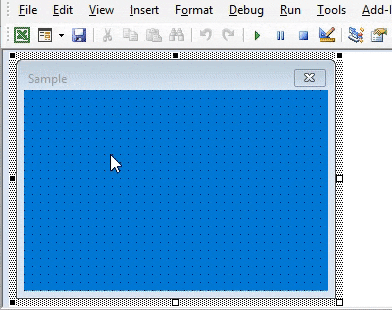
У него нет других вариантов, кроме как закрыть его, потому что мы не добавили к нему никаких других кнопок.
Excel VBA UserForm — Пример № 2
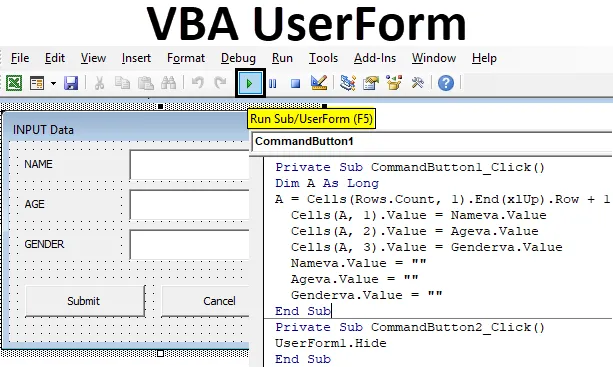
Давайте посмотрим, как добавить кнопки в пользовательскую форму для ввода данных в Excel VBA. Мы сделаем простую пользовательскую форму VBA, в которой мы попросим пользователя ввести его имя, возраст и пол. Этапы создания такой пользовательской формы следующие.
- В рабочем листе Excel перейдите на вкладку разработчика и нажмите на редактор Visual Basic.

- Теперь на вкладке вставки нажмите на пользовательскую форму, чтобы открыть окно пользовательской формы.
- Нам нужно добавить кнопки в эту форму пользователя, чтобы получить ввод от пользователя. Мы видим, что панель инструментов также открыта рядом с нашей пользовательской формой, которая имеет кнопки управления.

Эта панель инструментов содержит различные элементы управления, которые используются в пользовательских формах.
- Так что для нашего примера нам нужно, чтобы имя, возраст и пол были введены пользователем. Нам в основном нужны три метки, которые будут представлять наши инструкции. Нажмите на ярлыки .

- Наведите указатель мыши на форму пользователя, щелкните и перетащите, чтобы вставить метку в форму пользователя.
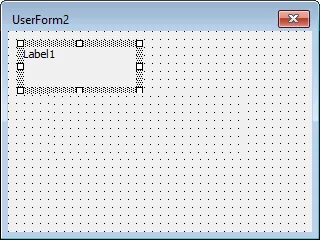
- В настоящее время он назван как метка 1, нам нужно изменить имя метки на « Имя » для инструкции для пользователя. Нажмите на ярлык и удалите предоставленное имя по умолчанию и вставьте новое имя.
- Теперь вставьте ярлык для возраста и пола аналогичным образом и переименуйте их.

- Теперь рядом с метками нам нужно вставить текстовое поле, чтобы пользователь мог вводить значения. На панели инструментов управления, нажмите на TextBox
- Наведите указатель мыши на ярлыки и нажмите на форму.

- Теперь давайте вставим командную кнопку в форму пользователя, которая будет хранить данные для нас. Из элементов управления панели инструментов нажмите CommandButton .
- Наведите указатель мыши на форму.

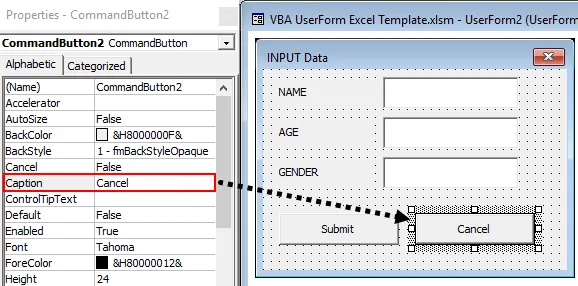
- Измените заголовок CommandButton1 на «Отправить» .
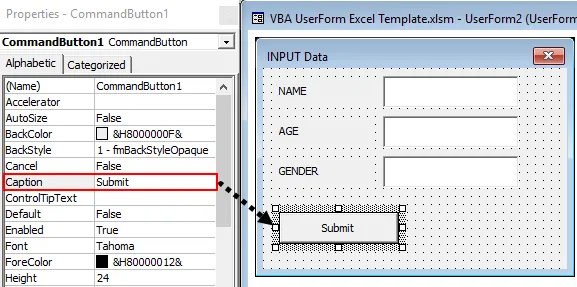
- Вставьте одну кнопку CommandButton и назовите ее « Отмена ».
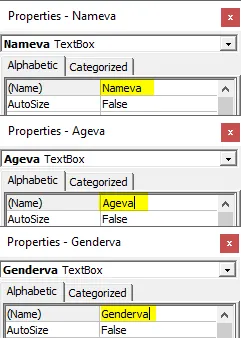
- Следующий шаг — переименовать каждое из текстовых полей, чтобы мы могли легко использовать их в наших кодах. Для имени переименуйте текстовое поле для него как Nameva для значения имени и для age как Ageva для пола аналогично Genderva для значения пола,
- Запустите пользовательскую форму, нажав на кнопку воспроизведения или нажав клавишу F5.

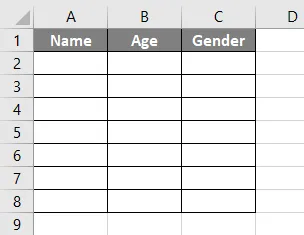
- В листе Excel запишите заголовок для данных следующим образом.
- Дважды щелкните по кнопке отправки, которая откроет нам окно кода для кнопки отправки следующим образом.
Код:
Частный Sub CommandButton1_Click () End Sub

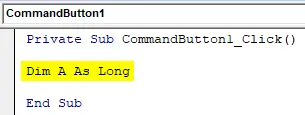
- В окне кода объявите переменную, как показано ниже.
Код:
Private Sub CommandButton1_Click () Dim A As Long End Sub
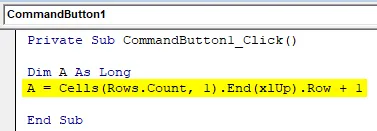
- Теперь давайте переместим первую свободную ячейку в первом столбце со следующим кодом.
Код:
Private Sub CommandButton1_Click () Dim A As Long A = Cells (Rows.Count, 1) .End (xlUp) .Row + 1 End Sub
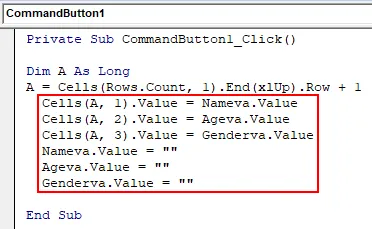
- Давайте сохраним значение, предоставленное пользователем в листе с помощью следующего кода.
Код:
Private Sub CommandButton1_Click () Dim A As Long A = Cells (Rows.Count, 1) .End (xlUp) .Row + 1 Cells (A, 1) .Value = Nameva.Value Cells (A, 2) .Value = Ageva .Value Ячейки (A, 3) .Value = Genderva.Value Nameva.Value = "" Ageva.Value = "" Genderva.Value = "" End Sub
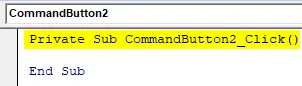
- Теперь дважды нажмите на кнопку «Отмена», это также покажет вам имя автоматического макроса, как это.
Код:
Частный Sub CommandButton2_Click () End Sub
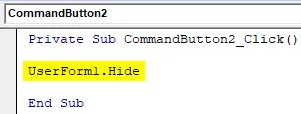
- Используйте приведенный ниже код.
Код:
Приватный Sub CommandButton2_Click () UserForm1.Hide End Sub
- Запустите пользовательскую форму с помощью кнопки запуска или нажатием клавиши F5, и мы получим следующий результат.

- Введите значения в текстовые поля следующим образом.

- Нажмите кнопку Отправить, чтобы увидеть результат в таблице Excel следующим образом.

Вот как мы создаем форму пользователя для получения данных от пользователя.
То, что нужно запомнить
- Пользовательские формы встроены или могут быть созданы разработчиком в VBA.
- Свойства пользовательской формы можно изменить в окне мастера свойств в VBA.
- Пользовательские формы должны иметь кнопки для получения данных от пользователя.
- Для запуска пользовательской формы убедитесь, что пользовательская форма выбрана.
Рекомендуемые статьи
Это руководство по VBA UserForm. Здесь мы обсудим, как создать пользовательскую форму в Excel, используя код VBA, а также некоторые практические примеры и загружаемый шаблон Excel. Вы также можете просмотреть наши другие предлагаемые статьи —
- VBA TextBox
- Создать шаблон Excel
- VBA List Box
- Создать электронную таблицу в Excel
- Код VBA в Excel
- Excel VBA Закрыть UserForm
Содержание
- Объект UserForm
- Синтаксис
- Замечания
- См. также
- Поддержка и обратная связь
- VBA Excel. Первая форма (для начинающих)
- Создание пользовательской формы
- Добавление элементов управления
- Отображение формы на экране
- Create Excel UserForms For Data Entry In 6 Easy Steps: Tutorial And Practical Example
- What Is A UserForm
- Why Work With UserForms
- How To Create An Excel UserForm: Overview
- How To Insert A New UserForm
- How To Add Controls To A UserForm With The Toolbox
- The Toolbox
- Group #1: Controls That Influence The Appearance Of Your UserForm
- Group #2: Controls That Allow Users To Enter Data, Make Selections Or Issue A Command
- How To Select, Move Or Resize UserForm Controls And UserForms
- The UserForm Grid
- The Format Menu Or UserForm Toolbar
- How To Access The Commands In The Format Menu Or UserForm Toolbar
- Commands In The Format Menu Or UserForm Toolbar
- How To Customize A UserForm Or Its Controls
- UserForm Or Control Properties Vs. Other VBA Properties
- The Properties Window
- How To Modify Properties With The Properties Window
- Why Modify The Name Property Of Your UserForms Or UserForm Controls
- How To Name UserForms Or UserForm Controls
- How To Assign VBA Code To A UserForm
- What Is A UserForm Code Window And Why You Work With It
- How To Toggle Between The Code And UserForm Windows
- Why UserForms Work With Event-Handler Procedures
- How To Create Event-Handler Procedures For UserForms
- How To Enter The Declaration Statement For An Event-Handler Procedure
- How To Refer To UserForm Controls Within Your Code
- How To Display Or Load A UserForm
- Where To Store The Macro That Displays A UserForm
- How To Display A UserForm From The VBE
- How Is The Control Flow When Excel Displays A UserForm
- How To Close Or Hide A UserForm
- Example: Create A Simple UserForm For Data Entry
- Step #1: Insert A UserForm
- Step #2: Add Controls To The UserForm
- Step #3: Move Or Resize The UserForm Controls
- Step #4: Customize The UserForm And Its Controls
- Step #5: Assign VBA Code To The UserForm
- Sub Procedure #1: Private Sub UserForm_Initialize()
- Private Sub commandButtonRecordEntry_Click()
- Sub Procedure #3: Private Sub spinButtonUnits_Change()
- Step #6: Display The UserForm
- Step #1: Go To A Module
- Step #2: Create A Sub Procedure That Calls The Show Method Of The UserForm Object
- Step #3: Assign A Keyboard Shortcut To The displayUserForm Macro
- Step #7: Close The UserForm
- UserForm For Data Entry In Action
- Conclusion
Объект UserForm
ОбъектUserForm — это окно или диалоговое окно, составляющие часть пользовательского интерфейса приложения.
КоллекцияUserForms — это коллекция, элементы которой представляют каждую загруженную пользовательную форму в приложении. Коллекция UserForms имеет свойство Count , метод Item и Метод Add . Count указывает количество элементов в коллекции; Элемент (элемент по умолчанию) указывает определенный член коллекции; Добавление помещает новый элемент UserForm в коллекцию.
Синтаксис
UserFormsUserForms [ . Item ] (index)
Индекс заполнителя представляет целое число с диапазоном от 0 до UserForms.Count — 1. Item — это элемент коллекции UserForms по умолчанию, который не требуется задавать.
Замечания
Используйте коллекцию UserForms для итерации всех загруженных пользовательских форм в приложении. В ней определяется внутренняя глобальная переменнаяUserForms. Вы можете передать UserForms(index) в функцию, аргумент которой указан как класс UserForm .
Свойства пользовательских форм определяют их внешний вид, в том числе позицию, размер и цвет, а также некоторые аспекты их поведения.
Пользовательские формы также отвечают на события, запускаемые пользователем или системой. Например, вы можете добавить в процедуру события Initialize для элемента UserForm код, позволяющий инициализировать переменные уровня модуля до отображения элемента UserForm.
Помимо свойств и событий, можно использовать методы для управления пользовательскими формами с помощью кода. Например, можно использовать метод Move для изменения расположения и размера UserForm.
При разработке пользовательских форм задайте свойство BorderStyle для определения границ, а свойство Caption — для размещения текста в строке заголовка. В коде можно использовать методы Скрыть и Показать , чтобы сделать UserForm невидимой или видимой во время выполнения.
Элемент UserForm имеет тип данных Object. Вы можете объявить переменные с типом UserForm, прежде чем присвоить их экземпляру типа UserForm, объявленному во время разработки. Аналогичным образом, можно передать аргумент в процедуру как значение типа UserForm. Вы можете создавать в коде несколько экземпляров пользовательских форм с помощью ключевого слова New в операторах Dim, Set и Static.
Доступ к коллекции элементов управленияв UserForm с помощью коллекции Controls . Например, чтобы скрыть все элементы управления в UserForm, используйте код, аналогичный приведенному ниже.
См. также
Поддержка и обратная связь
Есть вопросы или отзывы, касающиеся Office VBA или этой статьи? Руководство по другим способам получения поддержки и отправки отзывов см. в статье Поддержка Office VBA и обратная связь.
Источник
VBA Excel. Первая форма (для начинающих)
Пример создания пользовательской формы в редакторе VBA Excel для начинающих программировать с нуля. Добавление на форму текстового поля и кнопки.
Начинаем программировать с нуля
Часть 4. Первая форма
[Часть 1] [Часть 2] [Часть 3] [Часть 4]
Создание пользовательской формы
Создайте или откройте файл Excel с расширением .xlsm (Книга Excel с поддержкой макросов) или с расширением .xls в старых версиях приложения.
Перейдите в редактор VBA, нажав сочетание клавиш «Левая_клавиша_Alt+F11».
В открывшемся окне редактора VBA выберите вкладку «Insert» главного меню и нажмите кнопку «UserForm». То же подменю откроется при нажатии на вторую кнопку (после значка Excel) на панели инструментов.
На экране редактора VBA появится новая пользовательская форма с именем «UserForm1»:
Добавление элементов управления
Обычно вместе с пользовательской формой открывается панель инструментов «Toolbox», как на изображении выше, с набором элементов управления формы. Если панель инструментов «Toolbox» не отобразилась, ее можно вызвать, нажав кнопку «Toolbox» во вкладке «View»:
При наведении курсора на элементы управления появляются подсказки.
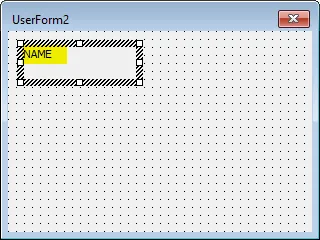
Найдите на панели инструментов «Toolbox» элемент управления с подсказкой «TextBox», кликните по нему и, затем, кликните в любом месте рабочего поля формы. Элемент управления «TextBox» (текстовое поле) будет добавлен на форму.
Найдите на панели инструментов «Toolbox» элемент управления с подсказкой «CommandButton», кликните по нему и, затем, кликните в любом месте рабочего поля формы. Элемент управления «CommandButton» (кнопка) будет добавлен на форму.
Кликнув по элементу управления на форме, вы можете изменять его размер, перетягивая границы за белые квадратики, и перетаскивать по форме, ухватив за одну из границ. Кликнув по заголовку формы или по ее рабочему полю, вы можете также изменять ее размер, перетягивая границы за белые квадратики.
Нажатием клавиши «F4» вызывается окно свойств, с помощью которого можно вручную задавать значения свойств пользовательской формы и элементов управления. В окне свойств отображаются свойства выбранного элемента управления или формы, если выбрана она. Также окно свойств можно вызвать, нажав кнопку «Properties Window» во вкладке «View».
Отображение формы на экране
Чтобы запустить пользовательскую форму для просмотра из редактора VBA, необходимо выбрать ее, кликнув по заголовку или свободному от элементов управления полю, и совершить одно из трех действий:
- нажать клавишу «F5»;
- нажать на треугольник на панели инструментов (на изображении выше треугольник находится под вкладкой «Debug»);
- нажать кнопку «Run Sub/UserForm» во вкладке «Run».
Для запуска пользовательской формы с рабочего листа Excel, можно использовать кнопки, описанные в этой статье. Например, чтобы отобразить форму с помощью «кнопки – элемента ActiveX», используйте в модуле рабочего листа следующий код:
Источник
Create Excel UserForms For Data Entry In 6 Easy Steps: Tutorial And Practical Example
When working in Excel, you have a few ways to get information from a user and allow them to enter data. These include the following:
 Out of the features I describe above, UserForms are one of the most powerful and efficient alternatives. Unless the information or input you need to get from the user is limited, UserForms are usually a good solution.
As explained in Mastering VBA for Microsoft Office 2016:
Dialog boxes and forms are among the most powerful and feature-packed elements of VBA.
In this UserForms Tutorial, you find all the information you need to start creating your own UserForms in Excel. This blog post is organized as follows:
- First section: I introduce (i) UserForms, (ii) the simple 6-step process you can use to create Excel UserForms, and (iii) the main constructs you use when designing and programming UserForms.
- Second section: I walk you through a step-by-step practical example of how to create a simple UserForm for data entry. In this section, you can see how the process of creating a UserForm (described in section #1) looks in practice.
This Tutorial is accompanied by an Excel workbook example that allows you to follow each of the steps I describe in the second section. You can get immediate free access to this workbook by clicking the button below.

The following Table of Contents lists the main sections of this Tutorial.
Table of Contents
What Is A UserForm
When working with VBA, you usually use the term “UserForm” to refer to dialog boxes.
A UserForm is an object. This object represents a window or dialog box within Excel’s User Interface. By working with the UserForm object, you can easily create custom dialog boxes. Each of these dialog boxes you create is held within an UserForm object.
You can think of a UserForm as a blank canvas. Within this canvas, you can place different elements, known as controls. Controls are, themselves, also objects. UserForm controls are the objects users work with to provide input through the UserForm.
You can find a description of the main controls you can work with further below. These controls are commonly used within Excel built-in dialog boxes. Therefore, once created, the general appearance and behavior of the custom dialog boxes you create with UserForms is usually like that of Excel’s built-in dialogs.
Why Work With UserForms
UserForms are very flexible. Therefore, you can create very complex and sophisticated UserForms that achieve a variety of different purposes and help you in different scenarios.
As I mention at the beginning of this UserForms Tutorial, there are a few ways in which you can display information and get input from a user. Some of the non-UserForm alternatives, such as Message and Input Boxes, work great in relatively simple cases. In fact, in such simple cases, Message and Input Boxes are probably more appropriate than UserForms.
There are, however, several circumstances where those alternatives aren’t powerful enough for your purposes. Consider, for example, the following scenarios or considerations:
- A user should make choices or decisions that can’t be adequately captured by the limited controls available in Message or Input boxes.
- The macro requires the user to make several different data entries.
- The user input you require is too specialized or complex for Message or Input boxes.
- You want to restrict the choices users can make or the data they can enter by establishing sophisticated or complex data validation and controlling rules.
- You want to ensure that users can easily navigate a data entry form without confusion.
More broadly, and in the words of Excel MVP Tom Urtis (in the Excel VBA 24-Hour Trainer):
UserForms enable you to interact with your users in ways that you can’t when using standard Message Boxes, InputBoxes, or controls embedded onto your worksheet.
This doesn’t mean that UserForms and, more generally, ActiveX controls are perfect or that they should be your go-to choice. There are some downsides to UserForms. For example, as explained by Excel MVP Jordan Goldmeier in Advanced Excel Essentials, UserForms can sometimes act unpredictably. Jordan also explains how differences in factors such as “internal settings and hardware” may result in UserForms appearing “different across different computers”.
How To Create An Excel UserForm: Overview
At a basic level, you can create a UserForm in the following 6 simple steps:
- Insert a UserForm.
- Add controls to the UserForm.
- Move or resize the added UserForm controls, as required.
- Customize the UserForm or its controls.
- Assign VBA code to the UserForm.
- Display or load the UserForm.
- Close or hide the UserForm.
How To Insert A New UserForm
You can insert a UserForm in the following 3 easy steps:
Go to the Project Explorer, and right-click on the workbook (Project) where you want to insert the UserForm.

In the context menu displayed by the VBE, go to Insert > UserForm.

As an alternative to steps #2 and #3 above, you can proceed as follows:
- Select the Project where you want to insert the UserForm.

Do one of the following:
- Click on the Insert UserForm button in the toolbar.
Go to Insert > UserForm.

Once you complete the process above, Excel the inserts the UserForm. By default, the UserForm contains an empty dialog box. Notice that, in addition to displaying the UserForm window on the right side of the screen, the VBE adds the following items to the Project Explorer:
- A Forms node. If the VBA Project you’re working on already contains a Forms node, the VBE doesn’t add it again.
- A new UserForm. This UserForm appears within the Forms collection.

A UserForm object can hold a single dialog box. Therefore, you must create and insert a new UserForm for each dialog box you want to create. However, you have significant flexibility regarding the amount of UserForms you can store within a single workbook.
Usually, in addition to displaying the new UserForm, the VBE shows a floating window known as the Toolbox. The Toolbox is, also, usually displayed when you activate a UserForm.

This Toolbox is the feature you use to add controls to the UserForm you just created. You can learn more about it in the appropriate section below.
If your Visual Basic Editor doesn’t display the Toolbox, do either of the following:
- Click on the Toolbox button in the VBE toolbar.
Go to the View > Toolbox.

How To Add Controls To A UserForm With The Toolbox
You can add a control to a UserForm in 3 simple steps:
- Select a control in the Toolbox.
For example, in the following image, I select a Label.

Click on the UserForm, in the place where you want to add the control. This results in the created control having its default size.

Alternatively, you can click-and-drag within the UserForm. This allows you to specify the size of the control.

If you need to add the same control several times to a single UserForm, you can take advantage of a shortcut by proceeding as follows:
- Double-click on the control within the Toolbox.

Click on the UserForm, where you want to add the control.
Repeat step #2 as required until you’ve added the number of controls you need.

Click on the Select Objects command in the Toolbox to restore the mouse pointer to Selection mode.

In the example above, I work with a Label. This is only 1 of the different controls you can add to your UserForms. To better understand the different controls you can add, let’s explore…
The Toolbox
The Toolbox is a relatively simple floating window that allows you to add ActiveX controls to your UserForms. You work with the Toolbox because the VBE’s menu doesn’t have commands that allow you to add UserForm controls.
It contains a single tab (Controls) and 16 icons.

Out of the 16 icons that appear in the Toolbox, 15 are controls you can insert in your UserForms. You can divide these controls in the following groups:
- Controls that influence the appearance of your UserForm.
- Controls that allow users to enter data, make selections or issue a command.
The remaining control is Select Objects. As indicated by its name, Select Objects allows you to select and manipulate the different elements of your UserForm.

You rarely need to click on the Select Objects control. This is because Select Objects is the default control and the mouse pointer usually returns to this mode automatically. According to author Richard Mansfield (in Mastering VBA for Microsoft Office 2016), there are 2 common cases where you need to click on the Select Objects control:
- If you select a control but change your mind before using it.
- If you add the same control several times to a single UserForm by using the technique I describe in the previous section (double-clicking on the control within the Toolbox).
In both cases, you restore the mouse pointer to Selection mode by clicking on Select Objects.
Which controls you choose to add to a UserForm depend on the objective you’re trying to achieve. The following sections briefly introduce the 15 controls that are available in the Toolbox.
Group #1: Controls That Influence The Appearance Of Your UserForm
This group of control allows you to customize your UserForm.
- Label: Displays a text label. You commonly use labels to (i) identify a section of the UserForm, or (ii) display information.

Frame: Displays a frame where you can enclose other controls. This grouping can be for either aesthetical or logical purposes. You can, for example, use Frames to (i) group several controls that are logically related, or (ii) distinguish between different sets of OptionButton controls. Additionally, Frames allow you to separate different groups of OptionButtons (described in Group #2 below)).

MultiPage: Displays a container with tabs. This is the control you usually use to create dialog boxes with tabs.

TabStrip: Displays several tabs within the dialog box.

Image: Displays an image.

If you choose to display an Image, consider that Images are stored within the workbook you’re using. Therefore, Images can have a substantial influence on the size of your workbook. Usually, you want to avoid using (i) too many Images, or (ii) Images that are too large.
Group #2: Controls That Allow Users To Enter Data, Make Selections Or Issue A Command
This group of controls allow the users of your UserForm to (i) enter data, (ii) make selections, or (iii) issue commands.
- TextBox: Displays an input field. Allows users to enter text or values.

ComboBox: Displays a drop-down list, where only 1 item is visible at a given time. Users can use the drop-down list to select an item. Additionally, users can normally make entries different from those within the list. In other words, you can think of a ComboBox as a combination of a TextBox and a ListBox.

ListBox: Displays a list. Users can select 1 or more items from the list, depending on the setting you specify for the ListBox.MultiSelect property.

CheckBox: Displays a checkbox. Allows users to specify a binary choice: True or False. If the checkbox is checked, its value is True. If the checkbox isn’t checked, its value is False.

OptionButton: Usually used in groups. When you have a set of OptionButtons, users can generally select only 1. When a user selects 1 option, Excel automatically de-selects the other options. This ensures that users only select a single option from the group.
You can use Frames (describe in Group #1 above) to separate OptionButtons. OptionButtons within a Frame are treated as a single group, separate from other groups of OptionButtons. This allows you to use several sets of OptionButtons, where the user can select an option in each group. Alternatively, you can work with the OptionButton.GroupName property.
In both cases, the idea is the same: grouped OptionButtons are mutually exclusive. Therefore, a user can select 1 option from within the group. If you don’t explicitly group OptionButtons using 1 of the methods I describe above, Excel treats all the OptionButtons in the UserForm as the same group.
ToggleButton: Displays a toggle button. Users can use this button to toggle between 2 states: True and False. If the ToggleButton is pressed, its value is True. If the ToggleButton isn’t pressed, its value is False. The appearance of a ToggleButton depends on the current state.
CommandButton: Displays a button, which users can click. When the user clicks a button, your VBA Application usually performs an action.
ScrollBar: Displays a scrollbar. Users can drag the scrollbar to specify a value.

SpinButton: Displays a spinner. Allows users to modify a value by clicking on 1 out of 2 arrow buttons.
You can have SpinButtons with either vertical or horizontal orientation. If the spinner is vertically-oriented, the up arrow increases the value and the down arrow decreases it. If the spinner is horizontal, the right arrow increases and the down arrow decreases the value.
RefEdit: Displays a reference edit control, which is a cell range input field. Users can use this control to enter or select a cell or range of cells.

You’re, strictly speaking, not limited to using the built-in controls within the Toolbox or Excel. This is because you can customize the Toolbox and use other ActiveX controls. However, in this UserForms Tutorial, I introduce only the controls that appear within the Toolbox. Those are the most commonly-used.
How To Select, Move Or Resize UserForm Controls And UserForms
Once you’ve added a control to a UserForm, you can easily move or resize it. You generally do this with the mouse. The following are some of the most commonly-used methods to move or resize controls or the UserForm itself:
- Select several controls by either (i) pressing and holding the Ctrl key while you select controls with the mouse, (ii) pressing and holding the Shift key while you select controls with the mouse, or (iii) clicking-and-dragging your mouse to enclose the group of controls you want to select.

Move a control by dragging-and-dropping it with your mouse.

Resize a control by selecting and dragging the sizing handles on the control’s border.

The UserForm itself also has sizing handles, which you can use to resize the UserForm.

The UserForm Grid
When you’re working with a UserForm, the VBE usually displays dots forming a grid.

The purpose of such grid is to help you align all the controls within the UserForm. Depending on your settings, the controls you work with snap automatically to the grid.
The grid is, in any case, not visible in the actual UserForm displayed to the users.
You can specify 3 settings related to this dot grid:
- Whether the grid is visible or not.
- The size of the grid elements.
- Whether controls snap to the grid or not.
You determine these settings from the General tab of the Options dialog. You can get to this tab in the following 2 easy steps:
- Go to Tools > Options.

Within the Options dialog, go to the General tab.

The settings that apply to the grid are grouped under Form Grid Settings. Within this group of settings, you find the following:
- Show Grid: Allows you to specify whether the grid is shown (or not shown). You can set this by checking (or unchecking) the box to the left of “Show Grid”.
If the checkbox is selected, the grid is displayed. If the checkbox isn’t selected, the grid isn’t displayed.

Grid Units: Allows you to set the size of the individual grid elements (the distance between the grid dots). You do this by specifying the width and height, in points, within the Width and Height fields. The default value is 6 points for both height and width. The larger the values, the bigger the separation between grid dots.

Align Controls to Grid: Allows you to specify whether controls align or snap to the grid. If you want the controls to snap to grid, select the checkbox next to the left of “Align Controls to Grid”. If the checkbox isn’t selected, controls don’t align to the grid.

Once you’ve selected the settings you want to use, click the OK button to confirm your selections.
You can use the commands in the Format menu or the UserForm toolbar to arrange the controls within a UserForm.
I describe the main commands below. First, let’s look at the different ways you can access them:
How To Access The Commands In The Format Menu Or UserForm Toolbar
You can access the commands within the Format Menu or UserForm toolbar using any of the following 3 methods:
- Through the Format menu, in the following 2 easy steps:
- Select the control(s) you want to manipulate.
Go to the Format menu and select the command you want to apply.

Through the UserForm toolbar, in the following 3 simple steps:
- If you can’t see the UserForm toolbar, make it visible by going to View > Toolbars > UserForm.

Select the control(s) you want to work with.
Click on the appropriate button in the UserForm toolbar.

Through a context menu in the following 2 easy steps:
- Select the control(s) and right-click on them.
Select the command you want to apply from the context menu.

The available commands may vary slightly, depending on the context you’re in and which of the 3 methods above you use to access them.
The order in which you select the controls matters:
When resizing or moving controls, the VBE must use 1 of them as a reference. You can identify which controls are moved or resized, and which control is used as reference, based on the color of their sizing handles. Controls that are resized or moved have black sizing handles. The control that is used as reference has white sizing handles.

The reference control is usually the last one you click on prior to executing the command. This allows you to choose the reference control after you’ve selected all the controls you want to manipulate.
Commands In The Format Menu Or UserForm Toolbar
The following are the 11 options displayed by the VBE when you expand the Format menu. Several of these commands are also available through the UserForm toolbar or a context menu, as I explain above.
- Align: Use this to align several controls. You can choose any of the following alignment options:

- Lefts: Aligns the selected controls to the left border of the reference control.
Centers: Aligns the (horizontal) center of the selected controls.
Rights: Aligns the selected controls to the right border of the reference control.
Tops: Aligns the selected controls to the top border of the reference control.
Middles: Aligns the (vertical) center of the selected controls.
Bottoms: Aligns the selected controls to the bottom border of the reference control.
To Grid: Snaps the selected control(s) to the grid.
Make Same Size: Allows you to resize the selected controls so that they have the same dimensions. You can choose from within the following resizing options:

- Width: Resizes the selected controls to be of the same width as the reference control. The height of the controls doesn’t change.
Height: Resizes the selected controls to be of the same height as the reference control. The width of the controls isn’t changed.
Both: Resizes the selected controls to have the same height and same width.
Size to Fit: Autofits the selected control(s). In other words, the control(s) are resized per their contents.

Size to Grid: Resizes the selected control(s) to the nearest grid points.

Horizontal Spacing: You can use these settings to specify the horizontal spacing between the selected controls. Choose from the following spacing options:

- Make Equal: Makes the horizontal spaces between the selected controls equal.
Increase: Increases the horizontal spacing between the controls.
Decrease: Decreases the horizontal spacing between the controls.
Remove: Removes the horizontal spacing between the controls.
Vertical Spacing: Allows you to specify the vertical spacing between the selected controls. You can use the same options as when working with Horizontal Spacing (above).

- Make Equal: Makes the vertical spaces between the selected controls equal.
Increase: Increases the vertical spacing between the controls.
Decrease: Decreases the vertical spacing between the controls.
Remove: Removes the vertical spacing between the controls.
Center in Form: Allows you to center the selected control(s) horizontally or vertically within the UserForm.

Arrange Buttons: You can use these settings to arrange CommandButtons either of the following ways:
- Bottom: Arranges the selected CommandButton(s) on the bottom of the UserForm.
Right: Arranges the selected CommandButton(s) on the right side of the UserForm.
Group: Groups the selected controls.

Ungroup: Ungroups controls that were previously grouped (for example, by using #9 above).

Order: Allows you to order a stack of controls from the front to the back. You can choose any of the following commands:

- Bring to Front: Brings the selected control to the front of the stack.
Send to Back: Sends the selected control to the back of the stack.
Bring Forward: Brings the selected control 1 step forward.
The UserForm toolbar contains several of the commands I list above. Additionally, it contains a Zoom drop-down list. This zoom feature allows you to zoom into or out of the UserForm controls. In other words, controls are resized per the percentage you choose.

How To Customize A UserForm Or Its Controls
You customize a UserForm or its controls (all of which are objects) by modifying their properties. You can specify these properties in 3 ways:
- Programmatically, using VBA code.
You usually rely on this option if you want to set properties at runtime. This means that you can use VBA to set properties when the UserForm is displayed.
Manually, by manipulating the object within the UserForm window.
This applies only to some properties, particularly those related to size and position such as Height, Width, Left and Top. You can learn more about this topic by reading the previous section.
Manually, using the Properties Window of the VBE.
This is the option you generally use while designing your UserForm within the VBE and is the focus of this section. The properties you set through the Properties Window are usually static (vs. dynamic) and, therefore, you rarely use VBA code (#1 above) to modify them later.
While designing a UserForm within the VBE, you can change a property through the Properties Window in the following 3 easy steps:
- Within the UserForm window, select (i) the control you want to customize, or (ii) the UserForm itself.

Go to the Properties Window and select the property you want to modify.


In this UserForms Tutorial, I focus on the basics of creating and designing UserForms. Therefore, I only explain how to use the Properties Window of the VBE for these purposes. In the UserForm example that appears in the second section of this blog post, you can find some basic examples of how to use VBA to set the properties of a UserForm or its controls programmatically.
UserForm Or Control Properties Vs. Other VBA Properties
Objects within the Excel VBA Object Model have properties. Properties are the attributes, characteristics or qualities that you can use to describe an object.
The UserForm object and the controls within the UserForm itself are also objects and, therefore, also have properties. The basic purpose of these properties doesn’t change: they allow you to describe the attributes, characteristics or qualities of an object.
There’s, however, an important difference between the way you usually work with properties (i) within VBA, and (ii) when dealing with UserForms and UserForm controls.
When you create macros, you usually use VBA code to either return (read) or modify (write) the current property setting. When you work with UserForms, you can also use VBA. However, you can also modify UserForm and UserForm control properties in a different way:
The Properties Window
The Properties Window is commonly displayed on the lower left corner of the VBE, although this varies. You can get the VBE to show the Properties Window by, for example, using the “F4” keyboard shortcut.

The Properties Window shows the properties of the currently-selected object. If your current selection includes more than 1 object, the Properties Window lists the properties that are common to the selected objects.
Alternatively, you can use the drop-down list at the top of the Properties Window to specify the object whose properties you want to see.

Objects have different properties, although some properties are commonly-shared by different objects. Therefore, the appearance of the Properties Window changes depending on the object you select.
Additionally, the Properties Window can display the properties of the same object organized per 2 different criteria. You select the organization criteria by choosing 1 of the 2 tabs the Properties Window has:
- Alphabetic: Organizes the properties in alphabetical order.

Categorized: Organizes the properties in categories.

Regardless of the categorization criteria you use, the properties don’t change. The Properties Window lists an object’s properties and those properties don’t change just because they’re listed in a different order.
How To Modify Properties With The Properties Window
The Properties Window usually contains 2 columns. The left column lists the name of the properties. The right column shows the current property setting.

Therefore, once you’ve selected the object you want to work with, you can proceed as follows:
- Identify the property you want to modify using the names that appear in the left column of the Properties Window.

Double-click the right column of the Properties Window and enter the new property setting.

You can generally enter a new property value in 1 of 3 ways:
- By typing the new setting.

By selecting a setting from a pre-set list of values. Properties that can take a limited list of values have a drop-down list in the Properties Window. You can easily identify such properties because, when you select one, the VBE displays a drop-down button.

When working with these properties you can either (i) click on the drop-down and select a value, or (ii) double-click the property name or property value to cycle through the available values.
By opening a dialog box. You can identify the properties whose setting you specify through a dialog box because, when selected, the VBE displays a button with an ellipsis (…).

You can modify the properties of several objects at the same time. To do this, select all the objects whose property you want to modify prior to executing the 2-step process I describe above. When you select several objects at the same time, the Properties Window displays those properties that are common to the selection.

Some of the properties of the UserForm are default settings for new controls. In other words, the new controls you add to the UserForm are influenced by that property setting. Therefore, if you modify those default control settings:
- Controls added after the property modification use the new property setting, but…
- Controls added prior to the property modification remain unchanged and don’t use the new property setting.
Why Modify The Name Property Of Your UserForms Or UserForm Controls
Each object has its own properties. These properties generally vary from object to object. There are, however, some properties that are common to several different objects. Commonly-used properties include Name, Width, Height, Left, Right, Value and Caption. In fact, UserForms and all UserForm controls have the Name property.
In practice, you usually modify just a few properties through the Properties Window. Name is 1 such property that you usually set through the Properties Window.
Every time you add a UserForm to a Project, the Visual Basic Editor assigns a default name:
“#” is an integer that starts at 1 and increases sequentially. Therefore, the first UserForm you add is UserForm1. The second is UserForm2. The third is UserForm3. And so on…
This may look familiar. Excel uses similar naming conventions for workbooks, worksheets, and regular VBA modules (among others).
That same rule applies to the controls within a UserForm. For example, if you’re working with Label controls, the first Label is named Label1. The second is Label 2. And so on…
You can find the name of a UserForm or UserForm control by checking its Name property in the Properties Window. This property is important:
You use the Name property of a UserForm or a UserForm control to refer to it when creating your VBA code. Since you may use these names relatively often, you may prefer using names that are more descriptive and meaningful than the default ones.
Notice, additionally, that any time you change the Name property of a UserForm or a UserForm control, you may have to go back to your VBA code to update the object references. To avoid this, you may prefer modifying the names of your UserForms and UserForm controls as soon as possible after creating them and prior to writing your VBA code.
How To Name UserForms Or UserForm Controls
Several of the general naming rules, such as those that apply to properties and Sub procedures, are also applicable to UserForms and UserForm controls. The following are the main rules you may want to consider when setting the names of your UserForm and UserForm controls:
- The maximum name length is 40 characters.
- The first character must be a letter.
- Characters, other than the first, can include letters, numbers and underscores (_).
- Names can’t include spaces ( ), periods (.), mathematical operators (such as +, -, /, * or ^), comparison operators (for example, >, How To Remove Controls From A UserForm
You can easily delete controls from a UserForm using either of the following 2 methods:
- Select the control and go to Edit > Delete, or press the Delete key.

Right-click on the control and select Delete from the context menu.

How To Assign VBA Code To A UserForm
Once you complete the design of your UserForm, you must create the macros that power it and respond to the user’s actions. You can create and assign macros to a UserForm in the following 2 easy steps:
- Go to the Code window of the UserForm by, for example, using the “F7” keyboard shortcut.
- Enter the appropriate VBA code within this Code window.
This section focuses on the macros that you attach or assign to the UserForm. This is different from the macros responsible for displaying the UserForm in the first place.
In other words, when working with UserForms, you deal with (at least) 2 different types of Sub procedures:
- A Sub procedure that displays the UserForm. You can read more about this topic in a section further below.
- 1 or more event-handler procedures, which are attached to the UserForm. This is the topic of this section.
Additional considerations apply to the VBA code you use to close the UserForm, even though this code is commonly attached to the UserForm. I explain how you can close or hide a UserForm further below.
What Is A UserForm Code Window And Why You Work With It
When working with UserForms, you create event-handler procedures that are stored within the code module of the appropriate UserForm object. In other words:
- UserForms are class objects have a code module. This is like what occurs with other object classes, such as Worksheets or Workbooks.
- You use this module to store the procedures to be executed when a user works with the UserForm.
- The procedures you assign to UserForms are event-handler procedures. In other words, these procedures are executed when an event occurs. In the case of UserForms, these events are the consequence of the user interacting with the UserForm.
Notice the difference between the following:
- The event-handler procedures which are executed when a user works with the UserForm. These event-handler procedures are stored within the UserForm Code window.
- The procedure(s) that control the display of the UserForm. These procedures are usually stored within a regular module, and never within the UserForm Code module. You can read more about how to display a UserForm further below.
How To Toggle Between The Code And UserForm Windows
Within the VBE, you work with 2 UserForm windows or modules:
- The UserForm window: You use this module to manipulate and customize the UserForm and its controls.

The Code window: You use this module to create and store the event-handler procedures associated with the UserForm.

You can toggle back and forth between these 2 windows with any of the 3 following features:
- The “F7” and “Shift + F7” keyboard shortcuts:
- “F7” displays the Code window.
“Shift + F7” displays the UserForm window.
The View Code and View Object commands within the View menu.
- Go to View > Code to see the Code window.

Go to View > Object to see the UserForm window.

The context menu displayed when you right-click on the UserForm within the Project Explorer.

- Right-click the UserForm and select View Code to go to the Code window.
Right-click the UserForm and select View Object to go to the UserForm window.
If you want to go to the UserForm window, you can generally double-click the UserForm within the Project Explorer.

Why UserForms Work With Event-Handler Procedures
When working with UserForms, your main purpose is usually to allow users to enter information or provide other input for your macros. Therefore, your code must be able to respond to what the user does with the UserForm. You do this by relying on events.
From a broad perspective, an event is something that happens while you’re working with Excel. In the case of UserForms, these are events that occur within the UserForm itself. Once the appropriate event occurs, your event-handler procedure is executed. This way, your VBA application can respond to the user’s actions.
When working with UserForms, your code must respond to both UserForm and control events. The events you can work with vary depending on the UserForm control. In other words, UserForm controls have different associated events.
How To Create Event-Handler Procedures For UserForms
The general principles that apply to event-handler procedures, a topic I cover in this blog post, are applicable to the event-handler procedures you create to deal with UserForms.
The following are 3 of these principles, as they apply to UserForms:
- The basic structure of the names of event-handler procedures is composed of the following 3 (or 4) items:
- The UserForm or UserForm control.
- An underscore (_).
- The event that triggers the event-handler procedure.
- In some cases, an argument list.
- If you don’t enter the appropriate declaration statement, following the structure I describe in #1 above, the procedure doesn’t work.
- However, you don’t have to learn the exact names or declaration statements for event-handler procedures. You can get the VBE to enter the appropriate declaration statement by using either of the 2 processes I describe in the following section.
How To Enter The Declaration Statement For An Event-Handler Procedure
You can get the VBE to enter the appropriate declaration statement for an event-handler procedure in the following 9 easy steps:
- Go to the UserForm Code window for the appropriate UserForm.

Click on the Object drop-down list that appears at the top left side of the UserForm Code window. This drop-down is labeled “(General)”.

When you expand this drop-down list, the VBE displays the UserForm and all the UserForm controls within the relevant UserForm.

Select the object you want to work with.
In the screenshot below, I select the UserForm.

Once you select an object, the VBE includes the declaration and End statements for a Sub procedure. This Sub procedure corresponds to the default event of the object you chose.
In the screenshot below, the VBE enters the opening and closing statements for the Sub procedure triggered by the Click event of the UserForm object (Private Sub UserForm_Click()).

If you want to work with the default event of the chosen object, you can start working on your Sub procedure. Use the statements entered by the VBE in step #4 above as a basis.
If you want to work with another event, proceed to step #6.
Click on the Procedure drop-down list, which appears at the top right side of the UserForm Code window. The label of this drop-down is “(Declarations)”.

The expanded drop-down list includes all the events that apply to the object you’re working with.

Select the event you want to work with.
In the screenshot below, I select the Initialize event.

Once you select an event, the VBE enters new declaration and End statements for a Sub procedure. This Sub procedure corresponds to your chosen object and event.
Use these statements as the basis to code your event-handler procedure.

Notice that the VBE doesn’t delete the declaration and End statements for the Sub procedure that works with the default event (step #4). If you want to keep a clean module, you can delete them.

If you’re working in the UserForm window, you can use an alternative process. In this case, you can get the VBE to enter the declaration statement for the event-handler procedure in the following 2 simple steps:
- Either (i) double-click on the object you want to work with, or (ii) right-click on the object and select “View Code”.
In the screenshot below, I select a CommandButton.
The VBE takes you to the UserForm’s Code window. Additionally, the VBE enters the declaration and End statements for the Sub procedure that handles the default event of the object, and places the cursor between these 2 statements.
For example, in the screenshot below, the VBE adds the opening and closing statements for a macro triggered by the Click event of the CommandButton (Private Sub CommandButton1_Click())
If you want to work with the default event of the object, you can start coding your Sub procedure.
If you want to work with another event, repeat steps #6 through #9 from the process I describe above, as follows:
- Click on the Procedure drop-down list.
![]()
Select the event you want to work with.
In the screenshot below, I select the double click (Dblclick) event.
Start coding your Sub procedure, using the declaration and End statements that the VBE enters as a basis.
If necessary, delete the declaration and End statements for the default event.

How To Refer To UserForm Controls Within Your Code
UserForms and UserForm controls are objects. You generally refer to them by using their Name property. The Name property is the first in an alphabetically-organized Properties Window.

You can see how to, and why, modify the Name property of UserForm controls in a previous section.
You can see the UserForm as the parent object of the controls within it. Therefore, the basic control reference structure is as follows:
“UserForm” is the UserForm object. “Control” is the control you’re referring to.
However, you usually refer to controls within event-handler procedures that are stored in the UserForm’s Code module. Therefore, you can simplify the reference by omitting a reference to the UserForm. In this case, you can refer to a control as follows:
An additional alternative is to use the Me keyword to refer to the UserForm. In this case, the reference structure is as follows:
How To Display Or Load A UserForm
You can display a UserForm in the following 2 easy steps:
- Go to the appropriate module.
Within the appropriate procedure, enter a statement that uses the Show method of the UserForm object. The basic structure of this statement is as follows:
“UserForm” is an optional UserForm object. If you omit this qualifier, VBA assumes you’re referring to the UserForm that is associated with the active UserForm module.
The Show method has 1 parameter: modal. This allows you to specify whether the UserForm is modal or modeless. I don’t cover this topic in this UserForms Tutorial.
When choosing the procedure in which to include the Show method, consider how and when you want the user to access the UserForm. You can, for example:
- Create a procedure whose sole purpose is to display the UserForm.
- Assign that procedure to a button or keyboard shortcut.
You can also include the Show method in event-handler procedures. In such cases, the UserForm is displayed when the relevant event occurs.
You can load a UserForm, without displaying it, by working with the Load statement. In this case, the basic statement syntax is as follows:
“UserForm” is a UserForm object.
When a UserForm is loaded, it exists in memory but isn’t visible. Therefore, you can programmatically work with the UserForm. The user, however, can’t interact with it.
Once you want to display a previously-loaded UserForm, you can use the Show method of the UserForm object.
You usually load a UserForm, without displaying it immediately, when the UserForm is complex and takes too long to load into memory. Once the UserForm is loaded in memory, you can quickly display it.
In certain cases, VBA loads the UserForm automatically without you having to use the Load statement. This is the case when you use the Show method of the UserForm object (above).
Where To Store The Macro That Displays A UserForm
You use the Show method within the procedure where you want to display the UserForm. This procedure is usually stored within a regular VBA module. You don’t store the macro that displays the UserForm in the UserForm Code window itself.
To understand why this is the case, it may help if you consider the following 3 separate steps:
- First, you need to get Excel to display the UserForm.
- Once the UserForm is shown, the user can work with it.
- Depending on what the user does with the UserForm, something happens.
The code that determines what happens depending on how the user interacts with the UserForm (step #3) is stored within the UserForm. If the UserForm is never displayed, the user doesn’t interact with the UserForm and this code is never executed.
Since the code within the UserForm is never executed if the UserForm isn’t displayed, you can’t store the code that determines when the UserForm is displayed in the UserForm Code module. If you store the code that displays a UserForm within the UserForm itself, the UserForm is never displayed.
How To Display A UserForm From The VBE
You can display a UserForm while working in the VBE by using the Run Macro (Sub/UserForm) command. You can execute the Run Macro (Sub/UserForm) command in any of the following 3 ways:
- Clicking on the Rub Macro button in the VBE toolbar.
- Going to Run > Run Macro.
- Using the “F5” keyboard shortcut.

When you execute the Run Sub/UserForm command, the Initialize event of the UserForm occurs. This option is useful for testing or preparing a UserForm you’re working on.
As an alternative to the Run Sub/UserForm command, you can use the Show method of the UserForm object in a statement typed in the Immediate Window. The basic structure of such a statement is:
“UserForm” is a UserForm object.

How Is The Control Flow When Excel Displays A UserForm
At a basic level, once the Show method of the UserForm object is called, Excel goes through the following 6-step process:
- Displays the UserForm.
Waits for the user to work with the UserForm.
The interaction of the user with the UserForm usually triggers an event associated to 1 of the controls within the UserForm. Therefore, the applicable event-handler procedure is executed.
Once an event-handler procedure runs, control returns to the UserForm.
Eventually, the UserForm is closed or dismissed by the user.
Once the UserForm is closed, Excel continues execution of the procedure that contains the Show method of the UserForm object. This is the Sub procedure responsible for displaying the UserForm (step #1 above).
In practice, however, the VBA statement that displays the UserForm is at (or near) the end of a procedure. This is because you usually store the code that is executed after the user works with the UserForm in the UserForm Code module. The code within the UserForm Code module is executed in earlier steps of this process (steps #2 to #4 above).
You can read more about the UserForm Code module in a previous section of this UserForm Tutorial.
How To Close Or Hide A UserForm
There are few different ways in which a UserForm can be closed or hidden.
The first way in which a UserForm can be closed is by clicking on its Close button on the top right corner. This generally applies to all UserForms, regardless of the VBA code you use.
You can, however, monitor whether a user clicks on the Close button by using events. Clicking on the Close button triggers the following 2 events:
- QueryClose: Occurs before the UserForm is closed.
- Terminate: Occurs after the UserForm is unloaded and when the UserForm is removed from memory.
Usually, when you’re creating a UserForm, you create an event-handler procedure that is triggered by the Click event of a CommandButton. This event-handler procedure normally includes 1 of the following VBA constructs:
- The Unload statement, which unloads the UserForm from memory. The basic statement structure for the Unload statement is as follows:
“UserForm” is a UserForm object.
The UserForm.Hide method, which makes the UserForm invisible. The basic statement syntax for the UserForm.Hide method is as follows:
“UserForm” is a UserForm object.
In both cases, if the procedure containing this statement is stored within the UserForm Code module, you can use the Me keyword. In such a case, you can always use the same statement regardless of the Name property of the UserForm. Additionally, you can replace the statements above with the following:
You generally use the Unload statement only after all the UserForm instructions and statements have been carried out. This includes retrieving the input data from the UserForm and carrying out any necessary actions. If you fail to do this, the UserForm has no real effect, other than displaying the UserForm itself.
I don’t cover the topic of retrieving input from a UserForm in detail within this blog post. But you can see some code examples further below.
This topic is important because, once a UserForm is unloaded, the changes made to the UserForm’s controls and their properties are reset. This results, as explained in Excel 2016 Power Programming with VBA, your code not being “able to access the user’s choices after the UserForm is unloaded.”
There may be cases where you need to use the input from a UserForm after the UserForm is unloaded. You can usually store that data using a public-scope variable. Other possible solutions suggested by VBA experts Dick Kusleika and Mike Alexander in Excel 2016 Power Programming with VBA include writing the value to a worksheet cell or the Windows registry.
The UserForm.Hide method doesn’t unload the UserForm from memory. It simply hides the UserForm. Therefore, you can still access and work with the user’s choices and the UserForm controls.
In fact, if you use the UserForm.Hide method on an unloaded UserForm, VBA loads the UserForm and keeps it hidden.
As explained in the Excel 24-Hour VBA Trainer:
The method you choose depends on why you don’t want the UserForm to be seen. Most of the time, you’ll want the form cleared from memory, but sometimes, information that was entered into the form needs to be referred to the next time you show the form while the workbook has remained open.
Example: Create A Simple UserForm For Data Entry
This UserForm Tutorial is accompanied by an Excel workbook example. If you want to follow the steps I describe below, get immediate free access to this workbook by clicking the button below.
The purpose of the example UserForm is to serve as a data entry mechanism for a workbook table recording certain sales data. The entries are as follows:
The worksheet where these entries are recorded has 2 single columns. These columns match with the entries above.

These entries are the part of the basis for several tables that I use in other Tutorials, such as this one about Pivot Tables or this one about Power Query.
The example UserForm that you create below works with the following UserForm controls:
- 1 Label.
- 1 TextBox.
- 1 SpinButton.
- 1 Frame.
- 5 OptionButtons.
- 2 CommandButtons.
In the following sections, you follow the 6-step process described at the beginning of this Tutorial to create a UserForm:
- Insert a UserForm.
- Add controls to the UserForm.
- Move or resize the UserForm controls.
- Customize the UserForm or its controls.
- Assign VBA code to the UserForm.
- Display or load the UserForm.
- Close or hide the UserForm.
The purpose of this section is to show you, step-by-step, the practical process you can follow to create a UserForm. The logic and theory behind each of these steps is thoroughly described in the appropriate section above. Please refer to those sections for more information and details.
The UserForm example you create is very simple. My purpose with this blog post is to get you started creating UserForms. Therefore, I don’t dive into certain features or VBA constructs that you can use and add to improve the UserForm and make it more sophisticated or complex.
Step #1: Insert A UserForm
Insert the UserForm by following these 3 easy steps:
- Use the “Alt + F11” keyboard shortcut to go to the VBE.
Go to the Project Explorer and right-click on the Project (workbook) you’re working on. In this example, select “VBAProject(Create Excel UserForms For Data Entry In 6 Easy Steps.xlsm)”.
Go to Insert > UserForm.

The Visual Basic Editor creates the following blank UserForm.
![]()
Step #2: Add Controls To The UserForm
The purpose of the example UserForm example is to serve for data entry. There are only 2 required entries:
To achieve this, use the following controls for the UserForm:
- 1 SpinButton, to specify the number of units sold.
- 1 TextBox, to display the number of units sold specified by clicking on the SpinButton.
- 1 Label for the TextBox.
- 5 OptionButtons, to choose the appropriate item. In this example, you use OptionButtons because you want to ensure that the user can select only 1 item (not several).
- 1 Frame, for the OptionButtons.
- 2 CommandButtons: A Record Entry and a Close Form button.
Add the SpinButton, TextBox, Label and Frame controls following the same 2-step process:
- Select the control in the Toolbox.
- Click on the UserForm, in the location where you want to add the control.
In the case of the CommandButtons and OptionButtons, use the following 3-step process:
- Double-click on the control within the Toolbox.
- Click on the UserForm several times, once for each time you add the control (2 for the CommandButtons, 5 for the OptionButtons).
- Click on the Select Objects command in the Toolbox to restore the mouse pointer to Selection mode.
Due to the amount of controls you include in the UserForm, start by resizing the UserForm itself. Your purpose is to make the UserForm taller. You do this by clicking and dragging on the UserForm’s lower center sizing handle.

Once the UserForm is big enough to fit all the controls you want to add, and due to the layout choice, add the controls in the following order:
The following GIF shows the process I describe above:

In this step, don’t worry too much in getting the precise location right. You organize the controls with more detail in the next step.
Step #3: Move Or Resize The UserForm Controls
Use the grid and several commands in the Format menu to arrange the controls within the UserForm. The exact commands you use vary depending on the exact situation you’re in.
For this example, do the following:
- Arrange the vertical spacing between the different OptionButtons and align them to the left, as follows:
- Select all the OptionButtons.
- Go to Format > Vertical Spacing > Remove.
- Go to Format > Vertical Spacing > Increase.
- Change the reference control by holding the Ctrl key while clicking on an OptionButton that has the appropriate alignment.
- Go to Format > Align > Lefts.
- Reduce the height of the Frame used to group the OptionButtons. Do this by clicking on and dragging on its lower center sizing handle.
- Move the Label, TextBox, SpinButton and CommandButtons up, so that they’re closer to the lower edge of the Frame. Do this by selecting all the controls and dragging them with the mouse.
- Align all controls, except the SpinButton and the CommandButton on the right side of the UserForm, to the left. Do this as follows:
- Select all controls, excluding the SpinButton and the right-hand CommandButton.
- Go to Format > Align > Lefts.
- Make the SpinButton the same height as the TextBox and align both controls, as follows:
- Select the SpinButton and the TextBox.
- Go to Format > Make Same Size > Height.
- Go to Format > Align > Rights.
- Go to Format > Align > Tops.
- Arrange the vertical spacing between the TextBox and the left-hand CommandButton, as follows:
- Select the left-hand CommandButton and the TextBox.
- Go to Format > Vertical Spacing > Remove.
- Go to Format > Vertical Spacing > Increase.
- Align the CommandButtons, as follows:
- Select the CommandButtons.
- Go to Format > Align > Tops.
- Go to Format > Horizontal Spacing > Remove.
- Go to Format > Horizontal Spacing > Increase.
- Decrease the height of the UserForm by using its lower center sizing handle.
- Decrease the width of both the Frame and the UserForm. In both cases, click and drag on their respective right center sizing handles.
The following GIF shows the 9-step process I describe above:

Step #4: Customize The UserForm And Its Controls
Customize the following 2 properties of all UserForm and UserForm controls that contain them:
- Name: The name of the UserForm or control.
- Caption: Caption text that is displayed (i) within or next to a control, or (ii) in the UserForm title bar.
The only exceptions are the TextBox and SpinButton. The TextBox and SpinButton objects don’t have a Caption property.
In addition to the above, make the following specific property modifications:
- Set the Default property of the Record Entry button to True. The Default property allows you to specify whether a CommandButton is the default button in the UserForm.
- Set the Cancel property of the Close Form button to True. You can use the Cancel property to specify that a CommandButton is the Cancel button. If you do this, the user can use the Escape key as a shortcut for the Close Form button.
- Set the Enabled property of the TextBox to False. You can use the Enabled property to indicate whether the TextBox is enabled and respond to the user’s actions (True) or disabled (False).
- Set the Locked property of the TextBox to True. The Locked property allows you to specify if the user can edit the entry or data within the TextBox. By locking the TextBox, you ensure that the user can’t edit, add or delete data in the TextBox.
Follow the same 3-step process for all objects whose properties are modified:
- Select the object to modify.
- Go to the Properties Window and select the appropriate property.
- Double-click on the current property setting, and (when required) replace it with a new one. With some of the properties used in this example Default, Cancel, Enabled and Locked), double-clicking allows you to cycle through the available values (True and False).
The following table shows the new Name and Caption properties for each of the objects. I use “n.a.” to indicate the cases where a property isn’t a member of the object.
| Original Object Name | Name Property | Caption Property |
| UserForm1 | userFormSalesEntry | Enter sales data |
| Label1 | labelUnits | No. of units sold |
| TextBox1 | textBoxUnits | n.a. |
| SpinButton1 | spinButtonUnits | n.a. |
| Frame1 | frameItem | Item |
| OptionButton1 | optionButtonSurfaceStudio | Surface Studio |
| OptionButton2 | optionButtonSurfaceBook | Surface Book |
| OptionButton3 | optionButtonSurfacePro4 | Surface Pro 4 |
| OptionButton4 | optionButtonXboxOneS | Xbox One S |
| OptionButton5 | optionButtonXboxOne | Xbox One |
| CommandButton1 | commandButtonRecordEntry | Record Entry |
| CommandButton2 | commandButtonCloseForm | Close Form |
Strictly speaking, you don’t need to specify the Name property of all the objects above. This is because you don’t refer to most of them (for example, the Label and Frame) within the VBA code you create in the following steps. However, as I explain above, you generally want to use meaningful and descriptive names for the objects you refer to within the code.
The following GIF shows the whole process to change the properties above:

Step #5: Assign VBA Code To The UserForm
My focus in this UserForms Tutorial are UserForms, not VBA code. My purpose is to show you how you can use some of the VBA constructs I explain in the first section of this blog post, such as the Unload statement.
Therefore, the Sub procedure examples below are very simple. You can use more sophisticated macros and find several Tutorials that focus on VBA code in the Archives.
In this step, you create the following 3 macros:
- A macro that prepares the UserForm for use by setting the default states of the TextBox, SpinButton and OptionButtons in the UserForm.
- A macro that records entries.
- A macro that connects the TextBox to the SpinButton, so that changes to the SpinButton are reflected in the TextBox.
I explain the VBA code used to display and close the UserForm in the following steps (#6 and #7).
The 8-step process you can follow to enter the VBA code for the UserForm is as follows:
- Double-click the Record Entry CommandButton.
Because of this, the VBE does the following:
- Takes you to the Code window.
Enters the declaration and End statements for a Sub procedure triggered by the Click event of the CommandButton object (Private Sub commandButtonRecordEntry_Click()). The Click event occurs when the user clicks on the CommandButton.
Enter the VBA code for the Sub procedure triggered when the user clicks on the Record Entry CommandButton. This is the main Sub procedure and carries out most of the work you require.
Click on the Object drop-down list at the top left side of the UserForm Code window, and select the SpinButton control (spinButtonUnits).
The VBE enters the declaration and End statements for a Sub procedure triggered by the Change event of the spinButtonUnits object (Private Sub spinButtonUnits_Change()). The Change event occurs when the Value property of the SpinButton changes. The Value property, in turn, changes when the user clicks any of the arrows of the SpinButton.
Enter the VBA code for the Sub procedure triggered when the user clicks on the arrows of spinButtonUnits.
Click on the Object drop-down list, and select the UserForm object (UserForm).

Because of this, the VBE enters the declaration and End statements for a Sub procedure triggered by the Click event of the UserForm.

Click on the Procedure drop-down list at the top right side of the UserForm Code Window, and select the Initialize event.

The VBE enters the opening and closing statements of a Sub procedure triggered by the Initialize event of the UserForm (Private Sub UserForm_Initialize()). The Initialize event happens when the UserForm is loaded, but prior to it being displayed. Therefore, you usually rely on Initialize to specify default values or fill controls with data.

Delete the opening and closing statements entered by the VBE in step #5 above (Private Sub UserForm_Click()).

Let’s look at the VBA code for the 3 procedures you create in this step:
Sub Procedure #1: Private Sub UserForm_Initialize()
The following is the VBA code for the macro executed when the UserForm is initialized:

This macro sets the default values and selections for several controls within the UserForm, as follows:
- Value of TextBox: 0.
- Value of SpinButton: 0.
- Selected OptionButton: Surface Studio.
You can also manipulate these properties through the Properties Window (step #4 above).
One of the main reasons I prefer to set these default property values through VBA code is that this allows me to reuse the code within this Sub procedure to reset the UserForm and prepare it for a new entry. In fact, the last statement in Sub procedure #2 below calls the UserForm_Initialize macro for these purposes.
Let’s look at each line of code within this macro:
Lines #1 And #5: With Me | End With
Opening and closing statements of a With… End With block.
The statements within the block (lines #2 to #4) work with the object specified in the opening line of the block (Me). You use the Me keyword to refer to the UserForm itself.
Line #2: .textBoxUnits.Text = 0
Sets the default value of the TextBox to 0. This default number of units (0) is recorded when the user fails to specify one through the SpinButton control.
You achieve this by setting the Text property of the TextBox (.textBoxUnits.Text) to 0.
Line #3: .spinButtonUnits.Value = 0
Sets the default value of the SpinButton to 0. This value matches the default value of the TextBox (line #2 above).
You do this by setting the Value property of the SpinButton to 0. The Value property of a SpinButton is an integer.
Line #4: .optionButtonSurfaceStudio.Value = True
Selects (by default) the OptionButton that corresponds to the Surface Studio.
You achieve this by setting the Value property of the first OptionButton (Surface Studio) to True. The Value property allows you to specify whether the OptionButton is selected (True).
Private Sub commandButtonRecordEntry_Click()
The following is the VBA code within the Sub procedure executed when the user clicks the Record Entry button:

This Sub procedure goes through the following process:
- Find the first empty row in the worksheet where the entered data is recorded.
- Record the user entries in that first empty row, as follows:
- The Item chosen with the OptionButtons of the UserForm is recorded in column A.
- The number of units displayed in the TextBox of the UserForm is recorded in column B.
- Prepare the UserForm for a new entry by:
- Resetting the values of the TextBox and SpinButton.
- Selecting the default OptionButton (for Surface Studio).
The macro doesn’t carry any data validation checks, nor handles any possible errors. For example, it doesn’t check whether the user has entered the number of units using the SpinButton. In this example, those checks are mostly handled by the SpinButton and the properties of the TextBox you modify in step #4 above, as follows:
- The user can’t enter data directly in the TextBox. This is a consequence of the values you set for the Enabled (False) and Locked (True) properties of the TextBox in step #4 above.
The number of units displayed on the TextBox is dependent on the SpinButton. In other words, the user specifies the number of units through the SpinButton. The TextBox simply displays the current number of units.
You achieve this through an event-handler procedure triggered by the Change event of the SpinButton object. You can find an example of such code below (Sub procedure #3).
This Sub procedure doesn’t close the UserForm. Therefore, the user can make several entries at any time without having to continually open the dialog box. The user can, however, close the dialog box at any time by clicking on the Close or Close Form buttons. See step #7 below to see how to close the dialog box with the Close Form button.
Let’s go through each line of code to understand how the macro works:
Lines #1 And #2: Dim myWorksheet As Worksheet |Dim myFirstBlankRow As Long
Use the Dim keyword to declare 2 variables:
- myWorksheet: An object variable. Represents the worksheet where the data is recorded.
- myFirstBlankRow: A variable of the Long data type. Represents the number of the first blank row in the table where the data is recorded.
Line #3: Set myWorksheet = Worksheets(“Excel UserForm data entry”)
Uses the Set keyword to assign a worksheet (Excel UserForm data entry) to an object variable (myWorksheet).
Lines #4 And #21: With myWorksheet | End With
Opening and closing statements of a With… End With block. The statements within the block (lines #5 to #20) work with the object specified in the opening line of the block (myWorksheet).
Lines #5: myFirstBlankRow = .Cells.Find(What:=”*”, LookIn:=xlFormulas, LookAt:=xlPart, SearchOrder:=xlByRows, SearchDirection:=xlPrevious).Row + 1
Finds the first empty row in myWorksheet and assigns its number to the myFirstBlankRow variable.
The process followed to find the first empty row in the worksheet is as follows:
- The number of the last cell with data in the worksheet is found (.Cells.Find(What:=”*”, LookIn:=xlFormulas, LookAt:=xlPart, SearchOrder:=xlByRows, SearchDirection:=xlPrevious).Row).
- A value of 1 is added. This addition returns the number of the row below the last cell with data or, in other words, the first empty row in the worksheet.
Let’s analyze the portion of the statement that finds the last row in the worksheet. I explain several different ways to find the last row in a worksheet in this VBA Tutorial.
- The Worksheet.Cells property (.Cells) returns all the cells within myWorksheet.
- The Range.Find method (Cells.Find) is used to search for the last cell with data within myWorksheet. The parameters of the Range.Find method, which are within parentheses, are set as follows:
- What: “*”. The data you’re searching for. The asterisk (*) acts as wildcard. Therefore, the Find method searches for any character sequence.
- LookIn: xlFormulas. The type of data you’re searching in. xlFormulas results in VBA searching (looking) in the cell formulas.
- LookAt: xlPart. Specifies whether the Find method matches the cell contents in their entirety, or just a part of them. xlPart results in Excel doing a partial match.
- SearchOrder: xlByRows. Specifies whether the search is carried out by rows or by columns. Since you’re looking for the last row, you set this to xlByRows.
- SearchDirection: xlPrevious. The direction (next or previous) in which the search is carried. In this case, you set the argument so that Excel searches for the previous (xlPrevious) match.
Once the last row in the worksheet is identified, 1 is added (+ 1). The resulting value is assigned to the myFirstBlankRow variable (myFirstBlankRow =).
Lines #6 And #19: With .Cells(myFirstBlankRow, 1) | End With
Opening and closing statements of a With… End With block. The statements within the block (lines #7 to #18) work with the object specified in the opening line of the block (.Cells(myFirstBlankRow, 1)).
Let’s analyze the object to which statements refer to:
- The Cells property (.Cells) works with the object specified in the opening statement of the outer With… End With block (line #4 above). That object is myWorksheet.
- The Cells property returns a single cell. That’s the cell located on the first empty row (myFirstBlankRow) and the first column (1 or A) of the worksheet. This cell is where the next data entry for Item is recorded.

Lines #7 And #18: Select Case True | End Select
Opening and closing of a Select Case statement.
Executes one of the groups of statements within this block of code (lines #8 to #17) based on the value taken by an expression. The group of statements that’s executed is determined by finding which expression matches the test expression.
The test expression is set in the opening line of code (#7) of the block. In this case, a Boolean value: True (Select Case True).
Lines #8 Through #17: Case optionButtonSurfaceStudio.Value | .Value = “Surface Studio” | Case optionButtonSurfaceBook.Value | .Value = “Surface Book” | Case optionButtonSurfacePro4.Value | .Value = “Surface Pro 4” | Case optionButtonXboxOneS.Value | .Value = “Xbox One S” | Case optionButtonXboxOne.Value | .Value = “Xbox One”
Line #8, #10, #12, #14 and#16 are the expressions against which VBA seeks to match the test expression (True) from line #7 above. The statement that VBA executes is the one following the expression that returns True and, therefore, matches the test expression.
The following table shows the tested expressions along with the statement that’s executed when that expression returns True:
| Rows # | Expression | Statement that’s executed if Expression = True |
| 8 and 9 | optionButtonSurfaceStudio.Value | .Value = “Surface Studio” |
| 10 and 11 | optionButtonSurfaceBook.Value | .Value = “Surface Book” |
| 12 and 13 | optionButtonSurfacePro4.Value | .Value = “Surface Pro 4” |
| 14 and 15 | optionButtonXboxOneS.Value | .Value = “Xbox One S” |
| 16 and 17 | optionButtonXboxOne.Value | .Value = “Xbox One” |
Notice the following:
- The structure of all the groups of statements above is identical.
- First, you have the expression that VBA seeks to match with the test expression (True).
- The OptionButton.Value property returns True if the OptionButton is selected.
- The OptionButtons used in this example are grouped. Therefore, when the user selects 1 option, the other options are automatically de-selected. In other words, only 1 OptionButton can be selected.
- Because of #1 and #2 above, the expression that matches the test expression is that which corresponds to the OptionButton selected by the user.
- Second, you have the statement that VBA executes when the corresponding expression is True.
- The Value property (.Value) works with the object specified in the opening statement of the With… End With block (line #6). That object is the cell where the next entry for Item goes.
- The executed statement sets the Value property of the relevant cell to be equal to a string. This string is the name of one of the Items.
Overall, the consequence of the above structure is that the data recorded in the Excel worksheet depends on the OptionButton the user chooses, as follows:
| If the user chooses | The data entry is |
| Surface Studio | Surface Studio |
| Surface Book | Surface Book |
| Surface Pro 4 | Surface Pro 4 |
| Xbox One S | Xbox One S |
| Xbox One | Xbox One |
Line #20: .Cells(myFirstBlankRow, 2).Value = Me.textBoxUnits.Value
Records the number of units within the No. of units sold TextBox in the appropriate worksheet cell.
Let’s see how this works:
- The statements sets the Value property of a cell (.Cells(myFirstBlankRow, 2).Value =) to be equal to the Value property of the UserForm TextBox (Me.textBoxUnits.Value). The Value property of the TextBox is determined by the SpinButton. This part of the process is controlled by the Sub procedure #3 I explain below.
- The first part of the statement (.Cells(myFirstBlankRow, 2)) works as follows:
- The Cells property (.Cells) works with the object specified in the opening statement of the With… End With block (line #4). That object is represented by myWorksheet.
- The Cells property returns a single cell. This cell is located on the first empty row (myFirstBlankRow) and the second column (2 or B) of the worksheet. That’s the cell where the next data entry for Units Sold is recorded.


Line #22: UserForm_Initialize
Calls the UserForm_Initialize Sub procedure. I explain this event-handler procedure in more detail above (Sub procedure #1).
The UserForm_Initialize macro sets the default values and controls of certain UserForm controls, as follows:
- TextBox: 0.
- SpinButton: 0.
- OptionButton selection: Surface Studio.
In other words, by calling the UserForm_Initialize Sub procedure, you reset the values and selections within the UserForm to their defaults. This ensures that the UserForm is ready for a new entry.
Sub Procedure #3: Private Sub spinButtonUnits_Change()
The following is the VBA code within the Sub procedure executed when the user clicks on any of the arrows of the SpinButton control:
This macro consists of a single VBA statement:
textBoxUnits.Value = Me. spinButtonUnits.Value
This statement sets the Value property of the TextBox object (textBoxUnits.Value) to be equal to the Value property of the SpinButton object (Me.spinButtonUnits.Value). In other words, it:
- Connects the TextBox to the SpinButton.
- Ensures that the value displayed in the TextBox is determined by the SpinButton.
Step #6: Display The UserForm
For this example, get Excel to display the UserForm in the following 3 simple steps:
- Go to a module different from the UserForm’s code module.
- Create a Sub procedure that calls the Show method of the UserForm object.
- Assign a keyboard shortcut to the displayUserForm macro.
Let’s go through each of these steps:
Step #1: Go To A Module
In this example, store the macro that displays the UserForm in a standard module (Module1).
If necessary, insert a new module by, for example, right-clicking on the workbook within the Project Explorer and going to Insert > Module.

Step #2: Create A Sub Procedure That Calls The Show Method Of The UserForm Object
Create the following macro (displayUserForm):

displayUserForm consists of the following single statement:
When executed, this macro displays the userFormSalesEntry you created in the previous 5 steps.
Step #3: Assign A Keyboard Shortcut To The displayUserForm Macro
For this example, execute the displayUserForm Sub procedure with a keyboard shortcut. Make this assignment in the following 4 easy steps:
- Open the Macro dialog box by, for example, using the “Alt + F8” keyboard shortcut.
Within the Macro dialog box, select the appropriate macro (displayUserForm) and click the Options button.

Within the Macro Options dialog box displayed by Excel, assign a keyboard shortcut and click the OK button.
In this example, assign the keyboard shortcut “Ctrl + Shift + A”.

Close the Macro dialog box.

Step #7: Close The UserForm
A user can close the dialog box example by clicking on the Close Form button. You can enter the code to close the UserForm when the user clicks this button in the following 4 easy steps:
- Go to the VBE by, for example, using the “Alt + F11” keyboard shortcut.
Double-click on the appropriate UserForm module (userFormSalesEntry).

Double-click on the button you want to use to close the UserForm (Close Form).
Because of this, the VBE does the following:
- Takes you to the UserForm’s Code window.
Enters the declaration and End statements for a Sub procedure triggered by the Click event of the commandButtonCloseForm object (Private Sub commandButtonCloseForm_Click()).
The following is the code within the Sub procedure executed when the user clicks the Close Form button:

This Sub procedure has the following single statement:
The Unload statement unloads the UserForm from memory. This results in the dialog box being dismissed.
UserForm For Data Entry In Action
You can enter data with the UserForm example in the following 5 simple steps:
- Use the “Ctrl + Shift + A” keyboard shortcut.
Excel displays the UserForm.

To make an entry:
- Enter the number of units sold by using the SpinButton.
Choose the appropriate Item.
Click on the Record Entry button.

Repeat step #3 as many times as required, depending on the number of entries you want to make.
To close the UserForm, press the Close or Close Form button.

The GIF below shows the UserForm in action. Notice how:
- Every time I click the Record Entry button, the entry is recorded in the table.
- When I click the Close Form button, the dialog box is closed.

Conclusion
After reading this UserForms Tutorial, you have the knowledge and resources to start creating UserForms in Excel now. The following are some of the topics you learned about:
- What is a UserForm, and why are they useful.
- The simple 6-step process you can use to create a UserForm for data entry.
- How to insert and customize UserForms.
- What are UserForm controls, and how you work with them. This includes, among others, how to add, select, move, resize, customize and remove controls.
- How to create the macros that power your UserForms. This includes the VBA code you use to both: (i) display, load, close and hide UserForms, and (ii) respond to the user’s actions within the UserForm.
In the second section of this UserForms Tutorial, you saw a practical example. In this example, you followed the easy 6-step process to create a simple UserForm for data entry. Remember that this blog post is accompanied by an Excel workbook example containing this UserForm example. You can get immediate free access to this workbook by clicking the button below.
In practice, you’re likely to work with more complex UserForms that (i) gather more data, (ii) use additional controls, and (iii) work with more complex VBA code. In most cases, the basic principles and constructs you’ve learned about by reading this UserForms Tutorial continue to apply.
Источник
2.1. Свойства и методы объекта UserForm Свойства объекта UserForm
Рассматривая
в п. 1.2 и 1.3 примеры, решаемые в редакторе
VBA, можно прийти к выводу, что такие
простейшие задачи с выводом единственного
результата в диалоговое окно не всегда
будут удовлетворять потребностям
пользователей. Одним из достоинств
языка программирования VBA является то,
что он относится к объектно-ориентированным
языкам. Следовательно, в данную среду
программирования уже заложены возможности
создания форм и его элементов простым
использованием без составления
громоздкого программного
кода.
Практически
во всех приложениях Office используются
пользовательские диалоговые окна.
Диалоговые окна в VBA называются формами
(объект UserForms). Каждому объекту UserForm
присущи определенные свойства, методы
и события, которые он наследует от класса
объектов UserForms. Диалоговые окна (формы)
и элементы управления составляют основу
современного визуального интерфейса.
Все элементы управления и технология
работы с ними в основном стандартизованы
и похожи для разных платформ и программных
сред. Эти объекты помещены в специальную
библиотеку MSForms.
Выделим
основные моменты, которые следует иметь
в виду при создании визуального
интерфейса.
•Все
загруженные диалоговые окна представляют
коллекцию UserFormsсо
стандартными методами и свойствами.
Элемент коллекции – объект класса
UserForm–
задает отдельное окно.
•Для
каждого типа элементов управления в
библиотеке msforms имеется класс объектов,
имя которого совпадает с именем элемента
управления (его типа). Например, есть
классы SpinButtonи
TextBox.
•Диалоговые
окна создаются, как правило, не программно,
а визуально. Вначале создается само
окно, а затем оно наполняется элементами
управления при помощи соответствующей
панели элементов. Этот этап называется
этапом
проектирования,
и его следует отличать от этапа выполнения,
когда приложение выполняется и конечный
пользователь взаимодействует с
приложением, в частности через диалоговые
окна и их элементы управления. Как только
создается диалоговое окно и помещается
в него тот или иной элемент управления,
в этот же самый момент автоматически в
программе появляется объект соответствующего
класса, с которым можно работать, вызывая
его методы и изменяя его свойства.
На
этапе проектирования, используя окно
свойств, можно задать большинство
свойств как самого диалогового окна,
так и всех элементов управления,
помещенных в него, кроме этого, программно
необходимо прописать все обработчики
событий.
•Последний
момент – отладка. Для ведения отладки
нужно предварительно откомпилировать
приложение и затем перейти в режим
выполнения приложения.
Для
того чтобы в разрабатываемое приложение
можно было добавить форму, необходимо
выполнить следующие действия:
1) запустить
редактор VBA;
2) выделить
правой кнопкой мыши объект Project, выполнить
команду Insert + UserForm (рис. 11), после чего
появляются новая форма и панель элементов
Toolbox (рис. 12).

Рис.
11.Добавление
формы
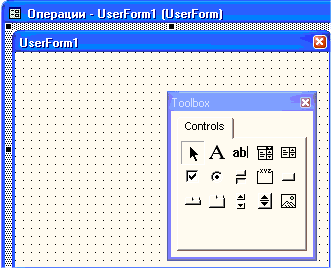
Рис.
12.Новая
форма
Форма
как объект имеет некоторые встроенные
свойства, и их можно устанавливать или
программным образом, или в Properties Window
(окне свойств) редактора VBA (табл.
6).
Таблица
6
Наиболее часто
используемые свойства объектов UserForm
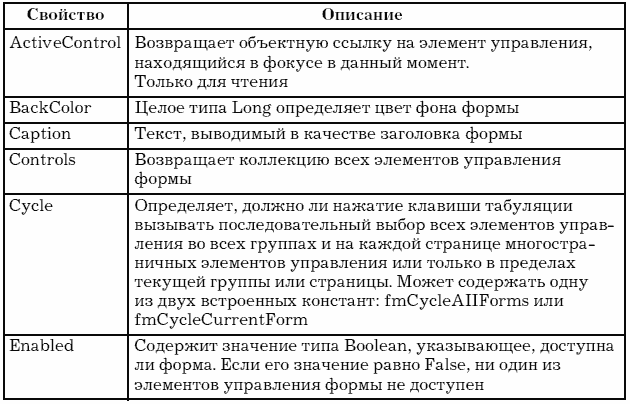
Методы объекта
UserForm
Всякий
раз, создавая в проекте новый объект
UserForm, одновременно создается новый
подкласс объекта UserForm. Любые процедуры
или функции, написанные в разделе General
(общий) модуля класса, относящегося к
форме, становятся дополнительными
методами для отдельного подкласса
объекта (табл. 7).
Таблица
7
Наиболее часто
используемые методы для объектов
UserForm
События объекта
UserForm
Событие
–это
что-то, что может произойти с диалоговым
окном или элементом управления диалогового
окна (табл. 8).
Событийные
процедуры следует записывать в модуль
класса, который является частью User Form.
При этом такие процедуры должны иметь
имена в виде
ObjectName_EventName,
где
ObjectName
–имя
формы или элемента управления, a EventName
–имя
события, с которым идет работа. Такой
формат имени позволяет VBA сопоставлять
заданному событию требуемую
процедуру.
Таблица
8
События объектов
UserForm
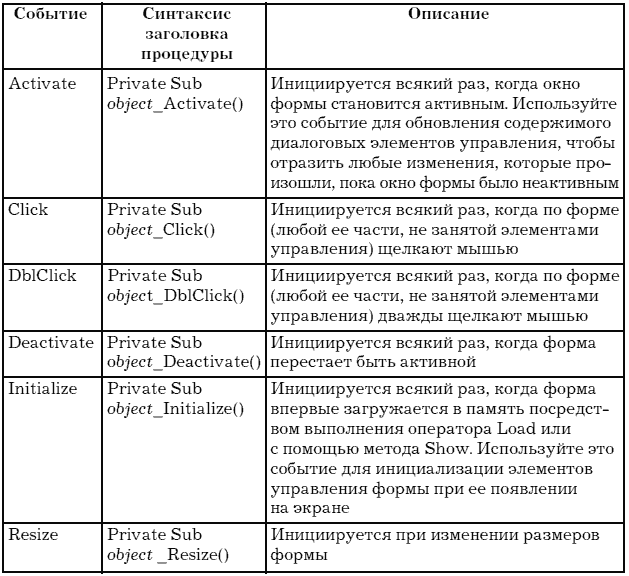
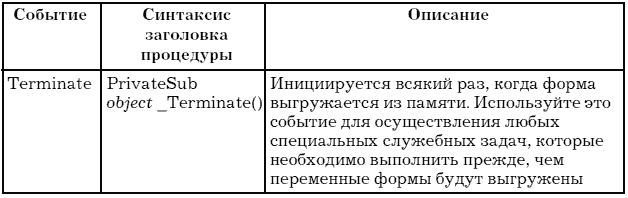
Элементы управления
Объект
UserForm может содержать те же элементы
управления, что и находящиеся в диалоговых
окнах Word, Excel или других приложений
Windows (табл. 9). Элементы
управления –это
элементы диалогового окна, позволяющие
пользователю взаимодействовать с
программой. Они включают в себя
кнопки-переключатели, текстовые поля,
линейки прокрутки, командные кнопки и
т. д.
Таблица
9
Стандартные
элементы управления, включенные в VBA
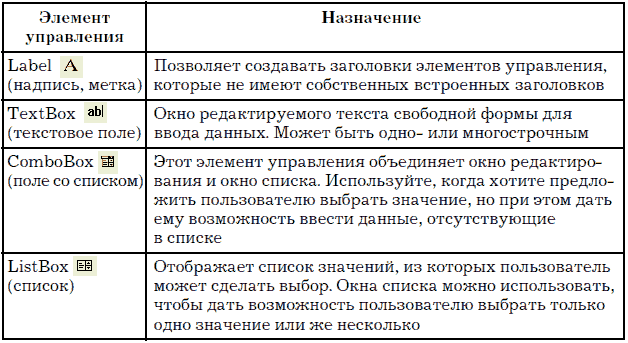
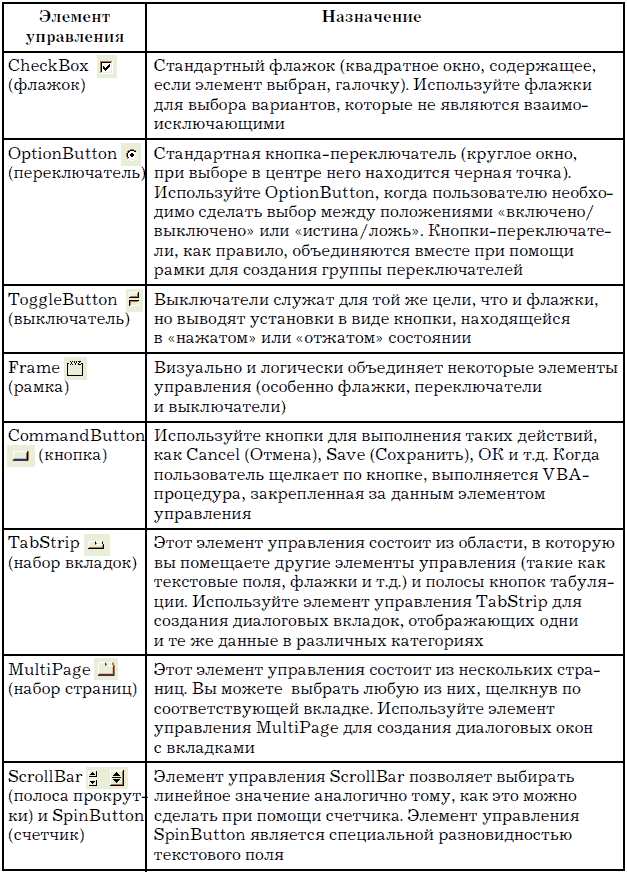
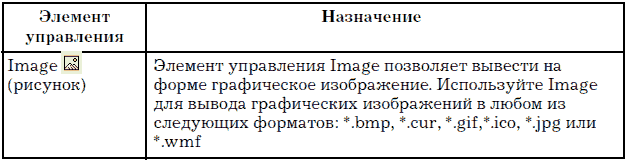
Обращение
к элементам управления происходит в
основном через их свойства и с помощью
процедур обработки событий, написанных
для каждого элемента (табл. 10).
Таблица
10
Cвойства стандартных
элементов управления
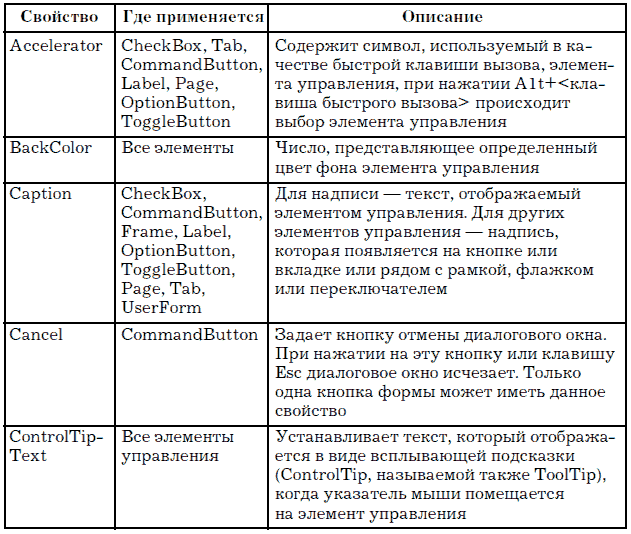
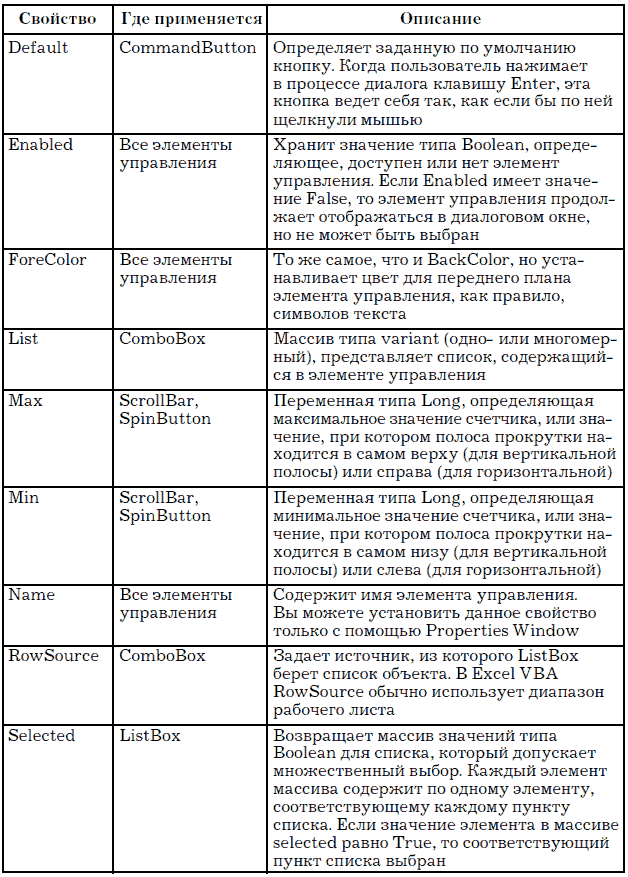

2.2. Использование
форм
Создание VBA-программ
Используя
формы, можно достаточно полно изучить
возможности работы со всеми типами
данных и их взаимодействия с учетом
того, что значения переменных будут
определяться не программно (примеры 1,
2, 3), а вводом через текстовые поля формы,
т. е. при непосредственной работе
пользователя с программой.
Рассмотрим
создание программ, которые взаимодействуют
непосредственно с создаваемыми формами
и где будет использоваться весь материал,
изученный в главе 1.
Пример
4.
Создать
форму, в которой при вводе имени в
текстовое поле после нажатия кнопки
ОКвыдается
приветственное сообщение в метку в
виде: «Имя, привет! Сегодня – дата и
время запуска программы».
Программа,
считывая значение с текстового поля,
выводит в соответствующий элемент
управления данное значение и дополнительно
использует функцию вывода времени и
даты запуска программы.
Технология
выполнения
Любая разработка
программы на VBA будет сопровождаться
разработкой формы, которая непосредственно
связана с создаваемой программой.
Поэтому на данном примере будет подробно
рассмотрен порядок выполнения
работы.
1-й
шаг. Проектирование программы-примера
Программа-пример
должна будет открывать на экране новое
окно с показанным в нем приветствием,
а также датой и временем (сообщением).
Окно будет оставаться на экране до тех
пор, пока пользователь не щелкнет на
кнопке ОК.
Имея
подробное описание задачи, можно
определить те элементы, из которых
должна состоять форма, взаимодействующая
с разрабатываемой программой. По условиям
примера программа имеет одно
пользовательское диалоговое окно,
поэтому необходимо создать одну форму
(UserForm). Для формы потребуются два элемента
управления – надпись для сообщения и
кнопка для команды ОК. Нужно будет также
создать программный код для двух
процедур: одной – для надписи, в которую
нужно поместить сообщение, а другой –
для выхода из программы, когда пользователь
щелкнет на кнопке ОК.
2-й
шаг. Реализация проекта
Для выполнения
данного шага выполните следующие
действия.
1. Активизируйте
приложение Word, сохраните документ под
соответствующим именем (Время) и перейдите
в редактор VBA.
2. Щелкните
правой кнопкой мыши в окне проекта по
пункту Project (Время), выберите пункт Insert
+ UserForm(появится
новая форма UserForm с панелью элементов
управления).
3. Расположите
на форме следующие элементы: TextBox,
Button1, Button2, Label1, Label2 (см. рис. 13).
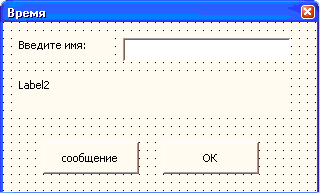
Рис.
13.Форма
для примера 4 в режиме конструктора
Добавление
надписи в форму
Чтобы поместить
надпись в пользовательскую форму,
выполните следующее.
•Убедитесь,
что форма активна, щелкнув по ней. Панель
элементов управления видна только
тогда, когда форма активна.
•Щелкните
на кнопку А(метка)
панели элементов управления.
•Поместите
указатель мыши в форму, где необходимо
расположить сообщение.
•В
окне свойств (Properties–
левая нижняя панель окна) выделите
свойство Captionи
наберите строчку «Введите
имя»,во
второй метке данное свойство должно
быть пустым, чтобы при запуске программы
надпись Label2 была невидима.
4. Измените
заголовок самой формы. Для этого щелкните
на полосе заголовка окна формы. В
изменившемся при этом окне свойств
найдите свойство Captionи
измените его на «Время». Этот новый
заголовок появится в полосе заголовка
формы.
Добавление
программного кода
Для нашей программы
требуется создать две процедуры, и они
связаны с событиями, возникающими в
процессе выполнения программы. Первая
процедура должна при нажатии на кнопку
Сообщениеотобразить
нужное сообщение, а вторая – завершить
выполнение программы, когда кто-нибудь
щелкнет на кнопке ОК.
5. Щелкните
дважды по кнопке OK. В появившемся при
этом окне программного кода появится
заготовка процедуры. Первой строкой
созданного программного кода будет
Private Sub CommandButton2_Click().
В
любой VBA-процедуре первая строка
программного кода определяет тип
процедуры (в данном случае это процедура
типа Sub, т. е. подпрограмма) и имя
процедуры. Private и Sub относятся к ключевым
словам VBA, т. е. к словам и символам,
которые являются частью языка VBA. В
данном случае VBA предлагает для процедуры
имя CommandButton2_Click, которое представляет
собой комбинацию имени кнопки и типа
события.
Последней
строкой автоматически генерируемого
программного кода будет End Sub.
Такой
строкой должны заканчиваться все
процедуры типа Sub. Эта строка сообщает
VBA о том, что выполнение процедуры
завершено.
Для
выполнения первой процедуры (закрытия
формы) необходимо прописать программный
код в этой заготовке:
Unload
Me
Оператор Unload
убирает указанный объект из памяти.
Здесь это объект с именем Me, имеющим в
VBA специальный смысл. В данном случае
оно означает форму и весь ее программный
код.
6. Создайте
обработчик события для кнопки «
Сообщение»,
для чего дважды щелкните по созданной
кнопке и пропишите код:
Dim
ima As String
ima =
TextBox1.Text
Label2.Caption
= ima & «,привет!
Сегодня
» & Format(Now, «dddddd, hh ч. mm мин.»)
Вторая
процедура, которая должна отображать
на экране сообщение, чуть сложнее первой.
Первая из напечатанных строк
Dim
ima As String
создает
переменную с именем ima и определяет ее
как строковую, что означает последовательность
текстовых символов.
Вторая
строка данной переменной присваивает
строковое значение, введенное в элемент
TextBox1 (текстовое окно может «читать»
только текстовое значение). Третья
строка выводит сообщение в расположенную
на форме метку Label2, для чего устанавливает
свойству Caption программно-строковое
значение. Функция Format выдает дату и
время.
3-й
шаг. Тестирование программы
Чтобы запустить
программу из редактора Visual Basic, выполните
следующее.
1. Щелкните
либо в окне формы, либо в окне программного
кода, чтобы соответствующее окно стало
активным.
2. Прокомпилируйте
программу: меню + debug + compile
project.
3. Запустите
программу на выполнение (F5).
После
небольшой задержки окно вашей программы
появится на фоне вашего VBA-приложения
(а не редактора Visual Basic). Если все в
порядке, на фоне приложения (Word или
Excel) появится созданная форма в рабочем
состоянии (рис. 14).
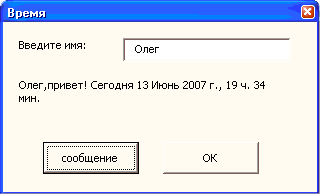
Рис.
14.Форма
примера 4 в рабочем состоянии
•
Это важно!
Если при запуске
разработанной формы появляются сообщения
вида (рис. 15 или рис. 16) о слишком большой
защите приложения от макросов, т. е.
вмешательства извне, необходимо выполнить
следующие действия:
1) закрыть
редактор VBA;
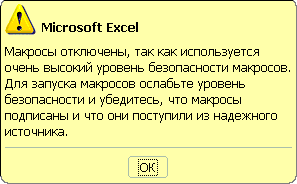
Рис.
15.Предупреждение
1-го вида

Рис.
16.Предупреждение
2-го вида о высокой защите
приложений
2) в
приложении Excel или Word (там, где происходит
работа в текущий момент) выполнить
команду: Сервис + Макрос +
Безопасность;
4) установить
низкую безопасность, так как создаваемая
форма не несет никакой угрозы для
операционной системы вашего компьютера
(рис. 17);
5) закрыть
приложение (Word или Excel) и запустить его
вновь.
Рассмотрим
простейшие примеры работы с циклами.
Пример
5.
Используя
инструкцию case, создать программу, которая
в зависимости от введенного значения
переменной апроизводит
различные вычисления с переменными b и
c. Если значение переменной ане
совпадает с программными, то выдается
сообщение «Введено не то значение».
Все
переменные вводятся в текстовые поля
формы. При нажатии на кнопку «Результат»
происходят выбор действия и вывод
полученного значения в специальную
метку формы.
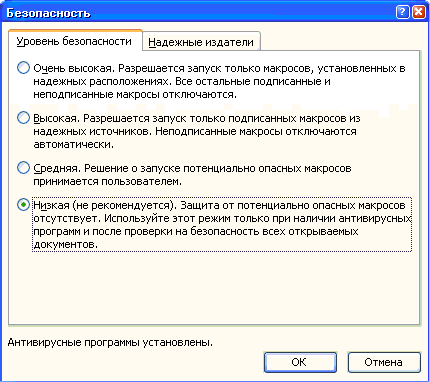
Рис.
17.Включение
режима низкой безопасности
![]()
Страницы:
1,
2,
3,
4,
5,
6,
7,
8,
9,
10,
11
Технология
выполнения
1. Активизируйте
приложение Word, сохраните документ под
именем Case.
2. Перейдите
в редактор VBA и создайте форму (рис.
18).
3. Пропишите
обработчик кнопки «Результат».
Dim
a, b, c, d As Integer
Private
Sub CommandButton1_Click()
a
= Val(TextBox1.Text)
b =
Val(TextBox2.Text)
c =
Val(TextBox3.Text)
Select
Case a
Case 5
d
= b + c
Label4.Caption =
«Результат:
d=» & d
Case 0
d
= – b – c
Label4.Caption
= «Результат:
d=» & d
Case 10
d
= b * c
Label4.Caption =
«Результат:
d=» & d
Case
Else
Label4.Caption =
«Введено
не
то
значение»
End
Select
End Sub

Рис.
18.Форма
примера 5 в режиме конструктора
Для
того чтобы программа работала корректно,
необходимо перевести все текстовые
значения, которые вводятся в текстовые
поля, в числовые. Для этого прописывают
в коде преобразование: a = Val(TextBox1.Text) и
т. д. После чего программа уже работает
с числовыми значениями.
Если
программа в итоге выдает значение одного
типа (числовое или строковое), то строку
вывода результата можно прописывать
по окончании всего блока Case. В данном
примере сначала выводятся числовые
значения (d), а затем строковое («Введено
не то значение»). Поэтому вывод результата
необходимо предусмотреть в каждой ветке
Case.
Результаты
работы показаны на рис. 19.
Пример
6
.
Создать программу, которая, используя
пользовательское диалоговое окно
(форму), выполняет следующие действия:
при вводе трех переменных в текстовые
поля она считывает данные и сравнивает
с первой переменной а. Результат выдается
в метку на форме (рис. 20).

Рис.
19.Некоторые
результаты работы формы примера 5
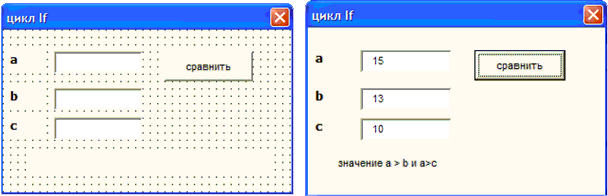
Рис.
20.Форма
примера 6 в режиме конструктора и в
рабочем состоянии
Листинг
примера 6
Private
Sub CommandButton1_Click()
Dim
a, b, c As Integer
a =
Val(TextBox1.Text)
b =
Val(TextBox2.Text)
c =
Val(TextBox3.Text)
If a >
b And a > c Then
Label1.Caption
= «Значение
а
> b и
a >c»
Else
Label1.Caption
= «Значение
а
не
всегда
больше
b и
с»
End If End Sub
Пример
7.
Создать
программу, которая, используя форму,
выполняет следующие действия: при вводе
переменной в текстовое поле она считывает
данное значение а, после чего организует
цикл for с шагом, равным 5, где при каждом
шаге значение переменной b становится
равным значению переменной а плюс шаг
изменения. Итоговое значение с суммирует
полученное значение b и введенное
значение а. Результат выдается в метку
на форме (рис. 21).

Рис.
21.Форма
примера 7 в режиме конструктора и в
рабочем состоянии
Листинг
примера 7
Dim
a As Variant
Dim b As
Integer
Dim c As
Integer
Private Sub
CommandButton1_Click()
a =
Val(TextBox1.Text)
For i = 1
To 12 Step 5
b = a +
i
c = a + b
Next
i
Label1.Caption = a &
«+» & b & «=» & c
End
Sub
Пример
8.
Создать
программу, которая выполняет следующие
действия: организованный цикл for each
присваивает переменной b, объявленной
в программе, последнее значение массива,
также определенного программой. После
этого происходят вычисления, предложенные
в программе:
•в
метку label2 выдается результат увеличения
полученной переменной на значение
первого элемента массива;
•в
метку label3 выдается результат увеличения
полученной суммы на значение второго
элемента массива;
•в
метку label4 выдается результат увеличения
полученной суммы на значение третьего
элемента массива;
•в
метку label6 выдается результат увеличения
полученной суммы на значение последнего
элемента массива.
Результат
выдается для наглядности в различные
метки на форме (рис. 22).

Рис.
22.Форма
примера 8 в режиме конструктора и в
рабочем состоянии
Листинг
примера 8
Dim
b As Variant
Private Sub
CommandButton1_Click()
Dim
d(1 To 4) As Variant
d(1) =
15
d(2) = 0
d(3)
= -10
d(4) = 25
For
Each b In d
b = d(1) +
b
Label2.Caption = «d(1)=»
& d(1) & « b=» & b
b
= d(2) + b
Label3.Caption =
« d(2)=» & d(2) & « b=» & b
b
= d(3) + b
Label4.Caption =
« d(3)=» & d(3) & « b=» & b
b
= d(4) + b
Label6.Caption =
« d(4)=» & d(4) & « b=» & b
Next
b
End Sub
Примечание.Как
говорилось выше, For Each … Next не использует
счетчик цикла. Циклы For Each … Next выполняются
столько раз, сколько имеется элементов
в определенной группе, такой как коллекция
объектов или массив. Другими словами,
цикл For Each … Next выполняется один раз для
каждого элемента в группе. Вследствие
чего данный цикл используется в основном
в специфических действиях, таких как
поиск необходимого листа в коллекции
объектов и т. д., и не используется
при решении простых задач.
Соседние файлы в предмете [НЕСОРТИРОВАННОЕ]
- #
- #
- #
- #
- #
- #
- #
- #
- #
- #
- #