
Excel for Microsoft 365 PowerPoint for Microsoft 365 Publisher for Microsoft 365 Excel 2021 PowerPoint 2021 Publisher 2021 Excel 2019 PowerPoint 2019 Publisher 2019 Excel 2016 PowerPoint 2016 Publisher 2016 Excel 2013 PowerPoint 2013 Publisher 2013 Excel 2010 Outlook 2010 PowerPoint 2010 Publisher 2010 Excel Starter 2010 More…Less
To see general options for working with your Microsoft 365 applications on Windows, click File > Options > General.
The options on this tab vary a bit depending on the Microsoft 365 program and version you’re using.
User Interface options
When using multiple displays: Generally speaking you should leave this set to Optimize for best appearance but if you’re having odd display behavior on your multi-monitor setup, you can try Optimize for compatibility to see if that resolves the problems. For more information see Office support for high definition displays.
Show Mini Toolbar on selection
Select this option to show the Mini toolbar when you select text. The Mini toolbar provides quick access to formatting tools.
(Excel-only)
Show Quick Analysis options on selection When you select a cell or group of cells Excel can show you tools to let you get quick insights about your data. For more information see Analyze your data instantly.
Enable Live Preview
Select this option to preview the effects of formatting changes in the document before you actually apply them. This is what lets you hover over a formatting option on the ribbon and see how the change would appear without actually having to click to apply that change.
ScreenTip style
Select a style to control whether the program displays ScreenTips and feature descriptions with button names.
(Excel Only) When creating new workbooks
The first two settings in this group control the default font, and font size, that will be used when you create a new workbook. The third setting in this group lets you specify the default view, in case you prefer something other than Normal. The fourth setting bears just a bit more explanation:
Include this many sheets: By default new workbooks in Excel start with just 1 sheet. If you know that you’d like your workbooks to start with more sheets than that, adjust this setting.
Personalize your copy of Office
User name
Type a name in the User name box to change your displayed user name.
Initials
Type your initials in the Initials box to change the initials associated with your user name.
Always use these values regardless of sign in to Office
Select this option if you want the program to display this user name and these initials even if you sign in to Microsoft 365 with an account that displays different information. This is handy for shared computers that have multiple users but if you always want the user name and initials properties to be the same.
Office Background
Choose from a list of built-in background patterns. For more information see Add an Office background.
Office Theme
Choose from a list of built-in Office themes to change the color scheme of Office. For more information see Change the Office theme.
LinkedIn Features (Microsoft 365 Subscribers only)
There is just a single option in this section, which lets you enable or disable LinkedIn features such as seeing information about your LinkedIn connections when you hover over their image in Outlook or other similar features. For more information see About LinkedIn information and features in Microsoft apps and services.
Start up options
Choose the extensions you want [application] to open by default: If, for example, you want Excel to be your default program for opening things like CSV files click the Default Programs… button and follow the steps to set Excel as the default program. This is also a good tool if Office files are opening in a program other than the Office program you expect them to for some reason.
Tell me if [Program] isn’t the default program for viewing and editing documents
Select this option if you want to be prompted to set the Microsoft 365 program as your default application for viewing and editing documents when the program detects that it isn’t the default already.
Show the start screen when [Program] starts
Clear this check box if you want to bypass the start screen when you open the program.
See Also
Word options (General)
Outlook options (General)
Need more help?
Want more options?
Explore subscription benefits, browse training courses, learn how to secure your device, and more.
Communities help you ask and answer questions, give feedback, and hear from experts with rich knowledge.
Home / Excel Basics / Excel Options (Mac and Windows)
On Mac, the Excel options are there with the name Excel Preferences, and in Windows, it’s just as options.

In this tutorial, we will look at simple steps to open and use Excel options on Mac and Windows.
Steps to Open Excel Options on Mac
- First, click on “Excel” from the menu bar that you have on the top.

- After that, click on “Preferences…” to open the Excel options.

- From there, click on the category to open the further options inside.

- In the end, once you make your changes (for example, if you want to change the default font), click on the close icon at the top left to save and close it.


Steps to Open Excel Options in Windows
- First, go to the File Tab from the Ribbon.

- From there, click on More, and then click on Options.

- From there, click on the category tab to open the further options inside.

- In the end, once you make your changes (for example, if you want to change the office color theme), click on the OK button from the bottom right of the dialog box.


What is Excel Options?
The Excel options dialogue box is accessed via the file menu. The keyboard shortcut is ALT, F, T. This is where the settings which drive Excel’s behavior are stored. The following visual and screenshots give a useful selection to consider. However, there are many other settings in Excel Options that may be helpful for specific situations.
| Type | Controls | Settings to consider |
| General | Font size, user name, etc. | User choice |
| Formulas | Formula performance | Enable iterative calculation: off |
| Error handling | Enable background error checking: off | |
| Proofing | Text control | Ignore internet and file addresses: off |
| Save | Where, how many, how often | Don’t show the backstage: on |
| Language | Languages used | Set the default languages |
| Advanced | Editing | After pressing enter, move selection: off |
| Editing | Allow editing directly in a cell: off | |
| Editing | Extend data range formats and formulas: off | |
| Editing | Enable AutoComplete for cell values: off | |
| Cut, copy and paste | Show paste options buttons when content is pasted: off | |
| Cut, copy and paste | Show insert options buttons: off | |
| Display | User choice but note gridlines and comment display | |
| Customize ribbon | Add delete tabs and commands | User choice |
| Quick access toolbar | Works with ALT and a number | Commands given shortcut number in order added |
| Add-ins | Increased functionality | User choice |
| Trust center | Security | User choice |
In the formulas section, the user can change the calculation settings to be automatic (most common) or manual (important for large files). Automatic calculation means that Excel will recalculate a formula and all its dependencies each time there is a change. Manual calculations, on the other hand, only recalculate formulas when the user specifically requests a calculation. This can be actioned using the F9 keyboard shortcut.
Iteration Settings
The third option, “Automatic except for data tables”, is appropriate for files with extensive use of data tables.
The iteration settings control how Excel responds to circular references. It is best practice to work with this setting unchecked (turned off). Often when using an existing file, as opposed to building a model, it is necessary to have this setting checked (turned on) to work effectively with the completed model.

In the Advanced tab under the Display Settings, you can select to show gridlines, the formula bar, row and column headers or to make these features invisible.
Comments can be presented in full, shown by an indicator (usually a red triangle in the top right-hand cell corner) or invisible, using settings in this section of the dialogue box.
Turning off some of the default Excel settings, such as the cursor moving down one cell after Enter is pressed and other autocomplete functionalities, allows the user to control Excel’s behavior.
One very useful setting is to stop Excel performing edits within the cell but in the formula bar instead. This is helpful when the file is large and complex since it is much easier to see what is going on when a complex formula is displayed in the formula bar rather than in the cell itself. This is done by having Allow Editing Directly in cells unchecked.
Some of the keyboard shortcuts for sections of the Excel Options dialogue box are not user friendly so clicking is always an option. Pressing TAB advances forward from field to field while SHIFT TAB goes backwards.

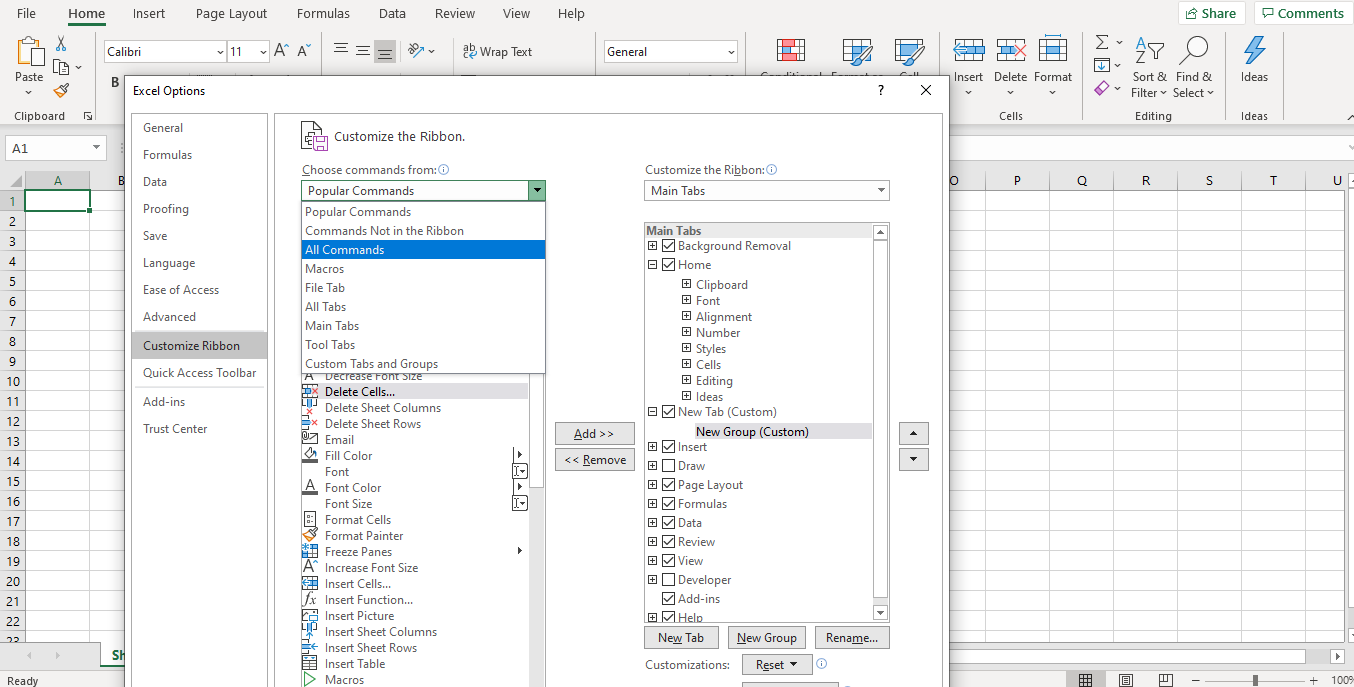
Customizing the Ribbon
Customizing the ribbon allows you to create your own tabs and the commands of those tabs. With the commands, you will always store it in a group. Excel allows you to create as many groups as you want so you can ensure that the tab is organized.
Customizing ribbons also allows you to add commands to default tabs if you create a custom group in the tab. Here are the steps to do that:

- Click on Customize Ribbon
- Make sure you’ve selected New Group
- Click New Tab
- Select a command and press Add
- Once you’ve selected all the commands, press OK

If you don’t see your desired command, click on Choose commands from the drop-down box and select All Commands.
There is no one size that fits all. When it comes to Excel, the default settings work fine in most of the cases. But if need be, you can easily customize many of the Excel Options.
In this blog post, I will show you how to use Excel Options to customize your workbooks and get a better spreadsheet experience.
Accessing Excel Options
To open the Excel Options dialog box:
In Excel 2010/13: Go to File –> Options.
In Excel 2007: Go to Menus –> Tools –> Excel Options.

Don’t be overwhelmed with all the categories and checkboxes in the Excel Options dialog box. You do not need to change everything, and in most cases, default setting works just fine. But here are some of the features that can give you more control on the way your Excel spreadsheets behave.
#1 Change the Default Font Type and Size
By default, Excel uses Calibri (body font) font size 11. If you or your organization is using a different font type and size, you can change the default by following these steps:
- In Excel Options, select General.
- In General options, within ‘When creating new workbooks’ section, change the default font type and font size.

Now when you open a new workbook, it will use the new font setting by default.
#2 Always Save Files in .xls format
If you are sharing your excel workbooks with people who have 2003 version, you need to manually change the format to .xls. Instead of doing this manually every time, you can change the default file format Save setting.
Here are the steps to do this:
- In Excel Options, select Save.
- In Save options, within ‘Save workbooks’ section, change the Save File format to Excel 97-2003 Workbook.

You can also set the default to Excel Macro-Enabled Workbook if you work with macros.
Now whenever you save a workbook, it will get saved in .xls format.
#3 Change Calculation mode from Automatic to Manual
With automatic calculation, a recalculation is triggered whenever there is a change in a cell/value that affects formulas (more so with volatile formulas). With worksheets that are loaded with a lot of data and formulas, this recalculation can waste a lot of time (and most of the time it is unnecessary) and make our workbooks slow.
To save time, you can change the calculation setting to manual. To do this:
- In Excel Options, select Formulas.
- In Formulas options, change calculation options to Manual.

When manual mode is selected, you need to manually force a recalculation by pressing F9 key.
#4 Keep the active cell selected after pressing Enter
By default, if you select a cell and press enter, the selection goes down. In a lot of cases, you may want to keep the same cell selected after hitting Enter.
Here is how you can make this change:
- In Excel Options, select Advanced.
- In Editing Options, uncheck the option ‘After pressing Enter, move selection’.

TIP: You can also achieve the same effect by pressing Control + Enter (instead of Enter).
#5 Automatically Insert Decimal Points during Data Entry
If your work involves a lot of numeric data entry with decimals, this one would be mighty useful.
How it works – If you have to enter numeric values with 2 data points, instead of typing 123.45, you can simply type 12345, and Excel would automatically insert 2 decimal places.
Here is how you can enable this:
- In Excel Options, select Advanced.
- In Editing Options, select ‘Automatically insert a decimal point’ and specify the places.

Caution: Remember, every time you enter a number, it will have 2 decimal places. So if you need 1 as the value, you will have to type 100 (considering there are 2 decimal places).
#6 Show All Comments at Once
When you insert a comment, by default there is a small red triangle that appears at the top left of the cell. While this is a good enough indicator, you are likely to miss comments if you have a lot of data/comments.
One workaround could be to show all the comments at once.
To do this:
- In Excel Options, select Advanced.
- In the Display section, under the ‘For cells with comments, show:’ option, select Comments and Indicators.
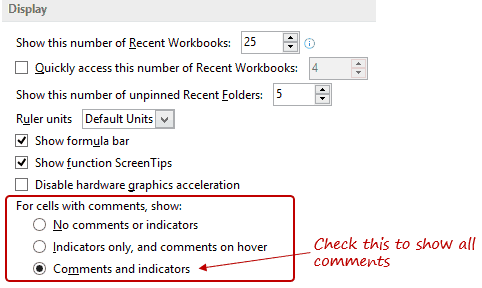
TIP: This would also be helpful if you are editing comments. Just click on the comment and edit it.
#7 Hide All 0’s
You can hide all the 0 values in your spreadsheet with one single click (you heard it right!).
Here is how to do this:
- In Excel Options, select Advanced.
- Scroll down and go to the section – ‘Display Options for this worksheet’.
- Uncheck ‘Show a zero in cells that have zero value’.

#8 Open Selected Workbooks Whenever You Start Excel
If you start your work with the same set of Excel workbooks (for example, to-do lists, project trackers, etc.), there is a way Excel will automatically open these workbooks whenever you start it. Here is how to do this:
- In Excel Options, select Advanced.
- Scroll Down and go to General section.
- In the field. ‘At startup, open all files in:’, enter the path of the folder that has the files that you want to open whenever you start Excel.

Note: You can add more files to the folder and it would automatically open when you open Excel next.
See Also: Excel Data Entry Tips.
#9 Automatically Complete Abbreviations
There is a feature in Excel where you can specify shorthand text and Excel will automatically complete it for you. For example, whenever you type ABC, Excel would automatically replace it with ABC Technology Corporation Limited. Something as shown below:
Here is how you can enable this:
- In Excel Options, select Proofing
- Click on AutoCorrect Options button

- In the AutoCorrect dialog box, type what you want to Replace (in Replace field) with what you want to replace it with (in With field)


- Click Add and then Ok
Now whenever you type ABC and hit enter (or space bar), it will automatically get replaced with ABC Technology Corporation Limited.
Note: this change takes place for all office applications such as word and PowerPoint).
There are tons of other features that can also be customized using Excel Options. If you get some free time, do go through it and you may find some additional options that you can use.
Give these options a try, let me know what you think. #5 and #9 are my favorites. How about you?
You May like the Following Excel Tutorials:
- 100+ Excel Interview Questions + Answers.
- 20 Excel Keyboard Shortcuts that will Impress Your Boss.
- A Collection FREE Excel Templates for Your Daily Use.
- 200+ Excel Keyboard Shortcuts
- Automatically Open Specific Excel Files on Startup
- How to Hide or Show Formula Bar in Excel?
- Using A1 or R1C1 Reference Notation in Excel (& How to Change These)
- How to Customize the Ribbon in Excel (Step-by-Step)
Workspace organization with the help of changing settings and options in Excel.
Custom managing of tools for comfortable work in the program
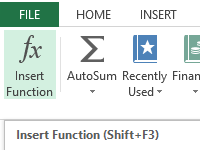
 Quick Access Toolbar in Excel.
Frequently used tools are better placed to get to obese quickly. There are the functions and settings for the Quick Access Toolbar.
 The toolbars on the strip.
There are practical exercises for managing toolbars on the each tab of the strip.
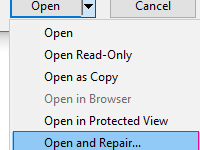 How to repair corrupt or unsaved Excel file.
You can restore corrupted files yourself using MS Office or a computer. This task is solved in various ways: retrieving data, moving the book.
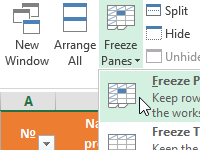 How to fix a row and column in Excel when scrolling.
The tool to anchor the area allows you to lock the table header, column, and several rows and columns at the same time when you scroll horizontally or vertically.