
Время на прочтение
7 мин
Количество просмотров 8.3K
Введение
Представляю вашему вниманию пошаговое руководство по разработке add-in’а для Excel.
Excel-DNA это бесплатная открытая библиотека для создания Excel расширений. Сайт проекта excel-dna.net
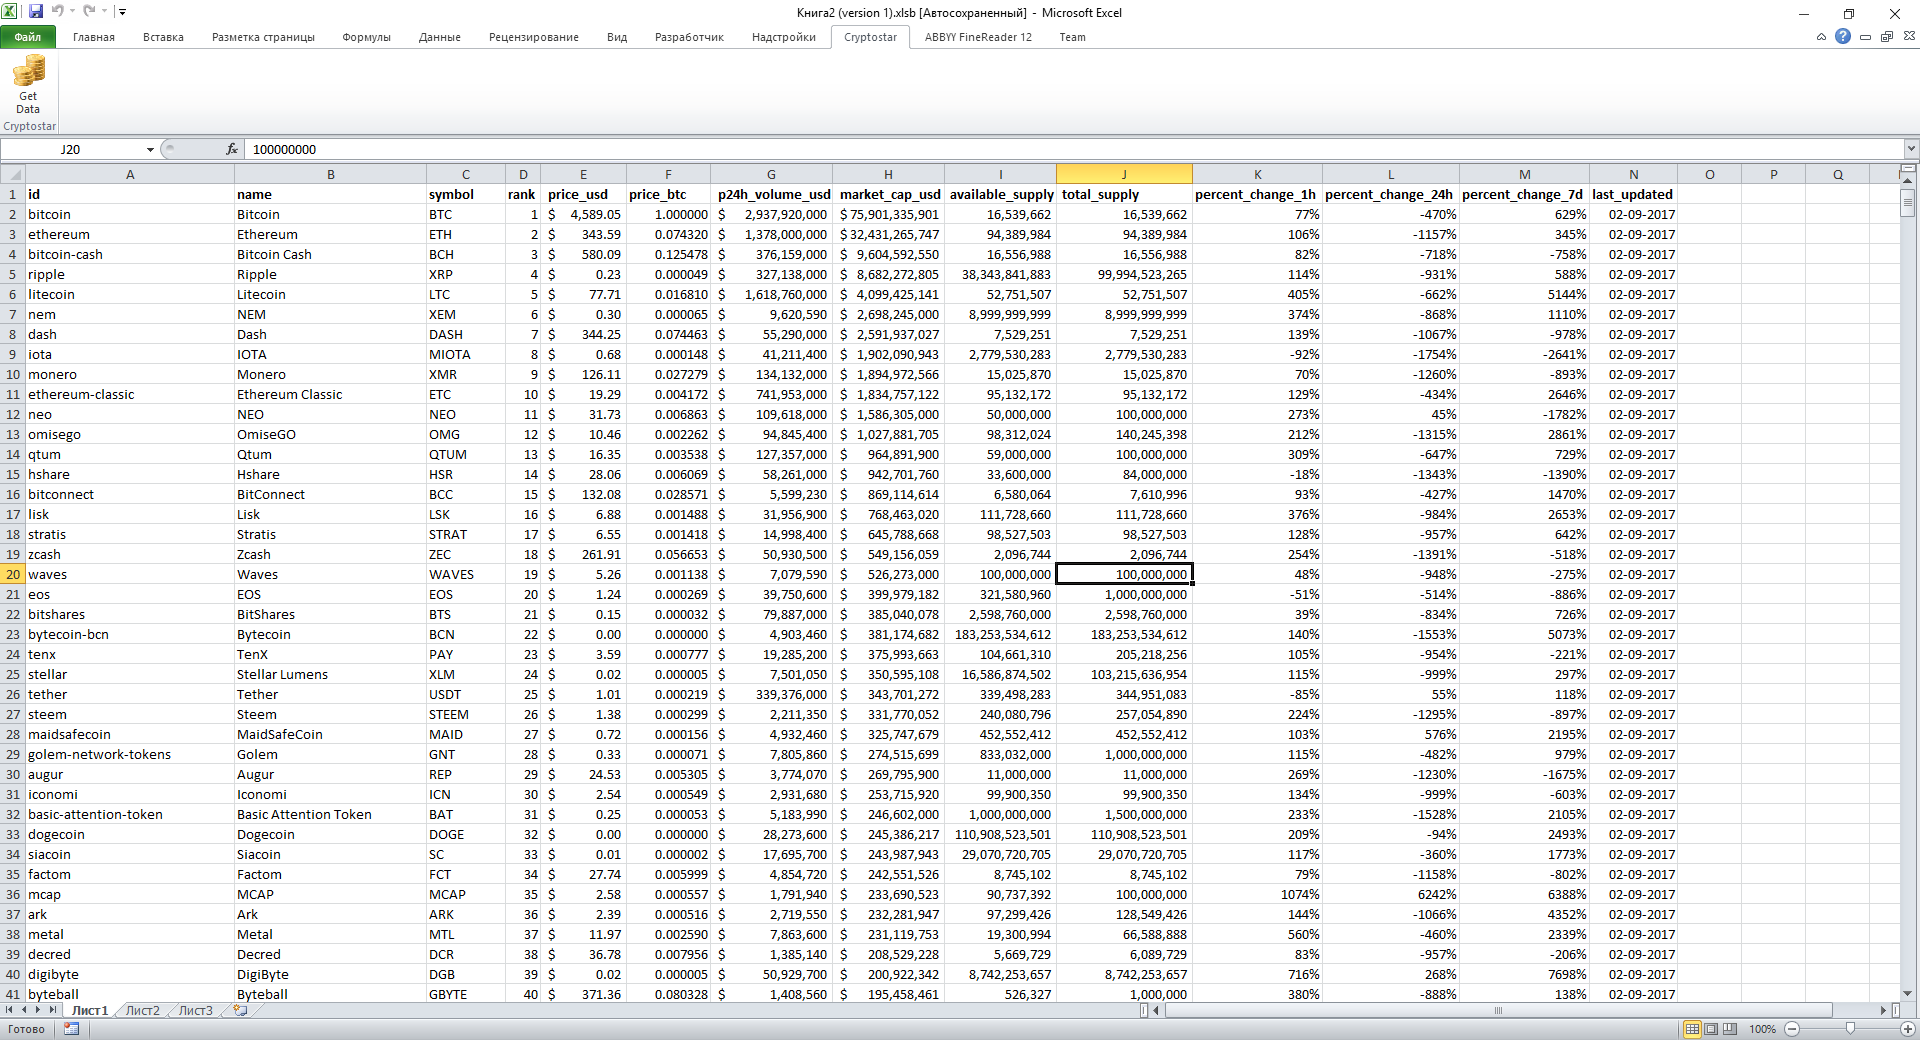
На протяжении данного руководства мы разработаем add-in, который позволяет по нажатию кнопки загружать данные со стороннего сайта в текущую страницу. Итак, начнем.
Разработка add-in’а
Для начала создадим новый проект типа Class Library, назовем его cryptostar. Подключим библиотеку excel-dna:
Install-Package ExcelDna.AddIn

Install-Package ExcelDna.Integration

Install-Package ExcelDna.Interop
Теперь можем приступать к реализации. В качестве источника данных будем использовать API api.coinmarketcap.com/v1/ticker, запрос возвращает массив объектов содержащих информацию о различных цифровых валютах.
[
    {
        "id": "bitcoin",
        "name": "Bitcoin",
        "symbol": "BTC",
        "rank": "1",
        "price_usd": "4512.7",
        "price_btc": "1.0",
        "24h_volume_usd": "2711790000.0",
        "market_cap_usd": "74640450605.0",
        "available_supply": "16540087.0",
        "total_supply": "16540087.0",
        "percent_change_1h": "0.3",
        "percent_change_24h": "-7.03",
        "percent_change_7d": "3.95",
        "last_updated": "1504391067"
    },
    {
        "id": "ethereum",
        "name": "Ethereum",
        "symbol": "ETH",
        "rank": "2",
        "price_usd": "336.689",
        "price_btc": "0.0740905",
        "24h_volume_usd": "1402470000.0",
        "market_cap_usd": "31781255657.0",
        "available_supply": "94393508.0",
        "total_supply": "94393508.0",
        "percent_change_1h": "2.36",
        "percent_change_24h": "-13.01",
        "percent_change_7d": "0.84",
        "last_updated": "1504391070"
    }
]
Первым делом напишем загрузчик данных:
    public class Ticker
    {
        public string id { get; set; }
        public string name { get; set; }
        public string symbol { get; set; }
        public decimal? rank { get; set; }
        public string price_usd { get; set; }
        public decimal? price_btc { get; set; }
        public string market_cap_usd { get; set; }
        public decimal? available_supply { get; set; }
        public decimal? total_supply { get; set; }
        public string percent_change_1h { get; set; }
        public string percent_change_24h { get; set; }
        public string percent_change_7d { get; set; }
        public long last_updated { get; set; }
    }

    public class DataLoader
    {
        public Ticker[] LoadTickers()
        {
            HttpWebRequest request = (HttpWebRequest)WebRequest.Create("https://api.coinmarketcap.com/v1/ticker/");
            request.Method = "GET";
            request.ContentType = "application/json";

            using (var response = request.GetResponse())
            using (var stream = response.GetResponseStream())
            using (var responseReader = new StreamReader(stream))
            {
                string data = responseReader.ReadToEnd();

                using (var sr = new StringReader(data))
                using (var jsonReader = new JsonTextReader(sr))
                {
                    var items = JsonSerializer.CreateDefault()
                            .Deserialize<Ticker[]>(jsonReader);

                    return items;
                }
            }
        }
    }
Пояснять данный код я не буду, так как он довольно простой и к нашей теме отношение имеет довольно опосредованное.
Теперь мы умеем получать данные в виде массива объектов класса Ticker. Пришло время научиться отображать эти данные на текущей странице.
Что бы отобразить данные, нам понадобится экземпляр класса Microsoft.Office.Interop.Excel.Application. Он предоставляет доступ к объектной модели Excel, через него мы сможем получить объект-страницу(worksheet) и записать наши данные в нужные ячейки. Давайте напишем класс для записи данных на страницу.
    public class DataRender
    {
        public void RenderData(Ticker[] tickers)
        {
            // используем dynamic что бы не привязываться к конкретной версии Excel
            dynamic xlApp = ExcelDnaUtil.Application;

            // получаем активную страницу
            var ws = xlApp.ActiveSheet;

	     // если страница не открыта ничего не делаем
            if (ws == null)
                return;

	     // очищаем содержимое страницы
            ws.Cells.Clear();

            // с использованием reflection заполняем страницу данными
            var props = typeof(Ticker).GetProperties();

            for (var j = 0; j < props.Length; j++)
            {
                var prop = props[j];
                var cell = ws.Cells[1, j + 1];
                cell.Value2 = prop.Name;
                cell.Font.Bold = true;
            }

            // предварительно запишем данные в двумерный массив, а затем присвоим этот массив объекту Range. Это позволит значительно ускорить работу плагина по сравнению с вариантом, в котором каждое значение по отдельности устанавливается в отдельную ячейку.
            object[,] data = new object[tickers.Length, props.Length];

            for (var i = 0; i < tickers.Length; i++)
            {
                for (var j = 0; j < props.Length; j++)
                {
                    var val = props[j].GetValue(tickers[i], null);

                    data[i, j] = val;
                }
            }

            var startCell = ws.Cells[2, 1];
            var endCell = ws.Cells[1 + tickers.Length, props.Length];

            var range = ws.Range[startCell, endCell];
            range.Value2 = data;

            var firstCell = ws.Cells[1, 1];
            // выравниваем колонки, чтобы все данные были на виду
            ws.Range[firstCell, endCell].Columns.AutoFit();
        }
    }
При работе с объектной моделью надо помнить о том, что работаем со ссылками на COM объекты. В основном потоке Excel мы можем спокойно использовать эти объекты и не заботиться об освобождении ссылок (Marshal.ReleaseComObject), однако, если мы захотим использовать объектную модель из отдельного потока, у нас есть два варианта:
- Самостоятельно отслеживать все используемые объекты и очищать ссылки на них. Этот подход чреват ошибками и я не рекомендую его использовать.
- ExcelDna предоставляет возможность добавить задание на выполнение в основном потоке, для этого предназначен метод ExcelAsyncUtil.QueueAsMacro, пример использования:
ExcelAsyncUtil.QueueAsMacro(() =>{
        Excel.Application xlApp = (Excel.Application)ExcelDnaUtil.Appplication;
        xlApp.StatusBar="Sending request...";
    });
Таким образом, мы научились отображать данные на странице. Приступим к работе с пользовательским интерфейсом. ExcelDna позволяет вносить изменения в стандартный Ribbon, добавлять в него новые вкладки и кнопки. Создадим собственную вкладку и разместим на ней кнопку. По нажатию на кнопку будет происходить загрузка данных на текущую страницу. Для этого мы должны отнаследоваться от класса ExcelRibbon и переопределить метод GetCustomUI, метод возвращает RibbonXML с описанием интерфейса нашего add-in’а.
    [ComVisible(true)]
    public class RibbonController : ExcelRibbon
    {

        public override string GetCustomUI(string RibbonID)
        {

            return @"
      <customUI xmlns='http://schemas.microsoft.com/office/2006/01/customui' loadImage='LoadImage'>
      <ribbon>
        <tabs>
          <tab id='tab1' label='Cryptostar'>
            <group id='group1' label='Cryptostar'>
              <button id='button1' image='bitcoin' label='Get Data' onAction='OnButtonPressed'/>
            </group >
          </tab>
        </tabs>
      </ribbon>
    </customUI>";
        }
        public void OnButtonPressed(IRibbonControl control)
        {
            try
            {
                var dataLoader = new DataLoader();

                var tickers = dataLoader.LoadTickers();


                var dataRender = new DataRender();

                dataRender.RenderData(xlApp, tickers);
            }
            catch(Exception e)
            {
                MessageBox.Show(e.ToString());
            }
        }
}
Мы объявили кнопку, располагающуюся на закладке и группе с названием cryptostar. У кнопки задан обработчик onAction=’OnButtonPressed’, при нажатии на кнопку будет вызван метод OnButtonPressed в классе RibbonController.
Помимо обработчика мы указали изображение для кнопки: image=’bitcoin’. Имя изображения задается в конфигурационном файле — Cryptostar-AddIn.dna. Данный файл автоматически добавляется в проект при подключении nuget’a. Пример:
<Image Name="bitcoin" Path="bitcoin.png" Pack="true" />Сборка и Отладка
Наш плагин готов, давайте попробуем его собрать. Нажимаем F5. После чего получаем набор файлов *.xll:
Cryptostar-AddIn64-packed.xll, Cryptostar-AddIn-packed.xll, Cryptostar-AddIn.xll, Cryptostar-AddIn64.xll
Видим, что полученные файлы отличаются как по разрядности, так и по наличию слова packed. С разрядностью все понятно, выбирать нужно тот, который совпадает по разрядности с Excel. А чем же отличаются packed и не packed add-in’ы? ExcelDNA позволяет упаковывать зависимости плагина в .xll файл. Зависимостями могут являться любые файлы, используемые в проекте, например внешние библиотеки или картинки. Зависимости задаются в конфигурационном файле, выглядит это так:
<DnaLibrary Name="Cryptostar Add-In" RuntimeVersion="v4.0">
  <ExternalLibrary Path="Cryptostar.dll" ExplicitExports="false" LoadFromBytes="true" Pack="true" />
  <Reference Path="Newtonsoft.Json.dll" ExplicitExports="false" LoadFromBytes="true" Pack="true" />
  <Image Name="bitcoin" Path="bitcoin.png" Pack="true" />
</DnaLibrary>
Обратите внимание на атрибут Pack=”true”, он указывает, что данный файл должен быть упакован.
Если мы используем неупакованный add-in, то в одной директории с ним должны находиться и все его зависимости.
Теперь выбираем подходящий .xll файл и запускаем его. Если вы все сделали правильно, то после открытия Excel увидите новую вкладку Cryptostart и кнопку Get Data, а по нажатию на нее страница наполнится данными по валютам:
К сожалению, программы редко работают с первого раза, поэтому нам может потребоваться отладчик. Настроить отладку ExcelDna add-in’а просто. Для этого в свойствах проекта на закладке Debug выбираем Start External Program и прописываем путь к Excel.exe, в моем случае это G:Program FilesMicrosoft OfficeOffice14Excel.exe. В start options пишем название упакованного файла add-in’a с учетом разрядности Excel. Например, Cryptostar-AddIn64-packed.xll. Все, теперь мы можем нажать F5 и полноценно отлаживать add-in.
Делаем установщик
Итак, add-in сделан, отлажен, протестирован и готов к работе. Вопрос в том, в каком виде его распространять. Один из вариантов доверить установку add-in’a пользователю. Делается это через интерфейс Excel, на закладке developer tab->Add-ins->Browse указываем путь к .xll файлу. Данный способ будет работать, только если .xll файл подписан сертификатом и сертификат присутствует в trusted root certification authorities store. Как создать сертификат и подписать им файл хорошо описано здесь.
Альтернативный способ – написать свою программу для установки add-in’a, которая бы прописывала необходимые ключи в реестре и таким образом регистрировала наш add-in. Задача эта не из легких, т.к. необходимо учитывать различные версии Excel у которых пути и ключи в реестре различаются. Но к счастью эта задача уже решена и существует шаблон проекта — инсталлятора, выполняющего необходимые действия. Шаблон можно взять здесь.
Заключение
В результате мы познакомились с библиотекой Excel-DNA и прошли полный путь от разработки add-in’a до его отладки и создания установщика.
Исходный код проекта доступен по ссылке.
Содержание
- Excel-DNA
- Use .NET
- Make User-Defined Functions
- Create Custom Ribbon Add-ins
- Getting Started
- Create a Project in Visual Studio
- Write the Addin Code
- Compile and Run
- Debug
- Distribution
- Getting Help
- Supporting Excel-DNA
- Sponsorship
- Corporate Support Agreements
- Testimonials
- What is excel dna
- What is Excel-DNA?
- Aren’t there other ways to create Excel add-ins with .NET? Why should I use Excel-DNA?
- Shouldn’t I just stick to the official Microsoft tools for making Excel add-ins, rather than relying on a third-party tool?
- What about VBA? Can Excel-DNA help me use my VBA skills and still move to .NET?
- Разработка Microsoft Excel add-in’а с использованием библиотеки Excel-DNA
- Введение
- Разработка add-in’а
- Сборка и Отладка
- Делаем установщик
- Заключение
Excel-DNA
Free and easy .NET for Excel
Excel-DNA is an independent project that integrates .NET into Microsoft Excel to extend its native capabilities. Using C#, Visual Basic.NET or F#, it is possible to create a standalone add-in file (.xll) with high-performance user-defined functions (UDFs), custom ribbon interfaces, and much more!

Use .NET
Excel-DNA is a library that enables creation of Excel add-ins with .NET. Add-ins can be written in VB.NET, C# or F# (or a combination of these), using the Visual Studio IDE or a just a text editor.
Make User-Defined Functions
With Excel-DNA it is possible to create new worksheet functions that integrate with Excel’s calculation model.
Create Custom Ribbon Add-ins
Excel-DNA add-ins can also extend the Excel user interface with ribbon enhancements and custom task panes.
Getting Started
The easiest way to make an Excel-DNA addin is to create to follow these simple steps:
Create a Project in Visual Studio
- Select Create a new project and then select Class Library in either Visual Basic, C# or F#.
- Enter a name for the project.
- Under Framework, select the .NET 6.0 (Long-term support) option.
Write the Addin Code
- Depending on the language of choice, in the .csproj, .vbproj, or .fsproj file, change the value between the TargetFramework tags to net6.0-windows.
- Add the following under
:
Depending on the language of choice (C#, Visual Basic.NET or F#), add the following code to the class file (.cs, .vb or .fs):
Compile and Run
- To compile the solution, ensure to explicitly select Build Solution, under the Build menu item at the top menu bar. Alternatively, press the Ctrl+Shift+B key combination.
- To run the code after compilation, select Start Debugging, under the Debug menu item at the top menu bar. Alternatively, press F5.
- When the solution is running, Excel will open and a security notice will pop-up. Select the Enable this add-in for this session only. option.
- In Excel, open a new workbook and use the newly created function:
Debug
It is possible to debug the solution through Visual Studio. To do so, follow these simple steps while the solution is running:
- In Visual Studio, navigate to the line of code that is required debugging.
- Create a breakpoint by selecting Toggle Breakpoint, under the Debug menu item at the top menu bar. Alternatively, press F9. The line of code would be highlighted in red.
- In Excel, use the function that is needed to be debugged. The execution of the function will be caught by Visual Studio at the breakpoint. The line of code would be highlighted in yellow.
- In Visual Studio, inspect the code and change it as required. Once done, select Continue, under the Debug menu item at the top bar. Alternatively, press F5.
- Finally, see the new results reflect in Excel upon completion of execution of the debugged function.
Distribution
In order to use the newly created add-in, users would require the .NET 6 runtime to be installed. Additionally, the correct architecutre (32bit or 64bit) of the installation should be taken into consideration.
Getting Help
For further help with Excel-DNA or to report an issue with the library, please feel free to contact us via our Excel-DNA Google Group, which is our primary support channel. Within the Google Group, it is possible to find detailed, responsive help to queries and a searchable archive with over 5000 messages.
Excel-DNA was made freely available because of our enthusiasm for Excel and the .NET Framework. We are looking forward to help you get started, knowing that the initial steps could be daunting to some. All Excel-DNA questions are welcome!
Supporting Excel-DNA
Encouragement of future development of Excel-DNA, and access to direct support can be achieved through:
- Sponsoring the project via GitHub Sponsors, or
- entering into a Corporate Support Agreement.
Sponsoring the Excel-DNA project is greatly appreciated and a monthly or once-off payment can be made through GitHub at: https://github.com/sponsors/Excel-DNA
Corporate Support Agreements
Corporate users who are using the Excel-DNA library as part of their critical infrastructure, may want to enter a more formal and direct Corporate Support Agreement. For an annual subscription fee this will ensure:
- Continuity of the Excel-DNA project, with ongoing development and maintenance, adapting to new versions of Excel and .NET.
- Access to direct assistance and support in using the library.
- Priority for bug-fixes and feature requests.
For more details, please contact us by email: govert@dnakode.com
Testimonials
Jane Street uses Excel-DNA.
«We migrated to Excel-DNA, which has simplified greatly our Excel interfacing. It is a superb product, superior to others we have used previously, and Govert is incredibly responsive and helpful in maintaining and improving it.» — Alberto Cherubini, EQ Finance
«Excel-DNA is in use in our major locations around the world and in many mission critical scenarios. Usage covers the full gamut of features from simple UDF add-ins to managing real-time trading flow, interacting with order management systems. The open source Excel-DNA project is incredibly useful to us. Thanks very much to Govert and contributors.» — Paul Gresham, Hong Kong.
«I have never programmed with Excel and Excel-DNA allowed me build Calcbench’s Excel Add-In in two weeks.» — Andrew Kittredge, Calcbench
«Excel-DNA is incredibly versatile and stable framework for building Excel add-ins and user-defined functions. With such a pivotal element in our project, we were very concerned about committing to Excel-DNA that was developed by an enthusiast. However, we quickly learned that Govert has created an outstanding open source project; that he is keen on helping with any challenging questions and that the community is active enough to sustain a healthy evolution of Excel-DNA.» — Ilya Vadeiko, FinDynamics
«Excel-DNA is the open source project that quietly delivers a robust and simple to use extensibility framework for Microsoft Excel. When we felt we had outgrown VBA, no longer wanted the complexity of C++ and were thoroughly fed up with VSTO, Excel-DNA seemed a great choice and we haven’t been let down.
In Excel-DNA, combined with his incredible understanding of Excel integration, the .Net framework and passion for wanting to help others, Govert continues to deliver a project that makes Excel-DNA a ‘no brainer’ choice.
Thank you to Govert and to everyone involved in Excel-DNA — well done.» — Simon Miles, Solution 7
Источник
What is excel dna
Welcome to the Excel-DNA wiki!
The wiki in this project will be used to document the internal implementation of the Excel-DNA core library (the native code .xll, ExcelDna.Loader and ExcelDna.Integration). Documentation for those using Excel-DNA to build add-in should go into the https://github.com/Excel-DNA/Excel-DNA.github.io repository.
What is Excel-DNA?
Excel-DNA is a library to help you make Excel add-ins with .NET. Your add-in can be written in VB.NET, C# or F# (or a combination of these), using the Visual Studio IDE or a just a text editor.
Aren’t there other ways to create Excel add-ins with .NET? Why should I use Excel-DNA?
There are a few different ways of making Excel add-ins with .NET, but Excel-DNA has unique advantages. First, let me explain the different kind of Excel add-ins.
Now let’s put together a list of the different ways to make an Excel add-in with .NET:
- VSTO
- COM add-in
- C API
- Other libraries — NetOffice, Add-In Express, FCell.
Finally, where does Excel-DNA fit in? Excel-DNA brings together all three parts we need to make a great Excel add-in with .NET — the native Excel C API, the COM object model and the .NET runtime.
Shouldn’t I just stick to the official Microsoft tools for making Excel add-ins, rather than relying on a third-party tool?
Using only the Microsoft tools, it has been hard to make powerful and full-featured Excel add-ins with .NET, that work in different Excel versions, and are easy to deploy. Some of the problems are:
- Microsoft has no official support for using the native Excel C API in .NET add-ins
- VSTO has no support for making user-defined worksheet functions
- Automation add-ins can provide UDF, but have poor performance, and allow limited customization
- VSTO and regular COM-based add-ins require administrative rights to install
What if I want to make an Excel add-in with Python, C or C++?
Excel-DNA is used for making Excel add-ins with .NET. There are similar libraries that integrate with the native Excel C API, for making add-ins with other languages.
What about VBA? Can Excel-DNA help me use my VBA skills and still move to .NET?
VB.NET is the newest member of the Visual Basic family. While sometimes overshadowed in popularity by C#, VB.NET is as powerful as C# (sometimes more!), can access all the same .NET libraries, and is fully supported for making Excel-DNA add-ins. While VB.NET gives a familiar syntax if you’re coming from VBA, there are still a few changes that you need to get used to. But rest assured that VB.NET gives you access to the full power of .NET and Excel-DNA.
Excel-DNA add-ins can also integrate with VBA code by creating your own COM libraries that can be called from VBA. One advantage in putting these libraries inside an Excel-DNA add-in is that they can be deployed without requiring registration with administrator privileges.
Источник
Разработка Microsoft Excel add-in’а с использованием библиотеки Excel-DNA
Введение
Представляю вашему вниманию пошаговое руководство по разработке add-in’а для Excel.
Excel-DNA это бесплатная открытая библиотека для создания Excel расширений. Сайт проекта excel-dna.net
На протяжении данного руководства мы разработаем add-in, который позволяет по нажатию кнопки загружать данные со стороннего сайта в текущую страницу. Итак, начнем.
Разработка add-in’а
Для начала создадим новый проект типа Class Library, назовем его cryptostar. Подключим библиотеку excel-dna:
Install-Package ExcelDna.AddIn
Install-Package ExcelDna.Integration
Install-Package ExcelDna.Interop
Теперь можем приступать к реализации. В качестве источника данных будем использовать API api.coinmarketcap.com/v1/ticker, запрос возвращает массив объектов содержащих информацию о различных цифровых валютах.
Первым делом напишем загрузчик данных:
Пояснять данный код я не буду, так как он довольно простой и к нашей теме отношение имеет довольно опосредованное.
Теперь мы умеем получать данные в виде массива объектов класса Ticker. Пришло время научиться отображать эти данные на текущей странице.
Что бы отобразить данные, нам понадобится экземпляр класса Microsoft.Office.Interop.Excel.Application. Он предоставляет доступ к объектной модели Excel, через него мы сможем получить объект-страницу(worksheet) и записать наши данные в нужные ячейки. Давайте напишем класс для записи данных на страницу.
При работе с объектной моделью надо помнить о том, что работаем со ссылками на COM объекты. В основном потоке Excel мы можем спокойно использовать эти объекты и не заботиться об освобождении ссылок (Marshal.ReleaseComObject), однако, если мы захотим использовать объектную модель из отдельного потока, у нас есть два варианта:
- Самостоятельно отслеживать все используемые объекты и очищать ссылки на них. Этот подход чреват ошибками и я не рекомендую его использовать.
- ExcelDna предоставляет возможность добавить задание на выполнение в основном потоке, для этого предназначен метод ExcelAsyncUtil.QueueAsMacro, пример использования:
Таким образом, мы научились отображать данные на странице. Приступим к работе с пользовательским интерфейсом. ExcelDna позволяет вносить изменения в стандартный Ribbon, добавлять в него новые вкладки и кнопки. Создадим собственную вкладку и разместим на ней кнопку. По нажатию на кнопку будет происходить загрузка данных на текущую страницу. Для этого мы должны отнаследоваться от класса ExcelRibbon и переопределить метод GetCustomUI, метод возвращает RibbonXML с описанием интерфейса нашего add-in’а.
Мы объявили кнопку, располагающуюся на закладке и группе с названием cryptostar. У кнопки задан обработчик onAction=’OnButtonPressed’, при нажатии на кнопку будет вызван метод OnButtonPressed в классе RibbonController.
Помимо обработчика мы указали изображение для кнопки: image=’bitcoin’. Имя изображения задается в конфигурационном файле — Cryptostar-AddIn.dna. Данный файл автоматически добавляется в проект при подключении nuget’a. Пример:
Сборка и Отладка
Наш плагин готов, давайте попробуем его собрать. Нажимаем F5. После чего получаем набор файлов *.xll:
Cryptostar-AddIn64-packed.xll, Cryptostar-AddIn-packed.xll, Cryptostar-AddIn.xll, Cryptostar-AddIn64.xll
Видим, что полученные файлы отличаются как по разрядности, так и по наличию слова packed. С разрядностью все понятно, выбирать нужно тот, который совпадает по разрядности с Excel. А чем же отличаются packed и не packed add-in’ы? ExcelDNA позволяет упаковывать зависимости плагина в .xll файл. Зависимостями могут являться любые файлы, используемые в проекте, например внешние библиотеки или картинки. Зависимости задаются в конфигурационном файле, выглядит это так:
Обратите внимание на атрибут Pack=”true”, он указывает, что данный файл должен быть упакован.
Если мы используем неупакованный add-in, то в одной директории с ним должны находиться и все его зависимости.
Теперь выбираем подходящий .xll файл и запускаем его. Если вы все сделали правильно, то после открытия Excel увидите новую вкладку Cryptostart и кнопку Get Data, а по нажатию на нее страница наполнится данными по валютам:
К сожалению, программы редко работают с первого раза, поэтому нам может потребоваться отладчик. Настроить отладку ExcelDna add-in’а просто. Для этого в свойствах проекта на закладке Debug выбираем Start External Program и прописываем путь к Excel.exe, в моем случае это G:Program FilesMicrosoft OfficeOffice14Excel.exe. В start options пишем название упакованного файла add-in’a с учетом разрядности Excel. Например, Cryptostar-AddIn64-packed.xll. Все, теперь мы можем нажать F5 и полноценно отлаживать add-in.
Делаем установщик
Итак, add-in сделан, отлажен, протестирован и готов к работе. Вопрос в том, в каком виде его распространять. Один из вариантов доверить установку add-in’a пользователю. Делается это через интерфейс Excel, на закладке developer tab->Add-ins->Browse указываем путь к .xll файлу. Данный способ будет работать, только если .xll файл подписан сертификатом и сертификат присутствует в trusted root certification authorities store. Как создать сертификат и подписать им файл хорошо описано здесь.
Альтернативный способ – написать свою программу для установки add-in’a, которая бы прописывала необходимые ключи в реестре и таким образом регистрировала наш add-in. Задача эта не из легких, т.к. необходимо учитывать различные версии Excel у которых пути и ключи в реестре различаются. Но к счастью эта задача уже решена и существует шаблон проекта — инсталлятора, выполняющего необходимые действия. Шаблон можно взять здесь.
Заключение
В результате мы познакомились с библиотекой Excel-DNA и прошли полный путь от разработки add-in’a до его отладки и создания установщика.
Источник
| layout | title |
|---|---|
|
page |
Using the Excel COM Automation Interfaces |
Summary
To use the Excel COM object model from your macro or ribbon handler, you need to get hold of the right Application object. Use the ExcelDnaUtil.Application call for this. If you assign this to a dynamic variable (C# 4 only), or an ‘Object’ variable in VB.NET, then everything is straight-forward (but you have no IntelliSense help).
Otherwise you would reference an interop assembly that defines the COM types to your .NET project. You still get the right Application object from ExcelDnaUtil.Application, but now cast this to the type Microsoft.Office.Interop.Excel.Application and use it from there.
There are different options for the interop assembly:
-
Use the version-specific official Primary Interop Assembly:
- Excel 2010 PIA
-
Install the «Excel-DNA.Interop» NuGet package, which gives you the Excel 2010 PIA assemblies.
-
Use the version-independent NetOffice libraries.
If you use the Embed Interop Types=True support in .NET 4 (the default when referencing a PIA under .NET 4), you need not ship any assembly with your add-in.
More info about Office versions and Interop Assemblies
Just like VBA code, as long as you stick to the parts of the COM object model that are common across versions, nothing in the COM interop part will be version-specific. This means if you you the Excel 2010 interop assemblies, but use only parts of the COM object model that are also there under Excel 2007, your add-in will work fine under Excel 2007 too. In that sense, the COM stuff is all version-independent. It’s exactly the same as with VBA.
If you make a VBA add-in under Excel 2010, it will work under Excel 2003 too, as long as the parts of the object model you use are supported in both versions. In exactly the same way an Excel-DNA add-in that includes the NuGet ExcelDna.Interop package (which gives you the Excel 2010 interop assemblies) will work fine under Excel 2003. You can reference (and even distribute with your add-in) the interop assembly for Excel 2010, and it will work fine under Excel 2003, for those parts of the object model that are common.
The only problem you have regarding versions (both in VBA and making an Excel-DNA add-in), it that you can’t see in the IntelliSense which parts of the COM object model are supported in which versions. So like in VBA, you might mistakenly use a method or property that does not exist in the hosting Excel version, and that will cause a runtime error. If this is a concern to you, then you can use the NetOffice interop assemblies. They are version-independent, in the sense that they contain the union of all properties and methods from all Excel versions. In addition NetOffice gives you IntelliSense info that indicates under which Excel versions a particular method or property is supported. That’s great, but the downside is that you have to distribute the NetOffice assemblies too, and can’t just «Embed Interop Types» like with the Primary Interop Assemblies.
COM reference management
In an Excel-DNA add-in, all access to the Excel COM object model should be from the main Excel thread. (A call to ExcelAsyncUtil.QueueAsMacro will allow you to initiate code running in a safe context on the main thread, from any other thread or context.)
When used only from the main thread, no special care is needed to manage the Excel COM object lifetimes. Your Excel-DNA add-in should have no calls to Marshal.ReleaseComObject or Marshal.FinalReleaseComObject. You also need not follow any rules related to the ‘two-dot’ access to COM objects. Code inside an Excel-DNA, running on the main thread, can safely access and use the Excel COM object model exactly like VBA code, with no additional concerns for reference counting.
Marshal.ReleaseComObject considered dangerous: https://devblogs.microsoft.com/visualstudio/marshal-releasecomobject-considered-dangerous/
Lifetimes of local variables under Debug vs. Release: http://www.bryancook.net/2008/05/net-garbage-collection-behavior-for.html
Samples
Using the .NET 4 ‘dynamic’ type in C#:
[ExcelCommand(MenuName="Test", MenuText="Range Set")]
public static void RangeSet()
{
    dynamic xlApp = ExcelDnaUtil.Application;

    xlApp.Range["F1"].Value = "Testing 1... 2... 3... 4";
}
- Download ACQ.zip — 3.2 MB
Introduction
Microsoft Excel has a lot of useful functionality and is widely used for data analysis. However it does not offer any built-in functions for data interpolation. This article describes how to implement interpolation routines using C# and use Excel-DNA to call them from Excel.
Background
Interpolation means estimating a value of the function based on its tabulated values. There are many different interpolation methods suitable for particular modeling needs. The purpose of the article is to show how interpolation routines can be implemented in C# and exposed to Excel with a help of Excel-DNA library. Peculiarities of the different interpolation methods are not discussed. The code examples below focus on 1D linear interpolation, but C# code and corresponding add-in support 1D interpolation, 2D interpolation on regular rectangular grid and scattered data in arbitrary number of dimensions.
Using the code
Developing functions for Excel is not easy. There are several wrapper libraries that greatly simplify interaction with Excel. For example Excel-DNA library allows to write Excel functions in C# with almost no boilerplate code https://exceldna.codeplex.com/.
Here is example of C# function exported by Excel-DNA to Excel. The function computes a sum of two numbers. Adding ExcelFunction attribute to the static public method instructs Excel-DNA to export it to Excel.
using ExcelDna.Integration;

public static class Examples
{
    [ExcelFunction(Description = "adds two numbers")]
    public static double acq_sum(double a, double b)
    {
        return a + b;
    }
}
Assume that we have implementation of linear interpolation in the the class ACQ.Math.Interpolation.LinearInterpolation, which can be used as shown in the code below.
double[] x = new double[] { 0, 1 };
double[] y = new double[] { 0, 1 };

ACQ.Math.Interpolation.InterpolationInterface interpolator = new ACQ.Math.Interpolation.LinearInterpolation(x, y);

double xi = 0.5;
double yi = interpolator.Eval(xi);
Using this class, linear interpolation in Excel can be implemented with just a few lines of code.
using ExcelDna.Integration;

public static class Examples
{
    [ExcelFunction(Description = "Linear Interpolation", IsThreadSafe = true)]
    public static object acq_linear_interpolation(double xi, double[] x, double[] y, object bounds)
    {
        if (ExcelDnaUtil.IsInFunctionWizard())
            return ExcelError.ExcelErrorRef;
        else
        {
            ACQ.Math.Interpolation.InterpolationInterface interpolator = null;
            try
            {

                interpolator = new ACQ.Math.Interpolation.LinearInterpolation(x, y);
                interpolator.Bounds = ExcelHelper.CheckValue(bounds, true);
             }
             catch (Exception ex)
             {

             }

             if (interpolator != null)
                 return ExcelHelper.CheckNan(interpolator.Eval(xi));
              else
                 return ExcelError.ExcelErrorNA;
            }
        }
    }
}
Here we used Excel-DNA function to check if function is being called from Excel Wizard ( ExcelDnaUtil.IsInFunctionWizard() ).
Interpolation constructor checks that all of the following conditions are satisfied and throws an exception otherwise.
- Array of nodes (x) should have the same size as array of function values (y)
- Array of nodes (x) should be sorted (from small to large values)
- Array of nodes (x) should not have repeated values (i.e. all nodes should be different, x[i] != x[i+1])
Interplator Eval method does not throw exceptions but returns a NaN value to indicate that something is wrong. Excel does not support NaN or Infinity, therefore we return ExcelError.ExcelErrorNA value in case when interpolation results in error. ExcelError.ExcelErrorNA will appear in Excel as #N/A.
static class ExcelHelper
{
    internal static object CheckNan(double value)
    {
        object result;
        if (Double.IsNaN(value) || Double.IsInfinity(value))
        {
            result = ExcelError.ExcelErrorNA;
        }
        else
        {
            result = value;
        }
        return result;
    }
    internal static T CheckValue<T>(object value, T defaultValue) where T : struct
    {
        T result = value is T ? (T)value : defaultValue;

        return result;
    }
}
Interpolator Eval function returns NaN when specified point xi is located outside tabulated function values (i.e. x> x[n-1] or xi < x[0]) and bounds is false. When bounds is true and xi is outside interpolation range, interpolator return y[0] when xi < x[0] and y[n-1] when xi > x[n-1]. Bounds argument is optional therefore is as declared as object instead of boolean. When bounds argument is not specified in Excel, Excel-DNA will pass the following value ExcelDna.Integration.ExcelMissing, and bounds will be set to default value of true using CheckValue function.
If linear interpolation is all you need then you are done. Unfortunately interpolator is constructed every time this function is called. Constructing linear interpolator is cheap, since it only checks validity of the input. However other interpolation algorithms require a lot more work and therefore it is not efficient to call constructor for each interpolation point. For example natural cubic spline is constructed by solving tridiagonal system of equations. Is it possible to call constructor once, store the interpolator object somewhere and then use it to compute interpolated values? The solution presented below does exactly that.
As far as I know Excel does not offer any built-in way to store temporary objects. Therefore we need to develop out own object cache where we can store objects.
The class shown below based on various ideas from Excel-DNA discussion boards that revolve around use of ExcelAsyncUtil.Observe to manage object lifetime. To the best of my knowledge it was first suggested by Govert van Drimmelen (creator of Excel-DNA). Observe function allows to link the object to the input, so when input changes new object is automatically constructed and old object is deleted. This works seamlessly with Excel automatic calculation.
The HandleStorage class stores object handles in the dictionary and provides method for creating handles: CreateHandle, retrieving objects TryGetObject and calling methods of stored objects TryReadObject. Notice the use of reader-writer lock to synchronize the access to the underlying dictionary of handles.
class HandleStorage
    {
        private ReaderWriterLockSlim m_lock = new ReaderWriterLockSlim();
        private Dictionary<string, Handle> m_storage = new Dictionary<string, Handle>();
        internal object CreateHandle(string objectType, object[] parameters, Func<string, object[], object> maker)
        {
            return ExcelAsyncUtil.Observe(objectType, parameters, () =>
            {
                var value = maker(objectType, parameters);
                var handle = new Handle(this, objectType, value);
                m_lock.EnterWriteLock();
                try
                {
                    m_storage.Add(handle.Name, handle);
                }
                finally
                {
                    m_lock.ExitWriteLock();
                }
                return handle;
            });
        }
        internal bool TryGetObject<T>(string name, out T value) where T : class
        {
            bool found = false;
            value = default(T);
            m_lock.EnterReadLock();
            try
            {
                Handle handle;
                if (m_storage.TryGetValue(name, out handle))
                {
                    if (handle.Value is T)
                    {
                        value = handle.Value as T;
                        found = true;
                    }
                }
            }
            finally
            {
                m_lock.ExitReadLock();
            }
            return found;
        }
        internal Tuple<bool, TResult> TryReadObject<T, TResult, TArg>(string name, Func<T, TArg, TResult> reader, TArg argument) where T : class
        {
            bool valid = false;
            TResult result = default(TResult);
            T obj = default(T);
            m_lock.EnterReadLock();
            try
            {
                Handle handle;
                if (m_storage.TryGetValue(name, out handle))
                {
                    if (handle.Value is T)
                    {
                        obj = handle.Value as T;
                        if (obj != null)
                        {
                            result = reader(obj, argument);
                            valid = true;
                        }
                    }
                }
            }
            finally
            {
                m_lock.ExitReadLock();
            }
            return new Tuple<bool, TResult>(valid, result);
        }
        internal void Remove(Handle handle)
        {
            object value;
            if (TryGetObject(handle.Name, out value))
            {
                m_lock.EnterWriteLock();
                try
                {
                    m_storage.Remove(handle.Name);
                }
                finally
                {
                    m_lock.ExitWriteLock();
                }
                var disp = value as IDisposable;
                if (disp != null)
                {
                    disp.Dispose();
                }
            }
        }
    }
Since we only need one object storage we create the GlobalCache object that internally has static instance of HandleStorage
class GlobalCache
{
    private static HandleStorage m_storage = new HandleStorage();
    internal static object CreateHandle(string objectType, object[] parameters, Func<string, object[], object> maker)
    {
        return m_storage.CreateHandle(objectType, parameters, maker);
    }
    internal static bool TryGetObject<T>(string name, out T value) where T : class
    {
        return m_storage.TryGetObject<T>(name, out value);
    }
}
The final piece of the design that allows us to use object handles in excel is Handle class. This class implements IExcelObservable interface and creates a unique string id for each object that will be passed to Excel. Notice that constructor also takes a reference to the handle storage, so that handle can be removed from storage when handle is disposed.
class Handle : IExcelObservable, IDisposable
    {
        private static readonly object m_lock = new object();
        private static int m_index;
        private readonly HandleStorage m_storage;
        private IExcelObserver m_observer;
        private readonly string m_name;
        private readonly object m_value;
        public Handle(HandleStorage storage, string objectType, object value)
        {
            m_storage = storage;
            m_value = value;
            lock (m_lock)
            {
                m_name = String.Format("{0}:{1}", objectType, m_index++);
            }
        }
        public IDisposable Subscribe(IExcelObserver observer)
        {
            m_observer = observer;
            m_observer.OnNext(m_name);
            return this;
        }
        public void Dispose()
        {
            m_storage.Remove(this);
        }
        public string Name
        {
            get
            {
                return m_name;
            }
        }
        public object Value
        {
            get
            {
                return m_value;
            }
        }
    }
Now the interpolator objects can be easily created and stored in cache for further use. The string id of object handle is returned to Excel.
    public class ExcelInterpolator
    {
        private static readonly object m_sync = new object();
        private static readonly string m_tag = "#acqInterpolator";
        private static readonly string m_defaultInterpolator = "Linear";

        [ExcelFunction(Description = "Create Interpolator object")]
        public static object acq_interpolator_create(
            [ExcelArgument(Description = "Array of nodes")] double[] x,
            [ExcelArgument(Description = "Array of values")]  double[] y,
            [ExcelArgument(Description = "linear, quadratic, cubic, hermite, akima, steffen etc")] object method,
            [ExcelArgument(Description = "Out of range value: false (num error), true (closest)")] object bounds)
        {
            if (ExcelDnaUtil.IsInFunctionWizard())
                return ExcelError.ExcelErrorRef;
            else
            {
                return ACQ.Excel.Handles.GlobalCache.CreateHandle(m_tag, new object[] { x, y, method, bounds, "acq_interpolator_create" },
                    (objectType, parameters) =>
                    {
                        ACQ.Math.Interpolation.InterpolationInterface interpolator = null;
                        try
                        {
                              string interpolation_method = ExcelHelper.Check(method, m_defaultInterpolator);
                              interpolator = ACQ.Math.Interpolation.InterpolationFactory.GetInterpolator(interpolation_method, x, y);
                              interpolator.Bounds = ExcelHelper.CheckValue(bounds, true);
                        }
                       catch (Exception ex)
                       {

                        }
                        if (interpolator == null)
                            return ExcelError.ExcelErrorNull;
                        else
                            return interpolator;
                    });
            }
       }
}
Interpolation objects can be retrieved from the handle storage and used for interpolation
[ExcelFunction(Description = "Evaluate interpolation at specified point")]
public static object acq_interpolator_eval(
    [ExcelArgument(Description = "Interpolator object")] string handle,
    [ExcelArgument(Description = "Interpolation point")] double x)
{
    ACQ.Math.Interpolation.InterpolationInterface interpolator;
    if (ACQ.Excel.Handles.GlobalCache.TryGetObject<ACQ.Math.Interpolation.InterpolationInterface>(handle, out interpolator))
    {
        if (interpolator != null)
        {
            return ExcelHelper.CheckNan(interpolator.Eval(x));
        }
    }
    return ExcelError.ExcelErrorRef;
}
Alternatively one can use read method ( TryReadObject ) to compute interpolation in the thread safe way.
[ExcelFunction(Description = "Evaluate interpolation at specified point (thread safe version)", IsThreadSafe = true)]
public static object acq_interpolator_eval_tsafe(
    [ExcelArgument(Description = "Interpolator object")] string handle,
    [ExcelArgument(Description = "Interpolation point")] double x)
{
    Tuple<bool, double> results = ACQ.Excel.Handles.GlobalCache.TryReadObject<ACQ.Math.Interpolation.InterpolationInterface, double, double>(handle, (interpolator, point) =>
    {
        return interpolator.Eval(point);
    }, x);
    if (results.Item1)
    {
        return ExcelHelper.CheckNan(results.Item2);
    }
    else
    {
        return ExcelError.ExcelErrorRef;
    }
}
Interpolation method is specified as string (not case sensitive), and corresponding interpolation class is found using reflection. Therefore new interpolation methods automatically become available in Excel when interpolation class is added to the corresponding namespace. This is done in two steps. First dictionary of all interpolation types is created in static constructor of InterpolationFactory class. The interpolation type can be easily found from the name of the method provided that interpolation class is located in ACQ.Math.Interpolation namespace and it implements InterpolationInterface. Activator.CreateInstance is used to create an interpolation object.
public class InterpolationFactory
    {
        private static Dictionary<string, Type> m_interpolation_types = new Dictionary<string, Type>();
        static InterpolationFactory()
        {
            Type base_type = typeof(InterpolationInterface);
            Type[] types = GetClassTypes(System.Reflection.Assembly.GetExecutingAssembly(), base_type.Namespace);
            foreach(Type t in types)
            {
                if (!t.IsAbstract && base_type.IsAssignableFrom(t))
                {
                    m_interpolation_types[t.FullName.ToLower()] = t;
                }
            }
        }
        private static Type[] GetClassTypes(Assembly assembly, string nameSpace)
        {
            return assembly.GetTypes().Where(t => t.IsClass && String.Equals(t.Namespace, nameSpace)).ToArray();
        }

        public static Type GetInterpolationType(string method)
        {
            string name = String.Format("ACQ.Math.Interpolation.{0}Interpolation", method).ToLower();
            Type result;
            m_interpolation_types.TryGetValue(name, out result);
            return result;
        }

        public static InterpolationInterface GetInterpolator(Type type, params object[] arguments)
        {
            InterpolationInterface interpolator = Activator.CreateInstance(type, arguments) as InterpolationInterface;
            return interpolator;
        }

        public static InterpolationInterface GetInterpolator(string method, params object[] arguments)
        {
            InterpolationInterface interpolator = null;
            Type interpolator_type = GetInterpolationType(method);
            if (interpolator_type != null)
            {
                interpolator = Activator.CreateInstance(interpolator_type, arguments) as InterpolationInterface;
            }
            return interpolator;
        }
}
Adding new interpolation method
All interpolation methods implement InterpolationInterface
public interface InterpolationInterface
{
    double Eval(double x);
    double EvalDeriv(double x);
    bool Bounds { get; set; }
}
There is also an abstract base class ( InterpolationBase ) that implements methods that are common to all interpolation algorithms such as input check and index lookup. Abbreviated version is shown below
public abstract class InterpolationBase : InterpolationInterface
    {
        protected readonly double[] m_x;
        protected readonly double[] m_y;
        protected bool m_bounds = true;

        public InterpolationBase(double[] x, double[] y, bool bCopyData = true)
        {
            if (x == null || y == null)
                throw new ArgumentNullException("interpolation arrays can not be null");
            if (x.Length != y.Length)
                throw new ArgumentException("interpolation x and y arrays should have the same length");
            if (x.Length < 2)
            {
                throw new ArgumentException("interpolation array should have at least 2 nodes");
            }

            for (int i = 0; i < x.Length - 1; i++)
            {
                if (x[i + 1] <= x[i])
                {
                    throw new ArgumentException("interpolation nodes should be ordered");
                }
            }

            if (bCopyData)
            {
                m_x = (double[])x.Clone();
                m_y = (double[])y.Clone();
            }
            else
            {
                m_x = x;
                m_y = y;
            }
        }
        public bool Bounds
        {
            set
            {
                m_bounds = value;
            }
            get
            {
                return m_bounds;
            }
        }
        public abstract double Eval(double x);
        public virtual double EvalDeriv(double x)
        {
            return Double.NaN;
        }

        protected int FindIndex(double x, out double value)
        {
            int index = 0;
            value = Double.NaN;
            if (x < m_x[0])
            {
                if (m_bounds)
                {
                    value = m_y[0];
                }
            }
            else if (x > m_x[m_x.Length - 1])
            {
                if (m_bounds)
                {
                    value = m_y[m_y.Length - 1];
                }
            }
            else
            {
                index = Array.BinarySearch<double>(m_x, x);
                if (index == 0)
                {
                    index = 1;
                }
                else if (index < 0)
                {
                    index = ~index;
                }
            }
            return index;
        }
        protected void Bracket(int index1, out double x0, out double x1, out double y0, out double y1)
        {
            int index0 = index1 - 1;
             x0 = m_x[index0];
            x1 = m_x[index1];
            y0 = m_y[index0];
            y1 = m_y[index1];
        }
Here is the full implementation of linear interpolation. The index look up, input check and the range check are done in base class.
    public class LinearInterpolation : InterpolationBase
    {
        public LinearInterpolation(double[] x, double[] y)
            : base(x, y)
        { }
        public override double Eval(double x)
        {
            double value;
            int index = FindIndex(x, out value);

            if(index > 0 )
            {
                double x0, x1, y0, y1;
                Bracket(index, out x0, out x1, out y0, out y1);

                double dx = x1 - x0;
                double b = (x - x0) / dx;
                value = y0 + b * (y1 - y0);
            }
            return value;
        }
}
2D interpolation on rectangular grid can be easily implemented by doing 1D interpolation in each dimension. The code below shows an example.
public class BiInterpolation<T> : InterpolationBase2D where T : InterpolationInterface
{
    public BiInterpolation(double[] x1, double[] x2, double[,] y)
        : base(x1, x2, y, true)
    {
    }
    public BiInterpolation(double[] x1, double[] x2, double[,] y, bool copyData)
        : base(x1, x2, y, copyData)
    {
    }
    public override double Eval(double x1, double x2)
    {
        double value = Double.NaN;
        int index1, index2;
        FindIndex(x1, x2, out index1, out index2);
        if (index1 > 0 && index2 > 0)
        {

            int n1 = m_x1.Length;
            int n2 = m_x2.Length;
            double[] yt = new double[n1];
            double[] y2 = new double[n2];
            InterpolationInterface interpolator;
            Type interpolator_type = typeof(T);
            for(int i=0; i<n2; i++)
            {
                for (int j = 0; j < n1; j++)
                {
                    yt[j] = m_y[i, j];
                }
                interpolator = Activator.CreateInstance(interpolator_type, m_x1, yt) as InterpolationInterface;
                interpolator.Bounds = false;
                y2[i] = interpolator.Eval(x1);
            }
            interpolator = Activator.CreateInstance(interpolator_type, m_x2, y2) as InterpolationInterface;
            return interpolator.Eval(x2);
        }
        return value;
    }
}
Notice that class interpolates over complete grind and makes more assumptions about interpolation method. This is very inefficient because most interpolation algorithms are local and only need function values in the adjacent nodes. But it allows to turn any 1D interpolation method into 2D. The code below shows an example of 2D Steffen interpolation.
public class BisteffenInterpolation : BiInterpolation<SteffenInterpolation>
{
    public BisteffenInterpolation(double[] x1, double[] x2, double[,] y)
        : base(x1, x2, y, true)
    {
    }
    public BisteffenInterpolation(double[] x1, double[] x2, double[,] y, bool copyData)
        : base(x1, x2, y, copyData)
    {
    }
}
This deficiency can be easily rectified by adding the size of the support to the 2D interpolation class, this will allow interpolation algorithm to tell 2D interpolator how many nodes it needs to perform interpolation. The code below shows how support size is used to adjust interpolation window. Setting support size to zero, tells interpolator to use full grid (for example for natural cubic spline interpolation).
public class BiInterpolation<T> : InterpolationBase2D where T : InterpolationInterface
    {
        public BiInterpolation(double[] x1, double[] x2, double[,] y)
            : base(x1, x2, y, true)
        {
        }
        public BiInterpolation(double[] x1, double[] x2, double[,] y, bool copyData)
            : base(x1, x2, y, copyData)
        {
        }
        protected virtual int SupportSize
        {
            get
            {
                return 0;
            }
        }
       public override double Eval(double x1, double x2)
        {
            double value = Double.NaN;
            int index1, index2;
            FindIndex(x1, x2, out index1, out index2);
            if (index1 > 0 && index2 > 0)
            {
                int sn = this.SupportSize;
                int n1 = m_x1.Length;
                int n2 = m_x2.Length;
                int j0, j1, i0, i1;


                if (sn <= 0)
                {
                    j0 = i0 = 0;
                    j1 = n1;
                    i1 = n2;
                }
                else
                {
                    j0 = System.Math.Max(0,  index1 - sn);
                    j1 = System.Math.Min(n1, index1 + sn);
                    i0 = System.Math.Max(0,  index2 - sn);
                    i1 = System.Math.Min(n2, index2 + sn);
                }
                double[] x1t = new double[j1 - j0];
                double[] yt = new double[j1 - j0];
                double[] x2t = new double[i1 - i0];
                double[] y2 = new double[i1 - i0];
                InterpolationInterface interpolator;
                Type interpolator_type = typeof(T);
                for (int j = j0; j < j1; j++)
                {
                    x1t[j - j0] = m_x1[j];
                }
                for (int i = i0; i < i1; i++)
                {
                    for (int j = j0; j < j1; j++)
                    {
                        yt[j - j0] = m_y[i, j];
                    }
                    interpolator = Activator.CreateInstance(interpolator_type, x1t, yt) as InterpolationInterface;
                    interpolator.Bounds = false;
                    y2[i - i0] = interpolator.Eval(x1);
                    x2t[i - i0] = m_x2[i];
                }
                interpolator = Activator.CreateInstance(interpolator_type, x2t, y2) as InterpolationInterface;
                return interpolator.Eval(x2);
            }
            return value;
        }
    }
Interpolation methods
The following interpolation methods are currently implemented in 1D:
- Nearest, Backward and Forward — table lookup
- Linear — linear interpolation
- Quadratic — quadratic spline interpolation
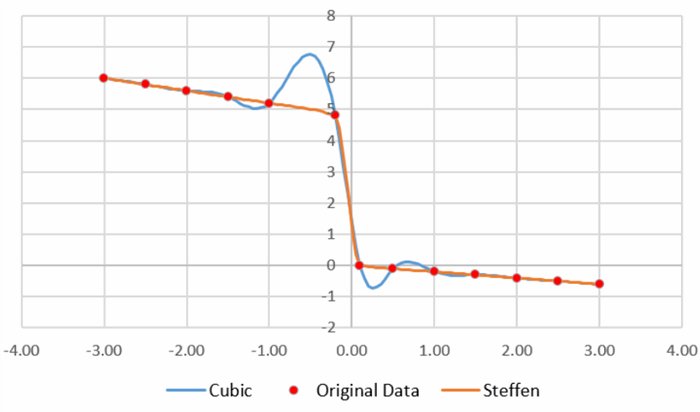
- Cubic — natural cubic spline
- Hermite and HermiteQS — local cubic spline (aka Catmull-Rom spline)
- Steffen and SteffenSoft — monotonic cubic spline
- Akima — Akima spline (cubic spline with special condition for derivatives)
- AkimaPeriodic — Akima spline with periodic boundary conditions
- Multiquadrics — Interpolation based on multiquadrics radial basis function
- ExpTension — exponential tension spline
Interpolation on 2D regular rectangular grid can be easily done by using 1D interpolation in each dimension (note that current implementation is not very efficient because it does not consider locality of 1D interpolators).
- BiLinear — linear in each dimension
- BiCubic — natural cubic spline in each dimension
- BiSteffen, BiSteffenSoft
- BiAkima
- BiHermite, BiHermiteQS
Scattered data interpolation is based on radial basis functions and currently limited to 512 interpolation nodes. The following radial basis functions are implemented (first three are the most common). Optional scale factors can be provided for each dimension.
- Linear
- Cubic
- Multiquadrics
- Gaussian
- Thinplate,
- InverseQuadratic,
- InverseMultiquadric
Here is a complete list of interpolation functions. All functions have prefix acq_ and located in ACQ category.
- acq_interpolator_create — creates interpolator object (returns a handle)
- acq_interpolator_tension_create — creates interpolator object for exponential tension spline
- acq_interpolator_eval — evaluates interpolation at specified point
- acq_interpolator_eval_deriv — evaluates interpolation derivative at specified point
- acq_interpolation — evaluates interpolation at specified point(in-situ without constructing interpolator object)
- acq_interpolator2d_create — creates 2D interpolator object
- acq_interpolator2d_eval — evaluates interpolation at specified point
- acq_interpolation2d — evaluates interpolation at specified point(in-situ without constructing interpolator object)
- acq_interpolator_scattered_create — creates RBF interpolator
- acq_interpolator_scattered_eval — evaluates RBF interpolator at specified point
- acq_interpolator_scattered_eval_x5 — evaluates RBF interpolator at specified point, coordinates are specified individually (up to 5)
Add-in installation
Add-in binary is located ACQDistribution folder. There are 32 and 64bit versions. There is also an Excel Demo.xlsx file, and some instructions in primer.interpolation.pdf
- Click the File tab, click Options, and then click the Add-Ins category
- In the Manage box, click Excel Add-ins, and then click Go. The Add-Ins dialog box appears
- Browse to the location of the ACQ32.xll/ACQ64.xll files, and pick the xll file based on Excel bitness.
- Make sure your Excel security settings allow you to run Add-ins
- All ACQ functions have prefix «acq_» and located in ACQ category.
The latest version is available at https://github.com/ratesquant/ACQ
Acknowledgment
This ACQ add-in is based on Excel-DNA https://exceldna.codeplex.com/. Thanks to Govert van Drimmelen (creator of Excel-DNA) for making it happen.
History
2016-05-01: First version
2016-05-02: Added example of interpolation class and references
References
- Hiroshi Akima. 1970. A New Method of Interpolation and Smooth Curve Fitting Based on Local Procedures. J. ACM 17, 4 (October 1970), 589-602
- A Simple Method for Monotonic Interpolation in One Dimension, Steffen, M., Astronomy and Astrophysics, Vol. 239, NO. NOV(II), P. 443, 1990
- P. Rentrop, «An Algorithm for the Computation of the Exponential Tension Spline», Numerische Mathematik 35(1):81-93 · February 1980
Currently use C++, C# and Python. Pascal, Delphi and FORTRAN in the past.