Элемент управления пользовательской формы CheckBox для выбора или невыбора его пользователем и передачи результата в VBA Excel. Свойства «Флажка», примеры кода.
UserForm.CheckBox – это элемент управления пользовательской формы, предназначенный для передачи в код VBA информации о выборе или невыборе его пользователем и возвращающий одно из двух значений: False (галочки нет) или True (галочка установлена).
Элемент управления CheckBox состоит из флажка и надписи. В VBA Excel флажок имеет квадратную форму, надпись расположена справа от него. Надпись реагирует на нажатие мышью так же, как и флажок.
По тексту статьи значение слова «Флажок» в кавычках равно значению слова CheckBox, флажок без кавычек обозначает квадрат с галочкой или без нее.
Кроме состояний «выбран» или «не выбран», существует и третье состояние флажка: серая галочка на сером фоне. Получить такое состояние на пользовательской форме можно путем присвоения свойству CheckBox.Value значения Null.
Надписи флажков выведены с помощью следующего кода VBA Excel:
|
Private Sub UserForm_Initialize() CheckBox1.Value = False CheckBox1.Caption = «CheckBox1.Value = « _ & CheckBox1.Value CheckBox2.Value = Null CheckBox2.Caption = «CheckBox2.Value = « _ & CheckBox2.Value CheckBox3.Value = True CheckBox3.Caption = «CheckBox3.Value = « _ & CheckBox3.Value End Sub |
Интересно было посмотреть, какое значение отобразится в надписи элемента управления CheckBox2. Обратите внимание на то, что если строку CheckBox2.Caption = "CheckBox2.Value = " & CheckBox2.Value заменить на CheckBox2.Caption = CheckBox2.Value, будет сгенерирована ошибка, так как в VBA не существует текстового отображения значения Null.
Эксперименты показали, что отобразить «Флажок» в третьем состоянии можно также с помощью присвоения свойству CheckBox.Value значения «пустая строка».
Элемент управления CheckBox может использоваться на пользовательской форме для
- выбора или отмены каких-либо параметров и условий,
- отображения или скрытия других элементов управления,
- изменение доступности других элементов управления для взаимодействия с пользователем.
Если требуется выбор только одной опции из группы предложенных, для этой цели в VBA Excel используется набор элементов управления OptionButton.
Свойства элемента «Флажок»
| Свойство | Описание |
|---|---|
| AutoSize | Автоподбор размера «Флажка». True – размер автоматически подстраивается под длину набираемой строки. False – размер элемента управления определяется свойствами Width и Height. |
| ControlSource | Ссылка на источник данных для свойства Value. |
| ControlTipText | Текст всплывающей подсказки при наведении курсора на CheckBox. |
| Enabled | Возможность взаимодействия пользователя с элементом управления. True – взаимодействие включено, False – отключено (цвет флажка и надписи становится серым). |
| Font | Шрифт, начертание и размер текста надписи. |
| Height | Высота элемента управления. |
| Left | Расстояние от левого края внутренней границы пользовательской формы до левого края элемента управления. |
| Picture | Добавление изображения вместо текста надписи или дополнительно к нему. |
| PicturePosition | Выравнивание изображения и текста в поле надписи. |
| TabIndex | Определяет позицию элемента управления в очереди на получение фокуса при табуляции, вызываемой нажатием клавиш «Tab», «Enter». Отсчет начинается с 0. |
| TextAlign* | Выравнивание текста надписи: 1 (fmTextAlignLeft) – по левому краю, 2 (fmTextAlignCenter) – по центру, 3 (fmTextAlignRight) – по правому краю. |
| Top | Расстояние от верхнего края внутренней границы пользовательской формы до верхнего края элемента управления. |
| TripleState | Определяет, может ли пользователь делать выбор между двумя состояниями «Флажка» или между тремя, включая серую галочку на сером квадрате. True – доступны три состояния, False – доступны два состояния. |
| Value | Значение «Флажка»: True – галочка установлена, False – галочка не установлена, Null – серая галочка на сером квадрате. |
| Visible | Видимость элемента CheckBox. True – элемент отображается на пользовательской форме, False – скрыт. |
| Width | Ширина элемента управления. |
| WordWrap | Перенос текста надписи на новую строку при достижении границы ее поля. True – перенос включен, False – перенос выключен. |
* При загруженной в поле надписи картинке свойство TextAlign не работает, следует использовать свойство PicturePosition.
Свойство по умолчанию для элемента CheckBox – Value, основное событие – Click.
В таблице перечислены только основные, часто используемые свойства «Флажка». Все доступные свойства отображены в окне Properties элемента управления CheckBox.
Примеры использования CheckBox
Пример 1
Отображение элемента управления CheckBox на пользовательской форме с параметрами, заданными в коде VBA Excel:
|
Private Sub UserForm_Initialize() With CheckBox1 .Caption = «Нажмите на меня» .ControlSource = «A1» .Value = False .Left = 12 .Top = 12 End With End Sub |
Размещается данная процедура в модуле пользовательской формы.
Если несколько элементов управления CheckBox привязать к одной ячейке, то при клике на одном из них, менять свое состояние будут и все остальные.
Пример 2
Смена надписи «Флажка» в зависимости от его состояния:
|
1 2 3 4 5 6 7 8 9 10 11 12 13 14 15 16 17 18 |
‘Устанавливаем первоначальные ‘значения свойств «Флажка» Private Sub UserForm_Initialize() With CheckBox1 .Caption = «Поставьте галочку» .Value = False .TripleState = False End With End Sub ‘Меняем надпись «Флажка» при ‘смене параметра CheckBox1.Value Private Sub CheckBox1_Change() If CheckBox1.Value Then CheckBox1.Caption = «Снимите галочку» Else CheckBox1.Caption = «Поставьте галочку» End If End Sub |
Пример 3
Скрытие и отображение, изменение доступности других элементов управления с помощью «Флажка».
Для реализации этого примера необходимо создать пользовательскую форму с четырьмя элементами управления: CheckBox1, TextBox1, TextBox2 и CommandButton1. А в модуле формы разместить следующий код:
|
1 2 3 4 5 6 7 8 9 10 11 12 13 14 15 16 17 18 19 20 21 22 23 24 25 26 27 28 29 30 31 32 33 34 35 36 37 38 39 40 41 |
‘Устанавливаем первоначальные ‘значения свойств элементов управления Private Sub UserForm_Initialize() With CheckBox1 .Caption = «Хочу сложить два числа» .Value = False .TripleState = False End With With TextBox1 .Enabled = False .Text = «Слагаемое 1» End With With TextBox2 .Enabled = False .Text = «Слагаемое 2» End With With CommandButton1 .Caption = «Сложить» .Visible = False End With End Sub ‘Меняем свойства других элементов ‘управления при смене состояния «Флажка» Private Sub CheckBox1_Change() If CheckBox1.Value Then TextBox1.Enabled = True TextBox2.Enabled = True CommandButton1.Visible = True Else TextBox1.Enabled = False TextBox2.Enabled = False CommandButton1.Visible = False End If End Sub ‘Складываем два числа Private Sub CommandButton1_Click() If IsNumeric(TextBox1) And IsNumeric(TextBox2) Then MsgBox TextBox1 & » + « & TextBox2 & » = « _ & CDbl(TextBox1) + CDbl(TextBox2) End If End Sub |
Форма открывается с недоступными для пользователя текстовыми полями и скрытой кнопкой «Сложить»:
После установки галочки на флажке текстовые поля становятся доступными для редактирования, и отображается кнопка «Сложить»:
Return to VBA Code Examples
In VBA, you can create a CheckBox where a user can check or uncheck the option. Checkboxes are often used in UserForms, but can also be used in a Worksheet. In this tutorial, you will learn how to create a Checkbox (in both VBA and in Excel Worksheets), get a user choice in VBA and use it in code.
If you want to learn how to create a Listbox, click here: VBA Listbox
If you want to learn how to create a Combobox, click here: VBA Combobox
Create a Checkbox
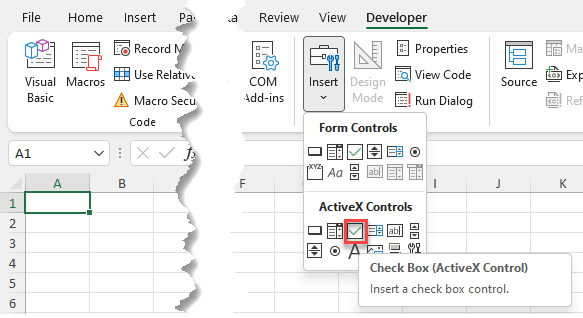
In order to insert a Checkbox in the Worksheet, you need to go to the Developer tab, click Insert and under ActiveX Controls choose Check Box:
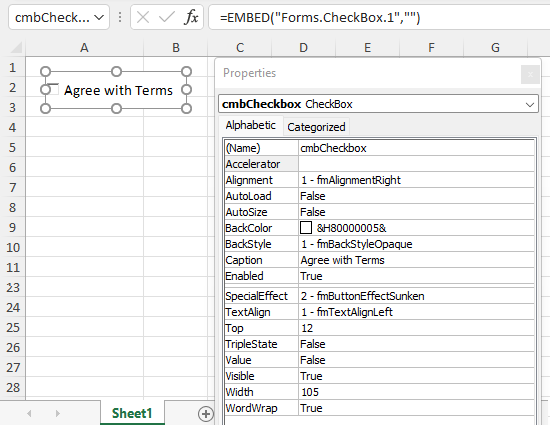
When you select the Checkbox which you inserted, you can click on Properties under the Developer tab:
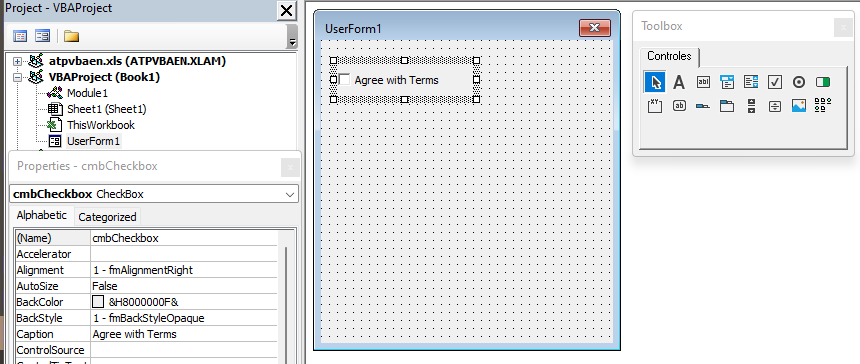
Here you can set different properties of the Checkbox. First, we changed the attribute Name to cmbCheckbox. Next, we can use the Checkbox with this name in VBA code.
Also, we changed the text which appears next to the checkbox to Agree with Terms. To do this, you need to set the attribute Caption.
Get a Selected Item of a Checkbox in VBA
The purpose of a Checkbox is to get a user’s choice (checkbox checked or not). In order to retrieve a value that is selected by user, you need to use this code:
If Sheet1.cmbCheckBox.Value = True Then
    Sheet1.Range("C3") = "Agree"
Else
    Sheet1.Range("C3") = "Don't agree"
End If
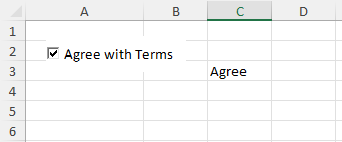
We want to populate the cell C3 with Agree if the checkbox is checked and Don’t agree otherwise. The value of the checkbox is in the Value attribute of the object Sheet1.cmbCheckbox. The value of the checkbox can be true or false.
As we checked the checkbox, the value of Sheet1.cmbCheckbox.Value is true, so the result in C3 is Agree.
Use a Checkbox in a UserForm
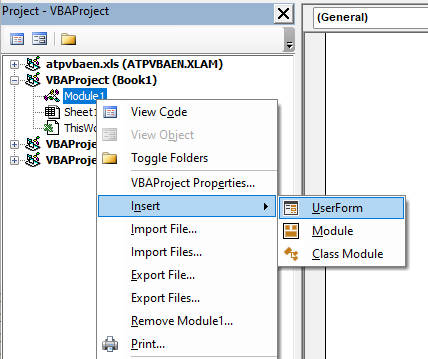
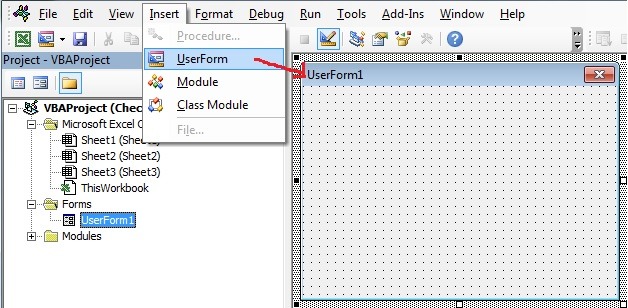
As we mentioned, Checkboxes are most often used in UserForms. To explain how you can do it, we will first insert an Userform. In the VBA Editor, right-click on Module name, click on Insert and choose UserForm:
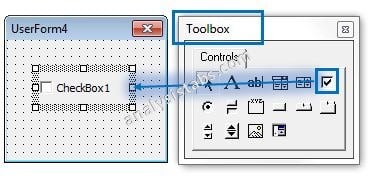
To display controls for inserting, you need to enable the Toolbox. To do this, click on the Toolbox icon in the toolbar. After that, you will get the windows with all the controls available. You can click on Checkbox to create it in the Userform:
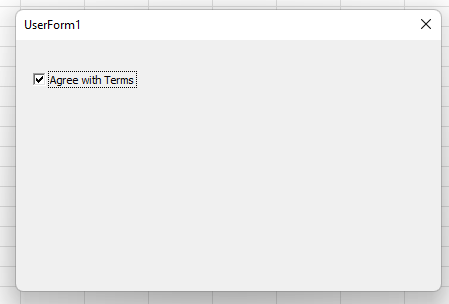
In the properties window, we will change the name of the Checkbox to chbCheckBox and caption to Agree with Terms. When we run the Userform, we get the Checkbox in it.
If you want to get selected value from the Checkbox, you need to use the same logic for the Checkbox in a Worksheet, which is explained earlier in the article.
VBA Coding Made Easy
Stop searching for VBA code online. Learn more about AutoMacro — A VBA Code Builder that allows beginners to code procedures from scratch with minimal coding knowledge and with many time-saving features for all users!
Learn More!
Excel VBA UserForm CheckBox
CheckBox is one of the UserForm control. You can select and drag CheckBox on the UserForm. CheckBox Control is used to specify or indicate binary choice. That is either Turn on or off a value. When we use more checkboxs, you can select more than one CheckBox at a time on the UserForm. You can select multiple check boxes in a group box. Please find more details about CheckBox Control in the following chapter.
- VBA CheckBox Control on the UserForm
- Add dynamic CheckBox Control on the UserForm using VBA
- Select or UnSelect a CheckBox using VBA
- Check if a check box is selected or not using VBA
- More details about Checkbox control
VBA ActiveX CheckBox Control on the UserForm
-
- Go To Developer Tab and then click Visual Basic from the Code or Press Alt+F11.
- Go To Insert Menu, Click UsereForm. Please find the screenshot for the same.
-
- Drag a check box on the Userform from the Toolbox. Please find the screenshot for the same.
-
- Now, you can see the following code.
Private Sub CheckBox1_Click()

End Sub
Note: In the above code ‘CheckBox1’ is the Check box name.
-
- Please add the following statements to the procedure.
Private Sub CheckBox1_Click()
    If UserForm2.CheckBox1.Value = True Then
       MsgBox "Checkbox has Checked", , "Checkbox"
    Else
       MsgBox "Checkbox has UnChecked", , "Checkbox"
    End If
End Sub
- Run the above macro by pressing F5.
- Check and uncheck the check box twice to get the two different outputs.
Add dynamic CheckBox Control on the UserForm using VBA
Please find the following steps and example code, it will show you how to add dynamic checkbox control on the userform.
-
- Add command button on the userform from the toolbox.
- Right click on the command button, click properties
- Change the command button caption to ‘Create_Checkbox’
- Double click on the command button
- Now, it shows following code.
Private Sub CommandButton1_Click()

End Sub
-
- Call the below procedure named ‘Add_Dynamic_Checkbox’ and find the below procedure to run.
Private Sub CommandButton1_Click()
    Call Add_Dynamic_Checkbox
End Sub
Procedure to call in the Command Button:
Sub Add_Dynamic_Checkbox()
    'Add Dynamic Checkbox and assign it to object 'Cbx'
    Set Cbx = UserForm2.Controls.Add("Forms.CheckBox.1")

    'Assign Checkbox Name
    Cbx.Caption = "Checkbox2"

    'Checkbox Position
    Cbx.Left = 10
    Cbx.Top = 10
End Sub
-
- Now, click F5 to run the macro, click ‘Create_Checkbox’ button to see the result.
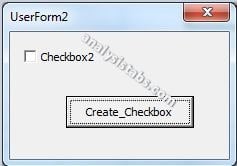
- You can see the created dynamic check box in the following screen shot.
output:
Select or UnSelect a CheckBox using VBA?
Please find the below code to know how to select or UnSelect a check box using VBA. In the below example we are using value property of the check box to select or UnSelect a check box.
‘ To select check box
CheckBox1.Value=True

‘ To unselect check box
CheckBox1.Value=False
Check if a check box is selected or not using VBA
Please find the below code to know how to check if a check box is selected or not using VBA. In the below example we are using value property of the check box.
Sub ChkBox_Ex1()
If CheckBox1.Value = True Then
MsgBox “CheckBox has selected”
Else
MsgBox “CheckBox has not selected”
End If
End Sub
More details about Check box control
Here is the link more about how to add check box control on the Worksheet or UserForm in Excel.
Read More …
Here is the one more link to more about how to add check box control on the Worksheet or UserForm using VBA in Excel.
Read More …
Here is the one more link to more about how to remove check box control on the Worksheet or UserForm in Excel.
Read More …
A Powerful & Multi-purpose Templates for project management. Now seamlessly manage your projects, tasks, meetings, presentations, teams, customers, stakeholders and time. This page describes all the amazing new features and options that come with our premium templates.
Save Up to 85% LIMITED TIME OFFER

All-in-One Pack
120+ Project Management Templates
Essential Pack
50+ Project Management Templates
Excel Pack
50+ Excel PM Templates
PowerPoint Pack
50+ Excel PM Templates
MS Word Pack
25+ Word PM Templates
Ultimate Project Management Template
Ultimate Resource Management Template
Project Portfolio Management Templates
-
-
- In this topic:
-
- VBA ActiveX CheckBox Control on the UserForm
- Add dynamic CheckBox Control on the UserForm using VBA
-
- Procedure to call in the Command Button:
-
- Select or UnSelect a CheckBox using VBA?
- Check if a check box is selected or not using VBA
- More details about Check box control
VBA Reference
Effortlessly
Manage Your Projects
120+ Project Management Templates
Seamlessly manage your projects with our powerful & multi-purpose templates for project management.
120+ PM Templates Includes:
Effectively Manage Your
Projects and Resources
ANALYSISTABS.COM provides free and premium project management tools, templates and dashboards for effectively managing the projects and analyzing the data.
We’re a crew of professionals expertise in Excel VBA, Business Analysis, Project Management. We’re Sharing our map to Project success with innovative tools, templates, tutorials and tips.
Project Management
Excel VBA
Download Free Excel 2007, 2010, 2013 Add-in for Creating Innovative Dashboards, Tools for Data Mining, Analysis, Visualization. Learn VBA for MS Excel, Word, PowerPoint, Access, Outlook to develop applications for retail, insurance, banking, finance, telecom, healthcare domains.
Page load link
Go to Top
В этой статье мы рассмотрим такой элемент управления в окне ToolBox, как Флажок, за работу с ним отвечает класс VBA CheckBox. Флажки довольно часто используются на формах, их часто называют “птичками” или “галочками”. Сами по себе объекты vba класса CheckBox являются независимыми друг от друга, и позволяют определить одно из двух состояний: галочка установлена, или галочка снята.
Флажки удобны при составлении опросов, например, из десяти цветов нужно отметить те, которые больше всего нравятся. Собственно, в этой статье мы и попытаемся сделать своеобразный опрос, но пока, давайте рассмотрим основные свойства класса CheckBox:
Name – ну, как всегда, имя объекта
Caption – определяет надпись, которая будет находится возле галочки справа.
TripleState – свойство позволяет определить третье состояние флажка. Как упоминалось выше, компонент vba CheckBox может принимать два значения: галочка установлена (true), галочка снята (false), но можно задать и третье состояние (Null) – в этом случае объект будет серого цвета и будет недоступен. Если это свойство содержит значение false – будут поддерживаться только два состояния, если true – все три.
Value – данное свойство позволяет получить состояние выбора (true, false или Null).
Событие Change класса CheckBox происходит при изменении состояния флажка.
Скажу честно, цель статьи – показать простой пример использования Флажков, поэтому я особо не вникал во все премудрости данного компонента.
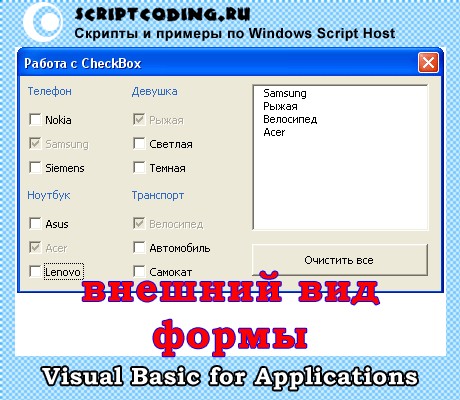
И так, цель задания: добавить в проект форму, на ней разместить 12 флажков, разделенных на 4 группы по 3 штуки, Например,
- Телефон: Nokia, Samsung, Siemens
- Девушка: рыжая, светлая, темная (Ха-ха!!!!)
- Ноутбук: Asus, Acer, Lenovo
- Транспорт: велосипед, автомобиль, самокат
Ну, думаю, вы суть поняли: размещаете надпись, а под ней в столбик флажки. Справа я добавил компонент ListBox – как только мы будем ставить галочку для vba CheckBox, элемент сразу будет добавляться в список, плюс, элемент управлении Флажок сразу будет становится недоступным после выбора (свойство Enabled примет значение False). Еще на форме (UserForm) нам понадобится кнопка, которая будет очищать список, и будет делать доступными все флажки.
Знаю, знаю, пример не столько практичен, сколько теоретичен….
В коде для формы нужно добавить следующие процедуры:
Private Sub CheckBox1_Change()
    If CheckBox1.Value = True Then
        ListBox1.AddItem CheckBox1.Caption
        CheckBox1.Enabled = False
    End If
End Sub

Private Sub CheckBox2_Change()
    If CheckBox2.Value = True Then
        ListBox1.AddItem CheckBox2.Caption
        CheckBox2.Enabled = False
    End If
End Sub

Private Sub CheckBox3_Change()
    If CheckBox3.Value = True Then
        ListBox1.AddItem CheckBox3.Caption
        CheckBox3.Enabled = False
    End If
End Sub

Private Sub CheckBox4_Change()
    If CheckBox4.Value = True Then
        ListBox1.AddItem CheckBox4.Caption
        CheckBox4.Enabled = False
    End If
End Sub

Private Sub CheckBox5_Change()
    If CheckBox5.Value = True Then
        ListBox1.AddItem CheckBox5.Caption
        CheckBox5.Enabled = False
    End If
End Sub

Private Sub CheckBox6_Change()
    If CheckBox6.Value = True Then
        ListBox1.AddItem CheckBox6.Caption
        CheckBox6.Enabled = False
    End If
End Sub
Private Sub CheckBox7_Change()
    If CheckBox7.Value = True Then
        ListBox1.AddItem CheckBox7.Caption
        CheckBox7.Enabled = False
    End If
End Sub

Private Sub CheckBox8_Change()
    If CheckBox8.Value = True Then
        ListBox1.AddItem CheckBox8.Caption
        CheckBox8.Enabled = False
    End If
End Sub

Private Sub CheckBox9_Change()
    If CheckBox9.Value = True Then
        ListBox1.AddItem CheckBox9.Caption
        CheckBox9.Enabled = False
    End If
End Sub

Private Sub CheckBox10_Change()
    If CheckBox10.Value = True Then
        ListBox1.AddItem CheckBox10.Caption
        CheckBox10.Enabled = False
    End If
End Sub

Private Sub CheckBox11_Change()
    If CheckBox11.Value = True Then
        ListBox1.AddItem CheckBox11.Caption
        CheckBox11.Enabled = False
    End If
End Sub

Private Sub CheckBox12_Change()
    If CheckBox12.Value = True Then
        ListBox1.AddItem CheckBox12.Caption
        CheckBox12.Enabled = False
    End If
End Sub

Private Sub CommandButton1_Click()
    CheckBox1.Enabled = True
    CheckBox2.Enabled = True
    CheckBox3.Enabled = True
    CheckBox4.Enabled = True
    CheckBox5.Enabled = True
    CheckBox6.Enabled = True
    CheckBox7.Enabled = True
    CheckBox8.Enabled = True
    CheckBox9.Enabled = True
    CheckBox10.Enabled = True
    CheckBox11.Enabled = True
    CheckBox12.Enabled = True
    ListBox1.Clear
End Sub
Процедуры от CheckBox1_Change до CheckBox12_Change носят практически один и тот же характер – идет обработка события Change. Если состояние флажка ровно true (вы поставили птичку), то в список ListBox1 с помощью метода AddItem добавляется значение, хранимое в свойстве Caption (надпись рядом с птичкой). Далее происходит присваивание значения False свойству Enabled – делаем объект CheckBox недоступным.
Процедура CommandButton1_Click отвечает за обработку клика по кнопке. Видим, что для каждого флажка свойство Enabled принимает значение True, то есть, он становится доступным. Метод Cleare – полностью очищает список ListBox1.
И так, в этой статье мы кратко рассмотрели работу с классом CheckBox (Флажок) vba языка, да, я рассмотрел довольно простой пример использования, но… не все сразу.
Кстати, пример показанный в статье можно использовать и в Exel и в Word. Сам расчет идет на то, что бы описать базовую информацию по языку VBA, а уже потом переходить к чему-то более сложному. Так, как только я закончу с элементами управления, я перейду к описанию синтаксиса языка VBA, который практически идентичен языку VBScript, но код VBScript может выполняться самостоятельно в теле отдельного файла (сценариях), а VBA – работает в теле документа Microsoft.
<<Lesson 21>> [Contents] <<Lesson 23>>
There are many Excel VBA controls that can be used to perform certain tasks by writing Excel VBA code for them. These controls are also known as Active-X controls. These controls are Excel VBA objects so they have their own properties, methods and events. They can be found on the Excel Control Toolbox, as shown in theFigure 17.1. We shall deal with the checkbox, the textbox and the option button.

Figure 22.1
22.1 The CheckBox
The Checkbox is a very useful control in Excel VBA. It allows the user to select one or more items by checking the check box or check boxes concerned. For example, you may create a shopping cart where the user can click on check boxes that correspond to the items they intend to buy, and the total payment can be computed at the same time.One of the most important properties of the checkbox is Value. If the check box is selected or checked, the value is true, whilst if it is not selected or unchecked, the Value is False.
The usage of the checkbox is illustrated in Example 22.1
Example 22.1
In this example, the user can choose to display the sale volume of one type of fruits sold or total sale volume. The code is shown below:
Private Sub CommandButton1_Click()
If CheckBox1.Value = True And CheckBox2.Value = False Then
MsgBox “Quantity of apple sold is” & Cells (2, 2).Value
ElseIf CheckBox2.Value = True And CheckBox1.Value = False Then
MsgBox “Quantity of orange sold is ” & Cells(2, 3).Value
Else
MsgBox “Quantity of Fruits sold is” & Cells (2, 4).Value
End If
End Sub
The Interface is shown in Figure 22.2

Figure 22.2
22.2 The TextBox
The TextBox is the standard Excel VBA control for accepting input from the user as well as to display the output. It can handle string (text) and numeric data but not images.
Example 22.2
In this example, we inserted two text boxes and display the sum of numbers entered into the two text boxes in a message box. The Val function is used to convert the string into numeric values because the text box treats the number entered as a string.
Private Sub CommandButton1_Click ()
Dim x As Variant, y As Variant, z As Variant
x = TextBox1.Text
y = TextBox2.Text
z = Val(x) + Val(y)
MsgBox “The Sum of ” & x & ” and ” & y & ” is ” & z
End Sub

Figure 17.3
22.3 The Option Button
The option button control also lets the user selects one of the choices. However, two or more option buttons must work together because as one of the option buttons is selected, the other option button will be deselected. In fact, only one option button can be selected at one time. When an option button is selected, its value is set to “True” and when it is deselected; its value is set to “False”.
Example 22.3
This example demonstrates the usage of the option buttons. In this example, the Message box will display the option button selected by the user. The output interface is shown in Figure 22.4.
The code
Private Sub OptionButton1_Click ()
MsgBox “Option 1 is selected”
End Sub
Private Sub OptionButton2_Click()
MsgBox “Option 2 is selected”
End Sub
Private Sub OptionButton3_Click()
MsgBox “Option 3 is selected”
End Sub
The Output Interface

<<Lesson 21>> [Contents] <<Lesson 23>>
A check box is a field which can be checked to store information. To create a check box in Excel VBA, execute the following steps.
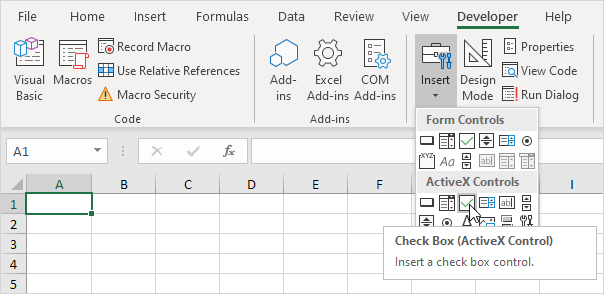
1. On the Developer tab, click Insert.
2. In the ActiveX Controls group, click Check Box.
3. Drag a check box on your worksheet.
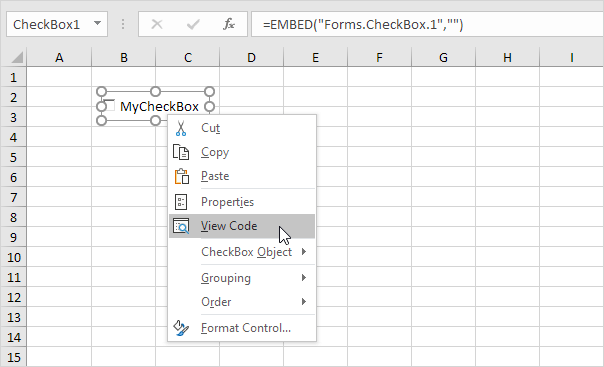
4. Right click the check box (make sure Design Mode is selected).
5. Click View Code.
Note: you can change the caption and name of a control by right clicking on the control (make sure Design Mode is selected) and then clicking on Properties. Change the caption of the check box to MyCheckBox. For now, we will leave CheckBox1 as the name of the check box.
6. Add the following code lines:
If CheckBox1.Value = True Then Range(«D2»).Value = 1
If CheckBox1.Value = False Then Range(«D2»).Value = 0
7. Click the check box on the sheet (make sure Design Mode is deselected).
Result:
Although in some situations it can be useful to directly place a check box on your worksheet, a check box is particularly useful when placed on a Userform.


