
Just to modify scott’s answer to make it a function:
Function FindFirstInRange(FindString As String, RngIn As Range, Optional UseCase As Boolean = True, Optional UseWhole As Boolean = True) As Variant

    Dim LookAtWhat As Integer

    If UseWhole Then LookAtWhat = xlWhole Else LookAtWhat = xlPart

    With RngIn
        Set FindFirstInRange = .Find(What:=FindString, _
                                     After:=.Cells(.Cells.Count), _
                                     LookIn:=xlValues, _
                                     LookAt:=LookAtWhat, _
                                     SearchOrder:=xlByRows, _
                                     SearchDirection:=xlNext, _
                                     MatchCase:=UseCase)

        If FindFirstInRange Is Nothing Then FindFirstInRange = False

    End With

End Function
This returns FALSE if the value isn’t found, and if it’s found, it returns the range.
You can optionally tell it to be case-sensitive, and/or to allow partial-word matches.
I took out the TRIM because you can add that beforehand if you want to.
An example:
MsgBox FindFirstInRange(StringToFind, Range("2:2"), TRUE, FALSE).Address
That does a case-sensitive, partial-word search on the 2nd row and displays a box with the address. The following is the same search, but a whole-word search that is not case-sensitive:
MsgBox FindFirstInRange(StringToFind, Range("2:2")).Address
You can easily tweak this function to your liking or change it from a Variant to to a boolean, or whatever, to speed it up a little.
Do note that VBA’s Find is sometimes slower than other methods like brute-force looping or Match, so don’t assume that it’s the fastest just because it’s native to VBA. It’s more complicated and flexible, which also can make it not always as efficient. And it has some funny quirks to look out for, like the «Object variable or with block variable not set» error.
Проверка переменных и выражений с помощью встроенных функций VBA Excel: IsArray, IsDate, IsEmpty, IsError, IsMissing, IsNull, IsNumeric, IsObject.
Проверка переменных и выражений
Встроенные функции VBA Excel — IsArray, IsDate, IsEmpty, IsError, IsMissing, IsNull, IsNumeric, IsObject — проверяют значения переменных и выражений на соответствие определенному типу данных или специальному значению.
Синтаксис функций для проверки переменных и выражений:
Expression — выражение, переменная или необязательный аргумент для IsMissing.
Все функции VBA Excel для проверки переменных и выражений являются логическими и возвращают значение типа Boolean — True или False.
Функция IsArray
Описание функции
Функция IsArray возвращает значение типа Boolean, указывающее, является ли переменная массивом:
- True — переменная является массивом;
- False — переменная не является массивом.
Пример с IsArray
|
Sub Primer1() Dim arr1(), arr2(1 To 10), arr3 Debug.Print IsArray(arr1) ‘Результат: True Debug.Print IsArray(arr2) ‘Результат: True Debug.Print IsArray(arr3) ‘Результат: False arr3 = Array(1, 2, 3, 4, 5) Debug.Print IsArray(arr3) ‘Результат: True End Sub |
Как показывает пример, функция IsArray возвращает True и в том случае, если переменная только объявлена как массив, но еще не содержит значений.
Функция IsDate
Описание функции
Функция IsDate возвращает логическое значение, указывающее, содержит ли переменная значение, которое можно интерпретировать как дату:
- True — переменная содержит дату, выражение возвращает дату, переменная объявлена с типом As Date;
- False — в иных случаях.
Пример с IsDate
|
Sub Primer2() Dim d1 As String, d2 As Date Debug.Print IsDate(d1) ‘Результат: False Debug.Print IsDate(d2) ‘Результат: True d1 = «14.01.2023» Debug.Print IsDate(d1) ‘Результат: True Debug.Print IsDate(Now) ‘Результат: True End Sub |
Функция IsEmpty
Описание функции
Функция IsEmpty возвращает значение типа Boolean, указывающее, содержит ли переменная общего типа (As Variant) значение Empty:
- True — переменная содержит значение Empty;
- False — переменной присвоено значение, отличное от Empty.
Пример с IsEmpty
|
Sub Primer3() Dim s As String, v As Variant Debug.Print IsEmpty(s) ‘Результат: False Debug.Print IsEmpty(v) ‘Результат: True v = 125 Debug.Print IsEmpty(v) ‘Результат: False Range(«A1»).Clear Debug.Print IsEmpty(Range(«A1»)) ‘Результат: True Range(«A1») = 123 Debug.Print IsEmpty(Range(«A1»)) ‘Результат: False End Sub |
Как видно из примера, функцию IsEmpty можно использовать для проверки ячеек на содержание значения Empty (пустая ячейка общего формата).
Функция IsError
Описание функции
Функция IsError возвращает логическое значение, указывающее, является ли аргумент функции значением ошибки, определенной пользователем:
- True — аргумент функции является значением ошибки, определенной пользователем;
- False — в иных случаях.
Пользователь может определить одну или несколько ошибок для своей процедуры или функции с рекомендациями действий по ее (их) исправлению. Возвращается номер ошибки с помощью функции CVErr.
Пример с IsError
Допустим, пользователь определил, что ошибка №25 означает несоответствие аргумента функции Vkuba числовому формату:
|
Function Vkuba(x) If IsNumeric(x) Then Vkuba = x ^ 3 Else Vkuba = CVErr(25) End If End Function Sub Primer4() Debug.Print Vkuba(5) ‘Результат: 125 Debug.Print IsError(Vkuba(5)) ‘Результат: False Debug.Print Vkuba(«пять») ‘Результат: Error 25 Debug.Print IsError(Vkuba(«пять»)) ‘Результат: True End Sub |
Функция IsMissing
Описание функции
Функция IsMissing возвращает значение типа Boolean, указывающее, был ли необязательный аргумент типа данных Variant передан процедуре:
- True — если в процедуру не было передано значение для необязательного аргумента;
- False — значение для необязательного аргумента было передано в процедуру.
Пример с IsMissing
|
Function Scepka(x, Optional y) If Not IsMissing(y) Then Scepka = x & y Else Scepka = x & » (а необязательный аргумент не подставлен)» End If End Function Sub Primer5() Debug.Print Scepka(«Тропинка», » в лесу») ‘Результат: Тропинка в лесу Debug.Print Scepka(«Тропинка») ‘Результат: Тропинка (а необязательный аргумент не подставлен) End Sub |
Функция IsNull
Описание функции
Функция IsNull возвращает логическое значение, указывающее, является ли Null значением переменной или выражения:
- True — значением переменной или выражения является Null;
- False — в иных случаях.
Пример с IsNull
Функция IsNull особенно необходима из-за того, что любое условие с выражением, в которое входит ключевое слово Null, возвращает значение False:
|
Sub Primer6() Dim Var Var = Null If Var = Null Then Debug.Print Var ‘Результат: «» If Var <> Null Then Debug.Print Var ‘Результат: «» If IsNull(Var) Then Debug.Print Var ‘Результат: Null End Sub |
Функция IsNumeric
Описание функции
Функция IsNumeric возвращает значение типа Boolean, указывающее, можно ли значение выражения или переменной рассматривать как число:
- True — если аргумент функции может рассматриваться как число;
- False — в иных случаях.
Пример с IsNumeric
|
Sub Primer7() Debug.Print IsNumeric(«3,14») ‘Результат: True Debug.Print IsNumeric(«четыре») ‘Результат: False End Sub |
Функция IsObject
Описание функции
Функция IsObject возвращает логическое значение, указывающее, является ли переменная объектной:
- True — переменная содержит ссылку на объект или значение Nothing;
- False — в иных случаях.
Функция IsObject актуальна для переменных типа Variant, которые могут содержать как ссылки на объекты, так и значения других типов данных.
Пример с IsObject
|
Sub Primer8() Dim myObj As Object, myVar As Variant Debug.Print IsObject(myObj) ‘Результат: True Debug.Print IsObject(myVar) ‘Результат: False Set myVar = ActiveSheet Debug.Print IsObject(myVar) ‘Результат: True End Sub |
EXPLANATION
This tutorial shows how to test if a range contains a specific value and return a specified value if the formula tests true or false, by using an Excel formula and VBA.
This tutorial provides one Excel method that can be applied to test if a range contains a specific value and return a specified value by using an Excel IF and COUNTIF functions. In this example, if the Excel COUNTIF function returns a value greater than 0, meaning the range has cells with a value of 500, the test is TRUE and the formula will return a «In Range» value. Alternatively, if the Excel COUNTIF function returns a value of of 0, meaning the range does not have cells with a value of 500, the test is FALSE and the formula will return a «Not in Range» value.
This tutorial provides one VBA method that can be applied to test if a range contains a specific value and return a specified value.
FORMULA
=IF(COUNTIF(range, value)>0, value_if_true, value_if_false)
ARGUMENTS
range: The range of cells you want to count from.
value: The value that is used to determine which of the cells should be counted, from a specified range, if the cells’ value is equal to this value.
value_if_true: Value to be returned if the range contains the specific value
value_if_false: Value to be returned if the range does not contains the specific value.
One thing I often found frustrating with VBA is the lack of any easy way to see the values in a range object.
I often use Debug.Print when debugging my VBA and I’d love to just be able to Debug.Print a range like you can with other variables.
But because a range is an object, not a variable, you can’t do that.
One way to see what’s in a range is to step through your code (pressing F8) and when the range is set, you can check the values in the range in the Locals window.
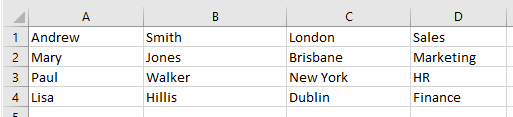
Our range looks like this
How To Open The Locals Window
In the VBA editor go to the View menu and click on Locals Window.
Each time F8 is pressed one line of VBA is executed. When the range MyRange is set, you can see that values appear for it in the Locals window.
By examining the MyRange object you can drill down to see the values in it.
Your browser does not support the video tag.
You can also set a Watch on the MyRange object to examine it in the Watch window, but this is essentially doing the same thing as examining it in the Locals window.
Using both Locals and Watch windows require you to step though code and examine values as the code executes.
If you want to just let the VBA run and see the values in the range printed out to the Immediate window, you need to write some code to do this.
How To Open The Immediate Window
In the VBA editor press CTRL+G, or go to the View menu and click on Immediate Window.
Print Values in Range One by One (Unformatted)
The code shown below will go through each cell in the range and print its value to the Immediate window.
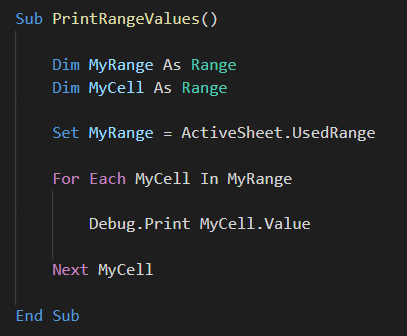
However because we are printing one value at a time, it doesn’t really give you a feel for the structure of the range. That is in this case, that there are 4 values per row/line.
Your browser does not support the video tag.
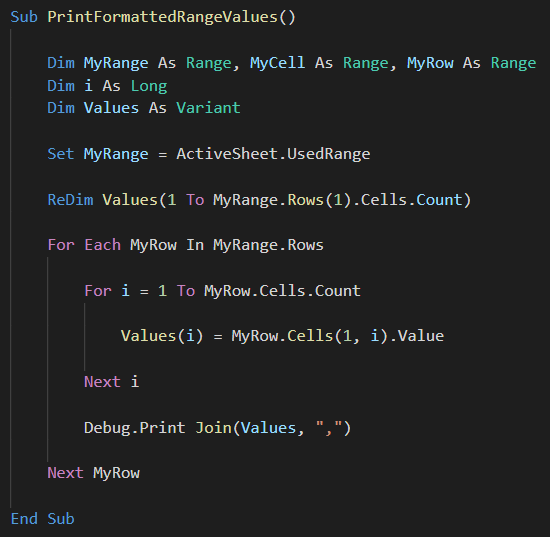
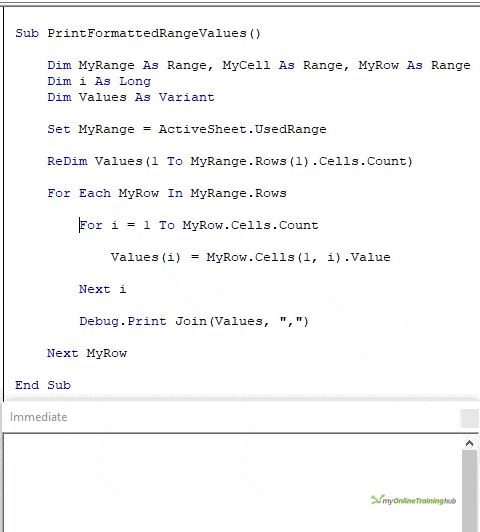
Print Values in Range Row by Row (Formatted)
This next sub stores each value in a row to an array, and then prints out all of these values using the JOIN function to create a string with values separated by a comma.
More on VBA String Functions
This formatted output gives a better representation of the actual structure of your range.
In this format, you can also use the output to write data to a CSV file.
Download Sample Workbook
Enter your email address below to download the workbook containing all the code from this post.
By submitting your email address you agree that we can email you our Excel newsletter.
In Excel VBA, IF Then Else statement allows you to check for a condition, and perform an action accordingly.
This is extremely valuable in many situations as we will see in the examples later in this tutorial.
To give you a simple example, suppose you have a list of grades in Excel and you want to highlight all those students who have scored an A. Now, if I ask you to do this manually, you will check each student’s grade and if it’s an A, you’ll highlight it, and if it isn’t, then you’ll leave it as is.
The same logic can be built in VBA using the If Then Else statement as well (and of course do a lot more than just highlighting grades).
In this tutorial, I’ll show you different ways the ‘If Then Else’ construct can be used in Excel VBA, and some practical examples in action.
But before I get into the specifics, let me give you the syntax of the ‘IF Then Else’ statement.
If you’re interested in learning VBA the easy way, check out my Online Excel VBA Training.
Syntax – IF Then Else
Below is the generic syntax of If Then Else construct in VBA
IF condition Then true_code [Else false_code]
Or
IF condition Then
true_code
Else
false_code
End IF
Note that the Else part of this statement is optional.
Now if you’re wondering what’s the difference between the two syntaxes, let me clarify.
The first syntax is a simple one-line IF THEN ELSE statement where you don’t need to use the END IF statement.
However, in the second syntax, the true_code part is in the second line. This is helpful when the code that you need to run in case the IF condition is true is long and consists of multiple lines.
When you split the IF statement into multiple lines, you need to tell VBA where the IF Then construct ends.
Hence you need to use the End IF statement.
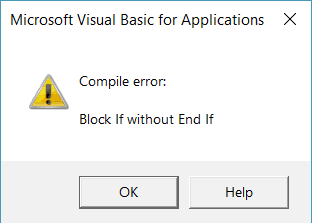
In case you don’t use End IF when required, VBA will show you an error – “Block IF without END IF”
Examples of Using IF Then Statement in VBA
To give you an idea of how the IF-THEN statement works in VBA, let me start with some basic examples (some practical and more useful examples are covered later in this tutorial).
Suppose you have a student’s score in cell A1 and you want to check whether the student passed the exam or not (passing marks threshold being 35).
Then you can use the following code:
Sub CheckScore()
If Range("A1").Value >=35 Then MsgBox "Pass"
End Sub
The above code has a single line of IF statement that checks the value in cell A1.
If it’s more than 35, it shows the message – “Pass”.
If it’s less than 35, nothing happens.
But what if you want to show a message in both the cases, whether a student passed or failed the exam.
The below code would do this:
Sub CheckScore()
If Range("A1").Value >= 35 Then
MsgBox "Pass"
Else
MsgBox "Fail"
End If
End Sub
The above code uses the IF as well as the ELSE statement to execute two different conditions. When the score is more than (or equal to) 35, the IF condition is true, and the code right below it gets executed (everything before the Else statement).
But when the IF condition is FALSE, the code jumps to the Else part and executes the code block in it.
Note that when we use a single line of IF Then statement, we don’t need to use End IF. But when we split it into more than one line, we need to use the End If statement.
Nested IF Then (Multiple IF Then statements)
So far we have used a single IF Then statement.
In case you have multiple conditions to check, you can use:
- Multiple IF conditions
- If Then Else statement
- IF Then ElseIf Else construct
Let me show you how these differ and how to use this in Excel VBA.
Multiple IF Then Statements
Let’s take the same example of using a student’s score.
If the student scores less than 35, the message to display is ‘Fail’, if the score is more than or equal to 35, the message to display is ‘Pass’.
We can use the below code to get this done:
Sub CheckScore()
If Range("A1").Value < 35 Then MsgBox "Fail"
If Range("A1").Value >= 35 Then MsgBox "Pass"
End Sub
You can use multiple IF Then statement as shown above. While this works, it’s not an example of good coding (as you will see the alternatives below).
In case you decide to use this, remember that these statements should either be independent or mutually exclusive. The important thing to know here is that in the above construct, all the IF statements are evaluated and the ones where the condition is true, the code is executed.
So even if the first IF statement is correct, the second would still be evaluated.
IF Then Else Statement
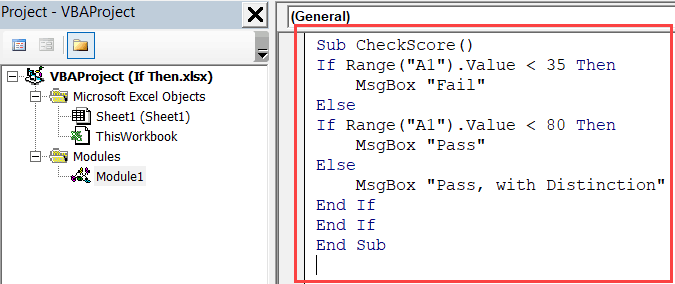
Suppose this time, instead of just displaying the message Pass/Fail, we have one more condition.
If the student scores less than 35, the message to display is ‘Fail’, if the score is more than or equal to 35, the message to display is ‘Pass’, and if the score is more than 80, the message to display is ‘Pass, with Distinction’.
We can use the below code to get this done:
Sub CheckScore()
If Range("A1").Value < 35 Then
MsgBox "Fail"
Else
If Range("A1").Value < 80 Then
MsgBox "Pass"
Else
MsgBox "Pass, with Distinction"
End If
End If
End Sub
In the above code, we have used multiple IF statements (nested IF Then) with the help of Else.
So there is an ‘IF Then Else’ construct within an ‘IF Then Else’ construct. This type of nesting allows you to check for multiple conditions and run the relevant block of code.
IF Then ElseIf Else Statement
The above code (that we saw in the previous section) can be further optimized by using the ElseIf statement.
Here is what we’re trying to do – If the student scores less than 35, the message to display is ‘Fail’, if the score is more than or equal to 35, the message to display is ‘Pass’, and if the score is more than 80, the message to display is ‘Pass, with Distinction’.
Sub CheckScore()
If Range("A1").Value < 35 Then
MsgBox "Fail"
ElseIf Range("A1").Value < 80 Then
MsgBox "Pass"
Else
MsgBox "Pass, with Distinction"
End If
End Sub
The above code uses ElseIf, which allows us to keep all the conditions within one single IF Then statement.
Using AND and OR in IF Then Else
So far in this tutorial, we have only checked for a single condition at a time.
However, when you have multiple dependent conditions, you can use the AND or OR statement with the IF conditions.
Below is the syntax of using AND/OR condition with the IF Then statement.
IF Condition1 AND Condition2 Then
true_code
Else
false_code
End IF
In the above code, only when both Condition1 and Condition2 are met, the true_code is executed. Even if one of the conditions is false, it will execute the false_code.
With OR, even if one of the conditions are true, it will execute the true_code. Only when all the conditions are false, it executes the false_code.
Now let’s see how AND and OR statement work with the IF Then Else construct.
Suppose you have the scores for two subjects instead of one, and you want to check for the following conditions:
- Fail – When the score is less than 35 in any of the subjects.
- Pass – When the score is more than or equal to 35, but less than 80 in both the subjects.
- Pass, with Distinction – When the score is more than 35 in both the subjects and is more than or equal to 80 in one or both the subjects.
Here is the code that will do this:
Sub CheckScore()
If Range("A1").Value < 35 Or Range("B1").Value < 35 Then
MsgBox "Fail"
ElseIf Range("A1").Value < 80 And Range("B1").Value < 80 Then
MsgBox "Pass"
Else
MsgBox "Pass, with Distinction"
End If
End Sub
The above code uses both OR and AND statements.
You can also write this same code with a slight change (using OR instead of AND).
Sub CheckScore()
If Range("A1").Value < 35 Or Range("B1").Value < 35 Then
MsgBox "Fail"
ElseIf Range("A1").Value > 80 Or Range("B1").Value > 80 Then
MsgBox "Pass, with Distinction"
Else
MsgBox "Pass"
End If
End Sub
Both the above VBA codes will give you the same result. Personally, I prefer the first one as it has a logical flow of checking the scores (but that’s just me).
Using Not Equal to in If Then
In all the examples above, we have used the conditions that check whether a value equal to a specified value or not.
You can also use similar codes when checking when the value is not equal to a specified value in the VBA code. Not equal to represented by <> the Excel VBA.
To see a practical example of using <>, have a look at Example 1 below.
Using If Then Else with Loops in VBA
So far, we have been going through some examples that are good to understand how the ‘IF-THEN’ statements work in VBA, however, are not useful in the practical world.
If I need to grade students, I can easily do that using Excel functions.
So let’s have a look at some useful and practical examples that can help you automate some stuff and be more efficient.
Example 1 – Save and Close All Workbooks Except The Active Workbook
If you have a lot of workbooks open and you quickly want to close all, except the active workbook, you can use the below code,
Sub SaveCloseAllWorkbooks()
Dim wb As Workbook
For Each wb In Workbooks
On error resume next
If wb.Name <> ActiveWorkbook.Name Then
wb.Save
wb.Close
End If
Next wb
End Sub
The above code would save and close all the workbooks (except the active one).
It uses the For Next loop to go through the collection of all the open workbooks and checks the name using the IF condition.
If the name is not the same as that of the Active workbook, it saves and closes it.
In case there is a VBA code in any of the workbooks and you haven’t saved it as .xls or .xlsm, you will see a warning (as the vba codes are lost when you save it in .xlsx format).
Example 2 – Highlight Cells with Negative Values
Suppose that you have a column full of numbers and you want to quickly highlight all the cells with negative values in red, you can do that using the below code.
Sub HighlightNegativeCells()
Dim Cll As Range
For Each Cll In Selection
If Cll.Value < 0 Then
Cll.Interior.Color = vbRed
Cll.Font.Color = vbWhite
End If
Next Cll
End Sub
The above code uses the For Each loop and checks each cell in the selection that you have made. If the cell has a value that is negative, it’s highlighted in red with white font color.
Example 3 – Hide All the Worksheet Except the Current Worksheet
In case you want to quickly hide all the worksheets except the active one, you can use the below code:
Sub HideAllExceptActiveSheet()
Dim ws As Worksheet
For Each ws In ThisWorkbook.Worksheets
If ws.Name <> ActiveSheet.Name Then ws.Visible = xlSheetHidden
Next ws
End Sub
The above code uses the For Each loop to go through a collection of worksheets. It checks the name of each worksheet and hides it if it’s not the active worksheet.
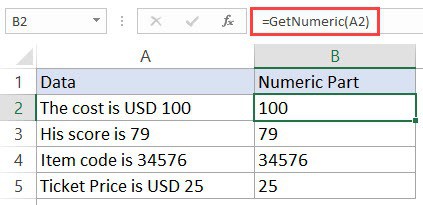
Example 4 – Extract the Numeric Part from an Alphanumeric String
If you have alphanumeric strings in cells and you want to extract the numeric part from it, you can do that using the below code:
Function GetNumeric(CellRef As String)
Dim StringLength As Integer
StringLength = Len(CellRef)
For i = 1 To StringLength
If IsNumeric(Mid(CellRef, i, 1)) Then Result = Result & Mid(CellRef, i, 1)
Next i
GetNumeric = Result
End Function
This code will create a custom function in Excel that can use within the worksheet (just like a regular function).
Where to Put the VBA Code?
Wondering where the VBA code goes in your Excel workbook?
Excel has a VBA backend called the VB editor. You need to copy and paste the code in the VB Editor module code window.
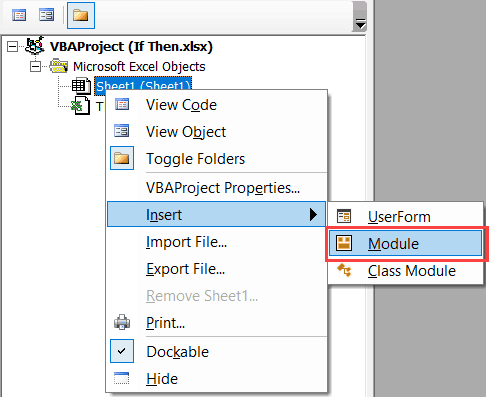
Here are the steps to do this:
- Go to the Developer tab.

- Click on Visual Basic option. This will open the VB editor in the backend.
- In the Project Explorer pane in the VB Editor, right-click on any object for the workbook in which you want to insert the code. If you don’t see the Project Explorer go to the View tab and click on Project Explorer.
- Go to Insert and click on Module. This will insert a module object for your workbook.

- Copy and paste the code in the module window.


You May Also Like the Following Excel Tutorials:
- How to Record a Macro in Excel.
- Working with Cells and Ranges in Excel VBA.
- Working with Worksheets in Excel VBA.
- Working with Workbooks in Excel VBA.
- Creating a Custom Function in Excel Using VBA.
- Excel VBA Events – An Easy (and Complete) Guide.
- Excel VBA MsgBox
- How to Run a Macro in Excel.
- How to Create and Use an Excel Add-in.
- Excel Personal Macro Workbook | Save & Use Macros in All Workbooks.
- Useful Excel Macro Examples for VBA Beginners (Ready-to-use).
- How to Use Excel VBA InStr Function (with practical EXAMPLES).

This Excel tutorial explains how to check values in the VBA debugging environment in Excel 2016 (with screenshots and step-by-step instructions).
Checking values
In Excel 2016, if you want to view the value of a variable in your VBA code at the time that the program was suspended, you can move your mouse pointer over that VBA code. Bubble text will appear displaying the variable/expression name and its value in its current state.
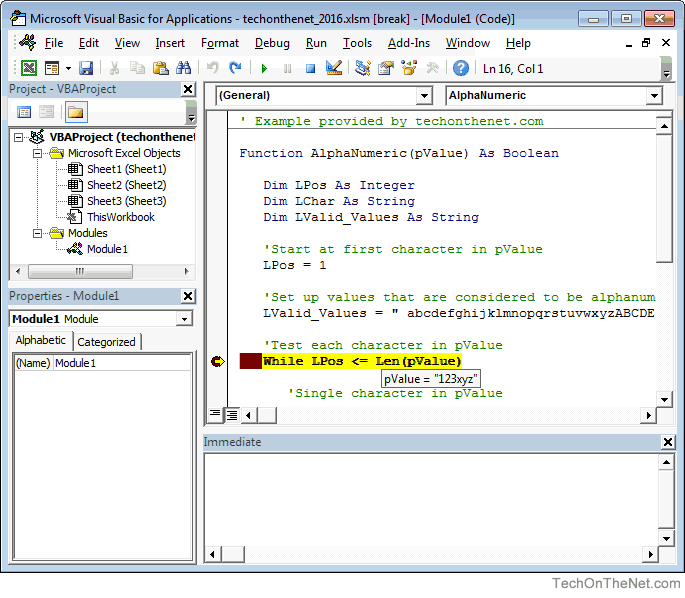
In this example, we’ve moved the mouse pointer over the expression pValue. The bubble text displays the expression name with a value of «123xyz».
This feature is useful if you need to quickly check a variable/expression in your code.
This tutorial provides a solution to check the Excel cell value and the cell value above in Excel worksheet using VBA.
This was originally a question posted in Microsoft Community. I extract it to illustrate an example how to check Excel cell value and cell value above.
Question
Given a range of 12 cells in a row filled with only 0’s and 1’s…
Would anyone know a way to return a true or false in a cell if looking in all the above cells, a 0 appeared 3 times in a row?
Thanks in advance for any ideas or thoughts.
Answer
To check whether Excel cell value and cell value above is 1 three times in a row, loop through each cell from the beginning row to end row, and check if the value is 0.
To check the cell value above, use Range(col & r + 1).Value =0
To check the cell value above, use Range(col & r + 2).Value=0
If there is an empty cell, the returned value is also 0. isEmpty() should be used to ensure the returned value is truly 0 but not empty. But for simplicity, I did not use isEmpty() in the below codes.
Public Sub checkrow()
     'define column you want to check
     col = "A"
     'define row number you need to check
     For r = 1 To 12
         If Range(col & r).Value =0 And Range(col & r + 1).Value =0 And Range(col & r + 2).Value =0 Then
             MsgBox (True)
             Exit Sub
         End If
     Next r
     MsgBox (False)
 End Sub
This post provides a complete guide to the VBA If Statement in VBA. If you are looking for the syntax then check out the quick guide in the first section which includes some examples.
The table of contents below provides an overview of what is included in the post. You use this to navigate to the section you want or you can read the post from start to finish.
“Guess, if you can, and choose, if you dare.” – Pierre Corneille
Quick Guide to the VBA If Statement
| Description | Format | Example |
|---|---|---|
| If Then | If [condition is true] Then [do something] End If |
If score = 100 Then Debug.Print «Perfect» End If |
| If Else | If [condition is true] Then [do something] Else [do something] End If |
If score = 100 Then Debug.Print «Perfect» Else Debug.Print «Try again» End If |
| If ElseIf | If [condition 1 is true] Then [do something] ElseIf [condition 2 is true] Then [do something] End If |
If score = 100 Then Debug.Print «Perfect» ElseIf score > 50 Then Debug.Print «Passed» ElseIf score <= 50 Then Debug.Print «Try again» End If |
| Else and ElseIf (Else must come after ElseIf’s) |
If [condition 1 is true] Then [do something] ElseIf [condition 2 is true] Then [do something] Else [do something] End If |
If score = 100 Then Debug.Print «Perfect» ElseIf score > 50 Then Debug.Print «Passed» ElseIf score > 30 Then Debug.Print «Try again» Else Debug.Print «Yikes» End If |
| If without Endif (One line only) |
If [condition is true] Then [do something] | If value <= 0 Then value = 0 |
The following code shows a simple example of using the VBA If statement
If Sheet1.Range("A1").Value > 5 Then
    Debug.Print "Value is greater than five."
ElseIf Sheet1.Range("A1").Value < 5 Then
    Debug.Print "value is less than five."
Else
    Debug.Print "value is equal to five."
End If
The Webinar
Members of the Webinar Archives can access the webinar for this article by clicking on the image below.
(Note: Website members have access to the full webinar archive.)

What is the VBA If Statement
The VBA If statement is used to allow your code to make choices when it is running.
You will often want to make choices based on the data your macros reads.
For example, you may want to read only the students who have marks greater than 70. As you read through each student you would use the If Statement to check the marks of each student.
The important word in the last sentence is check. The If statement is used to check a value and then to perform a task based on the results of that check.
The Test Data and Source Code
We’re going to use the following test data for the code examples in this post:

You can download the test data with all the source code for post plus the solution to the exercise at the end:
Format of the VBA If-Then Statement
The format of the If Then statement is as follows
If [condition is true] Then
The If keyword is followed by a Condition and the keyword Then
Every time you use an If Then statement you must use a matching End If statement.
When the condition evaluates to true, all the lines between If Then and End If are processed.
If [condition is true] Then
    [lines of code]
    [lines of code]
    [lines of code]
End If
To make your code more readable it is good practice to indent the lines between the If Then and End If statements.
Indenting Between If and End If
Indenting simply means to move a line of code one tab to the right. The rule of thumb is to indent between start and end statements like
Sub … End Sub
If Then … End If
If Then… ElseIf … Else … Endif
For … Next
Do While … Loop
Select Case … End Case
To indent the code you can highlight the lines to indent and press the Tab key. Pressing Shift + Tab will Outdent the code i.e. move it one tab to the left.
You can also use the icons from the Visual Basic Toolbar to indent/outdent the code

Select code and click icons to indent/outdent
If you look at any code examples on this website you will see that the code is indented.
A Simple If Then Example
The following code prints out the names of all students with marks greater than 50 in French.
' https://excelmacromastery.com/
Sub ReadMarks()

    Dim i As Long
    ' Go through the marks columns
    For i = 2 To 11
        ' Check if marks greater than 50
        If Sheet1.Range("C" & i).Value > 50 Then
            ' Print student name to the Immediate Window(Ctrl + G)
            Debug.Print Sheet1.Range("A" & i).Value & " " & Sheet1.Range("B" & i).Value
        End If

    Next

End Sub
Results
Bryan Snyder
Juanita Moody
Douglas Blair
Leah Frank
Monica Banks
Play around with this example and check the value or the > sign and see how the results change.
Using Conditions with the VBA If Statement
The piece of code between the If and the Then keywords is called the condition. A condition is a statement that evaluates to true or false. They are mostly used with Loops and If statements. When you create a condition you use signs like >,<,<>,>=,<=,=.
The following are examples of conditions
| Condition | This is true when |
|---|---|
| x < 5 | x is less than 5 |
| x <= 5 | x is less than or equal to 5 |
| x > 5 | x is greater than 5 |
| x >= 5 | x is greater than or equal to 5 |
| x = 5 | x is equal to 5 |
| x <> 5 | x does not equal 5 |
| x > 5 And x < 10 | x is greater than 5 AND x is less than 10 |
| x = 2 Or x >10 | x is equal to 2 OR x is greater than 10 |
| Range(«A1») = «John» | Cell A1 contains text «John» |
| Range(«A1») <> «John» | Cell A1 does not contain text «John» |
You may have noticed x=5 as a condition. This should not be confused with x=5 when used as an assignment.
When equals is used in a condition it means “is the left side equal to the right side”.
The following table demonstrates how the equals sign is used in conditions and assignments
| Using Equals | Statement Type | Meaning |
|---|---|---|
| Loop Until x = 5 | Condition | Is x equal to 5 |
| Do While x = 5 | Condition | Is x equal to 5 |
| If x = 5 Then | Condition | Is x equal to 5 |
| For x = 1 To 5 | Assignment | Set the value of x to 1, then to 2 etc. |
| x = 5 | Assignment | Set the value of x to 5 |
| b = 6 = 5 | Assignment and Condition | Assign b to the result of condition 6 = 5 |
| x = MyFunc(5,6) | Assignment | Assign x to the value returned from the function |
The last entry in the above table shows a statement with two equals. The first equals sign is the assignment and any following equals signs are conditions.
This might seem confusing at first but think of it like this. Any statement that starts with a variable and an equals is in the following format
[variable] [=] [evaluate this part]
So whatever is on the right of the equals sign is evaluated and the result is placed in the variable. Taking the last three assignments again, you could look at them like this
[x] [=] [5]
[b] [=] [6 = 5]
[x] [=] [MyFunc(5,6)]
Using ElseIf with the VBA If Statement
The ElseIf statement allows you to choose from more than one option. In the following example we print for marks that are in the Distinction or High Distinction range.
' https://excelmacromastery.com/
Sub UseElseIf()

    If Marks >= 85 Then
        Debug.Print "High Destinction"
    ElseIf Marks >= 75 Then
        Debug.Print "Destinction"
    End If

End Sub
The important thing to understand is that order is important. The If condition is checked first.
If it is true then “High Distinction” is printed and the If statement ends.
If it is false then the code moves to the next ElseIf and checks it condition.
Let’s swap around the If and ElseIf from the last example. The code now look like this
' https://excelmacromastery.com/
Sub UseElseIfWrong()

    ' This code is incorrect as the ElseIf will never be true
    If Marks >= 75 Then
        Debug.Print "Destinction"
    ElseIf Marks >= 85 Then
        ' code will never reach here
        Debug.Print "High Destinction"
    End If

End Sub
In this case we check for a value being over 75 first. We will never print “High Distinction” because if a value is over 85 is will trigger the first if statement.
To avoid these kind of problems we should use two conditions. These help state exactly what you are looking for a remove any confusion. The example below shows how to use these. We will look at more multiple conditions in the section below.
If marks >= 75 And marks < 85 Then
    Debug.Print "Destinction"
ElseIf marks >= 85 And marks <= 100 Then
    Debug.Print "High Destinction"
End If
Let’s expand the original code. You can use as many ElseIf statements as you like. We will add some more to take into account all our mark classifications.
If you want to try out these examples you can download the code from the top of this post.
Using Else With the VBA If Statement
The VBA Else statement is used as a catch all. It basically means “if no conditions were true” or “everything else”. In the previous code example, we didn’t include a print statement for a fail mark. We can add this using Else.
' https://excelmacromastery.com/
Sub UseElse()

    If Marks >= 85 Then
        Debug.Print "High Destinction"
    ElseIf Marks >= 75 Then
        Debug.Print "Destinction"
    ElseIf Marks >= 55 Then
        Debug.Print "Credit"
    ElseIf Marks >= 40 Then
        Debug.Print "Pass"
    Else
        ' For all other marks
        Debug.Print "Fail"
    End If

End Sub
So if it is not one of the other types then it is a fail.
Let’s write some code to go through our sample data and print the student and their classification:
' https://excelmacromastery.com/
Sub AddClass()

    ' get the last row
    Dim startRow As Long, lastRow As Long
    startRow = 2
    lastRow = Sheet1.Cells(Sheet1.Rows.Count, 1).End(xlUp).Row

    Dim i As Long, Marks As Long
    Dim sClass As String

    ' Go through the marks columns
    For i = startRow To lastRow
        Marks = Sheet1.Range("C" & i).Value
        ' Check marks and classify accordingly
        If Marks >= 85 Then
            sClass = "High Destinction"
        ElseIf Marks >= 75 Then
            sClass = "Destinction"
        ElseIf Marks >= 55 Then
            sClass = "Credit"
        ElseIf Marks >= 40 Then
            sClass = "Pass"
        Else
            ' For all other marks
            sClass = "Fail"
        End If

        ' Write out the class to column E
        Sheet1.Range("E" & i).Value = sClass
    Next

End Sub
The results look like this with column E containing the classification of the marks

Results
Remember that you can try these examples for yourself with the code download from the top of this post.
Using Logical Operators with the VBA If Statement
You can have more than one condition in an If Statement. The VBA keywords And and Or allow use of multiple conditions.
These words work in a similar way to how you would use them in English.
Let’s look at our sample data again. We now want to print all the students that got over between 50 and 80 marks.
We use And to add an extra condition. The code is saying: if the mark is greater than or equal 50 and less than 75 then print the student name.
' https://excelmacromastery.com/
Sub CheckMarkRange()

    Dim i As Long, marks As Long
    For i = 2 To 11

        ' Store marks for current student
        marks = Sheet1.Range("C" & i).Value

        ' Check if marks greater than 50 and less than 75
        If marks >= 50 And marks < 80 Then
             ' Print first and last name to Immediate window(Ctrl G)
             Debug.Print Sheet1.Range("A" & i).Value & Sheet1.Range("B" & i).Value
        End If

    Next

End Sub
Results
Douglas Blair
Leah Frank
Monica Banks
In our next example we want the students who did History or French. So in this case we are saying if the student did History OR if the student did French:
' Description: Uses OR to check the study took History or French.
' Worksheet: Marks
' Output: Result are printed to the Immediate Windows(Ctrl + G)
' https://excelmacromastery.com/vba-if
Sub UseOr()

    ' Get the data range
    Dim rg As Range
    Set rg = shMarks.Range("A1").CurrentRegion

    Dim i As Long, subject As String

    ' Read through the data
    For i = 2 To rg.Rows.Count

        ' Get the subject
        subject = rg.Cells(i, 4).Value

        ' Check if subject greater than 50 and less than 80
        If subject = "History" Or subject = "French" Then
            ' Print first name and subject to Immediate window(Ctrl G)
            Debug.Print rg.Cells(i, 1).Value & " " & rg.Cells(i, 4).Value
        End If

    Next

End Sub
Results
Bryan History
Bradford French
Douglas History
Ken French
Leah French
Rosalie History
Jackie History
Using Multiple conditions like this is often a source of errors. The rule of thumb to remember is to keep them as simple as possible.
Using If And
The AND works as follows
| Condition 1 | Condition 2 | Result |
| TRUE | TRUE | TRUE |
| TRUE | FALSE | FALSE |
| FALSE | TRUE | FALSE |
| FALSE | FALSE | FALSE |
What you will notice is that AND is only true when all conditions are true
Using If Or
The OR keyword works as follows
| Condition 1 | Condition 2 | Result |
| TRUE | TRUE | TRUE |
| TRUE | FALSE | TRUE |
| FALSE | TRUE | TRUE |
| FALSE | FALSE | FALSE |
What you will notice is that OR is only false when all the conditions are false.
Mixing AND and OR together can make the code difficult to read and lead to errors. Using parenthesis can make the conditions clearer.
' https://excelmacromastery.com/
Sub OrWithAnd()

 Dim subject As String, marks As Long
 subject = "History"
 marks = 5

 If (subject = "French" Or subject = "History") And marks >= 6 Then
     Debug.Print "True"
 Else
     Debug.Print "False"
 End If

End Sub
Using If Not
There is also a NOT operator. This returns the opposite result of the condition.
| Condition | Result |
| TRUE | FALSE |
| FALSE | TRUE |
The following two lines of code are equivalent.
If marks < 40 Then
If Not marks >= 40 Then
as are
If True Then
If Not False Then
and
If False Then
If Not True Then
Putting the condition in parenthesis makes the code easier to read
If Not (marks >= 40) Then
A common usage of Not when checking if an object has been set. Take a worksheet for example. Here we declare the worksheet
Dim mySheet As Worksheet
' Some code here
We want to check mySheet is valid before we use it. We can check if it is nothing.
If mySheet Is Nothing Then
There is no way to check if it is something as there is many different ways it could be something. Therefore we use Not with Nothing
If Not mySheet Is Nothing Then
If you find this a bit confusing you can use parenthesis like this
If Not (mySheet Is Nothing) Then
The IIF function
Note that you can download the IIF examples below and all source code from the top of this post.
VBA has an fuction similar to the Excel If function. In Excel you will often use the If function as follows:
=IF(F2=””,””,F1/F2)
The format is
=If(condition, action if true, action if false).
VBA has the IIf statement which works the same way. Let’s look at an example. In the following code we use IIf to check the value of the variable val. If the value is greater than 10 we print true otherwise we print false:
' Description: Using the IIF function to check a number.
' Worksheet: Marks
' Output: Result are printed to the Immediate Windows(Ctrl + G)
' https://excelmacromastery.com/vba-if
Sub CheckNumberIIF()

    Dim result As Boolean
    Dim number As Long

    ' Prints True
    number = 11
    result = IIf(number > 10, True, False)
    Debug.Print "Number " & number & " greater than 10 is " & result

    ' Prints false
    number = 5
    result = IIf(number > 10, True, False)
    Debug.Print "Number " & number & " greater than 10 is " & result

End Sub
In our next example we want to print out Pass or Fail beside each student depending on their marks. In the first piece of code we will use the normal VBA If statement to do this:
' https://excelmacromastery.com/
Sub CheckMarkRange()

    Dim i As Long, marks As Long
    For i = 2 To 11

        ' Store marks for current student
        marks = Sheet1.Range("C" & i).Value

        ' Check if student passes or fails
        If marks >= 40 Then
             ' Write out names to to Column F
             Sheet1.Range("E" & i) = "Pass"
        Else
             Sheet1.Range("E" & i) = "Fail"
        End If

    Next

End Sub
In the next piece of code we will use the IIf function. You can see that the code is much neater here:
' Description: Using the IIF function to check marks.
' Worksheet: Marks
' Output: Result are printed to the Immediate Windows(Ctrl + G)
' https://excelmacromastery.com/vba-if
Sub CheckMarkRange()

    ' Get the data range
    Dim rg As Range
    Set rg = shMarks.Range("A1").CurrentRegion

    Dim i As Long, marks As Long, result As String
    ' Go through the marks columns
    For i = 2 To rg.Rows.Count

        ' Store marks for current student
        marks = rg.Cells(i, 3).Value

        ' Check if student passes or fails
        result = IIf(marks >= 40, "Pass", "Fail")

        ' Print the name and result
        Debug.Print rg.Cells(i, 1).Value, result

    Next

End Sub
You can see the IIf function is very useful for simple cases where you are dealing with two possible options.
Using Nested IIf
You can also nest IIf statements like in Excel. This means using the result of one IIf with another. Let’s add another result type to our previous examples. Now we want to print Distinction, Pass or Fail for each student.
Using the normal VBA we would do it like this
' https://excelmacromastery.com/
Sub CheckResultType2()

    Dim i As Long, marks As Long
    For i = 2 To 11

        ' Store marks for current student
        marks = Sheet1.Range("C" & i).Value

        If marks >= 75 Then
             Sheet1.Range("E" & i).Value = "Distinction"
        ElseIf marks >= 40 Then
             ' Write out names to to Column F
             Sheet1.Range("E" & i).Value = "Pass"
        Else
             Sheet1.Range("E" & i).Value = "Fail"
        End If

    Next

End Sub
Using nested IIfs we could do it like this:
' Description: Using a nested IIF function to check marks.
' Worksheet: Marks
' Output: Result are printed to the Immediate Windows(Ctrl + G)
' https://excelmacromastery.com/vba-if
Sub UsingNestedIIF()

    ' Get the data range
    Dim rg As Range
    Set rg = shMarks.Range("A1").CurrentRegion

    Dim i As Long, marks As Long, result As String
    ' Go through the marks columns
    For i = 2 To rg.Rows.Count

        marks = rg.Cells(i, 3).Value
        result = IIf(marks >= 55, "Credit", IIf(marks >= 40, "Pass", "Fail"))

        Debug.Print marks, result

    Next i

End Sub
Using nested IIf is fine in simple cases like this. The code is simple to read and therefore not likely to have errors.
What to Watch Out For
It is important to understand that the IIf function always evaluates both the True and False parts of the statement regardless of the condition.
In the following example we want to divide by marks when it does not equal zero. If it equals zero we want to return zero.
marks = 0
total = IIf(marks = 0, 0, 60 / marks)
However, when marks is zero the code will give a “Divide by zero” error. This is because it evaluates both the True and False statements. The False statement here i.e. (60 / Marks) evaluates to an error because marks is zero.
If we use a normal IF statement it will only run the appropriate line.
marks = 0
If marks = 0 Then
    'Only executes this line when marks is zero
    total = 0
Else
    'Only executes this line when marks is Not zero
    total = 60 / marks
End If
What this also means is that if you have Functions for True and False then both will be executed. So IIF will run both Functions even though it only uses one return value. For example
'Both Functions will be executed every time
total = IIf(marks = 0, Func1, Func2)
(Thanks to David for pointing out this behaviour in the comments)
If Versus IIf
So which is better?
You can see for this case that IIf is shorter to write and neater. However if the conditions get complicated you are better off using the normal If statement. A disadvantage of IIf is that it is not well known so other users may not understand it as well as code written with a normal if statement.
Also as we discussed in the last section IIF always evaluates the True and False parts so if you are dealing with a lot of data the IF statement would be faster.
My rule of thumb is to use IIf when it will be simple to read and doesn’t require function calls. For more complex cases use the normal If statement.
Using Select Case
The Select Case statement is an alternative way to write an If statment with lots of ElseIf’s. You will find this type of statement in most popular programming languages where it is called the Switch statement. For example Java, C#, C++ and Javascript all have a switch statement.
The format is
Select Case [variable]
    Case [condition 1]
    Case [condition 2]
    Case [condition n]
    Case Else
End Select
Let’s take our AddClass example from above and rewrite it using a Select Case statement.
' https://excelmacromastery.com/
Sub AddClass()

    ' get the last row
    Dim startRow As Long, lastRow As Long
    startRow = 2
    lastRow = Sheet1.Cells(Sheet1.Rows.Count, 1).End(xlUp).Row

    Dim i As Long, Marks As Long
    Dim sClass As String

    ' Go through the marks columns
    For i = startRow To lastRow
        Marks = Sheet1.Range("C" & i).Value
        ' Check marks and classify accordingly
        If Marks >= 85 Then
            sClass = "High Destinction"
        ElseIf Marks >= 75 Then
            sClass = "Destinction"
        ElseIf Marks >= 55 Then
            sClass = "Credit"
        ElseIf Marks >= 40 Then
            sClass = "Pass"
        Else
            ' For all other marks
            sClass = "Fail"
        End If

        ' Write out the class to column E
        Sheet1.Range("E" & i).Value = sClass
    Next

End Sub
The following is the same code using a Select Case statement. The main thing you will notice is that we use “Case 85 to 100” rather than “marks >=85 And marks <=100”.
' https://excelmacromastery.com/
Sub AddClassWithSelect()

    ' get the first and last row
    Dim firstRow As Long, lastRow As Long
    firstRow = 2
    lastRow = Cells(Cells.Rows.Count, 1).End(xlUp).Row

    Dim i As Long, marks As Long
    Dim sClass As String

    ' Go through the marks columns
    For i = firstRow To lastRow
        marks = Sheet1.Range("C" & i).Value
        ' Check marks and classify accordingly
        Select Case marks
        Case 85 To 100
            sClass = "High Destinction"
        Case 75 To 84
            sClass = "Destinction"
        Case 55 To 74
            sClass = "Credit"
        Case 40 To 54
            sClass = "Pass"
        Case Else
            ' For all other marks
            sClass = "Fail"
        End Select
        ' Write out the class to column E
        Sheet1.Range("E" & i).Value = sClass
    Next

End Sub
Using Case Is
You could rewrite the select statement in the same format as the original ElseIf. You can use Is with Case.
' https://excelmacromastery.com/
Select Case marks
    Case Is >= 85
         sClass = "High Destinction"
    Case Is >= 75
        sClass = "Destinction"
    Case Is >= 55
        sClass = "Credit"
    Case Is >= 40
        sClass = "Pass"
    Case Else
        ' For all other marks
        sClass = "Fail"
End Select
You can use Is to check for multiple values. In the following code we are checking if marks equals 5, 7 or 9.
' https://excelmacromastery.com/
Sub TestMultiValues()

    Dim marks As Long
    marks = 7

    Select Case marks
        Case Is = 5, 7, 9
            Debug.Print True
        Case Else
            Debug.Print False
    End Select

End Sub
What’s Next?
Free VBA Tutorial If you are new to VBA or you want to sharpen your existing VBA skills then why not try out the The Ultimate VBA Tutorial.
Related Training: Get full access to the Excel VBA training webinars and all the tutorials.
(NOTE: Planning to build or manage a VBA Application? Learn how to build 10 Excel VBA applications from scratch.)