
- Remove From My Forums
-
Question
-
Hi
how can i find a shape in word doc ?
i want to find a textBox in word doc and add table inside it programmatically (using csharp). to do this, i need the width and height of textBox to fit my generated table according to user settings.
thanks in advance
http://www.codeproject.com/KB/codegen/DatabaseHelper.aspx
Answers
-
what I referred to as (textbox pointer) is the same as your ‘shape’ variable.
I don’t know C# but something along these lines …
if (wordDoc.Shapes.Count > 0) { foreach (Microsoft.Office.Interop.Word.Shape shape in wordDoc.Shapes) { string text = shape.AlternativeText; if (text.StartsWith("Text Box: ")) // or some better way of identifying your textbox {Microsoft.Office.Interop.Word.Range textboxrange = shape.TextFrame.ContainingRange
textboxrange.Tables.Add textboxrange, 2, 2 // change to your table details } } }
Enjoy,
Tony
www.WordArticles.com-
Marked as answer by
Friday, June 24, 2011 12:39 PM
-
Marked as answer by
In Excel we have the «Name Box» in the upper-left side, but I could not find a way to retrieve the name of a shape in Word. How do I do that?
![]()
braX
11.5k5 gold badges20 silver badges33 bronze badges
asked Jul 16, 2013 at 15:06
![]()
There are two types of shapes in MS Word- InlineShapes and Shapes. It’s quite easy to check name of shape object with some VBA code:
- select shape
- press Alt+F11 to open VBA Editor
- in Immediate window execute this code:
? Selection.ShapeRange.Name - as a result you get name of the shape.
InlineShape doesn’t have name property therefore you can’t check it’s name until you promote your InlineShape to Shape type object.
answered Jul 16, 2013 at 15:22
![]()
Kazimierz JaworKazimierz Jawor
18.8k7 gold badges35 silver badges55 bronze badges
2
Microsoft Word 2010 onwards
From Microsoft Word 2010 onwards (2010, 2013 and 2016) there is an «Selection Pane» in Microsoft Word.
On the selection pane the Microsoft Word InlineShapes as well as the Shapes are listed and named. Clicking on one of the shape names allows you to change them.
You can find the Selection Pane in the menu under
- «Home»-tab
- «Editing»-group
- «Select»-button
- «Selection Pane…»

Microsoft Word versions before 2010
For older Microsoft Word (2003, 2007) versions use the VBA approach (?Selection.ShapeRange.Name) as Kazimierz Jawor posted as an other answer to this question: https://stackoverflow.com/a/17680650/1306012
- Select the shape
- Open the VBA editor by pressing Alt+F11
- Open the immediate window by pressing Ctrl+G
- Type
?Selection.ShapeRange.Namein the immediate window to get the shape name
answered Sep 3, 2015 at 11:25
![]()
Bruno BieriBruno Bieri
9,55411 gold badges63 silver badges90 bronze badges
2
The most convenient method is to create a macro button, which is accessible from your tabs (e.g., Home, Insert, etc.). This way, you just click on the shape, click the macro button, and voila — the shape name displays in a message box (pop up window).
Use the following code:
MsgBox ActiveWindow.Selection.ShapeRange(1).name
answered Jul 1, 2016 at 15:25
![]()
1
Correct answer, I hope)))
    For Each ILShp In Doc.InlineShapes
    If ILShp.Type = 5 Then          ' 5 (wdInlineShapeOLEControlObject) - OLE control object. (ComboBox and CheckBox)
        ' if object is ComboBox
        If CStr(ILShp.OLEFormat.ClassType) = "Forms.ComboBox.1" Then
            Cb_Name = ILShp.OLEFormat.Object.Name           ' retuns ComboBox1
        endif
    Next
answered Feb 4, 2017 at 20:26
![]()
0
Word 2007
Works for pictures and haven’t tested the rest
Sub S___FindShapetypeOfSelectedShape()

    '1======= msgbox if floating shape selected
        On Error GoTo NOT_FLOATING_SHAPE 'go to check for inline shape
            MsgBox "Floating shape, " & ActiveWindow.Selection.ShapeRange(1).Name '"Picture 1480"; blue dottedlines= "picture 4"
            Exit Sub

    NOT_FLOATING_SHAPE:
        'on error goto 0 'use for testing
        On Error GoTo NO_SHAPE_FOUND 'doesnt work???

    '2.=========
            MsgBox "Inline Shape type NUMBER = " & ActiveWindow.Selection.InlineShapes(1).Type '

    '2a_________check for each type of inline shape
        '!!!(to see if msgbox draft below can be fixed)
        If ActiveWindow.Selection.InlineShapes(1).Type = wdNoSelection Then
            MsgBox "No selection"
            Exit Sub

        ElseIf ActiveWindow.Selection.InlineShapes(1).Type = wdInlineShapeChart Then
            MsgBox "wdInlineShapeChart"
            Exit Sub

        ElseIf ActiveWindow.Selection.InlineShapes(1).Type = wdInlineShapeDiagram Then
            MsgBox "wdInlineShapeDiagram"
            Exit Sub

        ElseIf ActiveWindow.Selection.InlineShapes(1).Type = wdInlineShapeEmbeddedOLEObject Then
            MsgBox "wdInlineShapeEmbeddedOLEObject"
            Exit Sub

        ElseIf ActiveWindow.Selection.InlineShapes(1).Type = wdInlineShapeHorizontalLine Then
            MsgBox "wdInlineShapeHorizontalLine"
            Exit Sub

        ElseIf ActiveWindow.Selection.InlineShapes(1).Type = wdInlineShapeLinkedOLEObject Then
            MsgBox "wdInlineShapeLinkedOLEObject"
            Exit Sub

        ElseIf ActiveWindow.Selection.InlineShapes(1).Type = wdInlineShapeLinkedPicture Then 'EMPTY FRAMES?
            MsgBox "wdInlineShapeLinkedPicture"
            Exit Sub

        ElseIf ActiveWindow.Selection.InlineShapes(1).Type = wdInlineShapeLinkedPictureHorizontalLine Then
            MsgBox "wdInlineShapeLinkedPictureHorizontalLine"
            Exit Sub

        ElseIf ActiveWindow.Selection.InlineShapes(1).Type = wdInlineShapeLockedCanvas Then
            MsgBox "wdInlineShapeLockedCanvas"
            Exit Sub

        ElseIf ActiveWindow.Selection.InlineShapes(1).Type = wdInlineShapeOLEControlObject Then
            MsgBox "wdInlineShapeOLEControlObject"
            Exit Sub

        ElseIf ActiveWindow.Selection.InlineShapes(1).Type = wdInlineShapeOWSAnchor Then
            MsgBox "wdInlineShapeOWSAnchor"
            Exit Sub

        ElseIf ActiveWindow.Selection.InlineShapes(1).Type = wdInlineShapePicture Then 'DOESNT FIND SOME PICTURES PASTED FROM WEB!
            MsgBox "wdInlineShapePicture"
            Exit Sub

        ElseIf ActiveWindow.Selection.InlineShapes(1).Type = wdInlineShapePictureBullet Then
            MsgBox "wdInlineShapePictureBullet"
            Exit Sub

        ElseIf ActiveWindow.Selection.InlineShapes(1).Type = wdInlineShapePictureHorizontalLine Then
            MsgBox "wdInlineShapePictureHorizontalLine"
            Exit Sub

        ElseIf ActiveWindow.Selection.InlineShapes(1).Type = wdInlineShapeScriptAnchor Then
            MsgBox "wdInlineShapeScriptAnchor"
            Exit Sub

        ElseIf ActiveWindow.Selection.InlineShapes(1).Type = wdInlineShapeSmartArt Then
            MsgBox "wdInlineShapeSmartArt"
            Exit Sub
    End If

    NO_SHAPE_FOUND:
        MsgBox "No floating or inline shape selected!"

    End Sub
answered Mar 21, 2021 at 4:27
![]()
PiecevcakePiecevcake
1971 silver badge12 bronze badges
 Please Note:
This article is written for users of the following Microsoft Word versions: 2007, 2010, 2013, and 2016. If you are using an earlier version (Word 2003 or earlier), this tip may not work for you. For a version of this tip written specifically for earlier versions of Word, click here: Searching for Floating Graphics.
![]()
Written by Allen Wyatt (last updated December 16, 2019)
This tip applies to Word 2007, 2010, 2013, and 2016
Word includes some commands and shortcuts that allow you to search for graphics in your documents. Unfortunately, those methods of searching are only good for finding inline graphics. If you want to find floating graphics, you are out of luck; since they are on the graphics layer and not in the actual document, Word pretty much ignores them.
There is a way you can find floating graphics using a macro, however. A macro can examine the floating graphics in your document and select each of them in turn. The following macro does just that:
Sub FindFigs()
    Dim varItem As Variable
    Dim bExists As Boolean
    Dim iShapeCount As Integer
    Dim iJumpTo As Integer

    ' ensure variable exists
    bExists = False
    For Each varItem In ActiveDocument.Variables
        If varItem.Name = "FigNum" Then
            bExists = True
            Exit For
        End If
    Next varItem

    ' initialize document variable if doesn't exist
    If Not bExists Then
        ActiveDocument.Variables.Add _
          Name:="FigNum", Value:=0
    End If

    ' figure to jump to
    iJumpTo = ActiveDocument.Variables("FigNum") + 1

    ' get number of shapes
    iShapeCount = ActiveDocument.Shapes.Count
    If iJumpTo > iShapeCount Then iJumpTo = 1

    If iShapeCount > 0 Then
        'Display the shape
        ActiveDocument.Shapes(iJumpTo).Anchor.Select
        'Select the shape
        ActiveDocument.Shapes(iJumpTo).Select
    End If
    'Set the variable for next time
    ActiveDocument.Variables("FigNum") = iJumpTo
End Sub
This macro uses a document variable to keep track of which graphic was last selected. If you need to search for floating graphics quite a bit, this means you can assign this macro to the Quick Access Toolbar or a shortcut key and search for each floating graphic in your document, in turn.
If you would like to know how to use the macros described on this page (or on any other page on the WordTips sites), I’ve prepared a special page that includes helpful information. Click here to open that special page in a new browser tab.
WordTips is your source for cost-effective Microsoft Word training.
(Microsoft Word is the most popular word processing software in the world.)
This tip (10442) applies to Microsoft Word 2007, 2010, 2013, and 2016. You can find a version of this tip for the older menu interface of Word here: Searching for Floating Graphics.
Author Bio
With more than 50 non-fiction books and numerous magazine articles to his credit, Allen Wyatt is an internationally recognized author. He is president of Sharon Parq Associates, a computer and publishing services company. Learn more about Allen…
MORE FROM ALLEN
Generating a List of Unique Words
Need to grab a list of unique words appearing in a document? You can tap the power of VBA’s Words collection to perform …
Discover More
Superscripts in Custom Formats
When you create custom formats for your data, Excel provides quite a few ways you can make that data look just as you …
Discover More
Keep with Previous
Word allows you to format a paragraph so that it is on the same page as whatever paragraph follows it. You may want, …
Discover More
More WordTips (ribbon)
Setting the Wrapping Default for Objects
Want to have objects such as text boxes and shapes always appear using some formatting you like? Here are some ideas on …
Discover More
Moving Images Behind Text
When positioning images in a document, you may want them to appear behind text, so that the text shows up over the top of …
Discover More
Inserting an Image On a Specific Page
Macros are great for processing a document just the way you want. You can even use them to insert graphics, as described …
Discover More

- Forum
- VBA Code & Other Help
- Word Help
- [SOLVED] Finding Shapes in a document

-
09-10-2012, 05:13 PM
#1
Finding Shapes in a document
I want to find the next shape or textbox in a document following on from the current selection. I want the order in the document not the order in the Shapes collection. I am using the code:
If Selection.ShapeRange.Count > 0 Then ' selection is inside a shape
   Selection.ShapeRange(1).Anchor.Paragraphs(1).Range.Select
   Selection.MoveDown unit:=wdLine ' move down one line from anchor
  End If
  Set pRange = Selection.Range
  pRange.End = ActiveDocument.Content.End
  If pRange.ShapeRange.Count >0 Then
   For Each sHp In pRange.ShapeRange
      Exit For
  Next sHp
  End if
The problem with this code is that if there are several shapes anchored to the same paragraph mark then only the first of these is selected and the others are passed over.
Can anyone solve my problem?
Last edited by Aussiebear; 04-02-2023 at 04:50 PM.
Reason: Adjusted the code tags
-
09-11-2012, 08:37 AM
#2
Why not just nest your shapes loop in a for each paragraph loop.
Note, this may be a slow way to do what you’re doing, but since you haven’t provided any specifics, here is a generic answer. This will only go through the main body of the document (no shapes in headers, footers, etc).
Sub Demo()
    Dim oPara As Paragraph
    Dim oShp As Shape
For Each oPara In ActiveDocument
   For Each oShp In oPara.Range.ShapeRange
      'do whatever you want here
      Debug.Print oShp.Name
   Next
    Next
End Sub
Last edited by Aussiebear; 04-02-2023 at 04:51 PM.
Reason: Adjusted the code tags
_______________________________________________
Please don’t cross-post without providing links to your cross-posts. We answer questions for free. Please don’t waste the time of the people helping you.
For cross-posting etiquette, please read: http://www.excelguru.ca/content.php?184— Frosty
-
09-12-2012, 01:39 PM
#3
My requirement is to go to the next shape from a current cursor position or from a current shape selection. The issue is that the current shape may be anchored from a paragraph character that also anchors other shapes so it is not simply a matter of advancing to the next paragraph.
The solution that I currently have is if the current selection is a shape, check its anchor character for multiple shapes, find the current shape’s name and advance by one shape. If the current shape is the last in the group then advance to the next paragraph. The resultant code is:
 If Selection.ShapeRange.Count > 0 Then ' selection is inside a shape
   shName = Selection.ShapeRange(1).Name ' store name of current shape
   Set aRange = Selection.ShapeRange(1).Anchor.Paragraphs(1).Range
   k = aRange.ShapeRange.Count
   i = 1
   Do While shName <> aRange.ShapeRange(i).Name And i < k
   i = i + 1
   Loop
   i = i + 1
   ' if i>k then current shape is last in anchored group
   If i <= k Then
      Set sHp = aRange.ShapeRange(i)
      GoTo markShape
   End If
   Selection.MoveDown unit:=wdLine ' move down one line from anchor
  End if
  ' ---
    Set pRange = Selection.Range
  pRange.End = ActiveDocument.Content.End
  If pRange.ShapeRange.Count < 1 Then
   MsgBox "No shapes after current selection"
   Exit Sub
  End If
  For Each sHp In pRange.ShapeRange
   Exit For
  Next sHp
markShape:
  ' sHp is the desired shape
This works in most cases but it is possible to have more than one shape with the same name which could cause an endless loop if they have the same anchor. Also, the shapes are not necessarily in order in the document.
Last edited by Aussiebear; 04-02-2023 at 04:53 PM.
Reason: Adjusted the code tags
-
09-12-2012, 02:01 PM
#4
When you say shapes are not necessarily «in order» — what do you mean? That the placement of the shape on the page may not be indicative of the order of the shapes in the .Shapes collection of whatever paragraph you’re currently in?
I don’t think that issue will be particularly solvable, unless you can give more criteria on what you would define as the «next» shape (lower? more to the right? both?).
It’s hard to provide a compete solution when you only provide snippets of code. While providing snippets of code is nice, in that you are limiting how much you want us to read while trying to provide you a solution, it also limits the solutions.
Does the above code work? If so, great. If not, can you give better criteria by what you mean by «next» shape when there are multiple shapes anchored to a given paragraph?
Why do you need the functionality in code of going to the «next» shape— what are you then doing? I assume a function which cycles through all shapes in the document, selecting each one in turn, is not desirable. So you’re trying to do some kind of CTRL+DOWN functionality for shapes only (the way that works by jumping the cursor to the next paragraph) — why?
Is using a mouse not good enough, when there are multiple shapes anchored to a single paragraph? Shapes are, by definition, a (typically) floating graphical object, not defined by linear anchor position in the document. In general, the standard way to interact with such shapes is to use the mouse.
What do you want to happen when there are groups of shapes? Select the group, then individual elements?
There is a potential can of worms thing going here… we might be able to help avoid that if you can give more of a «why» to this question.
-
09-12-2012, 05:18 PM
#5
When editing a document, it is desirable to step through the shapes in a document and perhaps edit text if the shape is a text box or adjust its position on the page or chase up a link if it is linked to another source. As Word has 24 types of shapes, it is useful to display and alter a shape’s characteristics without needing to click through Word’s wretched menus.
I use a non-modal form containing buttons to advance to the next shape, display the shape’s parameters and carry out other functions such as changing the anchoring and the word wrap. The form is displayed all the time making it possible to select a shape and either manually change or use the change buttons on the form. Then, the next shape can be selected by clicking the Next Shape button. It is important to carry out the changes in order in the document because of the cascading changes to layout that can occur.
It is sometimes not immediately obvious if text on a page is in-line or is in a borderless textbox or table and the shapes search routine helps quickly identify these things. (I also have a find next table routine).
All of this is intended to make an editor’s life easier and more productive. When editing a 600 page document with 200 tables, 150 text boxes and numerous pictures and other shapes, any little help is worthwhile.
My post was intended to get suggestions for overcoming a knotty problem that I had. I only posted the relevant snippet of a much larger routine.
My web site showing the macros that I am developing is:
http://www.editordie.com.au/editorkae/index.html
-
09-13-2012, 09:22 AM
#6
Okay… but you didn’t really answer the most pertinent question: how would you define the proper «order» of shapes anchored to the same paragraph?
I think some of your navigation tools will start to become obsolete with later versions of Word (the Selection pane shows all shapes, and their names, on the current page).
In addition, have you looked at the Application.Browser object? That is a quick way of navigating various elements of the document. It seems to me that you should be able to use that to navigate both graphics and tables, and then layer your own For each shape in selection.paragraph(1).shapes loop within that.
Application.Browser.Targer = wdBrowseGraphic
Application.Browser.Next (and .Previous, etc)Not sure where to go from here… I totally understand consolidating disparate Word functionality for the purposes of a particular workflow. But I would suggest, where possible, using whatever native functionality exists, rather than trying to re-write your own version of that native functionality.
If there’s anything else to do here, please let us know.
-
09-13-2012, 02:34 PM
#7
Thanks for your comments.
-
09-13-2012, 02:41 PM
#8
Sure thing.
I noticed you said you have code which manipulates the anchor of a shape. Everytime I have tried to do that, is been kludgy. Are you doing something other than cutting and pasting the shape at a new range? Do you check whether the shapes positional info is relational or absolute?
Better ways of navigating elements of a document are very useful functions. Just wondering if you’re reinventing the wheel on some of this, rather than simply displaying a more organized method for using built in functionality.
_______________________________________________
Please don’t cross-post without providing links to your cross-posts. We answer questions for free. Please don’t waste the time of the people helping you.
For cross-posting etiquette, please read: http://www.excelguru.ca/content.php?184— Frosty
-
09-13-2012, 11:49 PM
#9
I agree that I am to some extent re-inventing the wheel. I started in the days of Word97 and by the time Word2007 came along improvements to Word had made some of my stuff obsolete and I ditched much of it. The remainder is specific to editing and is very useful for those users.
These are some of Word’s foibles in relation to shapes that I have uncovered. I am sure that there are many more.
In Word 2010, shapes can be dragged up and down and the anchor point will move with the shape provided the anchor is not locked. It is also possible to drag onto a different page. Earlier Word versions had problems doing these things.
If you select the anchor paragraph, all shapes anchored to that paragraph are highlighted. If a shape has been dragged vertically then a “phantom” shape is also highlighted. The anchor point is at the start of the paragraph but you must select the whole paragraph in order to highlight the attached shapes.
There doesn’t seem to be a way of changing the anchor point in VBA. The anchor property is read only.
Shapes can be moved relative to the anchor by using the IncrementTop and IncrementLeft methods or by setting relative positions in the Layout menu.
There are two shape collections – Shapes and InlineShapes, as well as a Tables collection. If a shape object is converted between InlineShape and Shape it gets a split personality and is a member of both collections. This can introduce a problem with some of the methods that are present in one and not the other object.
Here is some code that shows a difference in result between Selection and Range objects. The First count is 0 and the Second count is 1 despite them referring to the same range.
Sub showAnchor()
  ' run with cursor in a shape or textbox
  Dim aRange As Range
     Selection.ShapeRange(1).Anchor.Paragraphs(1).Range.Select
     MsgBox "First count=" & Selection.ShapeRange.Count
     Set aRange = Selection.Range
     MsgBox "Second count=" & aRange.ShapeRange.Count
  End Sub
Last edited by Aussiebear; 04-02-2023 at 04:53 PM.
Reason: Adjusted the code tags
-
09-14-2012, 02:16 AM
#10
To see what’s involved in working with shapes via their location on the page, see:
http://www.msofficeforums.com/word-v…html#post39302
Although the code there is specifically for working with frames, working with other kinds of shapes is essentially the same.Cheers
Paul Edstein
[Fmr MS MVP — Word]
-
09-14-2012, 02:20 AM
#11
Originally Posted by smallkenThere doesn�t seem to be a way of changing the anchor point in VBA. The anchor property is read only.
You do that by working with the anchor’s range — you can cut & paste it to wherever you want.
If a shape object is converted between InlineShape and Shape it gets a split personality and is a member of both collections.
Umm, no, they’re strictly one or the other.
Cheers
Paul Edstein
[Fmr MS MVP — Word]
-
09-18-2012, 01:18 AM
#12
Sure thing. I noticed you said you have code which manipulates the anchor of a shape.
-
09-18-2012, 03:30 AM
#13
Here’s a fairly basic example. It relocates the first shape in the document to the first page. Test it with a shape on, say, the 2nd page.
Sub Test()
Dim Rng As Range
With ActiveDocument
   Set Rng = .GoTo(What:=wdGoToPage, Name:="1")
   .Shapes(1).Anchor.Cut
   Rng.Paste
End With
End Sub
Note that, in real life, you’d probably want to get the shape’s top & left settings so you can reposition it correctly at the new location.
Last edited by Aussiebear; 04-02-2023 at 04:54 PM.
Reason: Adjusted the code tags
Cheers
Paul Edstein
[Fmr MS MVP — Word]
-
09-24-2013, 03:03 AM
#14
Finding Shapes in a document
After two years, I finally got around to revisiting the problem and managed to devise a solution. The objective is to advance to and select the next (or previous) shape in the document whether the shape is floating or inline.
I followed up on Frosty’s suggestion of using Application.Browser.Next. The result is the cursor at the anchor point of the next shape but the shape itself is not selected. In trying to determine which shape Browser has found, problems arise if more than one shapes is anchored to the same point.
Below is my solution. It is complex but it works. I am wondering if there is a simpler solution.
Sub getFollowingShape()
  GetNextShape (True)
End Sub

Sub getPreviousShape()
  GetNextShape (False)
End Sub

Function anchorsN() As Long ' number of shapes hanging off anchor
Dim anRange As Range
  Set anRange = Selection.Range
  anRange.MoveEnd unit:=wdCharacter
  anchorsN = anRange.ShapeRange.Count
End Function

Sub GetNextShape(isNext As Boolean)
Dim aRange As Range
Dim shp As Shape
Dim j As Long
Dim mS As Long
Dim mI As Long
Dim kS As Long
Dim k As Long
Dim kA As Long
Dim kB As Long
  Application.Browser.Target = wdBrowseGraphic
  With Selection
    mS = .Range.ShapeRange.Count
    mI = .InlineShapes.Count
    kS = .Range.Characters.Count ' =1 if only shape is selected
    ' ***************************
    ' if there are no shapes or there are more than one shape in selection
    '   then search from collapsed selection
    If (mS = 0 And mI = 0) Or kS > 1 Or mS > 1 Or mI > 1 Then
      kA = 1
      kB = 1
      If isNext Then
        .Collapse direction:=wdCollapseStart
      Else
        .Collapse direction:=wdCollapseEnd
      End If
    Else  '  selection is a single shape only with single character range
      If mI < 1 Then
        kA = anchorsN ' anchors from current shape
        If isNext Then
          Application.Browser.Next ' dance to pick up all anchors
          Application.Browser.Previous
        Else
          Application.Browser.Previous ' fixes problem if first or last shape
          Application.Browser.Next
        End If
        kB = anchorsN ' total number of shapes at anchor
        kA = kB - kA + 1 ' position of current shape in anchor list
      End If
    End If
  End With
 ' ***************************
    If isNext Then
      Application.Browser.Next
    Else
      Application.Browser.Previous
    End If
 ' ***************************
 ' **** determine k = shape item no ******
    If kB = 1 Then
      If isNext Then
        k = 1
      Else
        k = anchorsN
      End If
    Else ' multi shapes at anchor
      If isNext Then
        k = kA + 1
        If k > kB Then k = 1
      Else
        k = kA - 1
        If k < 1 Then k = 1
      End If
    End If
    Set aRange = Selection.Range
    With aRange
      .MoveEnd unit:=wdCharacter
      If .ShapeRange.Count > 0 Then
        .ShapeRange(k).Select
      Else
        If .InlineShapes.Count > 0 Then .InlineShapes(1).Select
      End If
    End With
End Sub
-
09-24-2013, 05:10 PM
#15
The remainder is specific to editing and is very useful for those users.
Shapes have been around since the dawn of Drawing Objects and have never really supposed to have been used as Controls, but it was the easiest quickest solution MS could come up with when Form type controls, (Forms Toolbar,) were needed.
How hard would it be to convert to all MsForms Controls, (Controls Toolbar?) They are a lot easier to program with IMO.
BTW, Thank you for returning with a solution to the problem. I’m going to mark it solved, but don’t let that keep you or anybody else from continuing to improve your solution.
If you do decide to convert to MSForms controls, lets start another thread about them.
I expect the student to do their homework and find all the errrors I leeve in.
Posting Permissions

- You may not post new threads
- You may not post replies
- You may not post attachments
- You may not edit your posts
- BB code is On
- Smilies are On
- [IMG] code is On
- [VIDEO] code is On
- HTML code is Off
Forum Rules
Hi all
I am new to VBA and new to this forum («Hello Lawrence») 
I have a word document with shapes that I added via the Insert Shapes menu entry
Some of the shapes are lines, others are rectangles and some are callouts. I even have a picture or two. (Some are in the header area)
I wanted a script to run through the shapes and select them. I tried this:
Sub FindShapes()
Dim doc As Word.Document, rng As Word.Range
Dim shp As Word.Shape
Set doc = ActiveDocument
Set tot = doc.Shapes
a = tot.Count
For Each shp In doc.Shapes
shp.Select
Debug.Print shp.Type; shp.ID, shp.Name
Next
End Sub
But it does not find all the shapes. In same cases it may find only one shape.
What am I doing wrong?
Thank you
Lawrence
Updated: 03/05/2023 by

When creating a document in Microsoft Word, or a spreadsheet in Microsoft Excel, users can add many types of shapes to highlight important items. Bringing attention to those items helps readers to better understand the content of the document or spreadsheet. After a shape is added, it can be modified by changing features, such as size, color, and fill.
To add and edit a shape in Microsoft Word and Microsoft Excel, select a link below for help.
Add shapes in Microsoft Word
Select the version of Microsoft Word you’re using below and follow the steps to learn how to add a shape in a document.
- Microsoft Word Online.
- Microsoft Word desktop application.
Microsoft Word Online
- In Microsoft Word Online, click the Insert tab at the top of the window.
- On the Insert tab, in the Illustrations group, click the Drawings option.
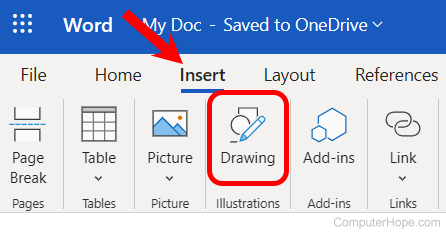
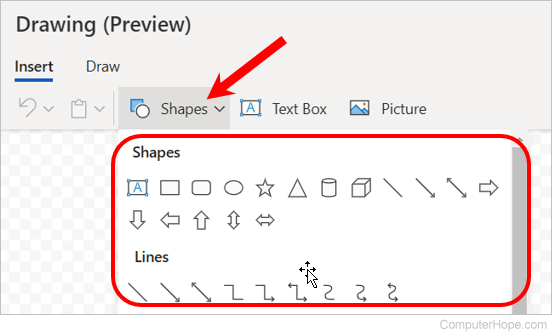
- In the Drawings (Preview) window, click the Shapes option, and select the type of shape you want to add or draw from the drop-down menu that appears.
- After selecting the desired type of shape, draw the shape in the Drawing window, then click the Save and Close button to add the shape in your Word Online document.
Microsoft Word desktop application
- In Microsoft Word, click the Insert tab at the top of the program window.
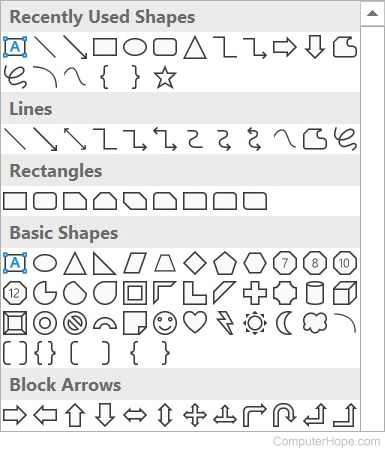
- On the Insert tab, in the Illustrations group, click the Shapes option.
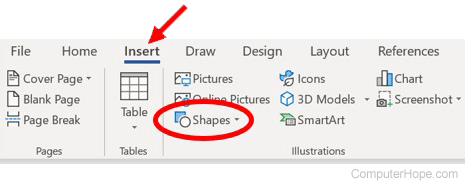
- Select the type of shape you want to add or draw from the drop-down menu that appears.
Add shapes in Microsoft Excel
The following steps help you add a shape to a spreadsheet in Microsoft Excel Online or the desktop application.
- In Microsoft Excel, click the Insert tab at the top of the program window.
- On the Insert tab, click the Illustrations option, then click the Shapes option.
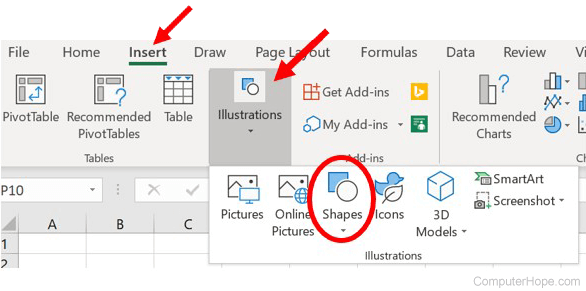
- Select the type of shape you want to add or draw from the drop-down menu that appears.
Edit shapes in Microsoft Word and Excel
- Click the shape to select it.
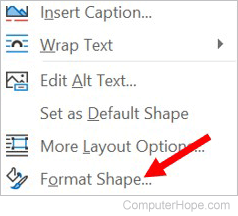
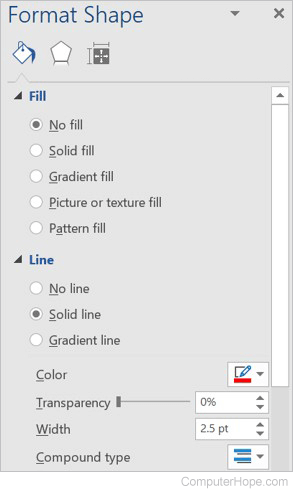
- Right-click the shape and select Format Shape in the pop-up menu.
- The Format Shape section opens on the right side of the program window. You can change the shape’s fill, select the type and fill color (or no fill at all), and the size, color, and shape’s lines. You can also add shadow, glow, reflection, and other effects.
![]()
Download Article
![]()
Download Article
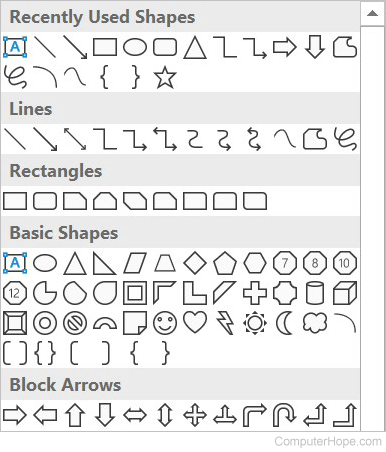
There is virtually no limit to what can be created using the Auto Shape feature in Microsoft Word. The feature provides a wide variety of geometric shapes that are useful in creating graphic objects, including lines, block arrows, banners, call-outs, equation shapes, symbols and many others. Additionally, a number of pre-formatted effects can be applied to enhance an Auto Shape, such as 3-D, shadow effects, gradient fills and transparencies. This article provides instructions on several ways to use the Microsoft Word Auto Shape feature.
-
1
Explore the Auto Shapes menu. Click the Insert tab on the menu bar, and click on the Shapes button located in the Illustrations menu on the formatting toolbar. Take note of the different Auto Shapes now visible in the pull-down menu.
-
2
Insert an Auto Shape into the document. Select a basic shape for the purposes of this tutorial. Simply click on any shape to begin the insertion process. The Auto Shapes menu will close automatically and the mouse-pointer will be replaced by a thin cross-hair. Click and drag anywhere in the document to insert the auto shape. The chosen shape has been inserted into the document.


Advertisement
-
1
Change the size of an Auto Shape once inserted. Click and drag on any corner of an Auto Shape to make it larger or smaller. The size of the Auto Shape has been adjusted.
-
2
Change the shape of an Auto Shape once inserted. To switch to a different Auto Shape, select the object, click the format tab on the menu bar and click the Edit Shape button, located in the Insert Shapes menu on the formatting toolbar. Select «Change Shape» from the pull-down menu to open the Auto Shapes menu, and make an alternate choice from the menu options. A new Auto Shape has been chosen.
-
3
Move the Auto Shape to a different location in the document. Click and drag anywhere along the edge of the object to move it to a different location within the document. The Auto Shape has been a repositioned within the document.


Advertisement
-
1
Select a fill color for the object. Click the Shape Fill button to fill the object with a solid color. The theme color palette will open. Select a color from the theme color palette or select the «More Fill Colors» option from the pull-down menu to create a custom color. The Colors dialogue box will open.
- Click and drag the cross hair on the right to adjust the hue of the custom color. Move the slider on the right side of the dialogue box up and down to adjust the brightness level of the custom color. Click OK to close the Color dialogue box. The fill color for the Auto Shape has been selected.
-
2
Select a style for the object. Confirm that the object is selected and click the Format tab on the menu bar. Take note of the available options provided in the Shape Styles menu, located on the formatting toolbar. Click on the down pointing arrow in the Shape Styles menu to open the Theme Fills menu.
- Choose a style from among the menu options. A preset style for the Auto Shape has been chosen.


Advertisement
-
1
Adjust the style of the object’s outline. Confirm that the object is selected and click the format tab on the menu bar. Click the Shape Outline button, located in the Shape Styles menu on the formatting toolbar. Select the «More lines» option from the pull-down submenu. The Format Shape dialogue box will open.
- Adjust the compound type, dash type, cap type or join type of the outline as desired and click OK to exit the dialogue box. The outline for the Auto Shape has been chosen.
-
2
Adjust the width of the object’s outline. Confirm that the object is selected and click the format tab on the menu bar. Click the Shape Outline button, located in the Shape Styles menu on the formatting toolbar. Change the thickness of the outline by selecting the «Weight» option from the Shape Outline pull-down menu. The Line Weight sub-menu will open.
- Choose a thickness from the options available or select the «More lines» option from the pull-down submenu. The outline’s width has been selected.
-
3
Adjust the color of the object’s outline. Confirm that the object is selected and click the format tab on the menu bar. Click the Shape Outline button, located in the Shape Styles menu on the formatting toolbar.
- Select a color from the color palette that appears in the pull-down menu, or click on the «More Colors» option to open the Colors dialogue box and create a custom color. A color has been chosen for the Auto Shape’s outline.


Advertisement
-
1
Apply preset effects to the object. Confirm that the object is selected and click the Effects button, located in the Illustrations menu on the formatting toolbar. Take note of the different effect presets visible in the pull-down menu. Open the sub-menus for each preset effect category by rolling the mouse-pointer over each category title.
- Browse through the options for each category and click on an effect to apply it to the Auto Shape. Change the selected effect by clicking on a different effect option under 1 of the effect categories. A preset effect has been selected.

-
1
Add text to the object. Right click the Auto Shape and select «Add text» from the pull-down menu. A cursor will appear in the center of the object. Type the desired text and click enter. To change the text formatting, select the text and choose from the available text formatting options on the Home tab.
- Choose a pre-formatted style from the Styles menu; change the alignment, spacing or indentation from the paragraph menu; and adjust the font, color, size or effects from the Font menu, located in the Home formatting toolbar. Text has been added to the Auto Shape.

Advertisement
Add New Question
-
Question
Can I put a picture in autoshape?

Yes, you may fill the autoshape with a picture.
-
Question
How do you delete a shape?
Select the shape and right-click; select the «delete» option. If you don’t see it, you can cut the image using the same steps.
-
Question
How do I add bullets to a list in an autoshape?
Right click in the autoshape to add text (unfortunately it adds a rectangle and does not follow the autoshape outline). Click on the bullet icon — done.
See more answers
Ask a Question
200 characters left
Include your email address to get a message when this question is answered.
Submit
Advertisement
Video
Thanks for submitting a tip for review!
About This Article
Thanks to all authors for creating a page that has been read 132,791 times.
Is this article up to date?
How to insert a shape in a Word document?
To insert a shape
- On the ribbon menu, under the tab Insert, within the group illustrations, click icon Shapes. A drop-down list appears with various shapes.
- Click a shape, the mouse cursor changes to a ‘+’ sign.
- Draw the shape in your document.
- Resize the shape by dragging the resize handles.
To add/remove fill color and outline color of a shape
- Select the shape in the document.
- Click tab Format under Drawing Tools.
- Within group Shape Styles, click icon Shape Fill and then
- Select a fill color from the palette.
- Click ‘No Fill’ to remove fill color.
- Within group Shape Styles, click Shape Outline, and then
- Select an outline color for the shape.
- Click ‘No Outline’ to remove the outline color of the shape.
How add text to a shape in Word
- Select a shape and right-click.
- From the right-click menu, select option Add Text.
How to change a shape?
- Select the shape in the document.
- Click tab Format under Drawing Tools from the ribbon menu.
- Within group Insert Shape, click Edit Shape.
- From the drop-down list, select option Edit Shape.
- Select a new shape.
How to group shapes in a document
- On the ribbon menu, under the tab Insert, within the group illustrations, click Shapes.
- Press and hold the keys CTRL or SHIFT or CTRL+SHIFT and click the shapes one by one.
- Right-click and click Group and the click Group from the sub menu.
How to rotate a shape
- Select the shape.
- Click tab Format under Drawing Tools from the ribbon menu.
- Within the group Arrange, click Rotate.
- From the drop-down menu, select any of the options or click ‘More Rotation Option’.
- In the Layout dialog box, under the tab Size, enter the angle of rotation.
- Click OK.
How to rotate text inside a shape
- Select text inside a shape.
- Click tab Format under Drawing Tools from the ribbon menu.
- Within the group Text, click Text Direction.
- Select an option from the drop-down list.
About me

About wordknowhowhttp://wordknowhow.comThis blog site was started to help people with Microsoft Word. I use Word a lot at work, and I understand that some features are difficult to use. There were no simplified instructions online to help me use these features. It is for this reason that this site exists; to make your life easier with Word.
Feel free to post your comments, queries, suggestions, etc. I will do my best to help you!
Lesson 14: Working with Shapes
/en/word2010/working-with-hyperlinks/content/
Introduction
You can add a variety of shapes to your document, including arrows, callouts, squares, stars, and flowchart shapes. Want to set your name and address apart from the rest of your resume? Use a line. Need to create a diagram showing a timeline or process? Use flowchart shapes.
In this lesson, you will learn how to insert a shape and format it by changing its fill color, outline color, shape style, and shadow effects. Additionally, you will learn how to apply 3D effects to shapes.
Using shapes
Word’s large shape collection allows you to organize and design the image you want. While you may not need shapes in every document you create, they can add visual appeal. To use shapes effectively, you’ll need to know how to insert a shape and format it by changing its fill color, outline color, and shape style, as well as add 3D effects.
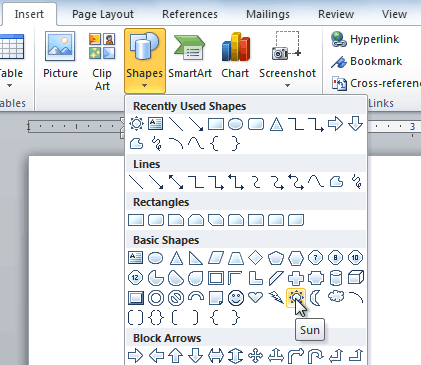
To insert a shape:
- Select the Insert tab.
- Click the Shapes command.
The Shape command
- Select a shape from the drop-down menu.
- Click and drag the mouse until the shape is the desired size.
Creating a new shape
- Release the mouse button.

To resize a shape:
- Click the shape to select it.
- Click and drag one of the sizing handles on the corners and sides of the shape until it is the desired size.
Resizing the shape
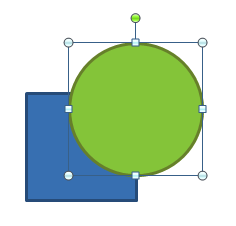
- To rotate the shape, drag the green handle.
Rotating the shape
- Some shapes also have one or more yellow handles that can be used to modify the shape. For example, with star shapes you can adjust the length of the points.
Modifying the shape


If you drag the sizing handles on any of the four corners, you will be able to change the height and width at the same time. The sizing handles on the top or bottom of the shape will only allow you to resize vertically, while the handles on the left and right sides will resize the shape horizontally.
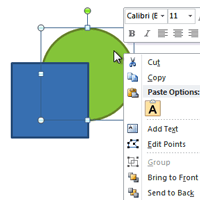
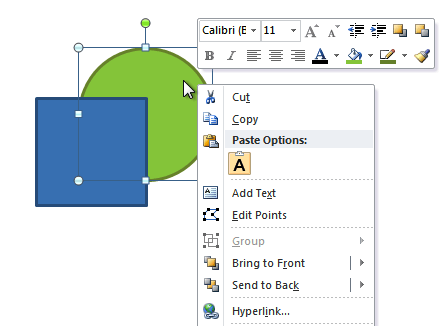
To change the order of shapes:
If one shape overlaps another, you may need to change the ordering so the correct shape appears in front. You can bring a shape to the front or send it to the back. If you have multiple images, you can use Bring Forward or Send Backward to fine tune the ordering. You can also move a shape in front of or behind text.
- Right-click the shape you want to move.
Right-clicking the shape
- In the menu that appears, hover over Bring to Front or Send to Back. Several ordering options will appear.
Selecting an ordering option
- Select the desired ordering option. The shapes will reorder themselves.
The reordered shapes
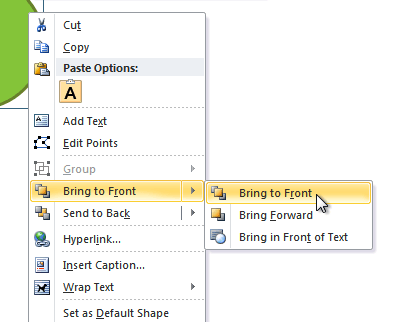
In some cases, the ordering option you select will not affect the ordering of the shapes. If this happens, select the same option again or try a different option.
Changing a shape’s appearance
To change to a different shape:
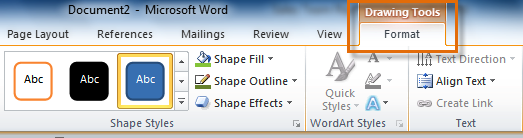
- Select the shape. A new Format tab appears with Drawing Tools.
The Format tab
- Click the Format tab.
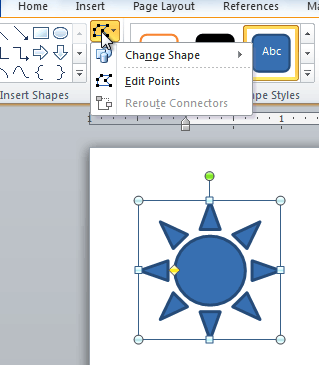
- Click the Edit Shape command.
The Edit Shape command
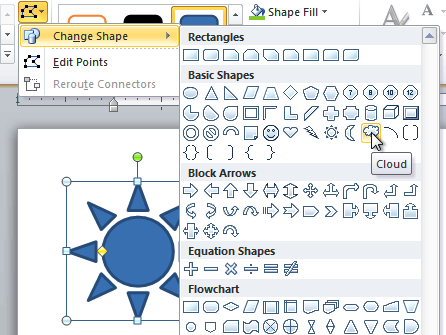
- Click Change Shape to display a drop-down list.
Choosing a new shape
- Select the desired shape from the list.
The new shape

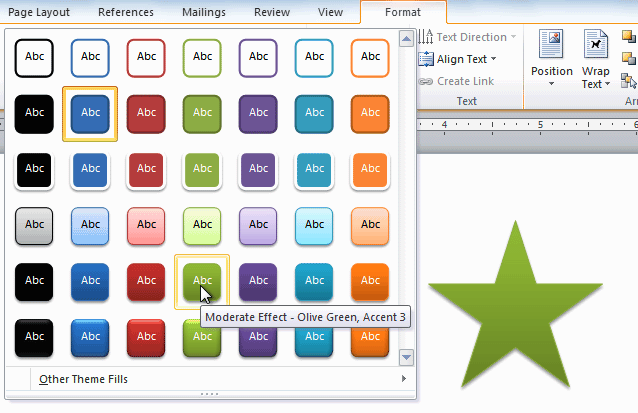
To change the shape style:
- Select the shape. The Format tab appears.
The Format tab
- Click the More drop-down arrow in the Shape Styles group to display more style options.
The More drop-down arrow
- Move your cursor over the styles to see a live preview of the style in your document.
Previewing shape styles
- Select the desired style.
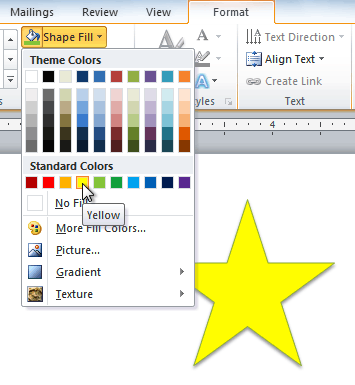
To change the shape fill color:
- Select the shape. The Format tab appears.
- Select the Format tab.
- Click the Shape Fill command to display a drop-down list.
Choosing a fill color
- Select the desired color from the list, choose No Fill, or choose More Fill Colors to choose a custom color.
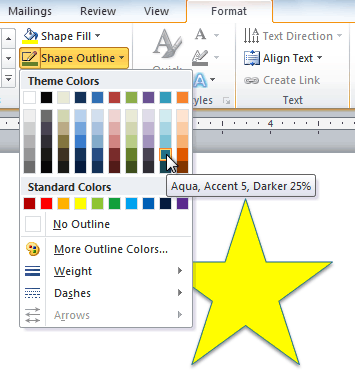
To change the shape outline:
- Select the shape. The Format tab appears.
- Click the Format tab.
- Click the Shape Outline command to display a drop-down menu.
Choosing an outline color
- From the drop-down menu, you can change the outline color, weight (thickness), and whether it is a dashed line.
A thicker outline

To change shadow effects:
- Select the Format tab.
- Click the Shape Effects command. A drop-down menu will appear.
- Hover your mouse over Shadow. You will see a list of shadow presets.
- Move your mouse over the menu options to see a live preview of the shadow effect in your document.
Choosing a shadow type
- Click the desired shadow effect to add it to your shape.
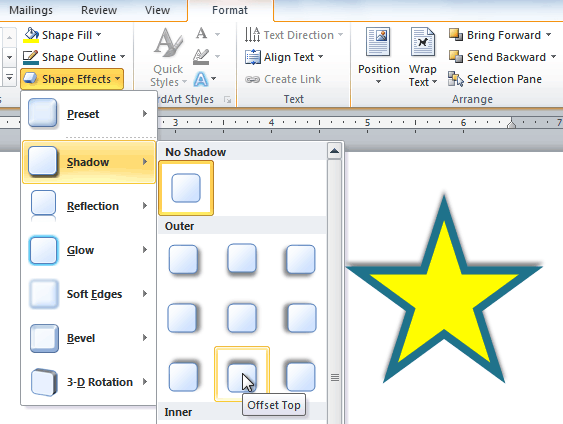
You can select Shadow Options from the drop-down menu and click the Color button to select a different shadow color for your shape.
3D effects
There are two types of effects you can apply to your shapes to give them a 3D appearance: 3-D Rotation and Bevel. 3-D Rotation gives the appearance that you are viewing the object from a different angle, and it can be applied to any shape. Bevel adds thickness and a rounded edge to shapes, but it doesn’t work with every type of shape.
To use 3-D Rotation:
- Select the shape.
- Click the Format tab.
- Click Shape Effects from the Shape Styles group.
- Hover the mouse over 3-D Rotation. A drop-down menu will appear.
- Select the desired rotation preset from the drop-down menu. You can also click 3-D Rotation Options if you would prefer to type custom values.
Choosing a 3-D rotation preset

To use bevel:
- Select the shape.
- Click the Format tab.
- Click Shape Effects from the Shape Styles group.
- Hover your mouse over Bevel. A drop-down menu will appear.
Choosing a bevel preset
- Select the desired bevel preset from the drop-down menu. You can also click 3-D Options if you would prefer to type custom values.
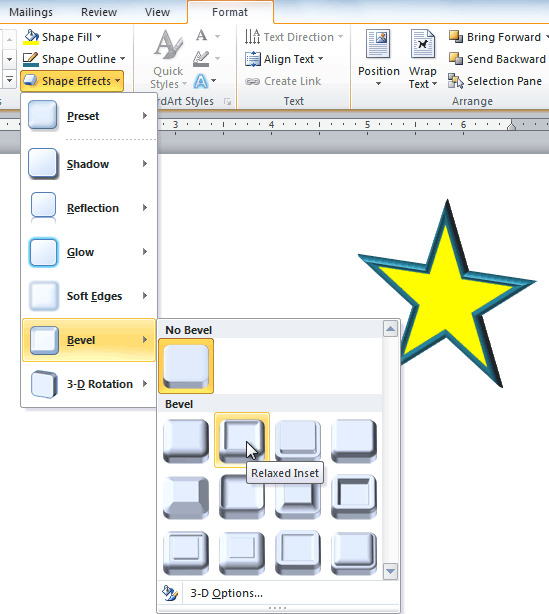
If you click 3-D Options, you’ll also be able to change the shape’s material to give it a metal, plastic, or translucent appearance, and you can choose the lighting type to change how the shape is illuminated.
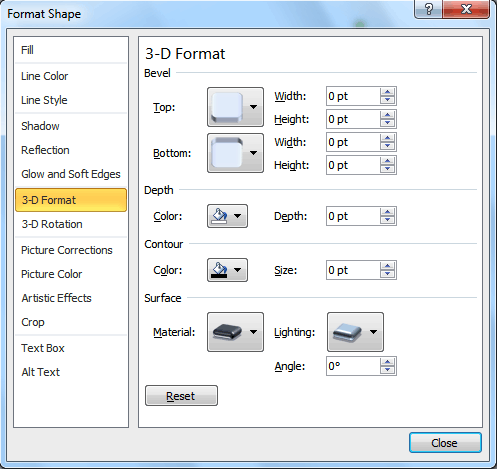 Viewing the 3-D Options
Challenge!
- Create a new Word document.
- Insert a shape.
- Change the shape to a different shape.
- Change the fill color.
- Change the outline color.
- Try various shadow effects.
- Try various 3D effects.
/en/word2010/text-boxes-and-wordart/content/