
Excel for Microsoft 365 Word for Microsoft 365 Outlook for Microsoft 365 PowerPoint for Microsoft 365 Excel 2021 Word 2021 Outlook 2021 PowerPoint 2021 Excel 2019 Word 2019 Outlook 2019 PowerPoint 2019 Excel 2016 Word 2016 Outlook 2016 PowerPoint 2016 Excel 2013 Word 2013 Outlook 2013 PowerPoint 2013 Excel 2010 Word 2010 Outlook 2010 PowerPoint 2010 Excel 2007 Word 2007 Outlook 2007 PowerPoint 2007 More…Less
You can easily insert a check mark (also known as a «tick mark») in Word, Outlook, Excel, or PowerPoint.
These marks are static symbols. If you’re looking for an interactive check box that you can click to check or uncheck, see: Add a check box or option button (Excel) or Make a checklist in Word.
-
In your file, place the cursor where you want to insert the symbol.
-
Open the Symbol dialog box:
-
Word or Outlook: Insert, select
 Symbols then More Symbols
 -
Excel: Insert, select
Symbols -
PowerPoint: Insert, select
Symbols > Symbol
The Symbols button
is on the far right end of the Insert toolbar tab. -
-
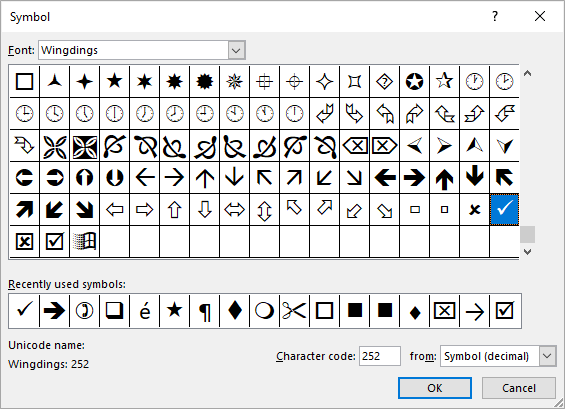
In the Font box, select Wingdings.
-
In the Character code box at the bottom, enter: 252
In the grid of symbols, the check mark
is selected. Another check-mark option is available two squares away from it (character code 254). -
Select the check mark you want. Click Insert. Then click Close to dismiss the dialog box.
-
Once the check mark has been inserted, you may change its size or color. Select the check mark, right-click it, and make your desired changes by using the floating toolbar:
 Symbols then
  is selected. Another check-mark option
  is available two squares away from it (character code 254).
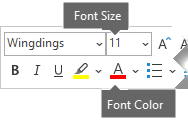
More check marks to choose from
Another font, Segoe UI Symbol, has three checkmark options. You can opt for this font in step 3 of the procedure above, and you can substitute one of the following character codes in step 4.
|
Symbol |
Character code |
|---|---|

|
2705 |

|
2713 |

|
2714 |
Need more help?

First, you need to customize Word’s ribbon and enable the “Developer” tab to show the option to add check boxes. Then, select “Developer” and click the “Check Box Content Control” button to insert a check box into your document. You can also transform Word’s bullets into checkboxes.
When you create surveys or forms with Microsoft Word, check boxes make the options easier to read and answer. We’re covering two good options for doing just that. The first is ideal for documents that you want people to fill out digitally within the Word document itself. The second option is easier if you’re planning to print documents like to-do lists.
Option 1: Use Word’s Developer Tools to Add the Check Box Option for Forms
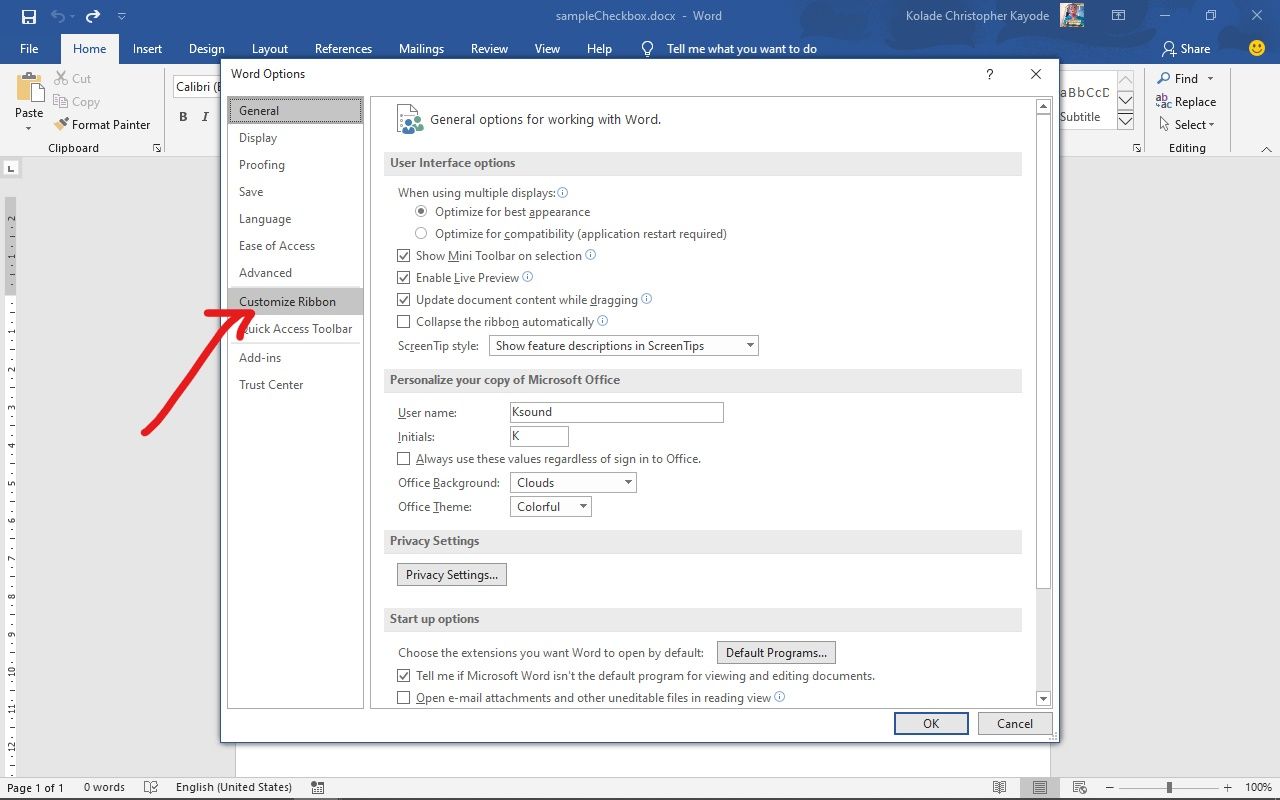
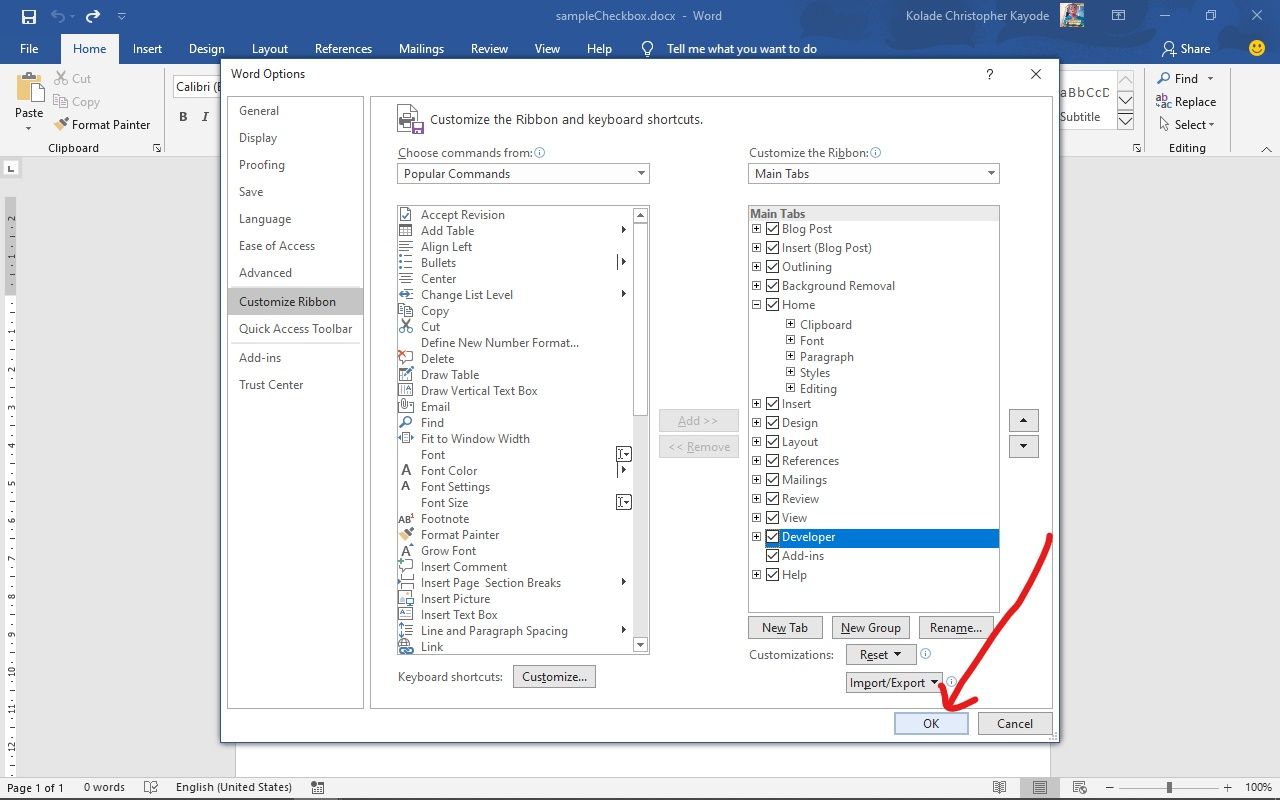
In order to create fillable forms that include checkboxes, you first need to enable the “Developer” tab on the Ribbon. With a Word document open, click the “File” drop-down menu and then choose the “Options” command. In the “Word Options” window, switch to the “Customize Ribbon” tab. On the right-hand “Customize the Ribbon” list, select “Main Tabs” on the dropdown menu.

On the list of available main tabs, select the “Developer” check box, and then click the “OK” button
Notice that the “Developer” tab is added to your Ribbon. Just position your cursor in the document where you want a check box, switch to the “Developer” tab, and then click the “Check Box Content Control” button.
You should see a check box appear wherever you placed your cursor. Here, we’ve gone ahead and placed a check box next to each answer and, as you can see, those check boxes are interactive. Click a box to mark it with an “X” (as we’ve done for answers 2, 3, and 4) or select the whole form box (as we’ve done for answer 4) to move the check box around, format it, and so on.
RELATED: How to Create a Fillable Form With Microsoft Word
Option 2: Change Bullets to Check Boxes for Printed Documents
If you’re creating a document to print out—like a to-do list or printed survey—and just want check boxes on it, you don’t have to mess around with adding Ribbon tabs and using forms. Instead, you can create a simple bullet list and then change the bullets from the default symbol to check boxes.
In your Word document, on the “Home” tab, click the small arrow to the right of the “Bullet List” button. On the dropdown menu, select the “Define new bullet” command.
In the “Define New Bullet” window, click the “Symbol” button.
In the “Symbol” window, click the “Font” dropdown and choose the “Wingdings 2” option.
You can scroll through the symbols to find the empty square symbol that looks like a check box, or you just type the number “163” into the “Character Code” box to automatically select it. Of course, if you see a symbol you like better—like the open circle (symbol 153)—feel free to choose that instead.
When you’ve selected your symbol, click the “OK” button to close the “Symbol” window, and then click the “OK” button to close the “Define New Bullet” window, too.
Back in your Word document, you can now type your bullet list. The check boxes appear instead of the regular bullet symbol.
And the next time you need the check box symbol, you don’t have to navigate through that whole set of windows. Just click that small arrow to the right of the “Bullet List” button again, and you’ll see the checkbox listed under the “Recently Used Bullets” section.
Again, this method is really only useful for documents you want to print out. The check box symbols are not interactive, so you can’t check them off inside a Word document.
If you’re also creating spreadsheets and presentations, you may want to learn how to insert checkboxes in Excel and add checkboxes to PowerPoint too.
RELATED: How to Add a Check Mark or Tick Mark in Word
READ NEXT
- › How to Add a Check Mark or Tick Mark in Word
- › How to Add a Drop-Down List to a Word Document
- › How to Create a Fillable Form With Microsoft Word
- › How to Create a Basic Survey in Microsoft Word
- › How to Count Checkboxes in Microsoft Excel
- › Get to Your Windows 11 Desktop: 7 Fastest Methods
- › Google+ Will Come to a Final End on July 5, 2023
- › Why the Right-Click Menu in Windows 11 Is Actually Good
Insert or Type a Check Mark or Tick Mark Symbol in Microsoft Word (with Shortcuts)
by Avantix Learning Team | Updated April 2, 2021
Applies to: Microsoft® Word® 2013, 2016, 2019 or 365 (Windows)
You can insert or type a check mark or tick mark symbol in a Word document in several ways. Check marks can be inserted using built-in commands or keyboard shortcuts. It’s important to note that there is a difference between inserting a static check mark and inserting a clickable check box which is typically used in a Word form.
Recommended article: How to Show or HIde White Space in Word Documents
Do you want to learn more about Microsoft Word? Check out our virtual classroom or live classroom (in-person) Word courses >
In this article, we’ll review 5 ways to insert a check mark symbol in a Word document:
- Insert check marks as bullets
- Use the Insert Symbol command
- Add and use a custom Word keyboard shortcut
- Add and use an AutoCorrect shortcut
- Use an Alt code shortcut by pressing Alt and then entering a number sequence
Do you want to learn more about Microsoft Word? Check out our virtual classroom or live classroom Word courses >
1. Inserting a check mark by inserting bullets
If you want to insert a check mark at the beginning of one or more paragraphs, you can apply custom bullets using the Wingdings font (or a similar font).
To apply check marks as custom bullets to paragraphs:
- Select the paragraph(s) to which you want to add check marks.
- Click the Home tab in the Ribbon.
- In the Paragraph group, click the arrow beside Bullets. A drop-down menu appears.
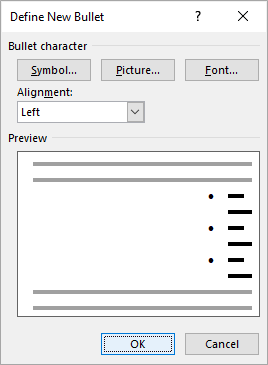
- Click Define New Bullet. A dialog box appears.
- Click Symbol. A dialog box appears.
- Select Wingdings from the Font drop-down menu. Alternatively, you can select another font such as Wingdings 2 or Segoe UI Symbol.
- Click the desired check mark.
- Click OK.
- Click Font. A Font dialog box appears.
- Select the desired font color and size. This dialog box offers the same options as the regular Font dialog box.
- Click OK twice.
The check marks will be added at the beginning of the paragraph(s).
In the Define New Bullet dialog box (below), you can select Symbol, Font or Picture:
The following characters appear when you select Wingdings as the Symbol font for bullets:
In the Define New Bullet dialog box, you can select Picture and then navigate to a picture you want to use as a bullet and then double-click it.
2. Inserting a check mark using Insert Symbol
If you want to add a check mark in a line of text (or at the end of a line of text), you can use Insert Symbol.
To insert a check mark using Insert Symbol in the Ribbon in Word:
- Position the cursor in the Word document where you want to insert a check mark.
- Click the Insert tab in the Ribbon.
- In the Symbols group, click Symbol. A drop-down menu appears.
- Click More Symbols. A dialog box appears.
- If necessary, click the Symbols tab.
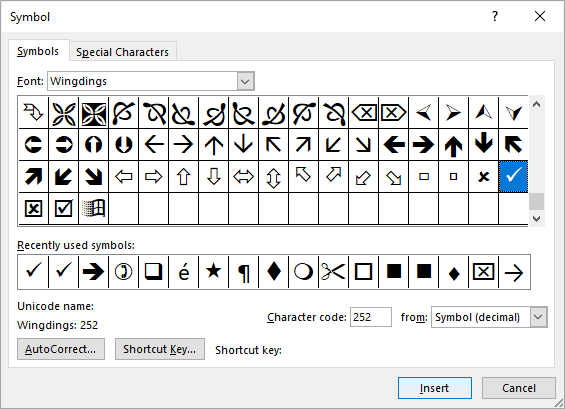
- Select Wingdings from the Font drop-down menu. Alternatively, you can select another font such as Wingdings 2 or Segoe UI Symbol.
- Scroll through the list of symbols until you find the check mark symbol you want to use and then click it.
- Click Insert.
- Click Close.
Once the check mark has been inserted, you can change its size or color using the Home tab in the Ribbon or by right-clicking and selecting formatting options from the mini-toolbar.
In the example below, Wingdings is selected in the Symbol dialog box:
3. Inserting a check mark using a custom Word keyboard shortcut
If you insert a check mark frequently, you can create your own keyboard shortcut for the check mark symbol.
To create a keyboard shortcut for a check mark:
- Position the cursor in a Word document.
- Click the Insert tab in the Ribbon.
- In the Symbols group, click Symbol. A drop-down menu appears.
- Click More Symbols. A dialog box appears.
- If necessary, click the Symbols tab.
- Select Wingdings from the Font drop-down menu. Alternatively, you can select another font such as Wingdings 2 or Segoe UI Symbol.
- Scroll through the list of symbols until you find the check mark symbol you want to use and then click it.
- Click Shortcut. A dialog box appears.
- Click in the box below Assign New Shortcut key.
- Press the keys you want to assign (such as Ctrl + Alt + M). Don’t type any text, just press the keys. Be careful not to override a useful built-in shortcut such as Ctrl + C.
- Click Assign. Typically the location for these shortcuts is the Normal (or default) template.
- Click Close twice.
Test the shortcut in your document by pressing the assigned keys.
The Customize Keyboard dialog box appears as follows:
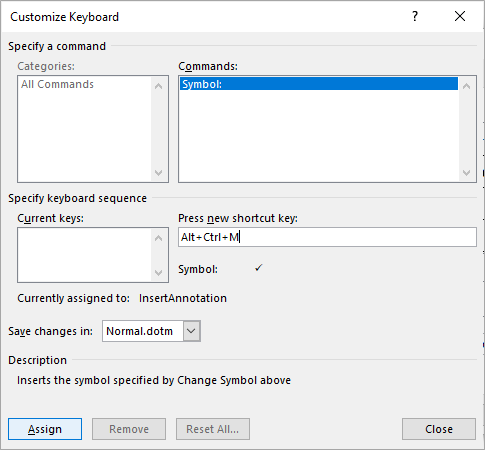
Since these shortcuts are typically saved in the Normal template, when you exit Word, if you are prompted to save the Normal template, click Yes.
4. Inserting a check mark using an AutoCorrect shortcut
You can also insert a check mark automatically using AutoCorrect.
To set up an AutoCorrect entry for a check mark:
- Position the cursor in a Word document.
- Click the Insert tab in the Ribbon.
- In the Symbols group, click Symbol. A drop-down menu appears.
- Click More Symbols. A dialog box appears.
- If necessary, click the Symbols tab.
- Select Wingdings from the Font drop-down menu. Alternatively, you can select another font such as Wingdings 2 or Segoe UI Symbol.
- Scroll through the list of symbols until you find the check mark symbol you want to use and then click it.
- Click AutoCorrect. A dialog box appears.
- In the Replace box, enter the name of the entry (such as cm1).
- Click Add.
- Click OK.
- Click Close.
To insert the entry in the document, type the entry (such as cm1) and then press the Spacebar.
The AutoCorrect dialog box appears as follows:
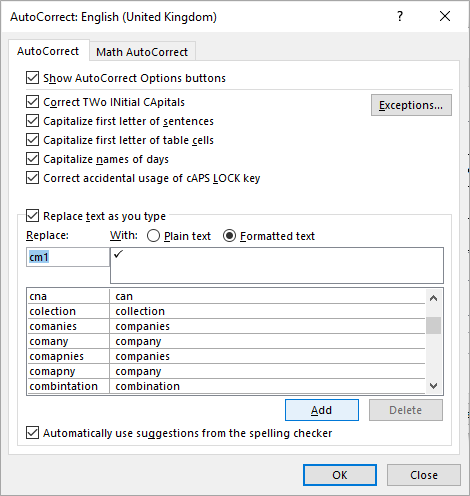
Since these shortcuts are typically saved in the Normal template, when you exit Word, you should be prompted to save it.
5. Inserting a check mark using an Alt keyboard shortcut
You can press the Alt key in combination with numbers on the numeric keypad to insert a check mark symbol.
To insert a check mark symbol in a Word document using Alt:
- Position the cursor where you want to insert the check mark symbol.
- Press Alt + 0252 or Alt + 0254 on the numeric keypad. If the sequence doesn’t work, press NumLock on the numeric keypad. Word will insert a different character.
- Select the character, click the Home tab in the Ribbon and select Wingdings from the Font drop-down menu.
If you want to create clickable check boxes, you could create a Word form using controls or create a dynamic form using Microsoft Forms.
Subscribe to get more articles like this one
Did you find this article helpful? If you would like to receive new articles, join our email list.
More resources
How to Create a Hanging Indent in Word (3 Ways)
14 Shortcuts to Quickly Select Text in Microsoft Word
How to View Word Count in Microsoft Word (4 Ways)
How to Insert the Not Equal Sign in Word (5 Ways to Type or Insert ≠)
10+ Great Microsoft Word Navigation Shortcuts to Move Around Quickly in Your Documents
Related courses
Microsoft Word: Intermediate / Advanced
Microsoft Excel: Intermediate / Advanced
Microsoft PowerPoint: Intermediate / Advanced
Microsoft Word: Long Documents Master Class
Microsoft Word: Styles, Templates and Tables of Contents
Microsoft Word: Designing Dynamic Word Documents Using Fields
VIEW MORE COURSES >
Our instructor-led courses are delivered in virtual classroom format or at our downtown Toronto location at 18 King Street East, Suite 1400, Toronto, Ontario, Canada (some in-person classroom courses may also be delivered at an alternate downtown Toronto location). Contact us at info@avantixlearning.ca if you’d like to arrange custom instructor-led virtual classroom or onsite training on a date that’s convenient for you.
Copyright 2023 Avantix® Learning
Microsoft, the Microsoft logo, Microsoft Office and related Microsoft applications and logos are registered trademarks of Microsoft Corporation in Canada, US and other countries. All other trademarks are the property of the registered owners.
Avantix Learning |18 King Street East, Suite 1400, Toronto, Ontario, Canada M5C 1C4 | Contact us at info@avantixlearning.ca
![]()
Download Article
![]()
Download Article
Want to add a check box or tick box to a list or form in Microsoft Word? It’s easy to do, and you can even make it checkable so you can click the box with your mouse. We’ll show you an easy way to add a clickable checkbox using Developer Mode in Microsoft Word.
Steps
-
1
Open a new file in Microsoft Word. Do so by opening the app shaped like a blue W. Then click on File in the menu bar at the top of the screen, and click on New Blank Document.
-
2
Click on File in the menu bar and then Options in the menu.
- On Mac, click on Word in the menu bar and then Preferences… in the menu.
Advertisement
-
3
Click on Customize Ribbon and then Main Tabs in the «Customize the Ribbon:» drop-down menu.»[1]
- On Mac, click on Ribbon & Toolbar in the «Authoring and Proofing Tools» section of the dialog box, then click on the Ribbon tab at the top of the dialog box.
-
4
Check «Developer» in the «Main Tabs» pane.
-
5
Click on Ok.
-
6
Click on Developer. It’s a tab in the upper-right part of the window.
-
7
Position the cursor where you’d like to insert the check box.
-
8
Click on Check Box. It’s in the menu bar at the top of the window.
-
9
Add additional check boxes and text as needed.
-
10
Lock the form. To do so, select the entire list, to be found in the Controls section on the Developer tab, then click on Group and Group.
- On Mac, click Protect Form in the Developer tab toolbar.


Advertisement
Add New Question
-
Question
What should I do if the check box is grayed out in my ribbon?

It is grayed out for me too. However, if you click on the one icon that isn’t — Legacy Tools — then you will find the exact same checkbox, which you should be able to select.
-
Question
How can I enlarge the size of a text box without enlarging the text?
In Word, just dragging the corner of the text box should be sufficient. If the text changes size accidentally, you can always highlight it and change it back to the desired size.
-
Question
How do you make a drop box in word?
Download LibreOffice. Follow the manual on how to add a list or list/add or list/multiselect box (or just look under «insert» in the menu). You can add a data source for the dropdown menu items from a database, a spreadsheet or within the file structure itself.
See more answers
Ask a Question
200 characters left
Include your email address to get a message when this question is answered.
Submit
Advertisement
Thanks for submitting a tip for review!
About This Article
Article SummaryX
1. Open a document.
2. Click File.
3. Select Customize Ribbon and then click Main Tabs.
4. Check the «Developer» box.
5. Click Save.
6. Click Developer.
7. Click where you want to insert the check box.
8. Click Check Box.
9. Add additional boxes and text.
10. Lock the form.
Did this summary help you?
Thanks to all authors for creating a page that has been read 1,240,190 times.
Is this article up to date?
Insert a check mark symbol
- In your file, place the cursor where you want to insert the symbol.
- Open the Symbol dialog box:
- In the Font box, select Wingdings.
- In the Character code box at the bottom, enter: 252.
- Select the check mark you want.
- Once the check mark has been inserted, you may change its size or color.
Contents
- 1 How do you insert a checkable box in Excel?
- 2 How do I create a checkable box in Excel?
- 3 How do I make a yes no box in Word?
- 4 Where is the Developer tab in Word?
- 5 How do I check a box in Word 2010?
- 6 Where is the Developer tab on Excel?
- 7 How do I create a yes no box in Excel?
- 8 What is the Developer tab in Excel?
- 9 How do I insert a tick box in Excel without the Developer tab?
- 10 How do I enable insert in Excel?
- 11 How do I insert a checkbox into sheets?
- 12 How do you use a check box?
- 13 Where is the Word Options dialog box in Word 2019?
- 14 How do I use developer tools in Word?
- 15 How do I use developer control in Word?
- 16 How do I add the Developer tab in Word 2007?
- 17 How do I add developer to excel?
- 18 How do I add the Developer tab in Excel 2020?
- 19 How do you make a yes or no sheet?
- 20 How does a Vlookup work?
How do you insert a checkable box in Excel?
To insert a checkbox in Excel, execute these steps: On the Developer tab, in the Controls group, click Insert, and select Check Box under Form Controls. To properly position the check box, hover your mouse over it and as soon as the cursor changes to a four-pointed arrow, drag the checkbox where you want it.
How do I create a checkable box in Excel?
How to Insert a Checkbox in Excel
- Go to Developer Tab –> Controls –> Insert –> Form Controls –> Check Box.
- Click anywhere in the worksheet, and it will insert a checkbox (as shown below).
- Now to need to link the checkbox to a cell in Excel.
How do I make a yes no box in Word?
On the Create tab, in the Tables group, click Table. Click Save , and in the Save As dialog box, enter a name for the new table. Select Click to Add and then select Yes/No from the list.
Where is the Developer tab in Word?
The Developer tab isn’t displayed by default, but you can add it to the ribbon.
- On the File tab, go to Options > Customize Ribbon.
- Under Customize the Ribbon and under Main Tabs, select the Developer check box.
How do I check a box in Word 2010?
Click in the document where you want the check box. Activate the Developer tab, then click on the check box in the Controls group. This will insert a check box that the user can tick and clear.
Where is the Developer tab on Excel?
The Developer tab isn’t displayed by default, but you can add it to the ribbon.
- On the File tab, go to Options > Customize Ribbon.
- Under Customize the Ribbon and under Main Tabs, select the Developer check box.
How do I create a yes no box in Excel?
In the “Data Validation” section, click “Data Validation.” Then, click the “Settings” tab. In the “Allow” drop-down menu, select “List.” Under “Source,” type “Yes,No” or any other comma-separated list to limit what can be entered in the cells.
What is the Developer tab in Excel?
Summary. The Developer tab is a feature included in Microsoft Excel, and it is usually hidden by default. The tab allows users to create VBA applications, design forms, create macros, import and export XML data, etc.
How do I insert a tick box in Excel without the Developer tab?
Click in the cell where you want to add the check box or option button control. Tip: You can only add one checkbox or option button at a time. To speed things up, after you add your first control, right-click it and select Copy > Paste.
How do I enable insert in Excel?
If the Insert Options button isn’t visible, then go to File > Options > Advanced > in the Cut, copy and paste group, check the Show Insert Options buttons option.
How do I insert a checkbox into sheets?
Insert checkboxes
- On your computer, open a spreadsheet in Google Sheets.
- Select the cells you want to have checkboxes.
- In the menu at the top, click Insert. Checkbox.
- To remove checkboxes, select the checkboxes you want to remove and press Delete.
How do you use a check box?
The > defines a checkbox. The checkbox is shown as a square box that is ticked (checked) when activated. Checkboxes are used to let a user select one or more options of a limited number of choices. Tip: Always add the tag for best accessibility practices!
Where is the Word Options dialog box in Word 2019?
To see general options for working with Word, click File > Options > General.
How do I use developer tools in Word?
Creating Fillable Forms Using Microsoft Word
- Enable Developer Tab. Open Microsoft Word, then go to the File Tab > Options > Customize Ribbon > check the Developer Tab in the right column > Click OK.
- Insert a Control.
- Edit Filler Text.
- Design Mode button again to exit the mode.
- Customize Content Controls.
How do I use developer control in Word?
Click File > Options > Customize Ribbon. In the list of tabs under Customize the Ribbon, select the Developer box and then click OK. Do one of the following: To add a control, click in the document where you want to add it, and then click the control you want to add on the Design tab.
How do I add the Developer tab in Word 2007?
Word 2007: Show the Developer tab
- Click the large Microsoft Office button (in the top left of the window).
- Click Word Options.
- Click Popular.
- Select the Show Developer tab in the Ribbon check box.
- Click OK.
How do I add developer to excel?
Here are the steps:
- Go to File –> Options.
- In the Excel Options dialogue box, click on Customize Ribbon in the left pane. It will show the Customize the Ribbon options on the right.
- On the right, within the Main Tabs pane, check the Developer option.
- Click OK.
How do I add the Developer tab in Excel 2020?
This is what you need to do:
- Right-click anywhere on the ribbon and choose Customize the Ribbon… in the pop-up menu of options:
- The Excel Options dialog window will show up with the Customize Ribbon option on the left selected.
- Under the list of Main Tabs on the right, select the Developer check box and click OK.
How do you make a yes or no sheet?
Step 1: Select the range of cells where you want to add the yes/no drop-down list. Step 2: Click on the Data option in the menu. Step 3: A drop-down list will appear. Click on the “Data validation”.
How does a Vlookup work?
The VLOOKUP function performs a vertical lookup by searching for a value in the first column of a table and returning the value in the same row in the index_number position.As a worksheet function, the VLOOKUP function can be entered as part of a formula in a cell of a worksheet.

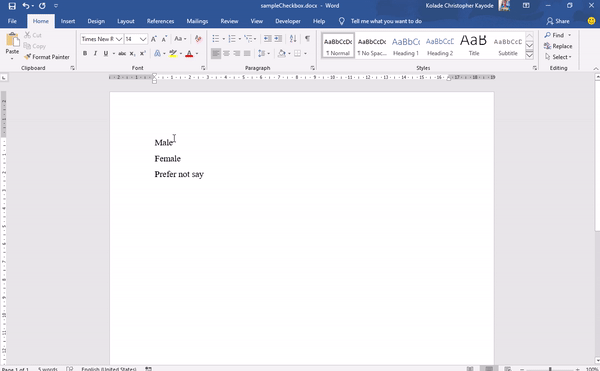
In Microsoft Word, you can create digital forms, surveys, to-do lists, and printable forms. And you might need to add a checkbox in these forms so your respondents can select certain options.
In this tutorial, I will show you how to insert an interactive checkbox in Microsoft Word for softcopy documents, and a non-interactive checkbox for hardcopy (printed) documents. Then you can start using them in your forms, surveys, and lists.
I will be using the Microsoft Word 2016 desktop app in this guide because it’s my personal preference. If you are using a different version, things may not be entirely the same, but you can still follow along.
How to Insert a Checkbox in Softcopy Documents like Digital Forms and Surveys
To insert a checkbox in a softcopy document (like forms and surveys that you want respondents to fill out digitally within the Word document), you’ll use the Developer tab in the menu bar.
Unlike other tabs such as File, Home, Insert, Design, and so on, the Developer tab doesn’t appear in the menu bar by default. So I will start this guide by walking you through how to show the Developer tab in the menu bar.
How to Show the Developer Tab
To show the Developer tab in the menu bar, first click on “File”:

Next, click “Options”:
Then select “Customize Ribbon” in the pop up that shows up:
Under “Main Tabs”, check the “Developer” option:

Finally, click “Ok”:
How to Insert the Checkbox in your Word Document
First, place the cursor where you want to insert the checkbox.
Next, click on the Developer tab in the menu bar. You will see options such as Add-ins, XML Mapping Pane, and some others (you will not see their names until you hover on them).
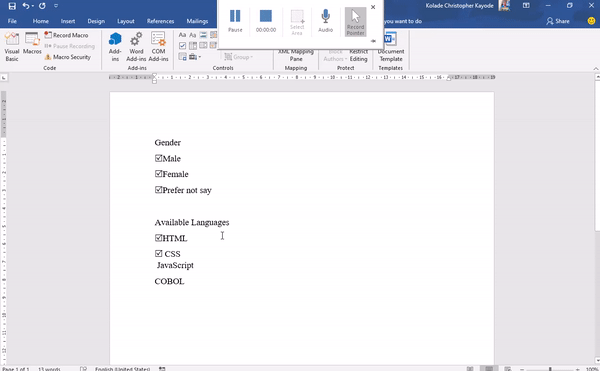
Hover on the one that has a checkmark and select it.
This will insert your checkbox.
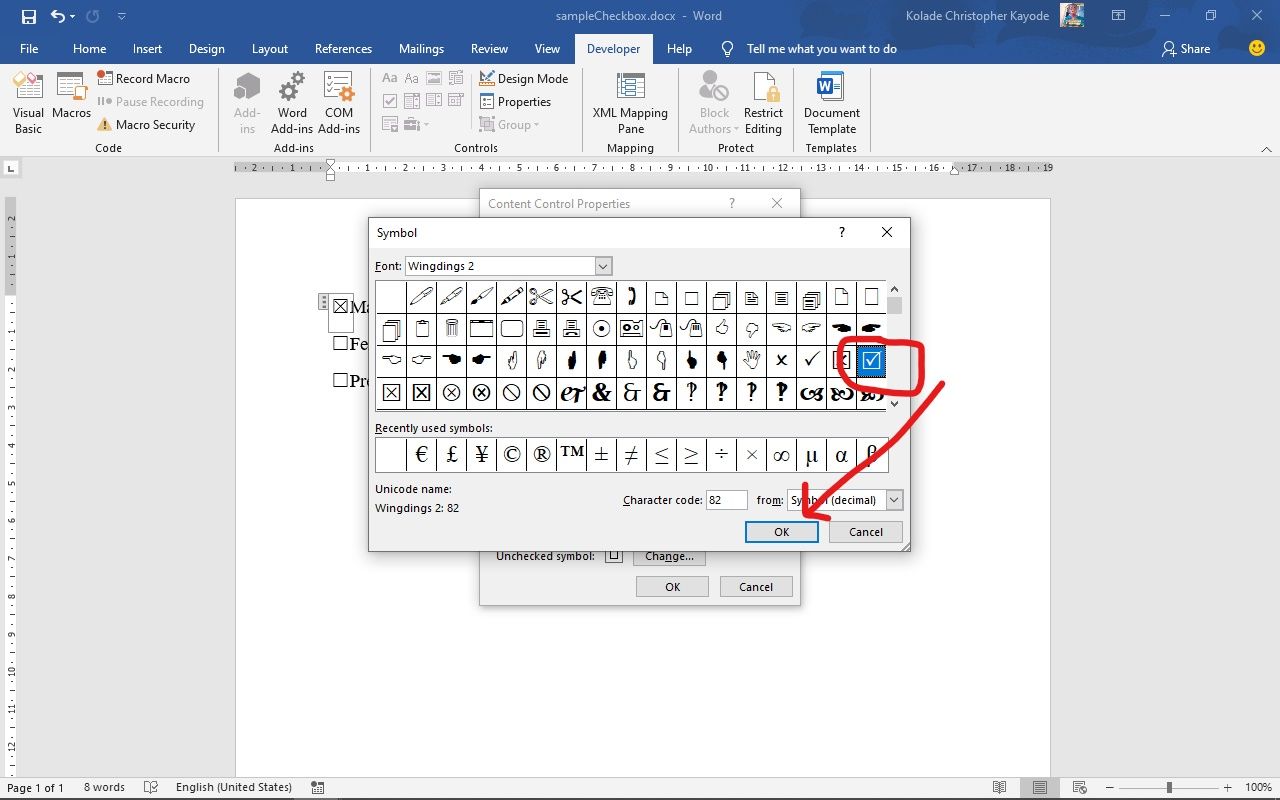
How to Change the Icon of the Checked State of the Checkbox
The checkbox becomes interactive immediately after you insert it. The only problem is that an «X» appears by default in the checked state, and you might want a checkmark instead of this.
So now I’m going to show you how to change the X to a checkmark.
Step 1: Select the checkbox, or place the cursor right next to it:

Step 2: Click on the Developer tab and select “Properties”:

Step 3: You will see the default symbols for checked and unchecked symbols. Right next to the “Checked Symbol”, click “change”.
Step 4: In the popup that shows up, look for “winding2” under font and select it. You will see the common checkmark icons used for the checked state of checkboxes. Just select one of them and click “Ok”, then “Ok” again.
Below is a gif demonstrating how to change the checked icon:

You can follow the same process to change the unchecked state, as I’ve shown below:

How to Remove the Bounding Box of the Checkmark
Another way you can make the checkbox look better and make it user-friendly is to remove the bounding box that appears when it is checked or unchecked, and when the cursor is placed on it.
Step 1: Place the cursor on the checkbox.
Step 2: Select the Developer tab in the menu bar and click on “Properties”.
Step 3: Right next to “Show as”, click the dropdown and select “None”.
Thee 3 steps above are demonstrated in the animated gif below:
How to Insert a Checkbox in Hardcopy (Printed) Documents
If you are dealing with printed documents, you don’t need to dabble around with the Developer tab to insert a checkbox. Instead, you can define a custom bullet point for the purpose.
Step 1: Make sure you are on the Home tab of the menu bar.
Step 2: Click the Bullets dropdown icon:

Step 3: Click “Define new bullet”:
Step 4: Select «Symbol» in the popup that shows up:
Step 5: Select «Winding2» as the font.
Step 6: Choose the checkmark Icon and click “Ok”, then “Ok” again:
This is how its all done:
How to Create a Shortcut to Add an Interactive Checkbox in Word
If you want to continue inserting more interactive checkboxes, you don’t need to waste time by doing it from the Developer tab all the time. You can create a shortcut with the steps below.
Step 1: Make sure the checkbox is being shown as a bounding box.
Refer to the steps under the «Remove the Bounding Box” part of this tutorial to get a refresh on how to do this.
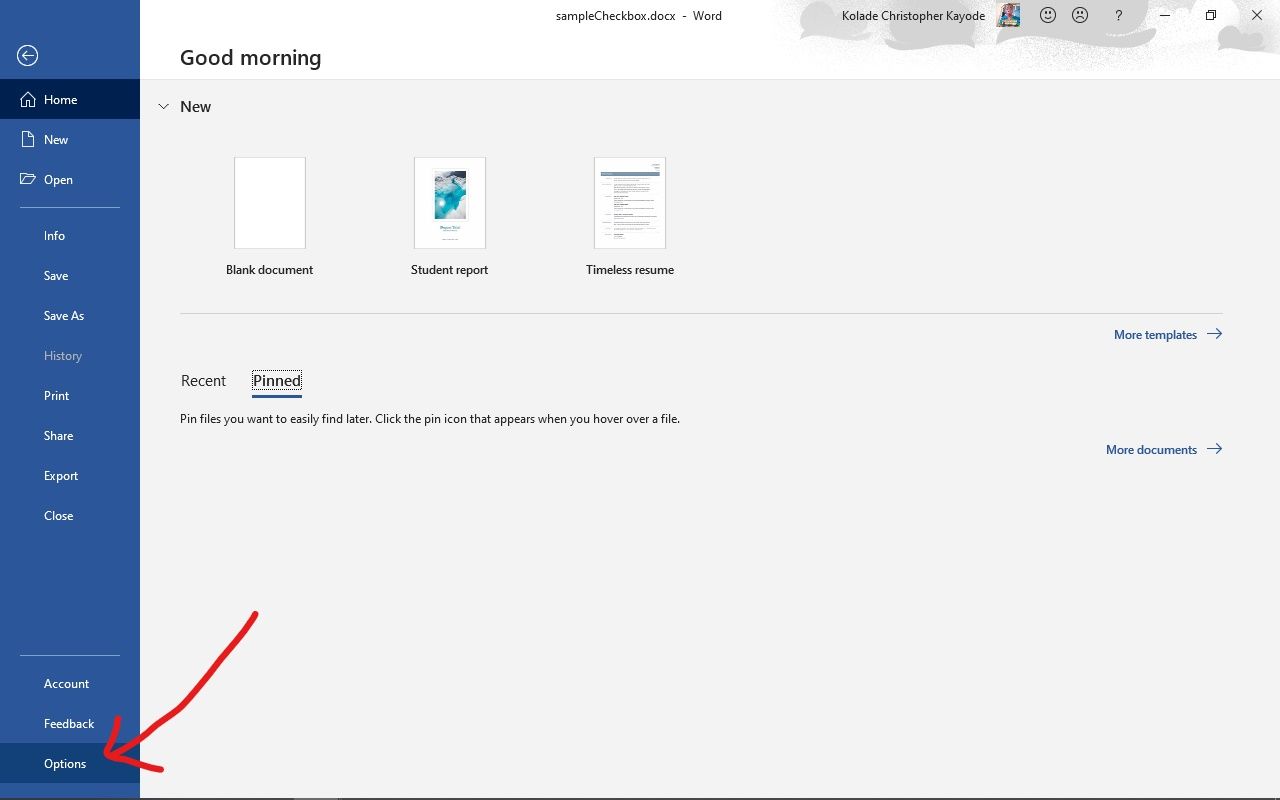
Step 2: Highlight the checkbox and click on the File tab of the menu bar:
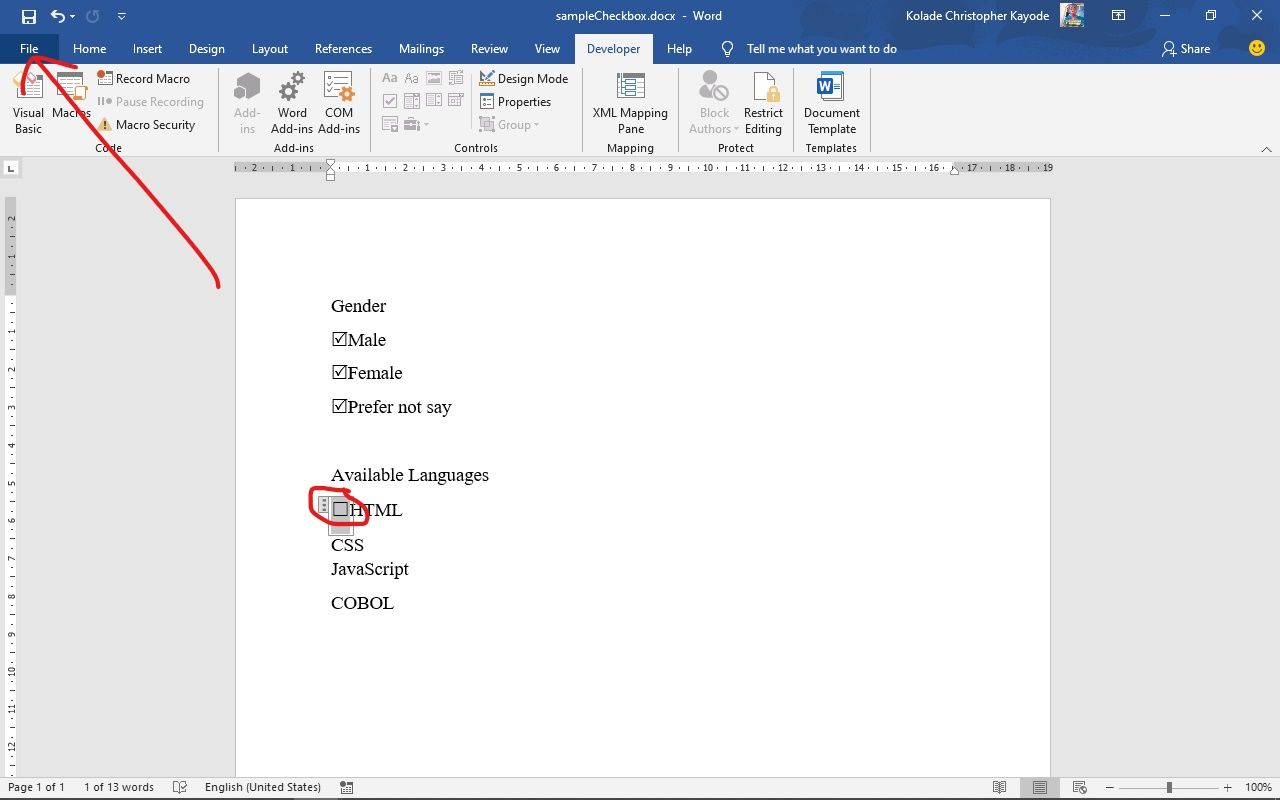
Step 3: Click on “Options”:
Step 4: Select “Proofing” in the popup that comes up and click on “Autocorrect Options”:
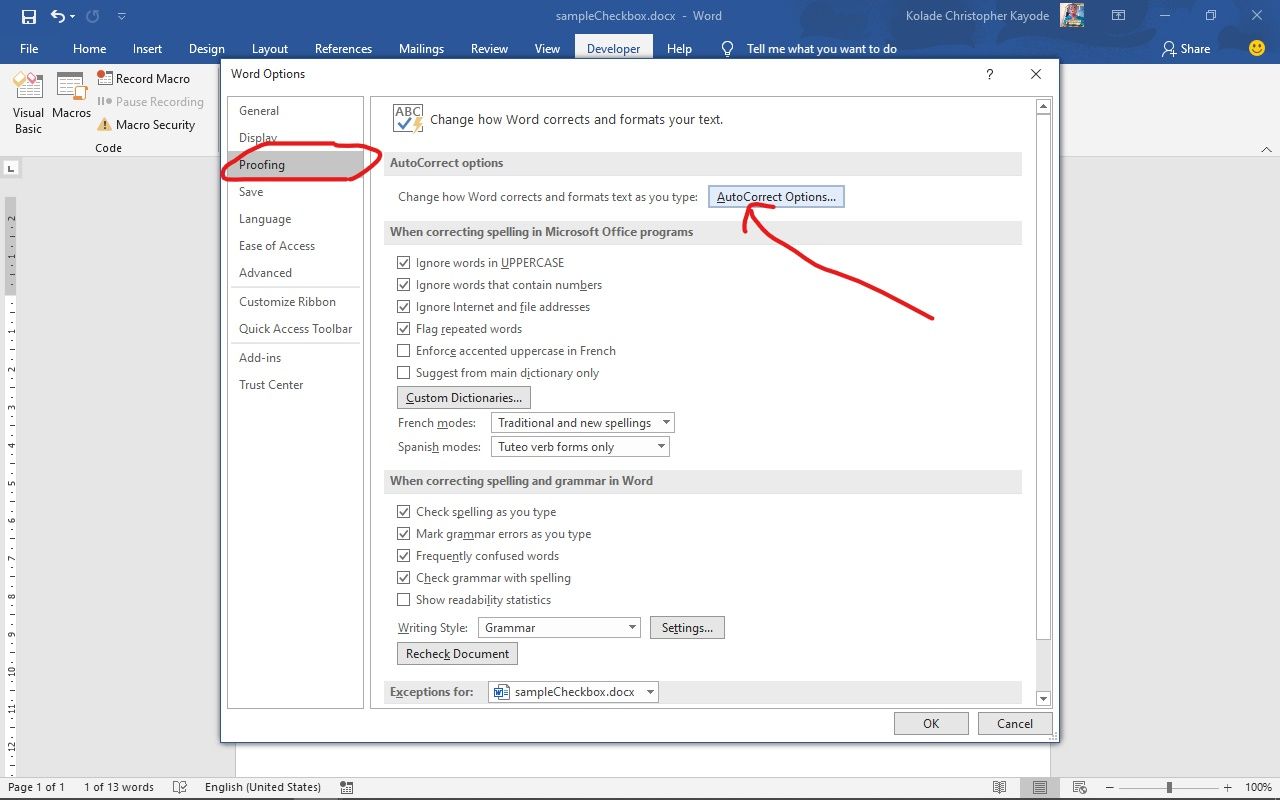
Step 5: You should see several options checked. Make sure “Replace text as you type” is checked too.
Step 6: In the editor under “Replace”, type in the shortcut you would like to use to insert checkboxes and click “Add”. Click “Ok” and “Ok” again.
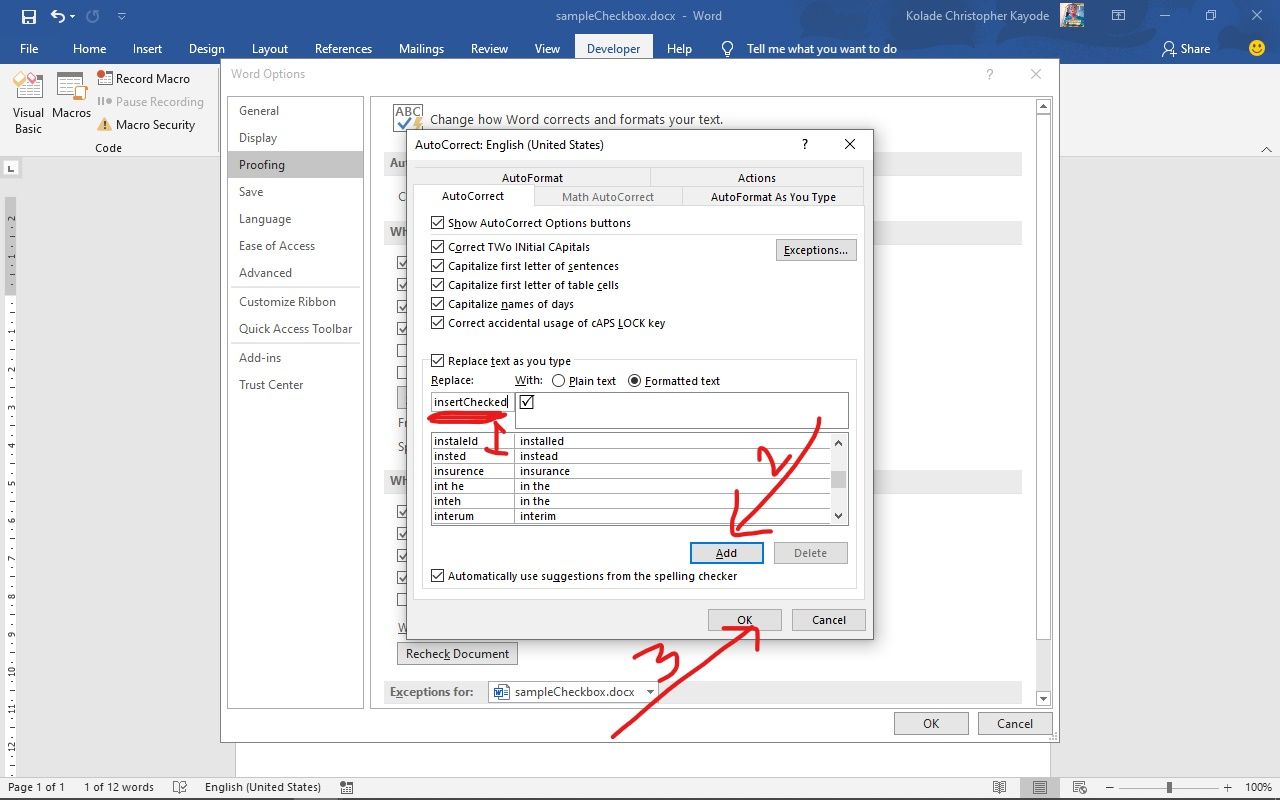
Now, to insert a checkbox, you can simply type the word you entered in step 6 and hit the space bar.
Conclusion
Checkboxes often play a crucial role in data collection using softcopy and printed documents. I hope this tutorial helped you understand how they work.
In this guide, you learned how to insert an interactive checkbox for fillable digital documents such as forms and surveys, and insert a non-interactive checkbox in printed documents.
Thank you for reading, and have a nice time.
Learn to code for free. freeCodeCamp’s open source curriculum has helped more than 40,000 people get jobs as developers. Get started
HTTA is reader supported. When you buy through links on our site, we may earn an affiliate commission at no extra cost to you. Learn more.
A check mark ✓ (or checkbox ☑) is a symbol used to indicate the concept of “yes” in the English language.


In this tutorial, you will learn how to type the checkmark symbol in Microsoft Word using the keyboard or mouse.
NOTE: Different application has different methods for typing the checkmark symbol. I will teach you how to type the checkmark symbol in Word in this post. Later, I’ll write on how it can be typed on other Office Applications in a separate blog post.
Without any further ado, let’s get started.
In Word, there are several ways available for you to type the checkmark symbol.
In this section, I’ll go through each one of these methods one after the other.
Let’s begin with the easiest options.
Type check mark symbol in Word using Alt Code
The alt code to type the checkbox symbol in Word is 10003. Use 10004 for a heavy checkmark.
To use this alt code type the check mark symbol in Word, obey the following instructions:
- Place the cursor where you want to type the checkmark.
- Press and hold the Alt key on your keyboard.
- While pressing down the Alt key, type the checkmark alt code which is 10003 or 10004 for a heavy checkmark. For this to work, you must use the numeric keypad on the right side of your keyboard.
- After typing the checkmark symbol alt code, release the Alt key.
As soon as you release the alt key, the symbol will be inserted at the cursor’s current location in your document.
This is how you may use the check mark symbol alt code in Microsoft Word.
Using Keyboard Shortcut to type Checkmark in Word
The Keyboard shortcut for check mark symbol in Microsoft Word is 2713, Alt+X.
Note: this checkmark symbol shortcut works only in Microsoft Word.
Below is a step by step guide on how to use this shortcut to type the check mark symbol into your Word document:
- First of all, place the insertion pointer at where you wish to type the checkmark.
- Next, type the checkmark alt code which is 2713.
- After typing the alt code, highlight it and press Alt+X on your keyboard.

As soon as you press the Alt+X shortcut, the checkmark alt code (2713) will convert into the check mark symbol.
This is how you may type the check-mark sign in Word using the alt code keyboard shortcut.
Using the Symbol’s dialog
Aside from typing the check mark symbol with the keyboard shortcut, there is also a mouse-based approach to get this symbol into your Word document.
Just obey the following instructions:
- Place the cursor where you want to insert the checkmark.
- Go to the Insert tab.

- In the Symbols group, select Symbol>More Symbols.

- The Symbol dialog box will appear. On this dialog box, click on the Font: drop-down and select Wingdings 2 from the list. More advanced symbols will appear. Locate the Checkmark symbol from these symbols and double-click on it to insert it into your document. Alternatively, just click to select it and then hit the Insert button.

NOTE: If you need to insert this symbol often in your document, you don’t have to go through all these steps each time you need it. Instead, copy it to your clipboard and hit Ctrl+V to paste it whenever the need arises.
This is how you may get the check mark symbol in Word using the insert symbol dialog box.
Adding Clickable and non-clickable check marks in Word
This approach is right for you if you have a list of options that users are supposed to choose from.
The clickable checkbox is interactive. It allows the user to place a check mark by clicking on the checkbox symbol.
On the other hand, the non-interactive check mark is just a visual check mark symbol that you cannot click to check or uncheck the symbol.
Interactive checkbox
Non-interactive checkbox
I will show you how to add clickable and non-clickable checkmarks to your list of options in Microsoft Word.
Without any further ado, let’s get started.
Ho to insert Non-Clickable checkmark in Word
Obey the following instructions to add this symbol to a list of options in Microsoft Word.
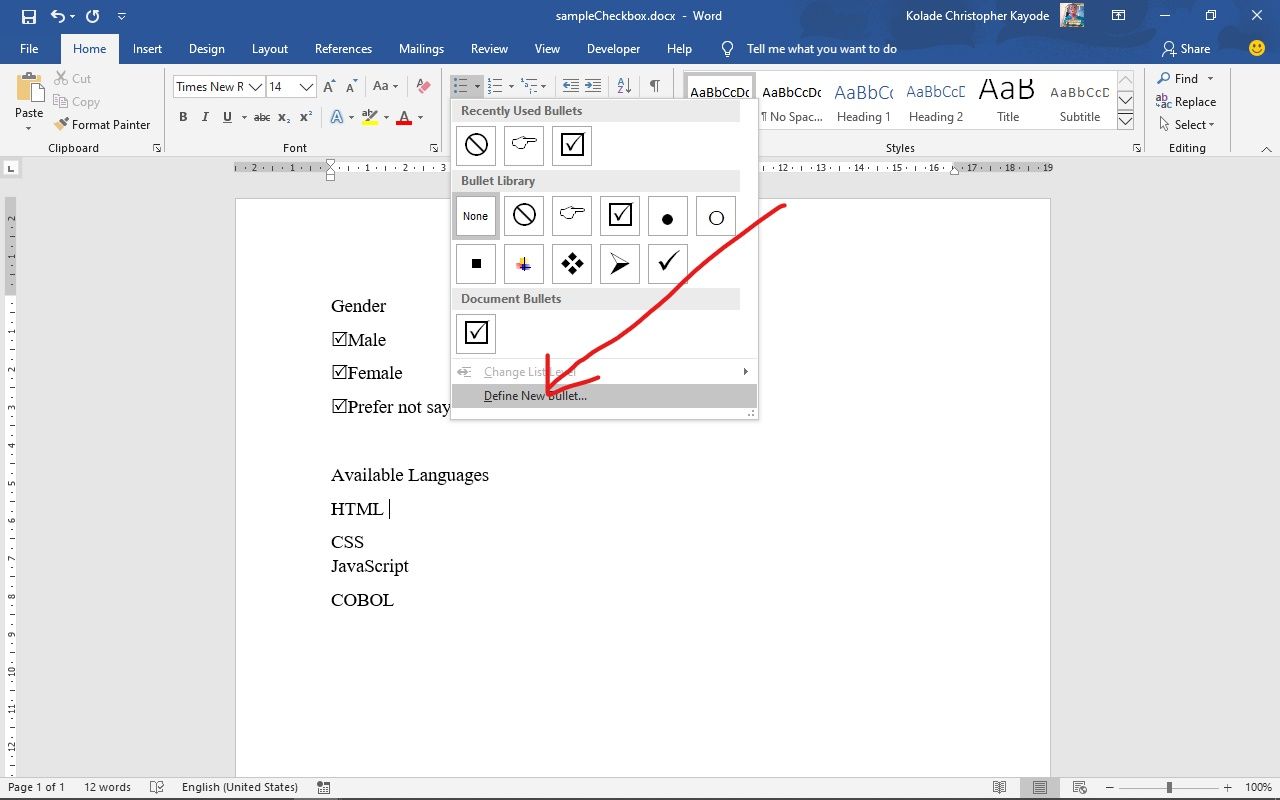
- Begin by typing all the options in a list. Begin each option on a new line.

- Highlight all the options you’ve just typed. Then click on the Home tab, in the Paragraph group, click on the bullet list drop-down.

- From the Bullet List drop-down menu, select the symbol you want to use as bullet. In this case we will select the check mark symbol. If this is your first time of using this symbol as bullet, you may not find it from this drop-down. If that’s like you, please jump to the next step.

- If you can’t find the check mark symbol on this drop-down, click on the Define New Bullet… button at the bottom.

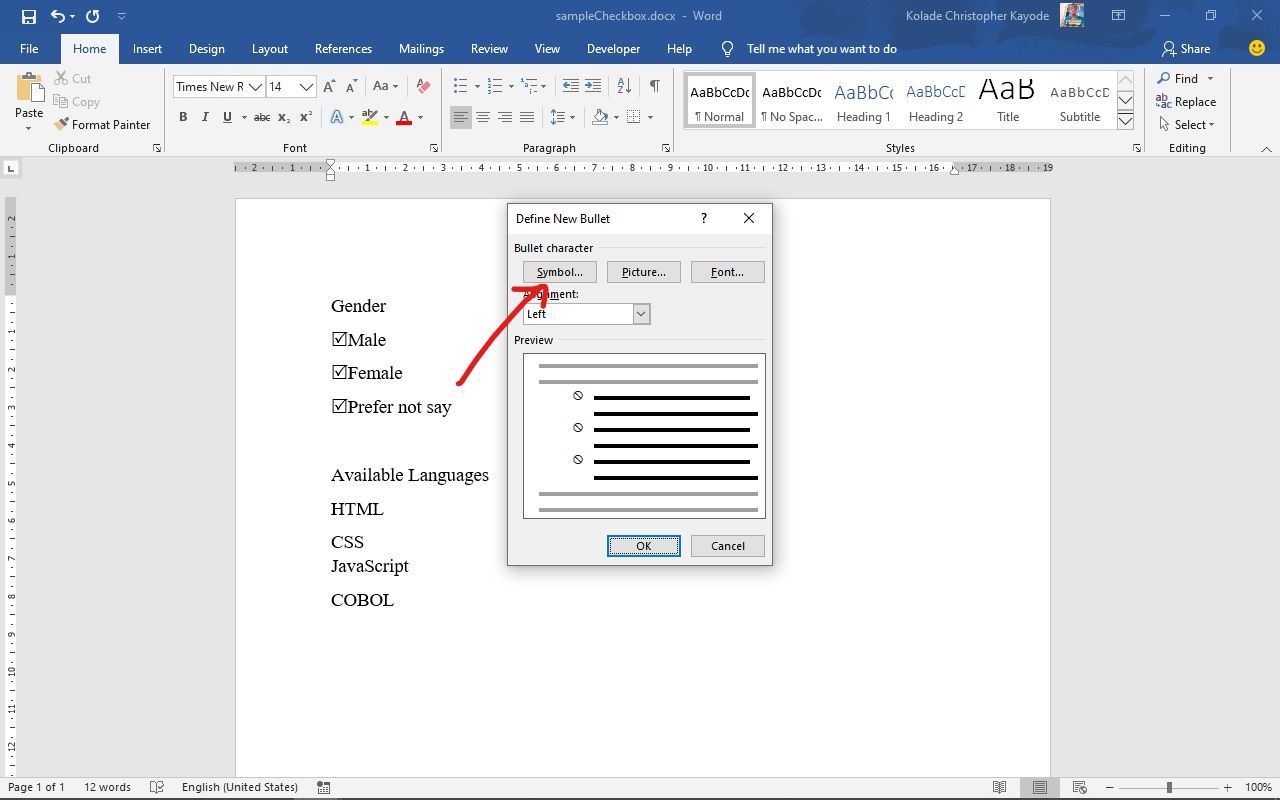
- The Define New Bullet dialog box will appear. In the Bullet Character category, click on the Symbol… button to launch the Symbol dialog.

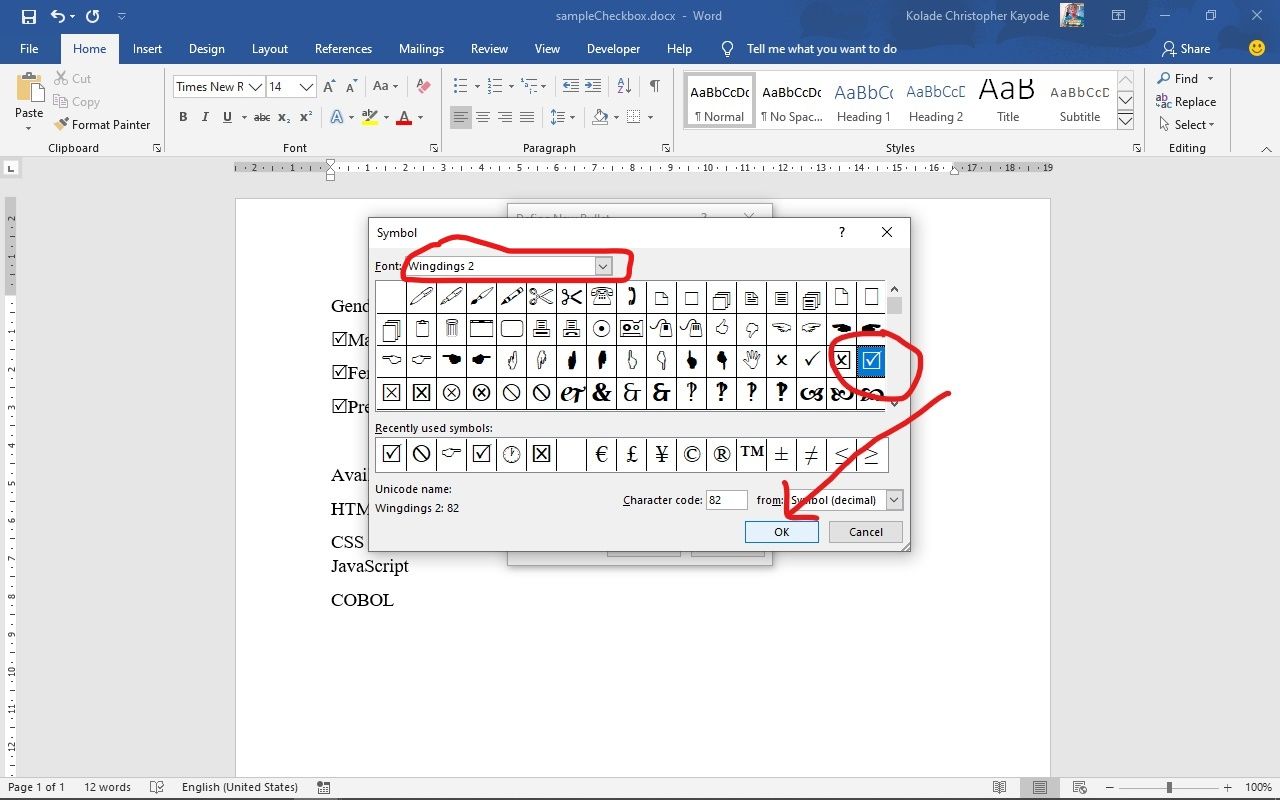
- From the Symbol dialog, click on the Font: drop-down and select Wingdings or Wingdings 2 from the list. More advanced symbols will appear. Locate the Checkmark symbol from this library of symbols, click to select it and then hit the Insert button.
- After specify the bullet symbol, click on the OK button on the Define New Bullet dialog.

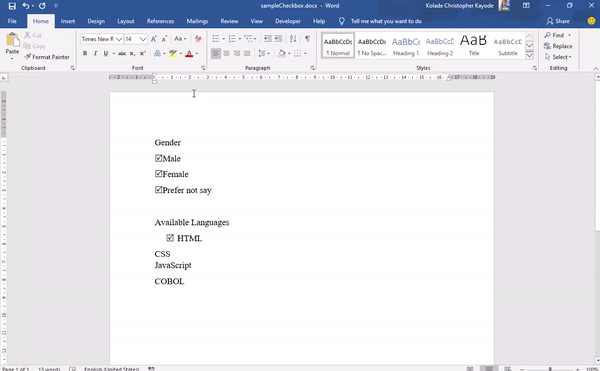
The checkmark symbol you select will be used as bullets. You can use other symbols as well. For example, if you want to add a checkbox without the check mark symbol inside it, select the checkbox symbol from the symbol’s dialog box.

Someone may also want some of the checkboxes checked and others unchecked. If that’s like you, you should consider adding a clickable checkbox symbol instead. This way, you can manually click to check and uncheck the options.
In the next section, I’ll explain how to add clickable check boxes in Word.
Inserting Clickable Checkmark Symbols in Word
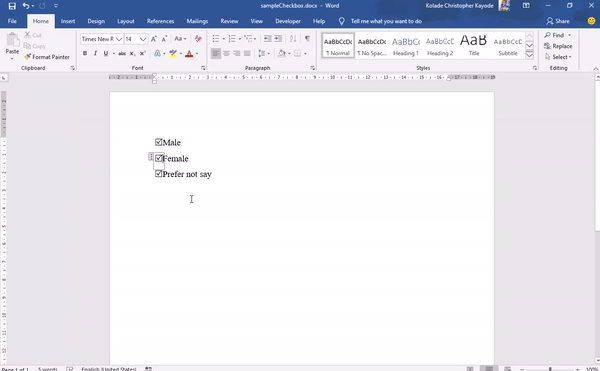
The clickable checkmark symbols allow users of your document to select and deselect the checkboxes as illustrated below:
Adding this type of checkmark symbol requires you to use the developer tab on the ribbon. This tab is not visible by default.
Thus, first of all, look and see whether there’s a tab named Developer on the ribbon.

If you seem not to find the Developer tab on the ribbon, you’ll therefore need to take steps to add it to the ribbon. Just obey the following instructions.
Adding the Developer tab
To add the developer tab in Word:
- Right-click anywhere on the Ribbon and select Customize Ribbon from the shortcut menu.

- The Word Options dialog box will appear with the Customize Ribbon category displayed. On the right side of this dialog box, click to select the Developer checkbox, then click on the OK button. If this is checked, the Developer tab will now become visible.

Now that you have the developer tab visible on your ribbon, follow the remaining steps below to add clickable checkboxes and checkmarks into your Word document:
- Click to place the cursor where you want to add the checkmark.

- Click on the Developer Tab.
- In the Controls category, click the Checkbox button.

The checkbox button will be added exactly where you placed your insertion pointer.

- Follow the same steps to add the checkbox to the rest of the items. Or, copy and paste the checkbox at the beginning of each line.

By default, clicking on this checkbox will mark an “X” symbol instead of the tick mark we want to see. The X sign is not what we want. We want to see a tick mark inside the tick box when clicked. You can change it to include any symbol you want (like this: ☑). Continue the steps below to learn how to change the checked symbol.
- Click to select the symbol.
- Go to the Developer tab, in the Controls category, click on Properties.

- In the Content Control Properties dialog, click on the Change button next to the Checked symbol option.

- The Symbol dialog box appears. Select Webdings 2 from the Font dropdown to display some of the Microsoft Word Advanced Symbols.
- Locate the tickbox symbol and click on it.

- Also, click the OK button for the Content Control Properties dialog.
Now you should have a tick on your checkbox whenever you click on it.
This how you may create a clickable check box or tick box into Microsoft Word documents.
Inserting Checkmark in Word Using the Wingdings font
This option is my least favorite approach to type certain symbols like the check mark symbol in Word. You need to know the symbol’s character code before hand, and you must also change the font before you can get the symbol. But if you can’t find the symbol you want to insert in the Symbol’s dialog, this approach is a helpful solution to consider even though it’s too much work.
Obey the following instructions if you want to type the check mark symbol in Word using the Wingdings front approach.
- Place your curser where you want to type the check mark symbol.
- Press Alt+0252 to type the plain check mark symbol or Alt+0254 to type the boxed checkmark symbol.
Holding down the alt key, use the numeric keypad and type the character code 0252 for the plain check mark symbol. Use 0254 for the boxed check mark symbol. You may have to press the Num Lock key to be able to use the numeric keypad.
After pressing the character code with the alt code pressed down, release the alt code. A new character ( ü ) will be inserted into your document.
- Don’t panic, that isn’t all the steps. Highlight this new character and apply the Windings font.

As soon as you apply the Wingdings font, you’ll get the check mark symbol into your document.

These are all the available ways to easily type the check mark symbol in Word.
If you have any question concerning this post, please drop it in the comments section below.
Related Post:
- How to type square root symbol on keyboard
Adding checkboxes to your Microsoft Word document gives you the functionality of a check list. Ticking off line items as they are complete, actioned or done.
Inserting a check list into your Word document is incredibly handy, most commonly used when creating surveys in word.

There are two ways to insert check boxes into Word, the first being more suitable for digital marking within Word itself and the second more suited to documents being printed and then checked off, such as a to do list.
In this post, we will show you how to insert both types of check boxes into your document with ease.
Inserting a tick-box in Microsoft Word
Option 1: Best for Digital Marking in Word itself

- Open Word
- Check that ‘Developer’ is turned on
- How to Turn Developer on
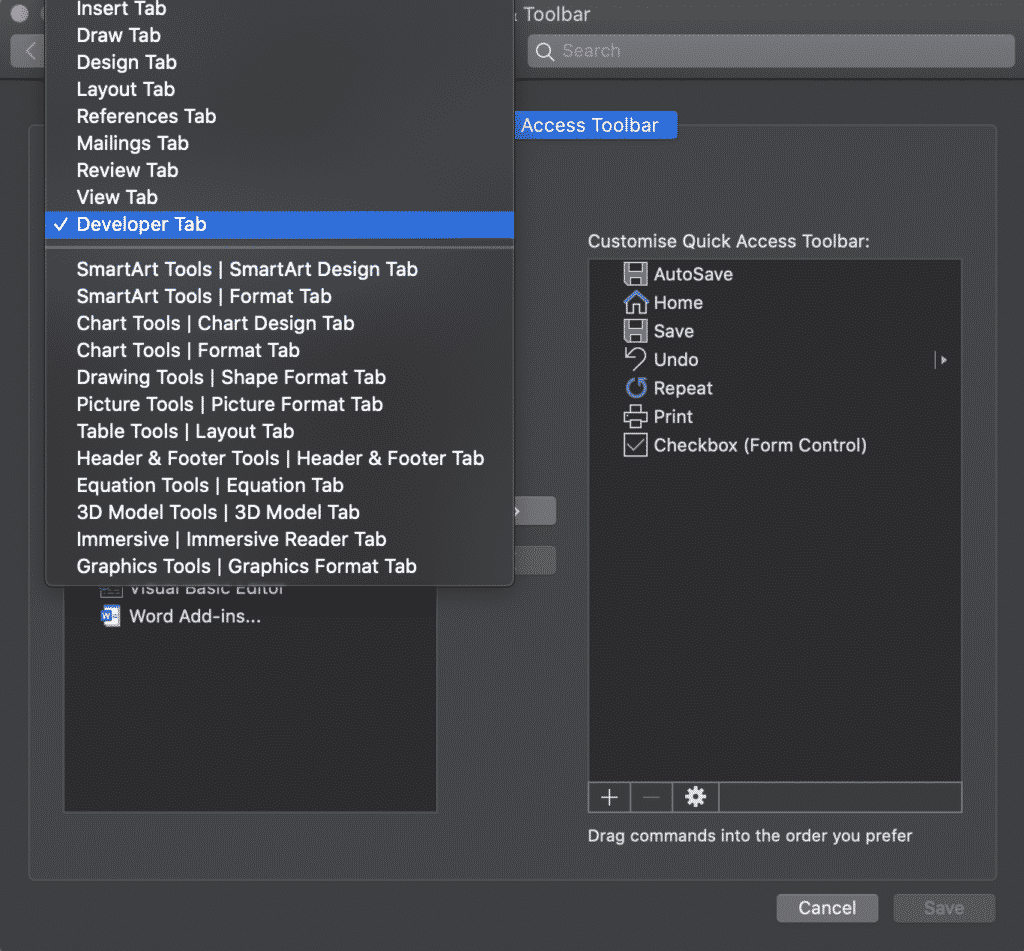
- Select the Customize Quick Access Toolbar dropdown
- Select More Commands
- Select Developer Tab
- Select Tick Box
- Press Insert
- How to Turn Developer on
- Once the Developer Tab has been activated:
- Place your cursor where you would like to insert the tick box

- Select the Tick Box in your Quick Access Short Cuts
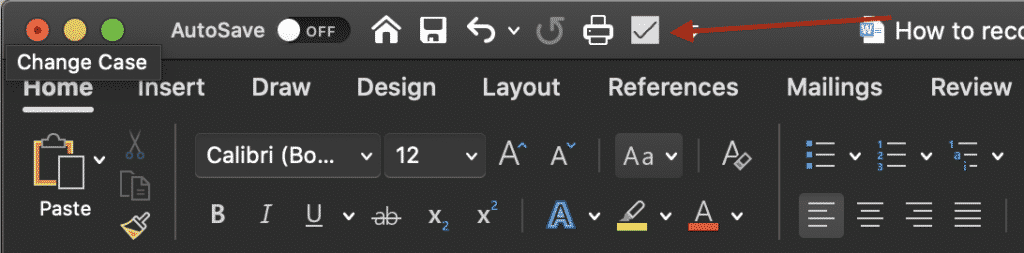
- Repeat for each line that you would like a tick box added in front of

Option 2: Best for Printing

- Open Word
- Highlight your list
- Click the Bullet Point button
- Click Define New Bulletpoint…
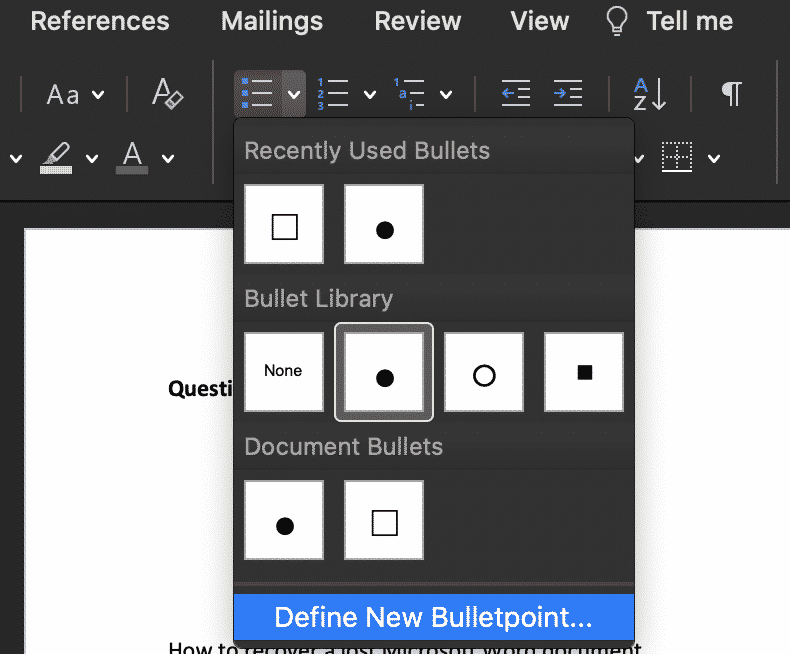
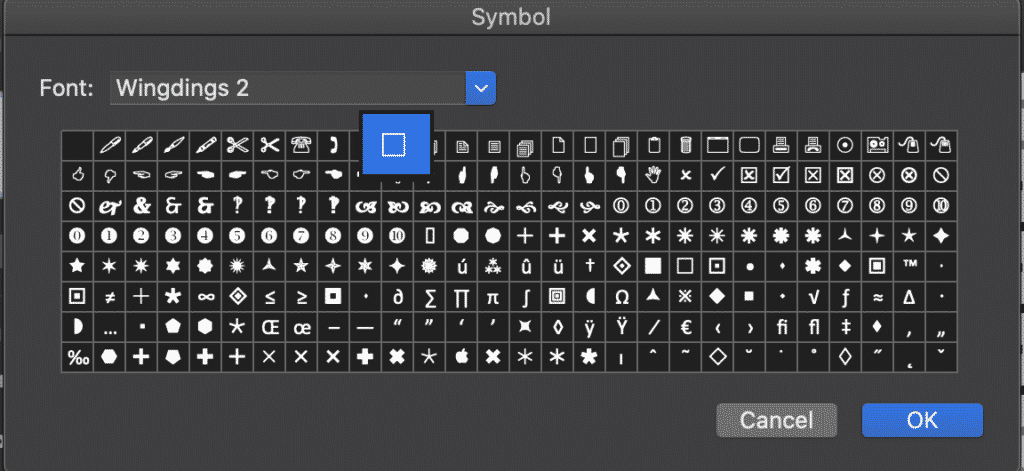
- Click Bulletpoint…
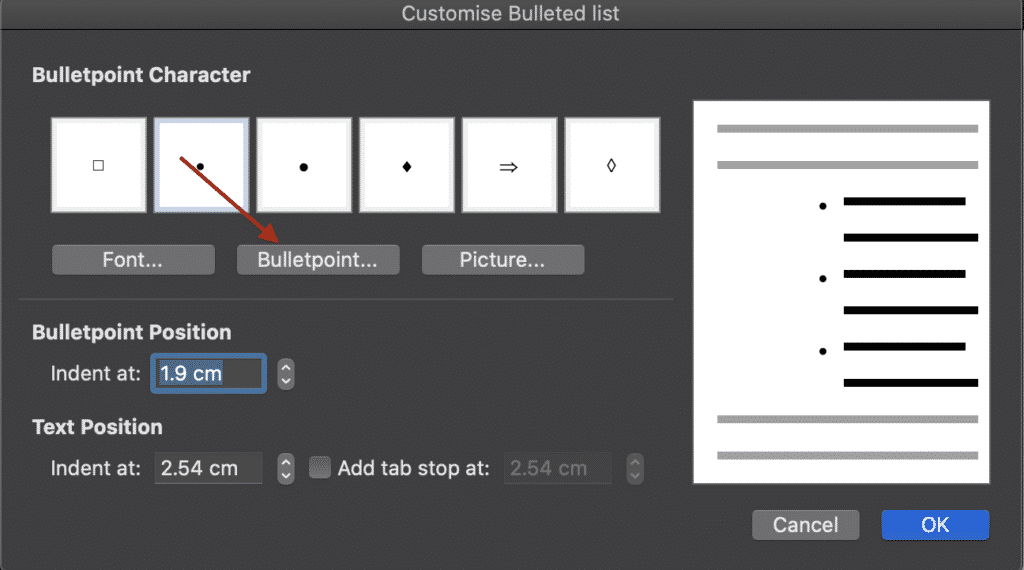
- Change Font to Wingdings 2
- Select the Square Symbol
- Press OK
You have now successfully inserted check boxes in front of all highlighted lines.
Is Version Control causing issues for you? We have a solution!
If you are collaborating on a Microsoft Word Document with others and are required to keep each version saved away for future reference, it is likely you are facing the same version control pain points that every other company is.
A very cluttered shared drive or cloud, one where each new version is saved every time one of your colleagues makes an edit. Leaving you with a shared drive full of documents looking something like ReportV4_updated_final_FINAL1 and no idea if that is actually the final version or not.
Then you face the challenge of naming your new document, do you add another _FINAL2 or is _JDsedits enough for everyone else to understand what’s going on?

If it wasn’t for the ability to sort your files in date order, I’m sure most of us would have given up on the search for the most recent file a decade ago and just rolled the dice on what looked like it was most recent. It must be _final_FINAL2_FINALFINAL right?
Or those days you don’t have shared drive access and do the drag and drop to your desktop and hope you remember to take that file back over into the shared drive next time you are in the office.
Its risky business. There must be an easier way!
Lucky for us all there is, companies such as Simul Docs offer purpose built tools to help us collaborate better and manage our version control for us.
Yep thats right, Simul docs will manage the version control for you. When you open your file, from the moment you start making edits Simul will save the document as the newest version giving it a version number such as 0.0.2 or 0.0.3.
You can then refer back to any version with ease, knowing at a glance which version is the most recent (goodbye _FINAL2_Updated) and hello simple numbered versions and clearly marked authors next to each.
Its version control bliss!
Not only that, but Simul Docs allows you to access your Word Document from anywhere, anytime. There is no need for remote shared drive access or the old clunky desktop saving. Simul gives you access to every version, anywhere, all you need is an internet connection.
Now that you have accessed your document from the comfort of the airport or your own home, you can add your tracked changes and comments, press save and let Simul notify the other collaborators that you have made some changes and they should probably jump in and check them out.
That means, no more emailing Word Documents back and forth with every edit.
Did your shared drive and inbox get a little lighter just thinking about these possibilities?

There really isn’t a downside to collaborating better with Simul Docs.
With free entry level packages on offer, its worth checking out.