
All Microsoft Office programs can check spelling, and most can check grammar.
Using Microsoft 365? You may be interested in checking out the powerful new Editor feature in Word! See Editor — your writing assistant for more information.
Run the spelling and grammar checker
To start a check of the spelling and grammar in your document, just press F7.
Click a heading below for more information
Most Office programs automatically check for potential spelling and grammatical errors as you type, so you don’t need to do anything to show errors while you work.
Notes:
-
Automatic spelling and grammar checking is not available in Access, Excel, or Project. You can manually start a spell check by pressing F7.
-
Automatic grammar checking is available only in Outlook, Word, and PowerPoint 2013 (or newer).
Office marks potential spelling errors with a red squiggly line, and potential grammatical errors are marked with a blue squiggly line.
If spelling or grammatical errors aren’t marked, automatic checking might be turned off. You can turn on the automatic spelling and grammar checker.
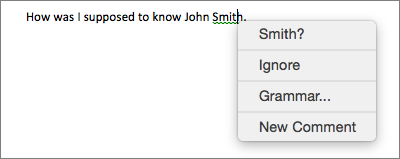
When you see a spelling or grammatical error that you want assistance fixing, right-click on the underlined word or phrase and choose one of the options to fix the error.
If Office is flagging words as misspelled but you have it spelled the way you want it, select Add to Dictionary to teach Office not to flag that word as misspelled in the future. For more information on this see: Add or edit words in a spell check dictionary.
If you don’t want Office to mark potential errors with squiggly lines while you are working, you can turn automatic spelling and grammar checking off:
-
Open the spelling and grammar options:
-
In OneNote, PowerPoint, Publisher, Visio, and Word: On the File menu, click Options, and then click Proofing.
-
In InfoPath: On the Home tab, click the arrow next to or under Spelling, and then click Spelling Options.
-
In Outlook: On the File menu, click Options, and click Mail, and then click Spelling and Autocorrect.
-
-
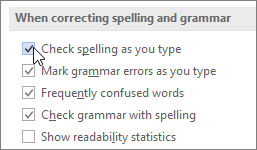
Select or clear the Check spelling as you type check box. In programs that have automatic grammar checking, you may also select or clear the Mark grammar errors as you type check box.

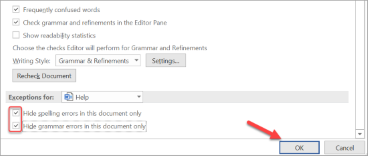
Note: In Word, you can turn the spelling checker on or off for only the document you’re currently working with or for all new documents. Select an option in the Exceptions for list, and then select or clear the Hide spelling errors in this document only and Hide grammar errors in this document only check boxes.
If you don’t want Office to check grammar at all (either when running a spell check or automatically as you type), you can turn it off:
-
Open the spelling and grammar options:
-
In OneNote, PowerPoint, Publisher, Visio, and Word: On the File menu, click Options, and then click Proofing.
-
In InfoPath: On the Home tab, click the arrow next to or under Spelling, and then click Spelling Options.
-
In Outlook: On the File menu, click Options, and click Mail, and then click Spelling and Autocorrect.
-
-
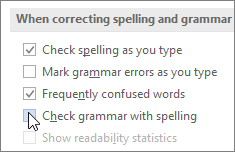
Clear the Mark grammar errors as you type and Check grammar with spelling check boxes.
Note: Not every Office program will have both of these options.
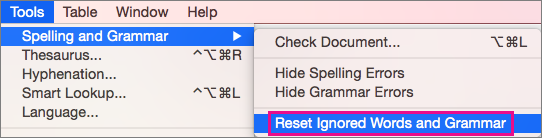
In Word, Outlook, PowerPoint 2013 (or newer), you can force a recheck of the words and grammar that you previously skipped by doing the following:
-
Open the document or item that you want to check.
-
On the File menu, click Options > Proofing> Recheck Document. In Outlook you’ll find this under File > Options > Mail > Spelling and Autocorrect
-
Click Yes when you see the warning message about resetting the spelling and grammar checker.
-
Click OK in the dialog box to get back to the document, and then run the spelling and grammar checker again.
See Also
Check spelling and grammar in a different language.
Test your document’s readability
The spelling and grammar checker isn’t working as expected
Select grammar and writing style options in Office 2013 and earlier
Add words to your spell check dictionary
The spelling or grammar checker isn’t checking words in a different language correctly
Choose AutoCorrect options for capitalization, spelling, and symbols
Check spelling before sending a message in Outlook
Learn how to get more from Editor with Microsoft 365
Office for Mac applications automatically check for potential spelling and grammatical errors as you type. If you’d rather wait to check spelling and grammar until you’re done writing, you can turn off automatic checking, or you can check spelling and grammar all at once.
Word
Check spelling and grammar automatically as you type
Word marks potential spelling errors with a red squiggly line, and potential grammatical errors are marked with a green squiggly line.
Tip: If spelling or grammatical errors aren’t marked, you might need to turn on automatic spelling and grammar checking, which is explained in the next procedure.
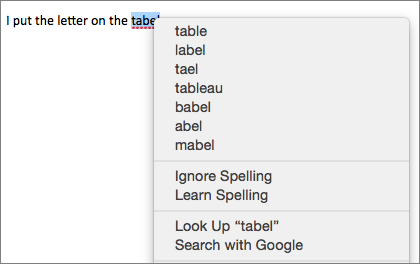
When you see a spelling or grammatical error, Control click the word or phrase and choose one of the options.
If Word has incorrectly flagged a word as misspelled and you want to add that word to your dictionary so that Word will properly recognize it in the future see Add or edit words in a spell check dictionary
-
On the Word menu, click Preferences > Spelling & Grammar.
-
In the Spelling & Grammar dialog box, under Spelling, check or clear the Check spelling as you type box.
-
Under Grammar, check or clear the Check grammar as you type box.
-
Close the dialog box to save your changes.
-
On the Review tab, click Spelling & Grammar.
-
If Word finds a potential error, the Spelling & Grammar dialog box will open, spelling errors will be shown as red text, and grammatical errors will be shown as green text.
-
To fix an error, do one of the following:
-
Type the correction in the box and then click Change.
-
Under Suggestions, click the word you want to use, and then click Change.
To skip the error, do one of the following:
-
Click Ignore to skip only that instance of the error.
-
Click Ignore All to skip all instances of the error.
-
For a grammatical error, click Next Sentence to skip that instance of the error and move to the next error.
To skip a misspelled word in all documents, click Add to add it to the dictionary. This only works for misspelled words. You can’t add custom grammar to the dictionary.
-
-
After you correct, ignore, or skip an error, Word moves to the next one. When Word finishes reviewing the document, you’ll see a message that the spelling and grammar check is complete.
-
Click OK to return to your document.
You can clear or reset the list of Ignored Words and Grammar so Word will check for spelling and grammar issues you previously told it to ignore.
Note: When you reset the list of Ignored Words and Grammar, the list is cleared only for the currently open document. Any spelling or grammar issues you told Word to ignore in other documents won’t be affected.
-
Open the document that needs to be checked.
-
On the Tools menu, point to Spelling and Grammar, and then click Reset Ignored Words and Grammar.
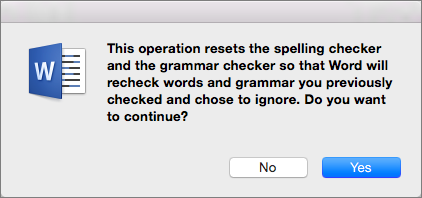
Word displays a warning about the operation resetting the spelling checker and the grammar checker.
-
Click Yes to proceed.
-
Click the Review tab, and then click Spelling & Grammar to check spelling and grammar.
Outlook
Check spelling and grammar automatically as you type
By default, Outlook checks for spelling errors as you type. Outlook uses a dashed red underline to indicate possible spelling errors and a dashed green line to indicate possible grammatical errors.
-
When you see a word with a dashed underline, Control click the word or phrase and choose one of the options.
-
On the shortcut menu, do one of the following:
-
Click one of the guesses at the top of the shortcut menu.
-
Click Ignore Spelling to ignore one instance of the word.
-
Click Learn Spelling to add the word to the spelling dictionary.
-
After opening an email message:
-
To have Outlook correct spelling mistakes automatically, on the Outlook menu, click Preferences. Click on Spelling and Grammar under Personal Settings. Click box next to Checkspelling as you type.
-
To turn automatic grammar checking on or off, on the Outlook menu, click Preferences. Click on Spelling and Grammar under Personal Settings. Click box next to Check grammar as you type.

You can correct all the spelling and grammar issues at the same time after you finish composing a message or other items.
-
On the Edit menu, point to Spelling and Grammar, and then click Spelling and Grammar…
-
Do any of the following:
-
In the list of suggestions, click the word that you want to use, or enter a new spelling in the box at the top, and then click Change.
-
Click Ignore to ignore this word and move on to the next misspelled word.
-
Click Add to add the word to the spelling dictionary.
-
Tip: The keyboard shortcut for skipping to the next spelling or grammar error is  + ; .
+ ; .
PowerPoint
You can check spelling in PowerPoint, but you can’t check grammar.
Check spelling automatically as you type
PowerPoint automatically checks for and marks potential spelling errors with a wavy, red underline.
Tip: If spelling errors aren’t marked, you might need to turn on automatic spell checking, which is explained in the next procedure.
When you see a spelling error, Ctrl+click or right-click the word or phrase and choose one of the suggested options.
-
On the PowerPoint menu, click Preferences > Spelling.
-
In the Spelling dialog box, select or clear the Check spelling as you type box.
-
On the Review tab, click Spelling.
-
If PowerPoint finds a potential error, the Spelling pane opens and spelling errors are shown.
-
To fix an error, do one of the following:
-
Correct the error on your slide.
-
Click one of the suggested words in the Spelling pane, and then click Change.
To skip the error, do one of the following:
-
Click Ignore to skip only that instance of the error.
-
Click Ignore All to skip all instances of the error.
-
click Add to skip a misspelled word in all documents and add it to the dictionary.
-
-
After you correct, ignore, or skip an error, PowerPoint moves to the next one. When PowerPoint finishes reviewing the presentation, you’ll see a message that the spelling check is complete.
-
Click OK to return to your presentation.
Excel
You can check spelling in Excel, but you can’t check grammar.
Check spelling all at once
-
On the Review tab, click Spelling.
Note: The Spelling dialog box will not open if no spelling errors are detected, or if the word you are trying to add already exists in the dictionary.
-
Do any of the following.
To
Do this
Change the word
Under Suggestions, click the word that you want to use, and then click Change.
Change every occurrence of this word in this document
Under Suggestions, click the word that you want to use, and then click Change All.
Ignore this word and move on to the next misspelled word
Click Ignore Once.
Ignore every occurrence of this word in this document and move on to the next misspelled word
Click Ignore All.
See also
Check spelling and grammar in a different language
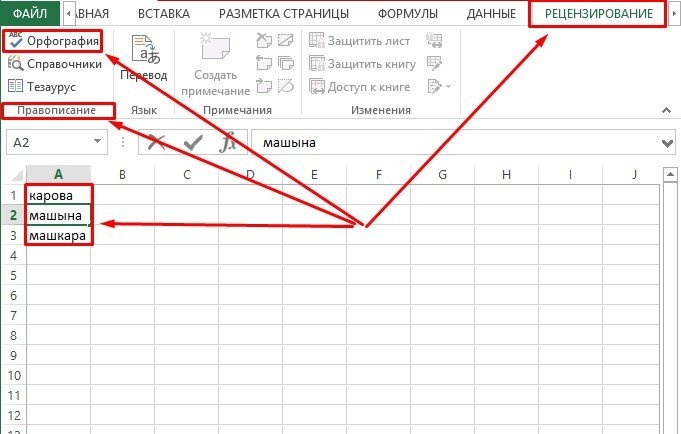
Чтобы проверить орфографию в тексте на листе, на вкладке Рецензирование нажмите кнопку Орфография.
Совет: Кроме того, можно нажать клавишу F7.
Ниже описано, что происходит при вызове функции проверки орфографии.
-
Если для проверки орфографии выделена одна ячейка, Excel проверяет весь лист, включая комментарии, колонтитулы и графические элементы.
-
Если выделено несколько ячеек, Excel проверяет орфографию только в этих ячейках.
-
Чтобы проверить орфографию в строке формул, выделите соответствующие слова.
Примечание: Excel не проверяет орфографию в ячейках, содержащих формулы.
Проверка орфографии при вводе
Функции автозаполнения и автозамены помогают исправлять ошибки непосредственно при вводе текста.
Функция автозаполнения, которая включена по умолчанию, помогает соблюдать точность при вводе, подставляя значения из других ячеек, но не проверяет отдельные слова в ячейке. Автозаполнение может пригодиться при создании формул.
Автозамена исправляет ошибки в тексте формулы, элементе управления листа, текстовом поле и метках диаграммы. Вот как это использовать:
-
Выберите Файл > Параметры.
-
В категории Правописание нажмите кнопку Параметры автозамены и ознакомьтесь с ошибками, которые чаще всего возникают при вводе.
Примечание: Функция автозамены не работает с текстом в диалоговых окнах.
Дополнительные ресурсы
Вы также можете проверить Исследования, Тезаурус и Перевод для получения дополнительной помощи с правописанием и языком.

-
На вкладке Обзор нажмите Правописание или нажмите F7 на клавиатуре.
Примечание: Диалоговое окно Орфография не откроется, если ошибки правописания не обнаружены или вы пытаетесь добавить слово, которое уже есть в словаре.
-
Выполните любое из описанных ниже действий.
Задача
Необходимые действия
Замена слова
В разделе Варианты выберите нужное слово и нажмите кнопку Изменить.
Изменение каждого экземпляра этого слова в данном документе
В разделе Варианты выберите нужное слово и нажмите кнопку Изменить все.
Пропуск слова и переход к следующему слову с ошибкой
Нажмите Игнорировать.
Пропуск каждого экземпляра этого слова в данном документе и переход к следующему слову с ошибкой
Нажмите Пропустить все.
Проверка орфографии при вводе
Вы можете использовать функцию автозамены для исправления опечаток и слов с ошибками. Для получения дополнительной информации см. Добавление, изменение или отключение автоматических исправлений.
Чтобы проверить орфографию любого текста на листе, нажмите Просмотр > Проверка > Правописание.
Те, кто работал в текстовом редакторе MS Word, видели красное подчеркивание, появляющееся при неправильном написании слов или опечатке. К сожалению, в MS Excel эта функциональность сильно отсутствует. Понятно, что всевозможные сокращения, сокращения и другие варианты написания слов в измененной форме могут ввести программу в заблуждение и автоматически дать неверные результаты. Несмотря на это, эта функция присутствует и может быть использована.
Устанавливаем русский язык по умолчанию
Автоматическое исправление опечаток и орфографических ошибок по умолчанию включено, но в программе есть проблемы иного порядка. При проверке документов в автоматическом режиме в 9 из 10 случаев программа реагирует на неправильные английские термины. Почему так происходит и как это исправить, попробуем разобраться дальше:
- В верхней части панели нажмите кнопку «Файл» и нажмите ссылку «Параметры».
- Выберите «Язык» из списка слева».
- В следующем окне настройки языковых параметров есть два элемента настройки. В первом «Выбор языков редактирования» видно, что язык по умолчанию — русский.

Если по какой-то причине вы предпочитаете английский (США) для работы с документами, вам необходимо произвести замену, активировав строку с языковыми предпочтениями и нажав подсвеченную кнопку «По умолчанию».
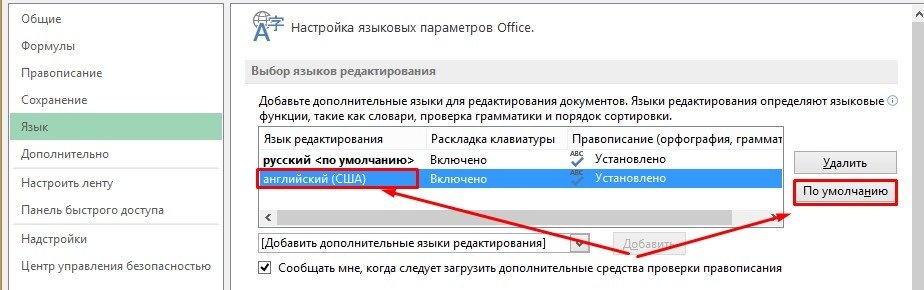
Далее спускаемся к пункту «Выбор языков интерфейса и справка». Здесь по умолчанию, как видите, установлен язык интерфейса Microsoft Windows и, для справки, язык интерфейса.
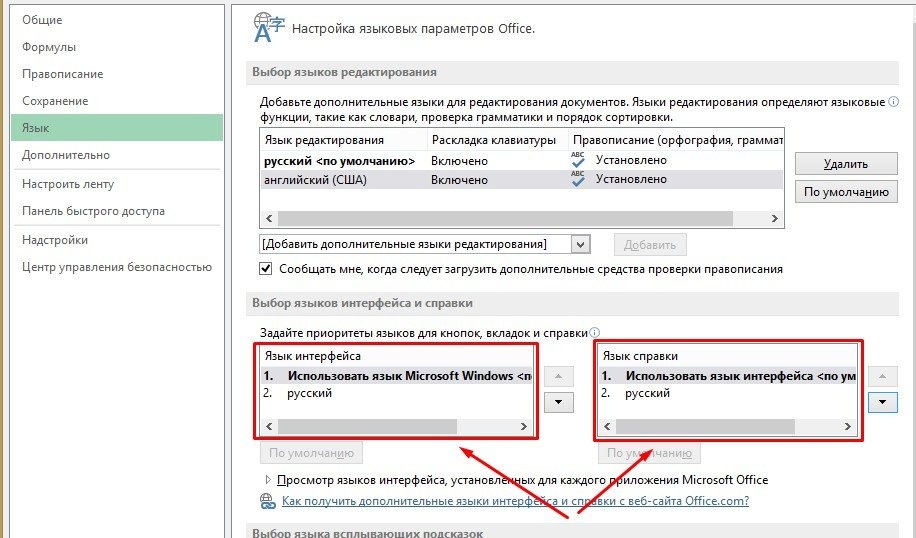
надо заменить на русский. Вы можете сделать это одним из следующих способов: Щелкните строку «Русский язык» и нажмите кнопку «По умолчанию» внизу или щелкните активную кнопку со стрелкой вниз.
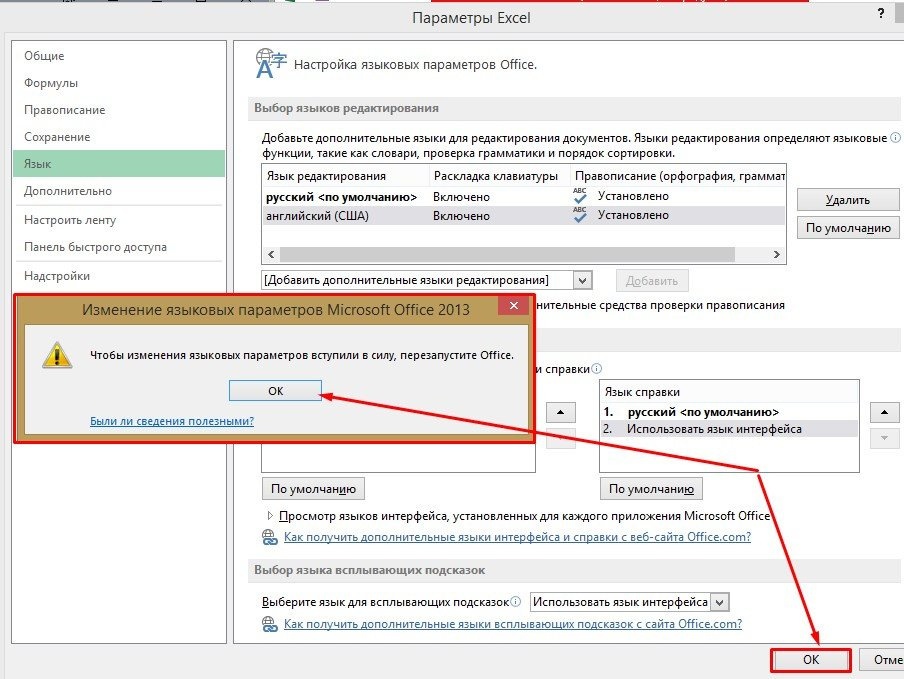
Осталось только принять, нажав «ОК». Появится окно с рекомендацией перезапустить программу, чтобы изменения вступили в силу. Принимаем и перезапускаем в ручном режиме.
После перезапуска программа должна автоматически сделать русский язык основным.
На этом настройка не заканчивается, и вам необходимо выполнить несколько дополнительных шагов:
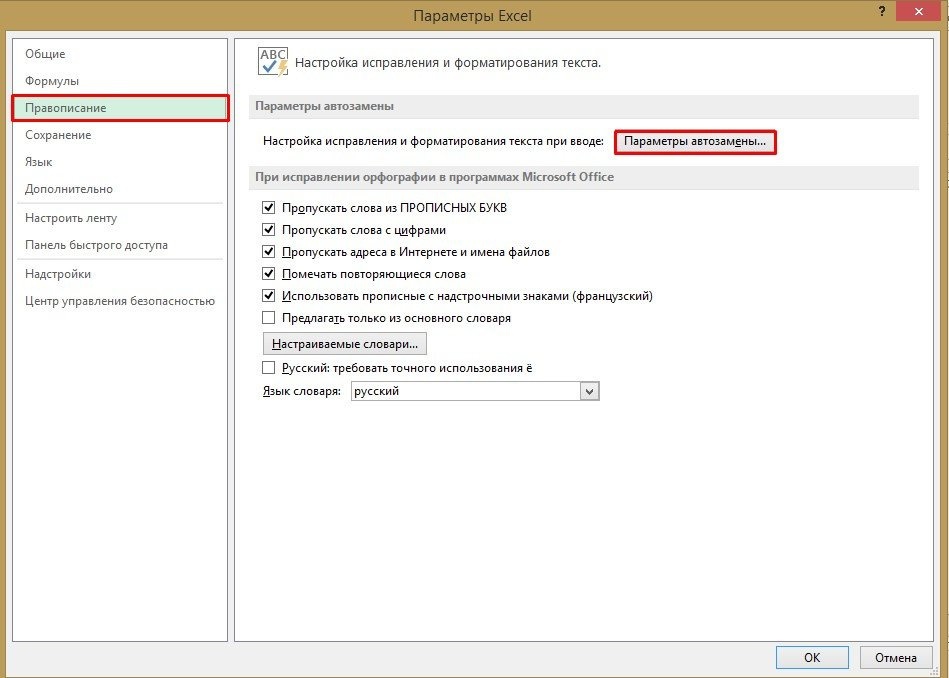
- В только что запущенном приложении снова перейдите в «Файл» и откройте «Параметры».
- Далее нас интересует инструмент «Орфография». Активируем открытие окна, нажав на линию ЛКМ.
- Найдите строку «Параметры автозамены…» и щелкните по ней ЛКМ.
- Перейдите в открывшееся окно, в котором нужно активировать столбец «Автозамена» (как правило, он активируется при открытии окна).
- В пункте «Показать кнопки для параметров автоматической коррекции» мы находим эту функцию включенной. Здесь для удобства работы с таблицами рекомендуется отключать различные функции, например «Делать первые буквы предложений с большой буквы» и «Ставить названия дней с большой буквы».
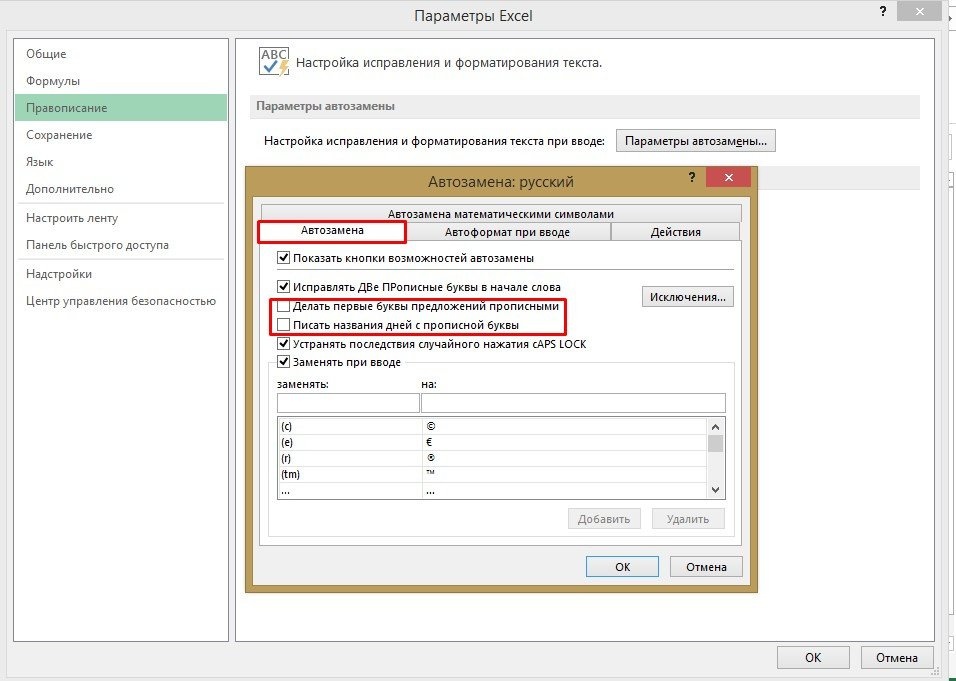
Объяснение от специалиста! Поскольку в русском языке дни недели не пишутся с заглавной буквы, вы можете отменить выбор этой строки. Также стоит отметить, что нет смысла писать первые несколько букв предложения с большой буквы, так как работа с таблицами предполагает постоянные сокращения. Если вы оставите галочку на этом элементе, после каждой точки в сокращенном слове программа отреагирует и исправит слово с ошибкой.
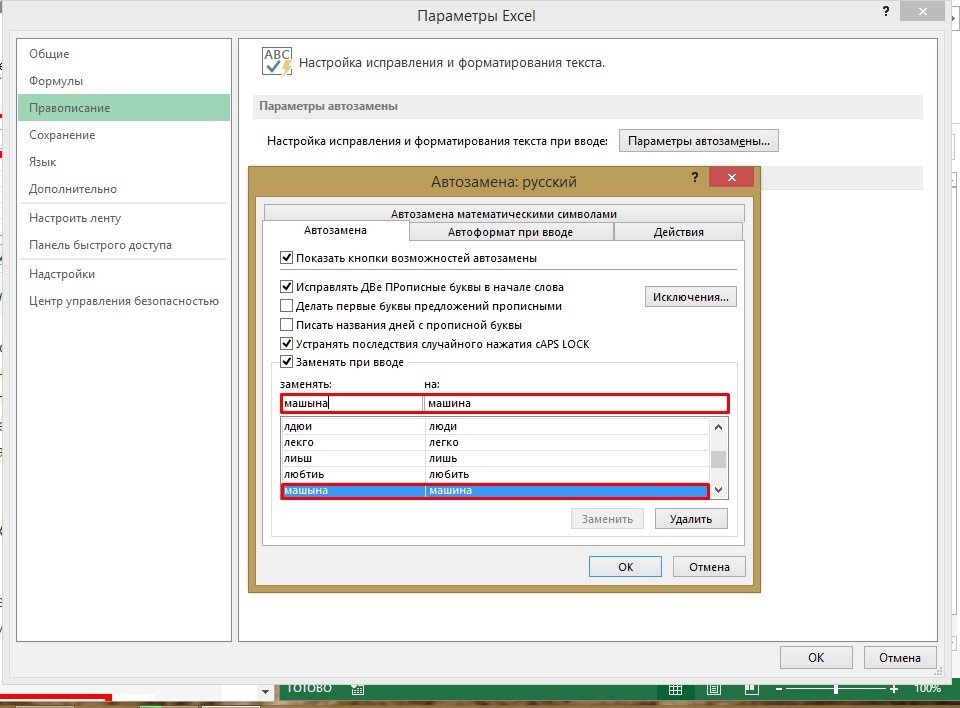
Спустимся ниже и увидим, что в этом окне интерфейса также есть список слов с автоматическим исправлением. Слева предлагаются варианты слов с ошибками, а справа — варианты их исправления. Конечно, этот список нельзя назвать полным, но все же основные слова с ошибками в нем присутствуют.
В верхней части расположены поля для ввода искомых слов. Например, напишем «машына». Программа автоматически предложит слово автокоррекции в левом поле. В нашем случае это «машина». Также возможно, что слова в предложенном словаре не отображаются. Затем вам нужно будет вручную ввести правильное написание и нажать кнопку «Добавить» ниже. На этом настройка завершена, и вы можете приступить к запуску автоматической проверки орфографии в Excel.
Запуск автоматической проверки орфографии
После составления таблицы и записи всей необходимой информации возникает необходимость проверки орфографии текста. Для этого вам необходимо выполнить следующий список действий:
- Если вам нужно проверить только часть текста, выберите тот, который нужно проверить. Если нет, вам не нужно выделять текст.
- Вверху программы найдите инструмент «Обзор».
- Затем в пункте «Орфография» найдите кнопку «Орфография» и щелкните по ней ЛКМ.
- Откроется окно с просьбой продолжить проверку орфографии с начала листа. Нажмите кнопку «Да».
- После того, как инструмент найдет слово с ошибкой, появится диалоговое окно со словом, в котором, согласно расписанию, была допущена ошибка.
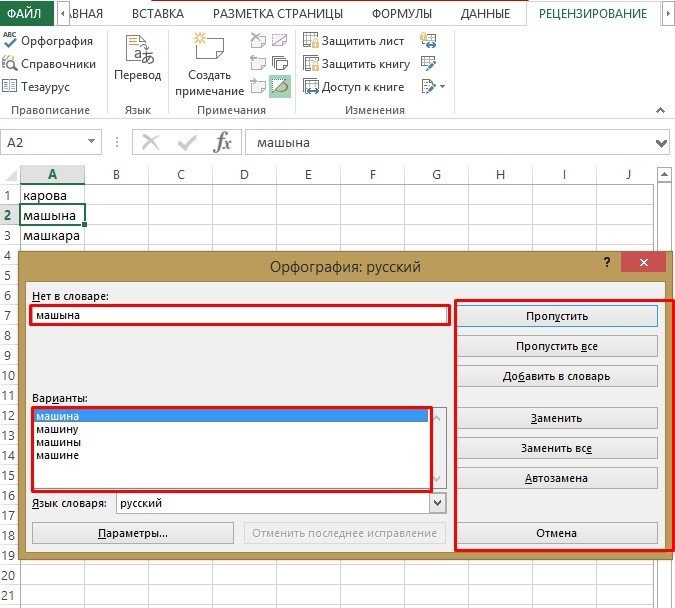
- В разделе «Варианты» выберите правильное слово и нажмите «Заменить», если в тексте есть только одно из этих слов, или «Заменить все», если есть вероятность, что выбранное слово появится несколько раз.
Примечание специалиста! Обратите внимание и на другие элементы справа. Если вы уверены, что слово написано правильно, необходимо выбрать «Пропустить» или «Пропустить все». Кроме того, если вы уверены, что слово написано с ошибкой, вы можете запустить «Автозамену». В этом случае программа автоматически заменит все слова. Есть еще пункт «Добавить в словарь». Это необходимо для автоматического добавления слов, которые вы часто пишете с опечаткой.
Заключение
Как бы хорошо вы ни владели русским языком, никогда нельзя быть полностью уверенным в правильности написанного текста. Человеческий фактор предполагает совершение различного рода ошибок. Особенно в этом случае MS Excel предлагает инструмент проверки орфографии, который можно использовать для исправления слов с ошибками.
Imagine preparing high-profile reports and being the sole creator of a greatly discreditable spelling error in one of the headers. Huff times hundred! We suppose that is enough to make you realize the necessity of checking spellings in Excel because, unlike MS Word, you will not see any red squiggly underlines that will prompt you to fix misspellings. So really, spell check is your best bet!
Although we have AutoCorrect to save face in some prearranged spelling situations, there’s only so much AutoCorrect can do and you will need the helping hand of a spelling check. Spell check is a sub-feature of proofing in Excel. It gives the user the option to deal with incorrect spellings, typos, and a consecutively repeated word. Note that spell check does not take care of grammatical errors.

Today’s tutorial will give you the chance to learn everything about spell check in Excel. You’ll discover what spell check can do, how to spell check (where you will find spell check itself and its options, the shortcut key, using VBA for spell checking), what you can spell check (cell(s), part of a cell, sheet(s)), how to tweak spell check, and where you are going wrong if spell check isn’t working.
Without further ado, Madam Excel, correction pen at the ready!
Recommended Reading: Excel AutoCorrect Feature -Detailed Guide
How to Spell Check in Excel
In the Ribbon menu, the spell check option is accessible from the Review tab. To use spell check, you need to select the relevant cell(s) or sheet(s). Ahead in the tutorial, we’ll show you what selecting certain cells or sheets will do when you run spell check.
For now, let’s see how to start spell check. Go to the Review tab and select the Spelling button from the Proofing group in the tab.

Now the Spelling window will open and this will be used to check the spellings on the worksheet. This is the window you will see:

Keyboard Shortcut for Spell Checking
Alternatively, spell check can also be quickly run by a keyboard shortcut. In fact, in this case, it’s just one shortcut key.
Press the F7 key to run spell check in Excel.
The F7 key will do the same work as using the Spelling button from the Ribbon and will launch the Spelling window as shown above.
How Does Spell Check Work
Now how does spell check go about its spell-checking. Spell check starts checking from the cell in selection and goes row by row. This means that spell check works from left to right, then downward, and left to right again.
Spell check automatically jumps from the cell in selection to the cell with the spelling error. So if there’s any cell in between the initially selected cell and the cell being checked by spell check that you reckoned needed attention, spell check has ignored it. Later, you will find out what type of data is ignored by spell check.
Now allow us to demonstrate the works of spell check. In the example shot below, we have selected the first cell of the sheet i.e. cell A1.

Now when spell check is run from the Ribbon or by pressing F7, spell check begins checking each cell starting from the cell in selection (A1 in this case). The feature goes row by row checking A1, B1, C1, and so forth until every cell in row 1 is checked. Then it starts with row 2, checking A2, B2, C2, so forth.
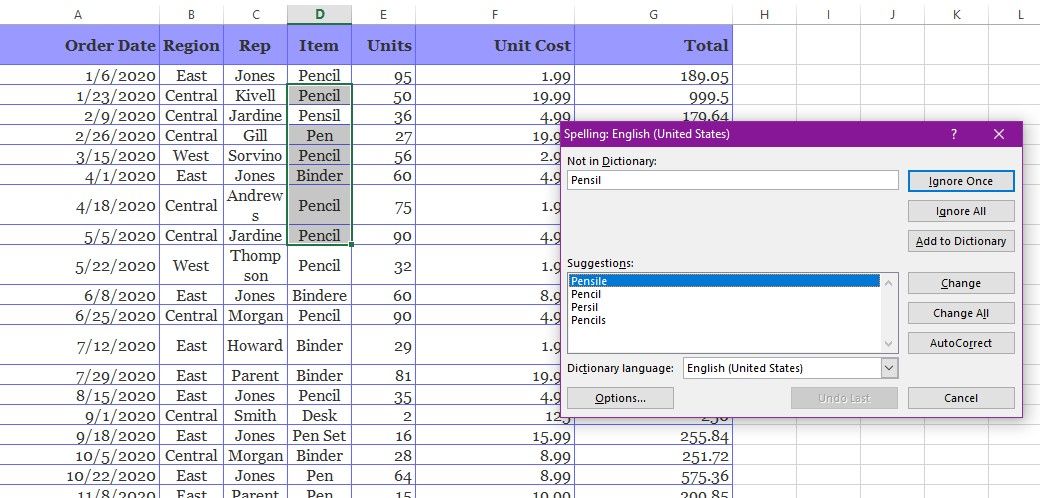
In our example case, the first non-empty cell is B2. Every cell is checked rightward for spelling and the first cell that has been found with a spelling error is C4. C4 has two incorrect spellings hence, spell check starts working on the first word i.e. Hppy in the Spelling dialog box:

Once the word has been dealt with by the user by ignoring or changing it, spell check will present the next spelling error in the same cell if any. C4 in our case example contains a second incorrect spelling which is presented next in the Spelling dialog box:

After spell check has tended to each incorrectly spelled word one by one in the cell, it moves to the next cell with spelling errors. Checking the cells rightward and then downward, spell check found the next spelling error in C5:

This is how spell check will work word by word and cell by cell to present all the spelling errors and what to do about them in the Spelling dialog box. When spell check has checked every occupied cell on the worksheet, a small window will pop up confirming that the spell check has been completed:

If Excel says you’re good to go, you most probably are! Press the OK command to close the pop-up and return to the worksheet.
Important question. How does spell check know what word to pick on? Spell check will go for the words that aren’t enlisted in Excel’s main and custom dictionary.
Understanding the Spell Check Window Options
We just went through how spell check works and that’s something it does on its own. What control do you have over spell check? Now we’ll run you through the options in the Spelling window so we know what can be done with the spelling errors. Let’s have a look at the Spelling window again:

Not in Dictionary
The word with incorrect spelling that has been detected by spell check will show in the Not in Dictionary field. You can manually edit the spelling by clicking on the text box but take a look at the Suggestions section first.
Suggestions
Here you will find the word(s) suggested by Excel as corrections.
Command Buttons:
- Ignore Once – The shown word will not be corrected and spell check will ignore it and move on to the next incorrect spelling. If the misspelling is deliberate, you can use this button to skip to the next incorrectly spelled word.
- Ignore All – If the same misspelling is present more than once in the spell check region, they will all be ignored if you click on this button.
- Add to Dictionary – This button will add the misspelled word to the custom dictionary. By doing this, you will prevent the misspelling from showing up in the current and future spell checks.
- Change – This is the most important button in the window (you wouldn’t be using spell check if you didn’t want to correct anything). Before using this button, you need to select the word from the Suggestions section that you want as the replacement for the misspelled word. Next, you will select the Change button to complete the action of correcting the misspelled word.
- Change All- Similar to how the Ignore All button works. If there is a repetition of the misspelled word in the spell check region, using this button will change all of them as per the word selected in the Suggestions section.
- AutoCorrect – The AutoCorrect button will add the misspelled word and its replacement selected from the Suggestions section to the AutoCorrect list. This button works prospectively. E.g. the misspelled word was “hppy” and the replacement word chosen from Suggestions was “happy”. The next time “hppy” is entered in Excel, it will automatically be corrected to “happy”.
- Options – The Options button leads to the spelling settings in Excel Options. We will talk about these options later on.

- Undo Last – With this button, you can undo the last correction. The change will be reversed and spell check will go back to the misspelled word in the Spelling window. This should be helpful if you’ve accidentally selected the wrong word in Suggestions. By undoing the correction, you can go back and select the right word.
- Cancel – This will close the Spelling window and abort the spell check operation even if there are misspelled words left to be tended to.
Spell Check Scope
Now we explore the extent of spell check; what it can check. It is particularly helpful to know the reach of spell check so you can check as little or as much as you require. Below we have the details to test as less as part of a cell and as much as the entire workbook for spelling.
Individual Cells and Ranges
This section covers spell checking scope on the active worksheet.
Part of cell
To only check part of a cell for incorrect spellings, go in cell edit mode by double clicking the target cell or selecting the cell and using the Formula Bar. Then select the relevant text.
Now you can select the Spelling button from the Review tab or press F7 to spell-check the selected part of the cell.

A single cell
To spell check the entire contents of just one cell, after entering cell edit mode of the target cell, select the entire contents of the cell. Then run spell check.

Range of cells
To spell check a certain range of cells, select the range(s) and hit spell check.

Spell check will also work for disjoined ranges selected by holding down the Ctrl key.
Continuous part of worksheet ‘til the end
If you select a certain cell and run spell check, it will cover the selected cell down to the last non-empty cell on the worksheet. This means that the sheet will be spell-checked from the selected cell until the end of the worksheet. E.g. in our example shot below, we have selected C5.

If we run spell check right now, the cells that will be covered are C5 to the end of the worksheet (i.e. up to the last occupied cell, which is C11).
Once the spell check is completed to C11, since the worksheet hasn’t been checked from the start, you will see a small dialog box asking if you want to check the sheet from the beginning:

Excel is mindful that you might not be good to go yet… If you now choose to have the sheet checked from the beginning, the checking will end at C4 (i.e. up to the selected cell).
Entire worksheet
To have the full worksheet checked for spellings, select the first cell of the sheet i.e. A1 and run the spell check using the F7 key.

According to the checking properties mentioned above, the sheet will be checked from the selected cell to the end so that effectively tests the entire worksheet.
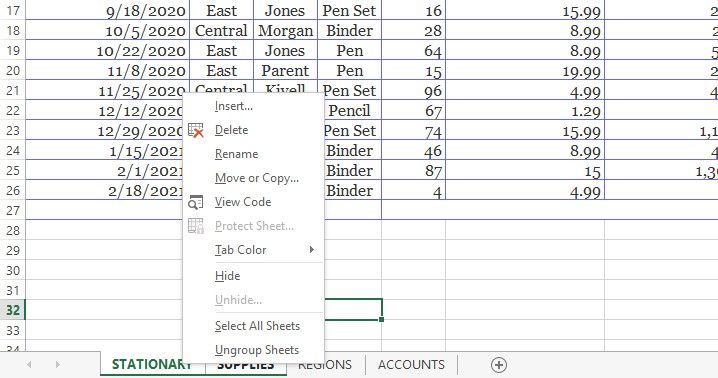
Selected Sheets
Spell check can cover multiple sheets at a time too if they are selected. To select the target sheets, keep the Ctrl key pressed and click on the sheet tabs above the status bar.

Now run spell check to test the selected sheets for misspelled words. You can select discontinuous sheets too, e.g sheets 2 and 5.
Entire Workbook
For checking the whole workbook with spell check, you need to select all the sheet tabs at the bottom. The quick way to do that is to right-click any sheet tab and select the option Select All Sheets from the menu.

This option will select all the sheets in the workbook:

Now once all the sheets are selected hit the F7 key to run the spell check for entire workbook.
Tip: If you want to select all the sheets except one, you can use the shortcut above to select all the sheets and then press the Ctrl key and click on the sheet you don’t want checked for spelling. That will exclude the unselected sheet.
Text in Formulas
Checking the text in formulas applies the same way as checking the text of an entire cell because that is essentially what you’ll be doing. Why you need to check the formula specifically is because formula cells will be ignored by spell check.
Start edit mode of the cell (using F2 key) with the formula and select the contents of the cell (and therefore the complete formula):

After selecting the formula, run spell check to pick out the misspellings.
Spell Check Settings In Excel
Remember we said we’ll discuss the spell check options? Now’s the time. By default, spell check will ignore certain kinds of text and flag the other kinds. The spell check settings we will show you ahead give you a bit more control on how spell check will work. Before we talk about these settings, let’s see how to reach them:
Excel Options are accessible from the File tab:

The complete path is File tab > Options > Proofing tab. But the shortcut path is the one we showed you earlier.
- Launch the Spelling window by the F7 key or from the Review
- In the window, select the Options

This will also lead to the Proofing tab in Excel Options.

The highlighted section is our point of interest. The options in the example shot above are the default settings. Let’s talk about these options now.
Ignore words in UPPERCASE
It’s a good idea to leave this option checked since some words will need to be used in complete uppercase letters but do bear in mind that if a word is in uppercase and is misspelled, it’ll still be ignored in spell check.
The following text will be overlooked by spell check: EXCELTRICK
Ignore words that contain numbers
Mixed text can be a part of codes e.g product codes.
This text will be ignored by spell check: AE0158
Ignore Internet and file addresses
Network and file paths will not be checked for spelling.
The following addresses will not be selected in spell check: www.exceltrick.com or C:exceltrick
Flag repeated words
Repetition of the same word will be flagged.
In the following text, the second “here” will be flagged by spell check: Enter here here
Enforce accented uppercase in French
This option is concerned with working in French (Canada) in Excel and when this option is checked, it can flag unaccented French uppercase.
The word “Elan” will be detected by spell check and suggested to be changed to “Élan”.
Suggest from main dictionary only
If you want spell check to ignore the entries in the custom dictionary, check this option.
Other options
The Custom Dictionaries button leads to, of course, custom dictionaries:

Here, you can create dictionaries for whichever language you want to use in Excel and it will only apply to that particular language. You can also edit the word list of the All Languages dictionary. Entries in this dictionary will apply to all languages.
The other two options in the Excel Options window include a few controls of language options regarding French and Spanish.
The last option gives the user choice to change the dictionary language.
Spell Check Not Working
There are many instances when Excel doesn’t behave the way we want it to and a few of those occurrences fall under spell check. Find out why spell check doesn’t work at times and what are the solutions.
Spell Check Button Disabled
If the Spelling button in the Ribbon is disabled (grayed out) you also won’t be able to use the shortcut key F7. This is likely to happen if the worksheet is protected. If you wish to run spell check, unprotect the sheet first by going to the Review tab > Protect group > Unprotect Sheet button.

Once the sheet is unprotected, the Spelling button will be enabled again:

Formula Cells not Checked
As mentioned earlier on, formula cells will go disregarded by spell check. Formulas will have to be checked individually by selecting the entire contents of the formula cell and running spell check on it.
Spell Check only Working for Active Cell
It may so happen that spell check is only working for one cell. In that case, you may accidentally be in cell edit mode and hence spell check is only running for the active cell. Exit editing the cell to make spell check work for the sheet.
Spell Check Using VBA
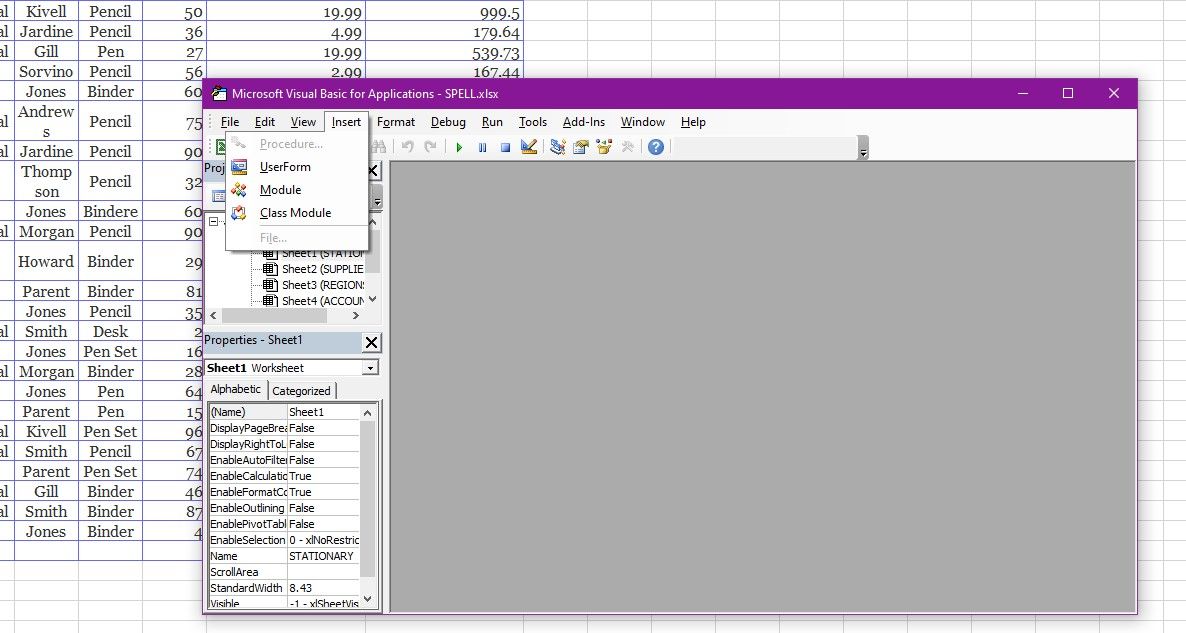
The spellings in Excel can be checked using VBA. VBA is a Microsoft programming language that efficiently systemizes carrying out repetitive tasks. The task will be carried out by running a specific code. The detailed steps to run the code using VBA are listed as follows:
- To launch the VB editor, press the Alt + F11 You can also use the Developer tab if it is enabled on your Excel. In the Developer tab, select the Visual Basic button from the Code group.

- Here enters the VB editor:

- Use the Insert tab to launch a Module window by selecting Module from the menu.

- Now you will see a Module window:

- Copy the code below and paste it into the Module window:
Sub SpellCheckActiveSheet()
 ActiveSheet.CheckSpelling
End Sub
The code activates spell check for the active worksheet.

The code can be run later. To do that, you will have to close the VB editor as the Macro is already created. Then you can run the code from the View or Developer tab’s Macro button or by pressing the Alt + F8 keys to select the related Macro.
- To run the code instantly from the Module window after pasting the code, select the Run button from the toolbar.

Running the code opens the Spelling window and spell check gets down to work!

Once the spell check is done, you will be redirected to the Module window if you had run the code from there. You may close the VB editor now.
Note: Regardless of the cell selection on the sheet, the code given above will spell check the entire worksheet.
Highlight Misspelled words In Active Sheet Using VBA
Following VBA code changes the background color of the cells where misspelled words are present. This makes it easier for anyone to find the wrongly spelled words just by looking at the sheet.
Sub ColorMispelledCells()
For Each cl In ActiveSheet.UsedRange
 If Not Application.CheckSpelling(Word:=cl.Text) Then _
 cl.Interior.ColorIndex = 28
Next cl
End Sub
Spell-Checking Visible Sheets Using VBA
If there are any hidden sheets in your workbook and you want to leave them out of spell check, use the code below in VBA:
Sub SpellCheckAllVisibleSheets()
For Each wks In ActiveWorkbook.Worksheets
 If wks.Visible = True Then
 wks.Activate
 wks.CheckSpelling
 End If
Next wks
End Sub
Spell-Checking Visible and Hidden Sheets Using VBA
This code will spell check all the sheets in the workbook; hidden and visible.
Sub SpellCheckAllSheets()
For Each wks In ActiveWorkbook.Worksheets
 wks.CheckSpelling
Next wks
End Sub
While running this code, the current sheet will remain in selection and spell check will not snap to each sheet that is being spell-checked (because how can spell check snap to a hidden sheet, right?
Right! That was a full-blown rollercoaster ride on spell check in Excel. We cracked every motor down and oiled every machine well. To make sure every Excel ride is as smooth as this one, we’ll tune out for now but you be ready to tune in shortly!
Когда дело касается грамматики, работа в Excel может вызвать массу разочарований. В отличие от Microsoft Word, Excel не вносит автоматических грамматических изменений в вашу работу. Когда вы отправляете некачественную работу, это может быть довольно неприятно.
К счастью, есть множество способов исправить ошибки на листах и книгах в Excel. В этой статье мы дадим несколько советов по проверке орфографии и грамматики в Microsoft Excel.
Активация программы проверки грамматики вручную
Вы можете активировать проверку орфографии и грамматики, нажав клавишу F7, находясь на листе Excel. Если на вашем компьютере это не работает, выполните следующие действия, чтобы активировать средство проверки грамматики:
1. Не выходя из файла Excel, выберите вкладку « Обзор ».

2. Щелкните Правописание .
3. Вы увидите диалоговое окно, содержащее первое слово с ошибкой, с параметрами для изменения, игнорирования или добавления его в свой собственный словарь.

4. Устраните орфографическую ошибку, и в диалоговом окне автоматически отобразится следующая ошибка.

Различные варианты проверки грамматики
В зависимости от характера вашего файла и количества данных в нем вы можете выбрать три различных способа проверки грамматики вашей работы. В зависимости от вашей срочности и необходимости вы можете проверить отдельные ячейки и диапазоны, выбранные листы или всю книгу. Вот пошаговое руководство для каждой категории:
1. Проверка отдельных ячеек
- Выберите нужную ячейку и нажмите сочетание клавиш F7 на клавиатуре, чтобы проверить ее правописание.
- В диалоговом окне будут отображаться варианты написания. Выберите способ устранения ошибки: исправьте, проигнорируйте или добавив слово в словарь.

2. Проверка диапазона ячеек
Чтобы проверить орфографию в нескольких ячейках на одном листе:
1. Выберите ячейки, в которых вы хотите проверить правописание, например, D3: D10 .

2. Активируйте проверку орфографии, нажав F7 или выбрав Обзор > Орфография .

3. Устраните орфографические ошибки, изменив их, добавив в свой собственный словарь или игнорируя их.

3. Проверка орфографии на выбранных листах
Вы можете проверить орфографию на определенных листах, выбрав их на нижней вкладке.
1. Нажмите клавишу Ctrl на клавиатуре, одновременно нажимая на листы, которые вы хотите проверить.

2. Активируйте проверку орфографии, нажав клавишу F7 на клавиатуре.
3. Появится диалоговое окно. Устраните отображаемую орфографическую ошибку. Затем в поле будет последовательно отображаться следующая ошибка, пока не будет исправлен весь диапазон рабочих листов.

4. Проверка орфографии всей книги
При работе со всей книгой вы можете облегчить свою работу, проверяя орфографию вместе.
1. Выберите любой рабочий лист в своей книге и щелкните его правой кнопкой мыши, чтобы отобразить всплывающее меню.

2. Щелкните Выбрать все рабочие листы.
3. Нажмите клавишу F7 на клавиатуре, появится диалоговое окно проверки орфографии.
4. Исправляйте орфографические ошибки по мере их отображения, пока не дойдете до последнего исправления.
Проверка грамматики с помощью макросов VBA
Если вы предпочитаете более автоматизированный метод, вам следует использовать макросы проверки орфографии VBA. Эти макросы представляют собой строки кода в Microsoft Excel, которые позволяют определять и заменять слова с ошибками.
Макросы VBA особенно полезны, поскольку они используют визуальные цвета для выделения слов с ошибками, что делает их более выраженными и легко обнаруживаемыми. Чтобы использовать макрос VBA, вам необходимо создать макрос VBA в редакторе Excel :
1. Откройте предполагаемый файл Excel.
2. Нажмите клавиши Alt + F11 . Откроется окно редактора Excel VBA .

3. Щелкните Вставить > Модуль .

4. Вставьте этот код в редактор модуля :
 Sub ColorMispelledCells()
 For Each cl In ActiveSheet.UsedRange
 If Not Application.CheckSpelling(Word:=cl.Text) Then _
 cl.Interior.ColorIndex = 12
 Next cl
 End Sub
5. Нажмите клавишу F5 на клавиатуре, чтобы запустить макрос.

6. Все слова с ошибками на листе теперь должны быть выделены, как показано на изображении ниже.

Исправление при вводе
Лучший способ сэкономить время в Excel – исправлять ошибки на ходу. Таким образом, вы не будете тратить дополнительное время на исправление орфографических ошибок, накопленных за всю рабочую нагрузку. Чтобы исправить ошибки при вводе, вы можете использовать функции автозамены и автозаполнения в Excel.
Функция автозаполнения часто используется по умолчанию в большинстве программ Excel. Он поддерживает вашу точность при вводе совпадающих записей в разных ячейках ваших листов.
Автозамена, с другой стороны, исправляет ошибки по мере их возникновения. Однако вам нужно будет активировать его заранее. Вот как вы можете его активировать.
1. Щелкните Файл > Параметры .

2. Откроется окно параметров Excel. Щелкните категорию проверки > Параметры автозамены > проверьте типичные ошибки.

3. Щелкните ОК .
Добавление слов в собственный словарь
При вводе иностранных слов, которых нет в словаре, например, названия компании или собственного имени человека, Excel помечает их как неправильные. Чтобы избежать этого в будущем, вам следует добавить слово в свой собственный словарь.
1. Щелкните Файл > Параметры > Проверка .

2. Щелкните Пользовательские словари.

3. Выберите свой собственный словарь или создайте новый собственный словарь.

Когда ваш собственный словарь будет готов, вы можете добавлять в него слова, нажимая кнопку « Добавить в словарь» в любое время, когда Excel помечает правильное слово как неправильное. Обратите внимание, что Excel будет игнорировать ошибку, пока слово все еще находится в вашем пользовательском словаре.
Проверка грамматики разных языков
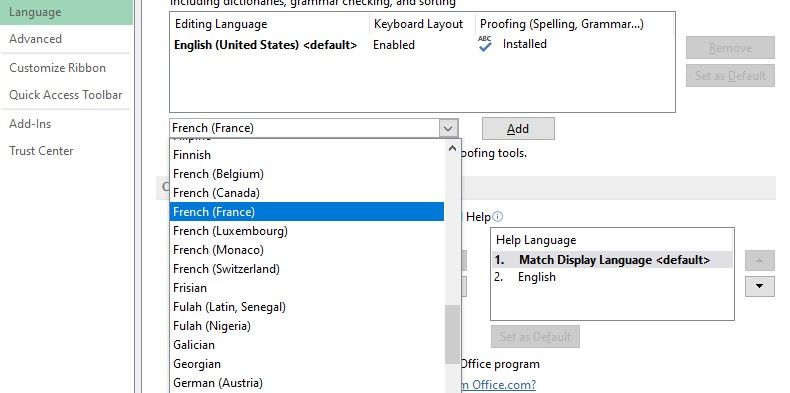
Вы также можете проверять грамматику текста и записей на других языках, отличных от вашего системного языка по умолчанию. Сделать это:
1. Щелкните Файл > Параметры .

2. В диалоговом окне «Параметры Excel» нажмите « Языки» > « Добавить дополнительные языки редактирования» .

3. Выберите язык в раскрывающемся меню, затем выберите « Добавить» .

4. Щелкните ОК .
Тезаурус
Тезаурус Excel – бесценный инструмент, если вы хотите найти синонимы в программе Excel. Вы можете использовать его, чтобы оживить скучные цепочки повторяющихся данных. Чтобы использовать тезаурус:
1. Щелкните слово, синоним которого вы хотите найти.
2. Щелкните Обзор > Тезаурус .

3. Выберите наиболее подходящее слово и нажмите « Вставить» .
Функция тезауруса полезна для улучшения грамматики на вашем листе.
Перевести
Функция перевода важна при работе с записями данных на разных языках. Иногда Excel может пометить слово как неправильно написанное, хотя в прямом смысле слова оно написано на иностранном языке. Чтобы перевести иностранное слово:
1. Щелкните слово, которое хотите перевести.
2. Выберите Обзор > Перевести .

3. Выберите Исходный язык и Целевой язык в появившемся меню.
![]()
4. Затем выберите Вставить .
Исследовать
Вы, вероятно, встретили новое слово или два, работая в Excel. Кнопка «Исследование» позволяет использовать доступные онлайн-ресурсы для получения дополнительной информации по любому вопросу.
Этот инструмент может быть очень полезным, если вы не знаете, что означает слово. Чтобы найти слово:
1. Щелкните Обзор > Исследование .

2. На появившейся панели « Искать» введите слово, которое вы хотите найти.
3. Выберите предпочтительные онлайн-ссылки.

4. Выберите « Начать поиск» .
Что делать, если проверка орфографии в Excel не работает
Возможно, вам не удалось активировать программу проверки орфографии, потому что ваш файл Excel защищен паролем. В этом случае вам нужно будет либо отменить эту защиту, либо проверить орфографию с помощью макроса.
Другая причина, по которой ваша проверка орфографии может не работать, – это если вы выбрали одну ячейку в режиме редактирования. В этом случае средство проверки орфографии будет проверять только выбранную ячейку, а не весь рабочий лист. Чтобы решить эту проблему, щелкните вкладку рабочего листа перед запуском проверки орфографии.
Также обратите внимание, что средства проверки орфографии и грамматики Excel не работают с ячейками, содержащими формулы. Для ячеек с формулами вам нужно будет щелкнуть конкретную ячейку, а затем исправить ее в строке формул.
Наконец, ваша проверка орфографии может не работать, если вы не активировали пользовательский словарь Microsoft. Есть много способов настроить словарь и убедиться, что он лучше всего работает во всех ваших программах Microsoft.
Вычитка стала проще
Вычитывать файлы Excel вручную никогда не было так просто. К счастью, вы можете создавать собственные ярлыки, которые помогут автоматизировать целые процессы, сделав их более простыми и управляемыми.
Сочетание всех методов, описанных в этой статье, обеспечит безупречную работу без каких-либо следов грубых грамматических ошибок. Итак, теперь вы можете попрощаться с некачественными рабочими листами!
Working in Excel can present a whole load of frustrations when it comes to grammar. Unlike Microsoft Word, Excel does not make automatic grammatical changes to your work. It can be rather embarrassing when you submit substandard work.
Luckily, there are numerous ways you can correct errors within your worksheets and workbooks in Excel. In this article, we’ll provide some tips on how to spell and grammar check in Microsoft Excel.
Manually Activating the Grammar Checker
You can activate the spelling and grammar checker by pressing F7 while still on your Excel worksheet. If that does not work on your computer, follow these steps to activate the grammar checker:
1. While still on your Excel file, select the Review tab.
2. Click on Spelling.
3. You will see a dialog box containing the first misspelled, with options to change, ignore, or add it to your custom dictionary.
4. Resolve the spelling mistake, and the dialog box will automatically display the next error.
Different Grammar Checking Options
Depending on the nature of your file and the amount of data in it, you may opt for three different ways to grammar-check your work. Depending on your urgency and need, you could check individual cells and ranges, selected worksheets, or the entire workbook. Here is a step-by-step guide for each category:
1. Checking Individual Cells
- Select your intended cell and click the F7 shortcut on your keyboard to spell check it.
- A dialog box will display spelling suggestions. Choose how to resolve the error by either correcting, ignoring, or adding the word into your dictionary.
2. Checking a Range of Cells
To spell-check multiple cells in a single worksheet:
1. Select the cells you wish to spell check, i.e., D3:D10.
2. Activate the spelling checker by using F7 or selecting the Review > Spelling.
3. Resolve the spelling errors by either changing them, adding to your custom dictionary, or ignoring them.
3. Checking Spelling in Selected Sheets
You can check the spelling in specific worksheets by selecting them at the bottom tab.
1. Press down the Ctrl key on your keyboard while simultaneously clicking on the sheets that you want to spell-check.
2. Activate the spelling checker by pressing the F7 key on your keyboard.
3. A dialog box will appear. Resolve the spelling error displayed. The box will then show the next error successively until the whole range of worksheets is error-free.
4. Spell Checking the Entire Workbook
When working with an entire workbook, you can ease your work by spell-checking it collectively.
1. Select any worksheet on your workbook and right-click on it to prompt a pop-up menu.
2. Click on Select All Worksheets.
3. Press the F7 key on your keyboard, a spelling dialog box will appear.
4. Resolve the spelling errors as they are displayed until you reach the last correction.
Grammar Checking Using VBA Macros
If you are out for a more automated method, then you should use VBA Spell Checking Macros. These Macros are lines of code within Microsoft Excel that allow you to identify and replace misspelled words.
VBA macros are particularly helpful since they use visual colors to highlight misspelled words, making them more pronounced and easy to locate. To use VBA Macro, you will need to create your VBA Macro in the Excel editor:
1. Open your intended Excel file.
2. Press on Alt+F11 keys. This will open an Excel VBA Editor window.
3. Click on Insert > Module.
4. Paste this code into the Module editor:
 Sub ColorMispelledCells()
For Each cl In ActiveSheet.UsedRange
If Not Application.CheckSpelling(Word:=cl.Text) Then _
cl.Interior.ColorIndex = 12
Next cl
End Sub
5. Press the F5 key on your keyboard to run the Macro.
6. All misspelled words in your worksheet should now be highlighted, as shown in the image below.
Correcting as You Type
The best way to save time in Excel is to correct the errors as you go. This way, you will not take additional time to correct misspellings accumulated throughout the entire workload. To correct errors as you type, you can use AutoCorrect and AutoComplete features in Excel.
AutoComplete feature is often on default on most Excel programs. It maintains your accuracy when typing matching entries throughout different cells in your worksheets.
AutoCorrect, on the other hand, will fix errors as they occur. However, you will need to activate it beforehand. Here is how you can activate it.
1. Click on File > Options.
2. An Excel Options window will appear. Click on the Proofing category > AutoCorrect Options > check the common errors.
3. Click Ok.
Adding Words to Your Custom Dictionary
When typing foreign words that are not in the dictionary, i.e., a company’s name or a person’s native name, Excel will flag it as incorrect. To avoid that in the future, you should add the word to your custom dictionary.
1. Click on File > Options > Proofing.
2. Click on Custom Dictionaries.
3. Select your custom dictionary or create a new custom dictionary.
Once your custom dictionary is ready, you can add words into it by clicking on the Add to Dictionary button any time Excel flags a correct word as incorrect. Note that Excel will ignore the error for as long as the word is still in your custom dictionary.
Grammar Checking Different Languages
You can also grammar-check text and entries that are in different languages other than your default system language. To do this:
1. Click on File > Options.
2. On the Excel Options dialog box, click on Languages > Add additional editing languages.
3. Select a language from the drop-down menu, select Add.
4. Click Ok.
Additional Grammar Resources in Excel
Thesaurus
The Excel thesaurus is an invaluable tool if you want to look up synonyms within the Excel program. You can use it to spice up boring chains of repetitive data. To use the Thesaurus:
1. Click on the word whose synonym you want to find.
2. Click on Review >Thesaurus.
3. Select the word that is most appropriate and choose Insert.
The Thesaurus feature is beneficial in enhancing grammar within your worksheet.
Translate
The translate feature is essential when working with data entries in different languages. Sometimes, Excel may flag a word as misspelled while, in the real sense, it is in a foreign language. To translate a foreign word:
1. Click on the word you want to translate.
2. Select Review > Translate.
3. Select the Source language and Target language from the menu that appears.
4. Then select Insert.
Research
You have probably encountered a new word or two while working on Excel. The Research button allows you to use the available online resources to get more information on any subject.
This tool can be very helpful if you are unsure about what a word means. To look up a word:
1. Click on Review > Research.
2. On the Search For pane that appears, type the word you want to research on.
3. Choose your preferred online references.
4. Select on Start Searching.
What to Do if Excel Spell Check Is Not Working
You may have been unable to activate your spelling checker because your Excel file is password protected. In this case, you will need to either undo this protection or check your spelling using a macro.
Another reason your spelling checker may fail to work is if you have selected a single cell in editing mode. In this case, the spelling checker will only proofread the selected cell rather than the entire worksheet. To solve this, click on the worksheet tab before running your spell checks.
Note, also, that Excel spelling and grammar checkers will not work on cells containing formulas. For cells with formulas, you will have to click on the particular cell then correct it from the formula bar.
Lastly, your spell checker may not work if you have not activated the Microsoft Custom Dictionary. There are many ways to customize your dictionary and ensure it works best in all your Microsoft programs.
Proofreading Made Simpler
Manually proofreading your Excel files has never been easy. Luckily, you can create custom shortcuts that will help you automate entire processes, ensuring they are much simpler and manageable.
Combining all the methods in this article will ensure your work is perfect without any trace of gross grammar errors. So now you can say goodbye to substandard worksheets!
To check spelling for any text on your worksheet, click Review > Spelling. Tip: You can also press F7. Here are some things that happen when you use the spelling checker: If you select a single cell for spell check, Excel checks the entire worksheet, including the comments, page headers, footers and graphics.
Contents
- 1 How do I enable grammar check in Excel?
- 2 Where is spell check Excel 365?
- 3 Why is Excel not spell checking?
- 4 Which key is used for spelling and grammar check?
- 5 How do I put spell check on my computer?
- 6 How do I spell check in Excel 2010?
- 7 How do you spell check in Excel 2016?
- 8 How do I turn on spell check?
- 9 How do you highlight misspelled words in Excel?
- 10 How do I spell check in Excel 2007?
- 11 How do I spell check a document?
- 12 What is ALT F4 on Windows 10?
- 13 How do I use spell check on Windows 10?
- 14 How do you spell check on a laptop?
- 15 Why is spell check not working?
- 16 How do you spell spell check?
- 17 On which toolbar would you find the spell check function in Excel?
- 18 On which toolbar you find the check spelling button?
- 19 Which feature used to check spelling of the text?
- 20 How do I make misspelled words to appear underlined in Excel?
How do I enable grammar check in Excel?
You can activate the spelling and grammar checker by pressing F7 while still on your Excel worksheet.
Where is spell check Excel 365?
You can go to Excel > Review > click Spelling and check if you have spelling error. For more details, you can refer to this article: Check spelling in a worksheet.
Why is Excel not spell checking?
Note: Remember, the AutoCorrect capability spell check is not triggered automatically in Excel, you have to invoke it on your own. That’s the reason that Excel can’t spell check as you type your text.
Which key is used for spelling and grammar check?
F7
Check and correct the spelling and grammar
Open the document you want to check for spelling or grammar mistakes, and then press F7. You can also use the ribbon to start the check. Press Alt+R to open the Review tab, and then press C, 1 to select the Check Document option.
How do I put spell check on my computer?
Here’s how. Click File > Options > Proofing, clear the Check spelling as you type box, and click OK. To turn spell check back on, repeat the process and select the Check spelling as you type box. To check spelling manually, click Review > Spelling & Grammar.
How do I spell check in Excel 2010?
To check the spelling in a worksheet click the Spelling button in the Proofing group of the Review tab (or press F7). Excel begins checking the spelling of text entries in the worksheet. When the program comes across an unknown word, it displays the Spelling dialog box.
How do you spell check in Excel 2016?
To use Spell Check:
- From the Review tab, click the Spelling command.
- The Spelling dialog box will appear. For each spelling error in your worksheet, Spell Check will try to offer suggestions for the correct spelling.
- A dialog box will appear after reviewing all spelling errors. Click OK to close Spell Check.
How do I turn on spell check?
First, pull down the notification shade and tap the gear icon. From there, scroll down to Languages and Input. On Samsung Galaxy devices, this is found under the General Management menu; on Android Oreo, it’s under System. In the Languages and Input menu, find the “Spell Checker” option.
How do you highlight misspelled words in Excel?
Highlight all misspelled words in worksheet with VBA code
- In the worksheet with misspelled words, you will highlight, please press the Alt + F11 keys to open the Microsoft Visual Basic for Applications window.
- In the Microsoft Visual Basic for Applications window, click Insert > Module.
- Press the F5 key to run the code.
How do I spell check in Excel 2007?
How to Check Your Spelling in Excel 2007
- Click the Spelling command button in the Proofing group of the Review tab (or press F7). Excel begins checking the spelling of text entries in the worksheet.
- Select one or more of the following dialog box options:
- Click OK when the spell check is complete.
How do I spell check a document?
To check spelling in a Word document, open up the document, head to the “Review” tab, then click on “Spelling & Grammar” (part of the “Proofing” group of tools). Then a window will appear showing the first word the program believes to be misspelled.
What is ALT F4 on Windows 10?
Alt + F4 is a Windows keyboard shortcut that completely closes the application you’re using. It differs slightly from Ctrl + F4, which closes the current window of the application you’re viewing. Laptop users may need to press the Fn key in addition to Alt + F4 to use this shortcut.
How do I use spell check on Windows 10?
Press the “Start” button, then click the settings cog in the bottom left corner, above the power button. Windows autocorrect can be enabled/disabled via the “Autocorrect misspelled words” heading, under “Spelling”. There you can also find “Highlight misspelled words”, which is the Windows 10 spell checker option.
How do you spell check on a laptop?
To start a check of the spelling and grammar in your file just press F7 or follow these steps:
- Open most Office programs, click the Review tab on the ribbon.
- Click Spelling or Spelling & Grammar.
- If the program finds spelling mistakes, a dialog box appears with the first misspelled word found by the spelling checker.
Why is spell check not working?
There are several reasons Word’s spelling and grammar-checking tool might not be working. A simple setting might have been changed, or the language settings may be off. Exceptions may have been placed on the document or the spell-check tool, or the Word template may have an issue.
Ironically, there is no official spelling of the term, as “spell-check” and “spell check” are also acceptable. However, “spellcheck” is most common.
On which toolbar would you find the spell check function in Excel?
You can find spell check option in review tab in the ribbon in Excel. When you click on the Spelling option in the review tab, it opens the Spell Check dialogue box.
On which toolbar you find the check spelling button?
The option for spelling and grammar of Microsoft-Word is found in the toolbar entitled as Review tab under the head proofing. Explanation: The spelling and grammar checker option appears in the Review tab below the group named Proofing.
Which feature used to check spelling of the text?
in word office in click on review bar there you will find spelling check click on it then you will find your spelling and grammar mistakes.
How do I make misspelled words to appear underlined in Excel?
How do I make misspelled words to appear underlined?
- First, make sure your settings are correct by going to Tools → Spelling and Grammar → Options and make sure the box Check spelling as you type is checked.
- If this fails, go to Tools → Language → For all Text and select your language.
Watch the Video Tutorial – Spell Check in Excel
Spell Check in Excel is often ignored given that Excel users often work with numbers as compared with text. But it is still one of the important checks one should have in place.
As compared to MS Word or PowerPoint, where you can visually see a red underline below the word that has been misspelled, nothing of that sorts happen in Excel.
Imagine a disastrous spelling error glaring out of your worksheet when you sent it to your client. No matter how much hard work you put into data crunching and analysis, all your credibility goes down the drain.
Well – NOT anymore.
In this tutorial, I will show you how to use spell check in Excel and how you can maximize your efforts by the options available to you.
Where to find Spell Check in Excel
You can find spell check option in review tab in the ribbon in Excel.

When you click on the Spelling option in the review tab, it opens the Spell Check dialogue box.

Keyboard Shortcut to Run Spell Check in Excel
You can also use the keyboard shortcut F7 to run spell Check in Excel. To use this, activate the worksheet in which you want to run spell check, select the cell/range of cells, and press F7 from your keyboard.

How Does Spell Check Works in Excel
An important thing worth knowing is how spell check in Excel works.
If you select cell A1, it will go through all the cells in the first row, then moves to the second row and check all the cells in the second row (from left to right) and then move to the third row and so on. If it identifies a cell with a spelling error, it displays the Spelling dialogue box.
If you select a cell somewhere else in the worksheet, let’s say B3, then it will go through the cells to the right and then to the row below it. When it is done with checking for all the cells after B3, it will show a prompt that asks the user if he wants to continue checking at the beginning of the sheet. Something as shown below:

If the user selects Yes, it goes back and checks the remaining cells (which would be A1 to B2 in our example).
To get a better understanding, have a look at this example below (cell shaded are the ones with a spelling error):

As shown, when we begin the spell check with A1, it completes the spell check for all the cells. But when we begin with cell B3, it checks for all the cells from B3 and then asks the user if he/she wants to continue checking from the beginning.
Understanding the Spell Check Dialogue Box
Whenever you run spell check in excel and it finds an error, it shows the Spell check dialogue box (as shown below):

Let’s quickly understand the different options available in the spell check dialogue box:
- Ignore Once: If spell check encounters a word it identifies as an error, but you want to keep it that way, you can click on Ignore Once. This will ignore that error once.
- Ignore All: If excel identifies a word as an error, but you want to keep all instances of that word (as is), click on Ignore All.
- Add to Dictionary: If Excel flags a word as an error but it is the correct word to be used (maybe it’s a name or abbreviation that you use in your company), then you can add it to the dictionary. When such a word is flagged as an error and you click on Add to Dictionary, Excel will make that a part of acceptable words and won’t flag it again. Note that this word is now part of Excel dictionary and would never be flagged in any of the workbooks.
- Change: When Excel highlights an error, it also shows some suggestions (for example it suggests Good in place of Goood). There can be one or more that one suggestion. Select the suggestion that you want to use and click on Change to apply that.
- Change All: If you click on this button, it will change all the occurrence of the misspelled word with the selected suggestion.
- AutoCorrect: Excel autocorrect option will change the misspelled word with the selected suggestion, and also add it to the autocorrect list. This means, that next time you type the same misspelled word, excel would automatically convert it into the suggestion that you selected.
- Dictionary Language: You can change the dictionary language using this drop down.
Here are some default settings in Spell Check in Excel:
- It ignores words which are in Upper Case. For example, if you have the word HELLOOO, it will not be flagged as an error.
- It ignores words that contain numbers. For example, if you have the word Hello123, it will not be flagged as an error.
- It ignores internet and file addresses.
- It DOES NOT ignore repeated words. For example, if you have the text – Hello, How are are you? – then it the additional are will be flagged as an error.
You can change these default setting by clicking on the ‘Option’ button in the Spell Check Dialogue box. It will open the Options dialogue box where you can make the necessary changes.

Hope you found this tutorial helpful. Let me know your thoughts by leaving a comment below.
You May Also Like the Following Excel Tutorials:
- 10 Super Neat Ways to Clean Data in Excel Spreadsheets.
- How to Lock Cells in Excel.
- How to Track Changes in Excel.
- MS Help – Checking Spelling and Grammar.
Когда работаешь много, то неизбежны ошибки. В конце концов не ошибается тот, кто ничего не делает. Исправить ошибки поможет проверка орфографии в Excel.
Скачайте файл тут. Я преднамеренно сделала несколько глупых ошибок, чтобы показать, как работает проверка орфографии в Excel. Откройте файл.
По окончании урока вы сможете:
- Настроить параметры операции «Проверка орфографии в Excel»
- Рассказать о командах диалогового окна «Орфография»
- Проверить орфографию на листе
- Скорректировать словарь
Шаг 1. Находим команду «Параметры» (Файл → Параметры):

Шаг 2. Отмечаем в диалоговом окне нужные режимы:

Я всегда отмечаю «Русский: требовать точного использования ё». Но в официальных документах «ё» не обязательно и это очень обедняет письменную речь.
| Это интересно! | 24 декабря 1942 года приказом народного комиссара просвещения РСФСР В.П. Потёмкина было введено обязательное употребление буквы «ё» везде: в школьных учебниках, переписках, газетах. И на картах, разумеется. Между прочим, этот приказ никто никогда не отменял А фамилия французского актёра будет Депардьё, а не Депардье. И правильно произносить фамилию русского поэта на самом деле нужно Фёт, а не Фет. |
2. Диалоговое окно «Орфография»
Шаг 1. Запускаем диалоговое окно «Орфография» (лента Рецензирование → группа команд Правописание → команда Орфография):

После выполнения команды может появится окно:

Окно появляется в том случае, если ваш курсор находится в любом месте листа. Отсюда следует очень интересный вывод:
| Понять и запомнить! | Можно назначить операцию «Проверка орфографии в Excel» только для выделенного диапазона |

Для выделенного диапазона A4:C9 проверка начинается с ячейки A4. Ячейка A3 с ошибочным словом «Касета для СD» выпадает из операции «Проверка орфографии в Excel»
Шаг 2. Изучаем диалоговое окно «Орфография»

- Пропустить (Ignore Once) – игнорировать ошибку в данном месте.
- Пропустить все (Ignore Аll) – не воспринимать данное слово как ошибку по всему листу.
- Добавить в словарь (Add to Dictionary) – добавить слово в словарь программы, чтобы в дальнейшем оно не воспринималось как ошибочное.
- Заменить (Change) – заменить ошибочное слово на то, которое выбрано в поле Варианты.
- Заменить все (Change Аll) – заменить ошибочное слово во всех местах по тексту на элемент списка, выбранный из поля Варианты.
- Автозамена (Autocorrect) – добавление ошибочного слова вместе с правильным словом из поля Варианты в функцию Автозамены для того, чтобы в дальнейшем такая ошибка автоматически исправлялась на правильный вариант.
- Это не команда, а поле Варианты, в котором вам предлагаются варианты замены ошибочного слова
3. Проверка орфографии в Excel
Шаг 1. Щелкаем по кнопке Заменить (Change) → слово «Наиминование» будет заменено на правильное и найдено следующее неизвестное слово «Касета».
Шаг 2. Щелкаем по кнопке Заменить (Change) → слово «Касета» будет заменено на правильное и найдено следующее неизвестное слово и так далее
Исправляем таким образом ошибки, пока не доберемся до слова «Безбарьерная». Чаще всего я работаю с техническими текстами, а технические термины в словарь не занесены. В результате весь документ подчеркнут красной волнистой чертой. Почему я вспомнила про Word?
4. Внесение слова в словарь
Как видите, проверка орфографии в Excel предлагает нам вариант «Безбарьерная
Шаг 1. Добавляем слово в словарь

А теперь посмотрим на наш словарь.
Шаг 2. Открываем диалоговое окно «Настраиваемые словари» (Файл → Параметры Word → Правописание → Настраиваемые словари):

Шаг 3. Отмечаем словарь «RoamingCustom.dic (по умолчанию)»:

Как видите, в моем словаре довольно приличное количество специальных терминов, которые офисные программы без моего вмешательства в словари отмечали, как ошибки. Но эти слова я добавлялf, работая в других офисных программах.

| Понять и запомнить! | Словарь проверки нашей грамотности единый для всех офисных программ! Что не может не радовать! |
В диалоговом окне «RoamingCustom.dic (по умолчанию)» вы можете добавлять слова, удалять одно слово или все слова разом. Не пренебрегайте работай со словарём, тем более, что это не обременительно.
Когда вы закончите проверять орфографию, то будет выведено сообщение о том, что проверка орфографии в Excel закончена:

Назначить проверку орфографии можно простым нажатием функциональной клавиши F7.
Теперь вы сможете:
- Настроить параметры операции «Проверка орфографии в Excel»
- Рассказать о командах диалогового окна «Орфография»
- Проверить орфографию на листе
- Скорректировать словарь