
I am trying to check if an add-in is installed and running. I am using this piece of code:
On Error Resume Next:

Set SolverNome1 = AddIns("Solver Add-In") 'Solver may have two different names
Set SolverNome2 = AddIns("Solver")
MsgBox IsEmpty(SolverNome1)
MsgBox IsEmpty(SolverNome2)

If IsEmpty(SolverNome1) And IsEmpty(SolverNome2) Then
    MsgBox "Install Solver add-in before trying to install this add-in.", vbExclamation
    Application.myAddInName.Installed = False 'uninstall my add-in
End If
The problem is that even with the Solver Uninstalled I still get IsEmpty(SolverNome1) = false so my condition clause doesn’t work as desired. I guess there I am misunderstanding the concept of installed or not. What piece of code should I be using to check if solver is running?

![]()
asked Aug 19, 2015 at 14:54
![]()
Answering my on question:
It is necessary to access the .installed property like this:
myBoolean1 = SolverNome1.Installed ‘will return false because the add-in is set and not installed
myBoolean2 = SolverNome1.Installed ‘won’t return because add-in is not set
answered Aug 19, 2015 at 15:05
![]()
IhidanIhidan
5581 gold badge6 silver badges24 bronze badges
Add-ins provide optional commands and features for Microsoft Excel. By default, add-ins are not immediately available in Excel, so you must first install and (in some cases) activate these add-ins so that you can use them.
Are you looking for information about Office Add-ins based on HTML, CSS, and JS? If you are, see Get an Office Add-in for Excel.
Some add-ins are built in to Excel, such as Solver and the Analysis ToolPak. Other add-ins are available from the Download Center and must first be downloaded and installed. Finally, there are add-ins that are created by third parties, such as a programmer in your organization or a software solution provider. These can be Component Object Model (COM) add-ins, Visual Basic for Applications (VBA) add-ins, and DLL add-ins. These add-ins must also be installed to use them.
Most add-ins can be categorized into three different types:
-
Excel add-ins These typically include Excel add-in (.xlam), Excel 97-2003 add-in (.xla), or DLL add-in (.xll) files or they are automation add-ins. Some Excel add-ins, such as Solver and the Analysis ToolPak, may be available after you install Excel or Microsoft Office. Typically, you only need to activate these add-ins to use them.
-
Downloadable add-ins Additional add-ins for Excel can be downloaded and installed from Downloads at Office.com.
-
Custom add-ins Developers and solution providers usually design custom Component Object Model (COM) add-ins, automation add-ins, VBA add-ins, and XLL add-ins. These must be installed for you to use them.
After you have installed or activated an add-in, the add-in and its commands may be available in one of the following locations:
-
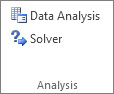
Data tab. After you install and activate the Analysis ToolPak and Solver add-ins, the Data Analysis and Solver commands are available in the Analysis group.

-
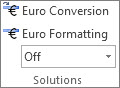
Formulas tab. After you install and activate the Euro Currency Tools, the Euro Conversion and Euro Formatting commands are displayed in the Solutions group.
-
Add-Ins tab. Other add-ins may be added to the Add-Ins tab. This tab is added to the ribbon when you install and activate the first add-in that is shown in the Add-Ins tab. If you don’t see the Add-Ins tab, you should exit and then restart Excel.
Other add-ins, such as the Get Started tab, are available in other places in Excel, such as a tab on the ribbon, or through macros or customized menus.
Important: If you are a software developer, you can use this procedure to install or remove an automation program before you design installation and removal programs for your add-in.
To activate an Excel add-in
-
Click the File tab, click Options, and then click the Add-Ins category.
-
In the Manage box, click Excel Add-ins, and then click Go.
The Add-Ins dialog box appears.
-
In the Add-Ins available box, select the check box next to the add-in that you want to activate, and then click OK.
If you cannot find the add-in that you want to activate in the Add-Ins available box, you may need to install it.
To install an Excel add-in
-
To install an add-in that is typically installed with Excel, such as Solver or the Analysis ToolPak, run the setup program for Excel or Microsoft Office and choose the Change option to install the add-in. After you restart Excel, the add-in should appear in the Add-Ins available box.
-
Some Excel add-ins are located on your computer and can be installed or activated by clicking Browse (in the Add-Ins dialog box) to locate the add-in, and then clicking OK.
-
Some Excel add-ins require running an installation package. You may need to download or copy the installation package to your computer (an installation package is typically a file with an .msi file name extension), and then run it.
-
Other add-ins that are not available on your computer can be downloaded and installed through a Web browser from Downloads or from other sites on the Internet or a server in your organization. Follow the setup instructions for the download as needed.
To inactivate an Excel add-in
-
Click the File tab, click Options, and then click the Add-Ins category.
-
In the Manage box, click Excel Add-ins, and then click Go.
-
In the Add-Ins available box, clear the check box next to the add-in that you want to inactivate, and then click OK.
In many cases, when you inactivate an add-in, it is removed from its group on the ribbon. In other cases, to remove the add-in from the ribbon, you may need to restart Excel.
Note Inactivating an add-in does not remove the add-in from your computer. To remove the add-in from your computer, you must uninstall it.
To remove an Excel add-in
Important: If you originally installed the Excel add-in from a network file server or from a shared folder, you might need to remove the add-in from that location. If you installed the Excel add-in from a CD and you mapped your CD drive to a new drive letter after installing the add-in, you need to reinstall the add-in from the CD. If you are running any Excel add-ins from the CD, you must uninstall the Excel add-ins, and then reinstall them from the CD.
-
Click the File tab, and then click Exit.
-
In Control Panel, click Programs and Features (Windows 7 and Windows Vista) or Add/Remove Programs (Windows XP).
-
Do one of the following:
-
If you installed Excel as part of Microsoft Office, click Microsoft Office in the list of installed programs, and then click the Change button.
-
If you installed Excel individually, click the name of your program in the list of installed programs, and then click the Change button.
-
If you installed the add-in from the Download Center, click the name of your program in the list of installed programs, and then click the Uninstall button.
-
-
Follow the instructions in the installation program.
Important: If you are a software developer, you can use this procedure to install or remove an automation program before you design installation and removal programs for your add-in. If you are not a developer, you should not need to use this procedure. Contact the system administrator who provided the add-in if you want installation and removal instructions.
Add a COM add-in
-
Click the File tab, click Options, and then click the Add-Ins category.
-
In the Manage box, click COM Add-ins, and then click Go.
The COM Add-Ins dialog box appears.
-
In the Add-Ins available box, select the check box next to the add-in that you want to install, and then click OK.
Tip If the add-in that you want to use is not listed in the Add-Ins available box, click Add, and then locate the add-in.
Remove a COM add-in
-
Click the File tab, click Options, and then click the Add-Ins category.
-
In the Manage box, click COM Add-ins, and then click Go.
The COM Add-Ins dialog box appears.
-
In the Add-Ins available box, clear the check box next to the add-in that you want to remove, and then click OK.
Note This removes the add-in from memory but keeps its name in the list of available add-ins. It does not delete the add-in from your computer.
-
To remove a COM add-in from the list of available add-ins and to delete the add-in from your computer, click its name in the Add-ins available box, and then click Remove.
Note: If you are a software developer, you can use this procedure to install or remove an automation program before you design installation and removal programs for your add-in. If you are not a developer, you should not need to use this procedure. Contact the system administrator who provided the add-in if you want installation and removal instructions.
-
Click the File tab, click Options, and then click the Add-Ins category.
-
In the Manage box, click Excel Add-ins, and then click Go.
The Add-Ins dialog box appears.
-
To install an automation add-in, in the Automation servers available box, click Automation, and then click the add-in that you want.
Tip If the add-in that you want isn’t in the list, click Browse, locate the add-in, and then click OK.
-
To remove an automation add-in, you must remove it from the registry. See your system administrator for details.
Some add-ins are built in to Excel, such as Solver and the Analysis ToolPak. Other add-ins are available from the Download Center and must first be downloaded and installed. Finally, there are add-ins that are created by third parties, such as a programmer in your organization or a software solution provider. These can be Component Object Model (COM) add-ins, Visual Basic for Applications (VBA) add-ins, and DLL add-ins. These add-ins must also be installed to use them.
Most add-ins can be categorized into three different types:
-
Excel add-ins These typically include Excel add-in (.xlam), Excel 97-2003 add-in (.xla), or DLL add-in (.xll) files or they are automation add-ins. Some Excel add-ins, such as Solver and the Analysis ToolPak, may be available after you install Excel or Microsoft Office. Typically, you only need to activate these add-ins to use them.
-
Downloadable add-ins Additional add-ins for Excel can be downloaded and installed from Downloads at Office.com.
-
Custom add-ins Developers and solution providers usually design custom Component Object Model (COM) add-ins, automation add-ins, VBA add-ins, and XLL add-ins. These must be installed for you to use them.
After you have installed or activated an add-in, the add-in and its commands may be available in one of the following locations:
-
Data tab. After you install and activate the Analysis ToolPak and Solver add-ins, the Data Analysis and Solver commands are available in the Data tab on the ribbon.
-
Home tab. Other add-ins may be added to the Home tab.
Other add-ins, such as the Get Started tab, are available in other places in Excel, such as a tab on the ribbon, or through macros or customized menus.
Important: If you are a software developer, you can use this procedure to install or remove an automation program before you design installation and removal programs for your add-in.
To activate a pre-installed Excel add-in
-
On the Tools menu, select Add-ins.
-
In the Add-Ins available box, select the check box for the Add-in you want to activate, and then click OK.
To install an Excel add-in
-
Some Excel add-ins are located on your computer and can be installed or activated by clicking Browse (in the Add-Ins dialog box above) to locate the add-in, and then clicking OK.
-
Some Excel add-ins require running an installation package. You may need to download or copy the installation package to your computer (an installation package is typically a file with an .msi file name extension), and then run it.
-
Other add-ins that are not available on your computer can be downloaded and installed through a Web browser from Downloads or from other sites on the Internet, a server in your organization, , or using the built-in Store option in Excel. Follow the setup instructions for the download as needed.
To install Add-ins from the Store
-
Click the Insert tab in the ribbon.
-
Click the Store button.
-
Use the Categories or Search field to find Add-ins.
-
Click Add to install the Add-in.
Note: Some Add-ins need to be purchased.
-
To remove an Excel add-in
-
Click the Insert tab, and then click My Add-ins.
-
In Office Add-ins, click the 3 dots menu next to the Add-in.
-
Click Remove.
-
Read the notice that appears regarding other devices and click Remove.
Contents
- 1 Introduction
- 2 The magic solution that works almost 50% of the time
- 3 Excel is crashing before you can try the magic solution
- 4 “Error in loading DLL” when referencing a TLB
- 5 “Error in loading DLL” when compiling the VBA project
- 6 The addin does not want to load
- 7 NullReferenceException thrown by the .Net (C#, VB.Net…) addin code
- 8 Generic run-time errors
- 9 All other unknown mystic errors
- 10 Conclusion
Introduction
So you have deployed your awesome Excel addin in production and all is working fine for some weeks : you are enjoying your success…
But one day the phone rings and the guy at the other side is not really happy; no, he is completely upset and you could almost smell his breath when he screams.
But why? Because your awesome addin has stopped working on his workstation without notice.
Sometimes the root-cause is obvious: you have delivered a new version, but in many cases you will hardly ever know the root-cause of this annoying situation: Windows update, Office update, quick and dirty moving/installation of the addin from a workstation to another one, bad alignment of Uranus and Jupiter…
A wealth of errors can happen, then it’s hard to have them all in mind, especially when you are in a hurry and with stress you start to get mixed up. So to be as efficient as possible you’d better have a checklist and this is precisely what this article will be, enumerating all the errors I have encountered describing usual causes and solutions.
So let’s troubleshoot!
The magic solution that works almost 50% of the time
If the error message does not inspire you or Excel crashes without notice when you call an external API from VBA (this often happens when you are using a third-party API that can evolve independently of the worksheets that use it) and you want or need to move fast you can try this as a first shot:
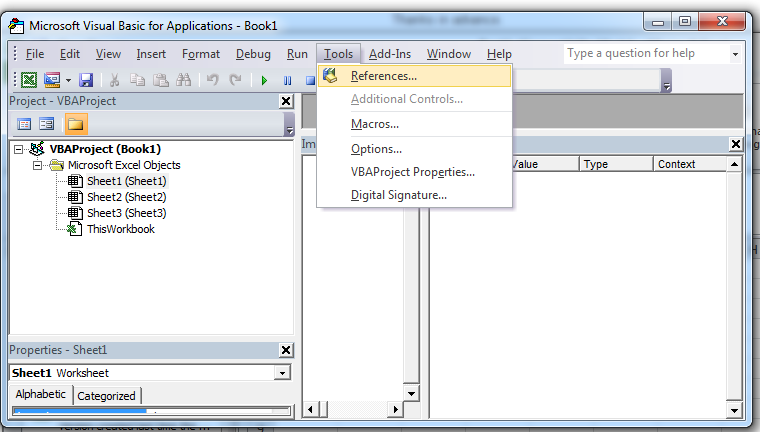
- go into the VBA editor (ALT-F11 is a handy shortcut)
- in the top menu choose “Tools” then “References” :

VBA Tools References
you should see this popup :
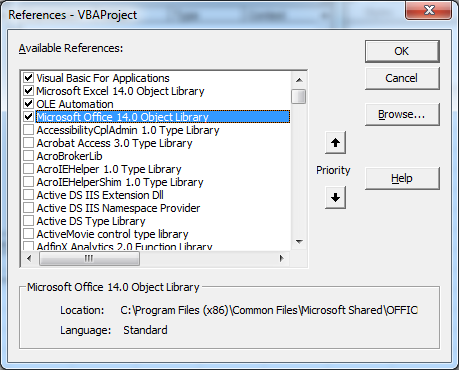
 The reference can point to an XLA file or a TLB file (which is the interface of your addin used by VBA).
 - locate your addin reference (if selected it should be at the top), uncheck it and click “OK“
- reopen this popup, locate you addin (you can type its first letter to directly go to the first addin whose name starts with this letter) but this time recheck it
- restart the operation that was broken and cross your fingers, it may be OK now
- still sucks? follow the rest of this guide depending on your error
 The reference can point to an XLA file or a TLB file (which is the interface of your addin used by VBA).
I’ve seen the unreference/rereference trick working for :
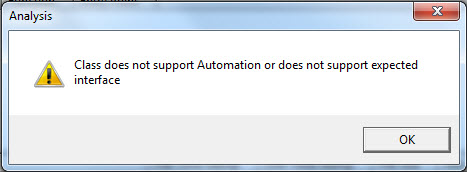
- Error 430 “class does not support automation or does not support expected interface” :

VBA Error 430
which is typically the consequence of an update of your addin API like changing the signature of a method.
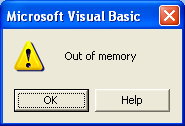
- “Out of memory” errors :

VBA Out of memory error
- VBA/addin interface mismatch: from VBA you call method “A” of your addin but you end up in method “B“. I’ve seen this happen a few times, at least when the two methods have the same signature and are close in the API, otherwise you should have an explicit error.
- and a bunch of other situations…
If your Excel application is made of normal spreadsheets (XLS, XLSM…) and XLAs do not forget to update the references for all the files referencing your addin, not only the spreadsheets.
Excel is crashing before you can try the magic solution
Sometimes you’re really not in luck and while you feel that a simple “unreference/rereference” could do the job Excel does not give you the opportunity to try it as it crashes before you can access the VBA editor.
This issue can occur if the workbook is referencing the absolute path to the TLB on your development environment and you deploy the workbook as is in your production environment where the TLB will probably be in another place (typically a sub-directory of “Program Files”).
It can also occurs if you have multiple versions of your addin on the workstation.
It can often happens on your development workstation if:
- you develop with multiple workspaces (one for each of your SVN/Git branches) and there is a mix between the different TLBs and addins : you can try a full cleanup (including Windows registry) and rebuild from the workspace you’re currently working on
- you use a task manager or integration server like Jenkins (ex Hudson) which builds your addin and register it into the system in your back : you can temporarily disable the task that breaks your setup
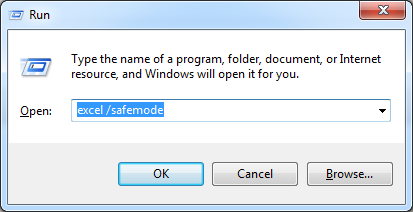
If the workbook is broken in production, you can use two solutions :
- Start Excel in safe-mode, either by starting it from the “Run” popup (shortcut is Windows-R) with the “/safemode” option :

Run Excel in safe-mode
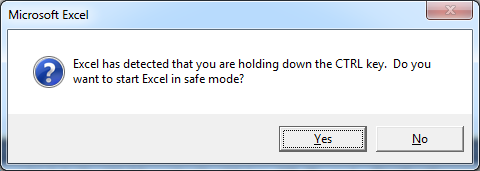
or by pressing continuously the CTRL key while starting it which should trigger the following popup :

Excel start safemode
Once Excel is started in safe-mode load the broken workbook. You should be able to access the “References” popup and do the unreference/rereference trick.
- You can temporarily move or rename the TLB file and starts your Excel application as usual. Excel should not crash anymore and starts as usual, only complaining about the missing TLB. You can now move/rename the TLB as it was before, proceed to the “unreference/rereference” trick and then save the workbook to ensure the correct reference is kept. All should be fine at the next startup.
“Error in loading DLL” when referencing a TLB
If, when referencing a TLB, you see this popup :

VBA Error in loading DLL
this is probably the sign that Excel cannot access the TLB file, the root cause can be :
- a simple installation issue : the TLB not being where it is expected (you can check the expected path in the Windows registry using RegEdit); so check the correct installation of your application and reinstall it if necessary.
-
a user rights issue with the TLB, and more generally all the installation items : this can happen if you have installed your application with a user that is not the one currently trying to use the application (e.g. a remote user).
You can then either:- proceed to a dedicated reinstallation for the current user,
- change the rights of the installation items to allow him full access,
- or add him to a user-group that has the required rights,
whichever you find easier and cleaner in your situation.
“Error in loading DLL” when compiling the VBA project
If this error occurs when the VBA code is compiled, either automatically when accessing a function/sub that uses the addin API or manually when clicking the Debug/Compile menu item then check if you have recently changed the settings of a dependency (e.g. of your .Net (C#, VB.Net…) project) that contains COM types you expose through your addin API.
I’ve seen this issue once in a C# project with the ADODB dll when the “Embed Interop Types” option was set to “True” in the reference properties. With only this settings and “Copy Local” to “False” a method of the addin that returned an ADODB connection was broken in Excel 2003 on Windows XP whereas all was working fine on Excel 2010 on Windows 7. I’ve not dived into the details but it seems the “Embed Interop Types” feature is not retro-compatible or may need some additional setup on the workstation, which in both case made it unusable.
So, setting “Embed Interop Types” to “False” and reverting “Copy Local” to “True” solved the issue caused by Visual Studio 2010 because it activates these settings by default with .Net 4.0 projects (the project had recently been migrated from .Net 3.5 to .Net 4.0)!
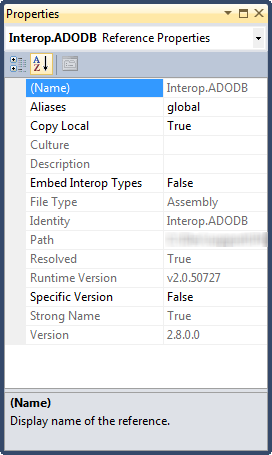
ADOBD Reference Properties
As often VS wanted to help but broke something 🙂
The addin does not want to load
If, depending on the way you load your addin, you have the following symptoms:
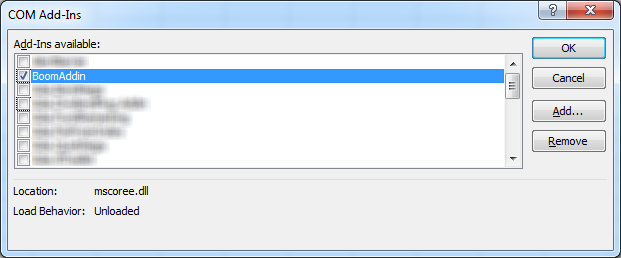
- you use the Excel interface: you can see the addin in the “COM Addins” list and you can check it:

COM addin checked
but when you reopen the “COM Addins” popup your addin is not checked anymore.
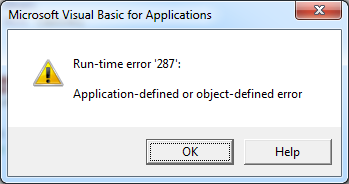
- you use VBA code: when you try to set the Connect property of the addin:
Dim boomAddin As COMAddIn
...
boomAddin.Connect = True
you get a “Run-time error ‘287’: Application-defined or object-defined error“:

VBA connect disabled addin error popup
In both cases it’s the sign Excel cannot or does not want to load the addin.
This can happen if your addin throws an exception when loaded, ie in the “OnConnection” method; in this case you should see a warning at the bottom of your addin description, in the “Load Behavior” field:
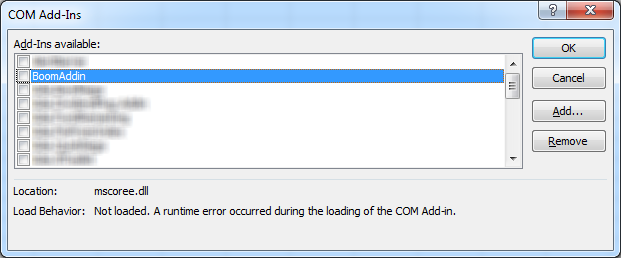
Excel COM addin error
You can reproduce this behavior with a simple code:
public void OnConnection(object application, Extensibility.ext_ConnectMode connectMode, object addInInst, ref System.Array custom)
{
    applicationObject = application;
    addInInstance = addInInst;

    throw new Exception("Boom!");
}
But if your addin causes more serious damages like an Excel crash, what you can experiment with such a code (note that the crash can happen in another method that OnConnection with the same sanction):
public void OnConnection(object application, Extensibility.ext_ConnectMode connectMode, object addInInst, ref System.Array custom)
{
    applicationObject = application;
    addInInstance = addInInst;

    System.Diagnostics.Process.GetCurrentProcess().Kill();
}
Excel won’t trust your addin anymore and may put in quarantine ALL the addins loaded at the time of the crash!
In this case, if you are lucky, at the next startup, Excel should warn you of the issue with this message:
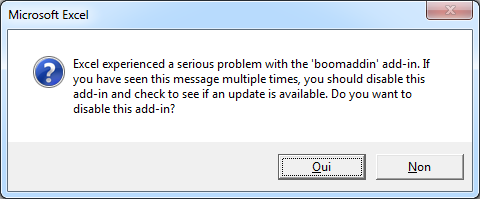
Excel addin serious problem
You can choose to give your addin a second chance by answering “No” or you can answer “Yes” so the addin will stay disabled and you won’t be able to load it into Excel until you notify Excel the addin should not be kept in quarantine any longer.
But if you are in doubt and think your addin may have been disabled how to check ?
You have at least two solutions :
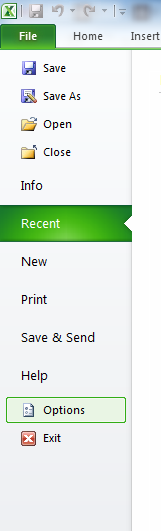
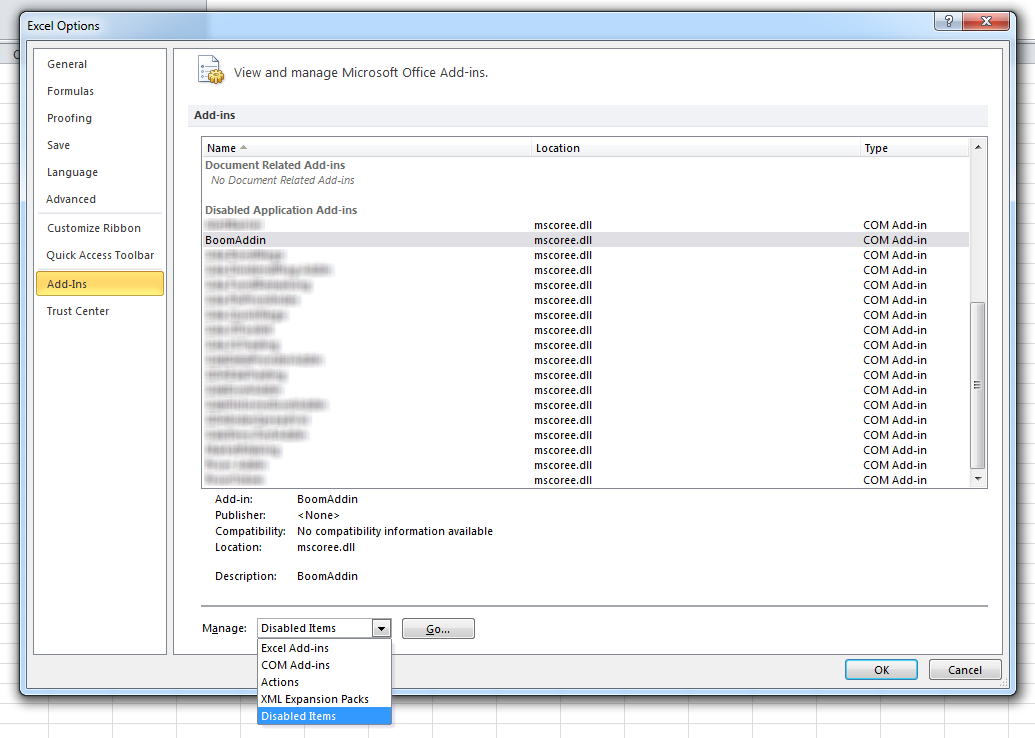
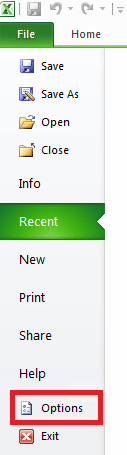
- using Excel 2010 : go to the “File” ribbon tab then “Options” :

Excel2010 File Options
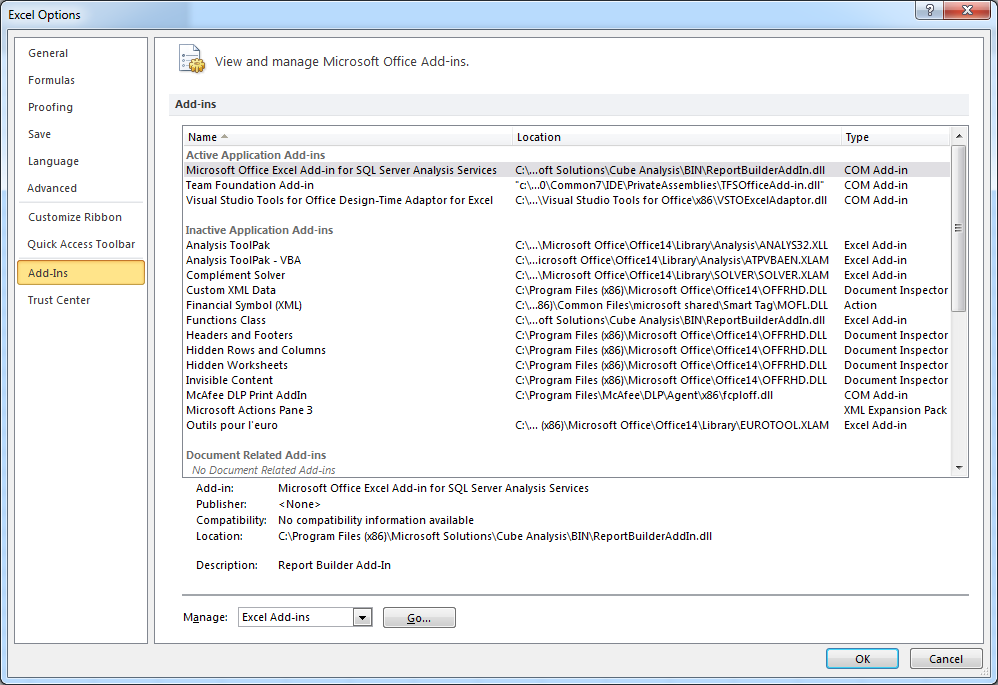
You should see the “Excel Options” popup in which you now select “Add-Ins” :

Excel 2010 Options Add-Ins
From here scroll down to the bottom of the list where the disabled items are listed.
Here is an example of a too zealous Excel that has disabled all the COM addins (and they were a lot!) :Excel2010 Disabled addins
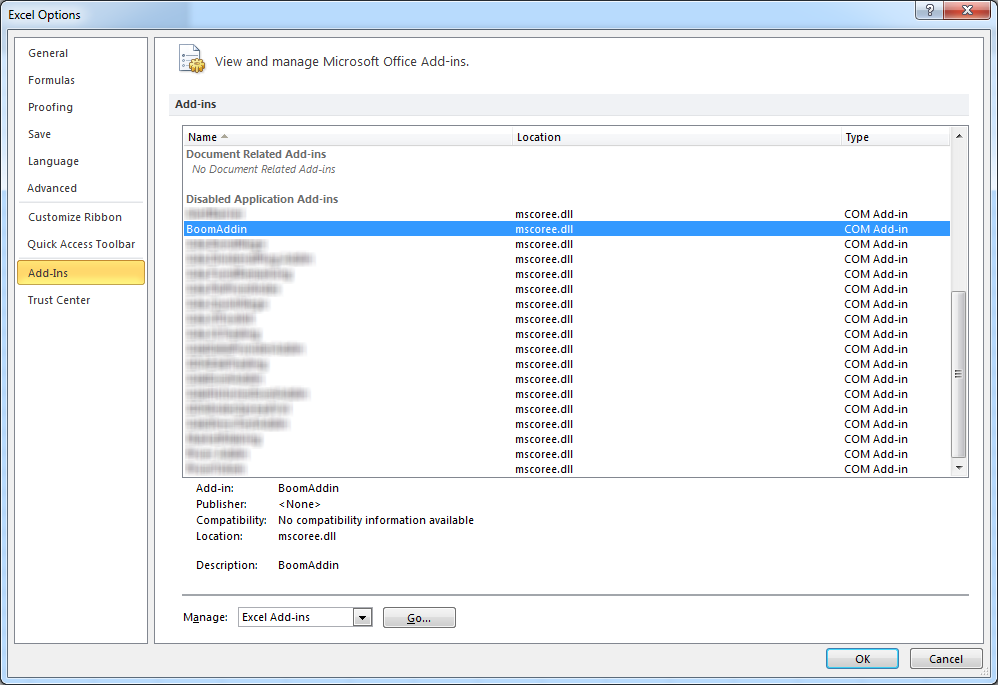
To show the culprit of all this mess use the “Manage” drop-down at the bottom of the window and choose “Disabled Items” :

Excel 2010 Go To Disabled
then click the “Go…” button to show the bad guy :

Excel 2010 Culprit Addin
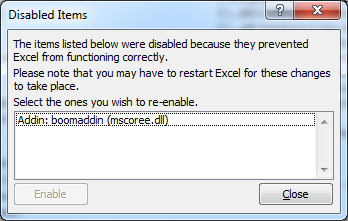
If you forgive your addin then select it and click “Enable” then “Close” :
Excel 2010 Addin Reenable
You should now be able to reload it and all the other addins disabled due to the crash via the “COM Add-Ins” popup.
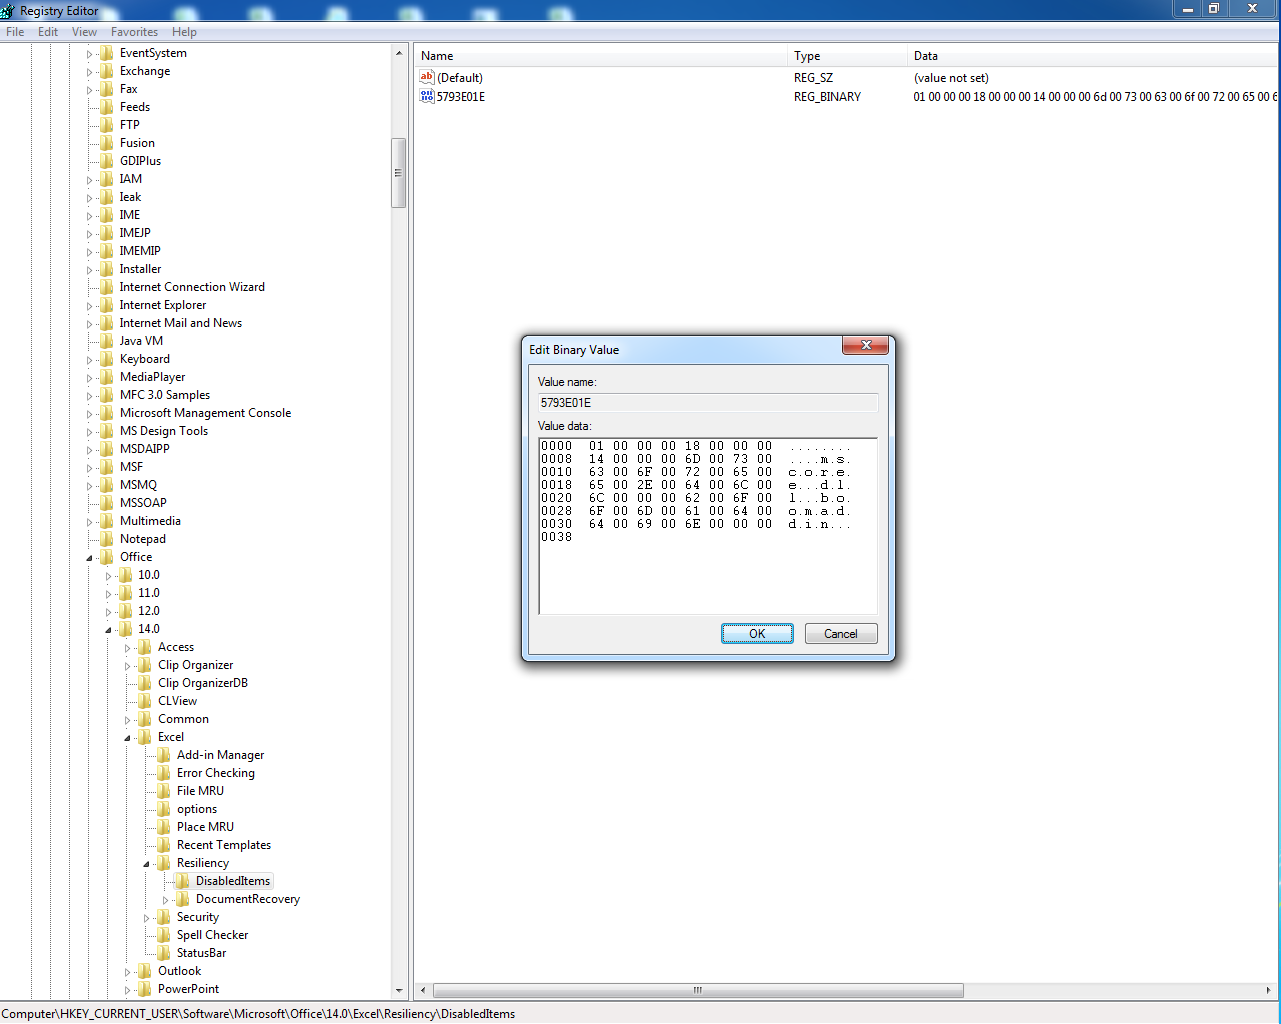
- using the Windows registry : Excel stores the disabled items list into the registry under the keys “…SoftwareMicrosoftOffice14.0ExcelResiliencyDisabledItems“, e.g. “HKEY_CURRENT_USERSoftwareMicrosoftOffice14.0ExcelResiliencyDisabledItems“. If an addin has been disabled you’ll find a binary key holding its name :

RegEdit DisabledItems Key
We can read the identity of our explosive addin : “boomaddin”.
If you want to reenable it you can either:- delete the numerical entry (here “5793E01E”)
- delete the whole “DisabledItems” key
Note that this change will be effective only for the next Excel instances, so you’ll have to restart your application to be able to load your addin as usual.

NullReferenceException thrown by the .Net (C#, VB.Net…) addin code
“Object reference not set to an instance of an object” like errors :
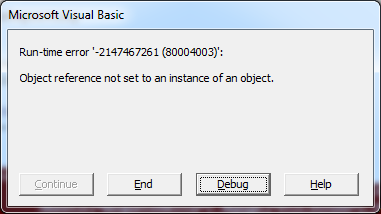
VBA Object reference error popup
generally happen when your .Net addin has not been loaded by Excel, so initialization code has not been executed (typically the part that captures the Excel application instance loading the addin).
Therefore your addin code may be naively accessing not initialized references.
Indeed you’ll typically use code like this one :
public void OnConnection(object application, Extensibility.ext_ConnectMode connectMode, object addInInst, ref System.Array custom)
{
    // keep the application object for future use
    applicationObject = application;
    addInInstance = addInInst;

    // other initialization code
}

public void DoSomething()
{
    // oops! if the addin is not loaded this code will throw a NullReferenceException
    (applicationObject as Application).ActiveCell.Value2 = "Something";
}
If the addin is not loaded the “OnConnection” method will not be called, then the “applicationObject” reference will not be initialized with the running Excel instance.
It could also happen that something is broken inside the “OnConnection” method itself preventing it from running to its end, letting the addin half-initialized (which is far more dangerous than not initialized at all as the resulting errors and behavior will be more surprising and entertaining ;)).
So you should always keep track of your addin state and notify of any inconsistency : using a simple boolean flag set to “true” at the end of initialization (typically at the end of the “OnConnection” method) should be sufficient in most cases.
So refer to point 5) to check the status of your addin.
Generic run-time errors
Sometimes you get this kind of anonymous error popup :

Excel Automation error
To make sense of this cryptic and apparently useless message you should lookup your error-code/HRESULT (here 80131524) in this list.
In this case the error was COR_E_DLLNOTFOUND due to a missing native DLL used through DllImport by the C# addin (itself called by a VBA macro).
Deployment of native DLLs often causes issues that you can troubleshoot using Dependency Walker (see my article about it).
All other unknown mystic errors
If you have any error not referenced here, for which you don’t find a solution by googling it and whose root-cause is impenetrable then, in desperation, you can try to remove any trace of your addin in your system :
- remove all the files and directories that contain the assets of your application like XLS/XLSX/XLSM spreadsheets (whose references could have been corrupted), DLLs and TLBs…
- cleanup the registry by hand by looking for all the references to your addin : DLLs and TLBs keys should be enough but you can also remove all the COM registration information of your types.
Then reinstall the addin and cross your fingers…
It should be relatively uncommon to need this : in the last year I’ve never had to go this far thanks to my better understanding of Excel addins and this kind of checklist.
Conclusion
If this article has helped you troubleshoot an issue I’d like to read your story.
If you have any remarks or suggestions about this article or if you know other errors with their standard fixes please share by letting a comment, I’ll do my best to update this article with your feedback.
Excel Add-Ins are third party components which can be installed into MS Excel anytime. It extends functionality and power of Microsoft Excel. This is a powerful automation tool that can save your hours of hard word daily. All you need to write and install an Add-In and it will run on your command to complete the given instruction.
Add-Ins are used as strong reporting, control and analysis tools. It simply gives you power to customize your Excel application to enhance its utilization beyond imagination. There is no limitations on number of Add-Ins to install in your Excel.
Add-Ins can be turned on or off anytime. Here we will learn how we can Add or install new Add-In to our Excel 2016, 2007, 2010 and 2013.
MS Excel 2007 has changed interface since Excel 2003. Although most of the functions are same but accessing menu options are a bit changed. Here is how you can as Add new Add-In to Excel 2007:
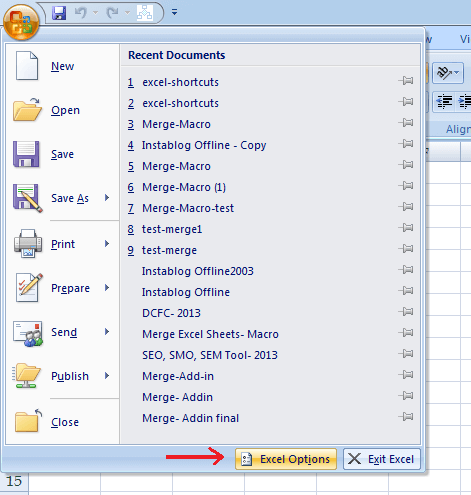
First click on the big round “Office Button” in the top left of the Excel window.
![]()
Now click on the “Excel Options” button at the bottom. You can also use the shortcut keys- ALT -> F -> I.
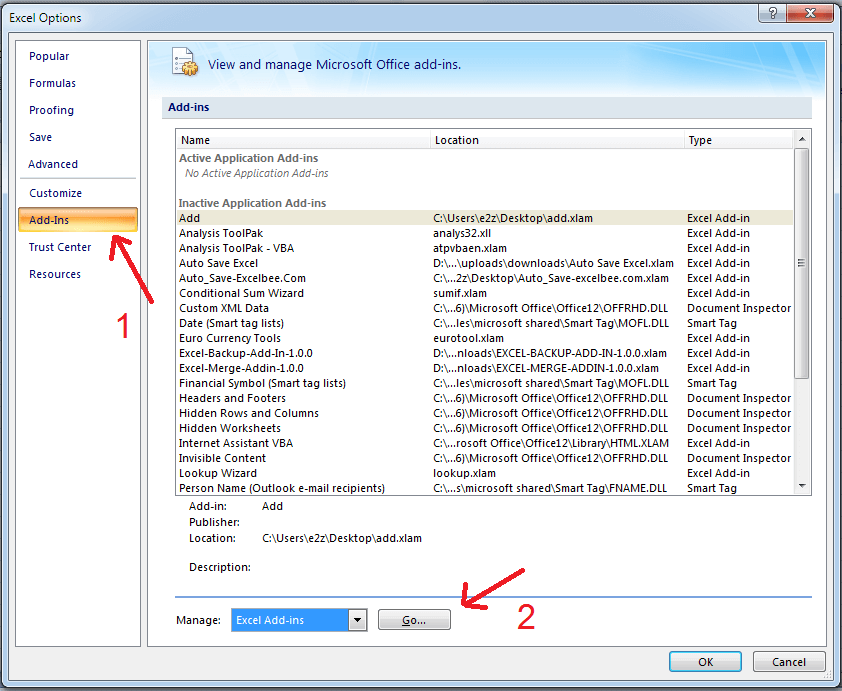
In the Excel Option window choose “Add-In” from the listed items in left panel. Check the dropdown below and select Excel Add-ins then click on go.
You will get a list of available Add-Ins by default. You may choose from the available Add-Ins and if you have additional add-In saved in your local system to install, then click on browse.
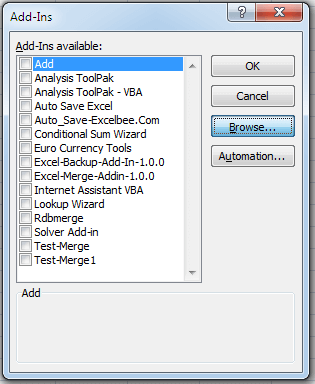
Choose the Add-In from your local system and click on “OK”. Check that the added Add-In checkbox is also checked.
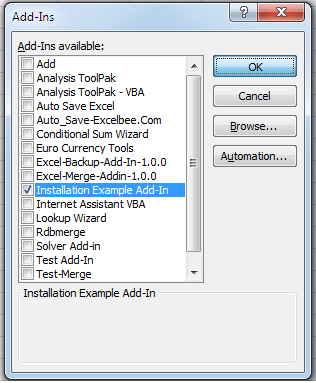
And here your Add-In is ready to use.
Installing Add-In in 2010:
Add-In installation process is almost same for both 2007 and 2010. Only difference is you need click on “File” option instead of “Office Button“” and select “Options” from the menu list instead of clicking on “Excel Options” to open “Excel Options” window in Excel 2010. Rest of the process is same as Excel 2007.
Installing Add-In in 2010:
Installing Add-In in Excel 2013 and 2016 is same as installing Add-In in 2010. So the only difference is in menu options in 2007 and 2013, rest remains same.
Hope it helps.
Was this article helpful?
YesNo
Watch Video – How to Insert and Use a Checkbox in Excel
In Excel, a checkbox is an interactive tool that can be used to select or deselect an option. You must have seen it in many web form available online.
You can use a checkbox in Excel to create interactive checklists, dynamic charts, and dashboards.
This Excel tutorial covers the following topics:
- How to Get the Developer Tab in Excel Ribbon.
- How to Insert a Checkbox in Excel.
- Examples of Using Checkboxes in Excel.
- How to Insert Multiple Checkboxes in Excel.
- How to Delete a Checkbox in Excel.
- How to Fix the Position of a Checkbox in Excel.
- Caption Name Vs. Backend Name
To insert a checkbox in Excel, you first need to have the Developer tab enabled in your workbook.
Can’t see the developer tab?
Don’t worry and keep reading!
Get the Developer Tab in Excel Ribbon
The first step in inserting a checkbox in Excel is to have the developer tab visible in the ribbons area. The developer tab contains the checkbox control that we need to use to insert a checkbox in Excel.
Below are the steps for getting the developer tab in the Excel ribbon.
Now with the Developer tab visible, you get access to a variety of interactive controls.
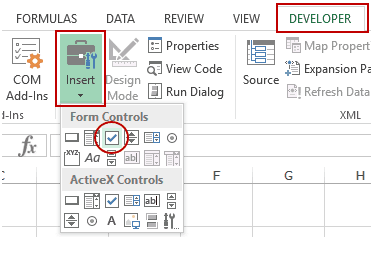
Here are the steps to insert a checkbox in Excel:
- Go to Developer Tab –> Controls –> Insert –> Form Controls –> Check Box.

- Click anywhere in the worksheet, and it will insert a checkbox (as shown below).

- Now to need to link the checkbox to a cell in Excel. To do this, right-click on the checkbox and select Format Control.

- In the Format Control dialog box, in the Control tab, make the following changes:
- Value: Checked (this makes sure that the checkbox is checked by default when you open the workbook)
- Cell Link: $A$1 (this is the cell linked to the checkbox). You can manually enter this or select the cell to get the reference.

- Click OK.


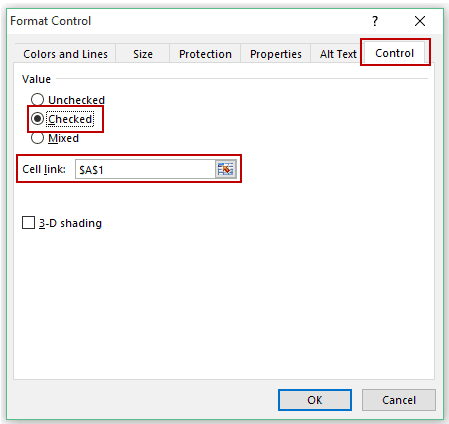
Now your checkbox is linked to cell A1, and when you check the checkbox, it will show TRUE in cell A1, and when you uncheck it, it will show FALSE.

Examples of Using a Checkbox in Excel
Here are a couple of examples where you can use a checkbox in Excel.
Creating an Interactive To-Do List in Excel
Below is an example of a To-Do list that uses checkboxes to mark the task as complete.
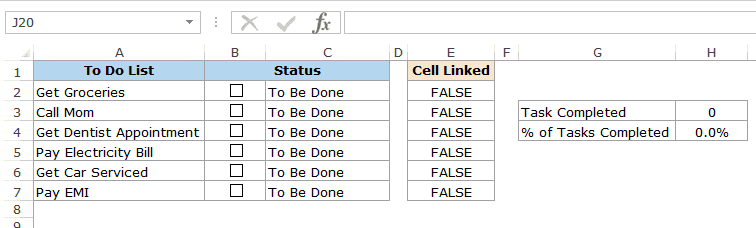
A couple of things are happening in the example above:
- As soon as you check the checkbox for an item/task, the status changes to Done (from To be Done), the cell gets a green shade, and the text gets a strikethrough format.
- The value of the cell link for that checkbox changes from FALSE to TRUE.
- The ‘Task Completed’ and ‘% of Task Completed’ numbers (in cell H3 and H4) change based on how many tasks have been marked as completed.
Here is how to make this:
- Have the activities listed in cell A2:A7.
- Insert checkboxes and place it in cell B2:B7.
- Link these checkboxes to cell E2:E7. There is no way to link all the checkboxes at one go. You’ll have to manually link each checkbox one by one.
- In cell C2, enter the following formula: =IF(E2,”Done”,”To Be Done”) and drag for all the cells (C2:C7).
- In cell C2:C7, apply conditional formatting to give the cell a green background color and strikethrough format when the value in the cell is Done.
- In cell H3, use the following formula: =COUNTIF($E$2:$E$7,TRUE)
- This will count the total numbers of tasks that have been marked as completed.
- In cell H4, use the following formula: =COUNTIF($E$2:$E$7,TRUE)/COUNTIF($E$2:$E$7,”<>”)
- This will show the percentage of tasks completed.
Click here to download the checklist.

Creating a Dynamic Chart in Excel
You can use an Excel checkbox to create a dynamic chart as shown below:
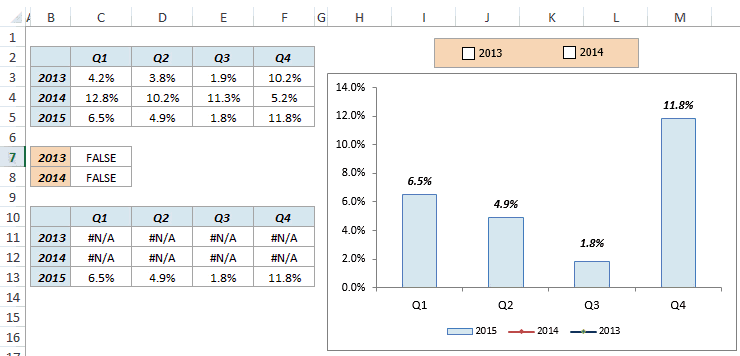
In this case, the checkbox above the chart is linked to cell C7 and C8.
If you check the checkbox for 2013, the value of cell C7 becomes TRUE. Similarly, if you check the checkbox in for 2014, the value of cell C8 becomes TRUE.
The data used in creating this chart is in C11 to F13. The data for 2013 and 2014 is dependent on the linked cell (C7 and C8). If the value in cell C7 is TRUE, you see the values in C11:F11, else you see the #N/A error. Same is the case with data for 2014.
Now based on which checkbox is checked, that data is shown as a line in the chart.
Click here to download the dynamic chart template.
Inserting Multiple Checkboxes in Excel
There are a couple of ways you can insert multiple checkboxes in the same worksheet.
#1 Inserting a Checkbox using the Developer Tab
To insert more than one checkbox, go to the Developer Tab –> Controls –> Insert –> Form Controls –> Check Box.
Now when you click anywhere in the worksheet, it will insert a new checkbox.
You can repeat the same process to insert multiple checkboxes in Excel.
Note:
- The checkbox inserted this way are not linked to any cell. You need to manually link all the checkboxes.
- The checkbox would have different caption names, such as Check Box 1 and Check Box 2, and so on.
#2 Copy Pasting the Checkbox
Select an existing checkbox, copy it and paste it. You can also use the keyboard shortcut (Control + D).
Note:
- The copied checkboxes are linked to the same cell as that of the original checkbox. You need to manually change the cell link for each checkbox.
- The caption names of all the copied checkboxes are the same. However, the backend name would be different (as these are separate objects).
#3 Drag and Fill Cells with Checkbox
If you have a checkbox in a cell in Excel and you drag all fill handle down, it will create copies of the checkbox. Something as shown below:

Note:
- The caption names of all the new checkboxes are the same. However, the backend name would be different (as these are separate objects).
- All these checkboxes would be linked to the same cell (if you linked the first one). You need to manually change the link of all these one by one.
Deleting the Checkbox in Excel
You can easily delete a single checkbox by selecting it and pressing the delete key. To select a checkbox, you need to hold the Control key and the press the left button of the mouse.
If you want to delete multiple checkboxes:
- Hold the Control key and select all the ones that you want to delete.
- Press the Delete key.
If you have many checkboxes scattered in your worksheet, here is a way to get a list of all the checkbox and delete at one go:
Note: The selection pane displays all the objects of the active worksheet only.
How Fix the Position of a Checkbox in Excel
One common issue with using shapes and objects in Excel is that when you resize cells or hide/delete rows/columns, it also affects the shapes/checkboxes. Something as shown below:

To stop the checkbox from moving around when you resize or delete cells, do the following:
Now when you resize or delete cells, the checkbox would stay put.
Caption Name Vs. Name
When you insert a checkbox in Excel, you see a name in front of the box (such as Check Box 1 or Check Box 2).
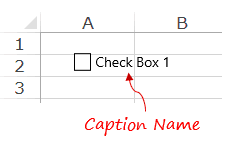
This text – in front of the box – is the Caption Name of the checkbox. To edit this text, right-click and select the ‘Edit Text’ option.

While you see the new text, in the backend, Excel continues to refer to this checkbox as Check Box 1.
If you select the checkbox and look at the Name Box field, you will see the name Excel uses for this checkbox in the backend.
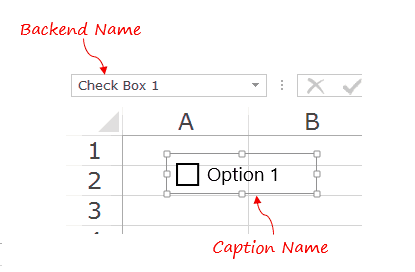
You can easily change this backend name by first selecting the checkbox in the worksheet and then typing the name in the name box (the naming rules are same as that of named ranges).
See Also: How to Insert a Checkbox in Google Sheets.
You May Also Like the Following Excel Tutorials:
- Inserting Checkmark in Excel.
- Create Dynamic Chart using Checkbox.
- Create Checklists using Checkbox in Excel.
- VBA Guide to Using Checkboxes in Excel.
- How to Insert a Scroll Bar in Excel.
- How to Insert and Use a Radio Button in Excel.
In some – admittedly rare – cases you might want to check if a cell is visible in Excel. Visible means that neither the row or column is hidden nor the row or column is grouped and collapsed. In this article, you can find three method for this.
Example and goal
Let’s take a look at a simple example: We want to know with an Excel formula, if cell C5 is currently visible or not.

If cell C5 is visible, we want to return TRUE or FALSE if it is hidden. Hidden means that
- that the row or column is hidden or,
- that the row or column is grouped and collapsed.
Method 1: Use the SUBTOTAL function
Excel doesn’t have a direct function to check if a cell is visible or not. But there is a workaround – that comes with some restrictions.

As you can see, the function is not too long. You just have to replace C5 with your cell reference:
=IF(SUBTOTAL(103,C5)=1,TRUE,FALSE)Explanation: The SUBTOTAL function returns the number of cells that are visible and not empty. The IF function around helps to return the correct values TRUE or FALSE. You can – of course – also return other values.
And this is already one of the major restrictions: If the cell is empty (but visible) the formula also returns FALSE.
The following extension catches this error but does not solve it entirely:
=IF(C5="","Cell empty, check not possible",IF(SUBTOTAL(103,C5)=1,TRUE,FALSE))The second restriction is that it only works if the row is hidden. It does not regard columns. So, if the column is hidden (or grouped and collapsed), the function still returns TRUE.
Method 2: VBA Macro to check if a cell is visible
The second method uses a short VBA macro. Just copy and paste the following code into a new VBA module (here is are the steps for that).
Function ProfessorExcelCellIsVisible(cell As Range)
    On Error Resume Next
    Application.Volatile

    Dim visible As Boolean
    visible = True

    If cell.EntireColumn.Hidden = True Then visible = False

    If cell.EntireRow.Hidden = True Then visible = False

    ProfessorExcelCellIsVisible = visible

End Function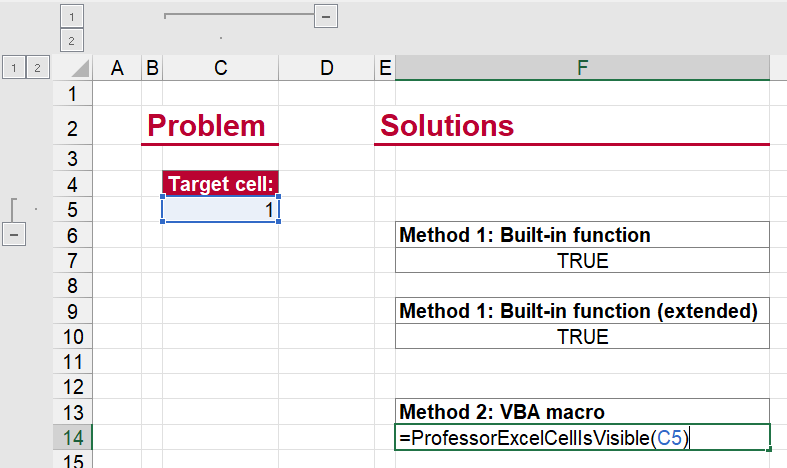
In your Excel file, you can now use this function:
=ProfessorExcelCellIsVisible(C5)Do you want to boost your productivity in Excel?
Get the Professor Excel ribbon!

Add more than 120 great features to Excel!
Method 3: Use an Excel add-in to check if a cell is visible
The third method is probably the most convenient one: Quickly install Professor Excel Tools, our Excel add-in with more than 120 features, and use the built-in function. You don’t even have to buy a license because the built-in Excel function are free to use. Sounds great, right?
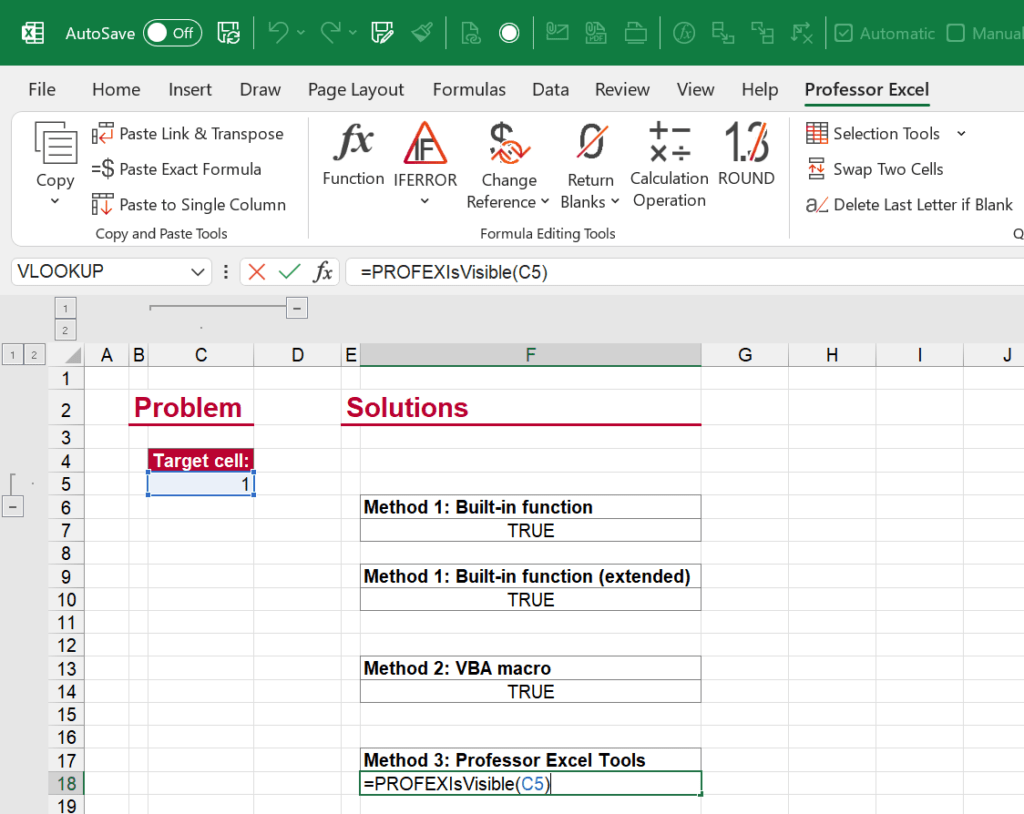
So, how does it work? After you have installed Professor Excel Tools (you will see a new ribbon called “Professor Excel”), just type the following function into an Excel cell:
=PROFEXIsVisible(C5)
This function is included in our Excel Add-In ‘Professor Excel Tools’
(No sign-up, download starts directly)
Download
Please feel free to download all the examples from above in this Excel file.
Image by Kevinsphotos from Pixabay

Henrik Schiffner is a freelance business consultant and software developer. He lives and works in Hamburg, Germany. Besides being an Excel enthusiast he loves photography and sports.
ErrorCheckingOptions
Excel offers Error checking options to trap worksheet errors like Empty Cells Error, Evaluate to error, Inconsistent formula error etc. These errors can be captured by enabling ErrorcheckingOptions in Excel by following below steps or using VBA (Visual Basic for Applications)
Enable Error Checking
- Navigate to File menu
- Click on Options
- Navigate Formula tab
- Check necessary Error checking rules as shown below like you can change color for default error in the sheet
Error Rules

Properties
All error options can be trapped from Errors collection object exposed by Range object by iterating Item method which takes a valid constant against each error.
BackgroundChecking
If cell formula pointing to empty cell reference the AutoCorrect option appears in Excel
Code example
Public Sub ErrorBackgroundCheckingOptionsExample()

    'Enable background error checking
    Application.ErrorCheckingOptions.BackgroundChecking = True

End Sub
Output

EmptyCellReferences
It is similar to Backgroundchecking property but shows Empty cell error under AutoCorrect popup.
Code example
Public Sub EmptyCellReferencesCodeExample()

    'Declare range object
    Dim oRange As Range

    'Bind selection reference object
    Set oRange = Selection

    'Enable empty cell reference
    Application.ErrorCheckingOptions.EmptyCellReferences = True

    If oRange.Errors.Item(xlEmptyCellReferences).Value = True Then
        Debug.Print "Empty cell reference is on"
    End If

    'Memory cleanup
    Set oRange = Nothing
End Sub
Output

EvaluateToError
Excel engine evaluate formulas for the cells containing error. This property enables AutoCorrect option as shown below when set to True.
Code example
Public Sub EvaluateToErrorCodeExample()

    'Declare range object
    Dim oRange As Range

    'Bind selection reference object
    Set oRange = Selection

    'Enable background error checking
    Application.ErrorCheckingOptions.EvaluateToError = True

    'Check evaluate to error option
    If oRange.Errors.Item(xlEvaluateToError).Value = True Then
        Debug.Print "Evaluate to Error cell reference is on"
    End If

    'Memory cleanup
    Set oRange = Nothing
End Sub
InconsistentFormula
This property helps identifying inconsistency within formulas if sets to True
Public Sub InconsistentFormulaCodeExample()

    'Declare range object
    Dim oRange As Range

    'Bind selection reference object
    Set oRange = Selection

    'Enable background error checking
    Application.ErrorCheckingOptions.InconsistentFormula  = True

    'Check evaluate to error option
    If oRange.Errors.Item(xlInconsistentFormula).Value = True Then
        Debug.Print "InconsistentFormula cell reference is on"
    End If

    'Memory cleanup
    Set oRange = Nothing
End Sub
Output


IndicatorColorIndex
Takes two constants xlColorIndexAutomatic which indicates default behavior or error checking color indicator and xlColorIndexNone which indicates not color index set.
Code example
Public Sub IndicatorColorIndexCodeExample()
    'Declare range object
    Dim oRange As Range

    'Bind selection reference object
    Set oRange = Selection

    'Validate error checking options color indicator
    If Application.ErrorCheckingOptions.IndicatorColorIndex = xlColorIndexAutomatic Then
        Debug.Print "Error checking color indicator set to Automatic mode"
    Else
        Debug.Print "Error checking color indicator not set"
    End If

    'Memory cleanup
    Set oRange = Nothing
End Sub
NumberAsText
This property helps identifying numbers which are punched as text within a cell when sets to True and enables AutoCorrect popup as shown below
Code example
Public Sub NumberAsTextCodeExample()
    'Declare range object
    Dim oRange As Range

    'Bind selection reference object
    Set oRange = Selection

    'Enable number as text error checking option
    Application.ErrorCheckingOptions.NumberAsText = True

    'Validate error checking options Number as text
    If oRange.Errors.Item(xlNumberAsText).Value = True Then
        Debug.Print "Error checking Number as text is On"
    Else
        Debug.Print "Error checking Number as text is Off"
    End If

    'Memory cleanup
    Set oRange = Nothing
End Sub
Output

OmittedCells
Cells which contain such formulas pointing to a range that excludes close or adjacent cells which possibly can be included, AutoCorrect popup gets enabled to help user as shown below where we are doing SUM over B2:B4 and left B5 hence Sum cell shows Omitted Cells error
Code example
Public Sub OmittedCellsCodeExample()
    'Declare range object
    Dim oRange As Range

    'Bind selection reference object
    Set oRange = Selection

    'Enable Omitted Cells error checking option
    Application.ErrorCheckingOptions.OmittedCells = True

    'Validate error checking options Omitted Cells
    If oRange.Errors.Item(xlOmittedCells).Value = True Then
        Debug.Print "Error checking Omitted Cells is On"
    Else
        Debug.Print "Error checking Omitted Cells is Off"
    End If

    'Memory cleanup
    Set oRange = Nothing
End Sub
Output

TextDate
This property enables error checking for two digits year within a cell having date when sets to True and enables AutoCorrect popup.
Code example
Public Sub TextDateExample()

    'Declare range object
    Dim oRange As Range

    'Bind selection reference object
    Set oRange = Selection

    'Enable Text Date error checking
    Application.ErrorCheckingOptions.TextDate = True

    'Check two digits year
    If oRange.Errors.Item(xlTextDate).Value = True Then
        Debug.Print "Text Date error check is on"
    End If

    'Memory cleanup
    Set oRange = Nothing
End Sub
Output

UnlockedFormulaCells
This property enables check for unlocked cells having formula when sets to True, enables AutoCorrect popup as shown below in output
Code example
Public Sub UnlockedFormulaCellsExample()

    'Declare range object
    Dim oRange As Range

    'Bind selection reference object
    Set oRange = Selection

    'Enable Text Date error checking
    Application.ErrorCheckingOptions.UnlockedFormulaCells = True

    'Lock the cell
    oRange.Locked = False

    'Memory cleanup
    Set oRange = Nothing
End Sub
Output

Note: ErrorCheckingOptions object exposed by Application object and most of the properties are boolean type
VBA Error object
Trapping error in VBA depends on the developer what approach he decides. VBA offers two types of error trapping:
- In-Line: this trapping trick is used before code execution where user suspects that given statement may result to certain error. Mostly common error trapping which can be used as:
- On Error Resume Next
- Procedure or function level: this error mechanism implements error trapping on entire code block written under a procedure or function using GoTo statement which requires a label or Zero. Commonly used statement as given below which raise a default error determined by VBA compiler:
- On Error GoTo 0
- Centralize Error trapping: Create a common function and call it through all the modules to trap the error
Procedure/Function Error
Public Sub ProcedureLevelErrorTrapping()
    On Error GoTo myError

    'code to be executed

'Define lable
myError:
'Define Error
If Err.Number <> 0 Then
    Debug.Print Err.Description
End If
End Sub
In above code we have used “myError” label hence whenever code execution encounters an error the control will shift to myError label and evaluate the error. A label must be attached by : (double colon)
Err.Raise
Allows developer to raise own error or customize error as shown below.
Syntax
Err.Raise(Number, Source, Description, HelpFile, HelpContext
Code example
Public Sub ErrorRaiseExample()
    Dim A As Integer
    Dim B As Integer
    A = 5
    B = 5

    'Check if A is equal to B
    If A = B Then
        Err.Raise Number:=123, Description:="A cannot be equal to B"
    End If

End Sub
Output

Err.Clear
Some times uses may require to continue execution exceptionally, the Clear method will allow user to clear or suppress the error.
Code example
Public Sub ClearErrorExample()
    On Error GoTo myError

    'code to be executed

'Define lable
myError:
'Define Error
If Err.Number <> 0 Then
    'Clear error
    Err.Clear
End If
Err.Number
Each error in VBA has a unique number to be identified. User can trap errors with the help of Error number and take necessary action as shown below where we try to perform division between Integer and String and Error Number 13 would be generated by compiler which is known for Type Mismatch.
Code example
Public Sub ErrorNumberExample()
    On Error GoTo myError

    Dim a As Integer
    Dim b As String
    a = 5
    b = "k"

    Debug.Print a / b

'Define lable
myError:
'Define Error
If Err.Number = 13 Then
    MsgBox "You are trying to perform operation between cross data types"
End If
End Sub
Output

There are various properties offered by Err object in VBA (Visual Basic for Applications) as listed below:
- Description
- HelpContext
- HelpFile
- LastDllError
- Source
Looks like my prequisites are OK. In Excel—>Options—>Add Ins—>Com Add Ins Dax Studio does not show up. Here is the checker log:
Checking Operating System
OSCaption       = Microsoft Windows 10 Enterprise
OSVersion       = 10.0.14393
OSArchitecture  = 64-bit
VisibleMemoryGB = 15.90
FreeMemoryGB    = 11.13

Culture Name              = en-US
Culture DisplayName       = English (United States)
Culture EnglishName       = English (United States)
Culture 2-Letter ISO Name = en
Culture DecimalSeparator  = .
Culture GroupSeparator    = ,
Culture CurrencySymbol    = $
Culture ShortDatePattern  = M/d/yyyy
Checking .Net Framework
v2.0.50727 -> 2.0.50727.4927
v2.0.507271033 -> 2.0.50727.4927
v3.0 -> 3.0.30729.4926
v3.0Setup -> 3.0.30729.4926
v3.0Setup1033 -> 3.0.30729.4926
v3.0SetupWindows Communication Foundation -> 3.0.4506.4926
v3.0SetupWindows Presentation Foundation -> 3.0.6920.4902
v3.5 -> 3.5.30729.4926
v3.51033 -> 3.5.30729.4926
v4Client -> 4.7.02053
v4Client1033 -> 4.7.02053
v4Full -> 4.7.02053
v4Full1033 -> 4.7.02053
v4.0Client -> 4.0.0.0
Checking AMO
PASS > Microsoft.AnalysisServices, Version=13.0.0.0, Culture=neutral, PublicKeyToken=89845dcd8080cc91
PASS > Microsoft.AnalysisServices, Version=14.0.0.0, Culture=neutral, PublicKeyToken=89845dcd8080cc91
WARN > Could not load file or assembly 'Microsoft.AnalysisServices, Version=15.0.0.0, Culture=neutral, PublicKeyToken=89845dcd8080cc91' or one of its dependencies. The located assembly's manifest definition does not match the assembly reference. (Exception from HRESULT: 0x80131040)
Checking ADOMD.NET
PASS > Microsoft.AnalysisServices.AdomdClient, Version=13.0.0.0, Culture=neutral, PublicKeyToken=89845dcd8080cc91
PASS > Microsoft.AnalysisServices.AdomdClient, Version=14.0.0.0, Culture=neutral, PublicKeyToken=89845dcd8080cc91
WARN > Could not load file or assembly 'Microsoft.AnalysisServices.AdomdClient, Version=15.0.0.0, Culture=neutral, PublicKeyToken=89845dcd8080cc91' or one of its dependencies. The located assembly's manifest definition does not match the assembly reference. (Exception from HRESULT: 0x80131040)
Dax Studio Configuration
Path: "C:Program FilesDAX StudioDaxStudio.exe"
Processing DaxStudio.exe.config file...
Path: 'C:Program FilesDAX StudioDaxStudio.exe.config'
Bindings Found: 9
AMO : 13.0.0.0
ADOMD : 13.0.0.0
Checking Excel Add-in
Detected Excel Version: 16 - Excel_v16
Excel Path: C:Program FilesMicrosoft OfficeRootOffice16EXCEL.EXE
Excel Architecture: x64

DAX Studio Excel Add-in Registry keys
   Description: Dax Studio Excel Add-In
   FriendlyName: Dax Studio Excel Add-In
   Manifest: file:///C:/Program Files/DAX Studio/DaxStudio.vsto|vstolocal
   LoadBehavior: 3

Checking for Excel 2010 Disabled Add-ins
  PASS > No Disabled items found.
Checking for Excel 2013 Disabled Add-ins
  PASS > No Disabled items found.
Checking for Excel 2016 Disabled Add-ins
  PASS > No Disabled items found.

Attempting to load Excel Add-in:
  PASS > Loaded Excel Add-in: DaxStudio, Version=2.7.4.102, Culture=neutral, PublicKeyToken=null

Checking VSTO Configuration
Architecture: x64
FATAL ERROR:
Object reference not set to an instance of an object.
at DaxStudio.Checker.Checker.CheckVSTO()
at DaxStudio.Checker.Checker.CheckExcelAddin()
at DaxStudio.Checker.MainWindow.OnLoaded(Object sender, RoutedEventArgs e)