
Source text:
Result of checking:
…
Sometimes it happens that in a text written in Latin, Unicode letters are somehow embedded (French, Japanese, etc.). Previously, SEO-specialists sinned this, which, in order to reduce text spamming, changed equivalent Latin letters in Unicode in repeated words («c» to «с», «e» to «é», «s» to «ś», etc.).
This free unicode characters detector tool will help you check the text for the contents of characters in another layout and highlight the letters found.
0 comments
You must be logged to leave a comment.
Popular SEO Tools / All Tools
|
|
|
|
|
|
|
|
|
|
|
|
|
|
|
|
|
|


<< Back
As one would expect, Microsoft Word includes a feature to count the words in a document; it also includes the ability to count the characters. Knowing the character count of a document is important for any business owner. For example, as a freelance writer your client may have specific character counts they want you to obtain; for other business owners, perhaps the contact form for your client is character-count specific. When you need to check the character count in Microsoft Word, you can do so in the same way you check the word count.
-
Open the document in Word that you want to count the characters in.
-
Click the «Review» tab.
-
Click «Word Count» in the Proofing section. The Word Count window opens and displays the numbers of characters in the document with and without spaces.
-
Click «Close» to close the Word Count window.
![]()
Download Article
Proofread and spell check your Microsoft Word documents with this user-friendly guide
![]()
Download Article
- Running a Spelling Check
- Correcting Errors as You Type
- Using the Mobile App
- Video
|
|
|
Microsoft Word has a built-in spellchecker for all your important documents and assignments. To find it, click the «Review» tab, click the down arrow next to «Spelling and Grammar,» and then choose «Spelling.» If you’re ever unsure about a spelling, Word will also point out any errors with a red squiggly line. Grammar is also automatically checked and indicated by a blue or green line. This wikiHow teaches you how to do a spelling and grammar check in Microsoft Word using your Windows, Mac, iPhone, iPad, or Android device.
Things You Should Know
- To run a spell check, click the «Review» tab. Click the down-arrow next to «Spelling and Grammar» and select «Spelling».
- Click a suggestion to apply it, or click «Ignore once», «Ignore all», or «Add to dictionary».
- On mobile, find a word with a red squiggly line underneath it. Tap a suggestion from the pop-up menu.
-
1
-
2
Click Review. This is at the top toolbar, between Mailings and View.
Advertisement
-
3
Click the down-arrow next to «Spelling and Grammar». A pop-up menu will open.
-
4
Select Spelling. The Editor panel will open on the right side.
- If you want to check both spelling and grammar at the same time, skip this step and click the abc icon instead
- You can also press F7 on your keyboard to quickly open the Editor panel. When it’s open, click Spelling.
-
5
View any errors. The Editor panel will show the nearest spelling (or grammar) error.
- Spelling errors will appear in red, while grammatical errors will appear in blue or green, depending on your version.
-
6
Apply an action. Below the error in the Editor panel, you’ll see suggested spellings along with three options: Ignore once, Ignore all, and Add to dictionary.
- To fix a mistake, click a correction in the suggestion list.
- If you don’t see any suggestions, Word’s dictionary was not able to find a similar replacement. You’ll need to delete the word and type it again.
- To skip this instance of the error, click Ignore. To skip all instances of this error in the document, click Ignore All.
- If you don’t want Word to ever report a certain spelling as incorrect, click Add to dictionary.
- To fix a mistake, click a correction in the suggestion list.
-
7
Select actions for the remaining errors. After you choose an option for the first error, Word will automatically take you to the next. When no more errors are found, you’ll see a confirmation message that says the spelling and grammar check is finished.
-
8
Click X to close the tool. Be sure to save your document when you’re finished.
Advertisement
-
1
Open a project in Microsoft Word. This looks like a W on top of a blue square.
-

2
Look for words or phrases underlined in red, green, or blue. Word is set up to check your spelling and grammar automatically as you type.[1]
- Spelling mistakes are underlined with a red squiggly line.
- Grammar issues are underlined with a blue or green line.
-
3
Click an error. A menu will open.
- You can also right-click the error for more options.
-
4
Select an action. You’ll see a few suggestions at the top of the menu.
- To replace an error with one of the suggestions in the menu, click it now.
- To ignore the error and remove its squiggly underline, click the slashed circle icon.
- To add the spelling to your dictionary, click the book icon.

Advertisement
-
1
Open the Microsoft Word app. Word is available for iOS in the App Store and for Android in the Google Play Store.
-
2
Enable spell check. Word should automatically have this enabled, but if it isn’t, do the following:
- Tap the edit icon. This looks like a pencil in front of an A.
- Tap Home.
- Tap Review.
- On Android, tap Spelling. On iOS, tap Proofing Tools and toggle on Spelling.
-
3
Look for words or phrases underlined in red. Word is set up to check your spelling automatically as you type.
-
4
Tap an error. A pop-up menu will open with suggestions and actions.
-
5
Select an action. Tap a suggestion to quickly apply it.
- Tap Learn to add the spelling to your device’s dictionary.
- Tap Cut or Delete to delete the word.
Advertisement
Ask a Question
200 characters left
Include your email address to get a message when this question is answered.
Submit
Advertisement
Video
Thanks for submitting a tip for review!
References
About This Article
Article SummaryX
1. Click Review.
2. Click Spelling & Grammar.
3. Select an action.
4. Repeat for all errors.
5. Click OK when finished.
Did this summary help you?
Thanks to all authors for creating a page that has been read 41,546 times.
Is this article up to date?
Everyday in business or in other fields there are lots of information or documentation files that are required to store for future use. For anyone, it is very difficult to store that information for a long time. Earlier letters, office files, documents, projects, and information are stored in a form of registrar, file, or by paperwork but finding it may be difficult for us. It takes a lot of time. To resolve this issue Microsoft brings software called MS Word.
Microsoft Word is a software tool that allows users to create documents like articles, letters, projects files very easily. It has various features like editing and formatting, graphics, designs, fonts styles, printing documents, etc.
Features of MS Word
- Various Page Designs, page numbers, border
- Tables
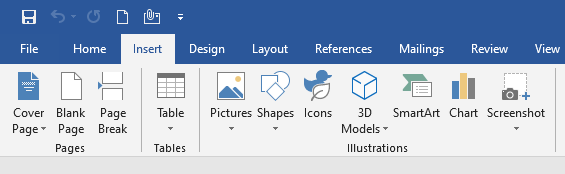
- 3D models, chart, and icons
- WordArt
- Page Layout formats
- Inserting Online pictures and video
- Text color and many more.
- Date and Time
- Page Designs
- Different text fonts
What is Spell Checker in MS Word?
Microsoft Word has a special feature called spell check that allows you to check spelling and grammatical mistakes that you made in the document. Basically spell check is a software tool that identifies the misspelled words present in the document. It also allows you to search a particular word in the document that you know you’ve misspelled in the whole document.
In Microsoft Word documents, Word’s spell check function is set to automatically check your spelling while you type. Errors in your document will have color-coded underlines reflecting your choices, like red for spelling errors, green for grammar errors, and blue for contextual spelling errors.

Steps to enable Spell Checker in MS Word
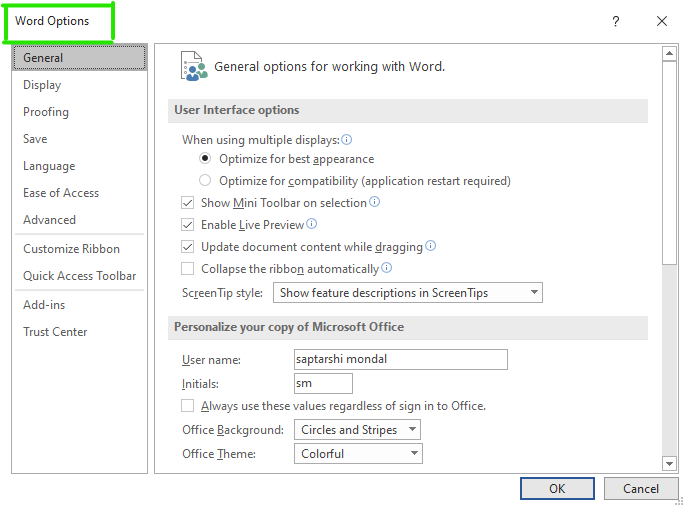
Step 1: On the navigation menu bar click on the File option.

Step 2: Next click on the option button as shown in the figure:

Step 3: A word option dialog box will appear on the screen.
Step 4: Now select the Proofing option from the left menu as shown in the figure:
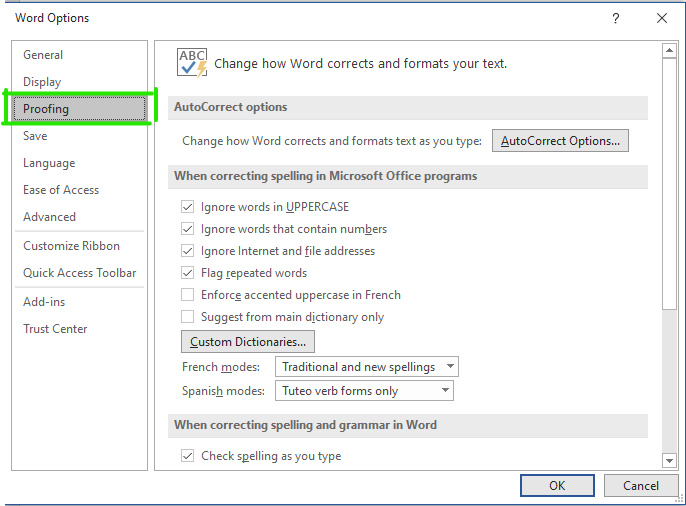
Step 5: Check all boxes as shown in the figure:
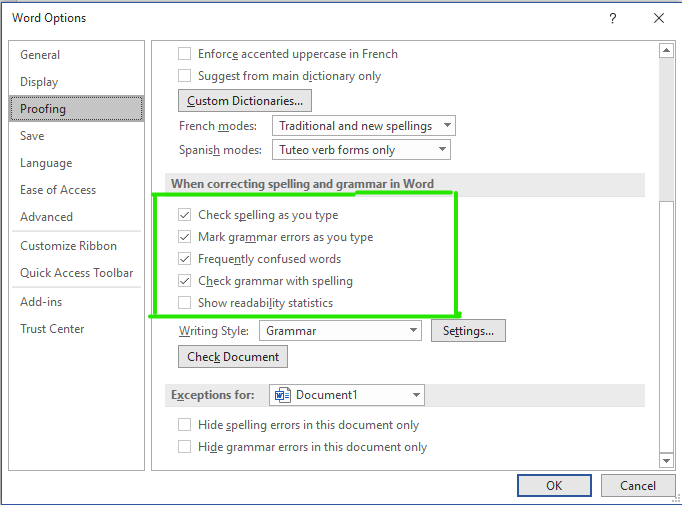
Step 6: Next click on the OK button.
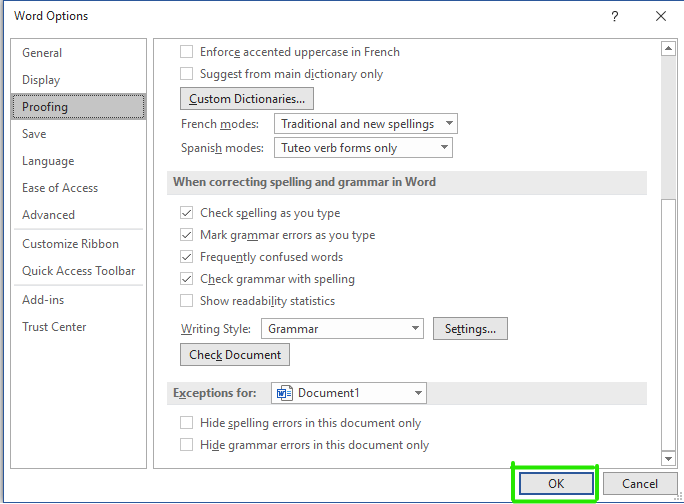
Finally, Spell Check is enabled in MS Word.
How to Manually Check Spellings
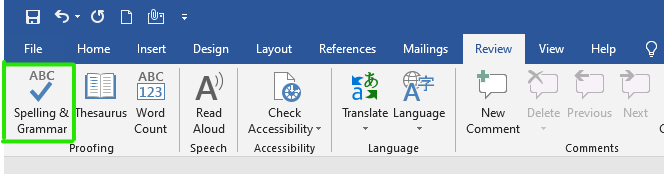
Step 1: On the navigation menu bar click on the Review option.
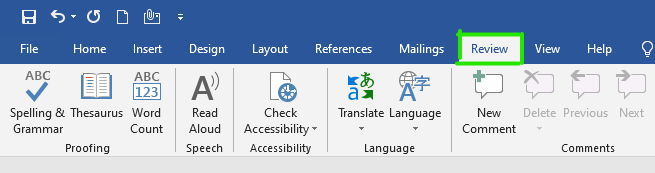
Step 2: Next click on the spellings & grammar option as shown in the figure:

Note – If there is any spelling or grammatical mistake in your Word document, then the following dialog box appears with misspelled words present in the red underlined text.

Step 3: If there is a spelling mistake in the document then it will appear in the red underline text as shown in the figure:

Step 4: Select the correct spelling from the suggestion menu.

Step 5: Next click on the YES option.

Note: If all spellings are correct in your Word document, then the following pop-up window will appear on the screen.
Step 6: Click on the OK option.

Finally, all the spellings and grammars are manually checked.
Shortcut Method to Check Spellings
Step 1: Right-click on the red-underlined word.

A menu with correctly spelled options will appear in which you can select the correct word or you can ignore it.
Step 2: Now choose the correct spelling from the menu as shown in the figure:

These are some of the ways to enable the spell check feature in MS Word.
All Microsoft Office programs can check spelling, and most can check grammar.
Using Microsoft 365? You may be interested in checking out the powerful new Editor feature in Word! See Editor — your writing assistant for more information.
Run the spelling and grammar checker
To start a check of the spelling and grammar in your document, just press F7.
Click a heading below for more information
Most Office programs automatically check for potential spelling and grammatical errors as you type, so you don’t need to do anything to show errors while you work.
Notes:
-
Automatic spelling and grammar checking is not available in Access, Excel, or Project. You can manually start a spell check by pressing F7.
-
Automatic grammar checking is available only in Outlook, Word, and PowerPoint 2013 (or newer).
Office marks potential spelling errors with a red squiggly line, and potential grammatical errors are marked with a blue squiggly line.
If spelling or grammatical errors aren’t marked, automatic checking might be turned off. You can turn on the automatic spelling and grammar checker.
When you see a spelling or grammatical error that you want assistance fixing, right-click on the underlined word or phrase and choose one of the options to fix the error.
If Office is flagging words as misspelled but you have it spelled the way you want it, select Add to Dictionary to teach Office not to flag that word as misspelled in the future. For more information on this see: Add or edit words in a spell check dictionary.
If you don’t want Office to mark potential errors with squiggly lines while you are working, you can turn automatic spelling and grammar checking off:
-
Open the spelling and grammar options:
-
In OneNote, PowerPoint, Publisher, Visio, and Word: On the File menu, click Options, and then click Proofing.
-
In InfoPath: On the Home tab, click the arrow next to or under Spelling, and then click Spelling Options.
-
In Outlook: On the File menu, click Options, and click Mail, and then click Spelling and Autocorrect.
-
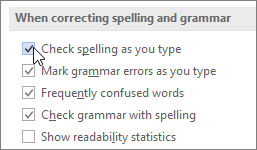
-
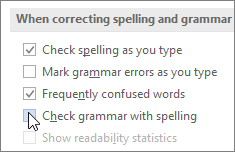
Select or clear the Check spelling as you type check box. In programs that have automatic grammar checking, you may also select or clear the Mark grammar errors as you type check box.
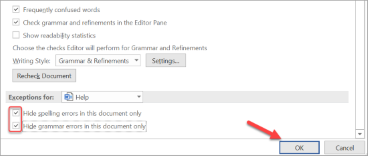
Note: In Word, you can turn the spelling checker on or off for only the document you’re currently working with or for all new documents. Select an option in the Exceptions for list, and then select or clear the Hide spelling errors in this document only and Hide grammar errors in this document only check boxes.
If you don’t want Office to check grammar at all (either when running a spell check or automatically as you type), you can turn it off:
-
Open the spelling and grammar options:
-
In OneNote, PowerPoint, Publisher, Visio, and Word: On the File menu, click Options, and then click Proofing.
-
In InfoPath: On the Home tab, click the arrow next to or under Spelling, and then click Spelling Options.
-
In Outlook: On the File menu, click Options, and click Mail, and then click Spelling and Autocorrect.
-
-
Clear the Mark grammar errors as you type and Check grammar with spelling check boxes.
Note: Not every Office program will have both of these options.
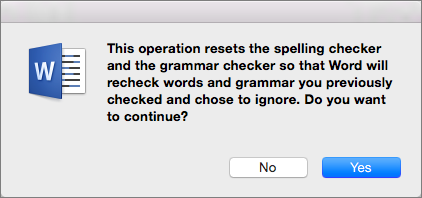
In Word, Outlook, PowerPoint 2013 (or newer), you can force a recheck of the words and grammar that you previously skipped by doing the following:
-
Open the document or item that you want to check.
-
On the File menu, click Options > Proofing> Recheck Document. In Outlook you’ll find this under File > Options > Mail > Spelling and Autocorrect
-
Click Yes when you see the warning message about resetting the spelling and grammar checker.
-
Click OK in the dialog box to get back to the document, and then run the spelling and grammar checker again.
See Also
Check spelling and grammar in a different language.
Test your document’s readability
The spelling and grammar checker isn’t working as expected
Select grammar and writing style options in Office 2013 and earlier
Add words to your spell check dictionary
The spelling or grammar checker isn’t checking words in a different language correctly
Choose AutoCorrect options for capitalization, spelling, and symbols
Check spelling before sending a message in Outlook
Learn how to get more from Editor with Microsoft 365
Office for Mac applications automatically check for potential spelling and grammatical errors as you type. If you’d rather wait to check spelling and grammar until you’re done writing, you can turn off automatic checking, or you can check spelling and grammar all at once.
Word
Check spelling and grammar automatically as you type
Word marks potential spelling errors with a red squiggly line, and potential grammatical errors are marked with a green squiggly line.
Tip: If spelling or grammatical errors aren’t marked, you might need to turn on automatic spelling and grammar checking, which is explained in the next procedure.
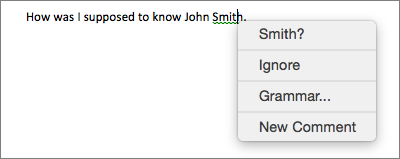
When you see a spelling or grammatical error, Control click the word or phrase and choose one of the options.
If Word has incorrectly flagged a word as misspelled and you want to add that word to your dictionary so that Word will properly recognize it in the future see Add or edit words in a spell check dictionary
-
On the Word menu, click Preferences > Spelling & Grammar.
-
In the Spelling & Grammar dialog box, under Spelling, check or clear the Check spelling as you type box.
-
Under Grammar, check or clear the Check grammar as you type box.
-
Close the dialog box to save your changes.
-
On the Review tab, click Spelling & Grammar.
-
If Word finds a potential error, the Spelling & Grammar dialog box will open, spelling errors will be shown as red text, and grammatical errors will be shown as green text.
-
To fix an error, do one of the following:
-
Type the correction in the box and then click Change.
-
Under Suggestions, click the word you want to use, and then click Change.
To skip the error, do one of the following:
-
Click Ignore to skip only that instance of the error.
-
Click Ignore All to skip all instances of the error.
-
For a grammatical error, click Next Sentence to skip that instance of the error and move to the next error.
To skip a misspelled word in all documents, click Add to add it to the dictionary. This only works for misspelled words. You can’t add custom grammar to the dictionary.
-
-
After you correct, ignore, or skip an error, Word moves to the next one. When Word finishes reviewing the document, you’ll see a message that the spelling and grammar check is complete.
-
Click OK to return to your document.
You can clear or reset the list of Ignored Words and Grammar so Word will check for spelling and grammar issues you previously told it to ignore.
Note: When you reset the list of Ignored Words and Grammar, the list is cleared only for the currently open document. Any spelling or grammar issues you told Word to ignore in other documents won’t be affected.
-
Open the document that needs to be checked.
-
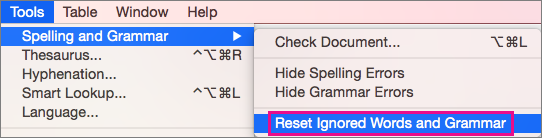
On the Tools menu, point to Spelling and Grammar, and then click Reset Ignored Words and Grammar.
Word displays a warning about the operation resetting the spelling checker and the grammar checker.
-
Click Yes to proceed.
-
Click the Review tab, and then click Spelling & Grammar to check spelling and grammar.
Outlook
Check spelling and grammar automatically as you type
By default, Outlook checks for spelling errors as you type. Outlook uses a dashed red underline to indicate possible spelling errors and a dashed green line to indicate possible grammatical errors.
-
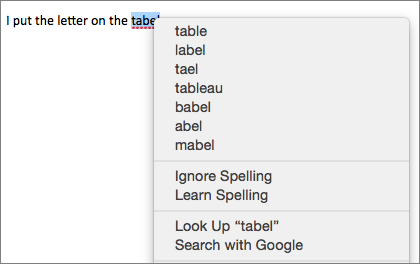
When you see a word with a dashed underline, Control click the word or phrase and choose one of the options.
-
On the shortcut menu, do one of the following:
-
Click one of the guesses at the top of the shortcut menu.
-
Click Ignore Spelling to ignore one instance of the word.
-
Click Learn Spelling to add the word to the spelling dictionary.
-
After opening an email message:
-
To have Outlook correct spelling mistakes automatically, on the Outlook menu, click Preferences. Click on Spelling and Grammar under Personal Settings. Click box next to Checkspelling as you type.
-
To turn automatic grammar checking on or off, on the Outlook menu, click Preferences. Click on Spelling and Grammar under Personal Settings. Click box next to Check grammar as you type.

You can correct all the spelling and grammar issues at the same time after you finish composing a message or other items.
-
On the Edit menu, point to Spelling and Grammar, and then click Spelling and Grammar…
-
Do any of the following:
-
In the list of suggestions, click the word that you want to use, or enter a new spelling in the box at the top, and then click Change.
-
Click Ignore to ignore this word and move on to the next misspelled word.
-
Click Add to add the word to the spelling dictionary.
-
Tip: The keyboard shortcut for skipping to the next spelling or grammar error is  + ; .
+ ; .
PowerPoint
You can check spelling in PowerPoint, but you can’t check grammar.
Check spelling automatically as you type
PowerPoint automatically checks for and marks potential spelling errors with a wavy, red underline.
Tip: If spelling errors aren’t marked, you might need to turn on automatic spell checking, which is explained in the next procedure.
When you see a spelling error, Ctrl+click or right-click the word or phrase and choose one of the suggested options.
-
On the PowerPoint menu, click Preferences > Spelling.
-
In the Spelling dialog box, select or clear the Check spelling as you type box.
-
On the Review tab, click Spelling.
-
If PowerPoint finds a potential error, the Spelling pane opens and spelling errors are shown.
-
To fix an error, do one of the following:
-
Correct the error on your slide.
-
Click one of the suggested words in the Spelling pane, and then click Change.
To skip the error, do one of the following:
-
Click Ignore to skip only that instance of the error.
-
Click Ignore All to skip all instances of the error.
-
click Add to skip a misspelled word in all documents and add it to the dictionary.
-
-
After you correct, ignore, or skip an error, PowerPoint moves to the next one. When PowerPoint finishes reviewing the presentation, you’ll see a message that the spelling check is complete.
-
Click OK to return to your presentation.
Excel
You can check spelling in Excel, but you can’t check grammar.
Check spelling all at once
-
On the Review tab, click Spelling.
Note: The Spelling dialog box will not open if no spelling errors are detected, or if the word you are trying to add already exists in the dictionary.
-
Do any of the following.
To
Do this
Change the word
Under Suggestions, click the word that you want to use, and then click Change.
Change every occurrence of this word in this document
Under Suggestions, click the word that you want to use, and then click Change All.
Ignore this word and move on to the next misspelled word
Click Ignore Once.
Ignore every occurrence of this word in this document and move on to the next misspelled word
Click Ignore All.
See also
Check spelling and grammar in a different language
Содержание
- 1 Немного истории
- 2 Варианты проверки
- 2.1 Как проверить текст на ошибки онлайн
- 2.2 Автоматическая
- 2.3 Проверка по умолчанию
- 3 Установка пакета
- 3.1 Настройки языка
- 4 Видео
- 4.1 Where is the Spell Check in Microsoft Word 2007, 2010, 2013 and 2016
- 4.1.1 A: Activate the Spell Check Setting
- 4.1.2 B: Using the Keyboard Shortcut
- 4.1.3 C: If the Classic Menu for Office installed
- 4.1.4 D: If the Classic Menu for Office not installed
- 4.2 What is Classic Menu for Office
- 4.2.1 Classic Menu for Office
- 4.2.2 Classic Menu for Office 2007
- 4.1 Where is the Spell Check in Microsoft Word 2007, 2010, 2013 and 2016
- 5 Для MS Word 2007 (2010)
- 6 Для MS Word 2003
- 7 Check Spelling and Grammar using Review tab
- 8 Check Spelling and Grammar using Right Click
Здравствуйте. Многим пользователям приходится часто набирать текст для составления документов, написания контента для сайтов, оформления писем и т.д. Очень важно писать правильно, чтобы не показать себя глупым и невежественным человеком. Я рекомендую программу Word из офисного пакета Microsoft Office. В данной статье хочу рассказать, как проверить текст на ошибки онлайн и в Word 2010 или других версиях этого текстового редактора.
Немного истории
Еще в 2010 году я создал развлекательный ресурс о кино, где публиковал рецензии на фильмы, обзоры премьер, биографии актеров. Спустя четыре года на сайте было размещено более трех тысяч статей. Однажды я решил посмотреть свои первые записи, и был ошеломлен. Обнаружил массу ошибок грамматических и пунктуационных, предложения состояли из множества оборотов, читать их было непросто. На то время я не проверял их на правописание, а зря. Первые дни я не мог успокоиться и редактировал старые тексты, чтобы довести их до ума.
Вывод напрашивался сам: следовало предварительно набирать обзоры в Ворде, чтобы автоматически исправлять ошибки.
В этой программе встроен очень полезный функционал, который выделяет (подчеркивает) некорректный ввод красной или зеленой волнистой линией. Но не всегда проверка срабатывает автоматически. Возможно, её предварительно нужно включить в настройках приложения. Как это сделать – Вы сейчас узнаете!
Варианты проверки
Существует несколько способов «сканирования» документов на наличие ошибок. Перейдем к их рассмотрению.
Как проверить текст на ошибки онлайн
Сервисов существует немало, но самыми распространенными являются Спеллер от Яндекса и Text.ru. Достаточно перейти по указанным ссылкам и вставить в поле ввода нужный текстовый фрагмент.

Автоматическая
Срабатывает по ходу набора текста, чтобы можно было сразу внести изменения. К примеру, Вы пропустили букву в слове, или не поставили пробел после знака препинания. Word сразу же предупредит о необходимости исправления.
Но если Вы вводите заведомо некорректные слова, а система никак на это не реагирует, значит, автоматическая проверка не включена. Как её активировать?
- Заходим в главное меню приложения, кликнув по кнопке в левом верхнем углу.
- Теперь следует нажать на «Параметры Word» (этот элемент может находиться в разных местах, в зависимости от версии программы). У меня это выглядит так:

- Для Ворд 2013 с обновленным интерфейсом меню имеет следующий вид:

- Дальнейшие опции одинаковы для разных выпусков офисного редактора. Слева выбираем пункт «Правописание». А справа находим строчку «Автоматически проверять…» и ставим возле неё галочку.

В самом низу можно задать набор правил для проверки. По умолчанию выбрано значение «для деловой переписки», но можно указать более строгий алгоритм, если хотите устранить максимум ошибок и убрать разговорные фразы.
Проверка по умолчанию
Если во время набора текста начинают подчеркиваться правильные слова, скорее всего они отсутствуют в словаре программы. Нужно их туда добавить. Как это сделать правильно?
- Выделяем необходимое слово / фразу / фрагмент документа;
- Переходим в раздел «Рецензирование», затем – «Правописание» (для Ворд 2007 и выше). Для более ранних версий следует зайти в меню «Сервис». Или проще нажать на клавиатуре «F7». Откроется следующее окно:

Здесь можно либо пропустить ошибку, либо исправить её (могут быть предложены варианты замены), либо добавить её в словарь (если считаете, что слово является правильным и не содержит ошибок).
С этим разобрались.
Но что делать, если Вы пытаетесь выполнить вышеуказанные действия, но перед Вами появляется сообщение «Средства проверки не установлены»? Или же просто отображается окошко, что «Проверка окончена», но красное / зеленое подчеркивание не убирается? В таком случае, необходимо перейти к следующим шагам.
Установка пакета
Речь идет о пакете проверки правописания, который по каким-то причинам не вошел в состав приложения. Возможно, Вы забили указать его во время инсталляции. Решение следующее:
- Переходим в «Панель управления» и открываем раздел «Программы и компоненты»:

- В появившемся окне отобразятся все установленные программы. Следует найти Word, выделить его и кликнуть по кнопке «Изменить»:

- После короткой паузы должно отобразиться окно с предложением добавить новые компоненты / удалить существующие. Жмем «Продолжить» (Далее).
- Теперь следует раскрыть ветку «Общие средства». В ней должны быть «Средства проверки правописания». Кликаем по элементу и выбираем опцию «Запускать всё с моего ПК»:

Вот и всё! Осталось дождаться установки выбранного компонента. После этого рекомендую перезапустить компьютер.
Настройки языка
Бывает, что для одного языка проверка производится корректно, а для другого – вообще не работает. Например, если нужно проверить текст на английском на ошибки. В таком случае, следует перейти во вкладку «Рецензирование» (она есть и в Ворде 2016 года), нажать на изображение глобуса. Это меню выбора языка, где следует снять отметку напротив опции «Не проверять правописание»:

Видео
Если не хотите читать много букв, то можете откинуться на спинку кресла (или стула) и посмотреть обучающее видео, как включить проверку орфографии в Word:
Как видите, всё очень просто. Буквально несколько кликов – и проблема устранена. Теперь знаете, как проверить английский текст на ошибки онлайн (или на любом другом языке). Даже если Ваша ситуация сугубо индивидуальна и не может быть решена с помощью моей инструкции, рекомендую задавать вопросы в комментариях. Я обязательно на них отвечу.
С уважением, Виктор
Where is the Spell Check in Microsoft Word 2007, 2010, 2013 and 2016
- Method A — Activate the spell check setting.
- Method B — The fastest way to process.
- Method C — If the Classic Menu for Office is installed (classic interface).
- Method D — If the Classic Menu for Office is not installed (ribbon interface).
The Spell Check function in Word can help you quickly find out the spelling and grammar mistakes in the Word document. There are four simple ways to call Spell Check function in Word 2007, 2010, 2013 and 2016.
A: Activate the Spell Check Setting
The automatic Spell Check function might be disabled sometimes and users could reactivate it. Please click File tab in Word 2010 and 2013 (or click the Office button in Word 2007) > Word Options > Proofing. If you are using Classic Menu for Office, click Tools > Word Options > Proofing.
See following:
B: Using the Keyboard Shortcut
If you need, just press F7 to call Spelling and Grammar function.
If you want to locate its position on ribbon, please see following content.
If you have installed Classic Menu for Office to bring back the familiar user interface and make it look like Word 2003/XP(2002)/2000, just click Tools > Spelling and Grammar.
If the
Classic Menu for Office
is not installed, please click
Review tab >
Proofing group >
Spelling and Grammar .
The software Classic Menu for Office is designed for the people who are accustomed to the old interface of Microsoft Office 2003, XP (2002) and 2000. It brings back the classic menus and toolbars to Microsoft Office (includes Word) 2007, 2010, 2013 and 2016. The classic view helps the people to smoothly upgrade to the latest version of Office, and work with Office 2007/2010/2013/2016 as if it were Office 2003 (and 2002, 2000).
Screen Shot of Classic Menu for Word
- All new features and commands of Office 2007, 2010, 2013 and 2016 have been added to the menus and toolbars;
- Without any training or tutorials after upgrading, users can work with Office 2007/2010/2013/2016 immediately;
- Easy to find any command items you want to process;
- Easy to show or hide the classic menus, toolbars and ribbon tabs;
- Easy to install and use. Supports all languages. Free download!
|
It includes Classic Menu for Word, Excel, PowerPoint, OneNote, Outlook, Publisher, Access, InfoPath, Visio and Project 2010, 2013 and 2016. |
||
|
It includes Classic Menu for Word, Excel, PowerPoint, Access and Outlook 2007. |
Для MS Word 2007 (2010)
1) Выделить весь текст документа (ctrl+a)
2) Кликнуть на язык в левом нижнем углу в строке состояния:
3) Выделить нужный язык (например, Русский (Россия)) > Убрать выделение со строки «Не проверять правописание» > нажать ОК:
Если это не помогает, необходимо включить функцию проверки правописания в принципе.
1) Нажать круглую кнопку в левом верхнем углу экрана > Параметры Word:
2) Зайти в раздел «Правописание», проставить необходимые галочки, нажать ОК:
Для MS Word 2003
Сервис > Параметры > Правописание. Установите флажок «Автоматически проверять орфографию»:
Advertisements
In this chapter, we will discuss how to check spelling and grammar in Word 2010. Microsoft Word provides a decent Spelling and Grammar Checker which enables you to search for and correct all spelling and grammar mistakes in your document. Word is intelligent enough to identify misspelled or misused, as well as grammar errors and underlines them as follows.
- A red underline beneath spelling errors.
- A green underline beneath grammar errors.
- A blue line under correctly spelled but misused words.
Check Spelling and Grammar using Review tab
Here is the simple procedure to find out the spelling mistakes and fix them −
Step 1 − Click the Review tab and then click the Spelling & Grammar button.
Step 2 − A Spelling and Grammar dialog box will appear and will display the wrong spellings or errors in grammar. You will also get suggestions to correct as shown below −
Now you have following options to fix the spelling mistakes −
-
Ignore − If you are willing to ignore a word, then click this button and Word ignores the word throughout the document.
-
Ignore All − Like Ignore, but this ignores all occurrences of the same misspelling, not just once but throughout the document.
-
Add to Dictionary − Choose Add to Dictionary to add the word to the Word spelling dictionary.
-
Change − This will change the wrong word using the suggested correct word.
-
Change All − Like Change, but this changes all occurrences of the same misspelling, not just once but throughout the document.
-
AutoCorrect − If you select a suggestion, Word creates an AutoCorrect entry that automatically corrects this spelling error from now on.
Following are the different options in case you have grammatical mistake −
-
Next Sentence − You can click Next Sentence to direct the grammar checker to skip ahead to the next sentence.
-
Explain − The grammar checker displays a description of the rule that caused the sentence to be flagged as a possible error.
-
Options − This will open the Word Options dialog box to allow you to change the behavior of the grammar checker or spelling options.
-
Undo − This will undo the last grammar changed.
Step 3 − Select one of the given suggestions you want to use and click the Change option to fix the spelling or grammar mistake and repeat the step to fix all the spelling or grammar mistake.
Step 4 − Word displays a dialog box when it finishes checking for spelling and grammar mistakes, finally Click OK.
Check Spelling and Grammar using Right Click
If you will right-click the mouse button over a misspelled word, then it will show you the correct suggestions and the above mentioned options to fix the spelling or grammar mistake. Try it yourself.
 Please Note:
This article is written for users of the following Microsoft Word versions: 97, 2000, 2002, and 2003. If you are using a later version (Word 2007 or later), this tip may not work for you. For a version of this tip written specifically for later versions of Word, click here: Searching for Special Characters.
![]()
Written by Allen Wyatt (last updated September 1, 2018)
This tip applies to Word 97, 2000, 2002, and 2003
Word allows you to search not just for text, but also for special characters that normally do not print. If you are working with documents that use tabular material, you will find yourself searching for tab characters quite a bit. To search for tabs, follow these steps:
- Press Ctrl+F. Word displays the Find tab of the Find and Replace dialog box.
- Click the More button, if it is available. (See Figure 1.)
- In the Find What box, enter the text for which you want to search. For example, to search for a tab character enter ^t (it is important to use a lowercase t). Alternatively, you can click on the Special button and select a special character from the list.
- Set other searching parameters, as desired.
- Click on Find Next.
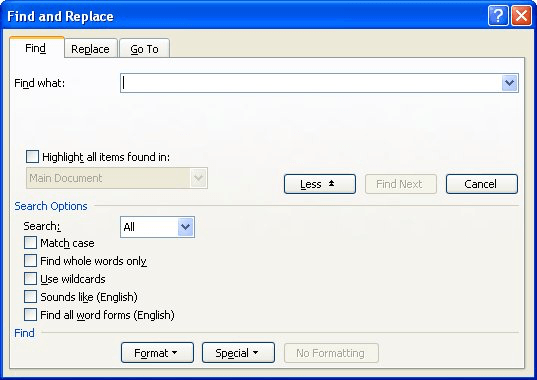
Figure 1. The Find tab of the Find and Replace dialog box.
Often, you will be searching for other special characters such as breaks and paragraph marks. It can be faster to remember these and type them in rather then looking them up all of the time. The following is a list of the more common special characters:
| Special Character | Symbol | |
|---|---|---|
| Paragraph Marker | ^p | |
| Manual Page Break | ^m | |
| Section Break | ^b | |
| Column Break | ^n | |
| Em Dash | ^+ | |
| En Dash | ^= | |
| Graphic | ^g | |
| Any Character | ^? | |
| Any Digit | ^# | |
| Any Letter | ^$ | |
| White Space | ^w | |
| Caret Character | ^^ |
You can also use many of these same special characters in the Replace With box when doing a search and replace operation. You cannot, however, use the special white space character (^w) in the Replace With box.
In addition, Word allows you to search for any character as long as you know its ASCII value. (You can find ASCII values for characters in the back of many programming books.) All you need to do is use the caret, followed by a zero and then the three-digit value of the character. For instance, if you wanted to search for a capital A, whose ASCII value is 65, you would use ^0065 as your search string.
WordTips is your source for cost-effective Microsoft Word training.
(Microsoft Word is the most popular word processing software in the world.)
This tip (10) applies to Microsoft Word 97, 2000, 2002, and 2003. You can find a version of this tip for the ribbon interface of Word (Word 2007 and later) here: Searching for Special Characters.
Author Bio
With more than 50 non-fiction books and numerous magazine articles to his credit, Allen Wyatt is an internationally recognized author. He is president of Sharon Parq Associates, a computer and publishing services company. Learn more about Allen…
MORE FROM ALLEN
AutoText Behaving Erratically
The AutoText feature of Word is a great tool for adding common text or phrases with a minimum of fuss. What do you do if …
Discover More
Getting Rid of Choppiness in Justified Text
Justified text doesn’t always produce the best-looking results. Here’s how to avoid some of the choppiness that can occur.
Discover More
Changing the MAC Address for a Network Adapter
MAC addresses are used to uniquely identify devices on your network, such as a network adapter. Here’s how you can modify …
Discover More
More WordTips (menu)
Searching for Paragraph Marks and Line Breaks
Word allows you to search not for special characters that normally do not print such as paragraph marks and line breaks.
Discover More
Searching for Footnote and Endnote Marks
Do you want to quickly search for any footnote or endnote marks in your document? Word makes it easy using the standard …
Discover More
Searching for White Space
White space permeates our documents, and sometimes you’ll need to search for that white space. Word makes it easy to …
Discover More
To check if a Python string contains all the characters from a list, check if each character exists in the word:
Here is an example:
chars = ["H", "e", "y"]
word = "Hello"

has_all = all([char in word for char in chars])

print(has_all)
Output:
False
To learn other useful string methods in Python, feel free to check this article.
Below you find a more detailed guide of how to check if a string contains characters from a list.
Step-by-step Guide
Given a list of characters and a string, you can check if all the characters of a list are found in the target string following these steps:
- Loop through the list of characters.
- Check if a character is in the target string.
- Add the truth to a list.
- Check if all truth values in a list are True.
Here is how it looks in code:
chars = ["H", "e", "y"]
word = "Hello"

truths = []

# 1. Loop through the chars
for char in chars:
    # 2. Check if a character is in the target string
    truth = char in word
    # 3. Add the truth to a truths list
    truths.append(truth)

# 4. Check if all boolean values are True
has_all = True
for truth in truths:
    has_all = has_all and truth

print(has_all)
Output:
False
But you can make this piece of code shorter by using:
- List comprehension to shorten the 1st for loop.
- Built-in all() method to get rid of the 2nd loop. This method checks if all booleans are True.
This makes the code look the same as in the example solution in the introduction:
chars = ["H", "e", "y"]
word = "Hello"

has_all = all([char in word for char in chars])

print(has_all)
Output:
False
To be more general, you can implement a function that gets the job done.
Here is how it looks in code:
def has_all(chars, string):
    return all([char in string for char in chars])

# Example call
print(has_all("Hello", ["H","i"]))
Output:
False
Conclusion
Today you learned how to check if a Python string contains all characters present in a list.
To recap, you need to run a loop through the list of the characters. Then you need to check if each of those characters exists in the target string.
Thanks for reading.
Happy coding!
Further Reading
50 Python Interview Questions
About the Author

-
I’m an entrepreneur and a blogger from Finland. My goal is to make coding and tech easier for you with comprehensive guides and reviews.
Recent Posts
Identify Unicode characters that force text messages into Unicode format.
How to Use the Unicode Character Detector
With this simple tool, you can instantly identify GSM characters and Unicode symbols in your text messages. Characters in the GSM charset will be grey, while Unicode special characters will be highlighted in red.
-
Step #1 Copy and paste a text message into the empty box. Characters will automatically be displayed in the results box.
-
Step #2 Identify the different symbols in your SMS message. GSM characters will be displayed in grey, Unicode characters will appear in red and escape characters will be displayed in orange.
-
Step #3 The tool also calculates the number of characters in the text and the number of parts of a split message, thus allowing you to control concatenation.
Why you should use the Unicode character detector
As you probably already know, text messages are limited to 160 characters if they are all from the GSM character set. However, if your text contains Unicode symbols, it will be limited to 70 characters instead of 160.
Of course, messages longer than 70 characters can still be sent, but they will become multipart. This means that a 160-character SMS message will be split into three text messages if they have Unicode symbols. This can be extremely frustrating. What is even more frustrating is when your client’s phone crashes due to the Unicode character strings (this has actually happened on several occasions).
By using the Unicode character detector, you can identify and replace symbols that aren’t part of the 7-bit GSM charset to avoid splitting text messages into multiple segments.
Why we built this tool
Unicode characters not only break up text, but sometimes they do not show up at all, or they appear as the dreaded □ □ □. To ensure that the information is passed correctly to the SMS gateway, text messages must be properly encoded. The problem is that many characters are extremely difficult to encode, and because the GSM 3.38 charset is almost impossible to support, many providers have decided to quit altogether.
We created the Unicode character detector tool to help our clients avoid the problems listed above and to ensure that your messages are delivered as intended.
Benefits of using the Unicode character detector
Here are the main benefits of using our Unicode character detection tool:
-
Identify GSM and Unicode characters in your text messages.
-
Identify the number of characters and parts in a text.
-
Based on the number of Unicode characters, find out if the text will be segmented.
-
Remove Unicode symbols and replace them with GSM characters.
-
Preview your text messages before sending them to customers.
-
Control how a text message will be split if it contains Unicode.
Why are text messages that contain Unicode segmented?
When you try to send a text message with symbols that fall outside the GSM character set, you have to use Unicode, which assigns a unique code to every character that isn’t part of the standard charset. Because several GSM characters are used to describe a Unicode character, you will only be able to send text messages of 35–70 characters.
Can I avoid text message segmentation and still use Unicode?
To avoid SMS segmentation and to convert Unicode symbols to Latin only, you can use our Text Transliterator.
GSM describes the protocols for second-generation cellular networks and mobile devices. Presently, it is the standard for mobile communications, holding over 90% of the market share. Therefore, all messages sent to such devices must respect the standard GSM charset.
When a text message contains non-GSM characters, it will be limited to 70 characters. The only solution to avoid having your texts split is to check for Unicode characters and to replace them with their equivalent in the GSM charset (if such an equivalent exists).
What characters are part of the GSM charset?
The standard GSM character set contains the letters of the English alphabet, digits and some special characters, including a few Greek ones.
GSM character list: here
What characters are part of the Unicode charset?
The Unicode character list contains symbols from the Cyrillic, Chinese, Arabic, Korean and Hangul alphabets. It also contains several special symbols (such as emoticons, emoji and kanji).
Unicode character list: here