

- Remove From My Forums
-
Question
-
I can insert a check box in word 07, but cannot check it, pls help …
Answers
-
Which kind of check box did you insert? If you are creating a form, you will have to protect it.
Not if it’s a content-control checkbox — you just need to exit the design mode (if it’s active)
Cheers
Paul Edstein
[MS MVP — Word]-
Marked as answer by
William Zhou CHN
Thursday, May 31, 2012 7:02 AM
-
Marked as answer by
All replies
-
On 2012-05-22 17:42 (GMT+1), CHHC wrote:
I can insert a check box in word 07, but cannot check it, pls help …
Which kind of check box did you insert? If you are creating a form, you will have to protect it.
Note that if you just need the appearance of a checked or unchecked box (that is, the box doesn’t actually «do» anything), take a look at this article:
http://gregmaxey.mvps.org/word_tip_pages/add_interactive_toggle_objects_to_document.html.
Stefan Blom, Microsoft Word MVP
-
Which kind of check box did you insert? If you are creating a form, you will have to protect it.
Not if it’s a content-control checkbox — you just need to exit the design mode (if it’s active)
Cheers
Paul Edstein
[MS MVP — Word]-
Marked as answer by
William Zhou CHN
Thursday, May 31, 2012 7:02 AM
-
Marked as answer by
-
On 2012-05-23 14:24, macropod [MVP] wrote:
Which kind of check box did you insert? If you are creating a form, you will have to protect it.
Not if it’s a content-control checkbox — you just need to exit the design mode (if it’s active)
Cheers
Paul Edstein
[MS MVP — Word]Good point. Thanks.
Stefan Blom, Microsoft Word MVP
-
The check box content control is in W2010 but not W2007, AFAIK.
Pam
![]()
Download Article
![]()
Download Article
Want to add a check box or tick box to a list or form in Microsoft Word? It’s easy to do, and you can even make it checkable so you can click the box with your mouse. We’ll show you an easy way to add a clickable checkbox using Developer Mode in Microsoft Word.
Steps
-

1
Open a new file in Microsoft Word. Do so by opening the app shaped like a blue W. Then click on File in the menu bar at the top of the screen, and click on New Blank Document.
-
2
Click on File in the menu bar and then Options in the menu.
- On Mac, click on Word in the menu bar and then Preferences… in the menu.
Advertisement
-
3
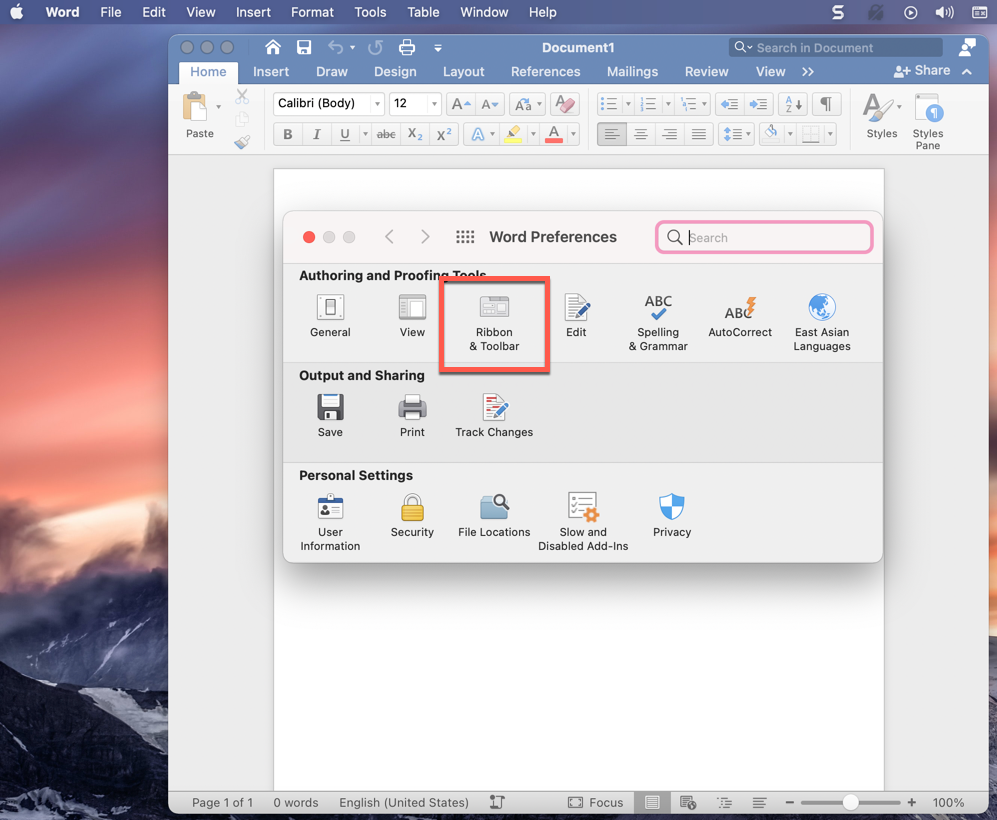
Click on Customize Ribbon and then Main Tabs in the «Customize the Ribbon:» drop-down menu.»[1]
- On Mac, click on Ribbon & Toolbar in the «Authoring and Proofing Tools» section of the dialog box, then click on the Ribbon tab at the top of the dialog box.
-
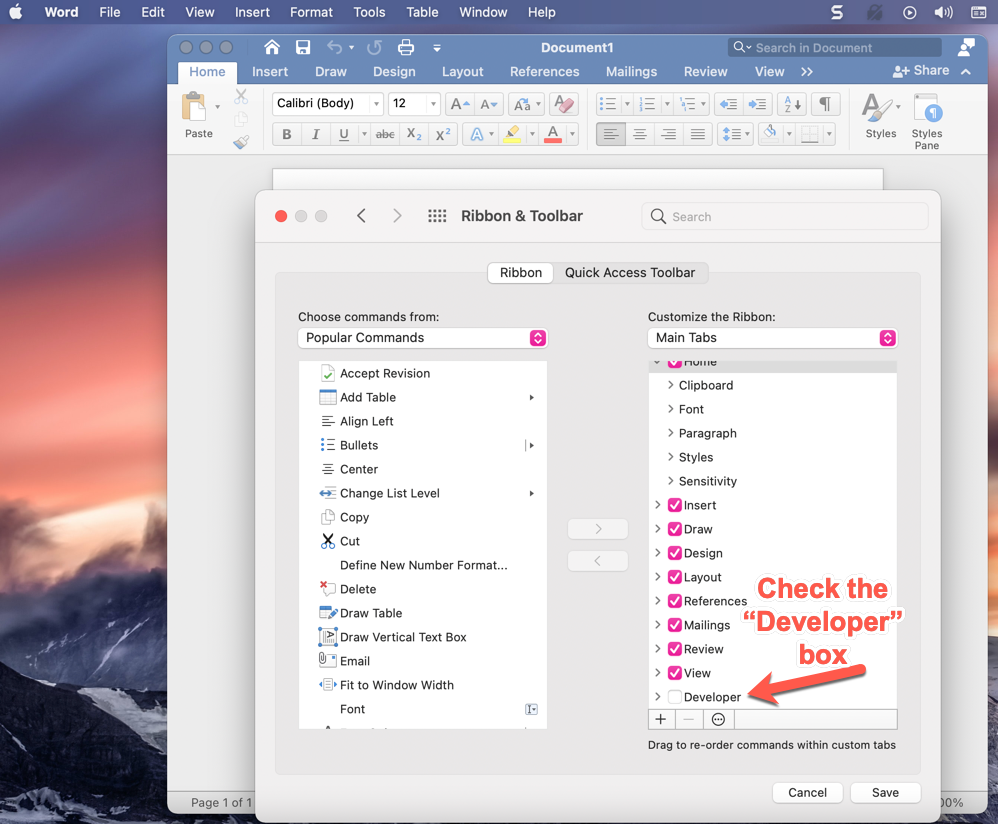
4
Check «Developer» in the «Main Tabs» pane.
-
5
Click on Ok.
-
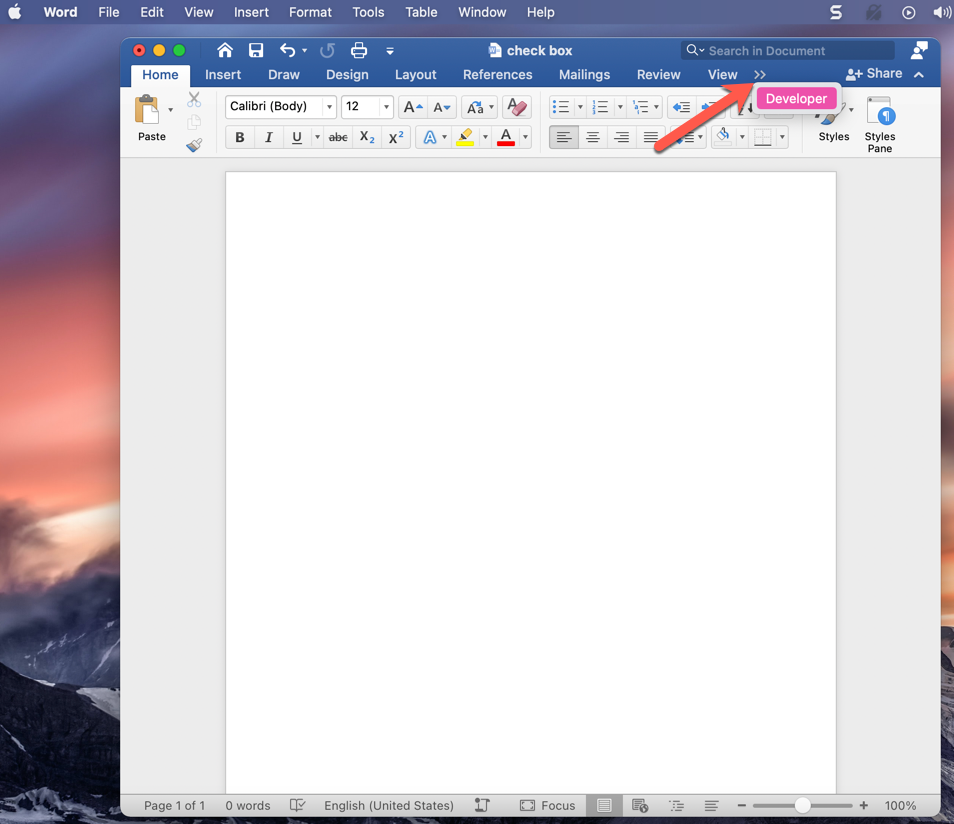
6
Click on Developer. It’s a tab in the upper-right part of the window.
-
7
Position the cursor where you’d like to insert the check box.
-
8
Click on Check Box. It’s in the menu bar at the top of the window.
-
9
Add additional check boxes and text as needed.
-
10
Lock the form. To do so, select the entire list, to be found in the Controls section on the Developer tab, then click on Group and Group.
- On Mac, click Protect Form in the Developer tab toolbar.


Advertisement
Add New Question
-
Question
What should I do if the check box is grayed out in my ribbon?

It is grayed out for me too. However, if you click on the one icon that isn’t — Legacy Tools — then you will find the exact same checkbox, which you should be able to select.
-
Question
How can I enlarge the size of a text box without enlarging the text?
In Word, just dragging the corner of the text box should be sufficient. If the text changes size accidentally, you can always highlight it and change it back to the desired size.
-
Question
How do you make a drop box in word?
Download LibreOffice. Follow the manual on how to add a list or list/add or list/multiselect box (or just look under «insert» in the menu). You can add a data source for the dropdown menu items from a database, a spreadsheet or within the file structure itself.
See more answers
Ask a Question
200 characters left
Include your email address to get a message when this question is answered.
Submit
Advertisement
Thanks for submitting a tip for review!
About This Article
Article SummaryX
1. Open a document.
2. Click File.
3. Select Customize Ribbon and then click Main Tabs.
4. Check the «Developer» box.
5. Click Save.
6. Click Developer.
7. Click where you want to insert the check box.
8. Click Check Box.
9. Add additional boxes and text.
10. Lock the form.
Did this summary help you?
Thanks to all authors for creating a page that has been read 1,240,190 times.
Is this article up to date?
We have a lot of templates that were created in Word 2010 with Windows 7 which contain Legacy check boxes. We are now migrating to Office 2013 and these checkboxes seem to have converted to a pictures and are no longer clickable boxes (protected or unprotected), neither works. If I delete these and replace them with new checkboxes via Word 2013 they work perfectly but I really do not wish to have to edit over 200 precedents to replace checkboxes.
We have tried on a machine running Word 2010 with Windows 10 and it still works so it is an office issue, not windows, however we have found that if we untick the windows setting for «Turn on Clear Type», the checkboxes are okay, but that causes a different set of problems so our IT department does not want to change this setting.
I attach 1 page of one of our templates containing these checkboxes, along with a screenshot of what it looks like on my computer, in case you don’t see the same result I am seeing.
Has anyone found a solution to this problem?
Only Visible to You and DevExpress Support
Visible to All Users
Modify
support ticket and change its visibility
Urgent
Duplicate
We have closed this ticket because another page addresses its subject:
Answers approved by DevExpress Support
Disclaimer: The information provided on DevExpress.com and its affiliated web properties is provided «as is» without warranty of any kind.
Developer Express Inc disclaims all warranties, either express or implied, including the warranties of merchantability and fitness for a particular purpose.
Please refer to the DevExpress.com Website Terms of Use for more information.
Recently viewed tickets
You have yet to view any tickets.
Your search criteria do not match any tickets.
A server error occurred while processing your request. Please try again at a later time.

First, you need to customize Word’s ribbon and enable the “Developer” tab to show the option to add check boxes. Then, select “Developer” and click the “Check Box Content Control” button to insert a check box into your document. You can also transform Word’s bullets into checkboxes.
When you create surveys or forms with Microsoft Word, check boxes make the options easier to read and answer. We’re covering two good options for doing just that. The first is ideal for documents that you want people to fill out digitally within the Word document itself. The second option is easier if you’re planning to print documents like to-do lists.
Option 1: Use Word’s Developer Tools to Add the Check Box Option for Forms
In order to create fillable forms that include checkboxes, you first need to enable the “Developer” tab on the Ribbon. With a Word document open, click the “File” drop-down menu and then choose the “Options” command. In the “Word Options” window, switch to the “Customize Ribbon” tab. On the right-hand “Customize the Ribbon” list, select “Main Tabs” on the dropdown menu.

On the list of available main tabs, select the “Developer” check box, and then click the “OK” button
Notice that the “Developer” tab is added to your Ribbon. Just position your cursor in the document where you want a check box, switch to the “Developer” tab, and then click the “Check Box Content Control” button.
You should see a check box appear wherever you placed your cursor. Here, we’ve gone ahead and placed a check box next to each answer and, as you can see, those check boxes are interactive. Click a box to mark it with an “X” (as we’ve done for answers 2, 3, and 4) or select the whole form box (as we’ve done for answer 4) to move the check box around, format it, and so on.
RELATED: How to Create a Fillable Form With Microsoft Word
Option 2: Change Bullets to Check Boxes for Printed Documents
If you’re creating a document to print out—like a to-do list or printed survey—and just want check boxes on it, you don’t have to mess around with adding Ribbon tabs and using forms. Instead, you can create a simple bullet list and then change the bullets from the default symbol to check boxes.
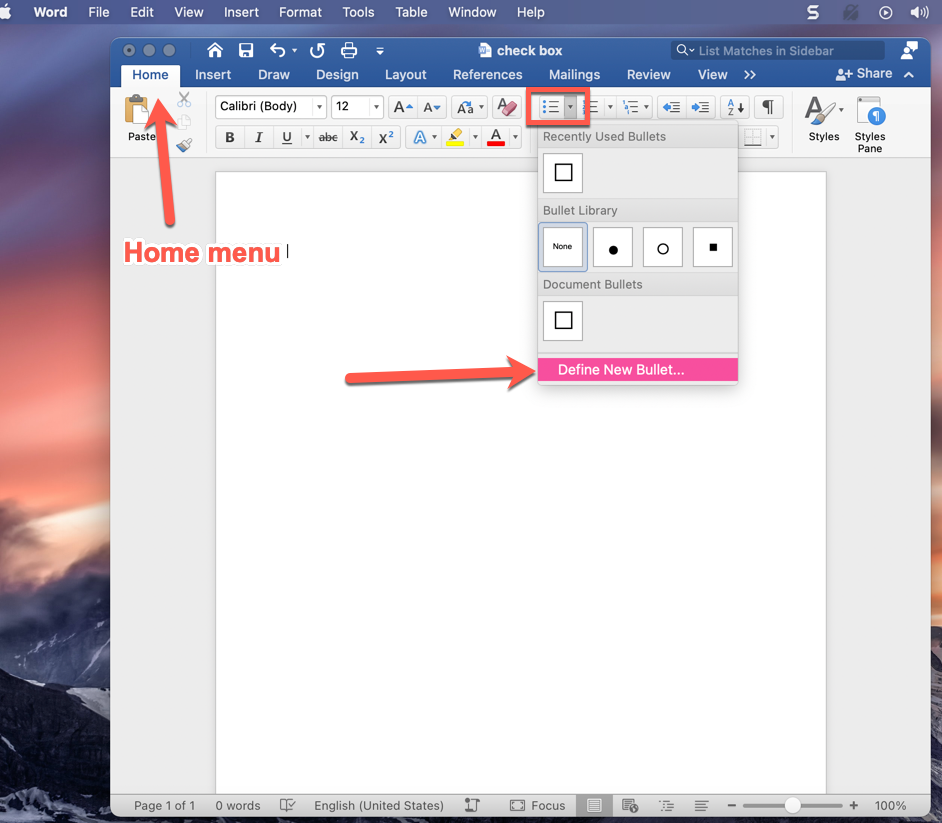
In your Word document, on the “Home” tab, click the small arrow to the right of the “Bullet List” button. On the dropdown menu, select the “Define new bullet” command.
In the “Define New Bullet” window, click the “Symbol” button.
In the “Symbol” window, click the “Font” dropdown and choose the “Wingdings 2” option.
You can scroll through the symbols to find the empty square symbol that looks like a check box, or you just type the number “163” into the “Character Code” box to automatically select it. Of course, if you see a symbol you like better—like the open circle (symbol 153)—feel free to choose that instead.
When you’ve selected your symbol, click the “OK” button to close the “Symbol” window, and then click the “OK” button to close the “Define New Bullet” window, too.
Back in your Word document, you can now type your bullet list. The check boxes appear instead of the regular bullet symbol.
And the next time you need the check box symbol, you don’t have to navigate through that whole set of windows. Just click that small arrow to the right of the “Bullet List” button again, and you’ll see the checkbox listed under the “Recently Used Bullets” section.
Again, this method is really only useful for documents you want to print out. The check box symbols are not interactive, so you can’t check them off inside a Word document.
If you’re also creating spreadsheets and presentations, you may want to learn how to insert checkboxes in Excel and add checkboxes to PowerPoint too.
RELATED: How to Add a Check Mark or Tick Mark in Word
READ NEXT
- › How to Add a Check Mark or Tick Mark in Word
- › How to Count Checkboxes in Microsoft Excel
- › How to Add a Drop-Down List to a Word Document
- › How to Create a Fillable Form With Microsoft Word
- › How to Create a Basic Survey in Microsoft Word
- › Why the Right-Click Menu in Windows 11 Is Actually Good
- › Universal Audio Volt 2 Review: A Workhorse Audio Interface With Vintage Charm
- › Google+ Will Come to a Final End on July 5, 2023

There are times when you’ll want to check items off a list or mark them as complete on a form. Fortunately, it’s not too difficult to add checkboxes to your Microsoft Word documents.
There are two main types of checkboxes: interactive (that let a user check the box while in the Word document on their computers), and not interactive (that you’d use if you were printing something for people to fill out). We’ll look at both options here.
With just a few adjustments and clicks, you can insert checkboxes right into Word – so let’s see how you can do it.
Just a quick note: this is a tutorial for Mac using Office 2019. If you use a Windows machine or have a different version of Word, some of this might differ a bit.
How to Add Checkboxes to a Word Document – the Interactive Way
In order to add interactive checkboxes directly into your Word document (like, that users can check off on their computers/electronically), you’ll need to enable some special tools.
Step 1: Enable the «Developer» ribbon
Go to the Word tab in your main Word menu (up at the top of your screen) and select «Preferences» from the dropdown.

This will bring up the following menu, where you’ll see an option for «Ribbon & Toolbar», like this:
Just click on the Ribbon & Toolbar button and you’ll see the Ribbon & Toolbar menu. There are a lot of choices there, but just look on the right side under the «Main Tabs» drop down and scroll to the bottom of that long list (many things will likely already be checked).
When you get to the bottom, you’ll see the «Developer» checkbox (like in the image below), and it will likely be unchecked. Just check that box and hit «Save» and then go back to your word document.
Now, when you go back to your word document, you’ll see that more options have been added to your ribbon (that’s the menu at the top of your document, with the options «Home», «Insert», «Draw», «Design», Layout», and so on).
Step 2: Go to the Developer Tab
You’ll see two little arrows at the end of that menu, and if you click on them you’ll see a «Developer» option – click the «Developer» button.
This will bring up a whole new Ribbon that looks like this:

Step 3: Add your Checkboxes
You’ll see the «Check box» option on that Developer ribbon, around the middle. If you click on it, a checkbox will be added to your Word document wherever your cursor is. So just make sure your cursor is located where you want the checkbox to be.

Once you’ve added all the checkboxes you want, and you’re ready to make your form interactive, there’s one step that remains.
Step 4: Protect your form
Word is smart, and it won’t let you actually check the checkboxes if you’re still editing and working on the form. If it did, anyone could come in when they went to fill it out and change the text, make edits, and so on.
So, you need to protect your form. This makes it so the only thing people can do is check those boxes (or uncheck them).
Simply click the lock symbol that says «Protect form» next to it at the right side of your Developer ribbon:
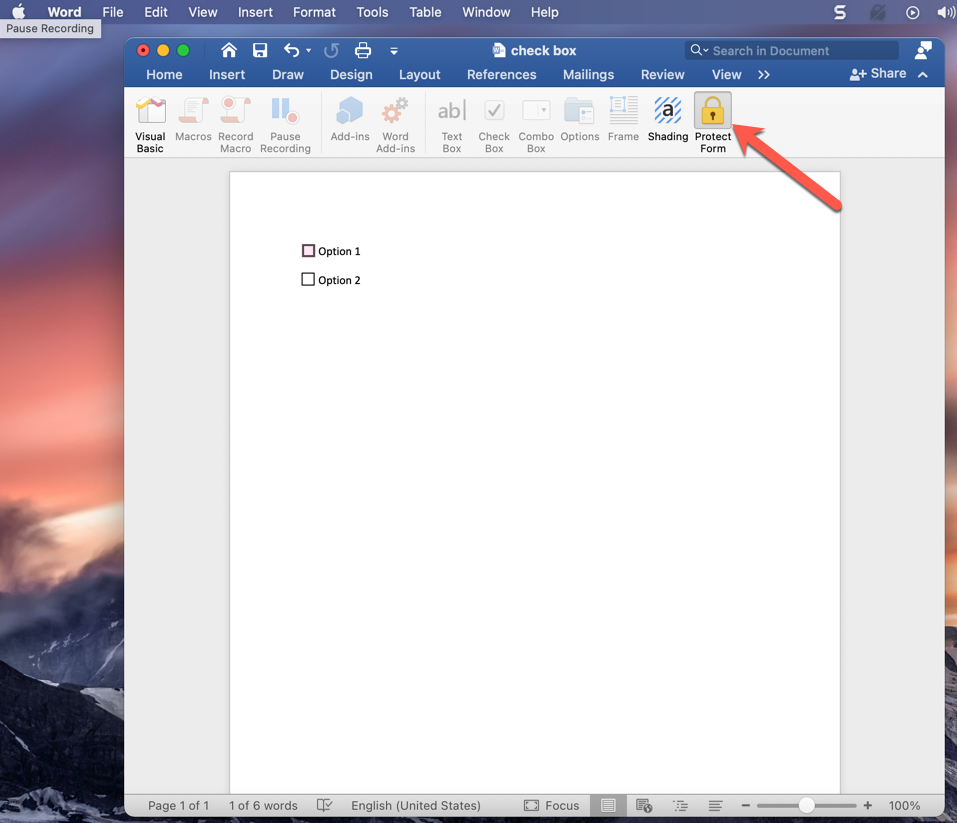
Once you’ve done that, you can now test out your fancy new checkboxes. If you click in the box, an X will appear, showing that it’s been checked. If you made a mistake and don’t want that check, just click the box again and the X will go away.
Do keep in mind that once you click «Protect form» you won’t be able to make any formatting or other changes (all your Ribbons will be «greyed out» and inaccessible). If you need to make edits, just click the Protect form button again and you’ll be able to make those changes.
Now you can add checkboxes to your forms and share them electronically.
But what if you just want to print out a list with checkboxes that people will fill out manually, on paper? Let’s look at how to do that next.
How to Add Checkboxes in Word for a Printed Document
If you just want to add boxes to a document that you’re going to print and have people check off by hand, it’s a bit easier to do. You’ll just use bullet points to create your checklist.
Before you can do that, though, you’ll need to make some updates to your bullet options.
Step 1: Customize your bullet point options
If you want bullets that look like empty checkboxes, you’ll just have to make a few updates to your bullet point options.
First, make sure your cursor is where you want the checkbox to be in your Word document. After following the below steps, that’s where Word will insert the box.
In Word, in the Home menu (on your document), you’ll find the bullet tab – it looks like three vertical dots, with a small arrow button next to it:
Click that small button with the arrow, and you’ll see the above dropdown with the option to «Define New Bullet» at the bottom.
Just click that option, and you’ll be taken to a new screen that looks like this:
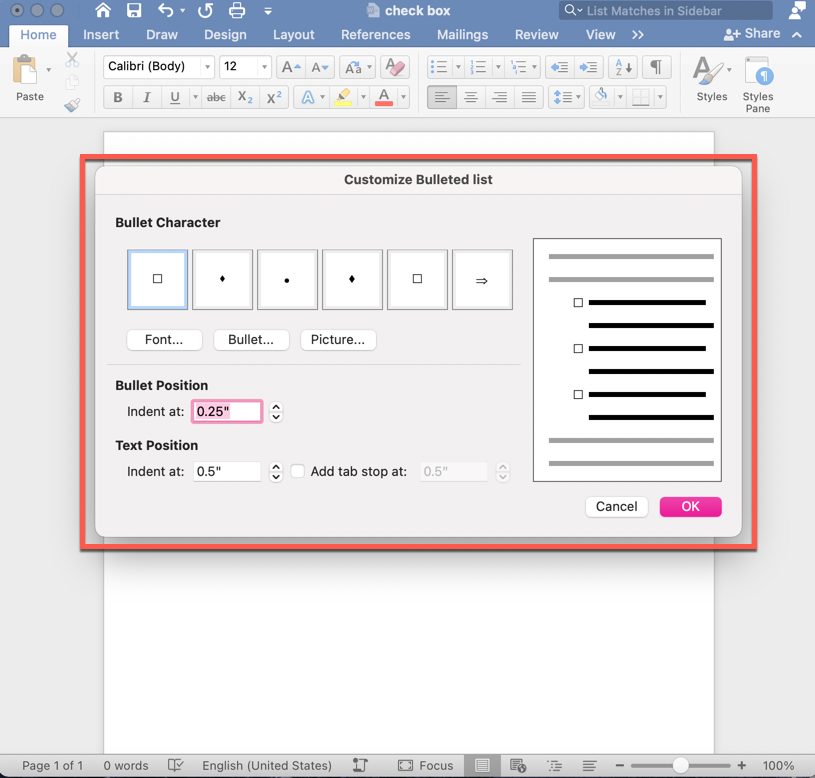
First, you’ll need to select the font that has a checkbox-like symbol in it. So click on the «Font» button (below the examples of bullet characters) and select «Windings 2» (you’ll likely need to scroll down just a bit).
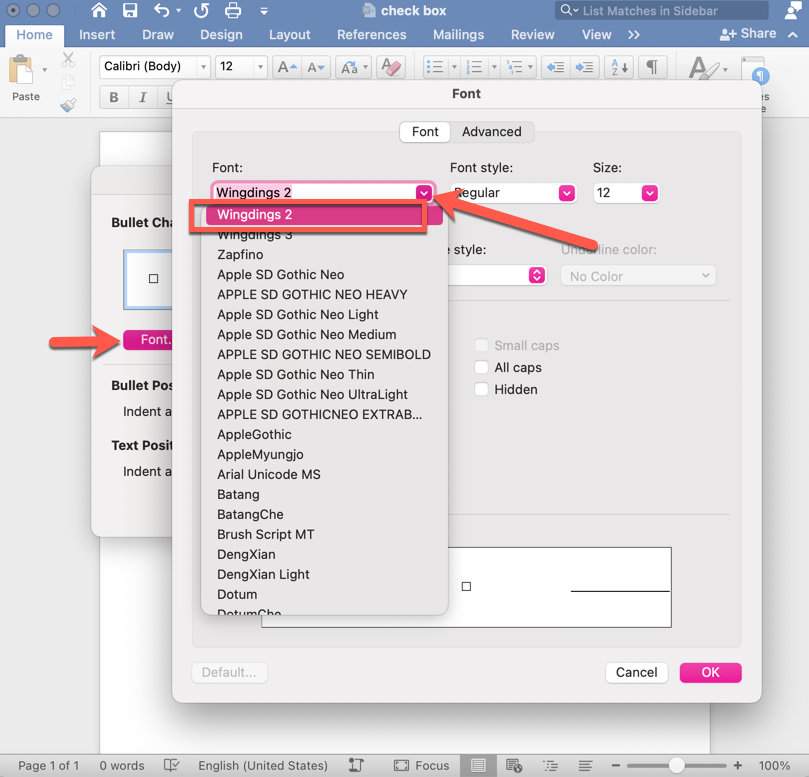
Then click «Ok» and you’ll be taken back to the customized bullet list screen. Now that your font is «Wingdings 2», you can customize your bullets.
Step 2: Choose the symbols for your customized bullets
To choose the checkbox symbol, simply click on one of the bullets that appears in the «Bullet Character» examples list (that selects it, so you’ll be changing that bullet). Then click on the «Bullets» button, and a list of symbols will appear:
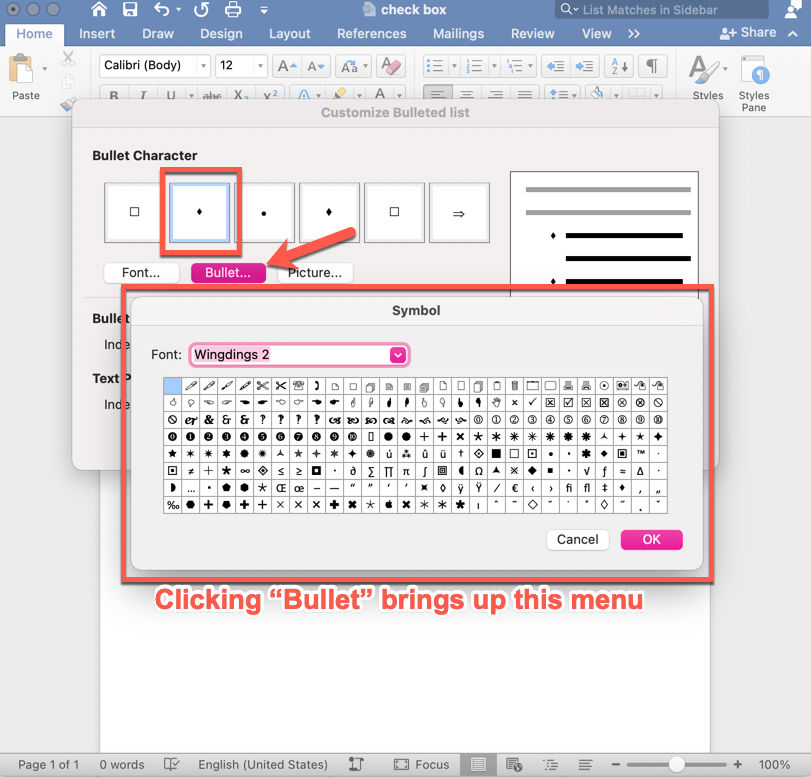
You can see that there are a lot of options, but towards the middle/right there’s an empty checkbox. Just click on that and click «Ok» and you’ll see that whatever bullet was there before has been replaced by the checkbox option.
Step 3: Enter your checkbox in your Word document
Now hit «Ok» again, and you’ll be taken back to your word document – where you’ll now see a checkbox!
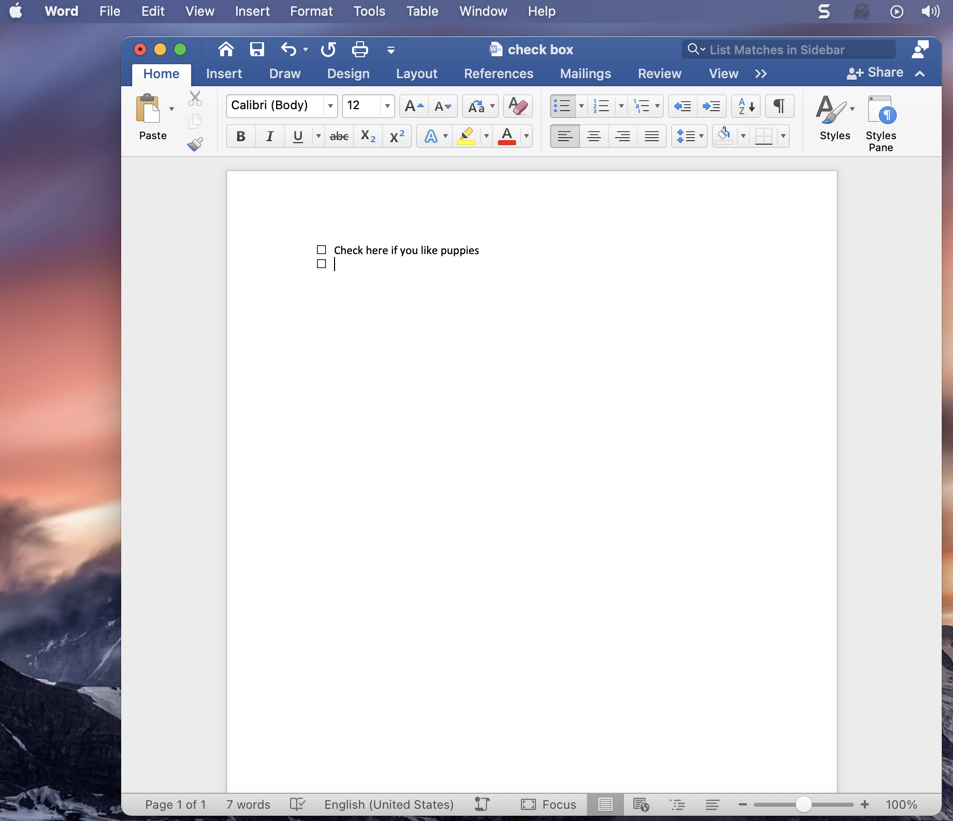
Fun tip: if you add some text (like «Check here if you like puppies» above) and then hit the Enter key, a new checkbox will appear below. So your checkboxes will automatically continue in list form until you’re done with your list.
When you’re finished with your list, just hit enter again and the cursor will go back to the beginning of a new line without a checkbox.
Do keep in mind that if you insert a checkbox, don’t type anything next to it, and then hit enter, the checkbox will just disappear and your cursor will go to a new line.
Here’s another fun tip: if you want to change the alignment of your checkbox list, you can just click and hold on one of the boxes and then drag it back and forth to indent it more or less.
That’s it!
Now you know how to insert both interactive and non-interactive checkboxes in Word documents. Enjoy!
Learn to code for free. freeCodeCamp’s open source curriculum has helped more than 40,000 people get jobs as developers. Get started
-
#1
I have created a document that has a few check boxes in Word 2010 on a PC. On the PC, if you click on the empty check box, it will become ‘checked’ which is what I want. When I use the same document on Word 2011 on the Mac, it doesn’t seem to have the same functionality. Has anyone noticed this? How are you supposed to do check boxes on forms — just use Wingding characters?
-
#2
I am trying to create a form in office 2011 for mac and can’t seem to find the option to even add a check box. Anyone?
-
#3
Checkboxes in Office 2011
On the right of the ribbon bar, click on the cog icon and select ribbon preferences.
In the properties preferences, customise section, scroll down in the list under Tab or Group title and tick the box for developer.
You will now have a new group called developer with check boxes etc available.
-
#4
It Works!
Thank you — that totally worked!
— MB
-
#5
Still can’t put a checkmark in?
The above method worked insofar as I could add the actual box to my document; however to put a check in the box, I have to double click, then a small window appears in which I have to select whether or not I want the box checked, among other things.
I just want to be able to click the box once and have a check appear, click it again and have it go away. I am sending this document out to colleagues and I know they don’t want to double click 50 different boxes and go through 50 different pop up windows in order to go through their checklist. please help!
-
#6
thank you
Thanks Amaethon that worked perfectly.
On the right of the ribbon bar, click on the cog icon and select ribbon preferences.
In the properties preferences, customise section, scroll down in the list under Tab or Group title and tick the box for developer.
You will now have a new group called developer with check boxes etc available.
-
#7
The above method worked insofar as I could add the actual box to my document; however to put a check in the box, I have to double click, then a small window appears in which I have to select whether or not I want the box checked, among other things.
I just want to be able to click the box once and have a check appear, click it again and have it go away. I am sending this document out to colleagues and I know they don’t want to double click 50 different boxes and go through 50 different pop up windows in order to go through their checklist. please help!
Go to developer and select protect form.
-
#8
Adding check mark symbols (√) in Word for Mac?
I am trying to create a checklist with check boxes that I can check off in Word:Mac 2011. I’ve already inserted the check boxes into my document, and am able to check off the items by protecting the form.
The problem is that I want to use check mark symbols (√), NOT X-marks in the check list.
Microsoft offers instructions online how to do this in Windoze, but breathes not a word (that I can find) about how to accomplish this on the Mac.
Here are Microsoft’s instructions for Windoze:
____
NOTE If you want to use a check mark symbol instead of the X, select the check box content control, click Properties in the Controls group, and then click the Change button next to Checked symbol. You can then choose a new symbol. The new symbol will replace both the box and the X.
Link: http://office.microsoft.com/en-us/word-help/make-a-checklist-in-word-HA101833107.aspx#_Toc259015746
____
Those instructions don’t work on the Mac. There is no «check box content control» that I can find.
Thanks for any advice you can offer.
-
#9
Adding check mark symbols (√) in Word for Mac
These solutions worked perfectly Amaethon and jlc1978. Thanks!
-
#10
Checkbox Solution
Hi, just bought a Mac and stumbling through this myself, but found this solution:
Once you have your checkboxes and associated text set, highlight and click «Protect Form» on the Developer Tab. You should then be able to check and uncheck the box as you please.
For example, I have a doc with Yes and No checkboxes in a table. By protecting the cell in the table, I am able to then check/uncheck my selection and tab through them to respond appropriately with the space bar. Good luck.
-
#11
Adding check boxes AND text fields
My problem is that I do not want to have to use the popup box for each check box. If I use the Protect Form, I can click in the check boxes as I would like (without the popup info box), but then I can no longer enter text such as name and address into the text fields). If I turn off Protect Form, I can now enter text, but now I have to use the popup info box to enter an X in each check box.
If there a way to be able to enter text in my form, AND be able to use check boxes without the popup info box?
-
#12
Adding check boxes AND text fields
My problem is that I do not want to have to use the popup box for each check box. If I use the Protect Form, I can click in the check boxes as I would like (without the popup info box), but then I can no longer enter text such as name and address into the text fields). If I turn off Protect Form, I can now enter text, but now I have to use the popup info box to enter an X in each check box.
If there a way to be able to enter text in my form, AND be able to use check boxes without the popup info box?
Did you find a solution to this please? I have exactly the same problem! Thanks very much in advance….
-
#13
Did you find a solution to this please? I have exactly the same problem! Thanks very much in advance….
Hmm, I don’t see your problem. If I add a check-box and a text-field + select menu->tools->protect document->form (my translation from a non english Word 2011) it seems to work as you desire.
-
#14
Did you find a solution to this please? I have exactly the same problem! Thanks very much in advance….
Hi. I had the same problem with checkboxes and text seemingly conflicting with each other, although this was in the newest version of Word. The problem seems to have been related to the fact that I was laying out my form using a table, and expecting people to just click inside table cells and start typing. So what I did was I added a text box form element for each bit where I wanted them to add text, and that seemed to solve it. By the way, the text box needs to be the button under the Developer tab, not the regular text box under the Insert menu. You’ll first need to unprotect your form to be able to add one or more to the page, then protect it again afterwards when you’re done. At first, I thought this hadn’t worked because when I clicked, I just got a blue square highlight, almost as if I’d selected an element. But when I started typing, the words appeared normally and the checkboxes can be crossed.
-
#15
Checkboxes in Office 2011
On the right of the ribbon bar, click on the cog icon and select ribbon preferences.
In the properties preferences, customise section, scroll down in the list under Tab or Group title and tick the box for developer.You will now have a new group called developer with check boxes etc available.
I am having an issue with a document that was created by my company. It has checkboxes already inserted into the document. I am unable to check or uncheck boxes on the document now that I am using it on a Mac. Any ideas?