
Apply styles

Try it!
Styles give your document a consistent, professional look.
-
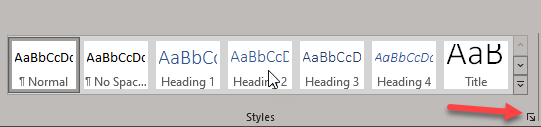
Select the text you want to format.
Tip: If you place your cursor in a paragraph, the style is applied to the whole paragraph. If you select specific text, only the selected text is formatted.
-
On the Home tab, point to a style to preview it.

If you don’t see a style you want, click the More button
to expand the gallery. -
Select a style.
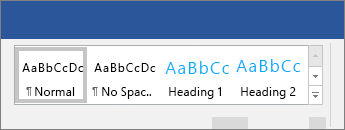
 to expand the gallery.
Using Headings allows you to move parts of the document around by using View > Navigation Pane and then moving the listed headings up or down in the doc. Headings also can be used in creation of a table of contents.
Note: If you need a different look, go to Design > Themes and select a new one. Each Theme has its own set of Styles.
Want more?
Use the Navigation pane in Word
Apply themes
Customize or create new styles in Word
Insert a table of contents
Need more help?
Want more options?
Explore subscription benefits, browse training courses, learn how to secure your device, and more.
Communities help you ask and answer questions, give feedback, and hear from experts with rich knowledge.
Let’s take your editing skills to a whole new level by learning about the different document styles in Microsoft Word. Consistency is the key here and what you want to do is to ensure that your document has consistent formatting throughout. So let’s learn about how to change a document style, how to create a new style and how to use them in your Word document.

What Are Document Styles?
If you look in the Home tab on the ribbon, you will notice that one section takes up almost the entire space – the Styles section:
![]()
In a sense, these styles replace what you may have been taught years ago. Font used to be king, now Styles are. They are used to almost “section off” chunks of text. From titles, headings, paragraphs and other sections, what Styles are used for is to format these sections so they all are the same.
Why Should You Use Them?
There are a number of reasons why you should be using document Styles and I will list them below:
- Ensuring consistency throughout the document.
- Making editing easier.
- Planning a document more easily.
More than anything, once you get used to using Styles in Word, you will realize that they are the way to go. They just make editing and customizing a document easy and actually a pleasure to work with.
Let’s start with the Heading Styles:
How to Use Heading Styles in Word
There are three or four main headings that are generally used in Word. (Title), Heading 1, Heading 2, and Heading 3.
Title: This is used only once and only in specific documents and as it says, it is a title, the top of a document.
Heading 1: This is used as the beginning of a document or every big section of a large document such as a thesis that goes on for pages and pages.
Heading 2: This is used as the title of paragraphs. These are the most typical headings that you will find.
Heading 3: These are subheadings that are used to accentuate a point in the paragraph.
If for example you are discussing styles the structure would be something like: H1 – All about Styles, H2: How to Change a Style, H3: Alternate method of changing a style.
How To Access the Different Heading Styles
In order to access the different heading styles the first thing I suggest to do is put your curser in the text you want to be a heading – don’t highlight it, and then press the Heading button that you want:
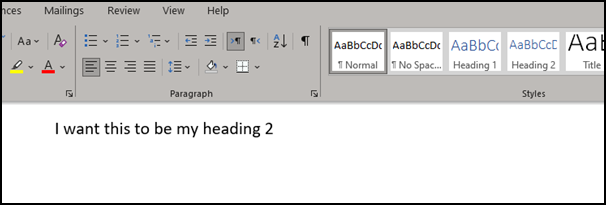
This will change the text to heading 2:
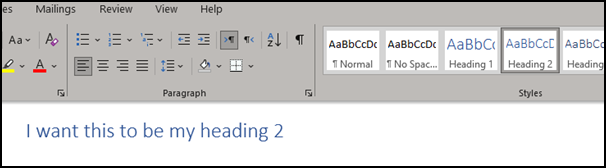
As you can see, in the top image the Normal box is selected and in the second image it is the Heading 2 that is. And you can see the difference between the two texts.
How to Edit a Heading Style
Before I go into how to edit styles, I want to show you a different way of editing them and that is by way of the themes in Microsoft Word. I’m not going to go into huge detail here but basically they are various themes that you use to style your entire document a certain way. They ensure a certain level of consistency throughout the document and since there are so many, I wouldn’t really recommend trying to reinvent the wheel unless you have a certain reason why you want the text and headings to be different from an inbuilt theme.
To View the Different Themes
- Go to the Design tab on the ribbon and you will see a number of different options with some boxes to give you an idea of the different themes available to you. What I would suggest is to have some text that includes some text and some headings and then click through the different theme buttons to see how each of them look.
- I’m pretty sure that you will be able to find what you are looking for without having to customize anything.
The themes are divided into two sections – there is the main theme and then in that theme there are a lot of different sub themes. Almost like a heading 2 and heading 3 😊.
On the left of the screen is the Themes box which you can click on and it contains a number of different themes to choose from:
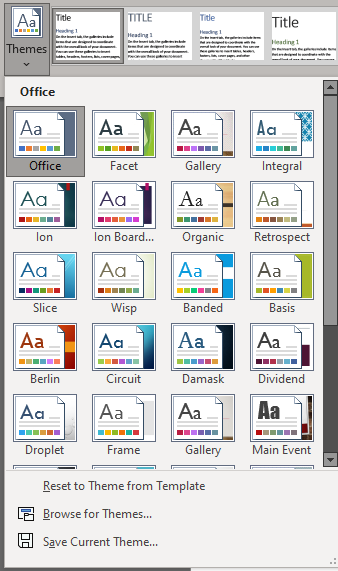
Each one of these themes has about 18 different sub themes. And of course, for each sub theme there is a different style for the headings, normal, and other text style options.
All in all, there is a lot to choose from so don’t just run into editing a style. There will almost definitely be one that will suit your needs.
How to Change Writing Style in Word
However, if you do want to change something in a style I’m going to show you how to do so now so don’t worry that I’m withholding information. I’m here to help you!
There are two main ways to change the style on a document and we’ll go through both of them. The first method is to format the text you want on the live document and then set it as the style. The second way is to edit the style directly from the style box.
Method #1 – Editing from the Text Itself
- Highlight the text that you want to use for a style.
- Style it however you want using the Font settings.
- Add more styling through the paragraph settings – These can even be bullets, numbering, and anything else that is in that section.
- Click off the highlight to check that you have the text just the way you want.
- Highlight it again.
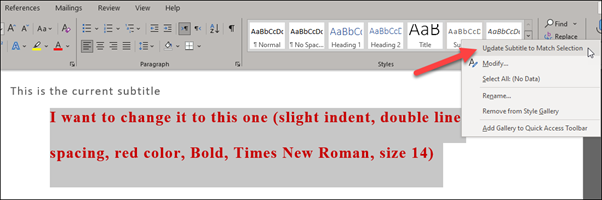
- Navigate to the style that you want to change. In this example I want to change the Subtitle style to something else completely.
- Right click on the box.
- Select Update Subtitle to Match Selection (Please note that the name Subtitle is used just because I’m updating that particular style. If you were changing any other one it would say Update (your chosen style) to Match Selection).
- Once you have clicked it you will see that it has been changed:
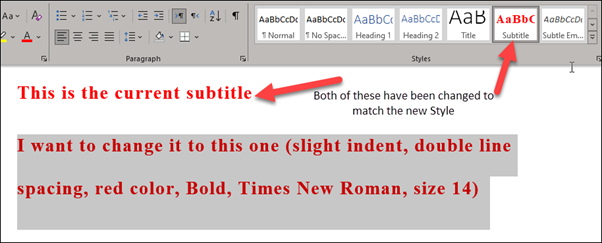
- You have changed the Style.
It’s important to note here both the preview of the style in the box and the previous text that was also in the Subtitle style have been changed. And this is exactly what we want to happen. This is because, as mentioned, the consistency has been kept here.
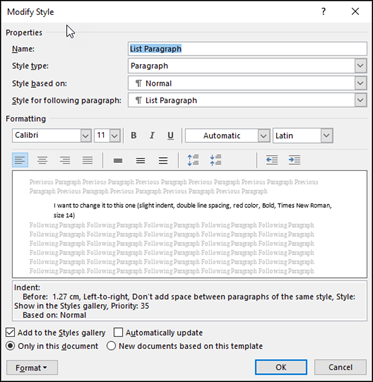
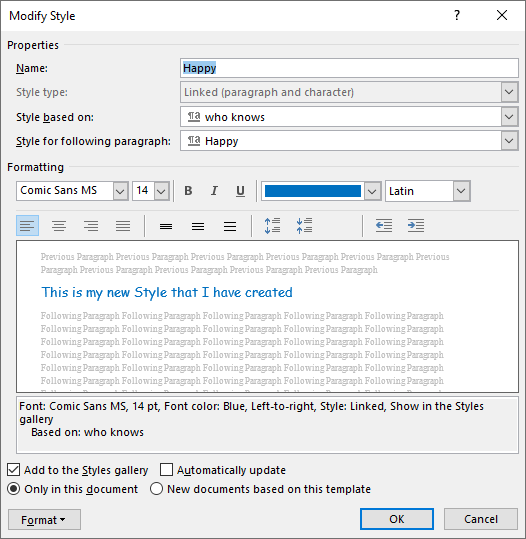
Method #2 – Editing a Style from within the Style Itself
- Right click on the Style you want to edit. (We will do the same again here. Change the style to slight indent, double line spacing, red color, Bold, Times New Roman, size 14).

- Select Modify and the option box will open.
- Let’s change the everything here:
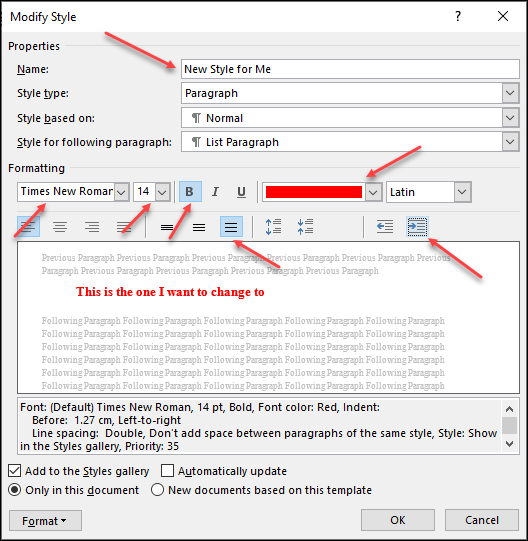
- As you can see, I’ve changed everything to what I want. In fact, I’ve even changed the name of the style just because I can!
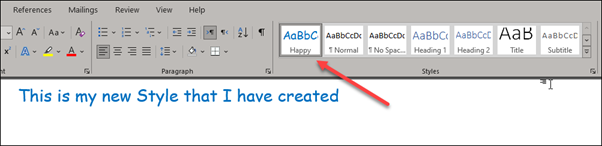
- Press OK and you have set up your edited style.
- You can view it on your styles bar preview:
And there we have it. It’s pretty easy when you know how. It’s important to play around and don’t worry if something goes wrong. There is always an undo.
Creating a New Style from Scratch
If you want to create a new style from A to Z you can do so of course. Obviously, I’m never going to recommend that because it takes a serious amount of time and I feel that there are so many options on Microsoft Word already that you don’t need go and reinvent the wheel.
Before you go ahead and do so, I suggest checking out what Themes and templates you can find online. You can check them out on Microsoft itself. Even though you may see them as templates, this is just the way they are called as they are answering specific questions. However, when you download them you will notice that all of them have specific styles for the document.
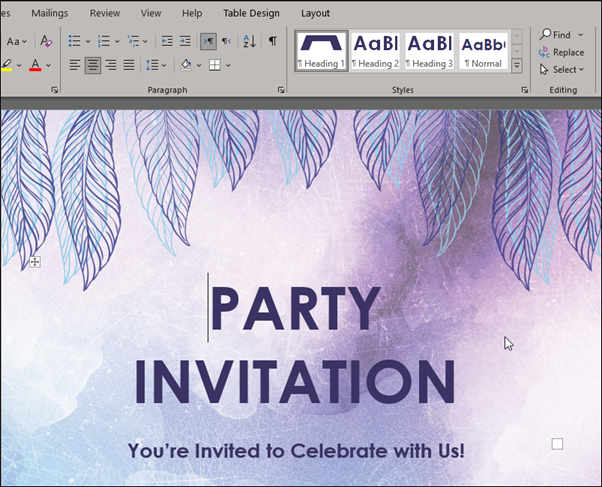
For example, if I download a template called Party invitation flyer and open it, you’ll see that there are only four different styles. There is nothing else here. And if that’s all you need, then this kind of thing is excellent.
However, if you still want to create a style from scratch then use the following steps:
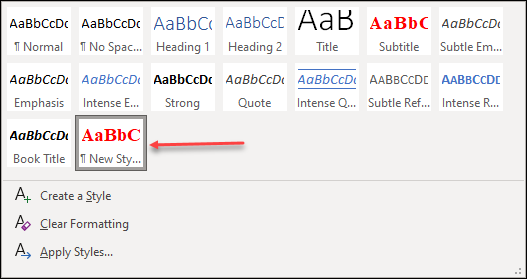
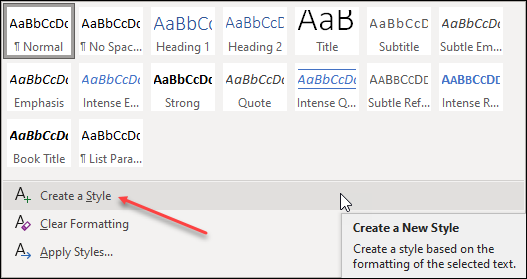
- Click on the styles box More option.
- Select the Create a Style option.
- You will get the chance to name your new style:
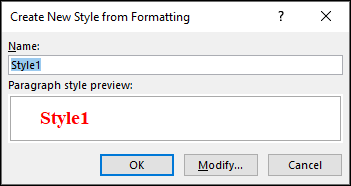
- Give it a name and then click on Modify. This takes you to the Create New Style from Formatting screen that we have met already.
- Use the different buttons and options to choose your style and click OK.
- You will see the new style in the Styles menu:
Editing the Styles Bar
If you look at the Styles bar, there are a lot of them that I will never ever use. This being the case, I want to remove those ones. So let’s do that:
There are two different ways of doing it and we’ll go through both of them. They do slightly different things so it’s important to have them both at our fingertips.
Method #1 – Directly in the Styles Bar
- Navigate to the Styles Bar and right click on the one that you don’t want to appear.
- Select the option Remove from Style Gallery:
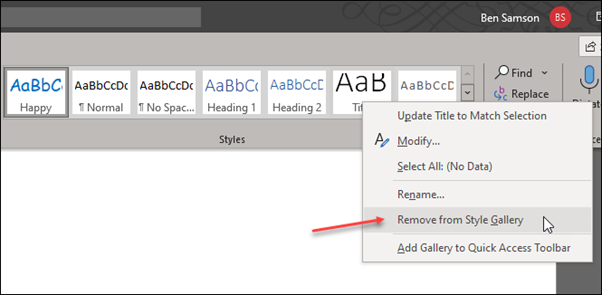
- The one that you have chosen is removed and you won’t see it anymore.
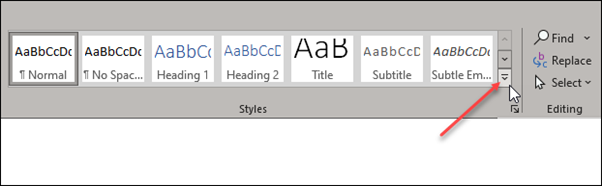
Method #2 – From the Styles Menu
- Navigate to the Styles Bar and click the Expand button in the bottom right corner of the section:
- You will see this appear somewhere on the page:
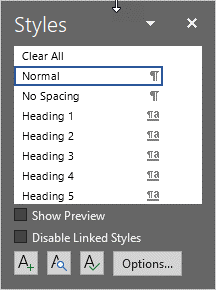
- Expand it so you see all the different Styles.
- Right click on each of them that you don’t want to appear in the actual Styles box and select the Remove from Style Gallery option:
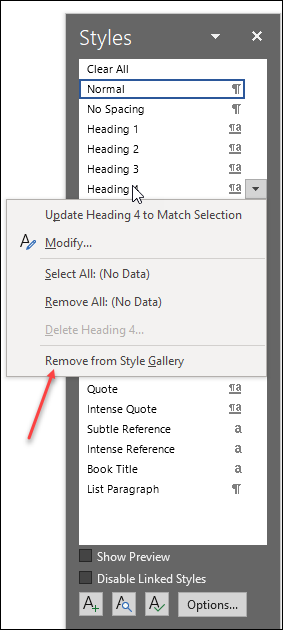
- The option will be removed from the gallery.
Please note that this only removes it from the gallery. In the menu that you have open, it will still appear. This is so you can add it another time if you need to.
I’m going to remove everything apart from Normal, Heading 1,2 and 3 as that’s all I use and let’s see the result:
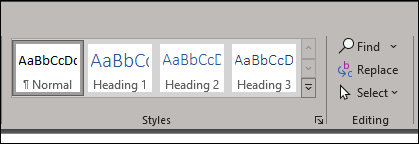
As you can see, much neater, much easier to use and it gives me more space in the ribbon for other things that I might use.
In Closing
I hope you have enjoyed learning about the Styles in Microsoft Word. Have a play around with them and let me know what you think of them. I enjoy them and especially the consistency that they give me. Good luck!
Click the [Home] tab > Locate the “Font” group. From the lower-right corner of the “Font” group, click the small arrow. The “Font” dialog box will open. Choose the font style and size you would like Word to use by default (e.g., Times New Roman, Size: 12).
What is it called to write in different fonts?
Calligraphy (from Greek: καλλιγραφία) is a visual art related to writing. It is the design and execution of lettering with a pen, ink brush, or other writing instrument.
How do I change my writing style?
If you want to change the Font Style on your Mobile Device, follow these steps:
- 1 Tap Settings.
- 2 Tap Display.
- 3 Tap Font and screen zoom.
- 4 Select your choice of Font Style. You can also adjust the Screen Zoom and Font Size by pulling the slider accordingly.
What is text style in MS Word?
Introduction. A style is a predefined combination of font style, color, and size that can be applied to any text in your document. Styles can help your documents achieve a more professional look and feel. You can also use styles to quickly change several things in your document at the same time.
What are the 5 main types of fonts?
5 Types of Fonts & How to Use Them In Graphic Design [2021]
- Some of the most popular types of fonts include serif, sans serif, slab serif, script and decorative.
- In this guide, we’re going to analyze some of the most prominent font types as well as explain how you can use them in your designs.
- Let’s get into it.
How many different writing styles are there?
four
There are four main types of writing: expository, descriptive, persuasive, and narrative. Each of these writing styles is used for a specific purpose. A single text may include more than one writing style.
What are language styles?
Language style is defined as the choice of words used by a specific group of people when they speak. An example of language style is bureaucratise, the words, jargon and abbreviations which are used by the government. noun.
How to quickly format basic text styles in Microsoft Word?
Another way to change the Word style is using the I ncrease Font Size or Decrease Font Size buttons. 5. We can easily change the font color as well. Highlight the text, then click the down arrow beside the Font Color selector. Click on the color of your choice.
How to add new font styles in MS Word?
Fonts in MS Word – Adding new font styles to your list. In MS Word, an entire family of fonts is usually referred to as a Typeface (like Times New Roman). People also prefer using font style or font type. And “Font” as a word, is reserved for a combination of different features such as font style, size, color and weight (like Arial, 12 pt, Red.
How to change font size in Microsoft Word?
You can also change the font when you format text in Word. 3. To change the font size, highlight the text. Click the drop-down arrow on the font size indicator on the ribbon. Click on the font size of your choice. Use basic formatting for Word to change the size of the text.
What do you mean by styles in Microsoft Word?
This includes the size, color, and font of the text. It also covers text alignment, spacing, and letter case. Microsoft Word styles make it easy to change and apply styles throughout a document. A “style” is a set of formatting settings applied to a specific kind of text .
Another way to change the Word style is using the I ncrease Font Size or Decrease Font Size buttons. 5. We can easily change the font color as well. Highlight the text, then click the down arrow beside the Font Color selector. Click on the color of your choice.
How to create different types of free fonts?
Converts to Different Free Fonts Styles 1 Upside Down Text Effect 2 Calligraphy fonts 3 Zalgo Text 4 Font changer 5 weird text generator 6 bold text generator 7 italics generator 8 creepy text generator 9 Cursive fonts / Cursive text generator 10 Old English fonts
You can also change the font when you format text in Word. 3. To change the font size, highlight the text. Click the drop-down arrow on the font size indicator on the ribbon. Click on the font size of your choice. Use basic formatting for Word to change the size of the text.
This includes the size, color, and font of the text. It also covers text alignment, spacing, and letter case. Microsoft Word styles make it easy to change and apply styles throughout a document. A “style” is a set of formatting settings applied to a specific kind of text .
Updated: 08/16/2021 by
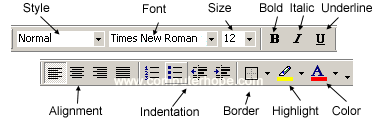
In Microsoft Word, you can change the properties of any text, including font type, size, and color, and make it bold, italic, or underlined (font style). The following illustration shows an example of the formatting bar and a description of the tools it contains.
Tip
In Word 2003 or earlier, if you do not see the formatting bar when you open Word, click View, then Toolbars, and make sure Formatting has a check next to it.
The font settings placement changed after Word 2003, with all the settings placed in the Font section on the Ribbon’s Home tab. An example of the font settings in Word 2016 is pictured below.
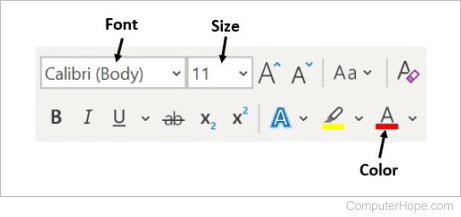
Select a link below to learn how to change font color, size, style, or type in Microsoft Word.
Changing font color
To change the font color in a Microsoft Word document, follow the steps below.
- Highlight the text you want to change.
- Click the down arrow next to the color icon on the formatting bar or Ribbon. It is usually displayed as the letter «A» with a red underline.
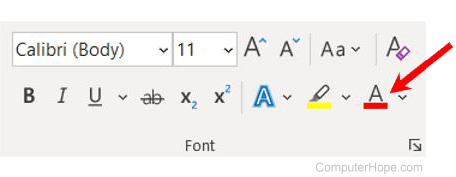
- After clicking the down arrow, select a color for the text.
Note
If you do not highlight any text, the font color changes at the cursor’s location as soon as you start typing.
Changing font size
To change the font size in a Microsoft Word document, follow the steps below.
- Highlight the text you want to change.
- Click the down arrow next to the size box on the formatting bar or Ribbon to enlarge or reduce the font size. The default font size is usually 11 or 12.
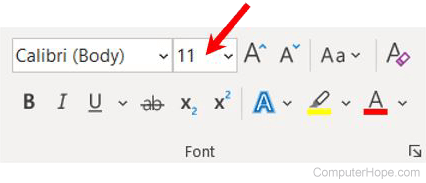
- After clicking the down arrow for the size, you see a list of predesignated sizes to select. Some fonts do not scale appropriately to have limited size options.
- You can also change the font size by clicking and highlighting the current default size. In the picture above, the default is 11. Once highlighted, you can type in a number. For example, if you want to use font size 100, you can type in that number rather than choosing a preset number from the list.
Note
If you do not highlight any text, the font size changes at the cursor’s location as soon as you start typing.
Changing font style
To change the font style, including bold, italic, and underline, follow the steps below in a Microsoft Word document.
- Highlight the text you want to change.
- Click the B, I, or U option on the formatting bar or Ribbon to change the text to bold, italic, or underlined.
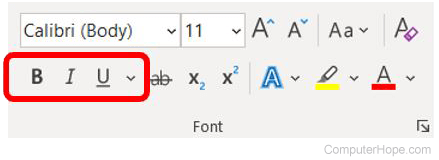
- After clicking the B, I, or U option, the text changes to the selected font style.
Tip
You can select more than one font style for text. You can also select different underline styles by clicking the down arrow next to the U icon.
Note
If you do not highlight any text, the font style changes at the cursor’s location as soon as you start typing.
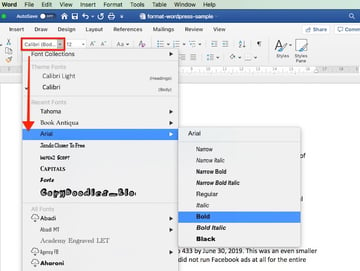
Changing font type
To change the font type in a Microsoft Word document, follow the steps below.
- Highlight the text you want to change.
- Click the down arrow next to the font field on the formatting bar or Ribbon. (If you want to change the font to bold, italic, or underlined, click the B, I, or U on the format bar.)

- After clicking the down arrow for the font, select the desired font from the list of installed fonts on your computer, like Arial, Calibri, and Times New Roman.
Note
If you do not highlight any text, the font type changes at the cursor’s location as soon as you start typing.
Whether you’re a one-person business operating out of your kitchen, or a billion-dollar company on Wall Street, the expectation is the same. Your business documents must be the paragon of professionalism and competence.


This expectation shouldn’t be a cause for worry. With applications like Microsoft Word you can create professional-looking documents with your own computer. Through the years, Word has become more powerful, yet more intuitive. Anyone with basic computer skills can use Word to create well-designed documents.
In this article, you’ll learn how to format text in Word to make your business documents easier to read and understand. You’ll also pick up tips on how to make sure your formatting doesn’t look amateurish—even if you’re getting started with Word.
Formatting Text in Word
Formatting text in Microsoft Word refers to controlling how text appears in your document. This includes the size, color, and font of the text. It also covers text alignment, spacing, and letter case.
Microsoft Word styles make it easy to change and apply styles throughout a document. A “style” is a set of formatting settings applied to a specific kind of text.
For example, you can set up a style for headings that’s bold, 14 points, aligned left, and uses the Tahoma font. This means all text in your document with the heading style will be formatted the same way. You don’t have to manually format each heading in your document.
In this post, you’ll see how to use MS Word styles.
How to Format Text in Word
To show you how to format text in Word, we’ll walk through formatting a completely unformatted business document file.
This is what my marketing report looks like without any formatting in Word:


As you can see, it’s plain and boring. Nobody would be inspired to read it, let alone act on the findings of the report!
Some basic Word text formatting can fix that.
1. How to Apply Typographic Emphasis
1. For starters, let’s use typographic emphasis (bold, italic, underline) to make the report title stand out.
To do this, select the text you want to emphasize. Click on the bold button on the Microsoft Word ribbon.


Note that the ribbon also has the buttons to apply italic, underline, strikethrough, and other formatting effects for text. Follow the same steps to apply those effects.
2. Now, let’s change the font, font size, and color of the title.
Again, select the text. Click the drop-down arrow on the font section of the ribbon, then select the font you want to apply. In this case, I’m using Arial bold.


3. To change the font size, highlight the text. Click the drop-down arrow on the font size indicator on the ribbon. Click on the font size of your choice.


Or, after highlighting the text, you can type the font size into the font size indicator on the ribbon. This is especially useful when the font size you want isn’t available in the font size selector.


4. You can also use the Increase Font Size or Decrease Font Size buttons on the ribbon to quickly change the font size.


5. We can easily change the font color as well.
Highlight the text, then click the down arrow beside the Font Color selector. Click on the color of your choice.


Choose More Colors… if you wish to apply a custom color.
2. How to Change Capitalization in Word
Microsoft Word also allows you to easily and quickly change the capitalization of your text. For example, if we want to make the title all uppercase, we don’t have to retype it.
Highlight the title, then click the Change Case button on the ribbon.


Or, highlight the text, go to Format > Change Case…


… then click on the radio button for the case you want to apply. Click OK.


Now the title is looking much better. It’s the most prominent part of the document and commands the reader’s attention. However, we can still improve its readability.
3. How to Format Paragraphs
One way to make your document easier to read is by increasing white space around lines and paragraphs.
1. To adjust the line spacing, select the text. Click on the arrow on the Line and Paragraph Spacing button. Select the line spacing you wish to apply.


2. To change the spacing around a paragraph, select the paragraph. Click on the arrow on the Line and Paragraph Spacing button > Line Spacing Options…. Then, type the amount of spacing before and after the paragraph. (Tip: You can adjust other settings from this dialog box as well.)
For the title, I’ll add a generous amount of space after the paragraph, to set it apart from the rest of the document.


3. Finally, let’s change the alignment of the title. Select the text, click on either the Align Left, Center Text, Align Right, or Justify button on the ribbon. Since this is a title, let’s use Center Text.


These simple formatting effects make the title stand out from the rest of the document.
4. How to Work With MS Word Styles
As much as Word makes it easy to format text, if you need to apply formatting effects on the entire document, the process becomes tedious.
Word solves that through styles. MS Word Styles allow you to define a set of formatting commands and apply them automatically to every item in the document with that style.
Let’s look at a specific example:
1. How to Modify a Paragraph Style
Let’s follow the steps above to define a style for the main headings of the report with the following characteristics:
- Font: Arial
- Size: 14 points
- Color: Blue-grey
- Typographic Emphasis: Bold
- Case: Capitalize each word
- Alignment: Left
- Line spacing: Single
- Paragraph spacing: 6 pts before paragraph, 0 pts after paragraph
It would look like this:


One way to apply this exact formatting on every main heading is to modify the existing Heading 1 style in our document. Place your cursor anywhere in the main heading. Go to Styles, right-click on Heading 1, then choose Update Heading 1 to Match Selection.


You can also modify any style by going to Format > Style…. The Style dialog box opens.


Select the style you want to modify from the Style list. This gives you a preview of the paragraph and character, as well as a description of the current style settings of the selected style.
Click Modify…. The Modify Style dialog box pops up.


Change the text and paragraph format settings. You can control the font, font size, font color, typographic emphasis, alignment, and spacing. When you’re done, click OK.
2. How to Apply a Paragraph Style
Now, go to each main heading in the document and apply the Heading 1 style to it. Place the cursor on a heading, go to Styles > Heading 1.


The selected text instantly takes on the formatting of Heading 1.


3. How to Create a List Paragraph Style
You can also create a new paragraph style from scratch, instead of modifying an existing one. To demonstrate, let’s create a list-type paragraph style.
1. Go to Format > Style…. Fill in the Properties section of the dialog box that opens. For Style based on, you may wish to use one of the pre-existing list styles as a starting point.


2. Next, change the formatting options. The box below gives you a preview of what the list paragraph would look like with those settings. There’s also a summary of the formatting properties you’ve specified.


You also have the option to do the following for this style:
- Add to template. Adds the style you’re creating to the document template.
- Add to Quick Style list. Shows the new style to the Quick Style list, making it quickly accessible from the ribbon.
- Automatically update. Automatically updates the style when you manually format a paragraph with that style.
When you’re happy with the settings you’ve made, click OK. Notice how the new Bullet style you created is now included in the Quick Style popup.


Once the bullet style is applied, our list now looks like this:


4. How to Use Character Styles in Microsoft Word
You can also define a style to an individual word or a block of text, rather than a paragraph. In the next example, I’d like to apply a character style for every URL in the document.
1. Select the text. Then, go to Format > Styles…. From the Style dialog, click New…. The Create New Style from Formatting dialog opens.


2. Give the new character style a name. For Style type, choose Character. Then, make the formatting settings you want to apply to this character. Note that you can’t change alignment and spacing for a character style. The preview box shows you a sneak peek of the text based on the settings you specified.


3. When you’re done, click OK.


To apply the character style, place your cursor in a word or select a set of words. Go to Format > Style…. Find the character style you wish to apply. Click Apply.


Tip: To quickly find the MS Word styles you’ve created, for List, choose User-defined styles.
5. How to Use Table Styles in Word
We can also define a table style to provide a consistent look to the tables in our document.
1. Create the table. Go to Insert > Table…, then indicate the number of columns and rows you need in your table (you can always add or remove these later). Click OK.


2. Add your text to the table. If necessary, click and drag any of the borderlines to adjust the width or a column, or the height of a row.
3. To apply a table style, click anywhere on the table, then go to Table Design. The Table Design ribbon appears.


4. Click on the down-arrow for table styles to display the table styles gallery.


5. Click on any style to apply it to your table.


Expand the table styles gallery again to change the existing style, clear the style you applied, or create your own table style.
Discover Great Microsoft Word Templates for 2020
Some experts say it’s a good idea to set up your formatting styles in Word first before typing or copying the text into the document. One quick way to do this is by starting with a Microsoft Word template. Templates come pre-formatted by professional designers to look current and impressive.
You can find thousands of Word templates for all kinds of business documents in Envato Elements.


For a small monthly subscription fee, you get unlimited downloads of all the templates at Elements. You also have unlimited access to everything else in the Elements catalog:
- presentation templates
- web templates
- fonts
- photos
- graphics
- other digital assets
Use as many of these assets as you want, as often as you want, without paying more. This makes Elements a terrific source for all the creative assets you need to create remarkable marketing and communication materials.
You can also pay as you go at GraphicRiver. This marketplace also offers a huge library of templates for Microsoft Word and other digital assets for all your marketing and communication needs. The difference is, you only pay each time you use an item. This can be a very economical option.
Below are some of the best print templates for Word available on Envato Elements and GraphicRiver:
After downloading any of these Microsoft Word templates, you can apply what you’ve learned about formatting text in Word. This way, you can personalize the template so that it aligns with your visual branding and preferences. You now know how to take any Word template and make it your own!
5 Top FAQs on Formatting Text in Microsoft Word
Below are some of the questions that come up as people format text in Word.
1. How Do You Make a Word Document Easier for the Reader to Scan?
Your primary goal when formatting text in Word is to make it easy for people to scan, read, and understand the content of the document. The different formatting options in Word help you achieve this:
- Use typographic emphasis like bold, italics, and underline to emphasize specific text and add variety to your document.
- Break up the document into sections with headings and sub-headings to help the reader scan and navigate their way through it.
- Use either bulleted or numbered lists where appropriate to shorten paragraphs and make lists easier to comprehend.
- Set up line and paragraph spacing so that there’s plenty of white spaces throughout the document.
2. How Many Fonts Should I Use in a Word Document?
It’s easy—and fun—to apply different fonts in Word. Too easy, in fact, that you could end up overwhelming your reader and making your document look like someone played with the formatting.
Avoid this by sticking to a maximum of two different fonts in a single document. For instance, you could choose a sans serif font for your title and headings, and a serif font for all other text. You could even use one font for the entire document, relying on typographical emphasis and color to distinguish different types of text from each other.
3. Why Should I Use Microsoft Word Text Styles?
Use Microsoft Word text styles because they let you apply formatting settings globally throughout your document. This is important in long documents, where formatting each line or paragraph is too onerous. With text styles, you only need to determine what style you want for each piece of text. Word will do the rest.
4. How Can I Make My Document Formatting Consistent?
Using MS Word styles, as you’ve learned in this article, is an easy way to make your document formatting consistent. You decide and set how you want each type of text to be formatted. Then you can apply those styles consistently through your entire document.
Beyond Microsoft Word styles, also make sure that the recurring parts of your document are consistent as well. These include your headers and footers, for example. You must also be consistent with the placement of images: Do they have borders? Are they always within the document’s margins or do they bleed to the edge of the page?
When you use a Word template, these design decisions are already made for you. So, if you want a consistent design without all the hard work, then starting with a template for Word is the way to go.
5. How do You Copy text into Word without also copying junk code?
When you copy text from one application and paste it into Word, you run the risk of also copying the underlying formatting code for it. This code or set of formatting commands is invisible so you won’t know you’re copying it inadvertently. This can mess up your formatting in Word. Soon, you’ll be pulling your hair wondering why Word won’t “follow” your commands.
To avoid this grief, make sure you strip all formatting when you copy and paste the text into Word. Here’s how: Copy the text. In Word, click Edit > Paste and Match Style.


That’s all there is to it!
Using Microsoft Word, Style Your Business Document for Maximum Impact
You’ve learned how to format a document in Word to make it easier to scan and read. Good formatting is also essential to make sure the final document represents you and your business in a favorable light.
You’ve seen how doable formatting is, even if you’re starting from scratch with completely unformatted text. You’ve also discovered that you can rely on professional designers to make the formatting decisions for you by starting with a template for Word.
For unlimited downloads of print templates for Word at a fixed subscription fee, look to Envato Elements. Here, you can also have your fill of fonts, icons, photos, and other design assets you’ll need without having to pay more. Or, get your premium Word templates from GraphicRiver on a pay-per-use basis. You also get a wide range of choices without having to commit to a subscription.
With Microsoft Word styles and formatting tools, there’s no more excuse to have poorly designed business documents. Make your next business document one you’ll be proud of.